Notice: Function _load_textdomain_just_in_time was called incorrectly. Translation loading for the acf domain was triggered too early. This is usually an indicator for some code in the plugin or theme running too early. Translations should be loaded at the init action or later. Please see Debugging in WordPress for more information. (This message was added in version 6.7.0.) in /home/u340358266/domains/leplaincanvas.com/public_html/wp-includes/functions.php on line 6170
Notice: Function _load_textdomain_just_in_time was called incorrectly. Translation loading for the sitka-core domain was triggered too early. This is usually an indicator for some code in the plugin or theme running too early. Translations should be loaded at the init action or later. Please see Debugging in WordPress for more information. (This message was added in version 6.7.0.) in /home/u340358266/domains/leplaincanvas.com/public_html/wp-includes/functions.php on line 6170
Notice: Function _load_textdomain_just_in_time was called incorrectly. Translation loading for the health-check domain was triggered too early. This is usually an indicator for some code in the plugin or theme running too early. Translations should be loaded at the init action or later. Please see Debugging in WordPress for more information. (This message was added in version 6.7.0.) in /home/u340358266/domains/leplaincanvas.com/public_html/wp-includes/functions.php on line 6170
Notice: Function _load_textdomain_just_in_time was called incorrectly. Translation loading for the sitka domain was triggered too early. This is usually an indicator for some code in the plugin or theme running too early. Translations should be loaded at the init action or later. Please see Debugging in WordPress for more information. (This message was added in version 6.7.0.) in /home/u340358266/domains/leplaincanvas.com/public_html/wp-includes/functions.php on line 6170
Notice: Function _load_textdomain_just_in_time was called incorrectly. Translation loading for the kirki domain was triggered too early. This is usually an indicator for some code in the plugin or theme running too early. Translations should be loaded at the init action or later. Please see Debugging in WordPress for more information. (This message was added in version 6.7.0.) in /home/u340358266/domains/leplaincanvas.com/public_html/wp-includes/functions.php on line 6170 LePlainCanvas – Page 3 – Illustration & Lifestyle Inspiration
With the everyday busy day, it may very well be the best time to treat yourself or a loved one to a fresh set of sheets. After all, there’s nothing better than a good night’s sleep. From the type of weave to the thread count, there are many things that make up a great set of bedding, and they don’t always have to cost an arm and leg. There are tons of international brands that have good quality bedsheets but it’s never affordable, that’s when we came across this local brand — SOJAO located at Joo Chiat.
Also a local bedding brand, Sojao actually translates to “go to sleep” in Hindi – which probably hints to you just how seriously they take sleep. Specialising in luxury organic bed sheets, expect to find silky smooth sheets that only get more amazing with each wash. How? Well, they boast a perfect thread count and use single-ply yarn, which basically means you’ll only be getting softer and comfier sheets as the years go on. If you find yourself going crazy over just how luxurious home living can be with Sojao, consider picking up some towels or loungewear to really find yourself lounging in heaven.
Not only you could find their line of bedsheets and sleepwear but you also can find many other local brands regarding lifestyle. Some of our favourites are Soil Boy, Oasis Beauty Kitchen, Xenia Tayer Diningware and more. At SOJAO we have a very comfortable experience, everything is what I need for my home. One of the products we highly recommend you to get is OASIS x SOJAO Sleep in Room and Linen Mist. It’s a product that collabs with Oasis, with a few lights, and spritzes, you will transform any room into a lush flower garden immersed with dreamy floral and green aromas. Heading outdoors for the day? You can also mist this over your face masks and clothes as a light perfume to add that touch of elegance while removing any lingering odours.
SOJAO Address: 251 Joo Chiat Rd, Singapore 427505 Operating Hours: 11 am to 7 pm (Closed on Tuesday)
Wood paneling conjures up pictures of dark and stuffy drawing rooms that look and feel oppressive. The truth is completely different. Modern wood wall paneling is a fantastically versatile wall finish that can be whatever character you choose.
From bright and airy to warm and cozy, wooden wall panels have come a long way from the dark and broody mahogany-clad rooms that we usually associate with wall panels.
If you haven’t considered wooden wall panels for your home, then this article might just sway your decision. Let’s start by considering some of the benefits of wooden wall panels.
xoxo, Joe
Credit | All shots are used on the mood board via our Pinterest boards.
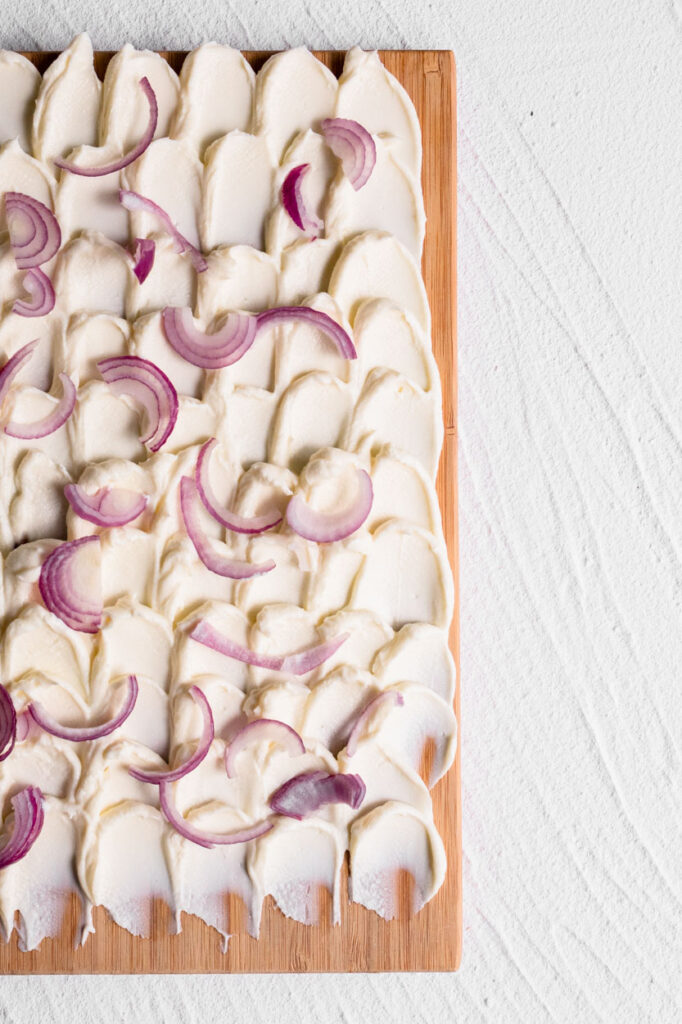
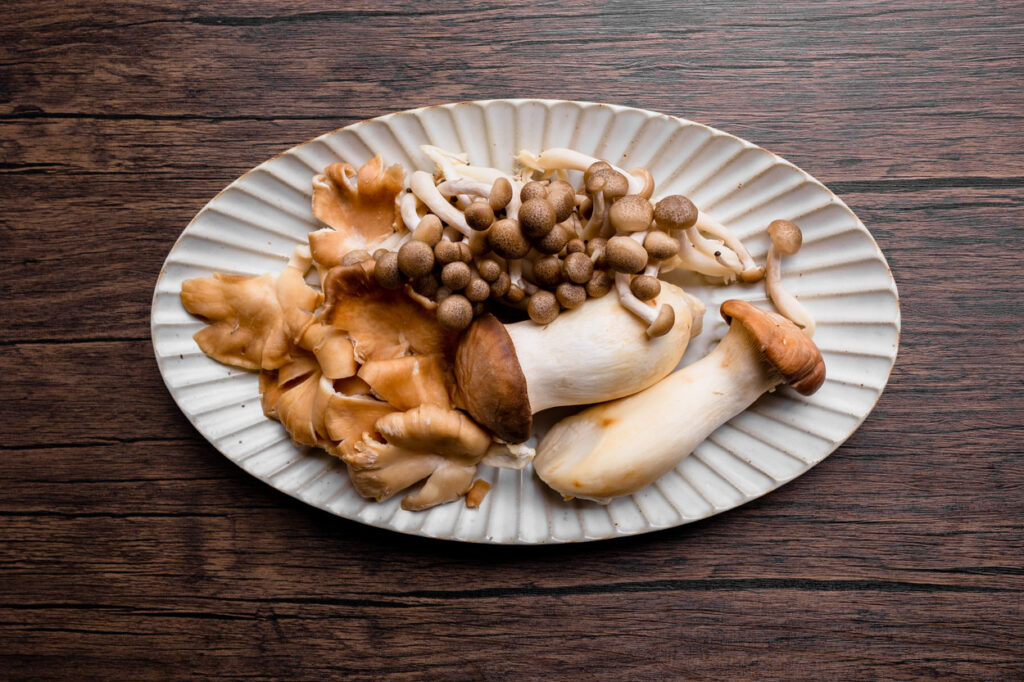
Butter board has been streaming across all social media platforms. If you still don’t know what’s a butter board, the simple answer is that it is butter that is spread on a board. But it’s so much more than that! It’s all about serving butter to a large group of people in a new unexpected way. Butter boards may not actually become the next charcuterie boards, but we think they will play a large part in holiday entertaining this year because they are easy to prepare, look festive, have a shock factor associated with them, and only require butter (salted or unsalted) along with any other ingredients available on hand to prepare.
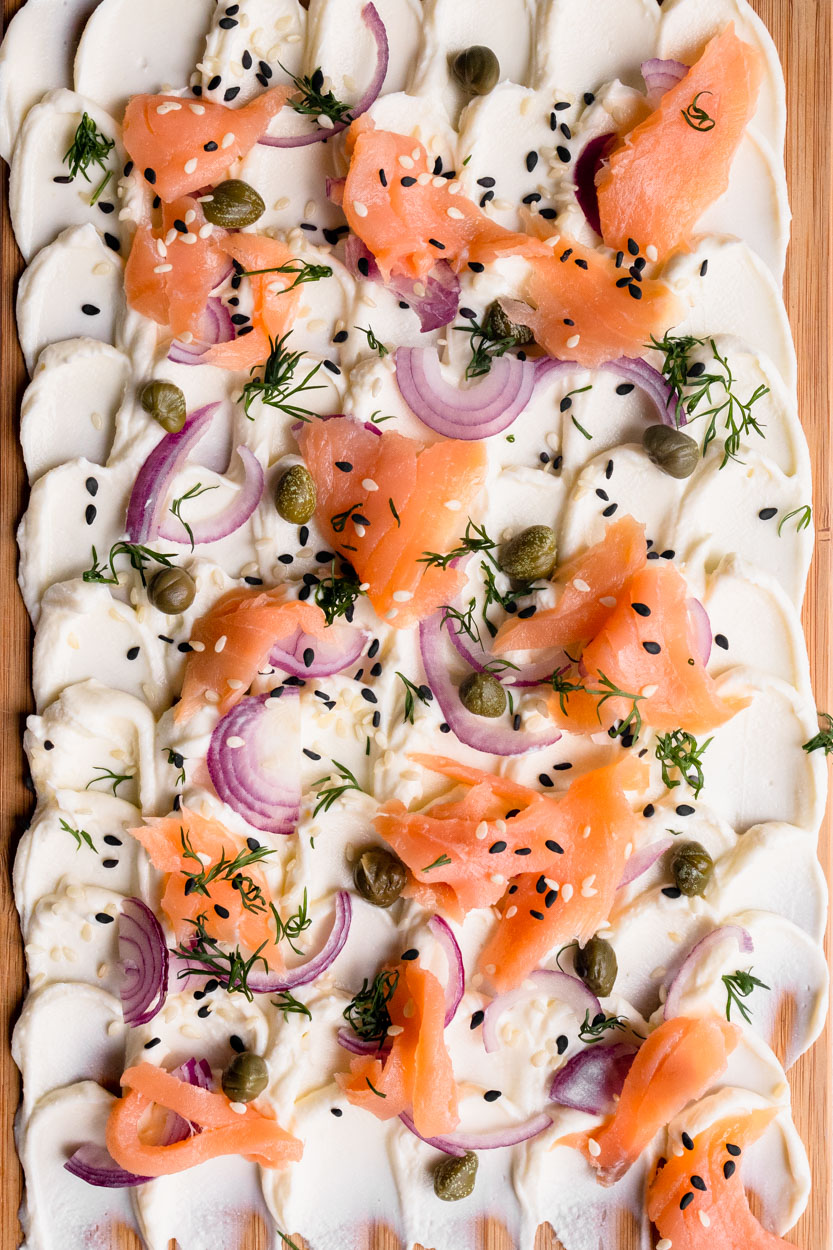
What’s fascinating about butter boards is that they seem over-the-top and elaborate. We are much more accustomed to the butter is in the shape of a stick, ball, or even a flower at a fancy restaurant — anything but a flat mixture spread over the entirety of a board. However, when you grab a piece of bread and swipe some butter onto it, it starts to feel more familiar and comforting. Us, we prefer cream cheese on our bread instead of butter therefore using the concept of butter board we made a Cream Cheese Smoked Salmon Board.
Ingredients that you may need
Cream Cheese
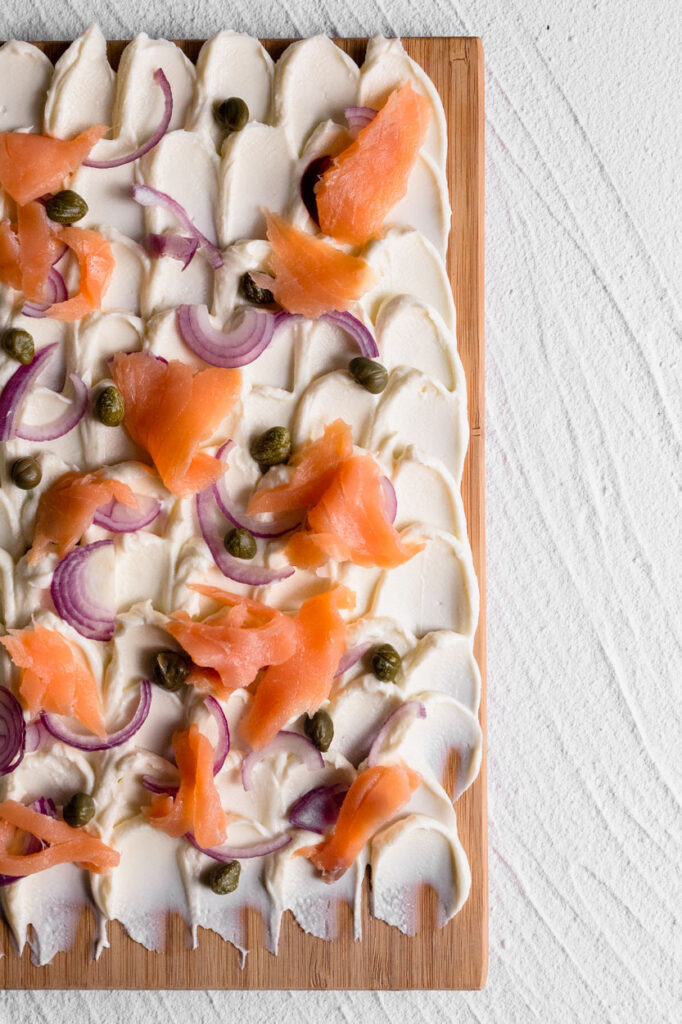
Smoked Salmon
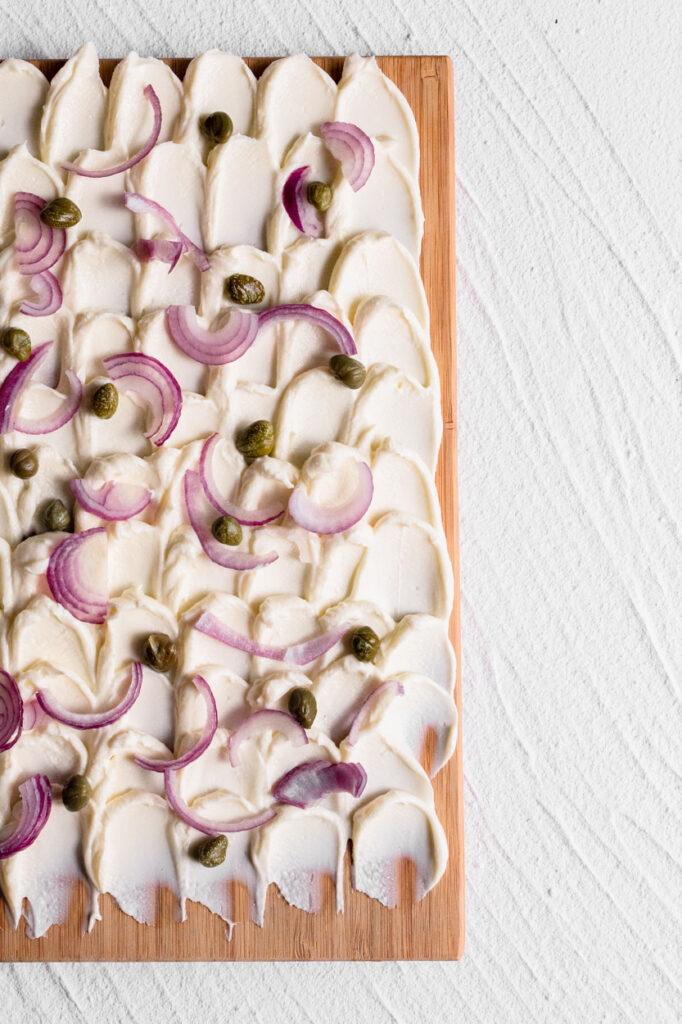
Red Onion
Capers
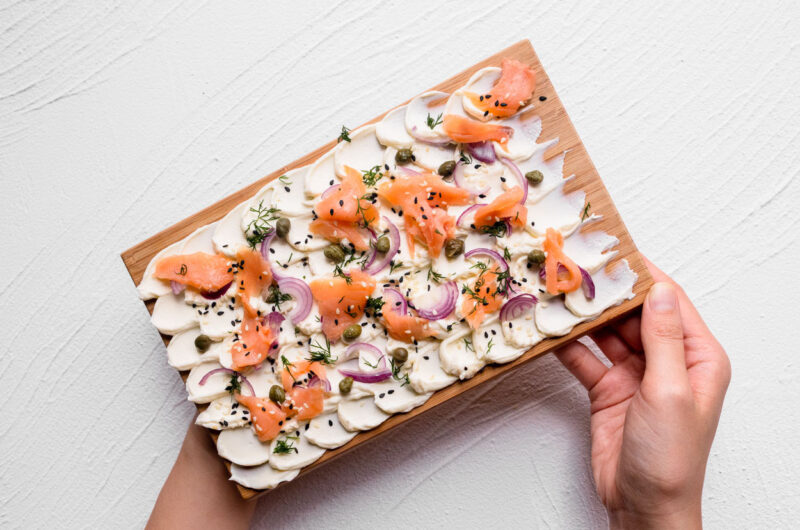
Garnish (Drill and Saseme seeds)
How do you prepare them?
There is much cooking skill needed for this recipe, but you may need some hand skills for plating. However, before you start plating them you will need the right consistency of cream cheese.
If you are using hard cream cheese. You want to make sure that you’re using softened cream cheese, not cream cheese straight from the fridge. Simply leave it out at room temperature for about 15 minutes, using a spatula fold the cream cheese well to remove clumps.
If you are using soft cream cheese. If you are lucky enough to get soft cream cheese, you can skip the part about leaving it out at room temperature, and move on to using a spatula to remove the clumps.
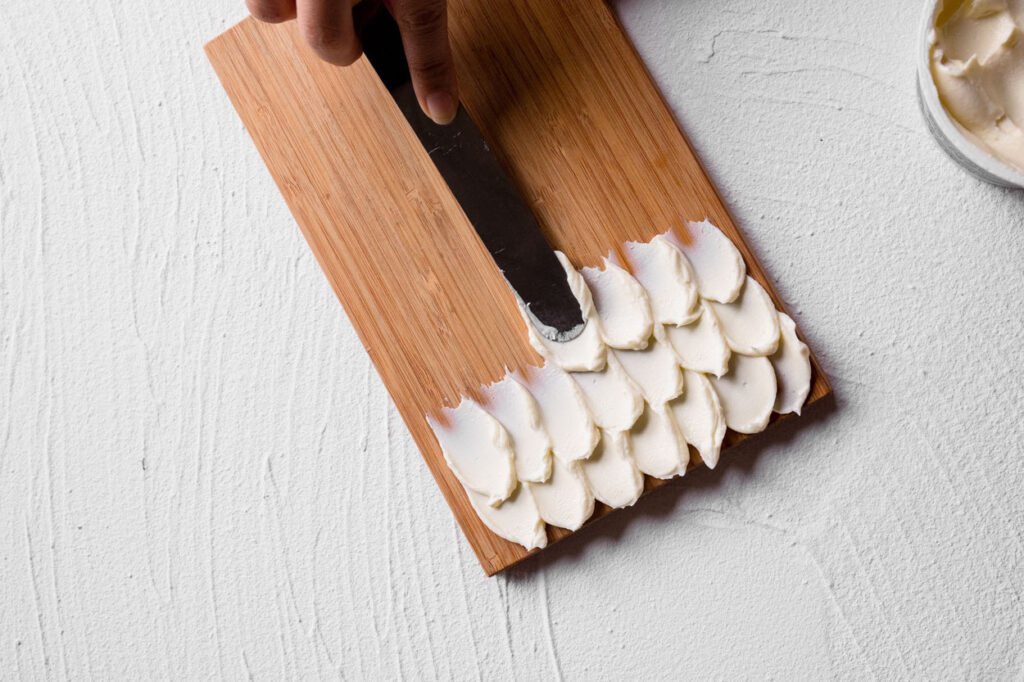
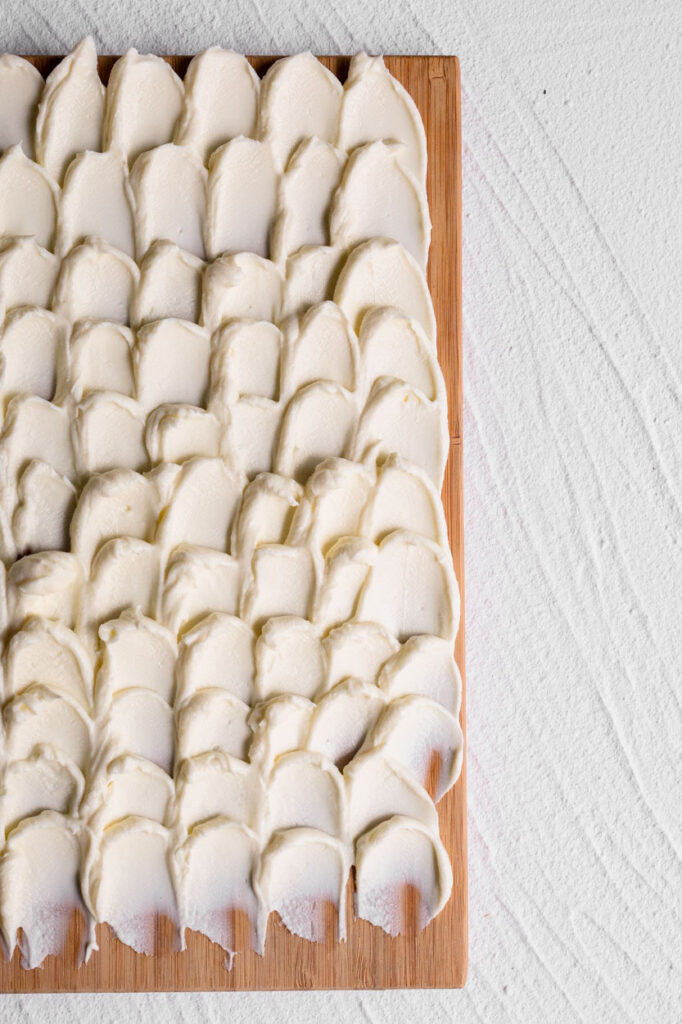
Once the cream cheese is softened, you’ll use a small knife or spoon to spread the butter as flat as possible onto any decorative board, cutting board, or flat platter you have. We like to create small swirls in the butter because it allows for small crevices that can collect the toppings you’ll add to the cream cheese board.
If you try this recipe please tag #byplaincanvas on Instagram. We love to see your photos of our recipes! Also, follow us on Instagramto keep up on what we’re cooking up.
If you are using hard cream cheese. You want to make sure that you’re using softened cream cheese, not cream cheese straight from the fridge. Simply leave it out at room temperature for about 15 minutes, using a spatula fold the cream cheese well to remove clumps. If you are using soft cream cheese. If you are lucky enough to get soft cream cheese, you can skip the part about leaving it out at room temperature, and move on to using a spatula to remove the clumps.
Once the cream cheese is softened, you’ll use a small knife or spoon to spread the butter as flat as possible onto any decorative board, cutting board, or flat platter you have. We like to create small swirls in the butter because it allows for small crevices that can collect the toppings you’ll add to the cream cheese board.
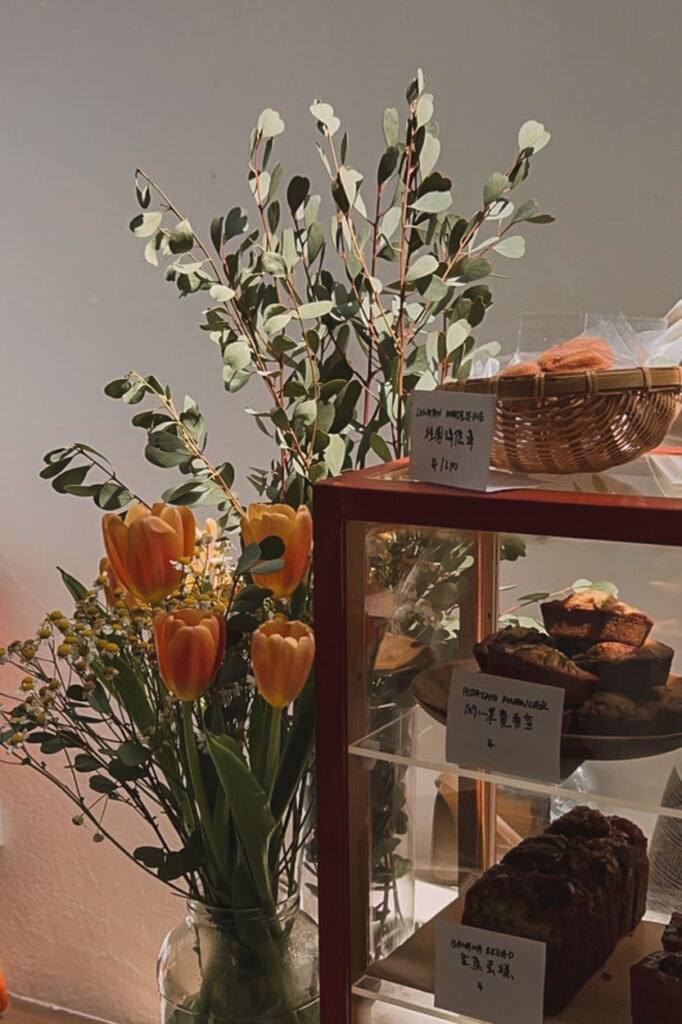
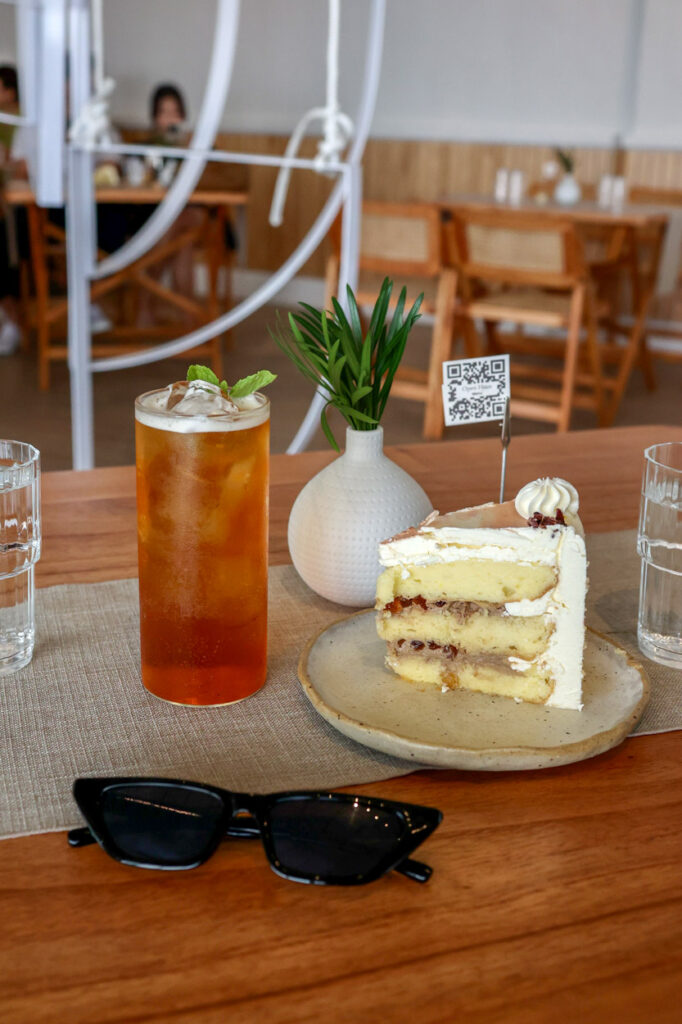
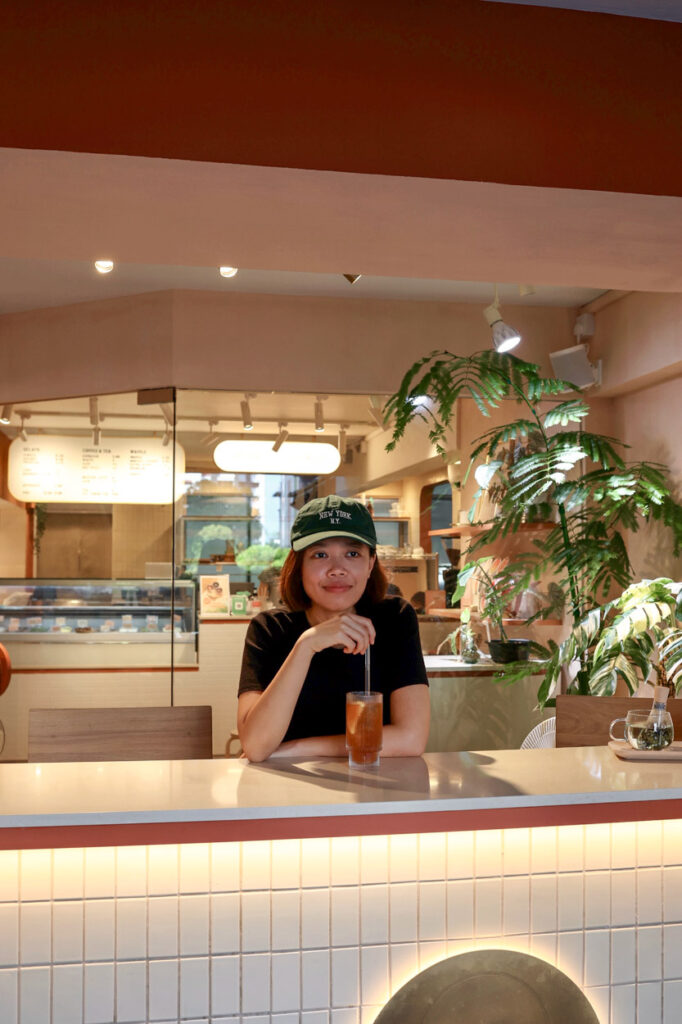
I’m back with another amazing piece of news from the East (best) side, this time it’s to inform you of the opening of Bloom Coffee at Upper East Coast Road. Taking over the now-defunct Stamping Ground Coffee, the new cafe comes with a Scandinavian minimalist interior, serving coffee and sangas, and is pet-friendly!
There for a quick sip? Bloom Coffee have Filter Brew (S$3 – S$10), Long Black (S$4.50), Matcha Latte (S$6.50), Yuzu Cardamom Lemonade (S$7.50), and other delightfully concocted drinks on the menu.
If you find yourself around the area, why not stop by for an Instagrammable shot of you sippin’ coffee.
Bloom Coffee Address: 87 Upper East Coast Road, Singapore 455223 Operating Hours: 8am – 6pm (Mon to Fri), 9am – 6pm (Sat & Sun), Closed on Tue
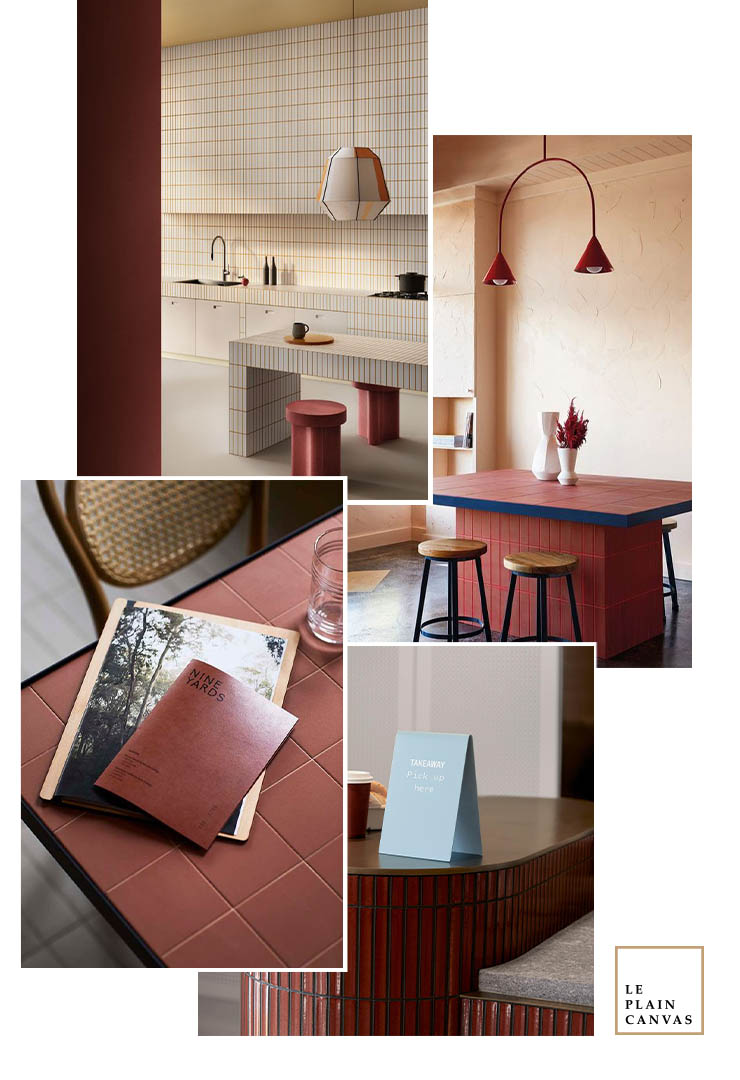
There are many decisions involved in the process of choosing tiles. Color, size, and shape are obvious factors to consider, but an often overlooked tile characteristic is a matt or gloss finish. This may seem like an easy decision, as gloss tiles are an extremely popular choice for homeowners, but this significant factor can make a huge difference to the feel and maintenance of any room.
Gloss tiles can make even the smallest of rooms appear larger. The outcome is similar to that of adding a mirror to a room. The light reflection opens up the space and tricks the eye into making the room appear wider and more open than it actually is. As a result, gloss tiles are an excellent design choice for bathrooms, ‘box rooms’, and hallways, which are typically smaller and narrower.
For a room to feel lighter and brighter, gloss tiles are the go-to. In spaces with low amounts of natural light, gloss tiles maximize this small amount by bouncing light back and forth around the space. A great option for small downstairs bathrooms.
Extremely easy to clean and maintain, the smooth nature of the glossy surfaces need only a simple wipe-down for them to sparkle. This is one of the many reasons as to why gloss tiles are a popular choice for messy spaces, such as kitchen backsplashes and shower walls.
xoxo, Joe
Credit | All shots are used on the mood board via our Pinterest boards.
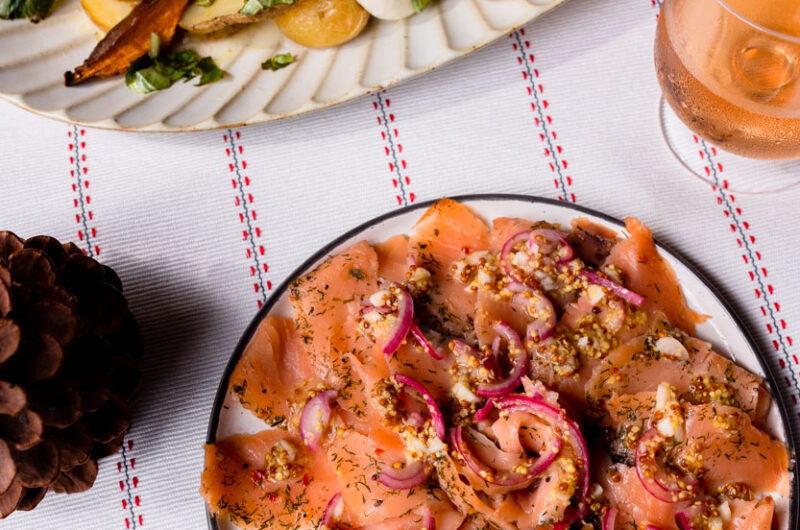
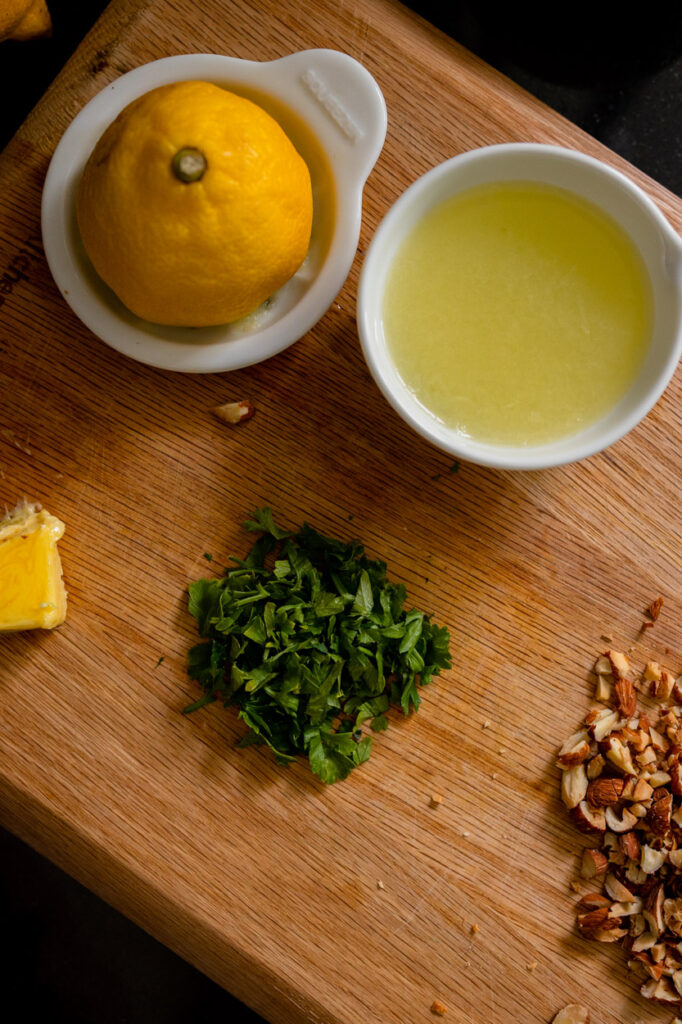
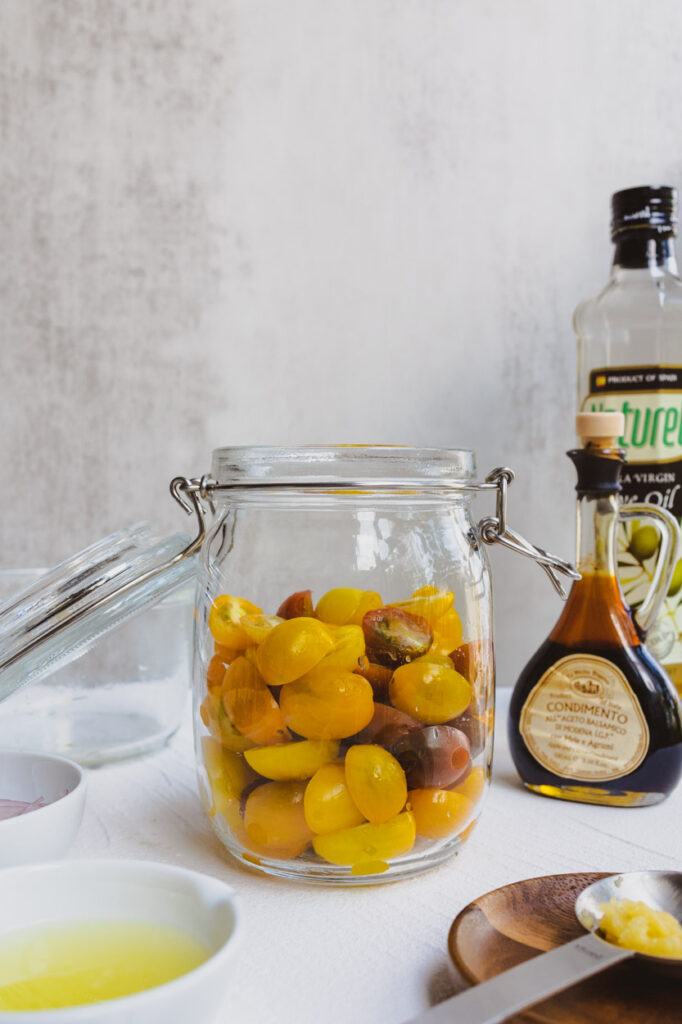
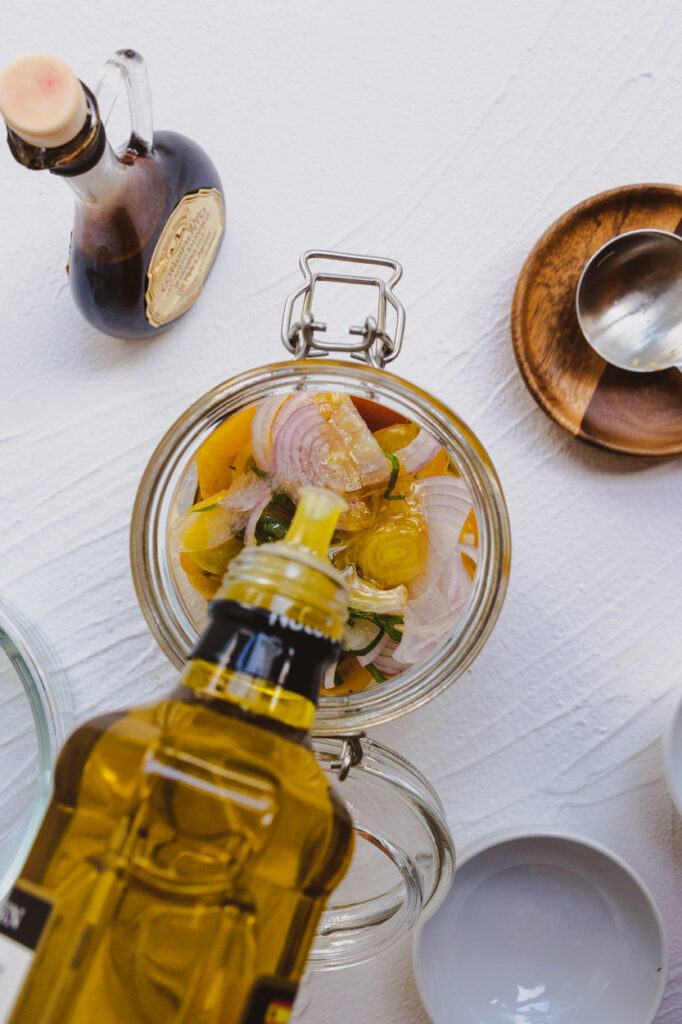
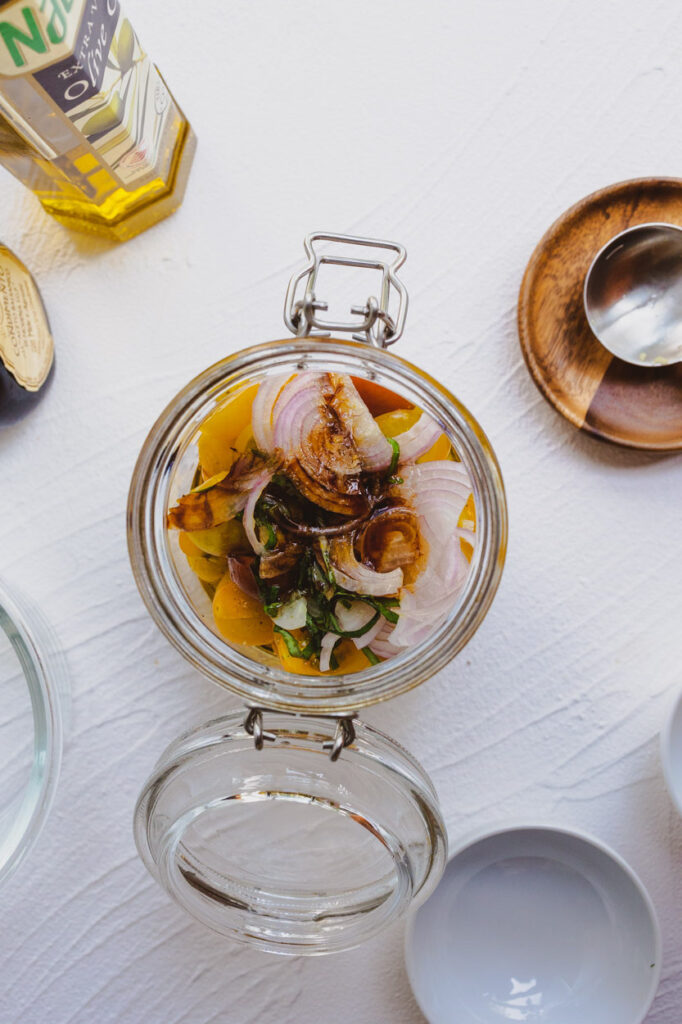
Carpaccio is a dish that originated in Veneto, Italy. The original preparation consisted of thinly sliced raw beef slices served with lemon juice, olive oil and shaved parmesan. The term carpaccio has later expanded to include all sorts of raw meat or fish preparations where the toppings or dressing on top consists of some sort of variation of lemon juice and olive oil.
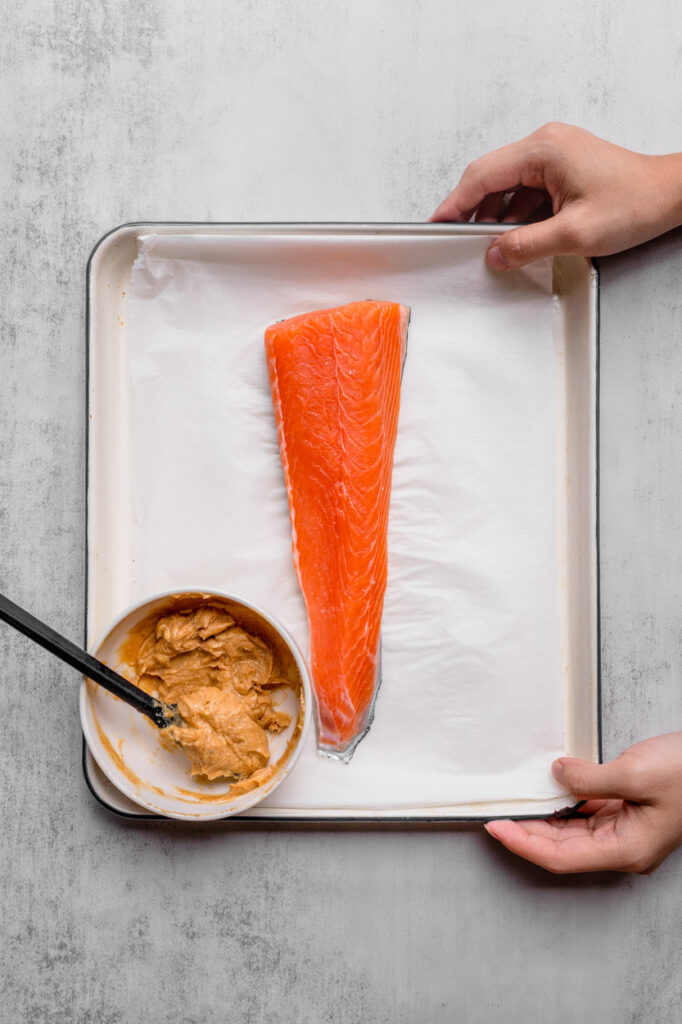
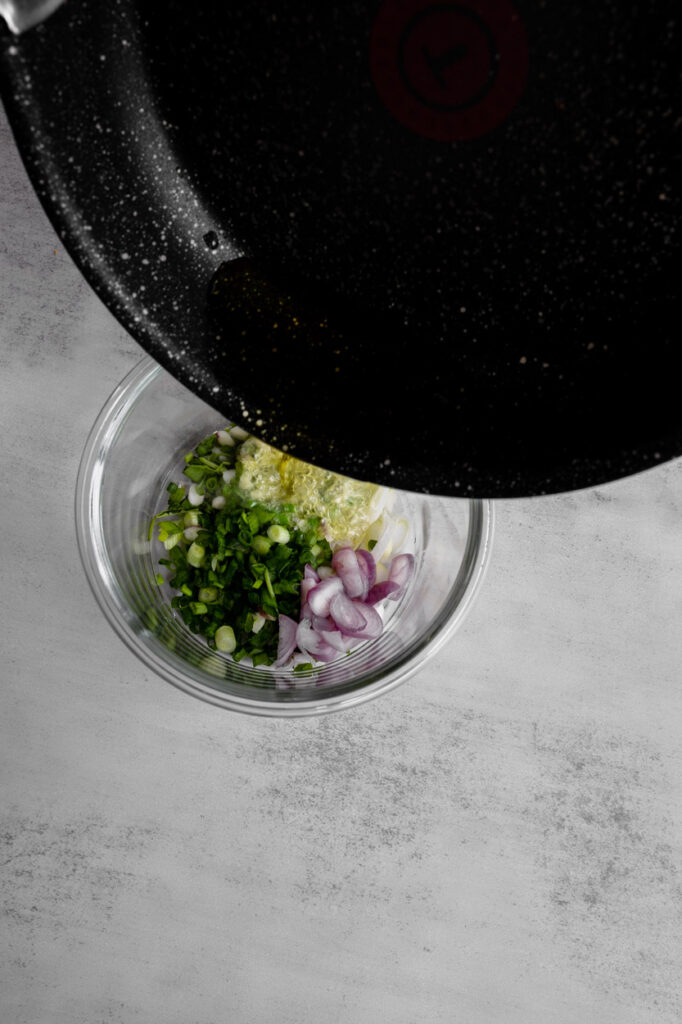
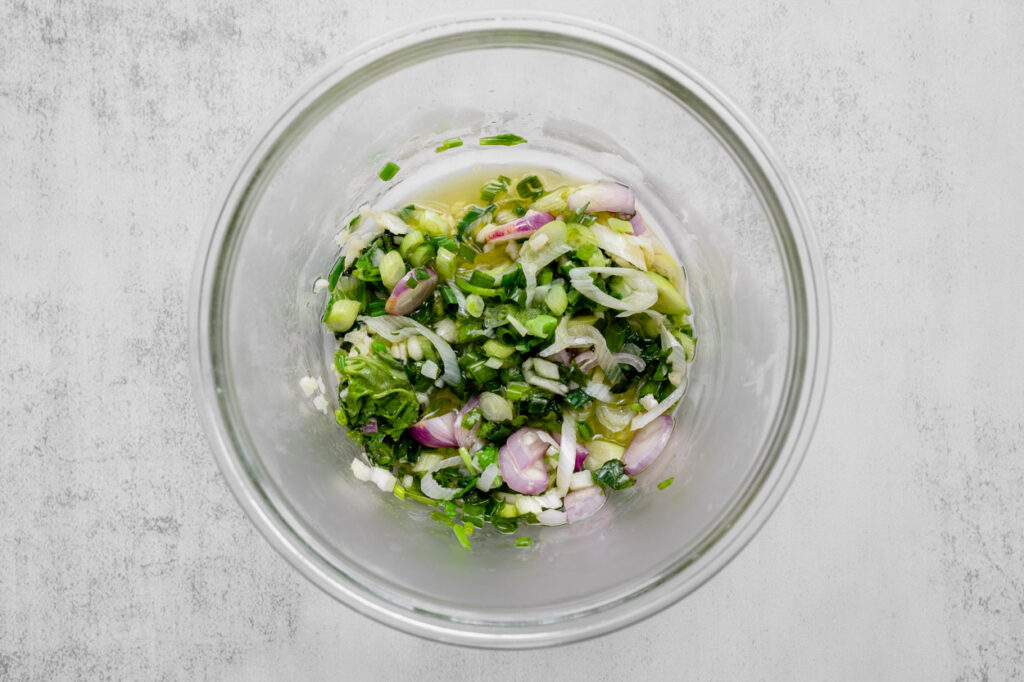
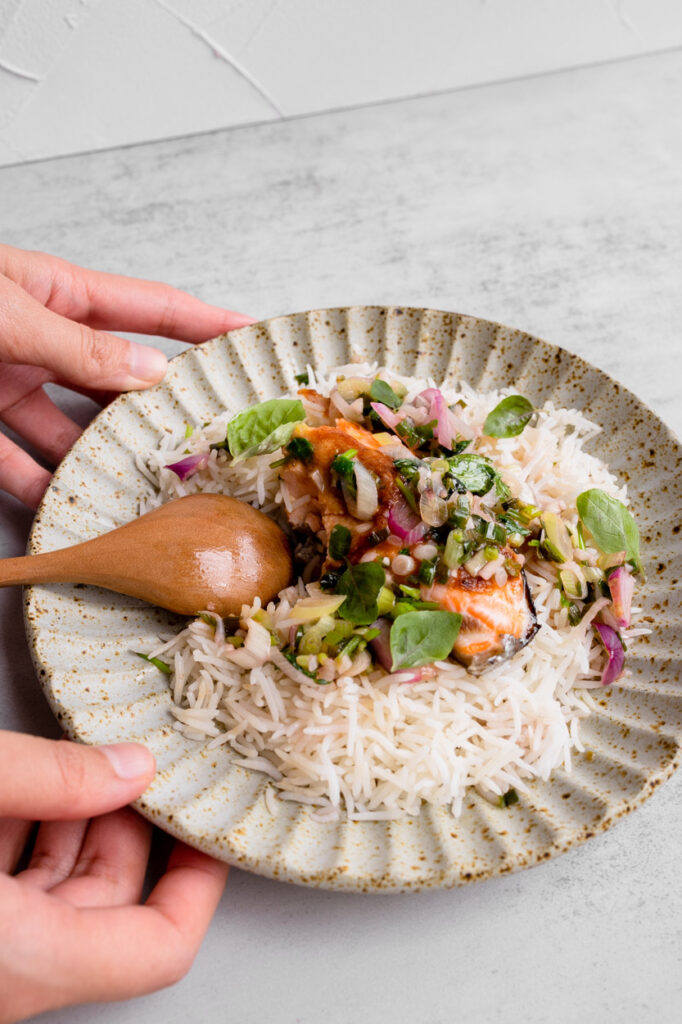
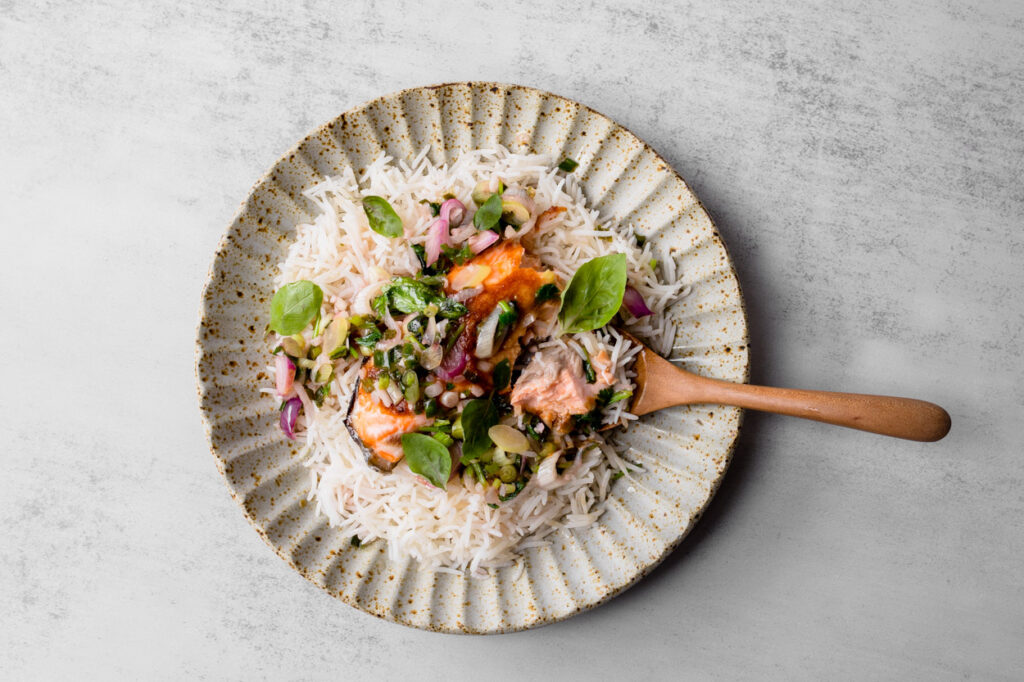
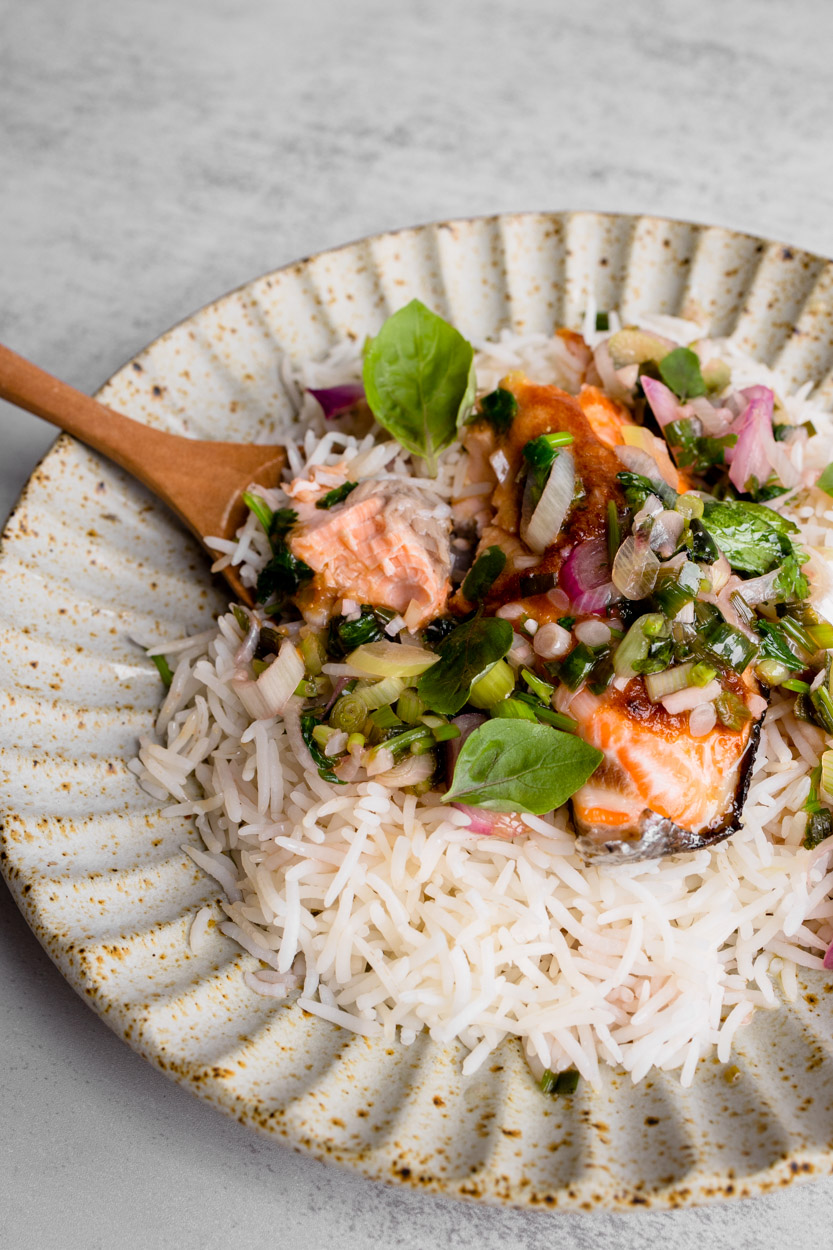
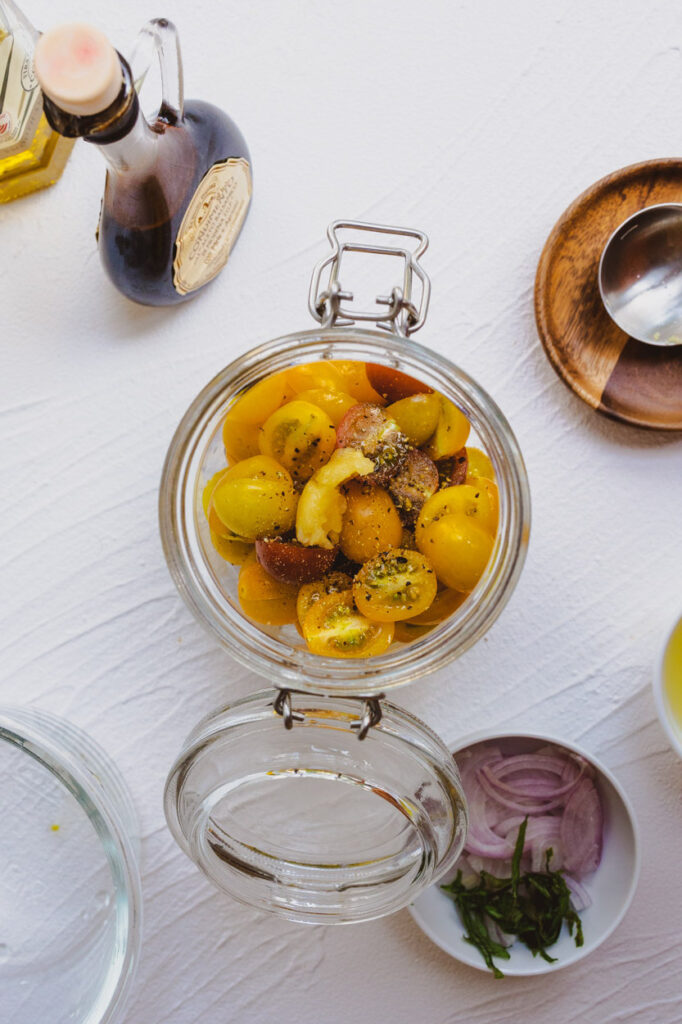
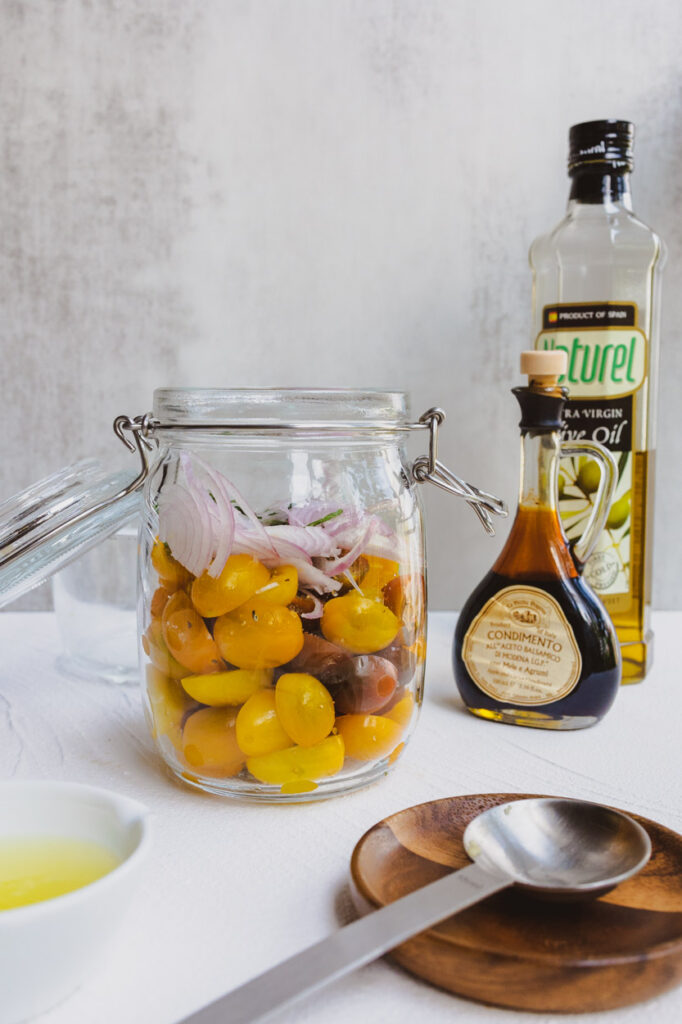
This variation that I have put together is inspired by traditional carpaccio but uses cold smoked salmon. To me, smoked salmon carpaccio is the ultimate spring or summer dish! In this recipe, smoked salmon gets lightly marinated in a lemony-shallot dressing then topped with crispy pan-fried capers, and garnished with fresh dill. You can then serve this dish as-is or on top of crostini, crackers, or heck…you can even serve this on a freshly toasted bagel for an elevated lox brunch situation!
I absolutely love this appetizer and it would be perfect for an Easter Sunday appetizer or brunch as well!! I hope you all enjoy this easy, elevated appetizer.
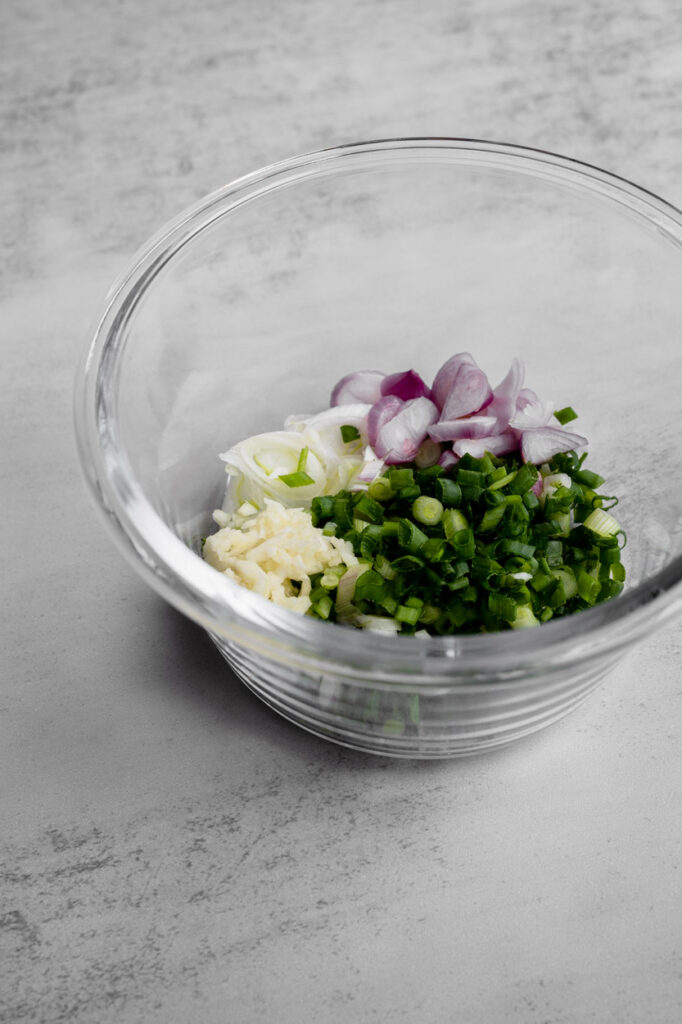
1 small shallot halved lengthwise and thinly sliced into half moons
FOR THE SALMON:
½ pound center-cut smoked Atlantic salmon *I get mine from the deli at Central Market
1 tablespoon loosely chopped fresh dill or more to taste
freshly cracked black pepper for garnish
crostini for serving
Methods
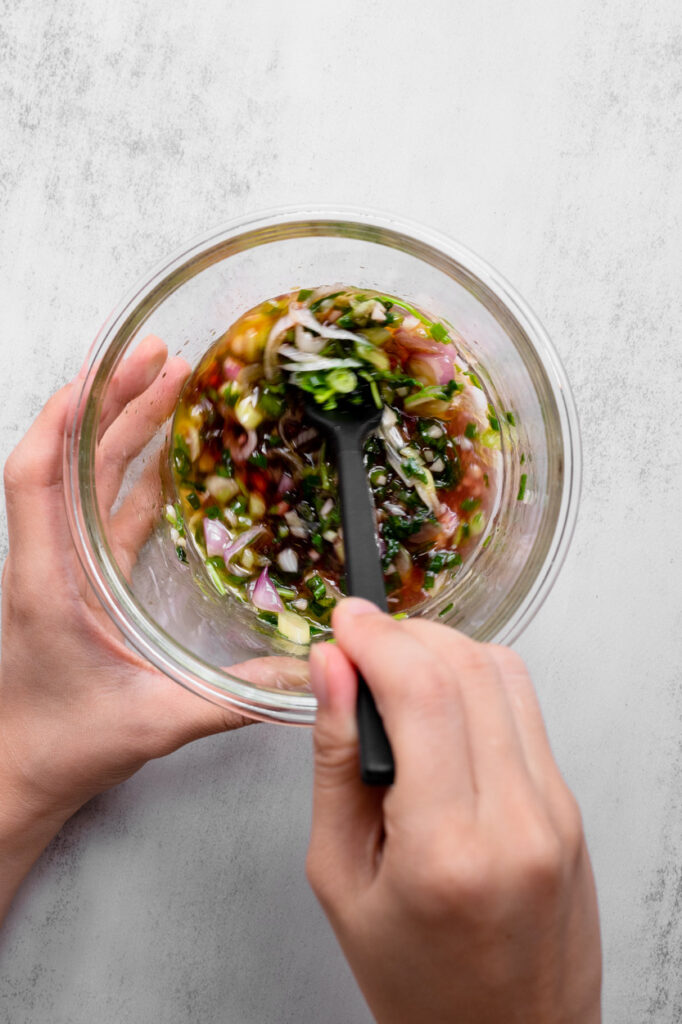
For the Dressing:
In a bowl, combine all the dressing ingredients and whisk until well combined. Set aside while you prepare the capers.
For the Smoked Salmon:
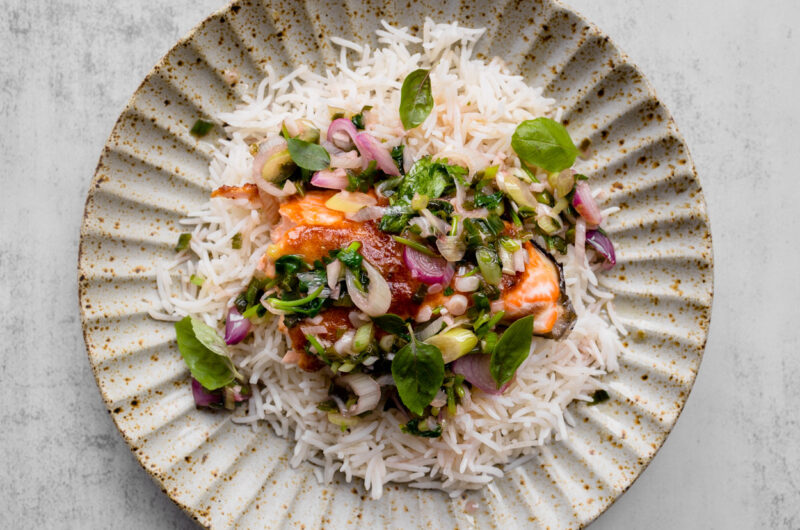
Cut the smoked salmon into 2-inch pieces and arrange on a large plate in a single layer.
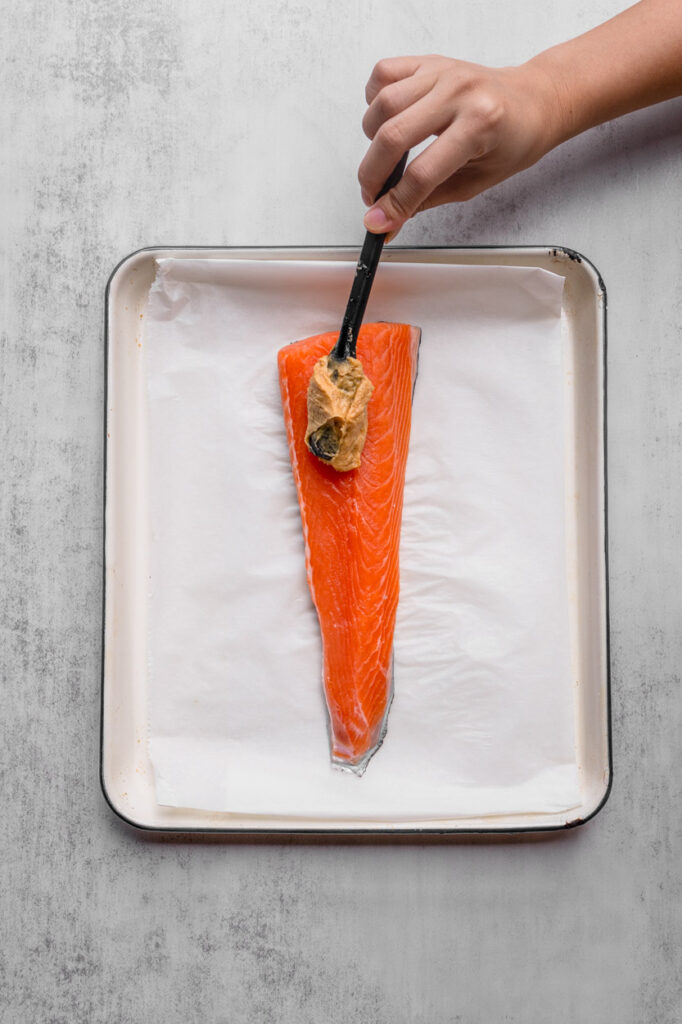
Spoon the dressing over the salmon evenly. Next, top with crispy capers. Lastly, finish the dish with fresh dill and cracked pepper. Serve alongside crostini.
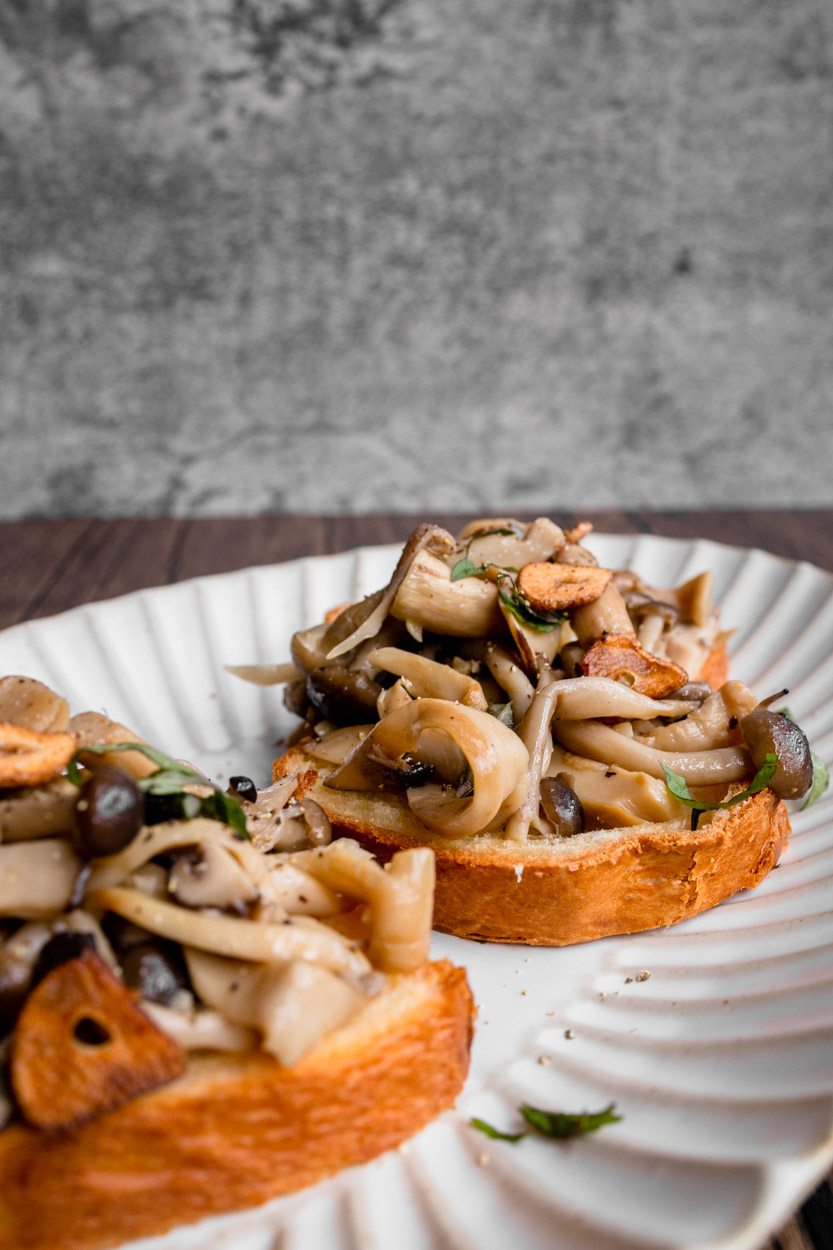
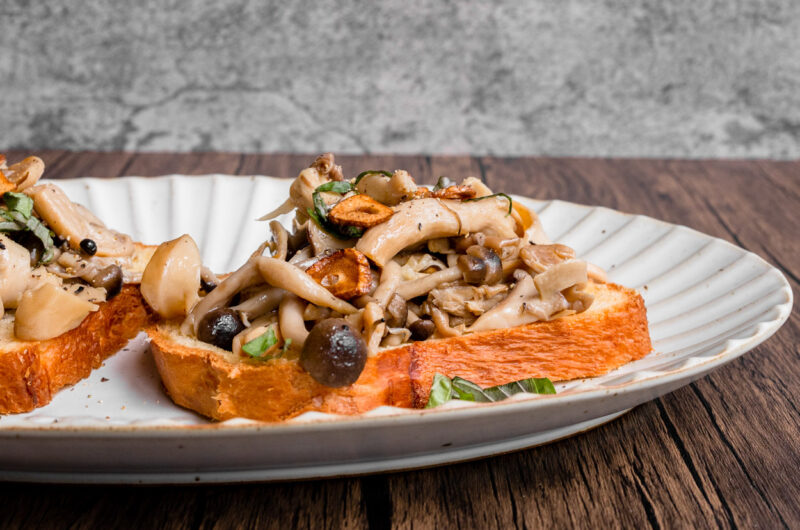
In Joo Chiat, you could find lots of hidden gems from lifestyle to food. One of our good finds was this muslin-friendly eatery selling banh mi & Vietnamese drip coffee along Joo Chiat Road. It was always a full house when we passes by it, we have always wanted to try it when we passes by it and we are glad that we did. From it signage you can see that it sells bánh mì and otah, not your usual bánh mì but offers a fusion banh mi with a local twist! Yes, they have an option of otah bánh mì.
There’s a total of six different variations of banh mi are available such as Honey-Glazed Grilled Chicken Thigh with Homemade Chicken Pate ($6.50), Battered Crispy Fish Fillet with Honey Mustard Sauce ($7), and even a whopping Earthquake ($8.50) that combines some of the best they had to offer in one baguette: chicken cold cut, grilled chicken thigh, and lemongrass beef patty.
The sofa is the main centrepiece of the home, it brings all the furniture together, all the family members together. It’s the place we came home to rest once we reaches home. This sofa that looks like seating on clouds has been a popular trend since 2022. There is one common with this cloud-like sofa, it is legless, while it looks bulky but the simple shape of the sofa still provides a minimalist look to the house.
A cloud sofa is basically what it sounds like! A dreamy, cushy oasis of all comfort and no hard edges. With a low frame and practically invisible legs, it looks like it’s merely floating in your living room. While it’s pretty standard to see this type of sofa upholstered in white or cream, you can also find these beauties in black, grey, brown, navy, and more! The cushions of a cloud sofa are often larger than your standard cushion. After all, fewer breaks in cushioning means it’s easier to settle into naps.
The beauty of a cloud sofa is that you can totally skip additional pillows because they already come with the perfect pillows built in. Add a throw and you’re good to go! If you’re pairing it with a coffee table, we’d suggest picking something that isn’t too tall. This helps to keep the sofa the centre of attention as a taller coffee table could throw off the proportions of the room.
xoxo, Joe
Credit | All shots are used on the mood board via our Pinterest boards.
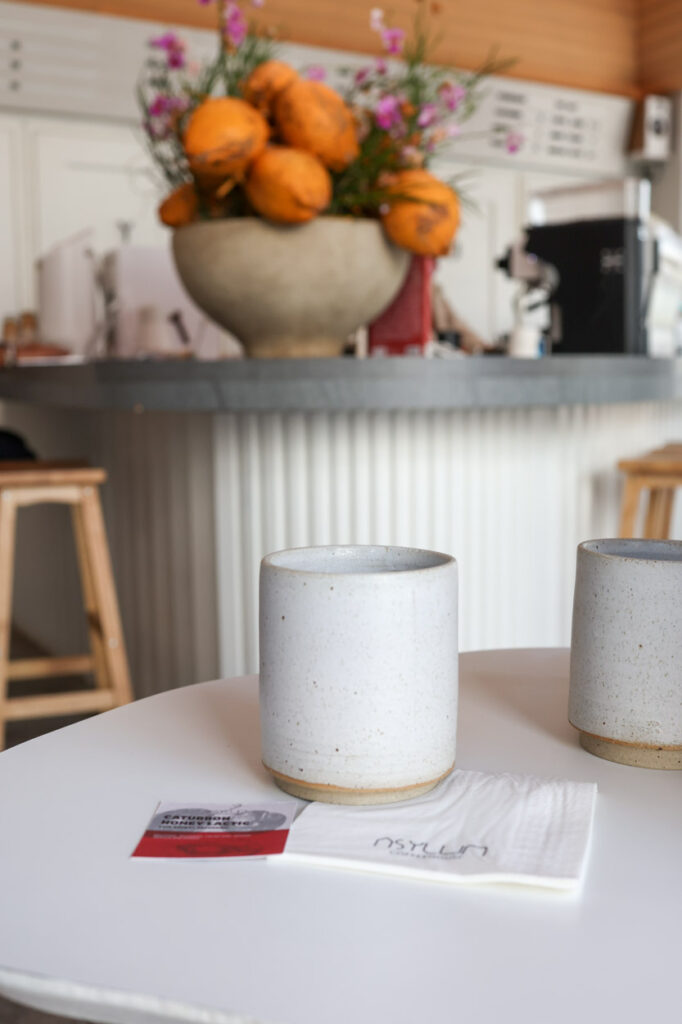
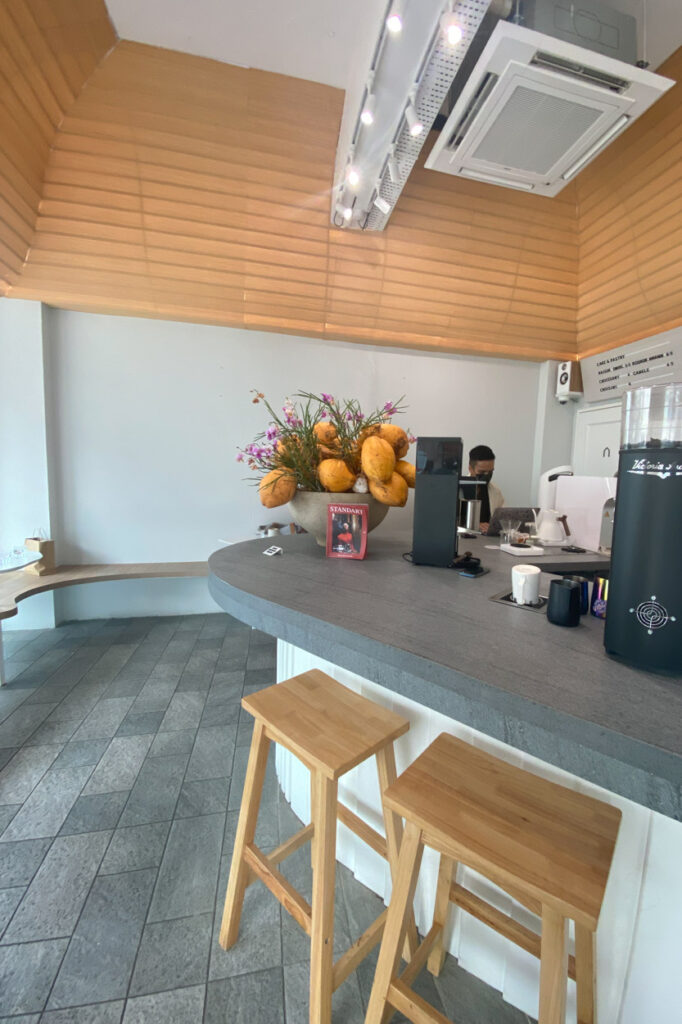
If we only can choose one roastery to visit in Singapore it can only be Apartment Coffee. The roastery was once located at Lavender Street which is hidden away from the crowds. We first found out about the place due to the interior vibes they have, the big glass panel and white minimalistic interior make it a good place to chill during the afternoon.
It’s been our bi-weekly place to visit, as we love their seasonal menu as there’s always something new to explore each time. Filter coffee ($7.00 – $7.50) is the focus here, but you can also get your favorite espresso-based White ($5.50) or Black ($5.50) if you prefer. Look forward to trying beans from around the world, including less common options. Therefore we were worried when it was announced that they will be moving to a new location (as we were worried the place will be too far from us).
However, we were glad that the place got nearer to us instead. The new space is now located at 139 Selegie Road, a short six-minute walk from Rochor MRT Station. The new space retains its signature bright and airy look with an industrial meets minimalistic look; think concrete floors, clean walls, and a plant feature corner for photo ops. Now the “apartment’ has also grown in size, which means it is able to accommodate more patrons.
We highly recommend you visit this roastery at least once, not only you can have a good cup of coffee but experience good service there. Even though Apartment Coffee can get a little crowded at times, we love that the service staff members are prompt in service and very enthusiastic in giving recommendations. They always ask for our feedback and answer all our questions. Here it is not only about the coffee but also building a relationship.
Perhaps this is their definition of slow living, the barista kept to his own pace of weighing the coffee beans, grinding them, and making the perfect cup of filtered coffee at a consistent pace. We love seating at the bar table and watching them do the process. Thus if you are in rush, this may not be a good place for you, as at times you may need to wait for at least 30 minutes. A little reminder to you is that the place doesn’t provide takeaway cups, thus if you want your coffee to-go remember to bring your own cup.
Apartment Coffee Address: 139 Selegie Road, #01-01, Singapore 188309 Opening Hours: 10 am to 6 pm
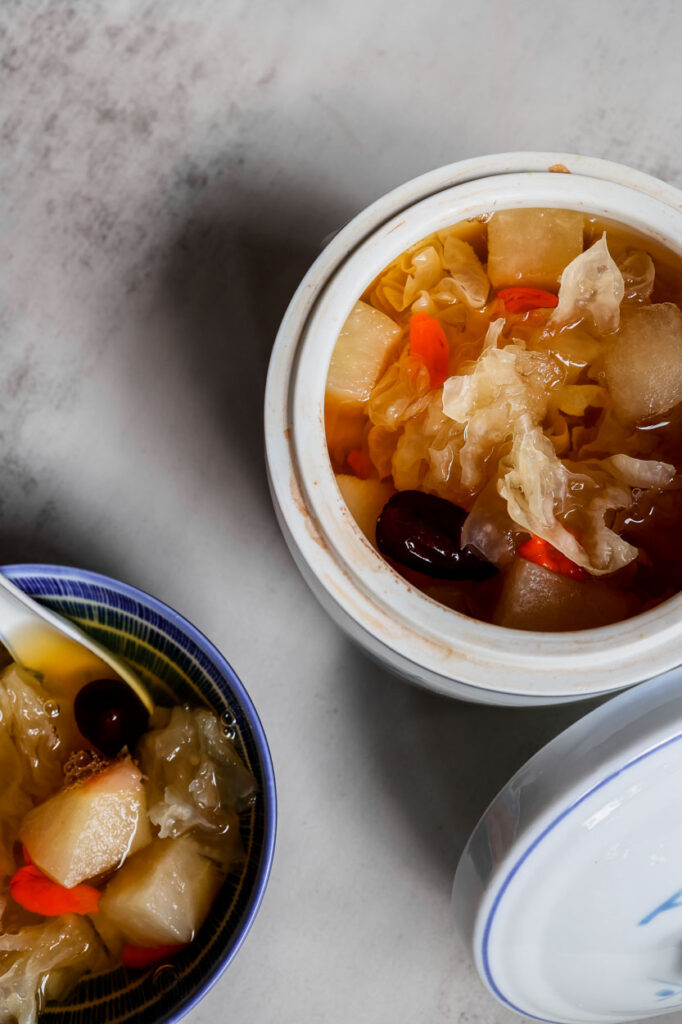
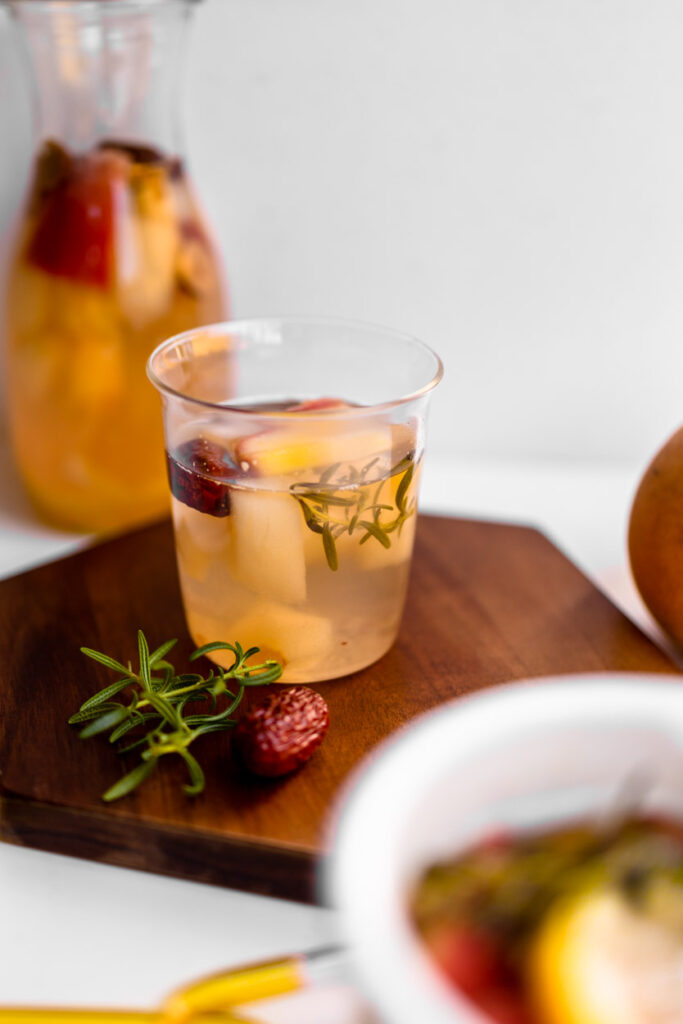
Snow Fungus Soup with Pears (冰糖银耳炖雪梨) is a Chinese dessert soup usually served on special occasions like Chinese New Year. Snow fungus and pear sweet soup is a common dessert in most Chinese families. This dessert is good for treating dry cough as snow fungus helps to nourish the body, lungs, and stomach, and because red dates contain loads of vitamins. It is very quick and easy to prepare this nourishing dessert by simply simmering the ingredients for 30 minutes. It is very refreshing to serve this sweet soup chilled and it quenches thirst, especially in our humid weather.
Ingredients that you will need
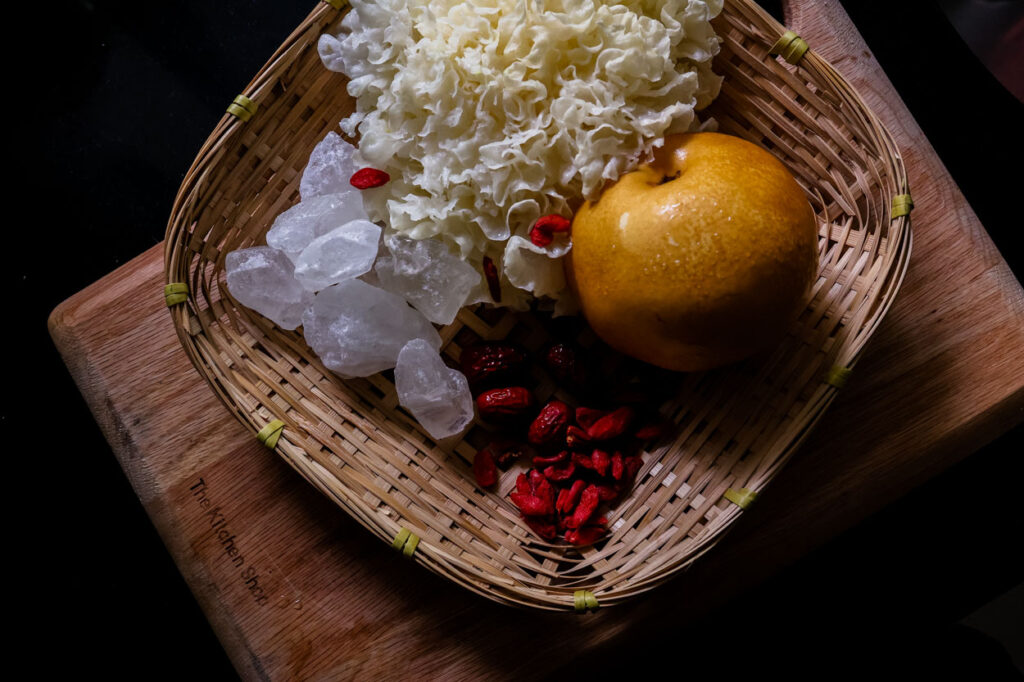
The main ingredients are, you guessed it, snow fungus, pears, red dates, wolfberries, and rock sugar.
Snow Fungus: Snow fungus, also known as ‘white wood ear’ is a natural tree fungus. You’re probably more familiar with the more common wood ear fungus which is a dark brown color. Snow fungus is a naturally sweet ingredient that tends to detoxify the body and replenish energy. It can also cure coughs and is said to be anti-inflammatory as well. Both these properties play a role in reducing inner body heat, also known as yang.
Pears: The addition of pear in the soup provides benefits such as micronutrients which are important for cardiovascular health. Pears are also used in Chinese cooking for their moistening and cooling effect. Snow fungus and pear soup is a great way to counter hot weather during the summer months.
Rock Sugar: You can also use white sugar, however, we prefer the sweet taste of rock sugar which taste more natural and sometimes like honey.
Woftberries & Red Dates: They are often associated with the ability to ‘calm the mind’. These dates contain saponin which is a natural ‘sleep promoter’. Low doses of these powerful fruits help ease anxiety and calm the nerves. Other than the benefit, it will provide some natural sweetness to the drink.
Preparations of Snow Fungus
You can find dried snow fungus in Chinese grocery stores. It will have to be soaked overnight prior to cooking, so a little bit of advanced planning is required for this recipe.
Soak white fungus in a bowl of hot water (covered) for about half an hour, then carefully discard the water. The white fungus should be puffed up and turned a whiter shade. Using a pair of kitchen scissors, trim and discard the dark yellow hard part on the center underside of the fungus. Cut the rest of the fungus into smaller pieces.
If you try this recipe please tag #byplaincanvas on Instagram. We love to see your photos of our recipes! Also, follow us on Instagramto keep up on what we’re cooking up.
Soak the dried snow fungus in a bowl of hot water for 30 minutes or overnight until they become rehydrated and soft.
While the fungus is soaking, clean and peel the pears before removing the core and slicing them into bite-sized chunks. Rinse off the goji berries and Chinese red dates as well.
When the snow fungus has softened, remove the hard slightly darker bottom center of the fungus using a pair of scissors. Then cut the fungus into bite-sized pieces.
After, add the water to a large pot and bring it to a boil. Then add in the snow fungus and reduce the heat to medium-low. Cover the pot and let it simmer for 30 minutes.
Once 30 minutes have passed, add the remaining ingredients. Add in the rock sugar depending on your preference for sweetness.
Let the soup simmer for another 5 to 10 minutes or until the pears become soft and tender.
Snow fungus and pear soup are best served hot. Enjoy!
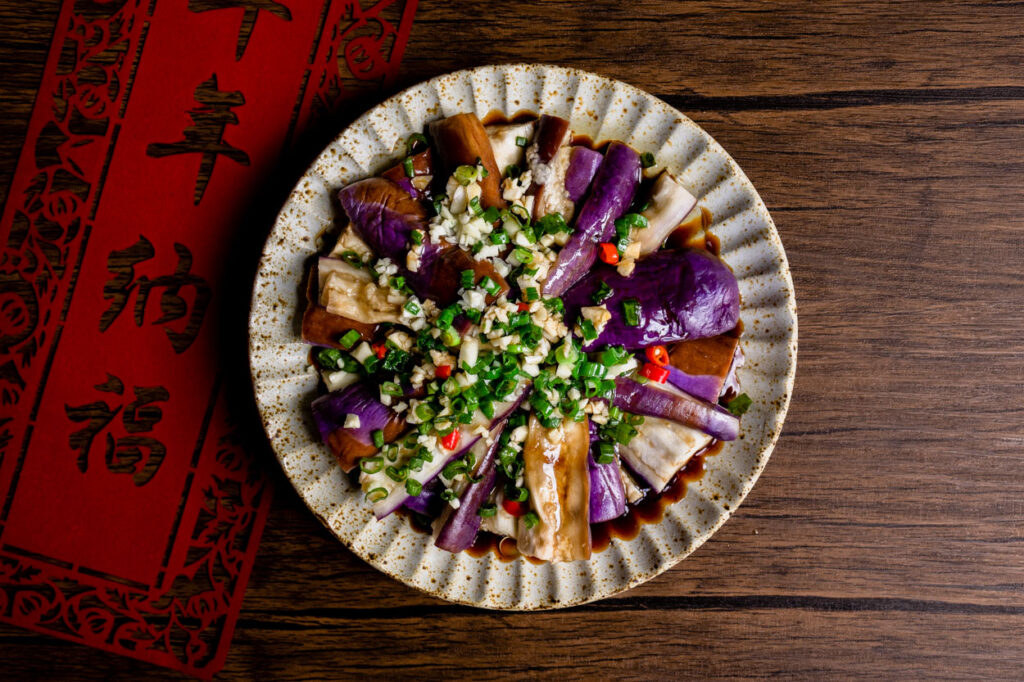
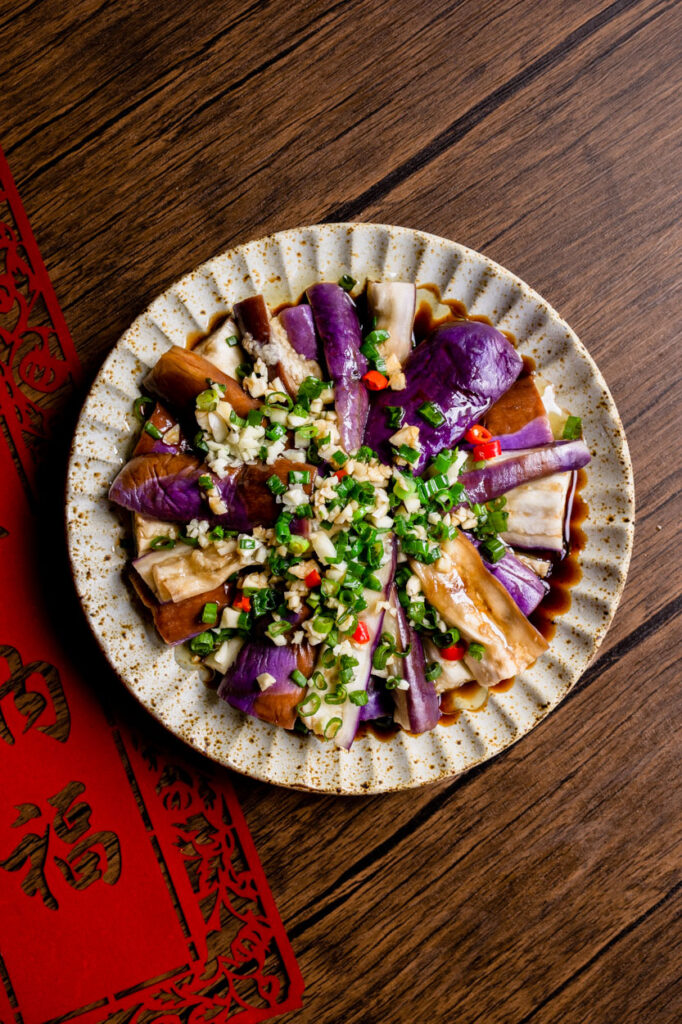
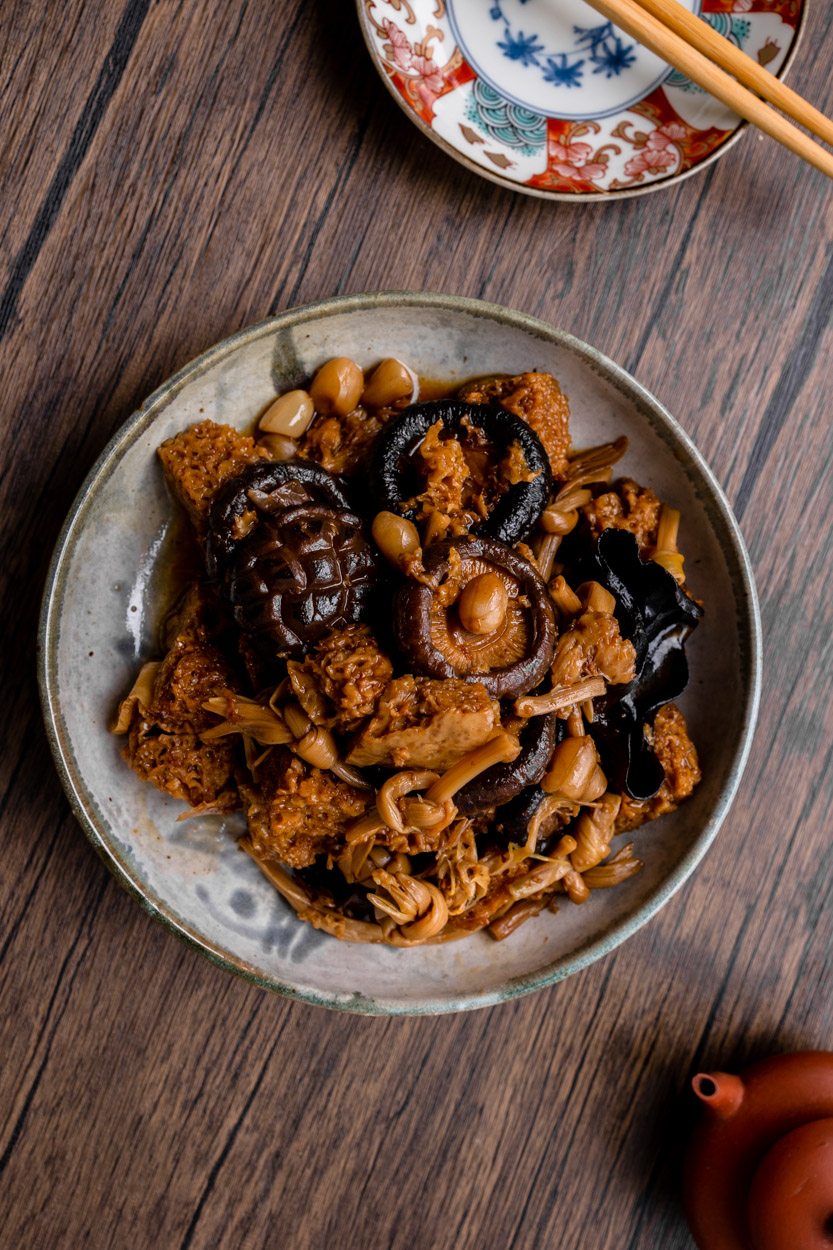
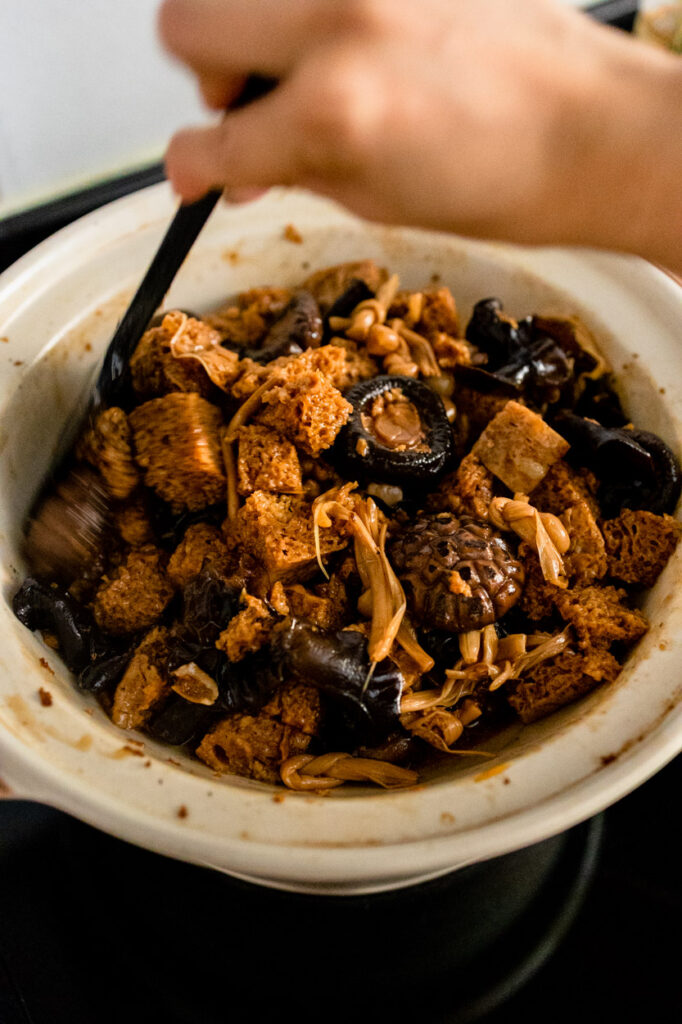
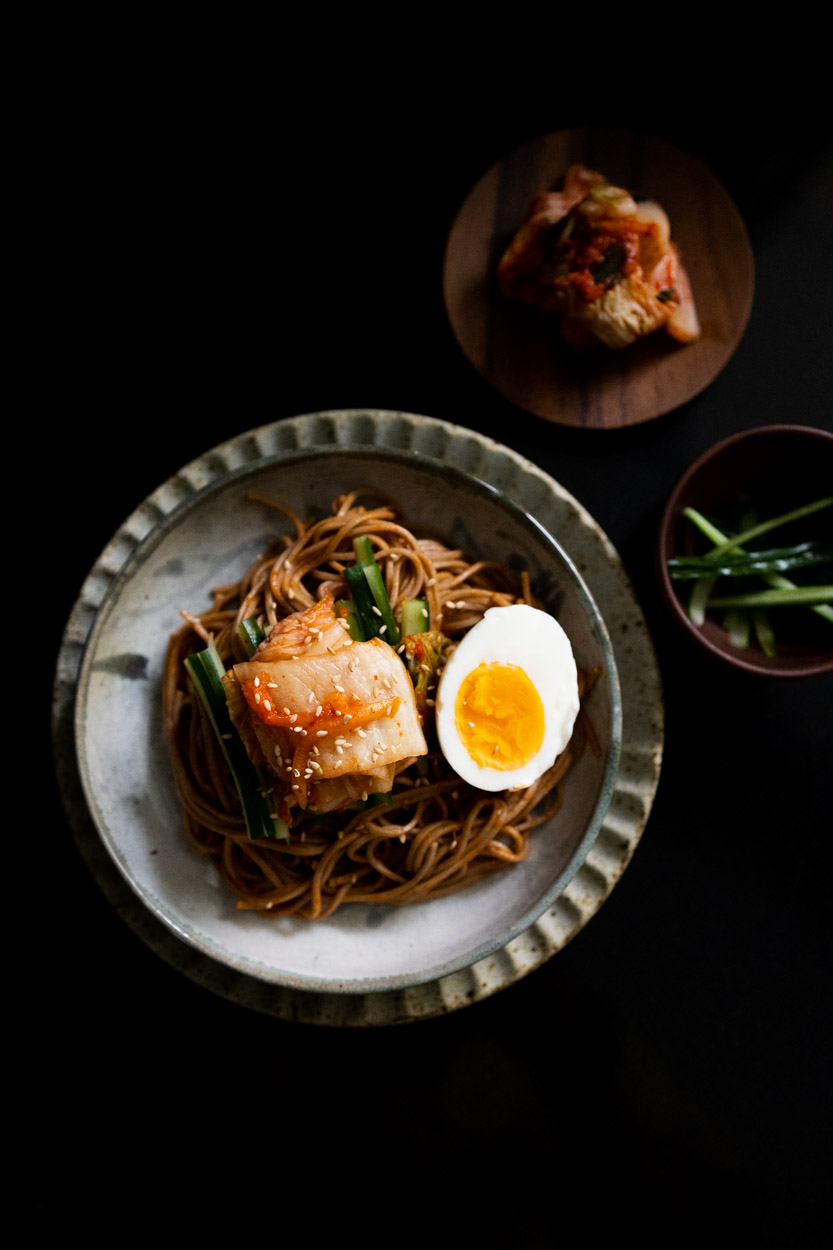
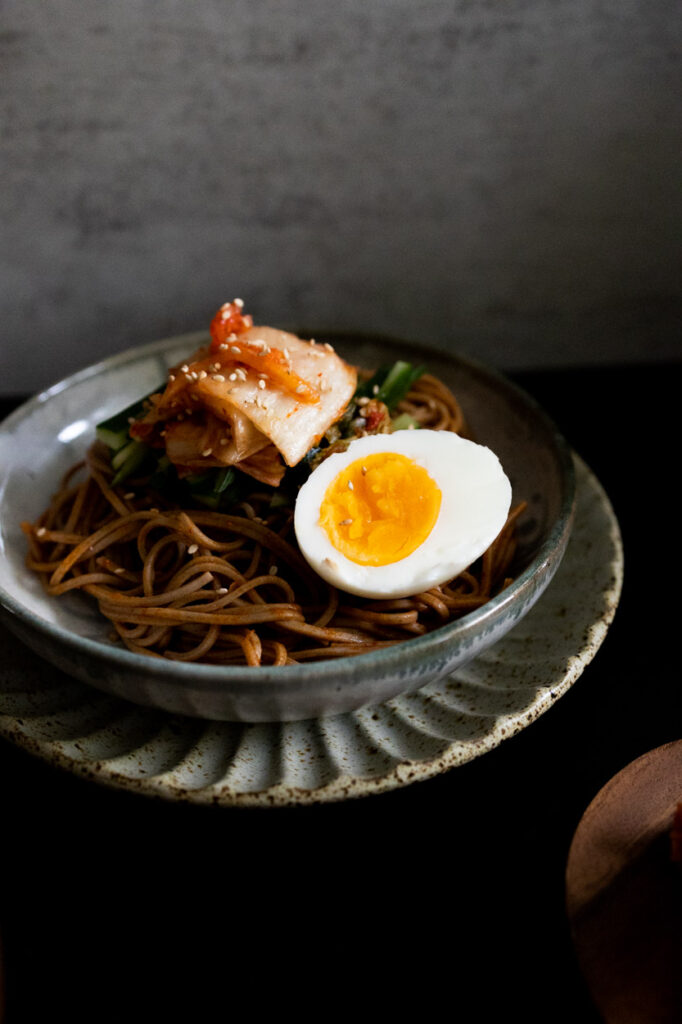
We have been stressing as Lunar New Year is so close to us but yet we have prepared anything. This year Lunar New Year falls on the 22nd of January, we just remove our Christmas tree and now we need to hurry to get prepared for it. To save some time like to create a simple dish for the eve of the Lunar New Year.
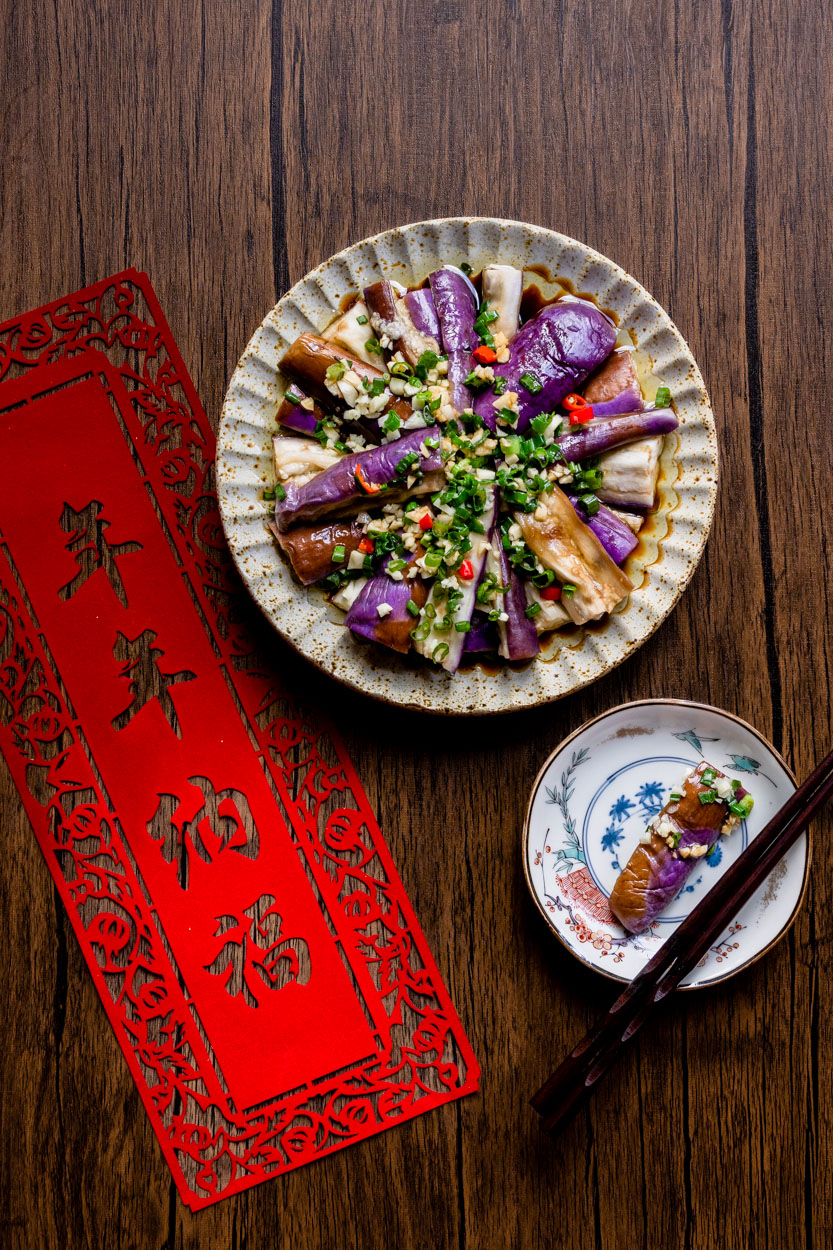
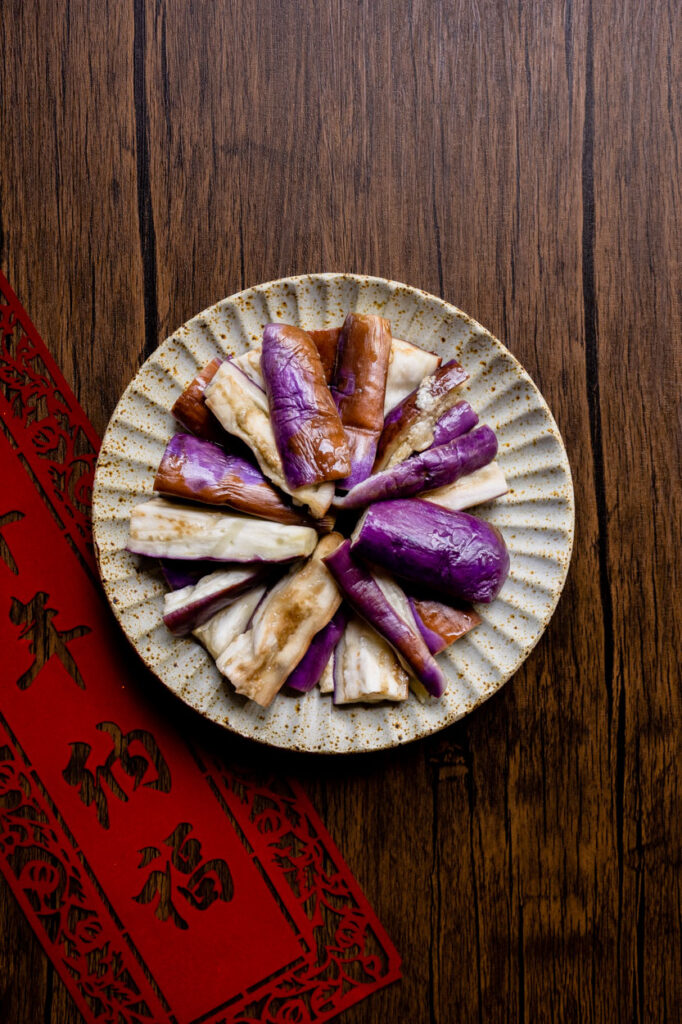
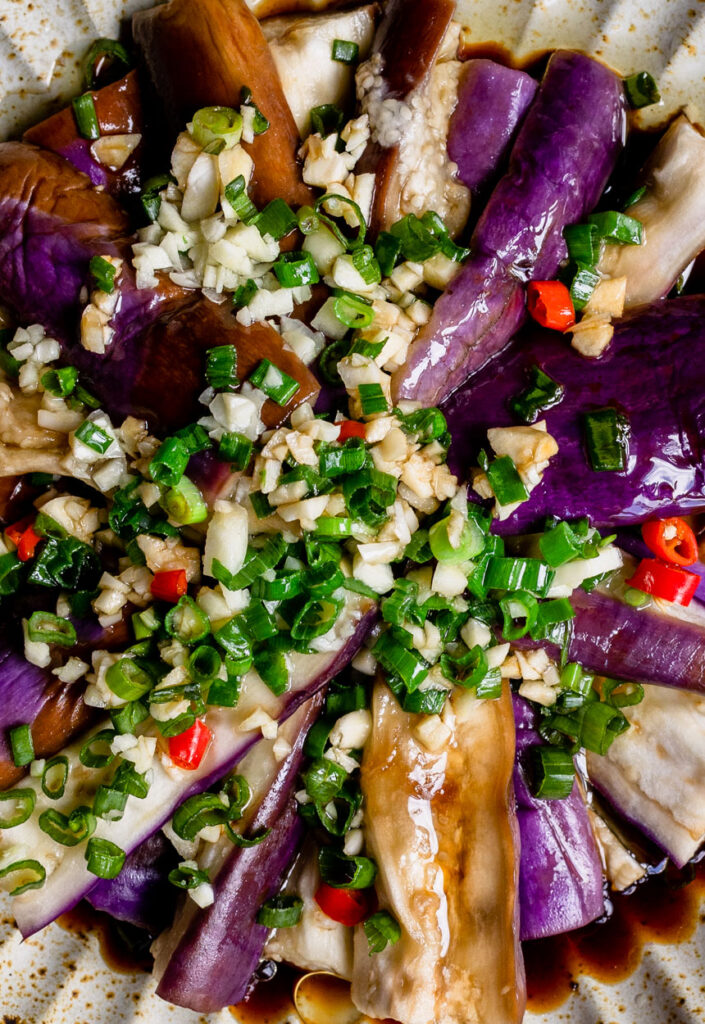
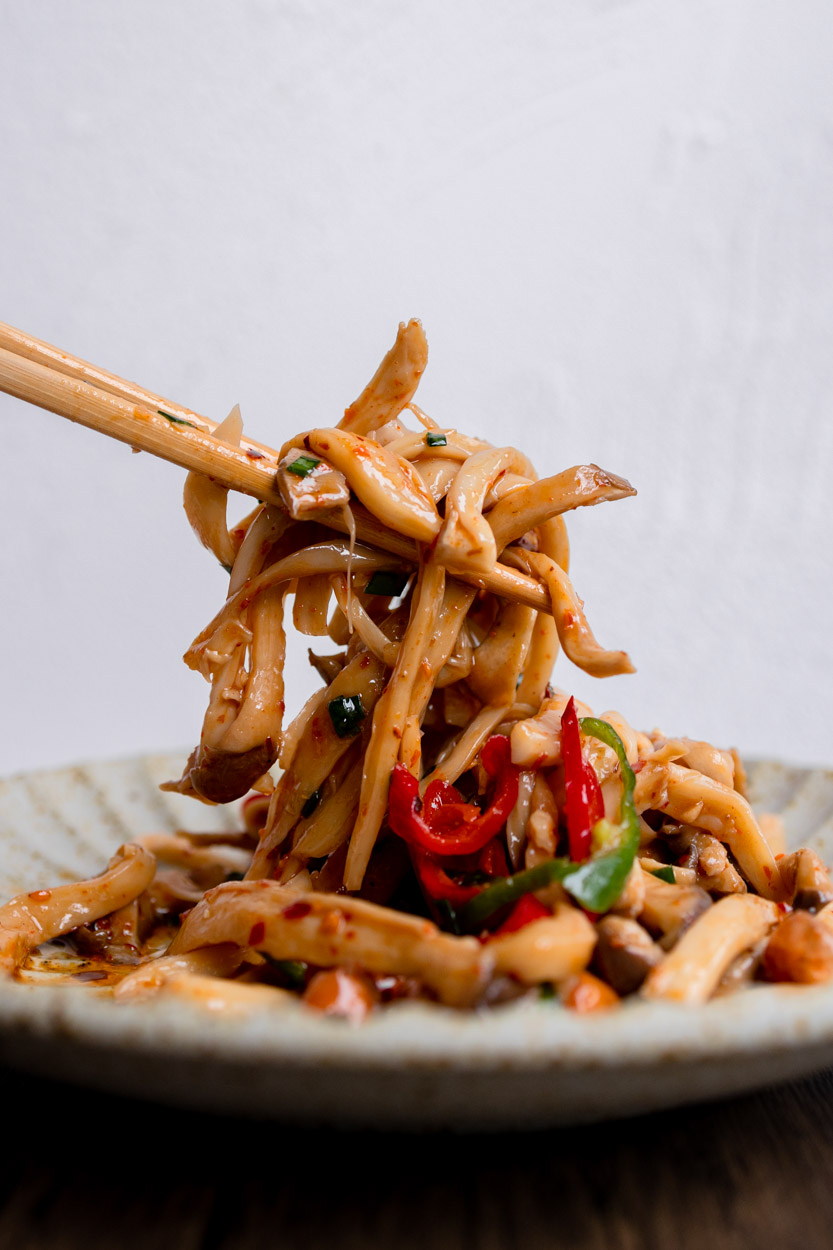
Eggplant is one of those polarizing vegetables—people either adore its soft, spongy texture or absolutely detest it. Us, we use to dislike eggplant, but until we discovered the steaming method. Eggplant is often fried with a lot of oil and ends up being too heavy for my tastes, but steamed eggplant is light and a wonderful vessel to soak up the sauce. It’s a fast way to cook eggplant, and even more important, the texture transforms and becomes silky soft, tender, and creamy.
Preparing the Eggplant
About Eggplant
Cooking eggplant can be equally frustrating, though. That beautiful and vibrant purple color can turn ugly grey after cooking. So, how do you keep eggplant purple after cooking without frying it? The answer is salt and/or vinegar. Once the eggplant is cut into pieces, it starts to oxidize when it meets the oxygen in the air. For this dish, we soaked the eggplant in vinegar water for 3 minutes. Eggplant is very absorbent, but since we are steaming them, it’s ok to soak them.
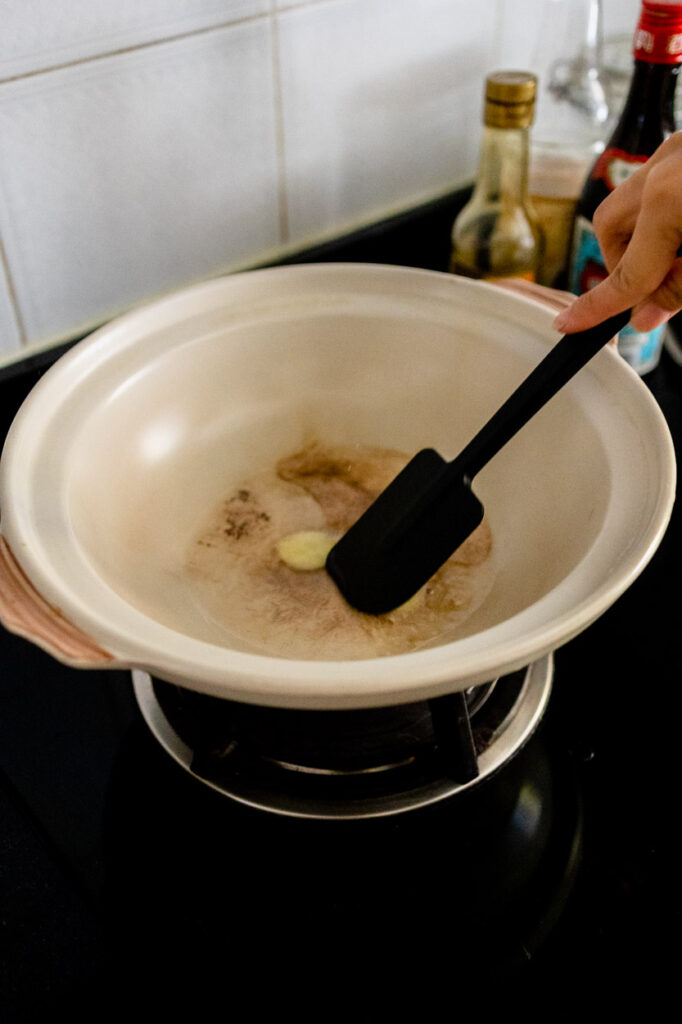
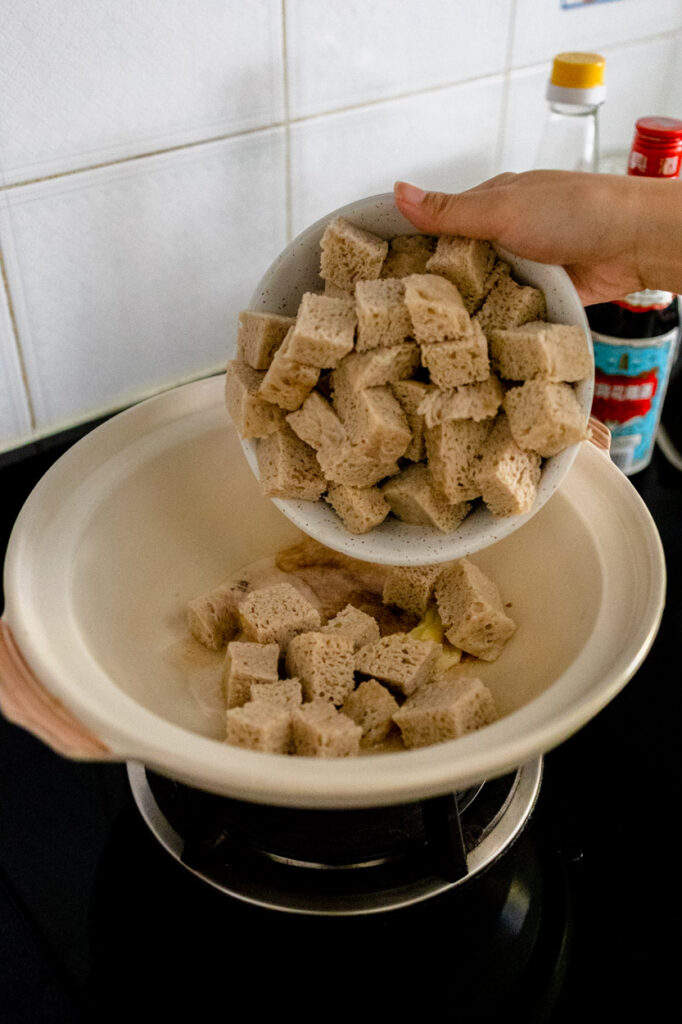
How do you steam them? Prepare your steamer, we use our traditional pot and steam tray, and turn the heat on low to preheat the water in the steamer. Cut each eggplant crosswise into 3 equal sections, then cut each section into 8-10 bite-sized strips. Fill a large container with about 2 quarts of water and 1/4 cup of white vinegar. Soak the eggplant in the vinegar water for 3 minutes. Then remove the eggplant and squeeze as much liquid out as possible. Arrange them on a heat-proof rimmed dish and carefully lower them into the steamer. Cover and turn the heat on high. Steam the eggplant for 8-10 minutes.
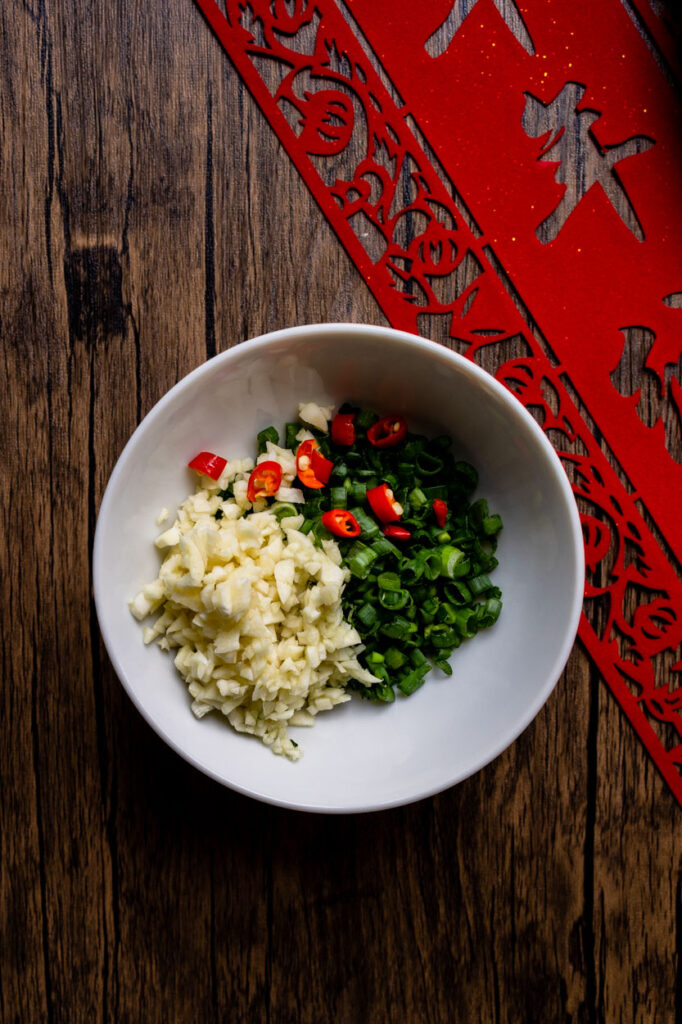
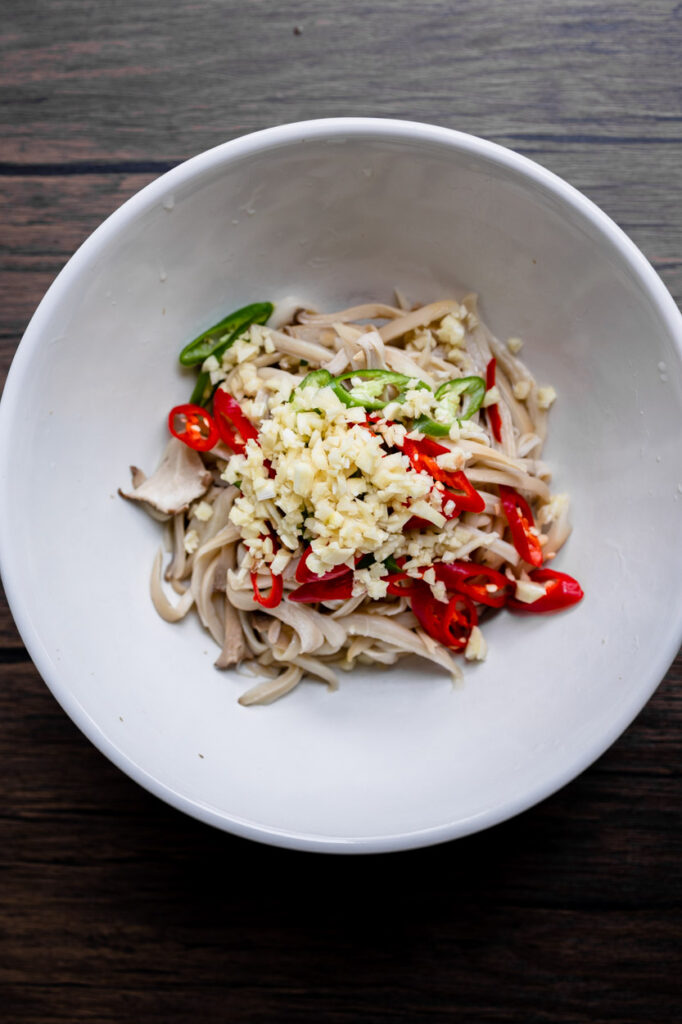
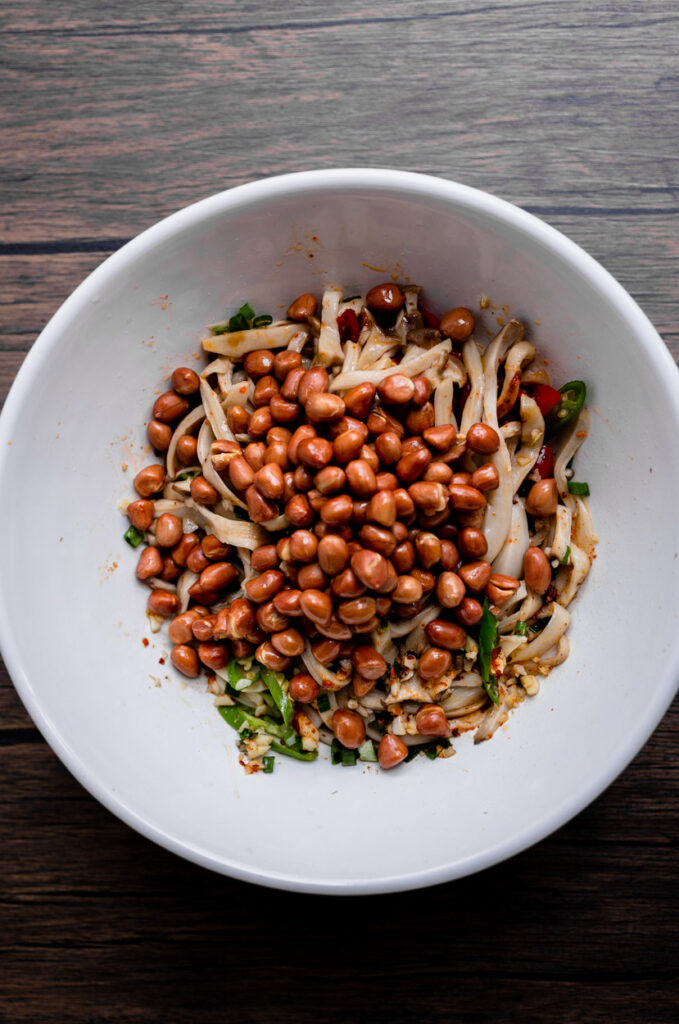
Combine all your ingredients
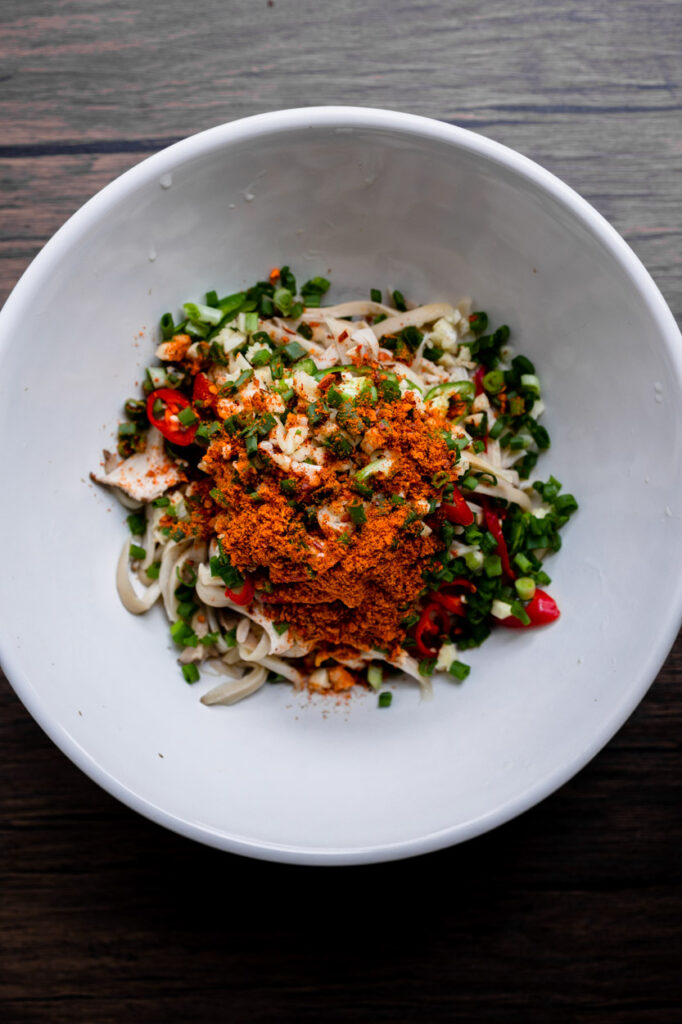
When the cooked eggplant is slightly cool, you can start plating them up. Start by laying the cooked eggplant, and the finely minced garlic, spring onion, and chili on top. Your only seasoning is soya sauce, thus when it comes to choosing one, we will choose one that is less in sodium avoiding it overpowering the taste of eggplant. Evenly pour the sauce over the eggplant.
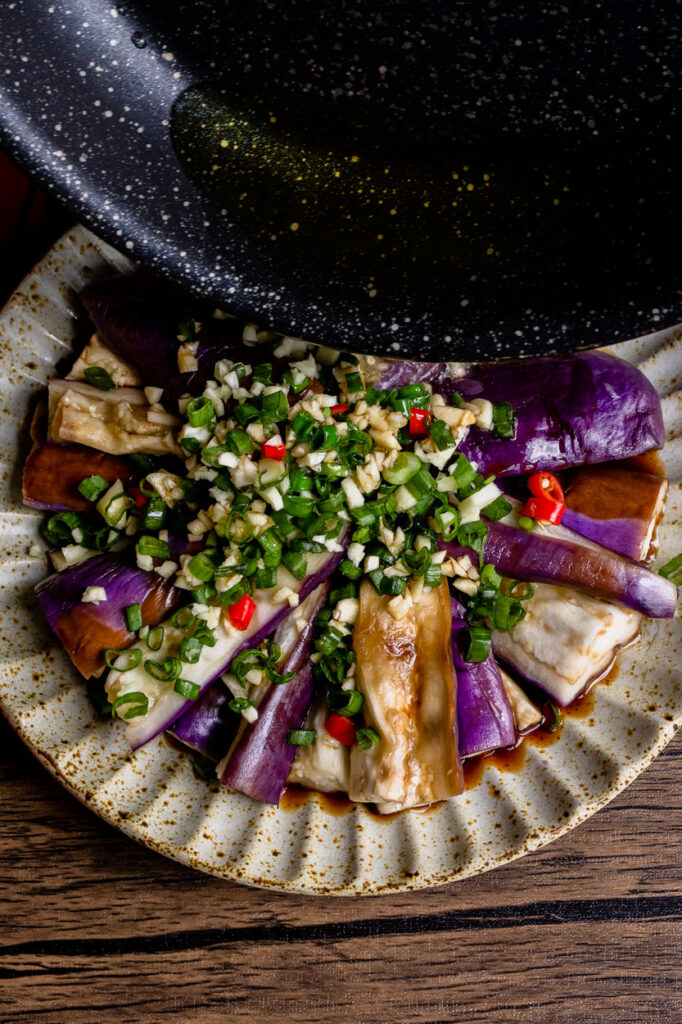
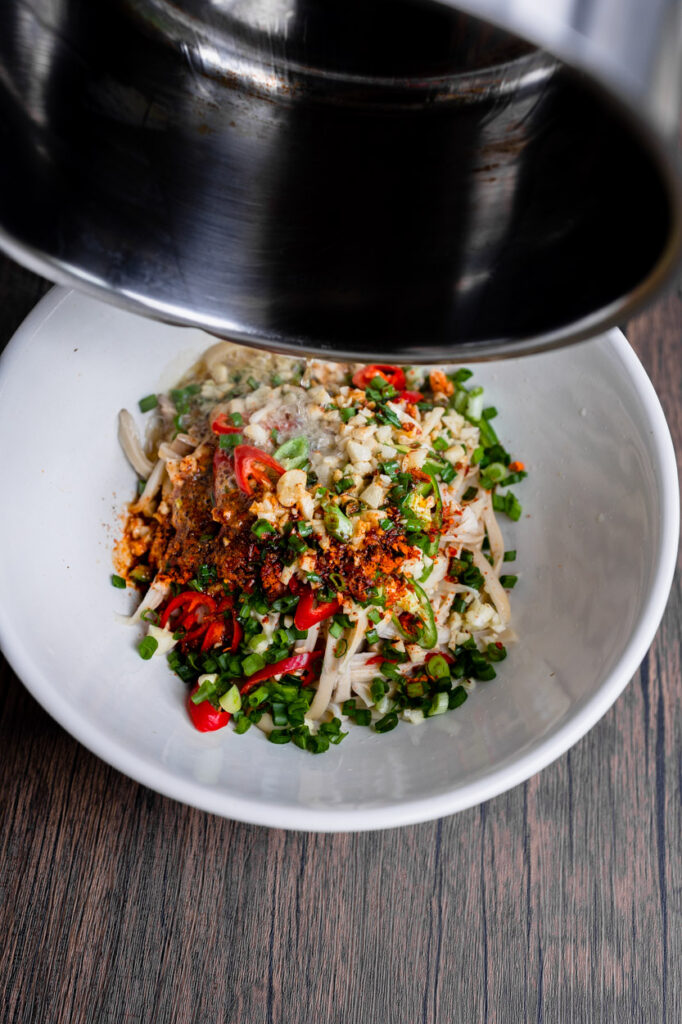
The key step of this dish is here, heat 3 tablespoons oil in a small saucepan until it starts to smoke lightly, and then carefully pour it over the garlic and scallion. You’ll get a wonderful sizzle and delightful aroma.
1 pound Japanese or Chinese eggplant (450g, about 3 eggplants)
1/4 cup white vinegar
2 tablespoons light soy sauce
4 cloves garlic (minced)
1 scallion (minced)
3 tablespoons vegetable oil
Methods
Prepare your steamer. Turn the heat on low to preheat the water in the steamer.
Cut each eggplant crosswise into 3 equal sections, then cut each section into 8-10 bite-sized strips.
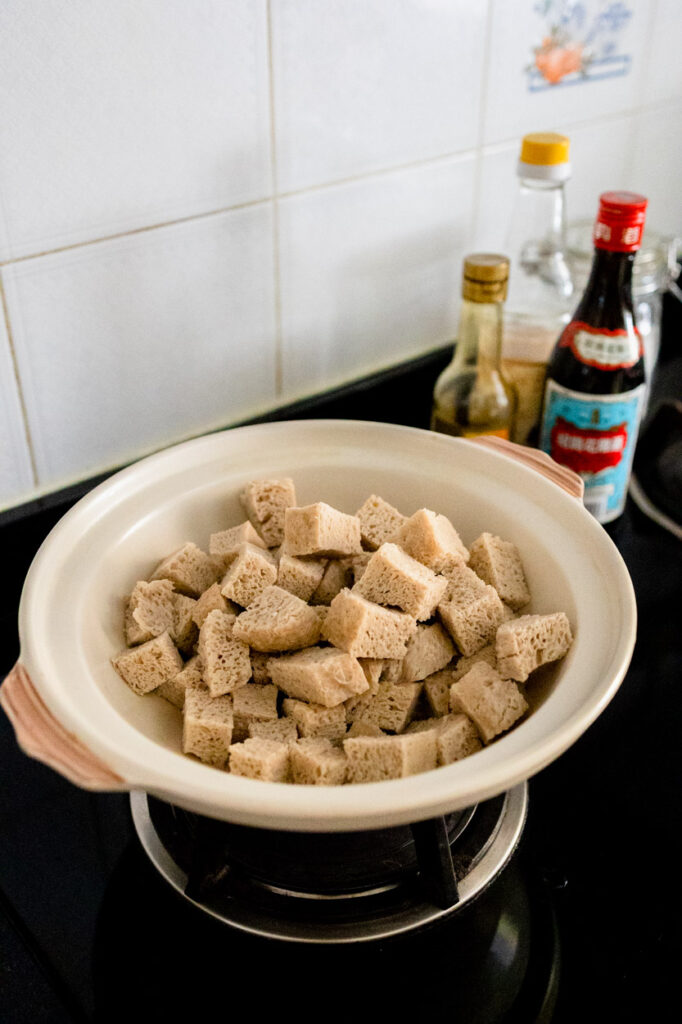
Fill a large container with about 2 quarts of water and 1/4 cup of white vinegar. Soak the eggplant in the vinegar water for 3 minutes. Then remove the eggplant and squeeze as much liquid out as possible. Arrange them on a heat-proof rimmed dish and carefully lower them into the steamer. Cover and turn the heat on high. Steam the eggplant for 8-10 minutes.
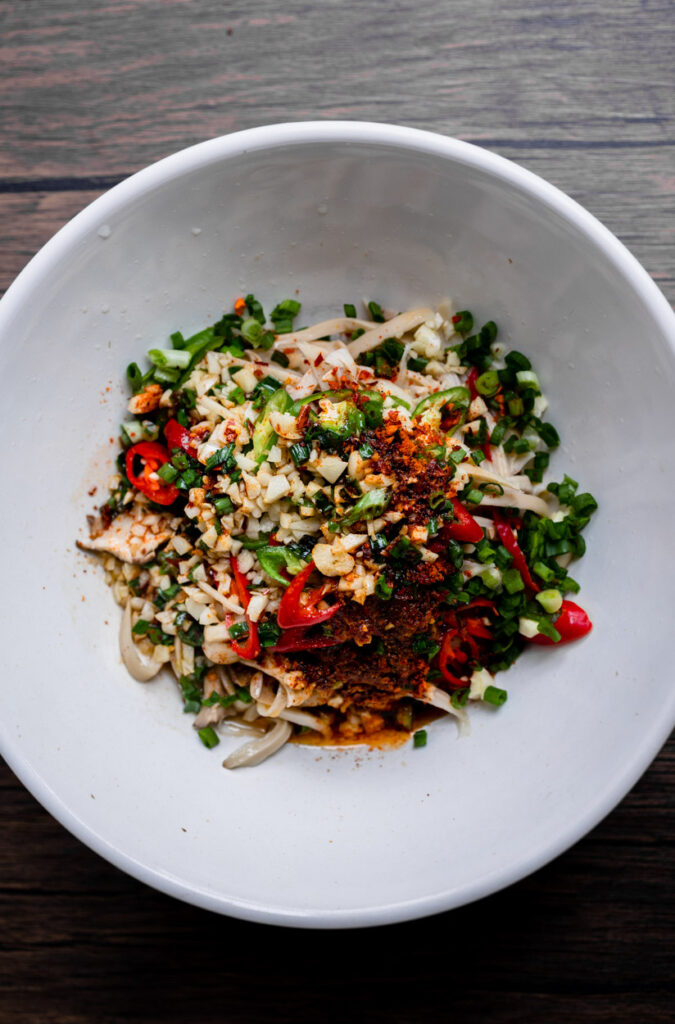
Remove the eggplant from the steamer (no need to pour out the liquid in the dish), and evenly pour the sauce over the eggplant. Top it with minced garlic and scallions. Pourover soya sauce and soak the eggplant evenly.
Heat 3 tablespoons oil in a small saucepan until it starts to smoke lightly, and then carefully pour it over the garlic and scallion. Serve hot or cold. If serving as a cold appetizer, you can make this dish in advance.
We got attracted by the colorful photo that everyone took from this MENTAL: Colours of Wellbeing exhibit that is displayed at the Art Science Museum till 26 February. Without much reading of the description of what the exhibition is about we got our tickets and head over to it. Unlike what we think that colors are actually for happy things, on the other hand, the uses of colors in these interactive installations tackle weighty topics like addiction, anxiety, and suicide by contemporary artists, scientists, makers, and designers from around the world.
They want to use colors to discuss the bleak and dark depressing issues. upends our assumptions about how an exhibition on mental health should look and feel. Rather than focusing on illness or treatment, it instead celebrates the kaleidoscopic spectrum of mental well-being, It was objective enough that the organizers want to create an ongoing conversation with the younger generation struggling with mental health and were supported by experts who helped explore the topics more deeply. Where it really does get our attention on it.
A few exhibitions provoke us to recognize our emotions. Even Fear features a weather balloon in a pink cage building up pressure slowly. When an explosion seems imminent, it deflates. Can you take the pressure from watching the process? Are you feeling anxious? Even Fear evokes anxiety and mimics the stress from everyday life. That’s how we feel when we look at the balloon.
Sometimes the words “mental health” could be dark, gloomy, and perhaps intimidating to us. However the Wheel exhibit, for instance, is a giant “hamster wheel” that will encourage you to get on your feet to run, walk, crawl or use your hands to clock as much distance as possible. Consistent effort is required to keep your mental health in check and improve – move well, feel well. The assistance there helps to key us safe on the wheel and at the same time encourages us to not be scared and try it.
The floating inflatable heads: Go Mental caught our eye. However, when you stand inside you will experience of night terrors, the history, and the future of Josh Muir. Pop your head inside the characters to hear the soundscapes of Josh’s mind created by the University of Melbourne students. It’s weird but a good experience.
Unlike other exhibitions, MENTAL has no recommended flow or fixed narrative. Visitors are encouraged to gravitate to whichever artwork they choose. Everyone can take different routes, just as each person’s journey is different from another’s.
Our take on MENTAL – it’s a fun exhibit to get your hands full and your hearts lighter. It’s a great exhibit to bring your old fashion minded parents or friends for a walk, letting them see a different side of mental.
Mental: Colours of Wellbeings Address: ArtScience Museum, 6 Bayfront Ave, Singapore 018974 Opening Hours: 10 am to 7 pm daily, last entry at 6 pm
One of the most exciting parts for the start of the year is a new set of Pantone colors of the year. One that caught my eye was Viva Magenta – according to Pantone, Viva Magenta is “a vibrant, attention-getting hue that emanates heat and energy.” This hue is said to be “intriguing and inviting,” making it a perfect choice for those who want to make a bold statement.
Vibrant and full of energy, Viva Magenta is the perfect color to inject some life into your home. Designers and homeowners alike can use Viva Magenta in lots of ways. You can bring it into your space as a velvet couch or feature wall. Or you might opt for a more neutral palette, using it only as one pop of color by using scatter pillows, a throw, or a lamp. Because it is such a strong color, too much Viva Magenta can be overwhelming. Use it sparingly in small doses to achieve the desired effect.
xoxo, Joe
Credit | All shots are used on the mood board via our Pinterest boards.
It’s almost time for the Chinese New Year, streets are bustling with people buying their 年货 (goodies), and many like us are cleaning our houses in preparation for a good Chinese New Year. To ensure we’re all ready to celebrate, last year we’ve put together a guide on what to eat during Chinese New Year and thetop lucky foodswe need to have during the Chinese New Year. Moreover, the guide is also packed with useful information on the festival, customs, and things Chinese people do to say goodbye to the old year and welcome the new year.
However, there are times we feel difficulties in following or practicing the custom. Thus this year we came out with our Top 10 favorite Chinese New Year recipes, while we try to follow the custom we also want to enjoy them.
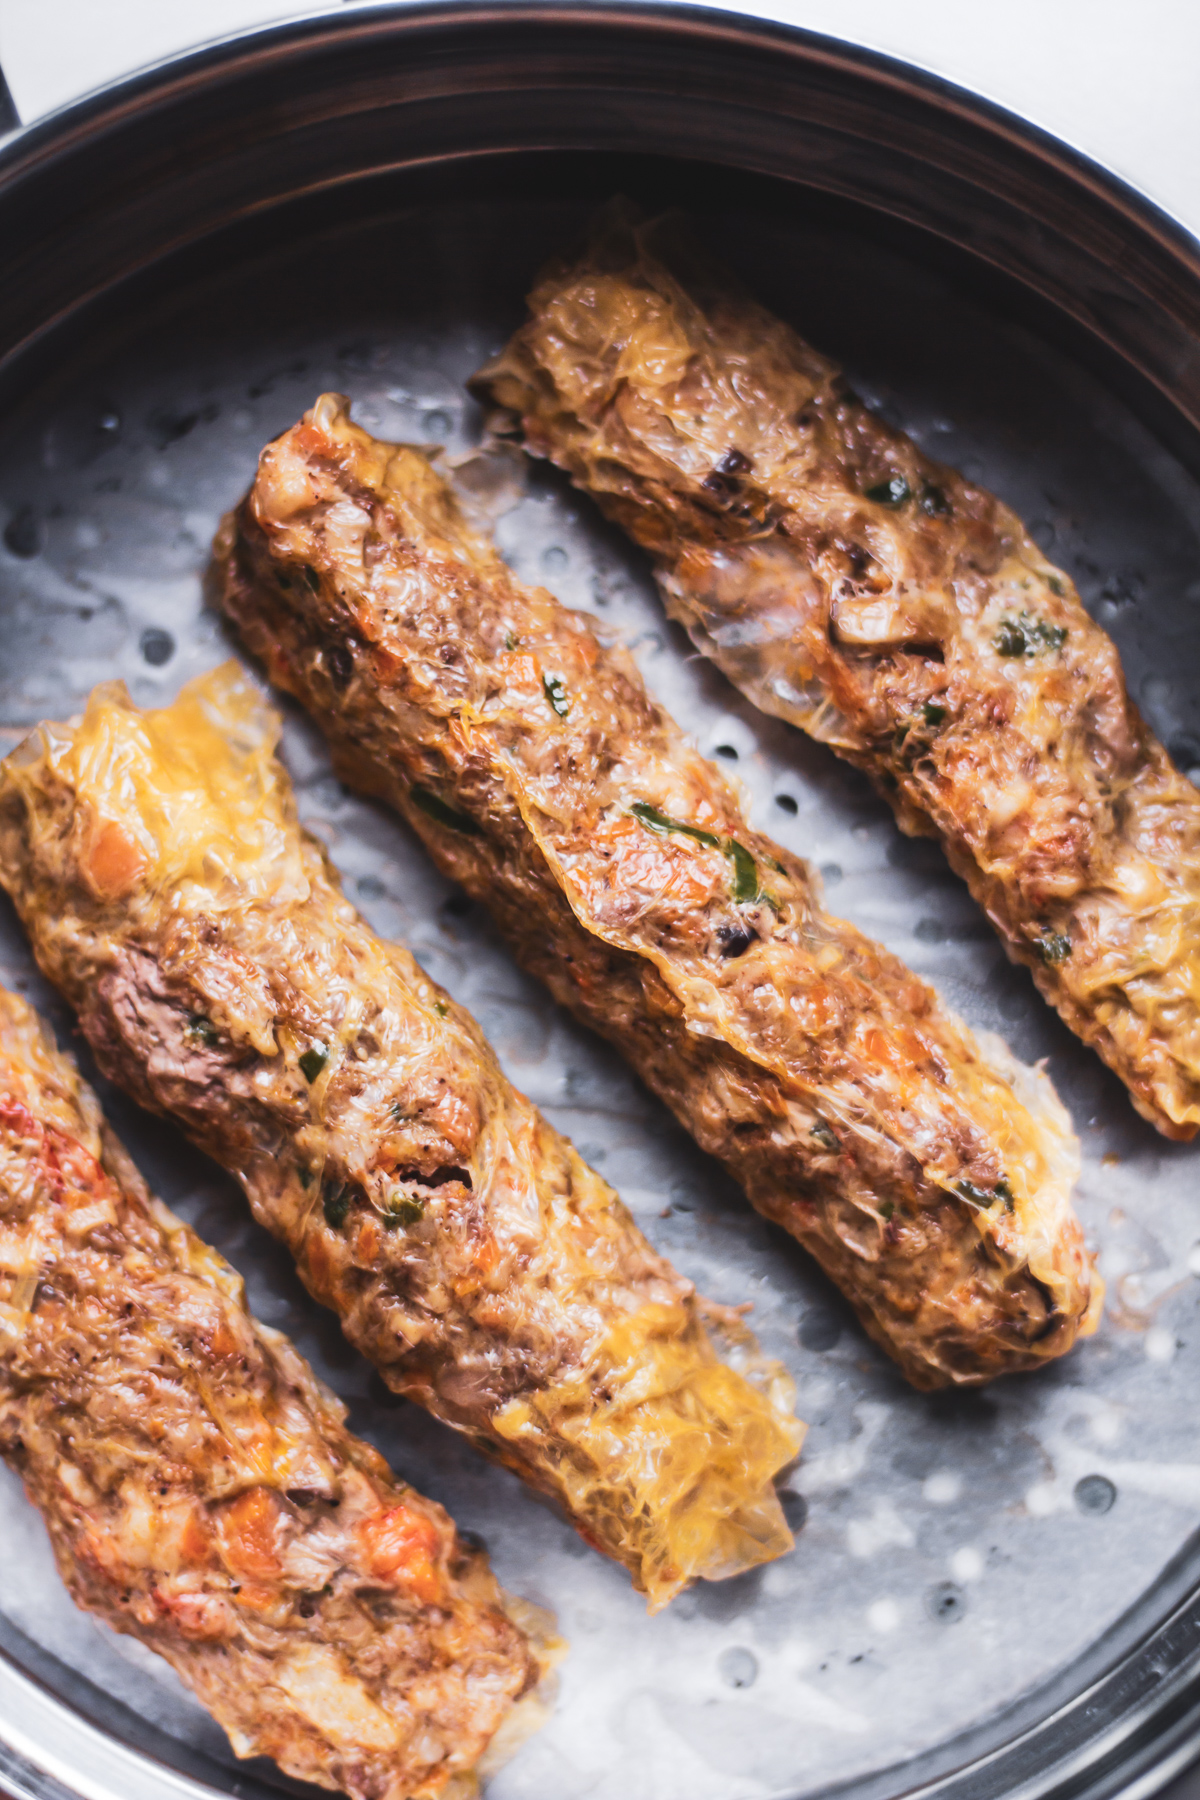
Five Spiced Rolls (Ngoh Hiang) wasn’t really a Chinese New Year dish, however, since young our mother make them quite often, especially during the New Year. Like our family, Ngoh Hiang is a family staple for many households of generations, be it the Peranakans or the Chinese. Similar to the commonly seen spring rolls, they are cylindrical-shaped rolls filled with vegetables and meat. However, instead of a spring roll wrapper the beancurd skin is been used.
It’s always good to have something hearty and with wok-hay flavor on the table during the Chinese New Year. Glutinous Rice with Chinese Sausage – this dish represents wok-hay in all ways. Wok hay is a Cantonese phrase used to describe a particular essence and aroma that is created in a dish when authentic stir-frying is performed. “Hay” means “energy” or “breath”; therefore, “wok hay” means “the energy or breath of a wok”.
This Glutinous Rice with Chinese Sausage, commonly also known as Chinese sticky rice is loaded with dried shrimp, sausage, shiitake mushrooms, and a flavorful sauce that’s all cooked up in the rice cooker! It’s an easy way to make this deliciously popular Cantonese dish which we really enjoy a lot.
If you are looking for something simple and meaningful, these fried crackers are something you can make for your family and friends as a snack during the gathering. Prawn crackers are deep-fried and expand like a flower when dropped in hot oil. If you’re worried about being tempted by calorie-filled Chinese New Year treats, then this fried vegetable cracker might be something you want to replace with the traditional prawn crackers. As a Cantonese family, we love to serve prawn crackers as they represent happiness and wish individual laughter throughout the whole year.
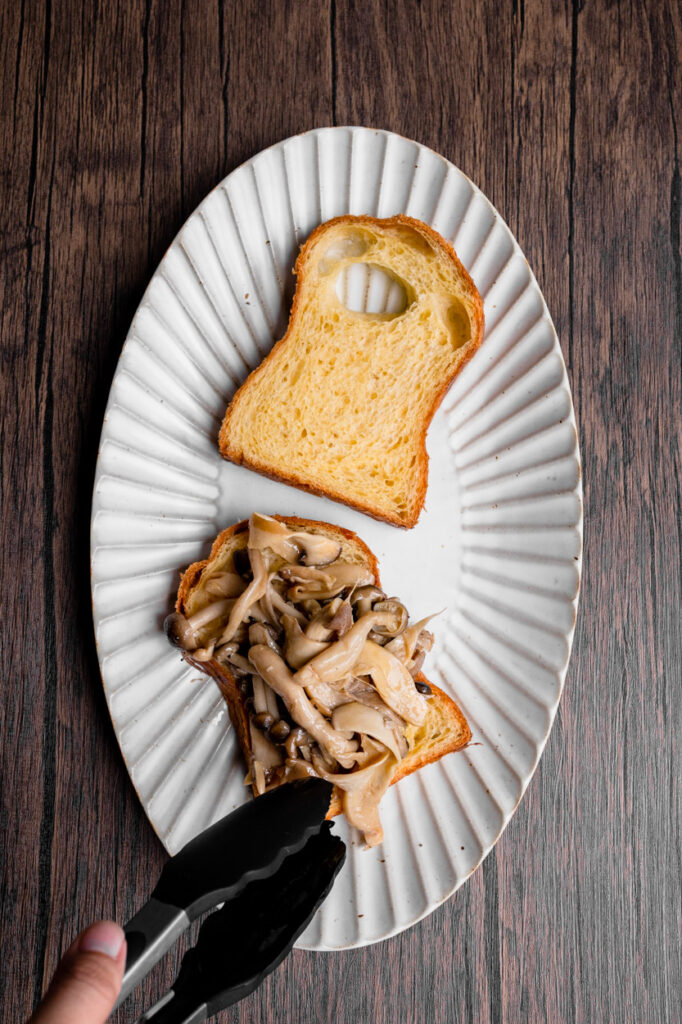
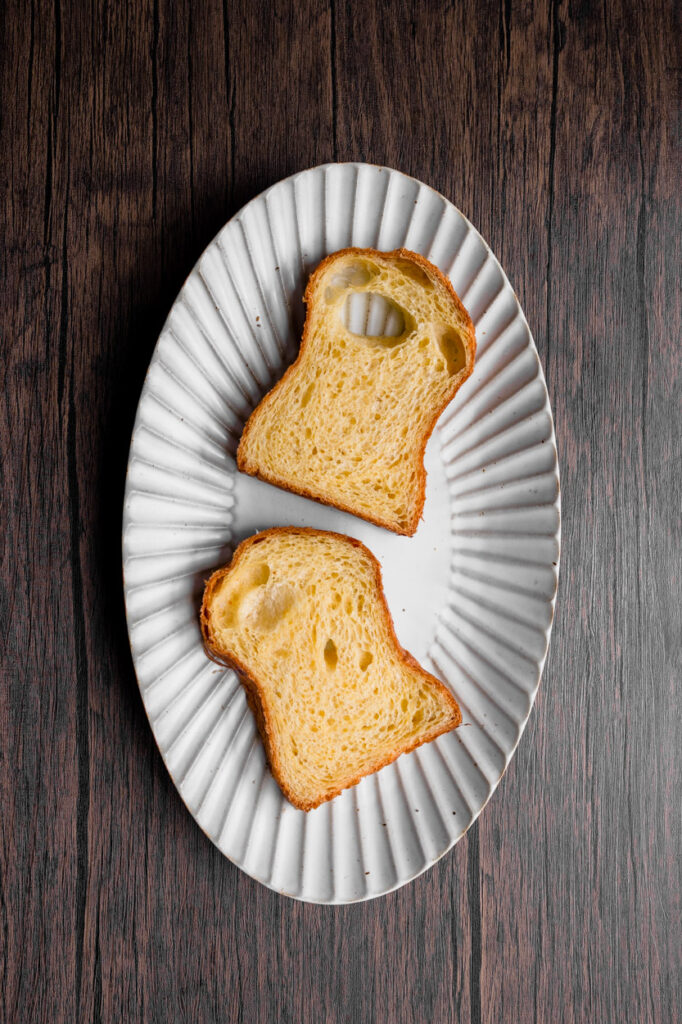
Ever since we were a kid, our family inevitably buys or makes this treat for the Chinese New Year celebration, in the hopes of having a better year ahead. It’s also a popular gift to give when visiting family and friends during the festive season. Traditionally, our grandma will just dip the Nian Gao (we got from the store) with egg wash and pan-fried it. While our mom preferred to steam or pan-fried it with root vegetables like sweet potatoes or yam.
Honestly, the block of Nian Gao is not quite appetizing. We promise that it is very delicious so don’t judge the book by its cover! Just to let you know, you might fall in love with this piece of Sweet Niao Gao sandwich instantly. You have to give this a try.
When we head to the market to reserve some ingredients with the butcher’s uncle whom we know, pork belly is one of the ingredients on our purchased list. As it is a flexible part of the pork, it can be used in many kinds of cooking methods. One of our favorite ways is to steam or braised it and Steamed Pork Belly with preserved Mustard Green which is also known as Mei Cai Kou Rou, 梅菜扣肉 are on our top of the list.
It’s loved by Hakka, Cantonese, and Teochew Families, we remember that our mom always will prepare a super huge pot of Steamed Pork Belly with preserved Mustard Green and served us hot porridge or noodles to enjoy the amazing savor. And it can last us for at least 2 days, but usually, it is too delicious we finish instantly.
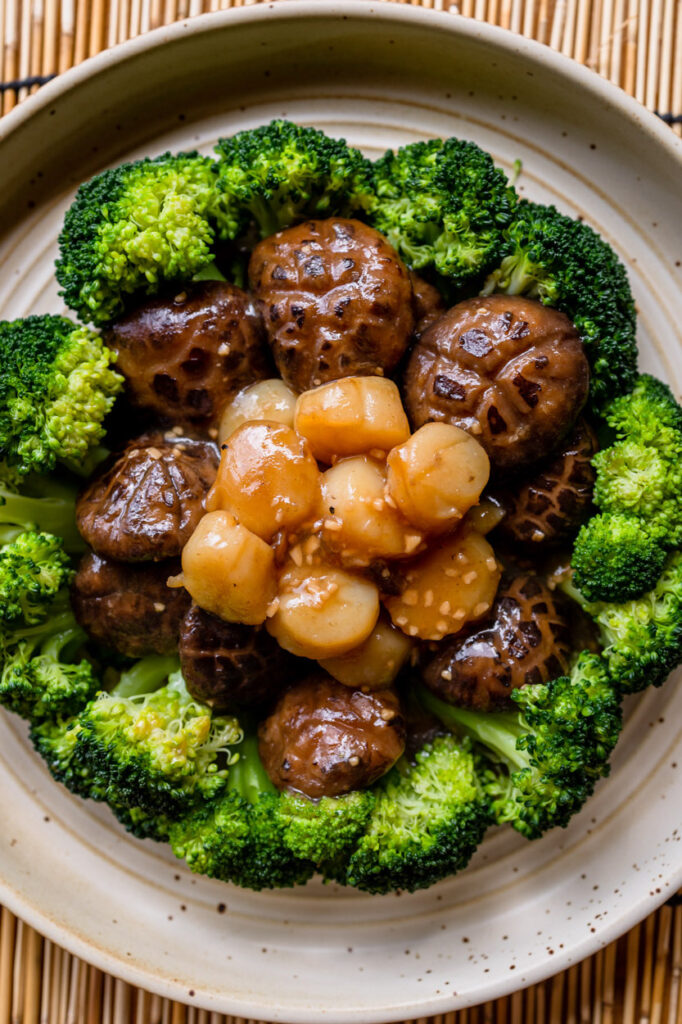
Another simple yet delicious recipe that is on our list is this Stir-Fry Braised Broccoli Mushroom Scallop. This is a popular vegetable dish we enjoy during our family meals, and you would often see it on the menu during your CNY reunion dinner. There are many variations to this recipe but for us, we love preparing it using shiitake mushrooms and seared scallops to enhance the sweetness and delicious umami flavor. Of course, not forgetting the symbolic meaning behind the round shape of the scallops and mushrooms represents oneness, prosperity, and the blossoming of new beginnings – an integral concept of reunion during Chinese New Year.
If you don’t enjoy eating broccoli, you can also replace it with bok choy or kai lan – which are longer vegetables representing long life, while leafy greens like cabbage or sang choy represent growing fortune.
There is no way you want to miss having a prawn dish on your table during Chinese New Year. Prawns are pronounced “Ha” in Cantonese, which means to 笑哈哈, laughing all year long. How could you miss the happiness of a brand new year? Therefore you wouldn’t want to miss out on this additive Chinese New Year dish – Crispy Cereal Prawns Recipe, 香脆麦片虾. Highly addictive, pour some on plain-tasting white rice to add some taste, especially for the kids who love the cereal coating that goes on the prawns!
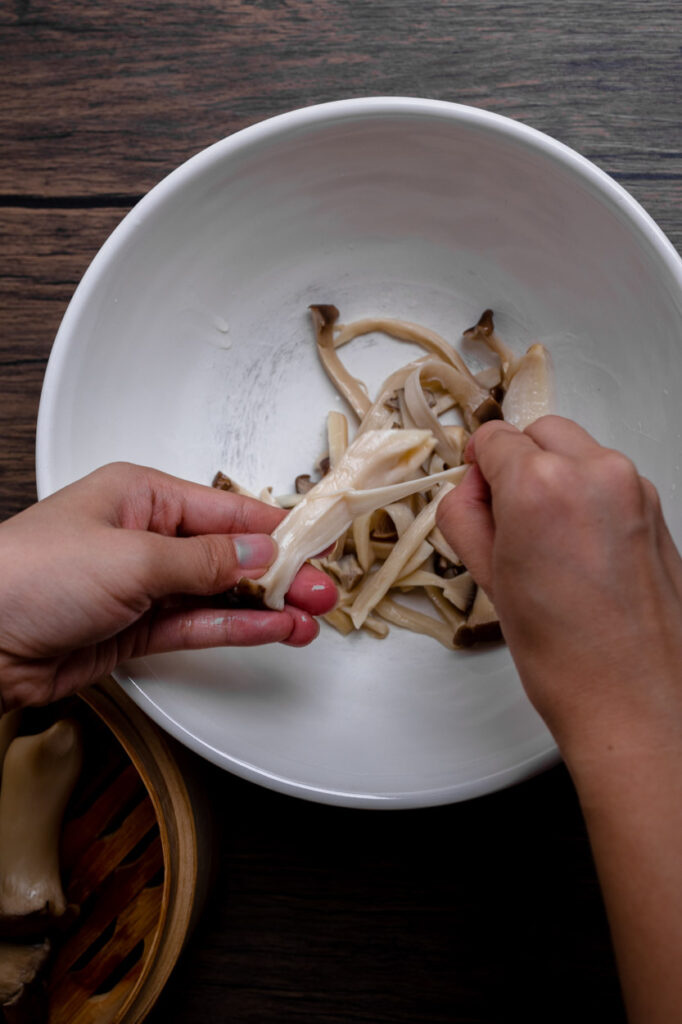
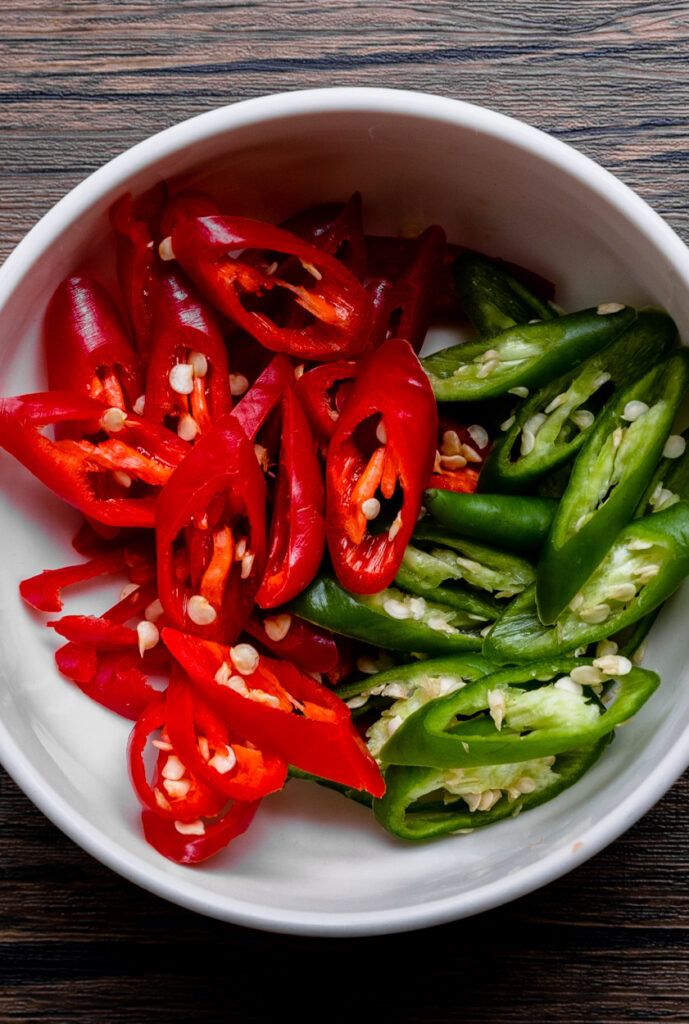
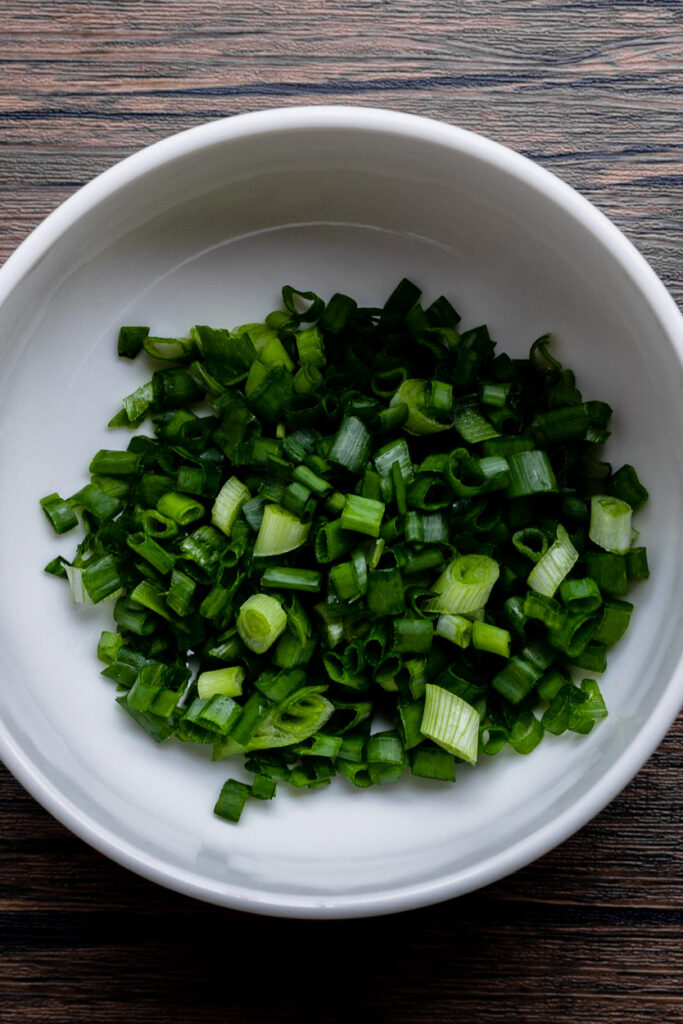
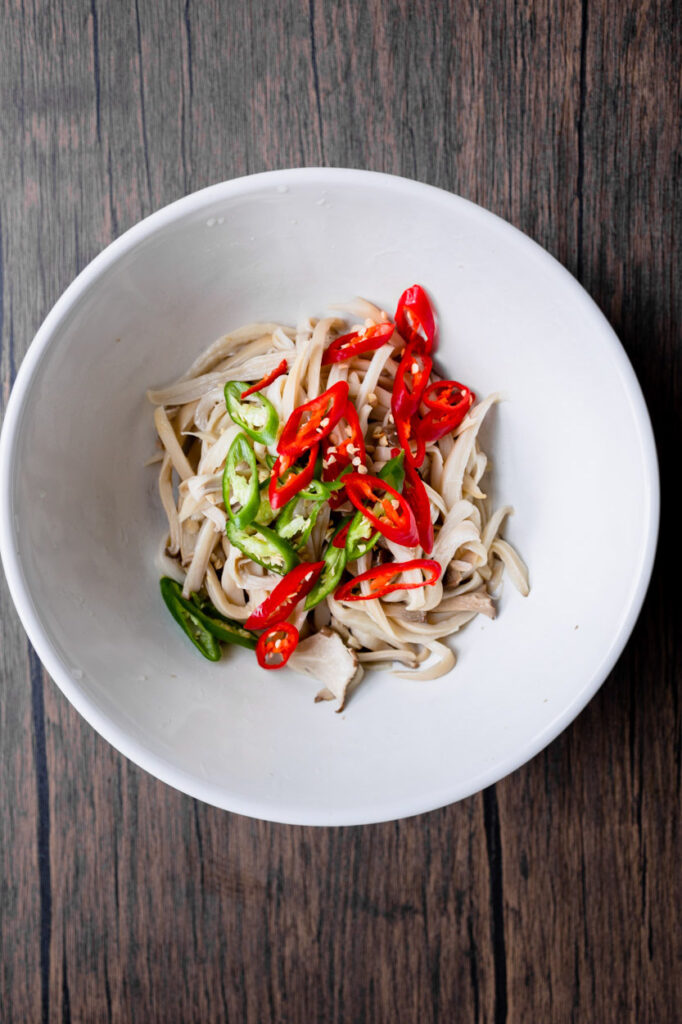
Whenever we look at a fridge from a Korean and it is always full of pre-made side dishes that you can enjoy them whenever you like. Unlike them we Chinese has fewer cold side dishes as we like enjoying them fresh and hot. However, during the period when we are preparing for the Chinese New Year, we like to prepare some food ahead of our busy schedule. And this Spicy Bamboo Salad is one cold dish we will have in our fridge, all you need is some patience in tearing the bamboo shoot.
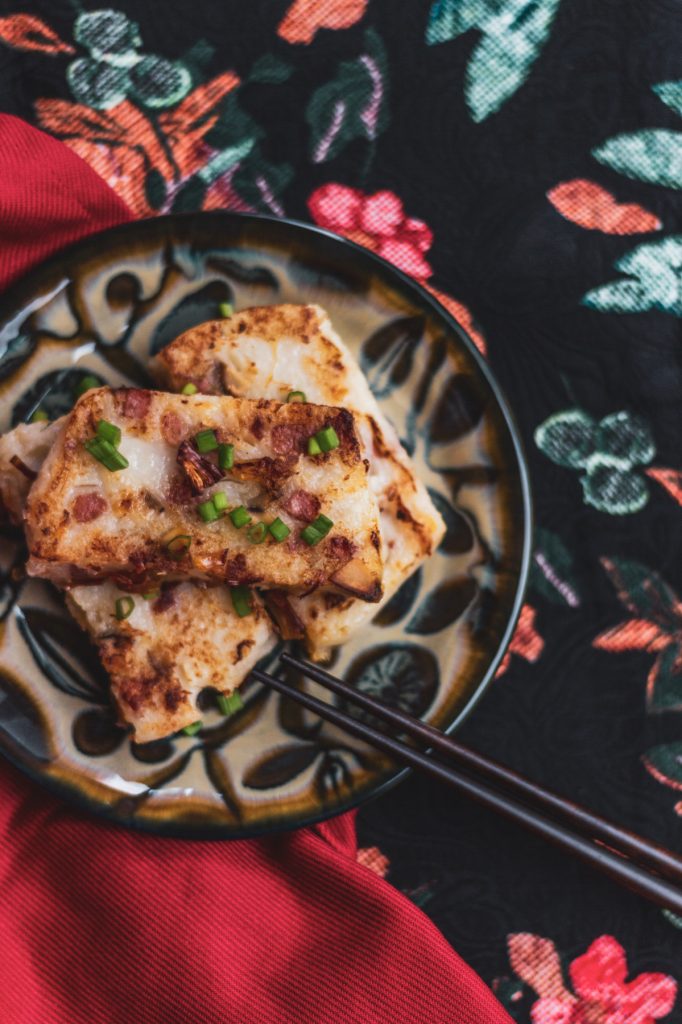
During the Chinese New Year, when we get to rest at home for a period of time, we tend to gather all the family and cook something that required more time to make and Turnip Cake is the one. One good thing about making your own version of Turmip Cake was that you can have more turnips in your kueh than the flour. We love the result of the Lo Bak Go, as it is firm and flavourful. You can serve and garnish it with spring onion. You will be able to taste all the amazing flavors from the ingredients with not even a bit of salt.
As we know Tang Yuan is a delightful dessert that is served as part of the family reunion meal. With an interesting texture and a super tasty flavor, Tang Yuan is one of our favorite Chinese sweet treats and one we cook all year round as dessert for dinner parties.
We have always been wanting to make some goldfish tangyuan because of the idiom 年年有余 symbolist that every new of the year there will still be food on our table. The recipe for making tang yuan is a no-brainer really. It always helps to relive a childhood memory when we used to play with glutinous rice dough as well!
Let’s celebrate this Chinese New Year, by creating new memories and preserving traditions in safety manner by all means. Let’s bring love, joy, and laughter to the people who treasure the most. Have a wonderful festive season! Give this recipe a try and don’t forget to tag us on Instagram as @leplaincanvas and use the #byplaincanvas hashtag. We love seeing your takes on my recipes.
For the first time in our lives, we didn’t have time to enjoy our festive holidays last year. All the gatherings and event is tight in the schedule. Well, the trip to bail was pretty last minute and the first time we spent less time preparing for one. We have missed out on a lot of events during the festive season.
As the year comes to an end, we swap our light sleeves for a cosy winter coat at Ice Magic: The Great Fantasy on Ice. The last day of the event was January 1, 2023, 3 days before it ended. We are pleased to have made it on time for it.
My sister and I always remember visiting a place like this with our parents when we were really young, maybe 4 years old for me and 7 years old for Angela. As a result, we always want to return there with our parents and recreate the family photo. Unfortunately, our parents could not attend as they are busy with their business as the Chinese New Year approaches. Even so, we are happy that we had the opportunity to experience it, a special moment for us before the year ends.
Ice Magic: The Great Fantasy on Ice
While we knew that the place would be freezing, we were still under-prepared for it. While they offer free winter jackets and shoes, they will still get chilly if you stay inside for an extended period of time. We stepped multiple times to the non-cold zone to warm up. After this experience, we know what we’ll need when we visit a cold country.
We hope we can visit one with our parents next year. Thank you Ice Magic: The Great Fantasy on Ice for having us.
2022 is a year of self-discovery for both of us. We have had a crazy eventful year and we think it ends in a positive way – at least we’ve decided on that. This year we are juggling a little more as both Joe and I have a lot more commitment in our life at the moment. In the earlier part of the year, we search for it, while later on, we try to make them work! Being a part-time blogger wasn’t always easy but it gave us fulfillment in doing things that we love. We get out of the kitchen a little more than in the last two years when we are confined in the house. So let’s run through the year together!
When adventure becomes part of our life
Recording our lives through photography and journalling has been a very big part of our life. As you could never imagine how much one person changes until you have something to look back on it. At the start of the year we have slightly more time for ourselves and Le Plain Canvas as we have less commitment compared to now. Thus we spend a lot of our time traveling around Singapore and discovering places we could never pass by during our everyday. We could never imagine having an “A Walk at ” series for our blog; A walk at Kampong Glam, A walk at East Coast Road, A Walk at Joo Chait, A Walk at Chijmes, A walk to the East | Changi Bay, A walk at National Gallery Singapore and A Walk to National Design Centre. Looking back we are really amazed by how small Singapore is yet how different was for different areas.
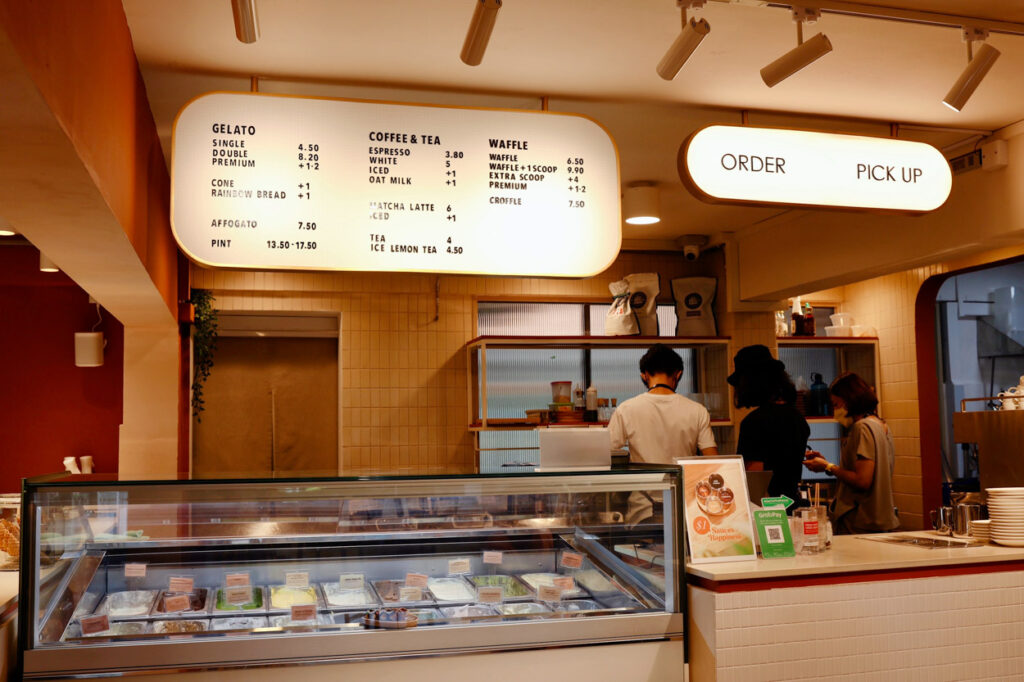
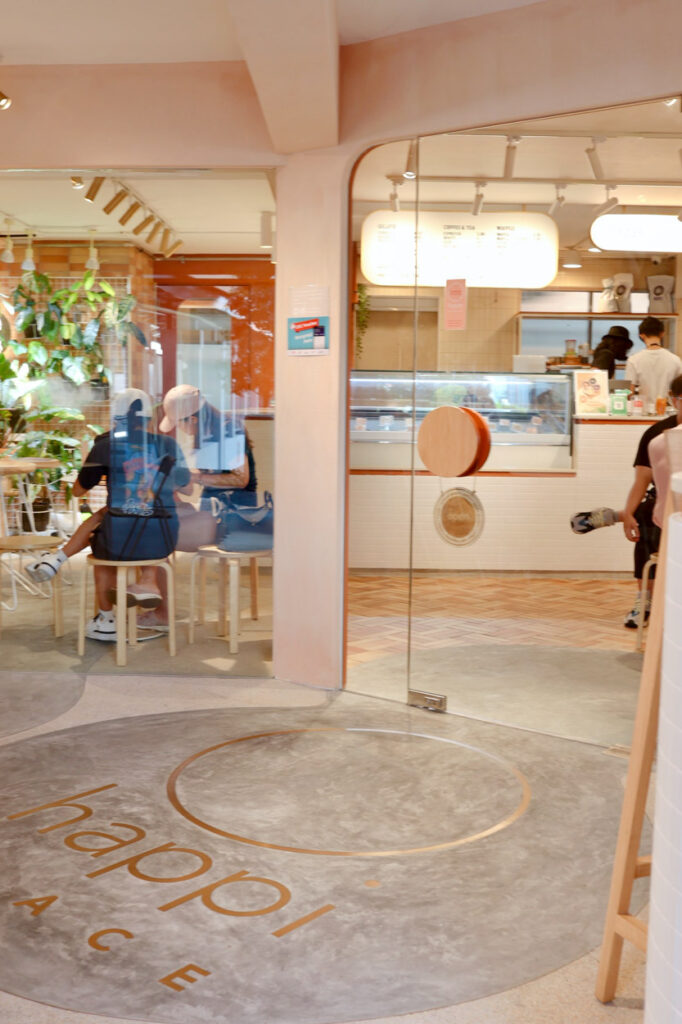
One change we have made with the content of the blog was this year we share with you our experience at some café. As Singapore has still many restrictions during the first quarter of the year, one of the new things we like to try was to visit a café in Singapore. This is one of the activities that brought us happiness when we are enjoying the vibes of the café and the food. Some of our favorites were Chu and Co, O Happi Place, Glass Roasters, Homeground, and Dawn. When the list started to build up we then introduce a new series called the “Café Explorer”.
An emotional journey of self-love
One of the dramatic changes, this year, I have kept my hair short and it has brought me joy to have it short. I’ve learned an emotional lesson about self-love. For almost 10 years, I have kept my hair long and never had the intention to cut them off but something happened and here it goes. When friends asked why I was cutting my hair, I could only say that I wanted to break free from the chains that bound me. The ritual of cutting my hair helped me to break away from all the unwanted feelings I had been experiencing. It helped lift my mental state.
We fell in love with Beach.
During the second quarter of the year, we get to have more commitments and worries. Rather than spending time in a crowded space, we move ourselves to the beach. All our worries seem to go away when the sun’s rays fall on our faces and we step on the warm sand.
This year, we have also learned how to embrace our bodies and skin, and allow ourselves to reconnect with nature. In the past, I felt ashamed of my body. I used to hate my body weight. After losing weight, my skin became saggy as well. In the process of healing from all my trauma, I am embracing everything about myself. It’s time for us to fall in love with our bodies a bit more. Let’s not be afraid to wear and do what we like. Life is too short to walk away from all the joy we deserve!
Closing the year with Bali
When it is nearly the end of the year, we got busier with all the celebrations and holiday season. We really need a break before the year’s end, thus having left the country for the first time in three years, we are both anxious and anticipating the trip. The trip brought all the joy we were looking forward to. We managed to hike up to the peak to close the year with the most picturesque sunrises and sunsets viewed from the hills and sea. (Can’t wait to share our experience at Bali with you)
How was 2022 like for you, to us it may not be the best but we know it is helping us to move to a better self. Looking forward to embarking on even more adventures in 2023!
We are always so anxious yet excited to welcome a new year, as we can’t wait for the challenges that we will be facing. Every year we will gather our family and friends to celebrate the last day of the year, with a little mini feast. However, there are times we like to rest and not worry about anything for that day. We got you! This New Year’s Eve, take some stress off your plate and ditch dinner in lieu of party food like dips, appetizers, desserts, and cocktails. It’ll cut down on the mess of forks and knives without sacrificing good eats, and leave you more room for what’s important—celebrating having made it through another year!
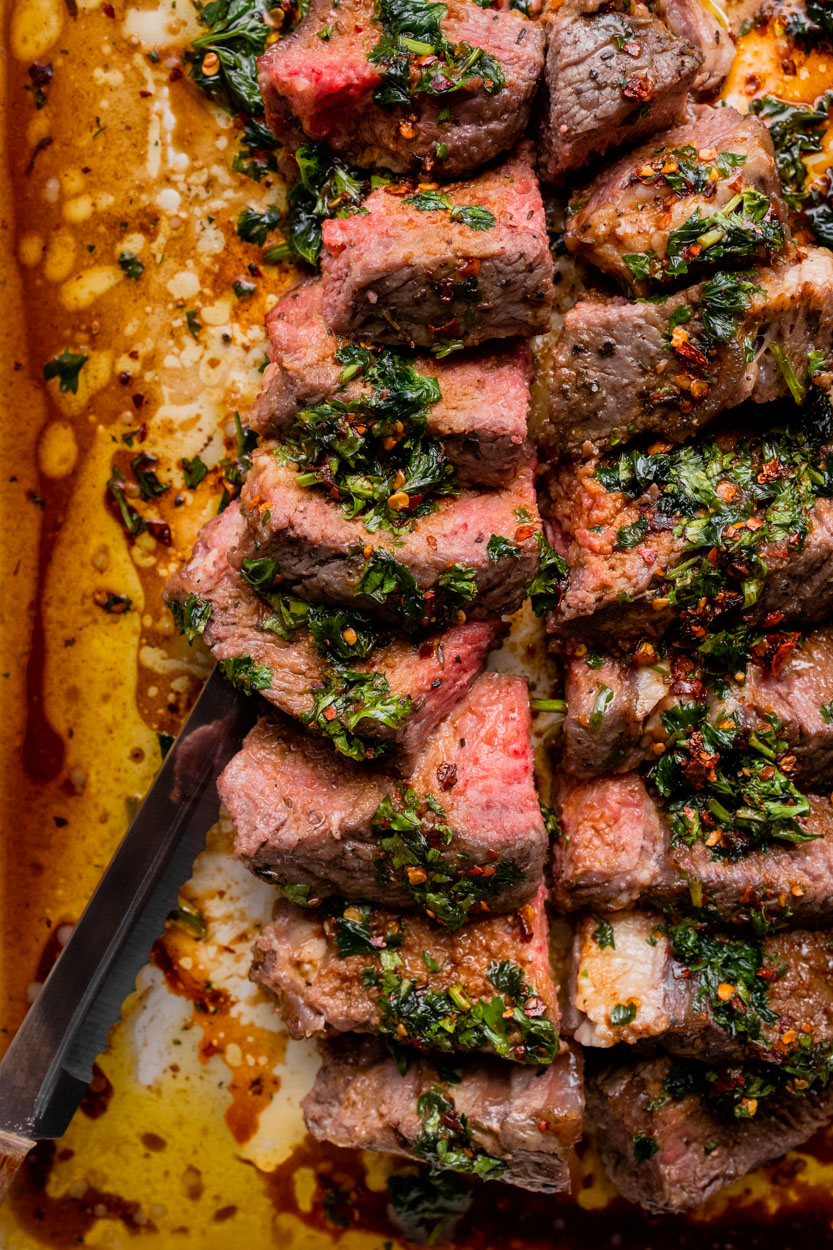
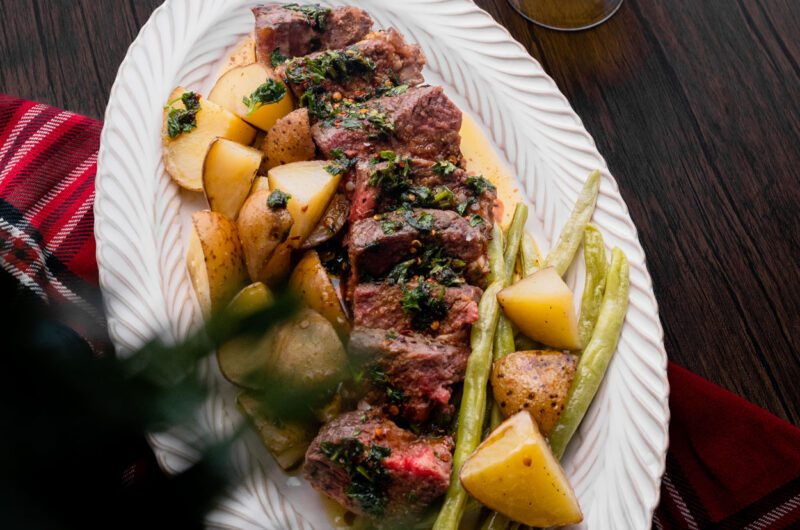
To start planning for the meal, we would always like to choose a main for our “party”. Chimichurri Beef Flank and Pork Tenderloin Stuffed with Spinach has always been our top choice when we can’t think of anything else.
As to cooking a steak, fats in it play an important role, thus comparing the flank with other parts it is lean and has close to 0% of fat in it. However, it changes your mind about this meat after trying them. It is lean but much more flavourful compared to other premium parts of the beef. Matching it with the chimichurri sauce, elevate the flavour of the steak to another level – making it a perfect and economic dish for your holiday. (we make it for our Christmas this year!)
Food is always better when we can share it with each other. This Stuffed Pork Tenderloin is one of our favourite dishes to make as it is juicy, filled with Mediterranean spinach and feta cheese blend and then covered in a tangy balsamic and rosemary sauce. Any home cook can make this gorgeous pork tenderloin recipe with restaurant-worthy results! Looking for side dish ideas to accompany your Stuffed Pork Tenderloin? Try these easy Grilled Green Peas and an upscale Cauliflower Quinoa Rice.
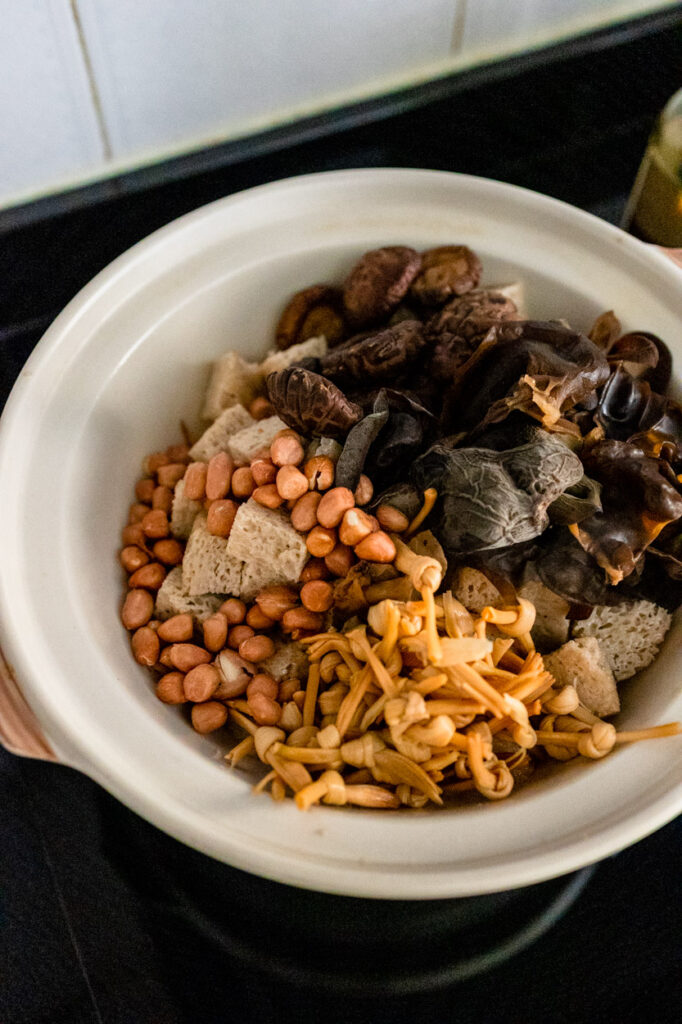
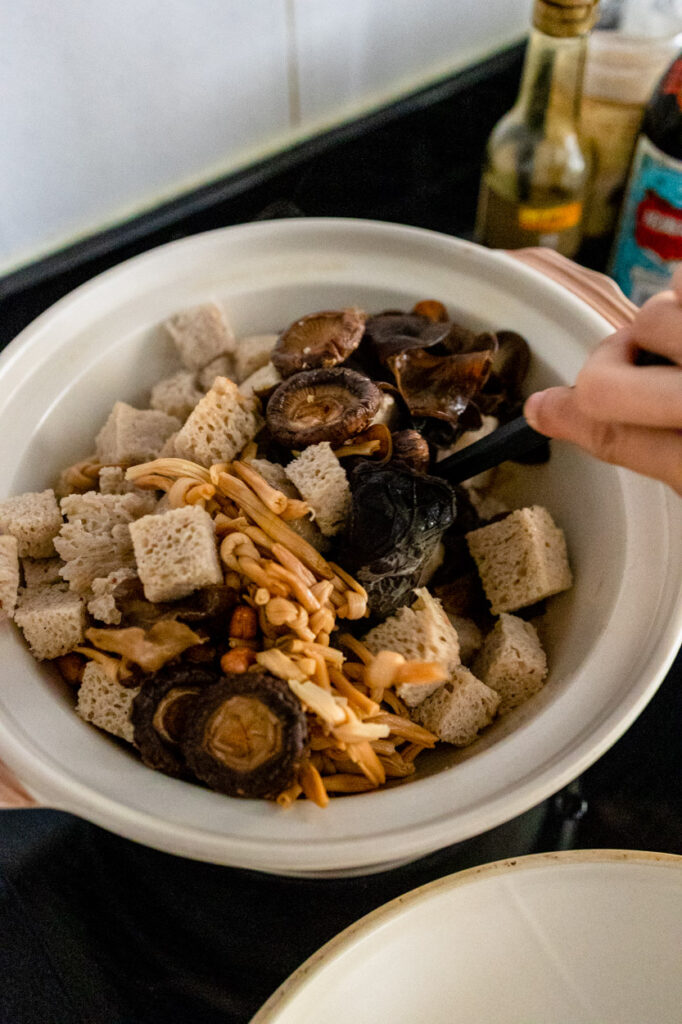
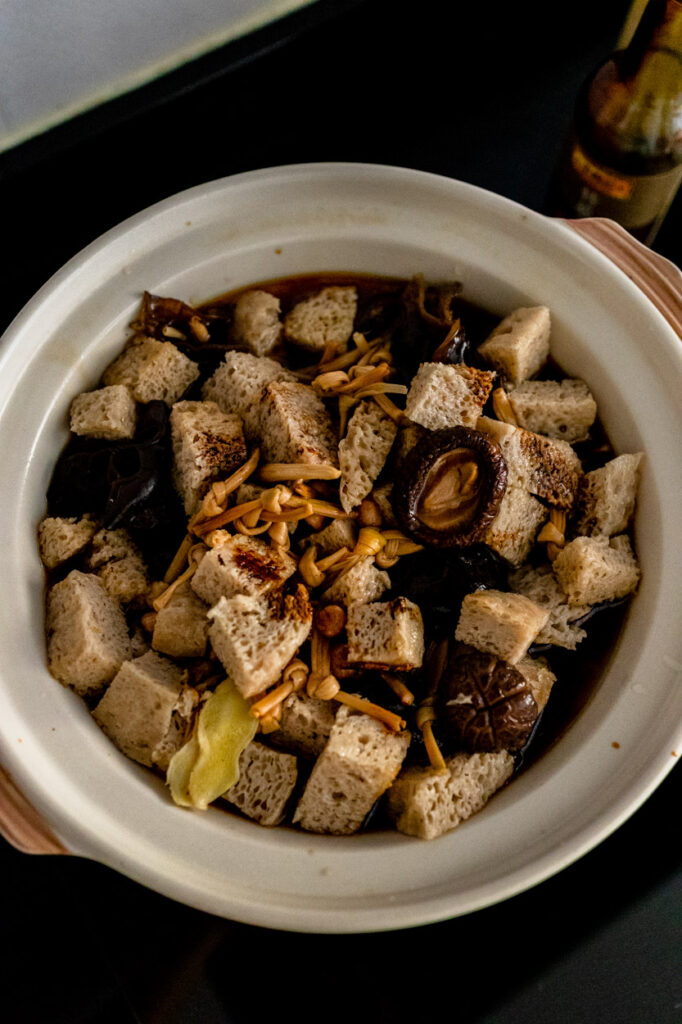
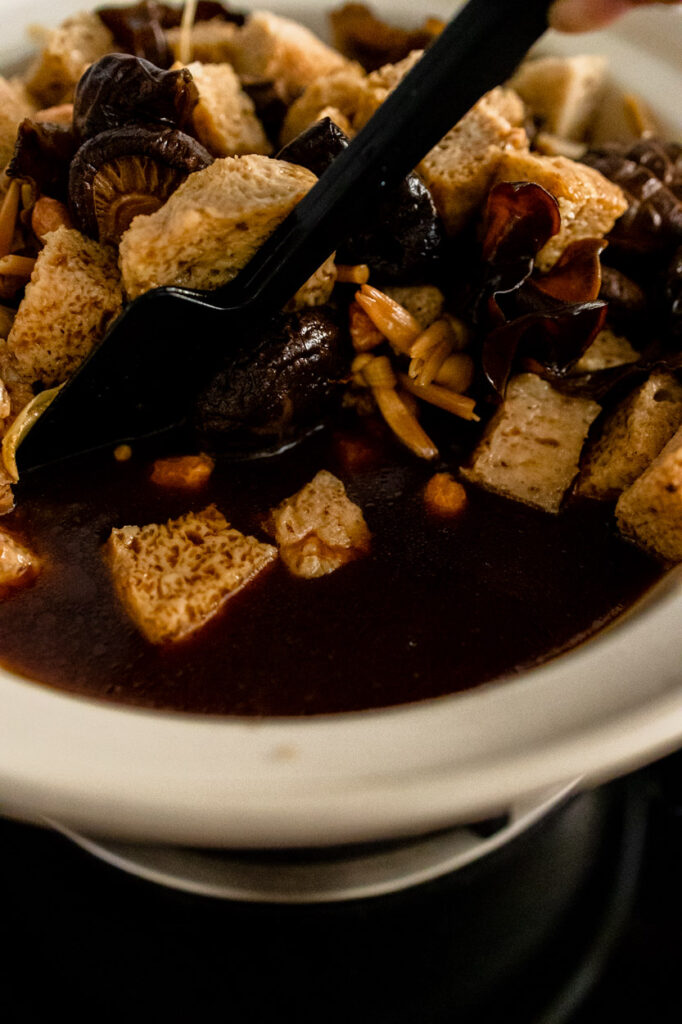
A Chinese hot pot party is as important as a social event as it is a meal, where friends and family gather and cook around a common pot while chatting and sipping beer. The great thing about a hot pot party is, it’s easy to prepare and very affordable. Plus, a group of people can share so many ingredients, so everybody has an opportunity to try out a variety of things, as well as enjoy their favourites. It’s a good and simple meal when we don’t want to be too complicated (although we always make it complicated).
How could we miss the drinks when it comes to parties?!
In the mid of the holiday, we love making different homemade lemonade to spice up the holiday mood. Especially because we always do it in small batches and it just feels like such a treat. Our all-time favourite is this mandarin orange lemonade (it’s SO good!). However, we love having the citrus in the summer, thus we decide to do one for the winter holiday and we have this Cajun Peach Lemonade.
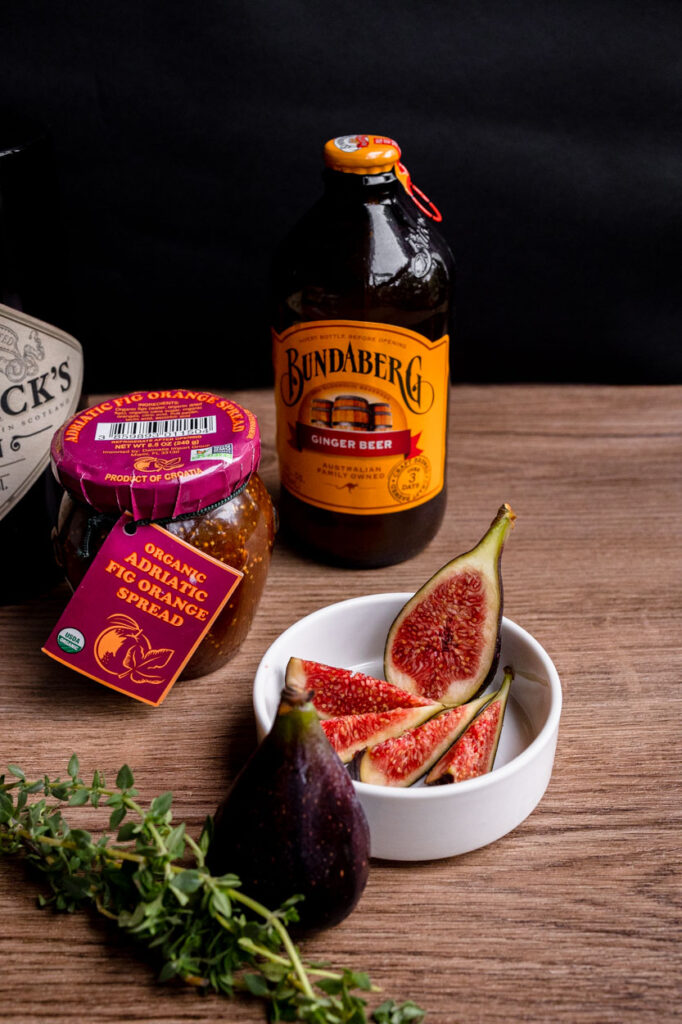
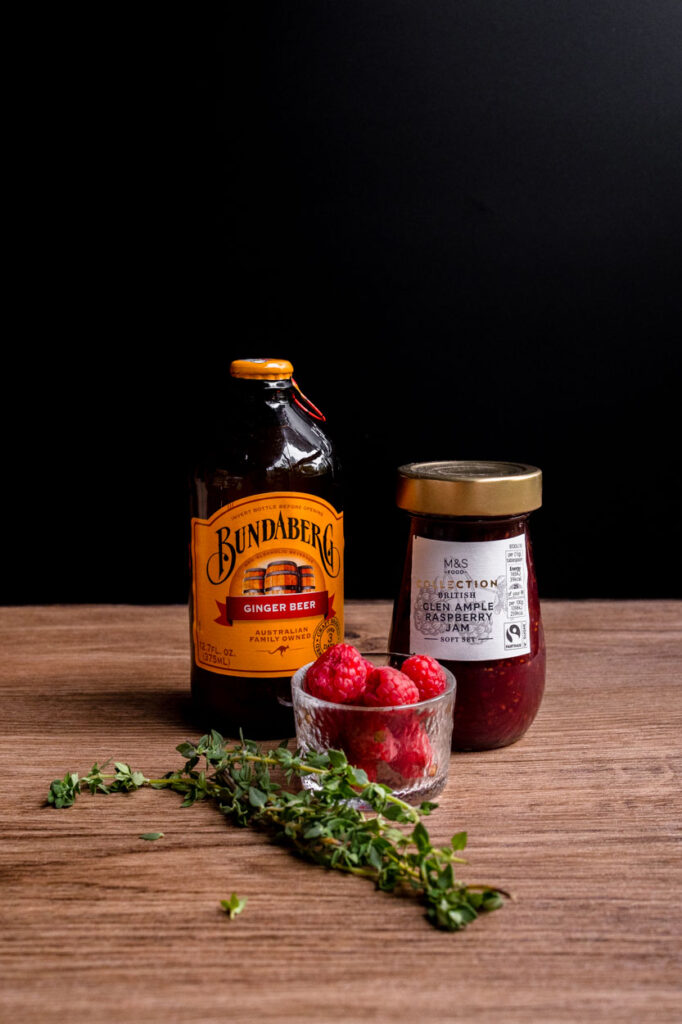
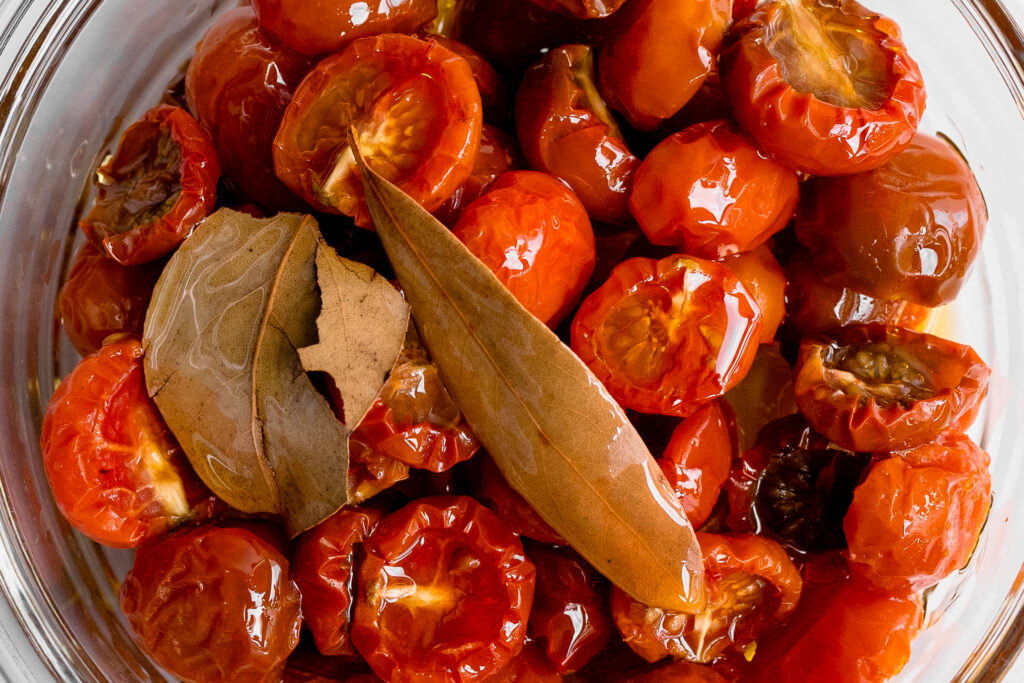
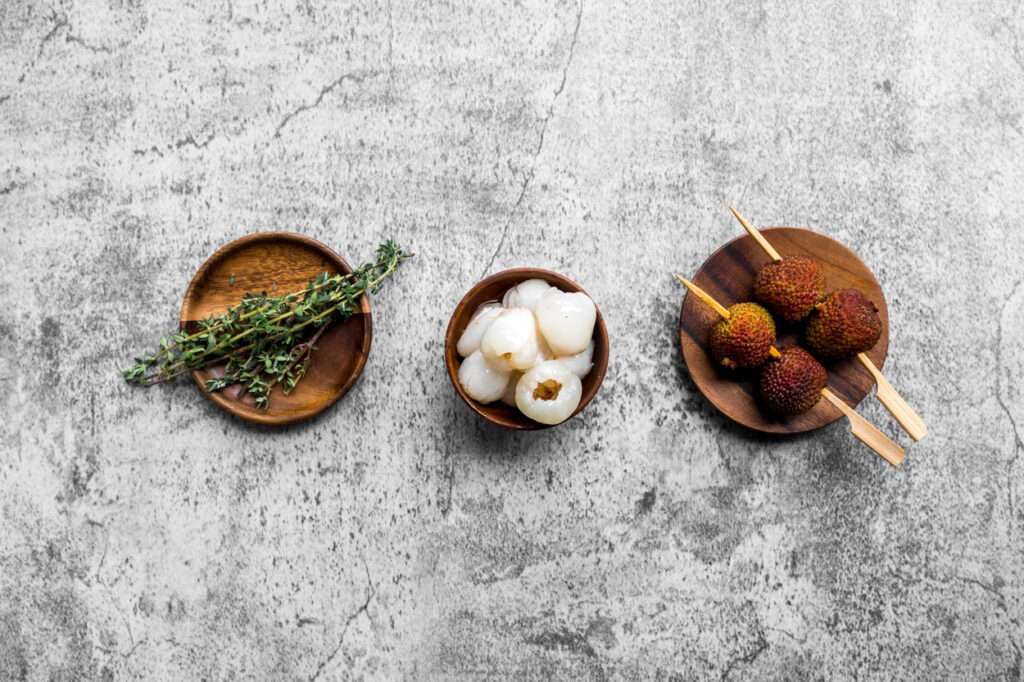
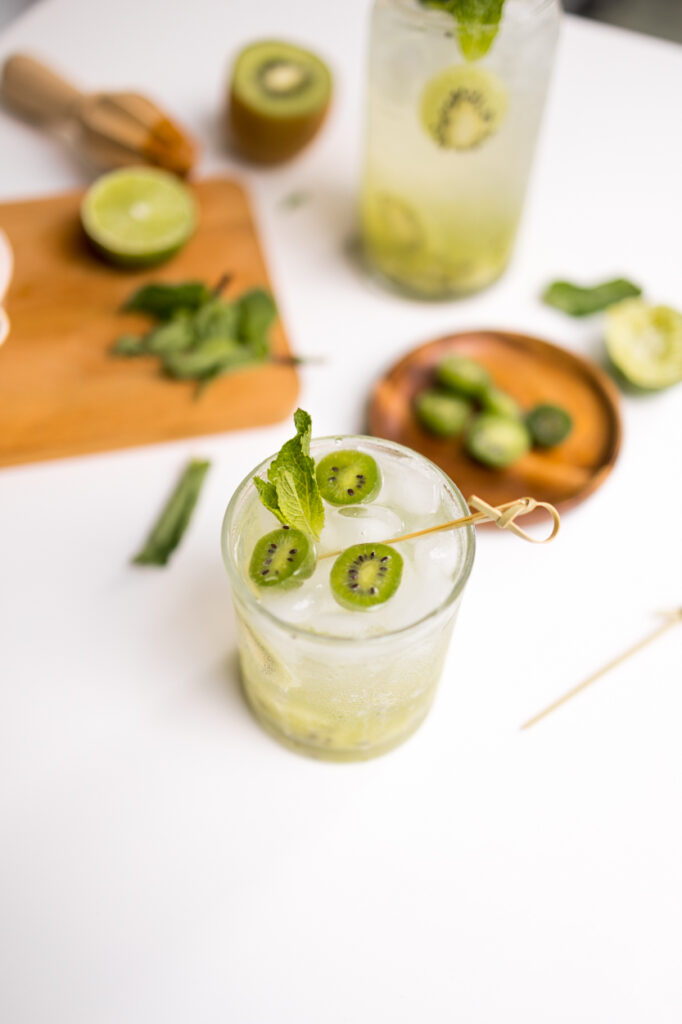
Where the cocktails are fun for the night when we have a lunch gathering we don’t want anything too heavy thus this Raspberry Mojito Mocktail recipe is the perfect drink to enjoy year-round! It’s loaded with juicy raspberries, fresh thyme, and a hint of lime. This non-alcoholic mojito drink is then topped off with Ginger Beer. This recipe is on repeat at our house. It’s so dang good! We had some raspberry jam so we set out to make a delicious drink.
If you are an alcohol lover, similar to the Raspberry Mojito Mocktail we use ginger beer for this Ginger Fig Cocktail. A cosy spirit-forward fall cocktail with fresh figs muddled in gin and ginger beer and topped with thyme. This will soon become your favourite cocktail to sip by the fire on those crisp chilly fall evenings. There’s always something special about the night and thus we think we need to do something to spice up the drink too.
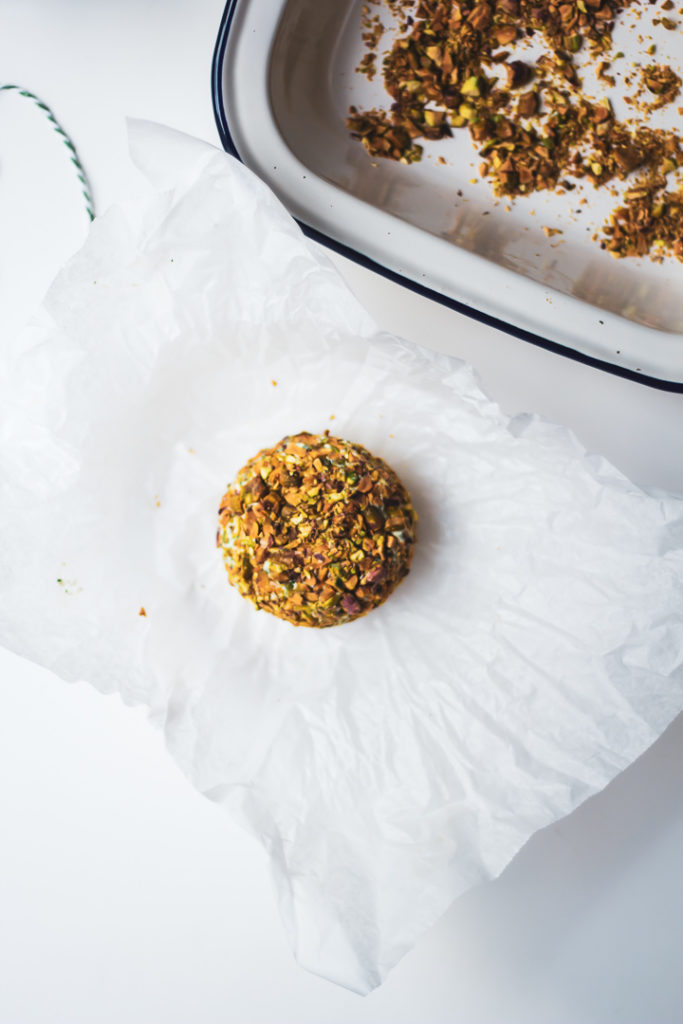
It’s easy because you pulse the ingredients together in one machine and the do-ahead potential means having time to watch my favourite drama. The ingredients should be at room temperature and you’ll need to refrigerate the cheese for at least three hours after mixing, so plan to prepare ahead of time. It’s the perfect do-ahead appetizer, leaving just the nut coating until game-time. Using just a food processor for combining, you save the time of chopping watercress and herbs and for clean-up. Not to mention you can make this ahead and keep them in the fridge.
Smoked salmon with cream cheese is certainly not revolutionary, but they have taken all of my favourite parts of a traditional Sunday bagel brunch (which is a very big deal in our family) and pulled it together in, dare I say, an extremely elegant way. We use sliced smoked salmon from IKEA, but you could certainly sub this out with any canned smoked salmon flakes that you can find locally. Don’t skimp on the red onion and radishes, though! You need that sharp bite to contrast all the creaminess. This is exactly the type of food I crave, and I know I’ll be making it again and again and again. Recently we did a simple version of the dip Cream Cheese Smoked Salmon Board.
Hummus is our ultimate go-to when it comes to dips. Unfortunately, the store-bought hummus had white sugar, refined sunflower oil and other nasty ingredients, so I prefer to make this homemade hummus and it tastes even better.
We eat hummus as an appetizer with some crudités (we love carrots!) or with homemade tortilla chips, salad dressing or as a side dish, but my favourite way to enjoy this delicious dish is spreading the hummus over a baked pizza crust and I also add chopped tomatoes, sweet paprika, extra virgin olive oil and some olives, it tastes really awesome! You could also try Pumpkin Hummus, Green Goddess Hummus, Green Split Pea Hummus, Roasted Carrot Hummus, or Classic Chickpea Hummus with Peri Peri Sauce.
We hope this little guide will help you ease your busy day of planning the party. If you recreate any of these appetizers for the holiday let us know how you liked it by leaving a comment and rating below or by tagging us on Instagram, we love seeing all of your tasty recreations!
Previously we shared with you one of the mocktails – the Raspberry Mojito Mocktail we like to enjoy during the holiday afternoon, we were then thinking about how about the night. There’s always something special about the night and thus we think we need to do something to spice up the drink too.
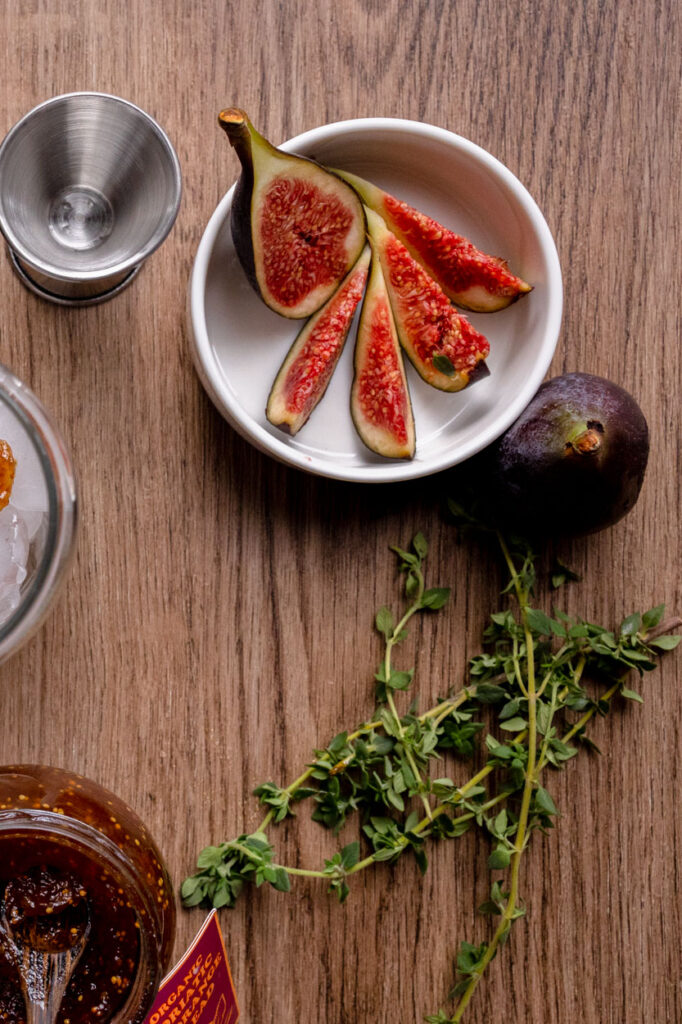
A cozy spirit-forward fall cocktail with fresh figs muddled in gin and ginger beer and topped with thyme. This will soon become your favorite cocktail to sip by the fire on those crisp chilly fall evenings.
Ingredients you need for the drink
Fresh figs – this is one of the heroes of this cocktail. If fresh figs are not available, you can use a good quality fig preserve instead.
Figs Jam – the key to this simple drink is this fig jam, where it’s hard to get them you could also make your own fig jam.
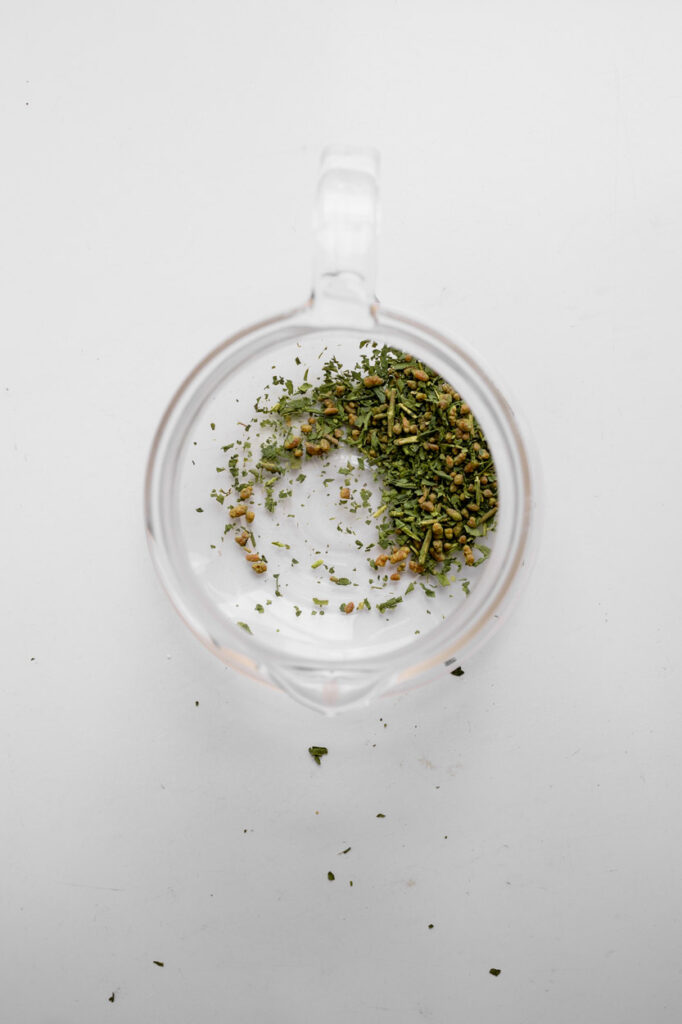
Homemade ginger syrup – homemade syrups make all the difference in the world when you want to make really good cocktails. But I understand that this may not always be possible, especially when most of these syrups have to be made in quantities significantly more than what you need for one or two cocktails. A good quality ginger beer like Fever Tree is a good substitute for homemade ginger syrup. You can add the ginger beer towards the end instead of the seltzer.
Seltzer – any club soda will work for this fig and gin cocktail. If you are using ginger beer in place of homemade ginger syrup, skip the seltzer.
Thyme – this is a garnish as well as works to entice the nose while sipping your cocktail. It brings out the botanical aromatics in the gin.
Making it ahead
I always thought that we make cocktails fresh after it discovering it will be sold in bottles by many bars thus I thought why not make batches of them and store them in the fridge so that I can enjoy them whenever I like? However, to keep it fresh remember to clean your bottles well and not to keep them for more than a month. Also do shake your bottle well but not to hard before enjoying your glass of cocktail.
If you try this recipe please tag #byplaincanvas on Instagram. We love to see your photos of our recipes! Also, follow us on Instagramto keep up on what we’re cooking up.
0.5 oz fresh lime juice about 3 tsp, juice from one small lime
3-4 fresh figs
4 oz seltzer to top with
more figs and thyme for garnish
Methods
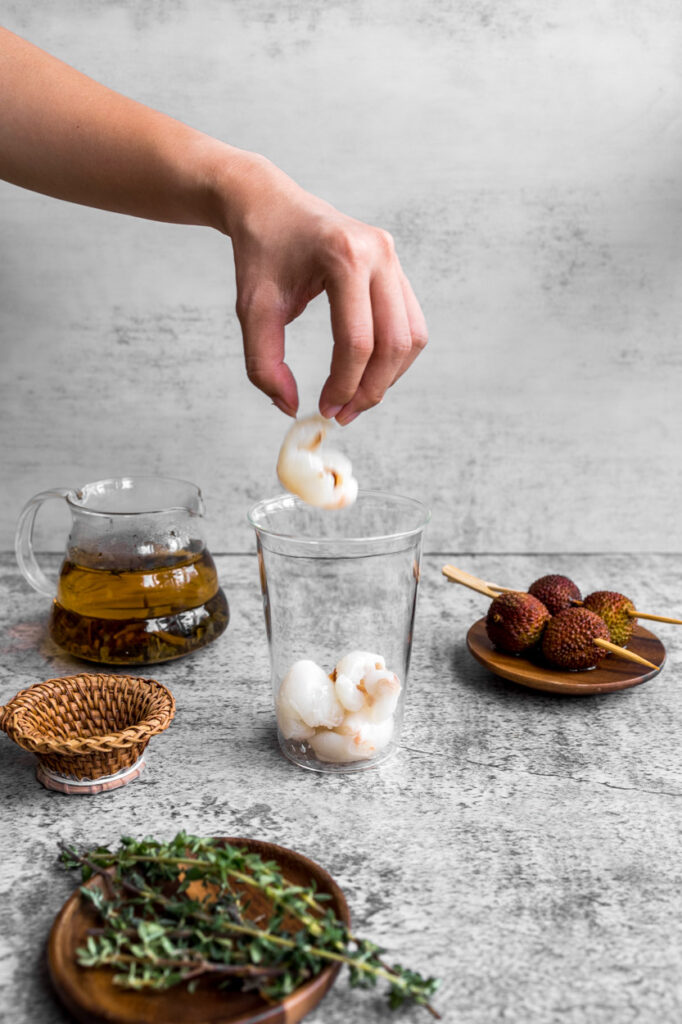
Muddle the figs in a cocktail shaker with a muddler.
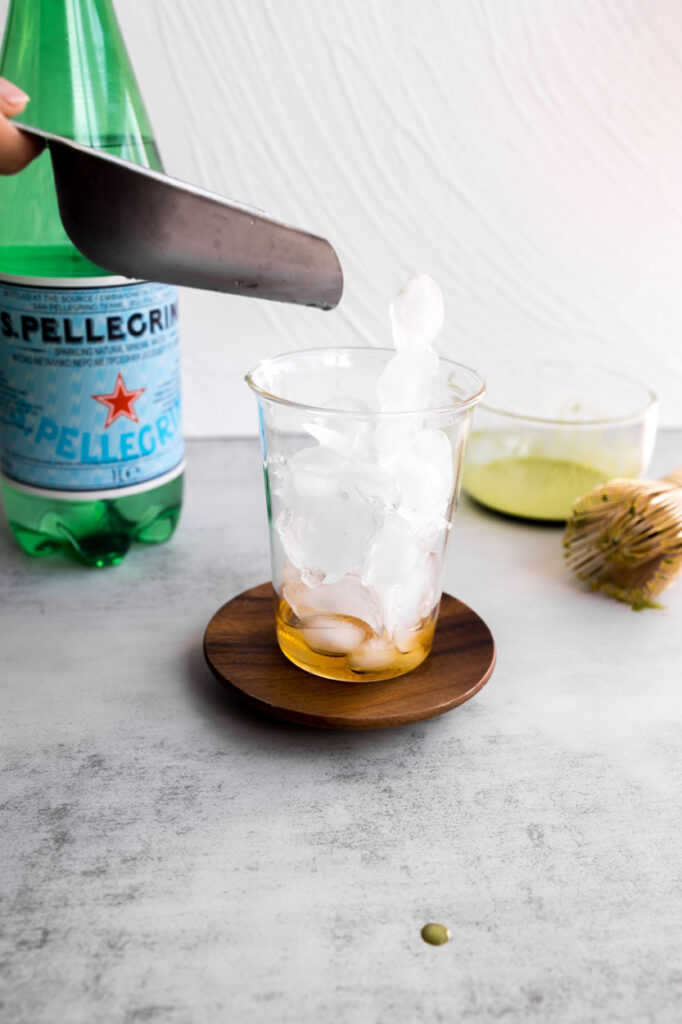
Add the ice cubes to the cocktail shaker along with other ingredients except for the seltzer and thyme.
Shake well for 5-8 seconds.
Pour over a tea strainer (basically a double strainer – the strainer in the cocktail shaker and the tea strainer) into cocktail glasses filled with crushed ice.
Top with seltzer and give it a quick swizzle to mix well.
When it comes to Christmas, many think of a bright and colorful one or a simple one. Where will you like a plain and simple Christmas for our small home, when I look at moody Christmas I don’t hate it, however on another hand, it is cozy to me.
What kind of Christmas decoration do you prefer?
xoxo, Joe
Credit | All shots are used on the mood board via our Pinterest boards.
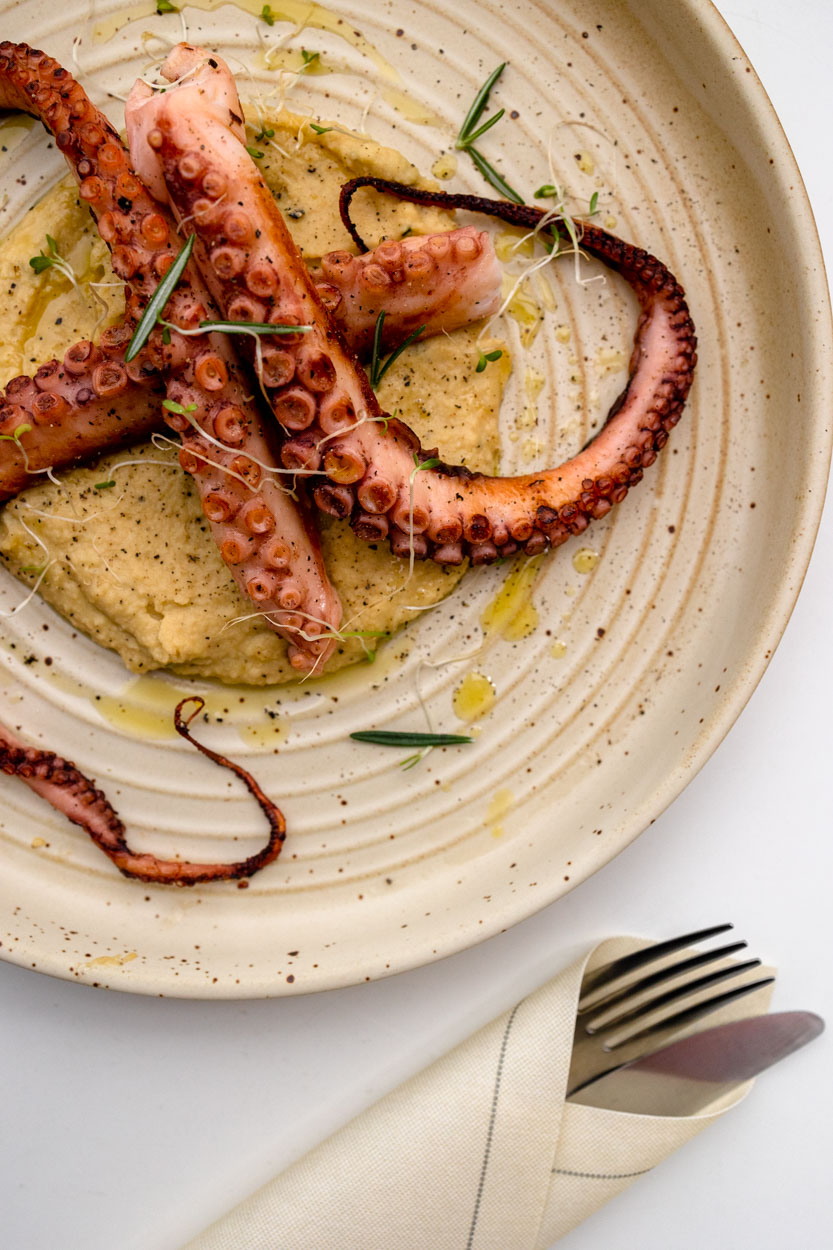
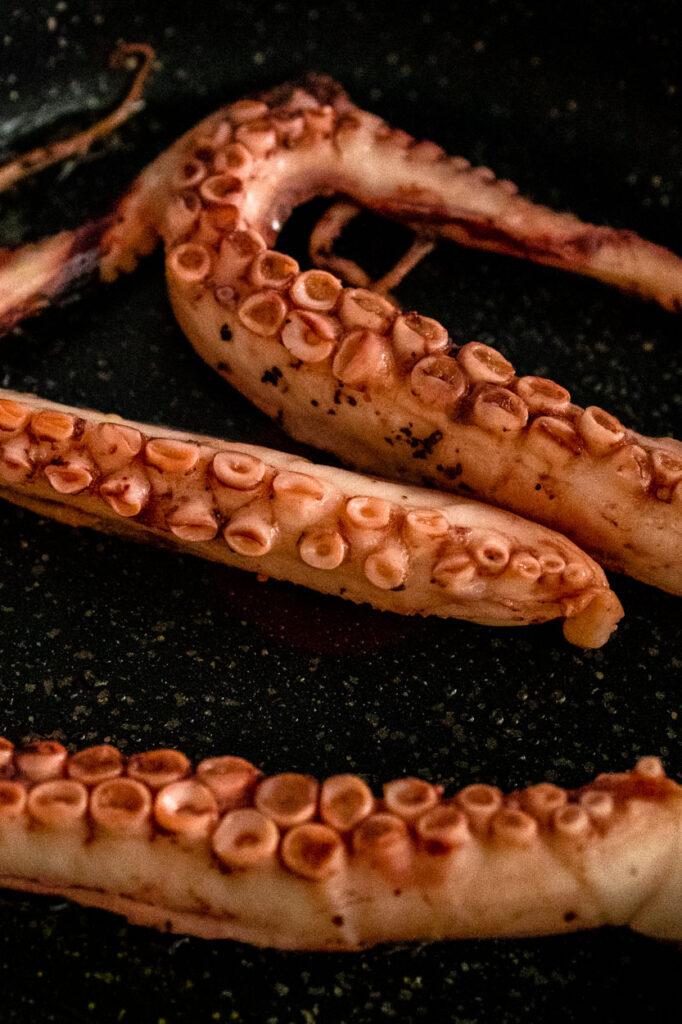
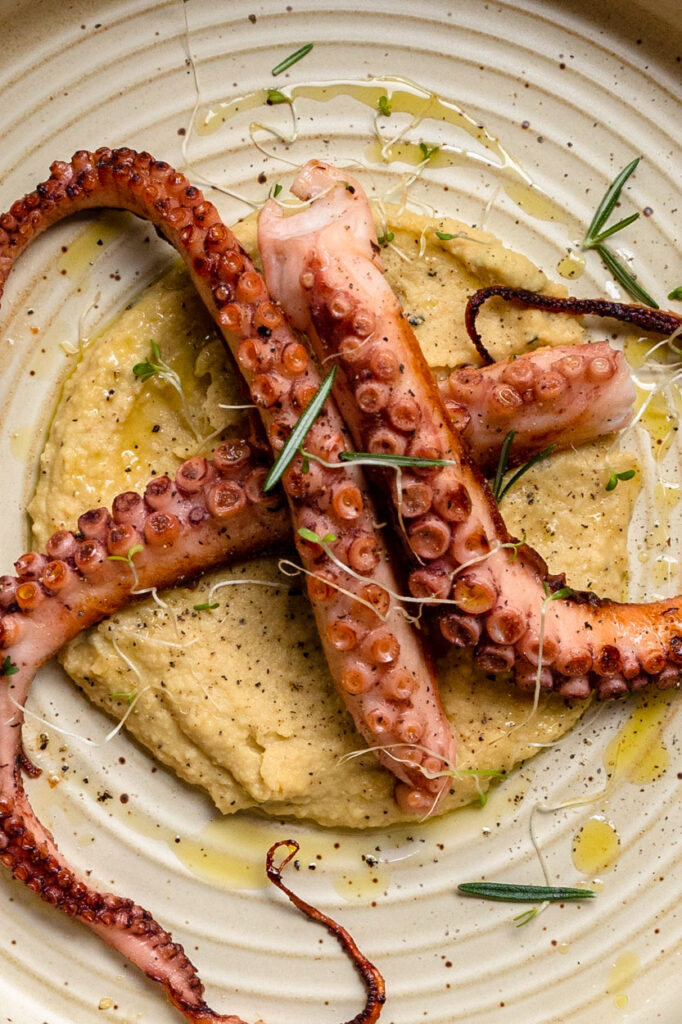
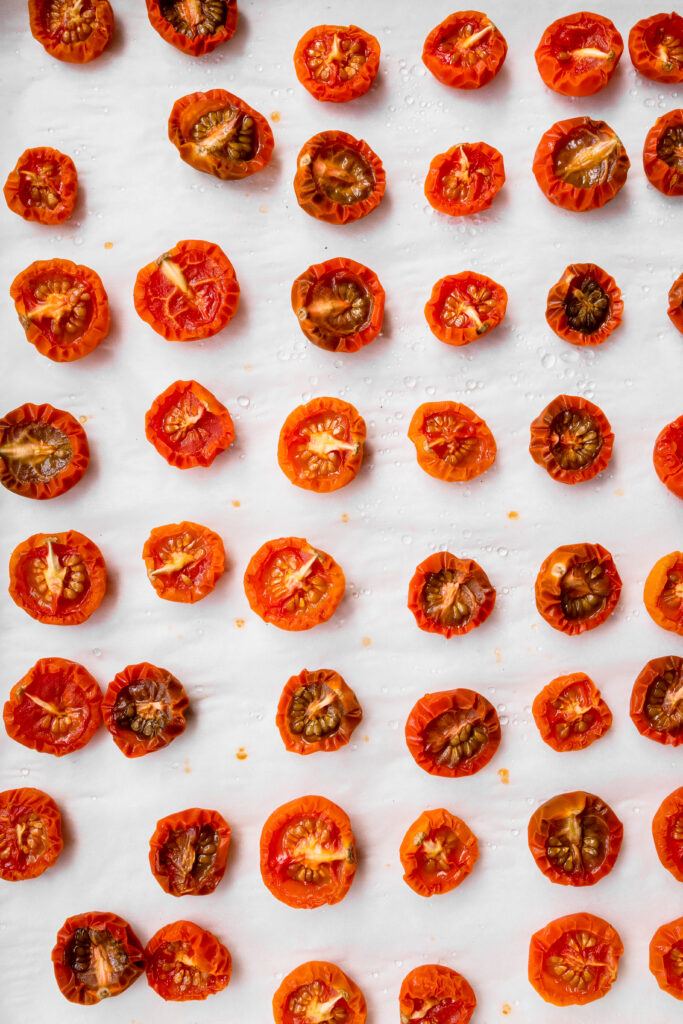
When it comes to octopus dishes, it is always the most expensive seafood you can see in restaurants. It always looks fancy and difficult to make, thus they always make us scared to create them. Finally, we give it a try it may look like a fancy meal, but this Grilled Octopus with Chickpea Puree is much easier than you thought.
How to Make Grilled Octopus?
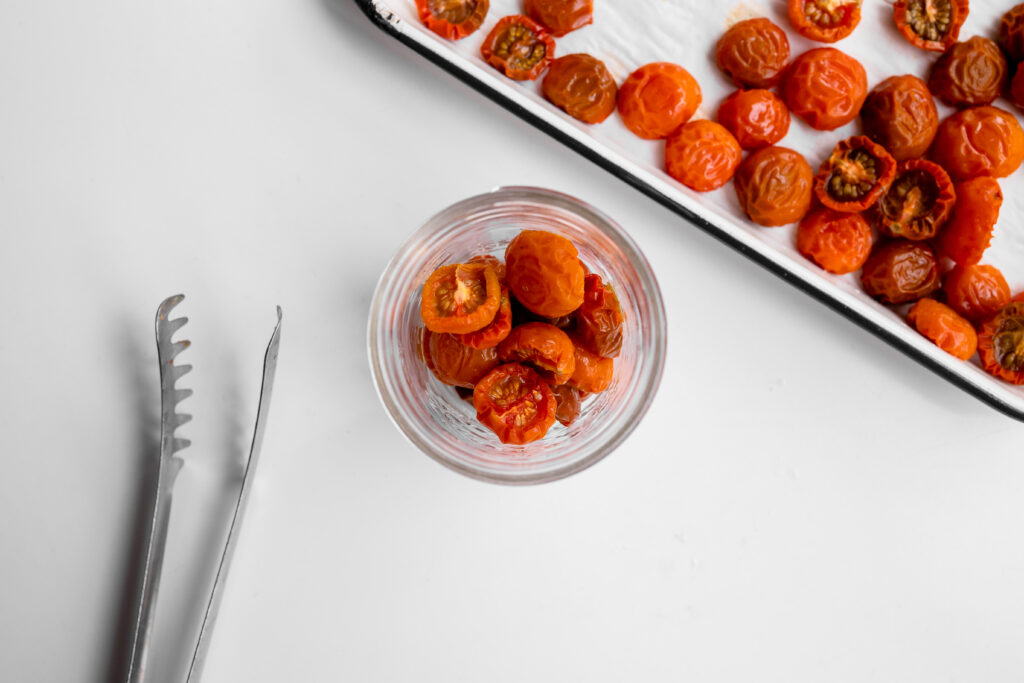
You can buy fresh, raw and uncooked octopus or boiled octopus that has been cooked. As octopuses are naturally briny, you don’t need a lot of ingredients. All you need are great olive oil and basic seasonings. A few minutes on the grill and you’re done! Not to mention the chickpeas puree will help you to complete the flavour of the octopus.
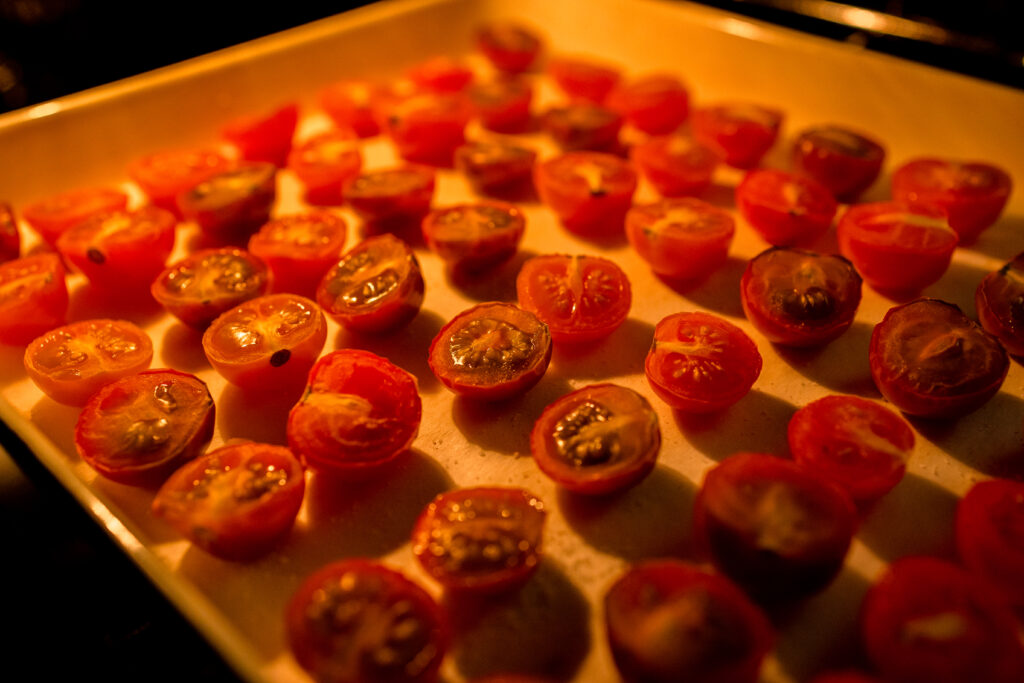
If the Octopus is Raw If you are lucky enough to get a raw octopus you will need to steam it before grilling it. Steaming it will allow the juice of the octopus to store in the fresh, as grilling or boiling it immediately will allow the octopus to lose its juice before you grill it. 1) In a steamer, place the marinated octopus in a bowl and steam it for 10 minutes till it is slightly curled up. 2) In a pan, drizzle it with 2 rounds of olive oil, and grilled the octopus till slightly browned at 3 minutes for each side.
If the Octopus is Boiled If you want a fast meal, it is great for you to get octopus that is already boiled, while it has less flavour compared to the raw octopus, it is a great option when you want to have a quick meal. Not to mention you can store them longer. All you need is to drizzle the pan with 2 rounds of olive oil, and grilled the octopus till slightly browned at 3 minutes for each side.
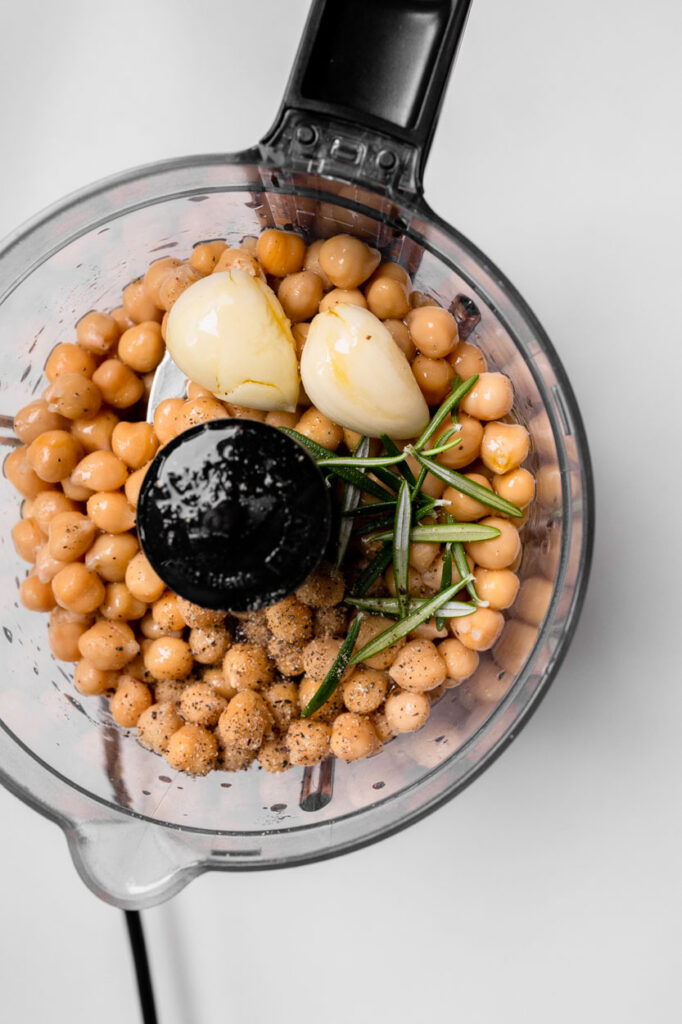
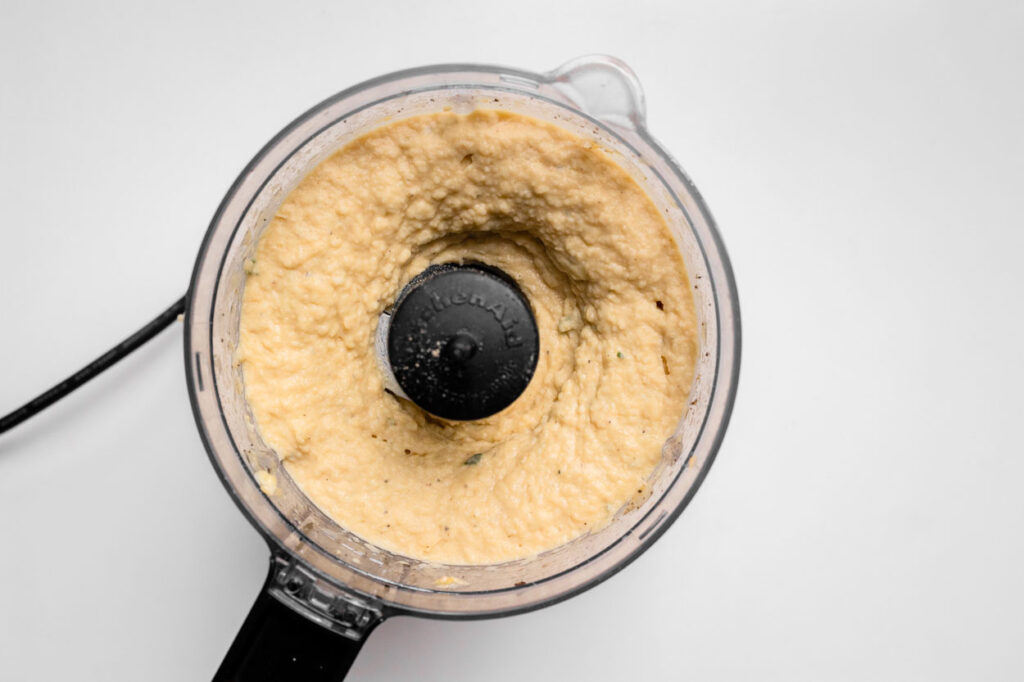
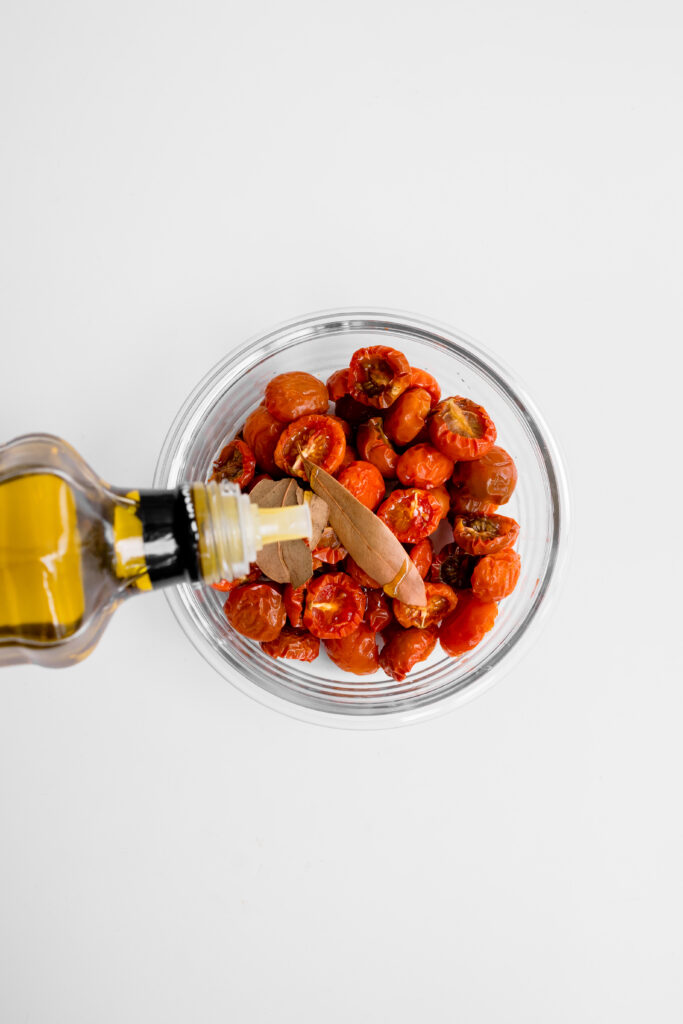
How to make Chickpeas Puree?
Chickpeas puree is like a runny version of hummus one of our favourite dips. The basic ingredients for the hummus are chickpeas, garlic, olive oil and tahini. But for the chickpeas puree
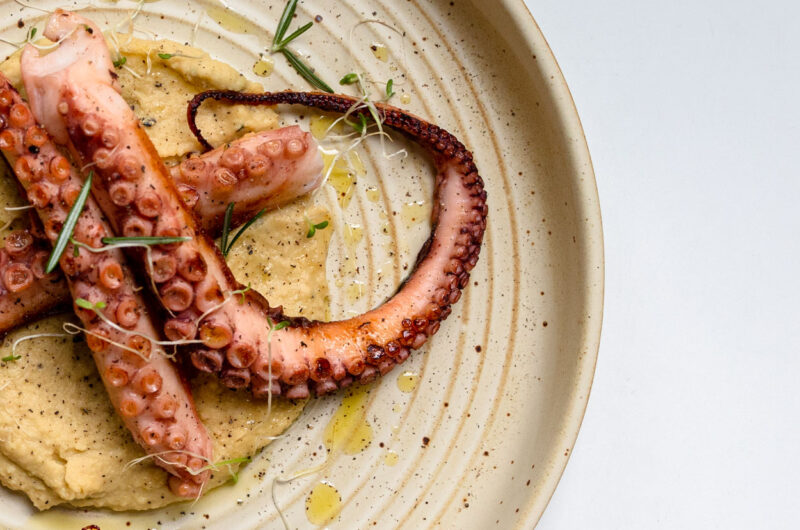
How To Grill Octopus Without Boiling?
If you are lucky to get fresh octopus, you just need to grill them on direct heat for a total of a few minutes on both sides. As soon as the tentacles or limbs curl up and the flesh turns white or opaque in colour, they are cooked. Do not over grilled or they will turn rubbery and chewy. Perfectly grilled octopus should be tender to the bite and juicy.
If you try this recipe please tag #byplaincanvas on Instagram or Twitter. We love to see your photos of our recipes! Also, follow us on Instagramto keep up on what we’re cooking up.
It’s the time of the most beautiful time of the year, during this holiday period when we will be hosting differents gatherings at home, where we will be serving different food and chit-chat together we like to make different drinks.
Where the cocktails are fun for the night when we have a lunch gathering we doesn’t want anything too heavy thus this Raspberry Mojito Mocktail recipe is the perfect drink to enjoy year-round! It’s loaded with juicy raspberries, fresh thyme, and a hint of lime. This non-alcoholic mojito drink is then topped off with Ginger Beer. This recipe is on repeat at our house. It’s so dang good! We had some raspberry jam so we set out to make a delicious drink.
What Ingredients do you Need?
Raspberry Jam: Raspberry Jam is the key to this drink, usually we will squash the raspberry and make it into raspberry syrup but using raspberry jam saves you all the time. You could make your own jam too instead of the store-bought one.
Fresh/ Frozen Raspberry: Fresh raspberry not only is short in the season but it also has a short lifespan, thus frozen raspberry is a good choice.
Ginger Beer: Ginger beer is ginger ale’s sinister cousin. Like ginger ale, it is ginger-flavoured, sweetened, carbonated, and served cold. But where ginger ale is sweet with a hint of ginger, ginger beer is ginger with a hint of sweet.
Thyme/ Mint (of your choice)
How do you make this drink?
While there aren’t many steps in making this drink, all you need to mix all the ingredients well will they are iced. After making sure the drink is been mixed well, we will drain the ice awhile from the drink, to prevent it to diluted over time. It will be great if you have a cocktail mixer as it will make sure the drink are been mixed well.
Can I replace Ginger Beer? The key to this drink is the hint of ginger in the drink and it will be a totally different drink if you replace them with tonic, soda water or anything else. Thus we would recommend you not change the ingredient.
Tips when using frozen raspberry. DO NOT thaw the frozen raspberry but treat it like an iced and serve them frozen in your drink!
If you try this recipe please tag #byplaincanvas on Instagram or Twitter. We love to see your photos of our recipes! Also, follow us on Instagramto keep up on what we’re cooking up.
In many countries, during the winter they warm up the house and themselves with a fireplace that has at home. And during the Christmas period, they will specially decorate the place as it is the place where most of the family members gather together. Christmas tree, socking, ribbon, throw over, and more, are used to make the place wonder.
While we don’t have one in Singapore but it is always nice to see some inspiration about it. We especially love the fireplace that is in white theme as they complement the green and red in Christmas really well. Simple element are used to provide the clean look.
Would you like to decorate your fireplace if you have one?
xoxo, Joe
Credit | All shots are used on the mood board via our Pinterest boards.
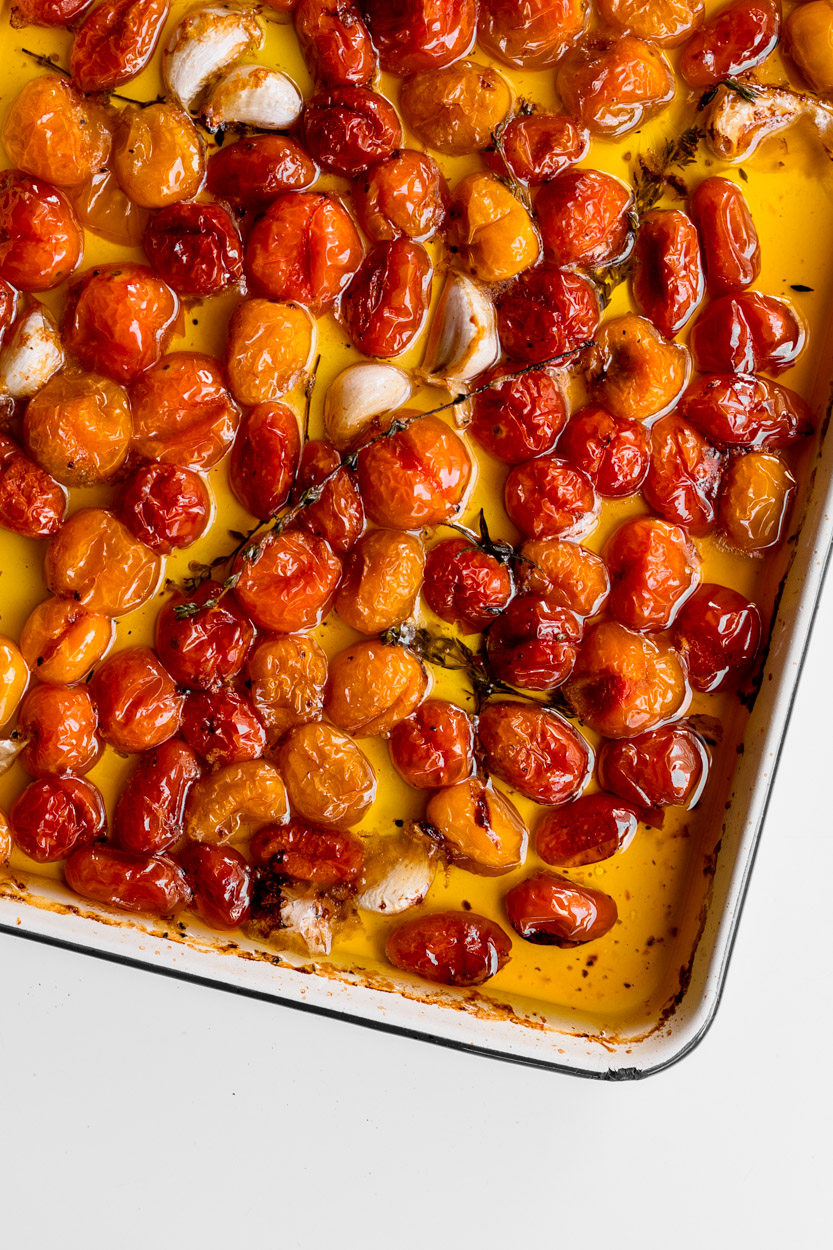
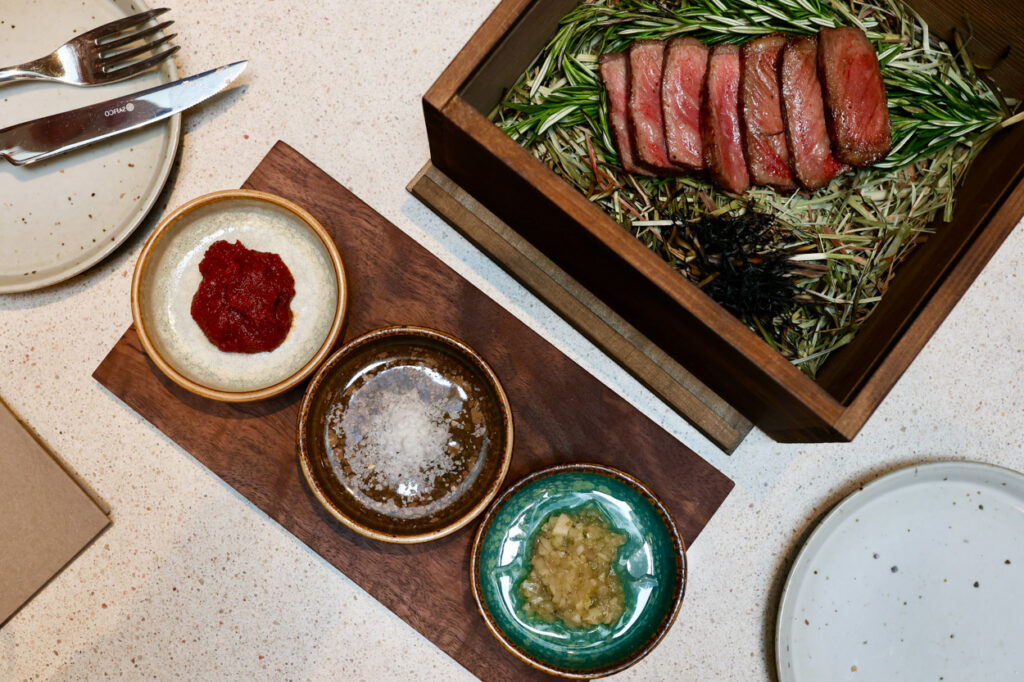
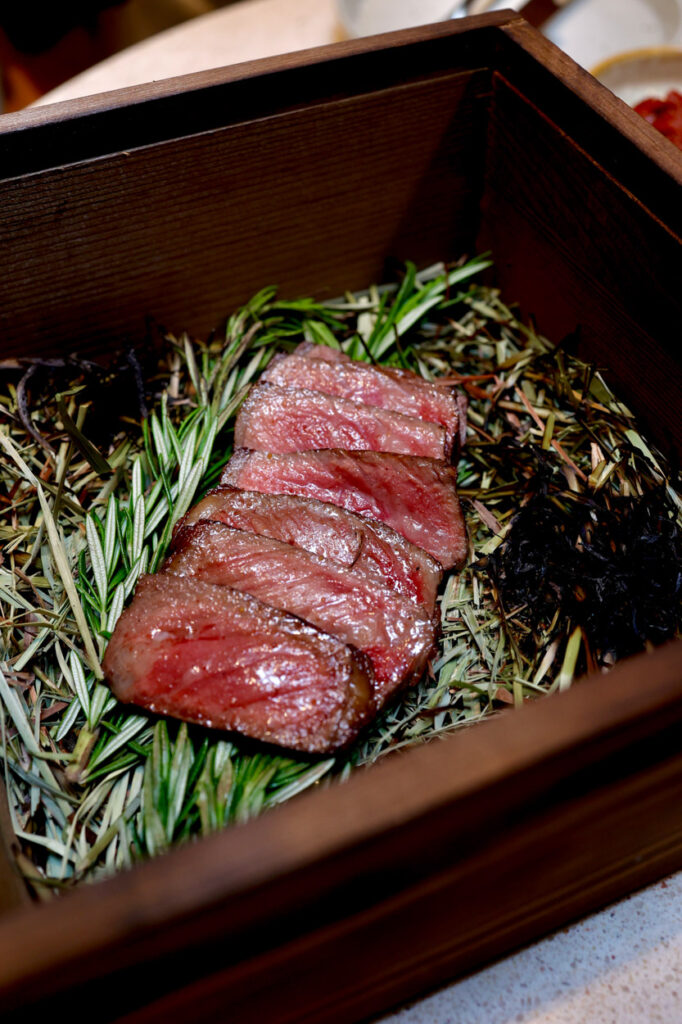
Sometimes cooking steak can be very intimidating. Paying a pretty penny on the perfect cut only to end up over-cooking it is so heartbreaking! Learning how to cook steak the right way isn’t only great for your wallet but also benefits your steak-cooking confidence. To us, Ribeye is the perfect cut of steak. The beautiful marbling of fat throughout breaks down and cooks into the meat, making it deliciously tender and flavorful without elaborate seasoning. The flavor only gets even better it’s slow-cooked!
Ingredients you need for this Steak
Ribeye steak – A boneless, 2 to 2 ½ inch thick cut is best for this method. Make sure it has minimal amounts of gristle and is marbled evenly throughout.
Steak seasoning – A thick and juicy Ribeye doesn’t need much to help bring out the flavor. A simple seasoning of fresh garlic, sprigs of thyme, and sea salt are all you need before this steak heads into the oven.
Compound butter – Slices of fresh, homemade, and creamy compound butter melt into the steak to add more flavor.
Roasted potato – Make this a meal with a few roasted tomatoes on the side. They will add a natural sweetness and acidity to the dish that is also highly nutritious. Keep them on the vine for a pop of color and elegant presentation.
How To Cook Ribeye Steak In The Oven
Season the steak: Completely pat the steak dry with paper towels, making sure to dab the sides as well. Add the salt, smashed garlic, and thyme to both sides of the steak. Press the seasonings into all areas. If they aren’t sticking, add a little oil to the steak.
Cook the steak: Place the seasoned steak on a cooling rack on top of a cookie sheet. Bake on the middle rack in the oven for about 45 minutes or until it’s at the temperature you like.
Let it rest: Take the cooked steak out of the oven and loosely add a piece of foil over top. Leave it to rest on a cutting board for 15 minutes to help redistribute the juices inside. Meanwhile, preheat your skillet over high heat.
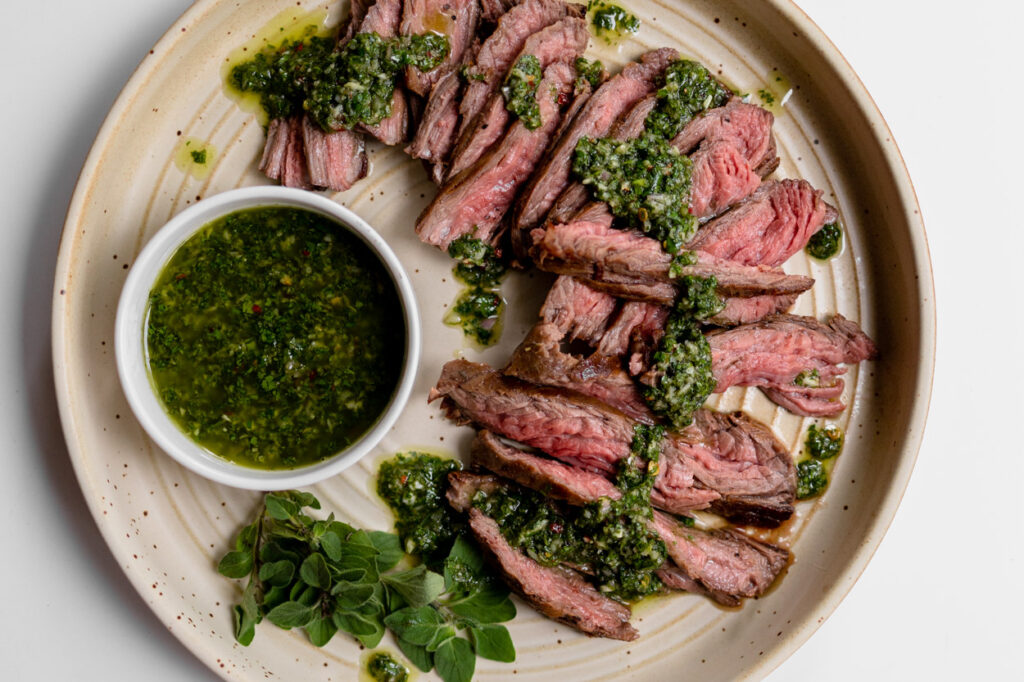
Serve and enjoy: Slice the cooked ribeye on a cutting board against the grain to serve to a crowd or leave it uncut. Drizzle with chimichurri sauce, place the roasted tomatoes on the side, and enjoy with your favorite low-carb side dishes.
Lola’s Cafe first started in Kovan, opening its doors in 2013. They are well known for their food and required to book if you are visiting them during the weekend. We are glad they open a new brand at Holland Village which is more accessible for us. Do take note that the menu at both outlets is slightly different, with the Holland Village outlet offering exclusively new dishes, such as pasta!
The cafe is located right at the end of Holland Village where all the popular pubs is located at. They consist of both outdoor and indoor seat for different preference. It is tastefully decorated with wooden tones and has a minimalistic vibe. Dashes of plants are sprinkled all over the cafe, bringing nature indoors.
We went for the Crab Cake Benedict ($19) which consist of handmade crab cake on toasted English muffins, topped with miso hollandaise sauce and furikake.
Not forgetting the poached eggs as well. As you cut across, the combination of oozy egg yolk, moist crab cake and unique miso hollandaise may just create that mini explosion in your mouth.
All of the pasta looks amazing and we decided to go for the classic Bacon Carbonara (S$18) is your typical pasta with a twist— there is wine in this dish! Handmade fettuccine is topped with smoked bacon, parmesan and a sous vide egg that is egg-cellent.
Head over to this cafe for twice during lunch hours and it requires a 30 minutes waiting. Thus if you hate waiting please book a table ahead before heading. But even if you don’t I believe the wait is worth it.
Lola’s Cafe Address: 48 Lorong Mambong, Singapore 277699 Operating Hours: 9am – 10pm (Tue to Sun), Closed on Mon
What better way to get your holiday started off right than with these festive Christmas appetizers? If you need to satisfy a crowd before your holiday dinner, keep them happy and snackin’ on these deliciously filling apps until you’re ready to serve up the main meal.
Cream Cheese Smoked Salmon Board
The TikTok viral butter board really got my attention until…we were scrolling through Instagram several days ago and saw someone take the butter board trend and use cream cheese and smoked salmon…one of our favorite combinations!
It’s really so easy you don’t need a recipe and you can make this board for as many or as few people as you like. There is no cooking required, it makes a beautiful presentation and as we said above, it is so yummy that you won’t even believe it! We can’t think of a season or an event that this board wouldn’t be perfect for…Christmas morning (definitely happening here), a cocktail party appetizer, drinks on the porch, by the fire, and even dinner for 1 or 2! It’s seriously that good!
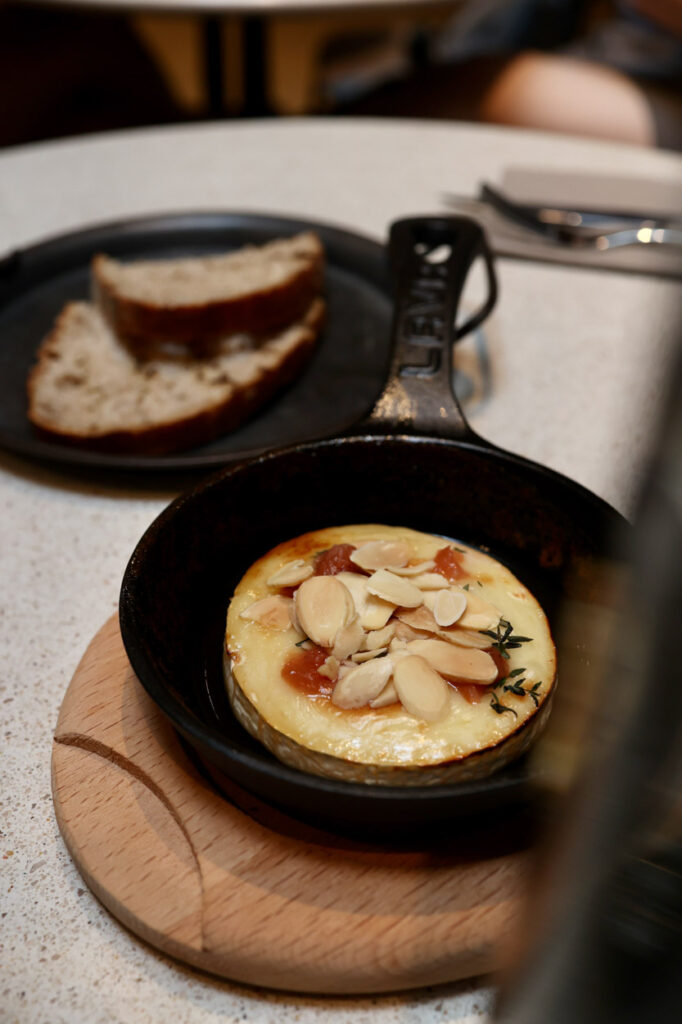
Lemon Burrata with Basil
We love an easy starter to kick off a dinner party or to enjoy with a pre-dinner cocktail. Isn’t it great when you can combine a few fresh ingredients on a plate and call it done?! Creamy burrata blend with grassy olive oil, lemon zest, and sweet basil for a satisfying spread on toasted ciabatta. Pair it with a young, crisp Pinot Grigio or white sangria for a festive start to your special occasion.
On the surface, it looks like a ball of fresh mozzarella, and it sort of is. On the inside, it’s a velvety mixture of cheese curds and cream wrapped up in a shell of mozzarella cheese. Burrata hasn’t been around as long as mozzarella and was invented as a way to make use of mozzarella scraps to reduce waste in the cheesemaking process. Brilliant! A great choice for those wants to try something new.
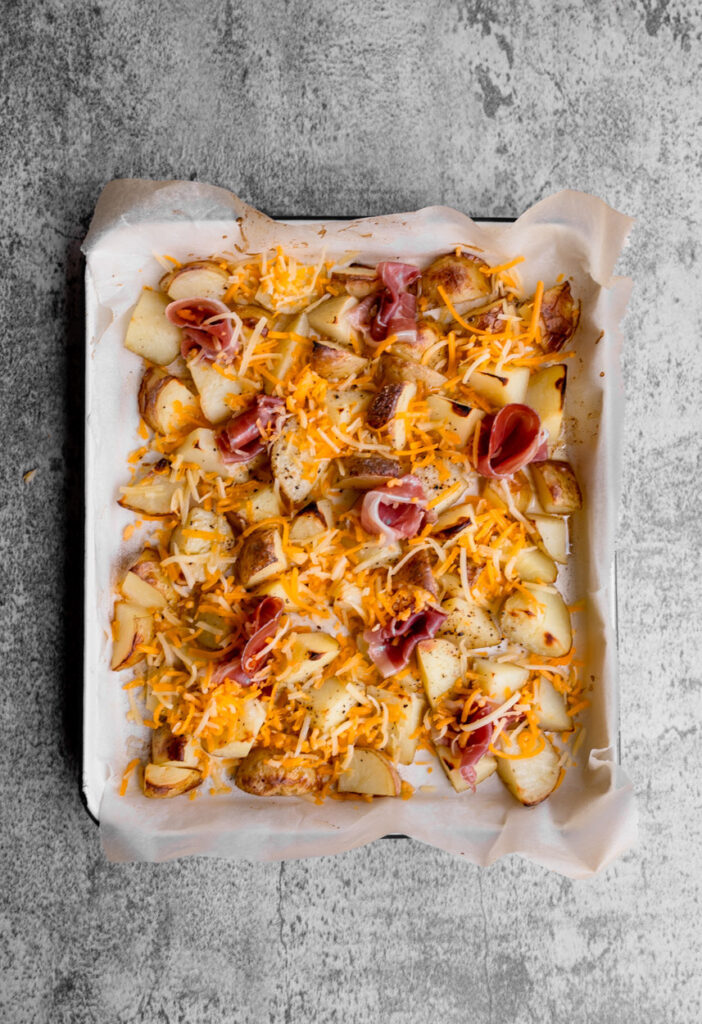
Mixed Roasted Potatoes With Mozerella
While this is more like a side dish for a meal, there are times we also like to have it as an appetizer. With Christmas right around the corner, it seems like mashed potatoes and potato gratin are all the rage. Sure, these classic potato recipes are tasty, but oven-roasted potatoes offer something totally different and equally delicious. If you’re looking for a last-minute holiday side dish that your guests will love, this recipe is the one for you. Here’s why:
Crispy potato skins. Is there anything better than crisp, puffy potato skins straight out of the oven?
Creamy middles. Those crave-able, golden brown edges give way to super creamy centers, so each bite has an amazing mix of textures.
The dressing. Honestly, it’s tempting to devour these roasted potatoes straight off the sheet pan, when they’re simply tossed with olive oil, salt, and pepper. But I like to take them one step further. While they’re still warm, I toss them in a bold, zingy vinaigrette made with lemon, Dijon mustard, and rosemary. Once the potatoes absorb it, they become bright, rich, and totally irresistible.
Clearly, we’re hooked on these easy oven-roasted potatoes. Whether you make them for a holiday meal or for dinner any night of the week.
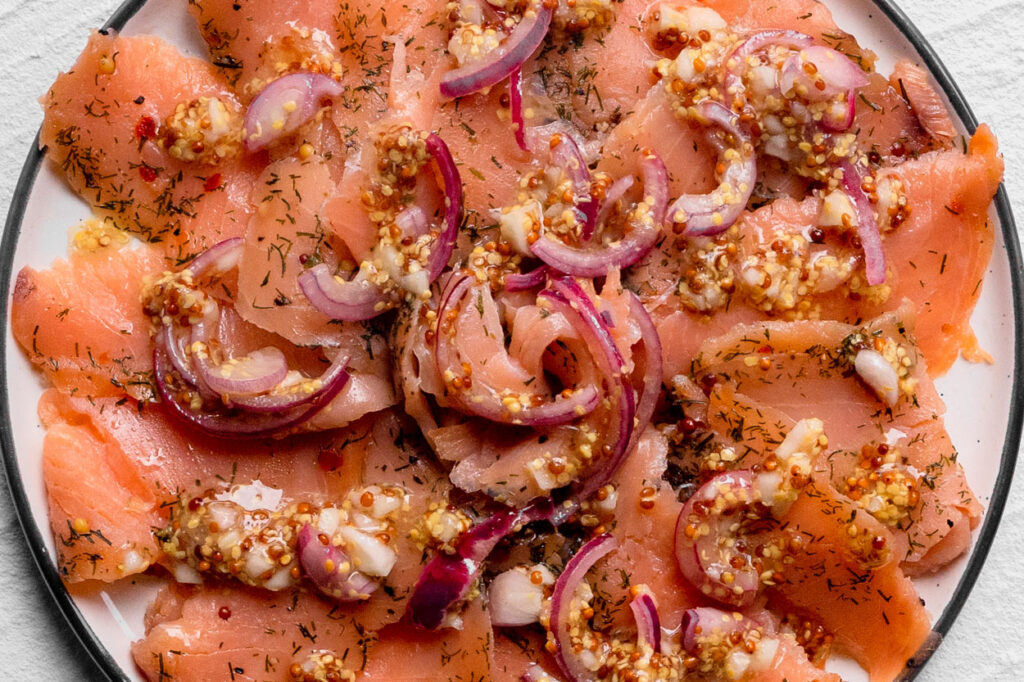
Spicy Smoked Salmon
are fantastic appetizers or finger food, and perfect for entertaining. Smoked salmon, dill, and mustard are combined to create an easy savory starter. If you love smoked salmon, you have to try these easy salmon “dips”! They look really fancy, and perfect for entertaining, but they are also easy enough to prepare for brunch.
Whether you’re looking to make a simple appetizer for Christmas dinner, or you’re trying to impress guests at a birthday party, this recipe is a guaranteed hit. Spicy smoked salmon has a very mild and pleasant flavor, which is sure to please a crowd.
What do you need?
Smoked salmon: Cold smoked salmon or smoked trout will both work well. If you use frozen smoked salmon, you will have to defrost it before use.
Whole grain mustard: Unlike mustard, whole grain mustard is a prepared condiment that is only partially blended, with some of the mustard seeds still visible, creating an overall coarse and slightly pasty texture.
Dill: Fresh dill is a great pairing with salmon and cream cheese. It is however optional, so you can omit it if you prefer, or substitute it with parsley.
Red Onion: The key to this dish is this small red onion, it will elevate the dish.
If you recreate any of these appetizers for Christmas let us know how you liked it by leaving a comment and rating below or by tagging us on Instagram, we love seeing all of your tasty recreations!
First, preheat the oven to 350°F for toasting the ciabatta.
Place the burrata in a serving dish and set aside to rest at room temperature while you prepare the remaining ingredients.
Combine chopped fresh basil, lemon zest, chopped garlic, and one tablespoon of good-quality olive oil in a small bowl. Add a pinch or more of crushed red pepper flake and flaky salt to taste. Let the flavors mingle while you toast the bread.
Mixed Roasted Potatoes With Mozerella
Preheat the oven to 350 degrees.
Place the burrata in a shallow serving bowl, and set it aside (it’s best served at room temperature).
Combine the basil, lemon zest, garlic, and 1 tablespoon of olive oil in a small bowl. Add crushed red pepper and salt to taste. Let the flavors mingle while you toast the ciabatta.
Place the ciabatta slices on a sheet pan + brush them lightly with 1 tablespoon of olive oil. Toast them in the oven for 4 to 6 minutes.
Arrange the toasted ciabatta in a serving dish or basket. Spoon the basil mixture over the burrata. Drizzle the last tablespoon of olive oil around the bowl.
Here’s the best part — slice into the burrata to let the gooey middle flow into the bowl. Scoop the cheese onto your ciabatta and enjoy!
During the birthday of Joe, we decide to capture that special day but heading to a hidden place at Singapore for a mini photoshoot for her 30th birthday.
Ribbons, bells, miniature angels, and candy canes are just some of the things we fill our house with every Christmas season. Most of us tend to over-decorate every area of our home in order for us to feel happy and cozy during the festive period! How do you think a minimalist can pull off the season without having “too much” of what we traditionally do?
Rather than those big and bulky Christmas trees, pick a smaller one so that your home won’t be overwhelmed with them.
If your home boasts neutral tones and simplistic vibes, your Christmas décor can fit right in without throwing off your perfectly-curated aesthetic. Add small, simplistic wreaths across your kitchen—an unlikely space to receive Christmas cheer–for a unique but still low-maintenance decorating idea.
What do you think about a simple Christmas?
xoxo, Joe
Credit | All shots are used on the mood board via our Pinterest boards.
Once Thanksgiving is over, you’ll know that the holiday season is just around the corner. It was just January and here we are less than a month from the end of 2022. If you’ve been following us, you know that Christmas is our favorite holiday season. As the most meaningful season of the year, I give back and am grateful for all the love and joy I have received.
This time of the year we will be busy with an endless list of agendas. While work is burying us, we still find time to do things that we love – and explore ideas in food and drinks. Both Joe and I were thinking since we have the thought of making a Christmas Wreath but we do not have time to pick up the greens why not make an edible one?
It is ready simple and beautiful Antipasto for serving individual items at a party so many fingers aren’t touching the food. These skewers can be made quickly and restocked with extra throughout the party. Let us get started.
What is Antipasto?
Antipasto is the first course of an Italian meal (it means “before the meal”) and typically refers to a small plate of meat, cheese, pickled vegetables, and olives. Instead of serving our antipasto on a plate, we’ve added them to skewers for this recipe.
Here’s what you’ll need to make this recipe.
1-pint cherry tomato
½ pound mixed Greek olives
8 ounces fresh Mozzarella balls (we used Ciliegine)
4 ounces sliced salami
1 bunch of fresh rosemary
1 tablespoon olive oil
1 teaspoon balsamic vinegar
pinch of salt and pepper
30 bamboo skewers
Can you use different ingredients for making an antipasto wreath?
Absolutely! The whole idea is to mix and match different ingredients and enjoy. So, you can use whatever ingredients you love. Remember to tick the boxes for cured meat, cheese, and vegetables. This Antipasto wreath recipe is very versatile.
Substitutions and Alternatives
This holiday wreath appetizer is so great because you can truly mix and match whatever ingredients you like. You don’t have to stick with the traditional items that you’d find in an antipasto tray.
For a change, try one of these alternative ingredients:
Pickled/smoked meat
Roasted vegetables
Mushrooms
Artichoke hearts
Anchovies
Asiago or cheddar cheese
If you try this recipe please tag #byplaincanvas on Instagram or Twitter. We love to see your photos of our recipes! Also, follow us on Instagramto keep up on what we’re cooking up.
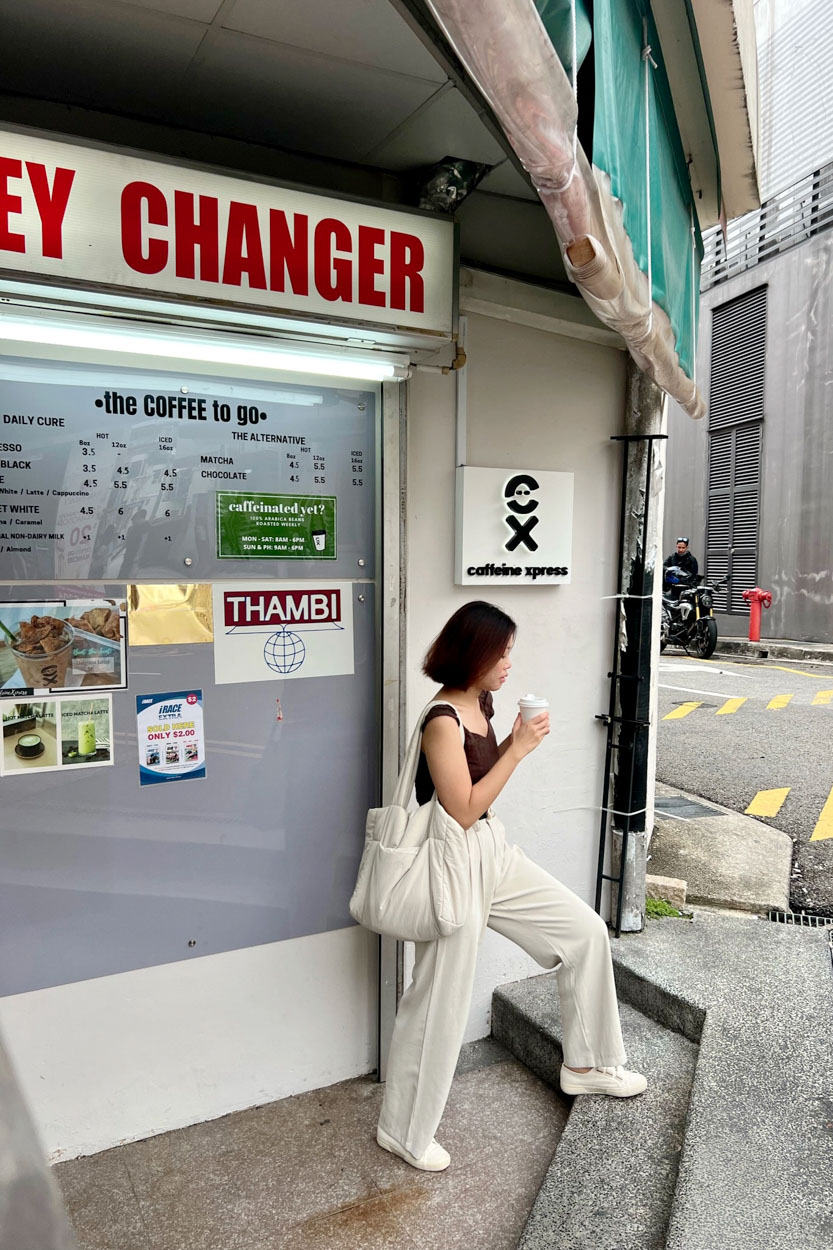
If you’ve ever visited Holland Village, you’d recognise Thambi Magazine. The iconic old-school magazine store is known for being one of the only newsstands left in Singapore, but did you know that it also houses a hidden little cafe? It wasn’t a very big place, but at Caffeine Xpress you couldn’t find the coffee that you need.
The cafe uses beans from the local brand Six Four Coffee, and for freshly brewed coffee, their prices are relatively affordable. An Espresso is priced at S$3, while a Latte costs S$4 for 8oz, and S$5.50 for 12oz or an iced drink.
If you’re not a coffee person, the cafe also serves Matcha (S$4 for 8oz, S$5.50 for 12oz and iced) and Chocolate (S$4 for 8oz, S$5.50 for 12oz and iced). There’s also the option of replacing the coffee in your Dalgona Latte with chocolate if you prefer a non-caffeinated version of the drink.
Caffeine Xpress Address: 211 Holland Road #01-K4 Holland Road Shopping Centre, Singapore 278967 Opening Hours: 8am – 6pm (Mon to Sat), 9am – 6pm (Sun)
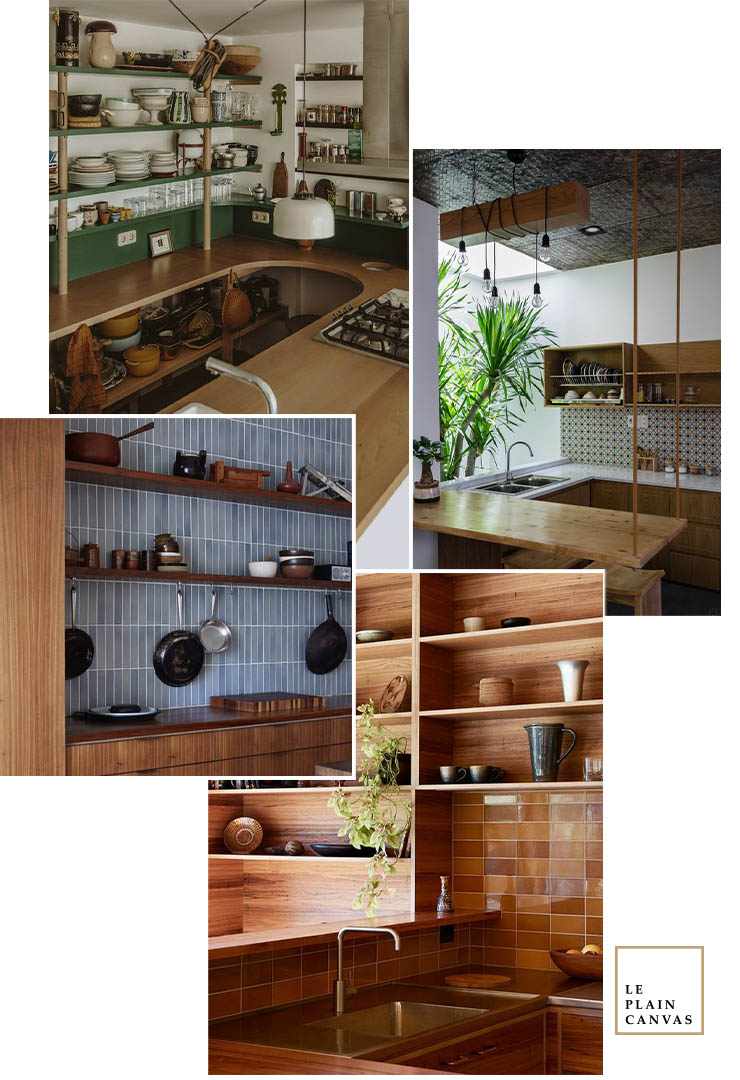
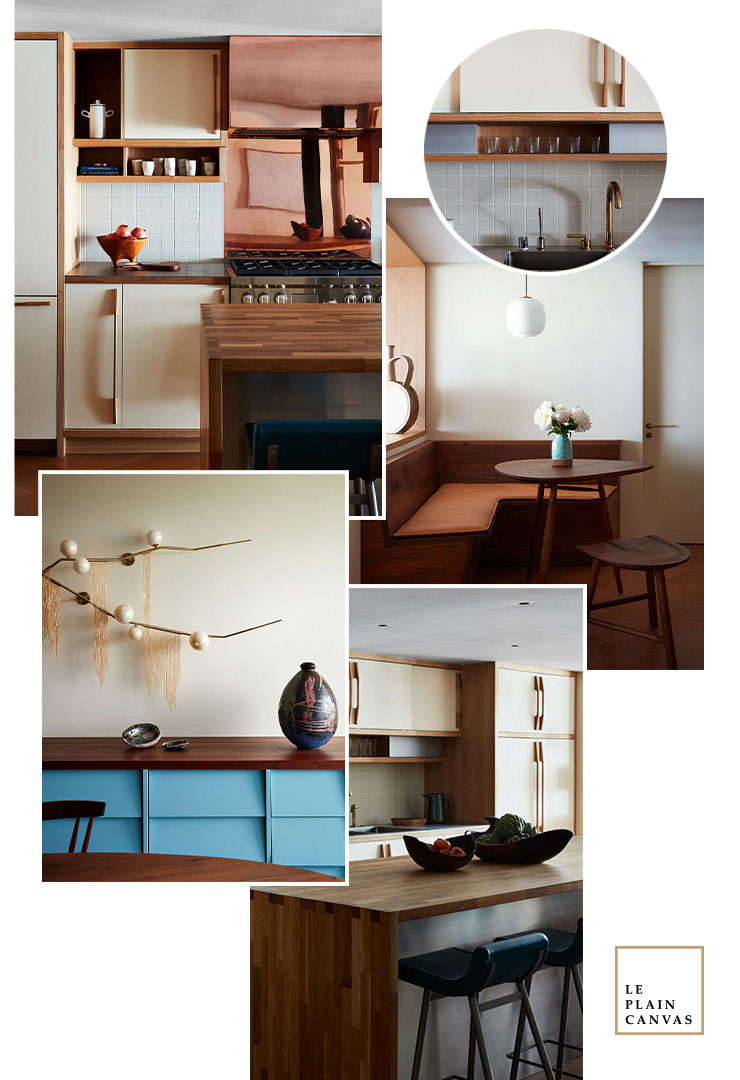
Having open storage creates an informal, relaxed feel in the kitchen – but it doesn’t work for everyone. You need to consider the shelves’ position, what you intend to store on them, and how they will look. Here are 10 points to think about before deciding whether this style is right for you.
Keep it neat and tidy If you’re more inclined to the latter, you should perhaps think twice about installing more places where you’ll be tempted to scatter your stuff. If you are a tidy lot, however, and know that everyone will generally put everything where it belongs, open storage could be perfect for you.
Be prepared for more dusting There’s no getting away from it – open storage will gather dust far more quickly than closed units will. So if you plan to display some of your more attractive but little-used items on shelves, remember that they’ll need to be wiped down more frequently.
Take your height into account If you’re a little shorter than average and will frequently have to climb a stepladder to reach high-up pots and pans, then open storage might not be the most practical option for you. If the height is on your side, however, you will probably find reaching up to an item much easier than bending down to rummage around in a low cupboard for it.
Are you still up for this shelving?
xoxo, Joe
Credit | All shots are used on the mood board via our Pinterest boards.
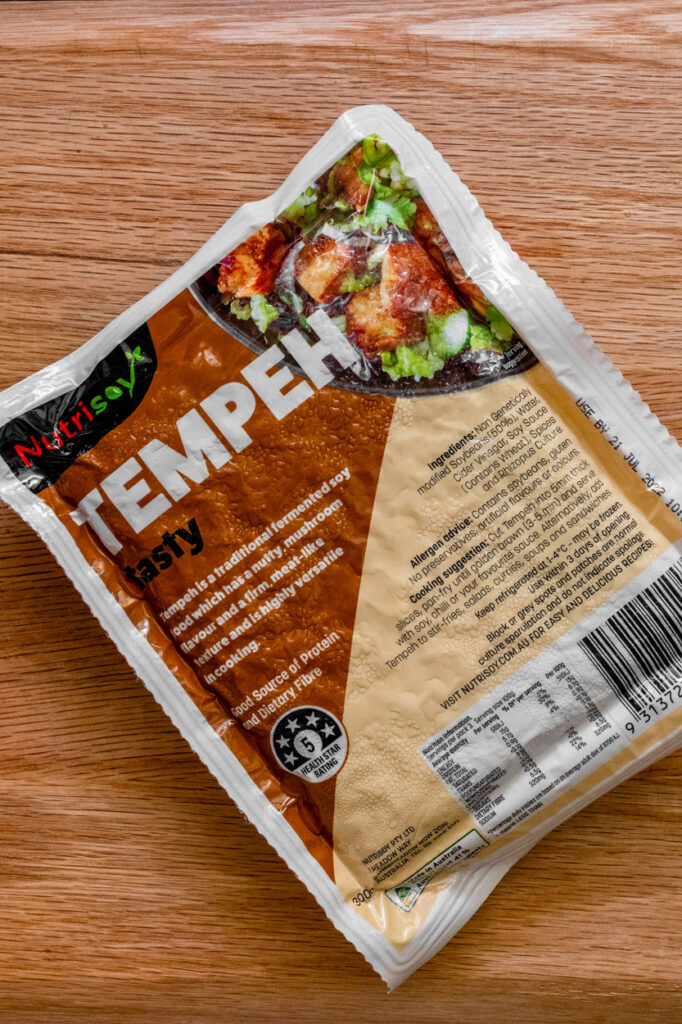
While we have been meat eaters for many years, we are still very new to going vegan. For now, our vegan diet consists of potato, tempeh, and lots of tofu. However, even with only just these 3 ingredients, there are many ways and flavours we can make use of and have fun enjoying them. Here are our Top 8 Vegan Recipes for the Fall!
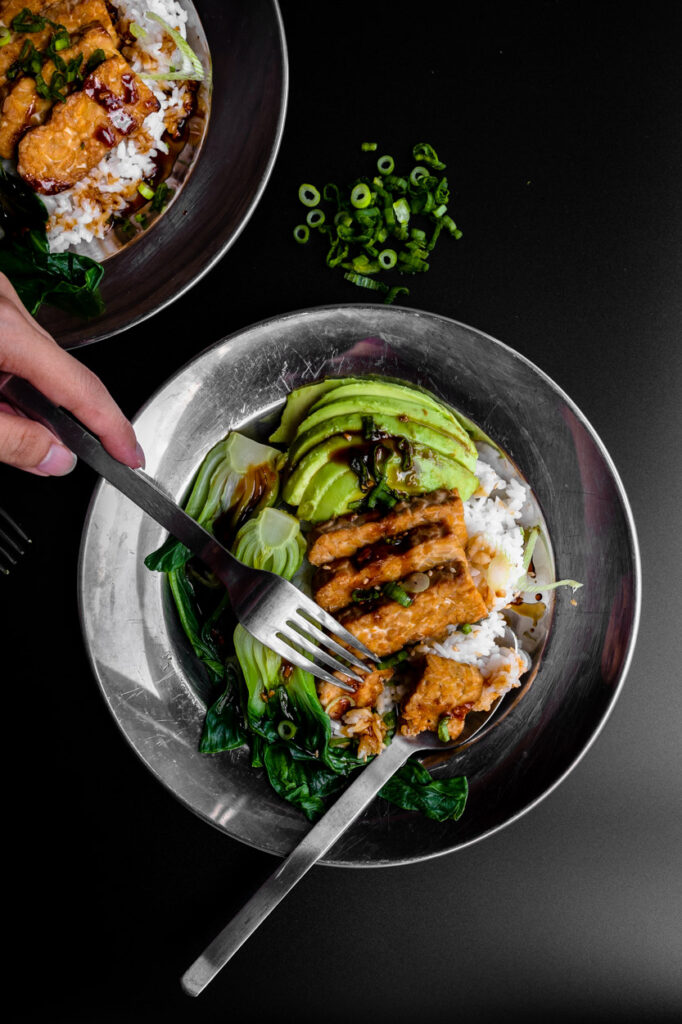
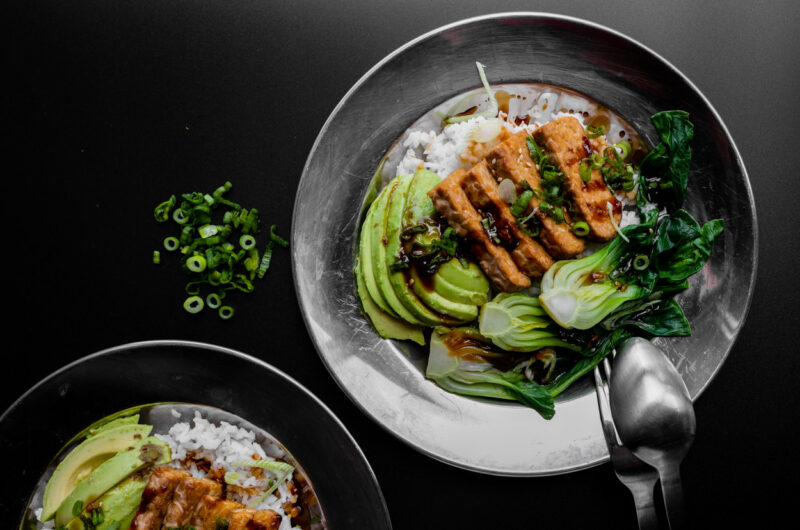
You will fall in love with this Soy and Scallion Tofu bowl instantly. If you are a vegan or decide to have a meatless Monday (just like Angela), this recipe shows you how to make tofu taste like teriyaki meat without a fuss. You can enjoy the juiciest, well-seasoned bowl without worrying about your plant-based meal tasting like grass.
The crispy-crumbly texture and the juicy, savoury flavours of this simple tofu stir-fry are oh-so-lovable. Scooped over a pillowy bowl of steaming white rice, it’s a new (to us) kind of comfort food and we are all about it.
Sweet potatoes are a staple food in many parts of the world. They are a good source of fibre and potassium, When did you first decide to let sweet potato slide into your diet, forcing some old buddies out? I know people who did it for the hype of how healthy sweet potatoes are (usually compared to potatoes). It’s higher in fibre, and lower in Glycemic Index(half of the potato’s value), and because it was once overlooked, its mauve-orange appearance feels fresh and chic.
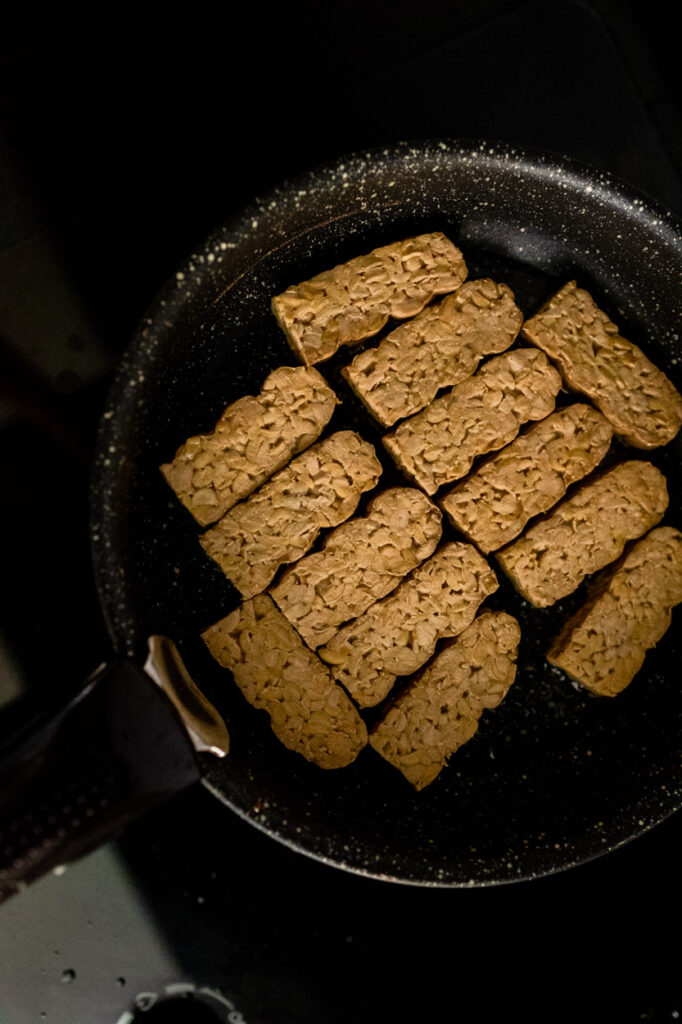
Teriyaki Tempeh Rice – this recipe comes together in just 15 minutes and is sure to be a crowd-pleaser in your home! It’s packed with flavour and has a ton of plant-based protein. I’m glad the pictures now reflect how absolutely delicious this recipe is!
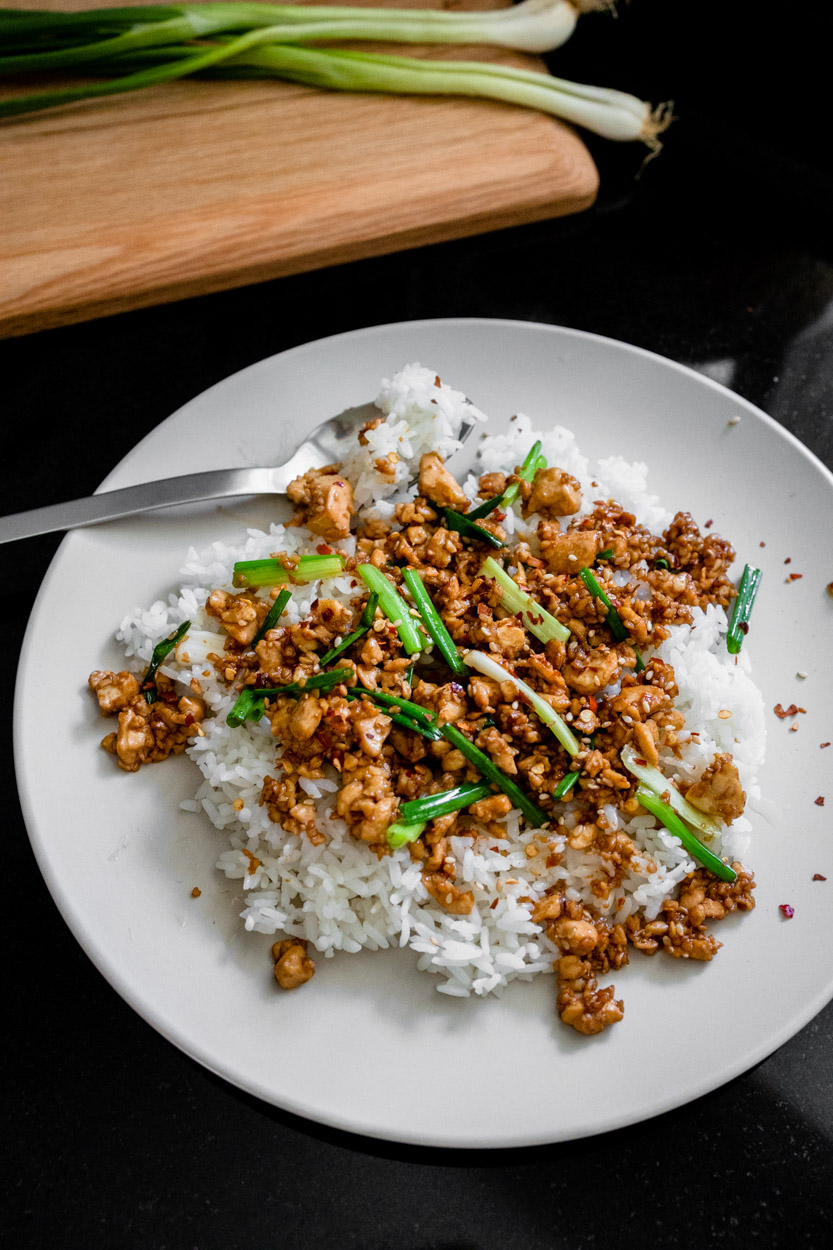
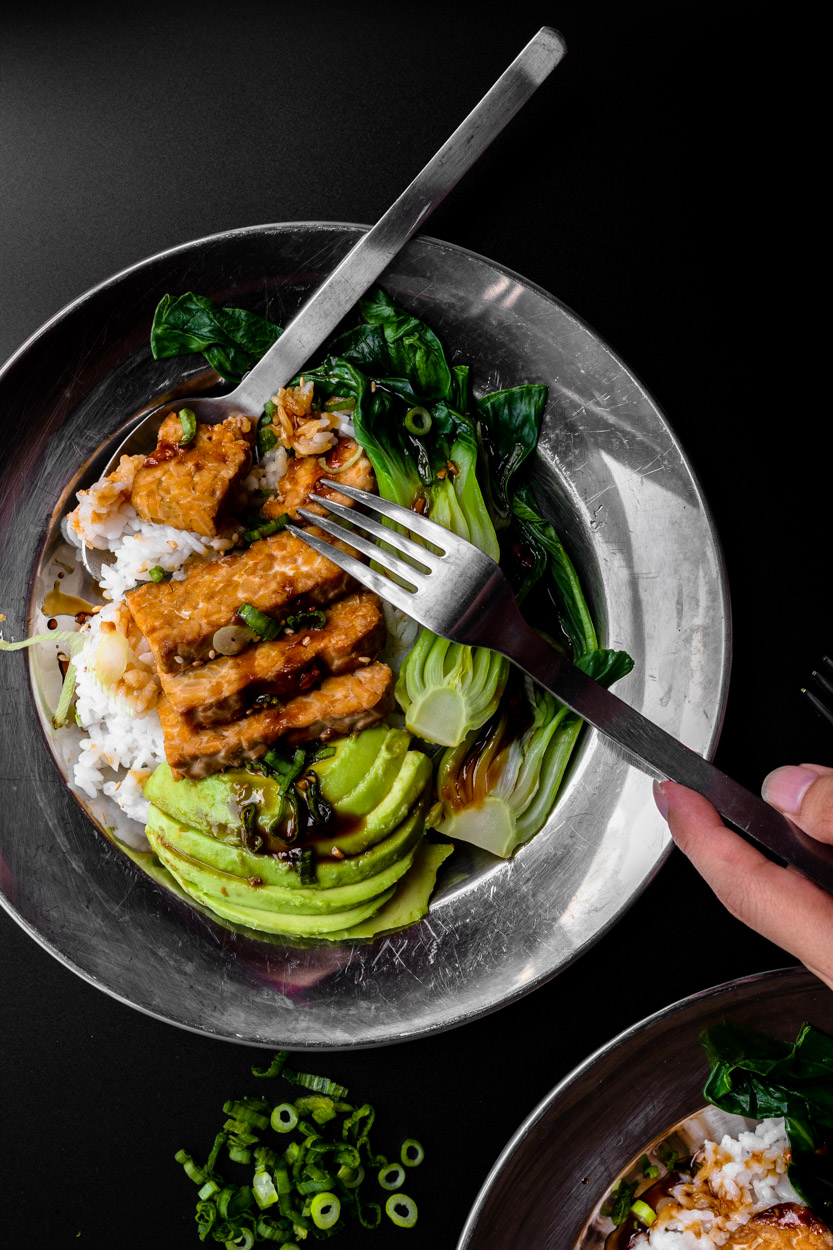
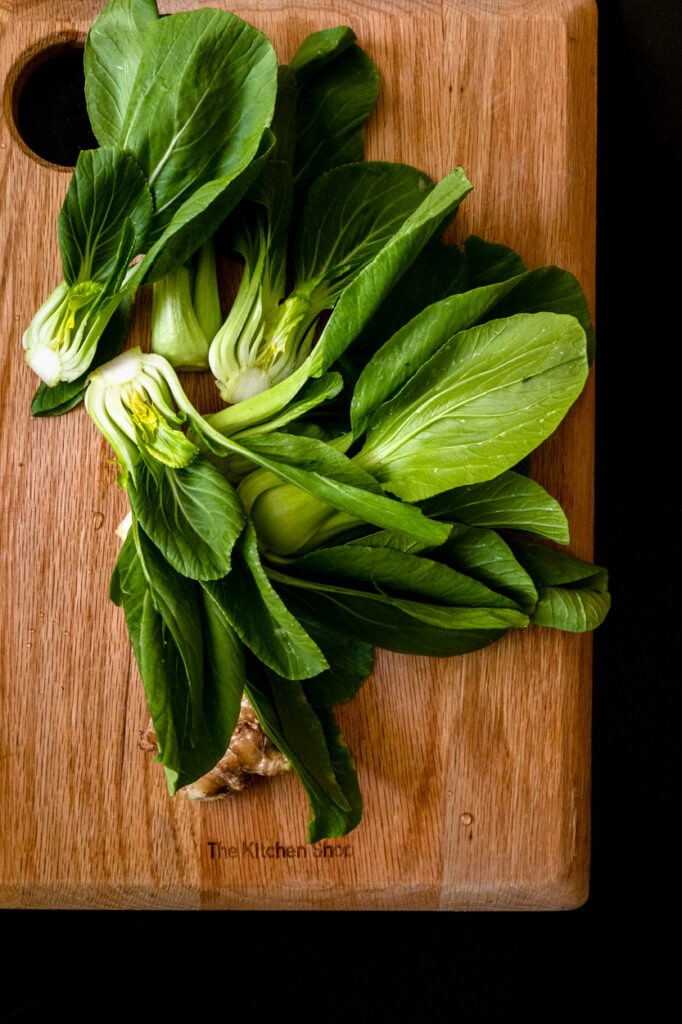
This is a healthy, vegetarian/vegan take on beef and bak coy, my Chinese take-out dish of choice growing up. It’s just as delicious and satisfying! And like most of the dinner recipes you’ll find here, this one is pretty easy to toss together — no cooking experience needed. Everything is cooked in one skillet so you don’t have to worry about cleaning a bunch of dishes either. Hooray!
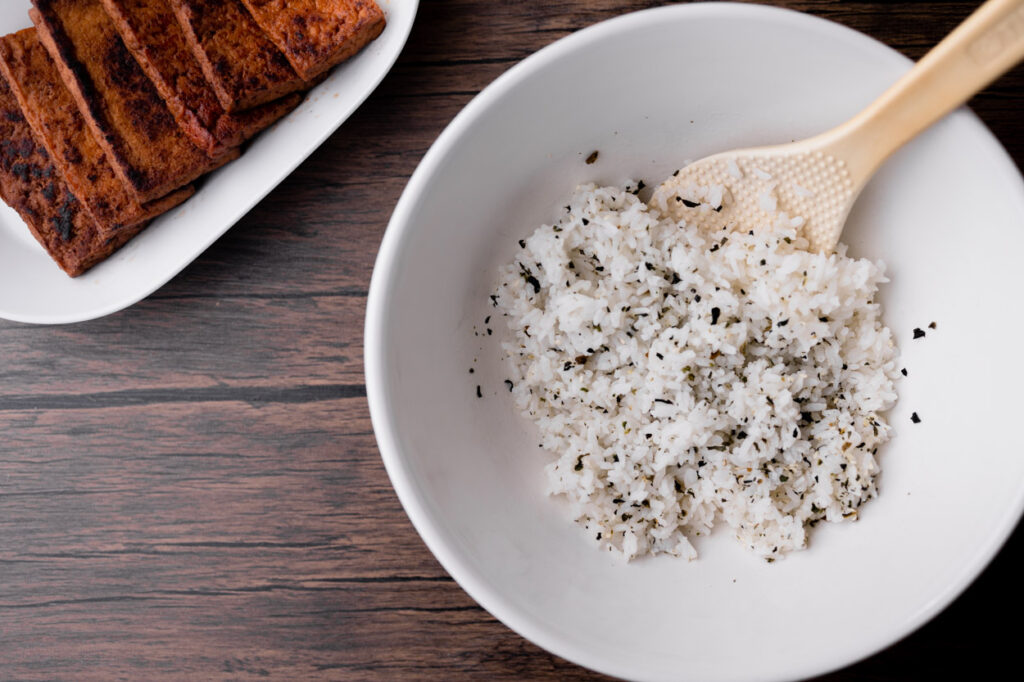
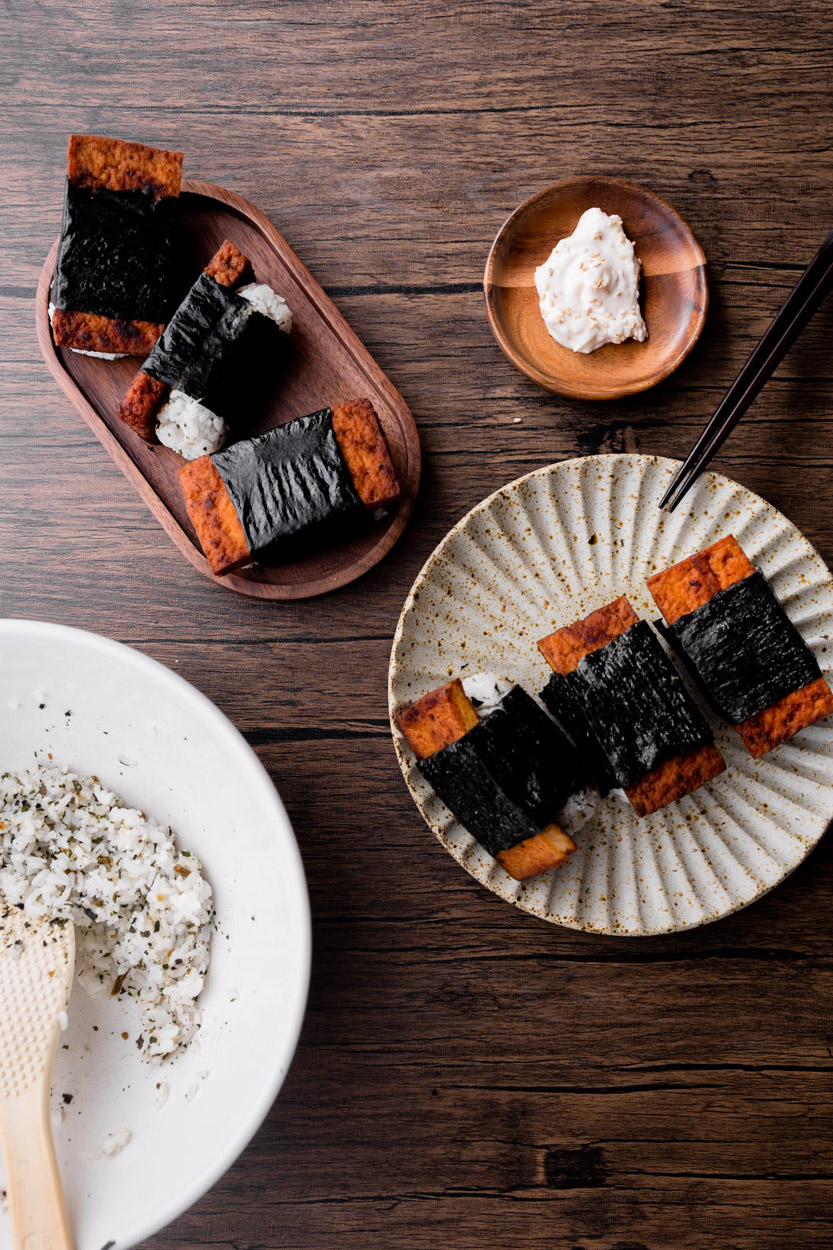
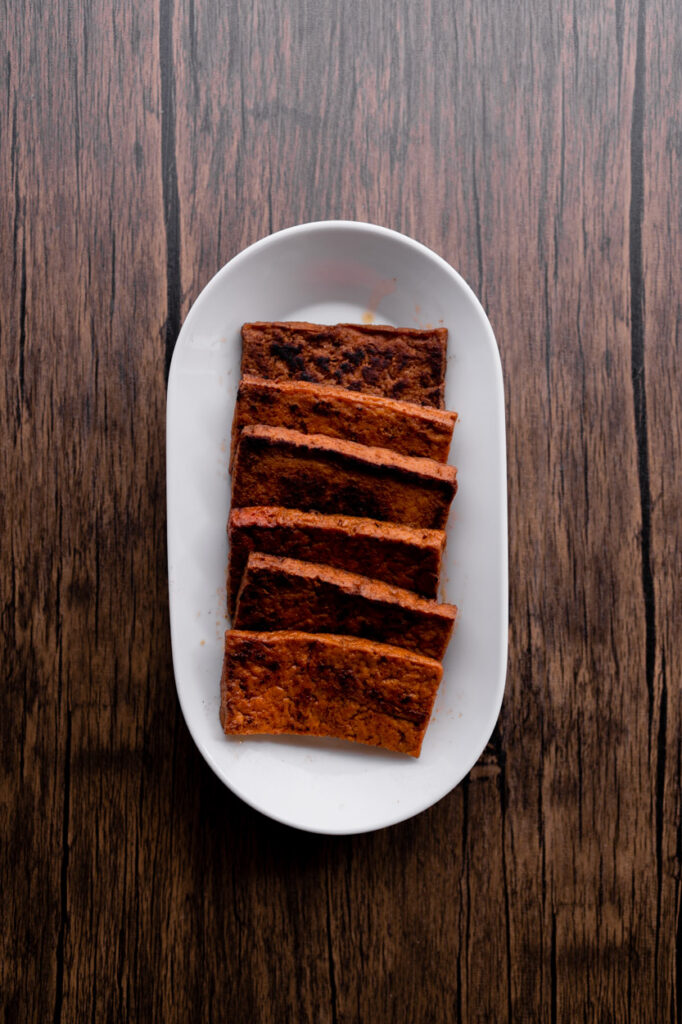
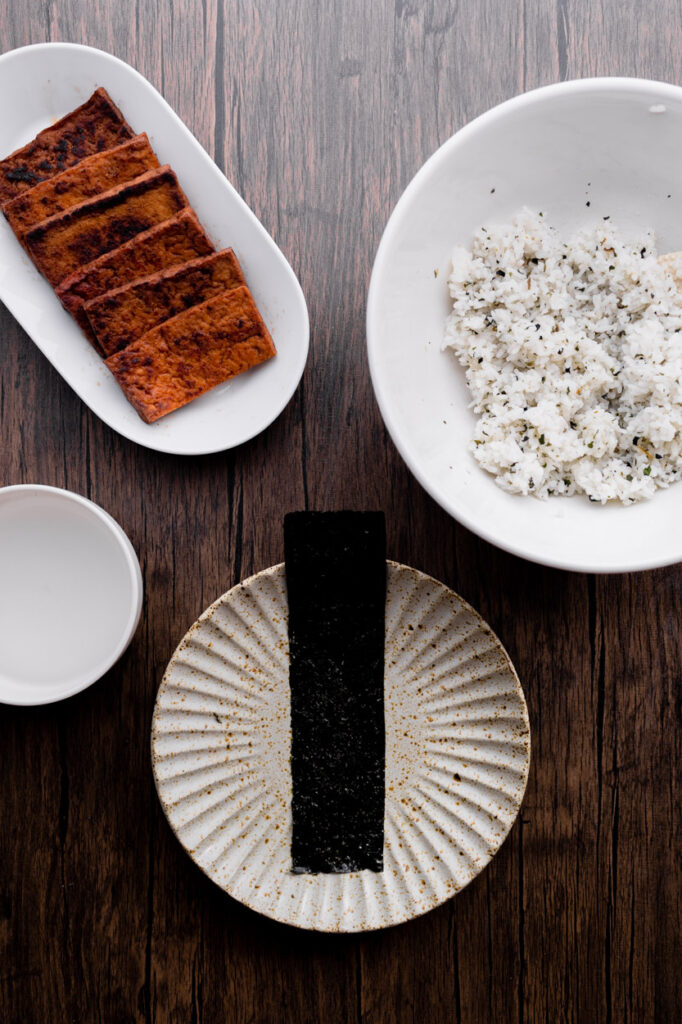
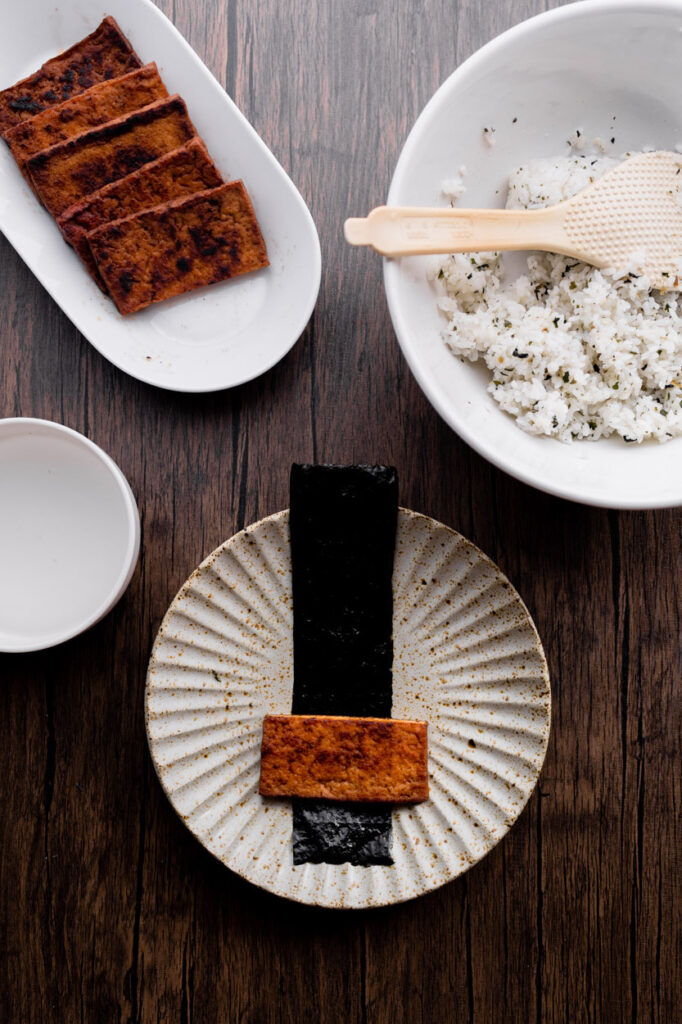
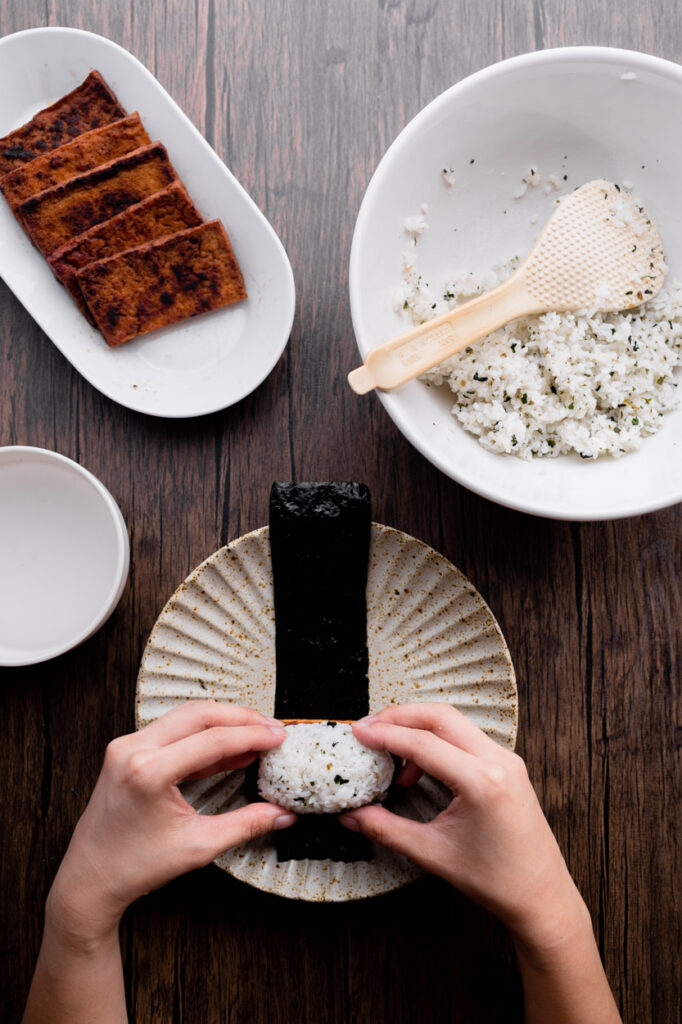
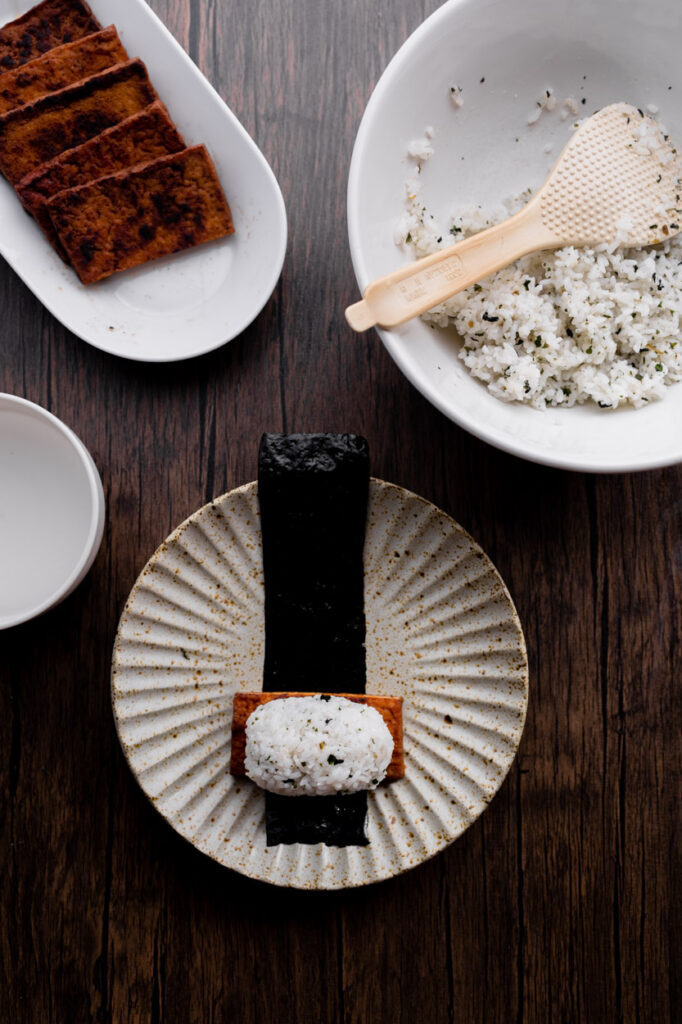
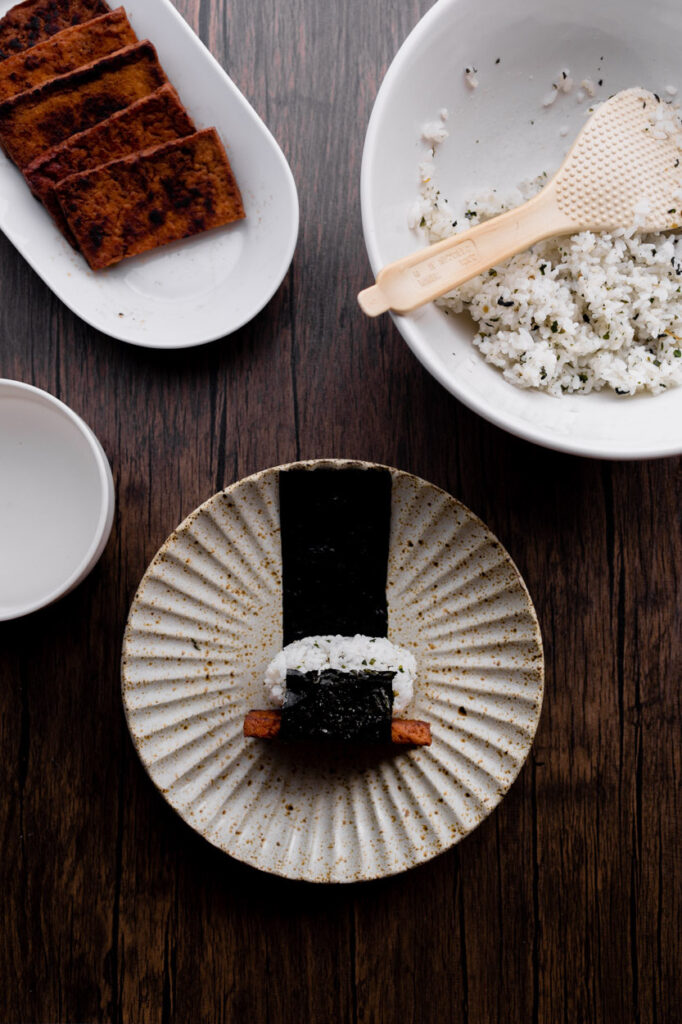
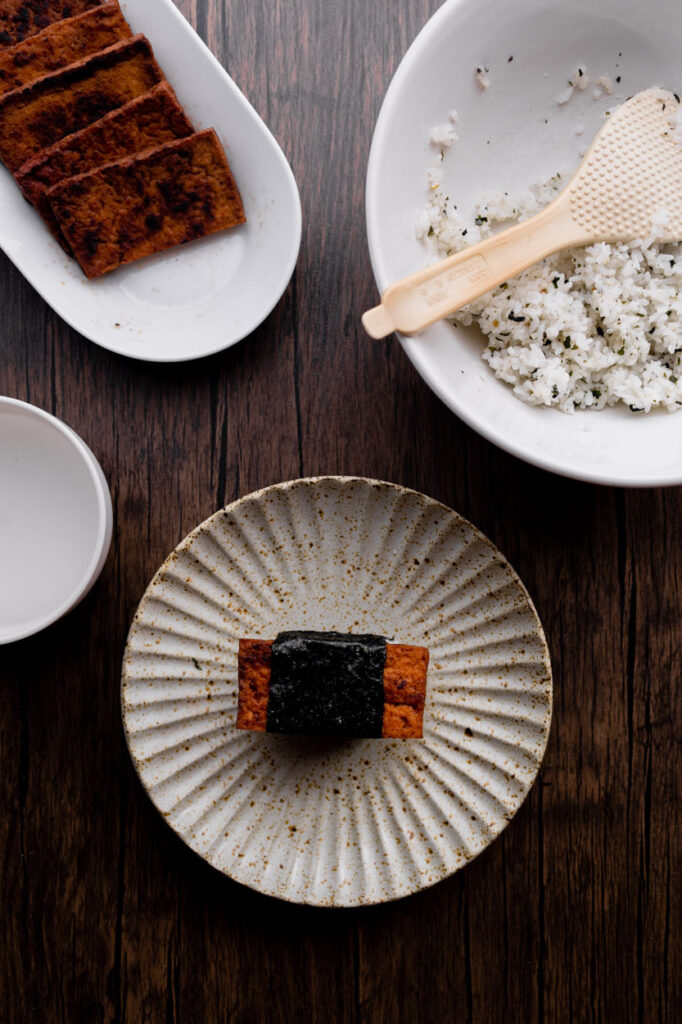
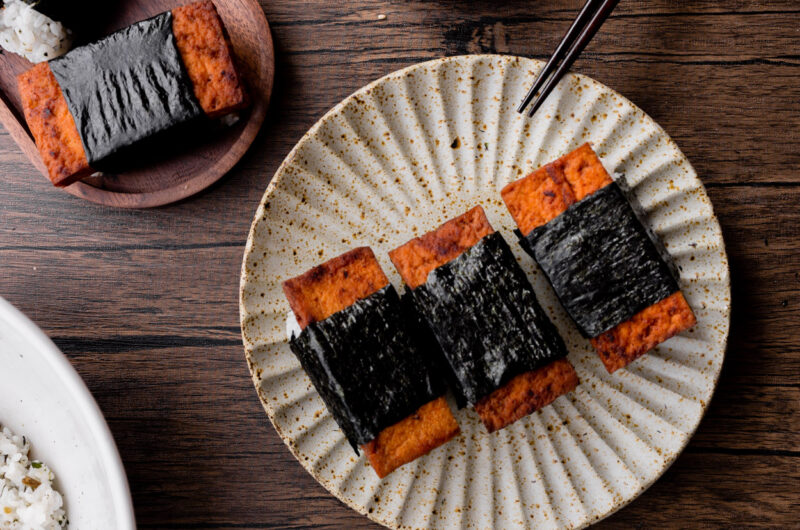
Years back we tested our very first spam musubi and ever since it has been our favourite to-go snack/ quick bite for the lunch. However, we couldn’t enjoy it as much as we could as spam is one of the unhealthy options and not to mention it is kind of overpriced. Therefore, with A vegan twist on the classic spam musubi, this tofu musubi will win over our hearts!
For those who don’t know what is spam musubi, it is basically big sushi with spam on it with seaweed wrapping over it. You could prepare it ahead without the seaweed and refrigerate it for the next day. Although, we are sure that you won’t keep any after you did it. All you need is to microwave it for 30 seconds and wrap the seaweed over like an onigiri.
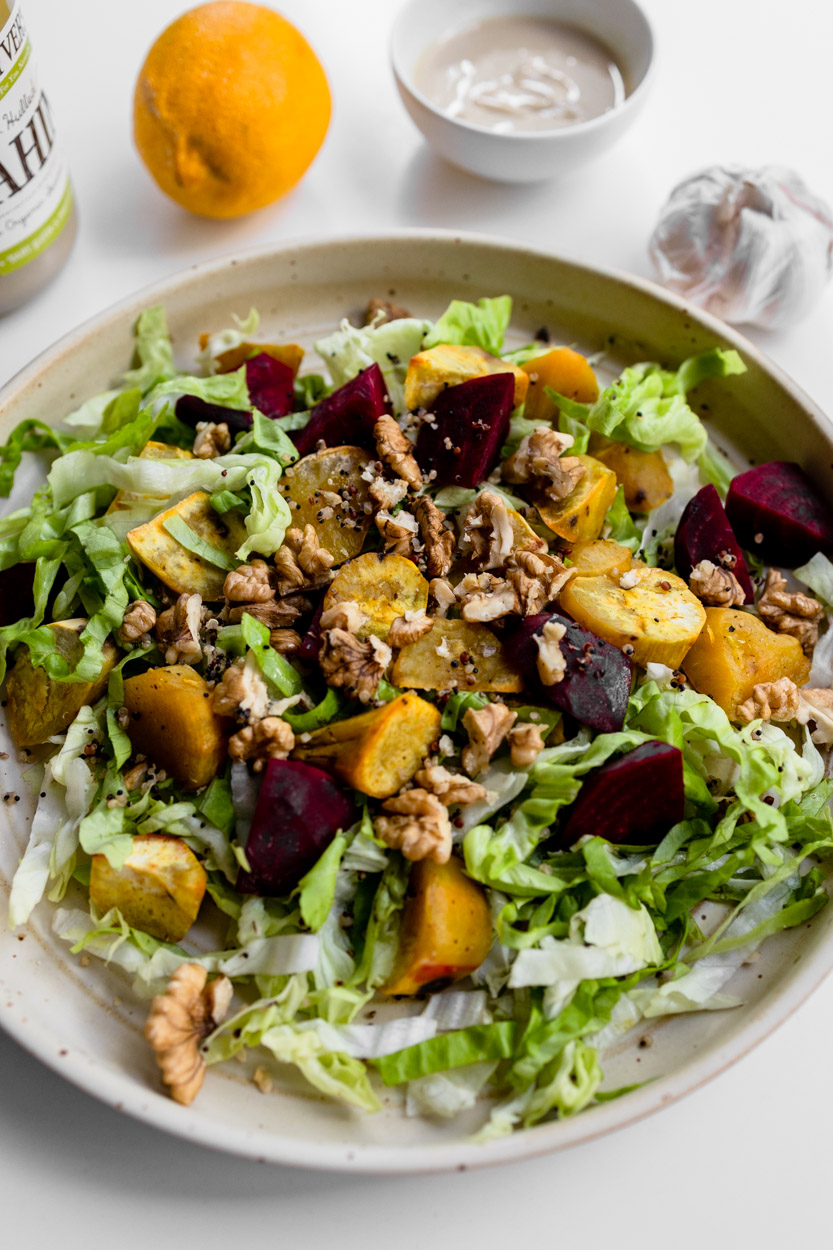
This colourful Fall Harvest Salad combines so many great textures and autumn flavours. Loaded with roasted sweet potato, fresh crisp beetroot, quinoa, and toasted walnut, this fall salad is tossed with lettuce and a delicious homemade tahini lemon dressing. It’s healthy, wholesome, nourishing, and filling. Plus, it’s a gorgeous and colourful salad to put on your holiday table this year. Enjoy this for dinner and save the leftovers for lunch the next day!
As you know we have been trying to improve our diet for the past year by introducing healthier options such as vegan, replacing our refined with grain, choosing a healthier cooking method and more. In the past year, my knowledge of vegan food is minimal, I always thought they are plain. However, as time passes and we learn more about it, there are days we could replace them with our meat. This time we pick up another new ingredient – tempeh.
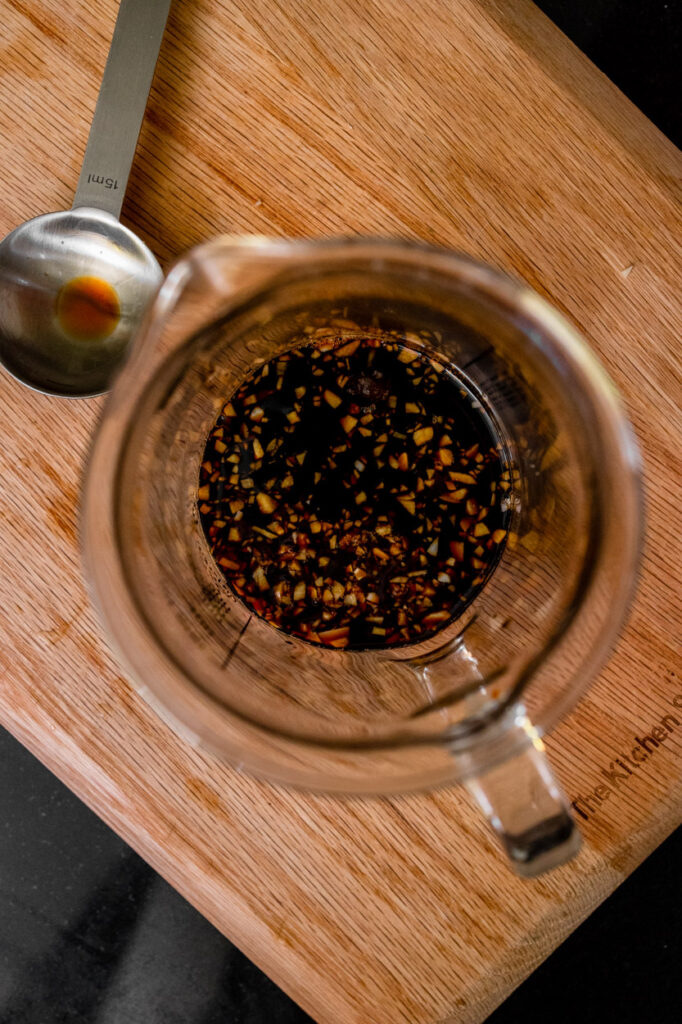
As we mentioned, tempeh has a nutty-mushroom flavour as opposed to tofu. Using spices to create marinades that have strong flavours is the key. This Korean BBQ marinade is sweet, salty, and full of Asian flavours. To make the marinade, whisk together all the ingredients in a bowl. You can also use a mason jar and shake up all the ingredients together.
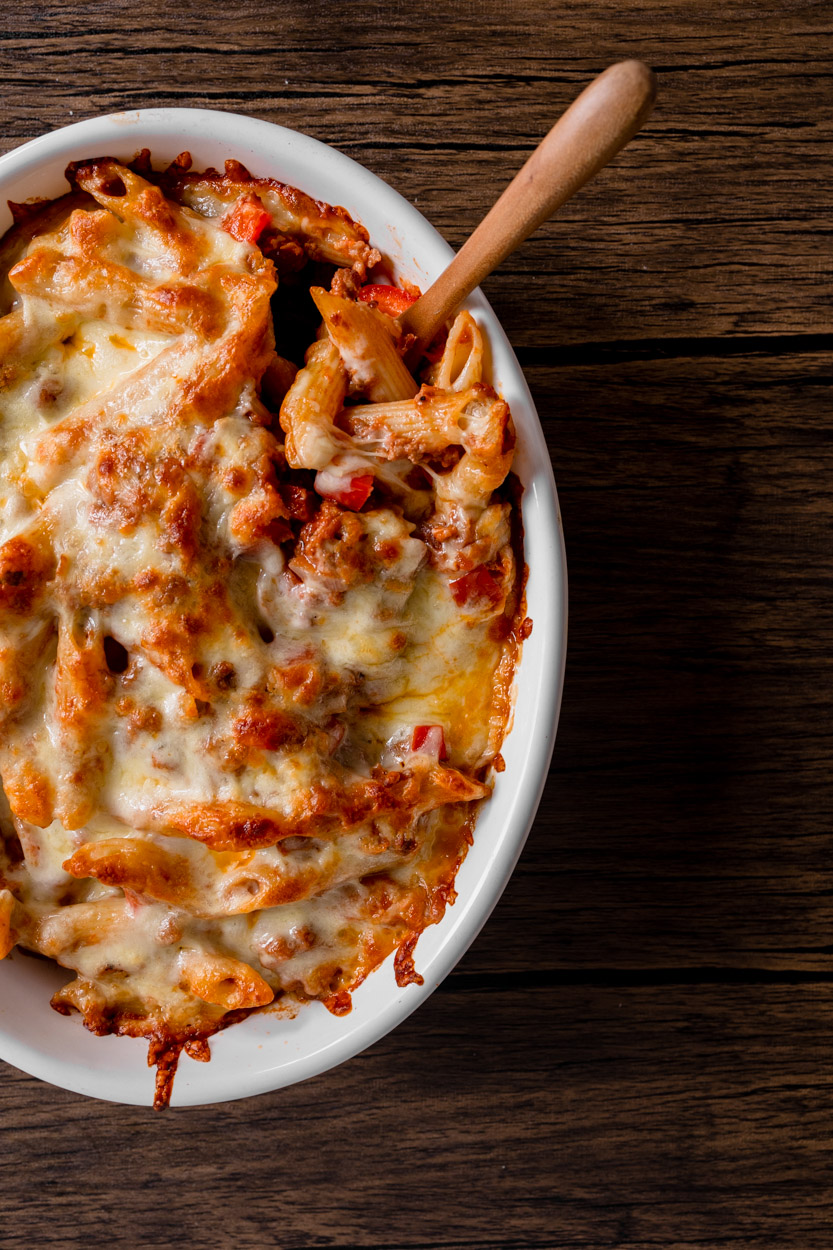
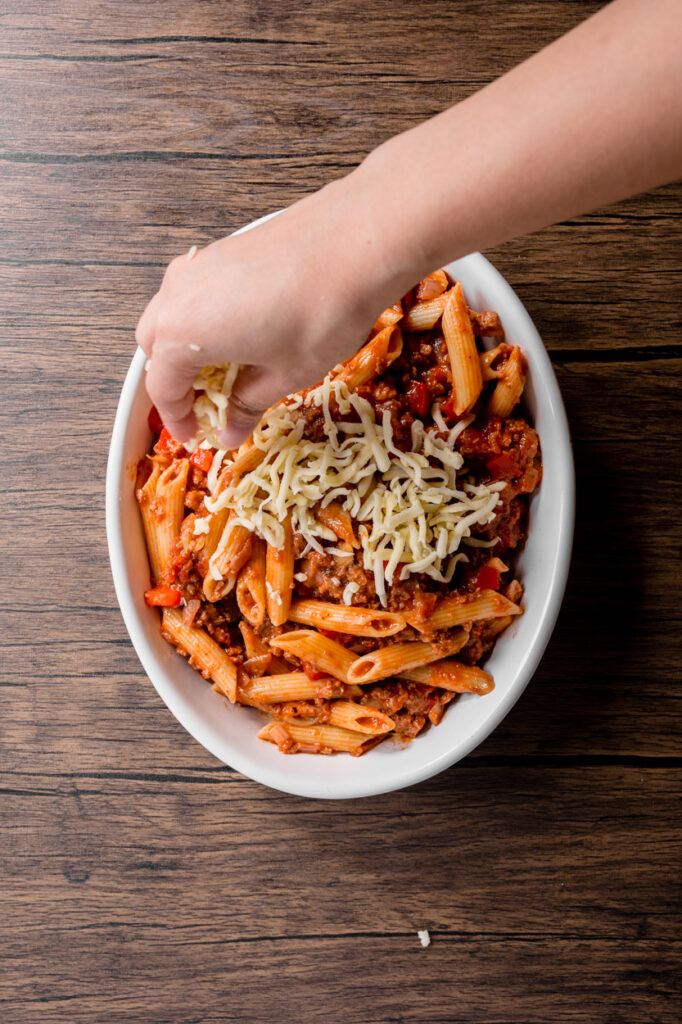
This vegan pasta bake is everything you want from a saucy cheesy pasta dish! it’s a firm favourite in our house and for a good reason! With colder days creeping up we crave comforting meals that are delicious and easy to make. This is actually one of Angela’s signature dishes so she’s the inspiration behind it, and we’ve tweaked it with some of our favourite things!
Our Vegan Pasta Bake is packed with ingredients, topped with our favourite vegan cheese, and baked to perfection. It makes for a perfect weeknight dinner that freezes and stores very well. Leftovers, anyone?
We fell in love with hummus the first time Angela tried it a few years ago, but we’ve always made the traditional version until I try a store-bought roasted red pepper hummus and it tastes even better! Unfortunately, the store-bought hummus had white sugar, refined sunflower oil and other nasty ingredients, so I prefer to make this homemade hummus and it tastes even better.
We eat hummus as an appetizer with some crudités (we love carrots!) or with homemade tortilla chips, salad dressing or as a side dish, but my favourite way to enjoy this delicious dish is spreading the hummus over a baked pizza crust and I also add chopped tomatoes, sweet paprika, extra virgin olive oil and some olives, it tastes really awesome!
Some people manage to go vegan overnight and if that’s the right approach for you, fantastic. But don’t be concerned if you feel you need more time. Like any other lifestyle change, going vegan not only takes getting used to it, but it takes time to determine what will work best for you. It’s not a one size fits all experience and there are numerous approaches you can take. Which are your favourite recipes?
Kohi Roastery & Coffee Bar isn’t all that remarkable at first glance. At a fleeting look, it’s a literal hole-in-the-wall. Mind you, it’s a rather unique “hole” that’s framed by a bright canary yellow paint job – one that has hoards of customers waiting patiently outside for their coffee fix during the day.
This particular coffee chain might hail from Bangkok, but there’s certainly no shortage of good coffee roasters in Singapore. And that’s exactly why Kohi is using a Red Dot blend, as a nod to our local coffee scene. Expect notes of citrus and tropical fruits, with an overlaying base of black tea.
Don’t expect to find items like your Caramel Macchiato here, the menu isn’t too extensive with simple items like White ($6), Black ($5), and Espresso ($4). There’s also Espresso Tonic ($7) and Coco(nut) Xpresso ($7) for sweltering hot days.
The coffee uses a Red Dot Blend, which has hints of tropical fruit, citrus, and black tea.
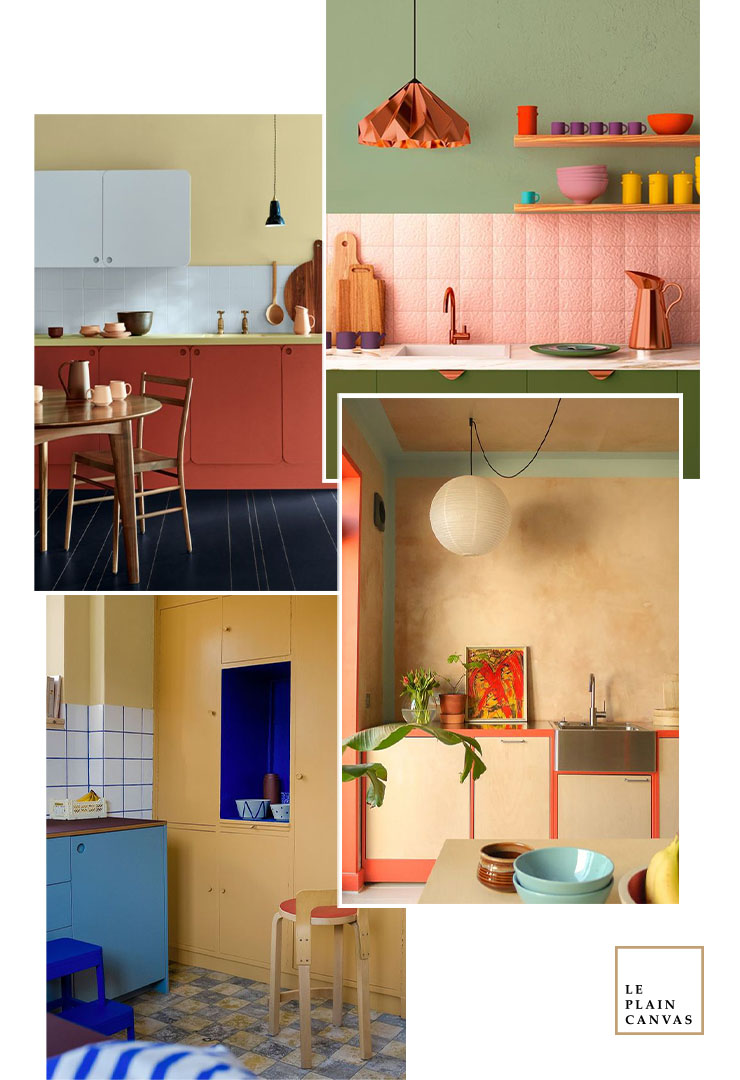
Fifty shades of brown might not have quite the same ring to it as the titular literary franchise it calls to mind, but it’s arguably a better design proposal. If you’re considering new ways to decorate with color, the humble hue is suitable for just about any design style and myriad tastes.
From a variety of earthy tints to all of the sumptuous wood tones nature can muster, brown is an elevated color choice that’s perfect for boosting a room’s style factor.
xoxo, Joe
Credit | All shots are used on the mood board via our Pinterest boards.
Roasted Carrot Soup is an easy carrot soup recipe with tomatoes, garlic, cumin, and Greek yogurt to make it creamy and filling. This tomato-based vegetarian soup is simple and healthy, and the leftovers are perfect for lunches and dinners all week long!
Roasting carrots in the oven means this carrot soup is more hands-off than a traditional soup that involves sautéing veggies on the stovetop. But this Roasted Carrot Soup is also miles better than a standard carrot soup because roasting caramelizes the veggies and adds depth and complexity to the flavor. This alone makes for a delectable soup, but we decided to take it to the next level by adding cumin, freshly grated ginger (optional), cream, and vegetable stock. This is a vegetable soup worth getting excited about!
Why you’ll love this recipe
Simple Ingredients: All you need is 4 ingredients to make this flavourful soup.
Rich Flavor: Roasted carrots have a rich, sweet, and savory caramelized flavor that is made even better by turning them into a gorgeous creamy soup. You can really taste the roasted carrots and I love it.
Easy to make: There are a few steps involved in getting this soup just right, but they aren’t very hard. Follow these easy instructions to learn how to make carrot soup that everyone will love.
4 Simple Ingredients
Carrots. The trick to the rich, almost intoxicating taste of this simple carrot soup is roasting the carrots which enhances their flavor and makes them super sweet.
Cumin. Added to the carrots prior to roasting for a little extra kick.
Vegetable Stock. We like to use the vegetable stock for more flavors
Cream. Gives the soup a light tang that balances the sweetness of the roasted carrots and onions and creates a smooth, velvety texture. The cream’s high protein content makes the Roasted Carrot Soup more filling too.
Additional tips to make your life easier
Use two sheet pans if needed. If you crowd your vegetables, they’ll steam instead of roasting and caramelizing. If your veggies look crowded on the sheet pan, transfer half of them to a second pan so they have sufficient space.
The broth needs to be hot. You’re not cooking the soup after pureeing, so heat up the broth before you put it in the blender with the vegetables. Vent the top a little to let steam escape and avoid hot soup splattering all over the place.
Don’t overload your blender. You can puree the soup in batches if you need to.
How to store and reheat?
This is the kind of soup that tastes better and better as the days pass! Store it in an airtight container in the refrigerator for up to 5 days; reheat it in the microwave or on the stovetop.
If you recreate any of theseRoasted Carrot Soup let us know how you liked it by leaving a comment and rating below or by tagging us on Instagram, we love seeing all of your tasty recreations!
3 cups great quality vegetable broth, boiling hot*
1 can, of 400g cream
3/4 teaspoon sea salt
Methods
Preheat oven to 425 degrees F/218 degrees C.
On a large sheet pan prepared with a silicone mat, parchment, or foil, add the carrots and the onions. Drizzle the olive oil over the vegetables and season with a grinding of fresh sea salt and ground black pepper. Rub the seasonings and oil into the vegetables and spread them out.
Roast for 30 to 35 minutes, turning halfway until veggies are roasted and carrots are fork tender.
In a large blender, add all the remaining ingredients to the vegetables. Ensure that the broth is very hot. If you’re not using a large blender (holds at least 6 cups) then do this in increments. Vent the top a little to let steam escape and avoid hot soup splattering all over the place.
Using the soup setting on your blender, or a very powerful blend option, blend until creamy and smooth. My blender automatically blends for about 3 minutes continuously.
Taste and add salt and pepper to taste if necessary. Top with garnish, we use carrot oil and basil leaves. Serve in bowls and enjoy!
Puck Provisions is the new kid on the block. If you’re the type that needs your caffeine to kick in before reality does, then we’ve got your back. We’ve got no shortage of places to hit up, and this hole-in-the-wall spot will tick all your boxes.
They’ve got a massive coffee bar counter for you to chill with a friend, and watch the barista make your coffee. Is it just me that loves the hum of the coffee machines and the smell of a fresh brew wafting in the air?
They’ve got pretty sage walls for a calming effect, perfect for starting your day on a good note. Puck Provisions is still in its soft launch phase, and everything on the menu is on a tipping basis. They use single-origin Ethiopia beans roasted in-house for their range of espresso drinks. Avid coffee drinkers can pick between Doppio, Piccolo, Black, or White, depending on preference.
We especially love the huge sharing table here, as it is not as busy as many places, it is a good place to work or have a read on your book.
Puck Provision Address: 618 Serangoon Rd, #01-01 Opening hours: Tues-Fri 10 am – 5 pm, Sat-Sun 10 am – 6 pm (Closed on Mon)
We’re often praising the versatility of nature-inspired green shades, and we’ve always had a soft spot for the wonderful luxe, timeless, and understated appeal of olive green. The richness of this deep and earthy colour makes it a go-to consideration for any new decorating scheme.
When utilized as a wall colour, olive green warms the space and adds a calming quality to the home, making it popular in biophilic interiors. When it comes to décor, it’s a shade that works well as an accent piece in neutral and nature-inspired homes, as being both inviting and pared-back. For a playful interior, olive green can also be paired with pink for an eye-catching look.
‘Olive green is a perfect all-year-round shade – in the summer it reminds us of the Italian countryside and alfresco dining, and pairs beautifully with white or even a very pale blush and gold accents.
xoxo, Joe
Credit | All shots are used on the mood board via our Pinterest boards.
This vegan pasta bake is everything you want from a saucy cheesy pasta dish! it’s a firm favorite in our house and for a good reason! With colder days creeping up we crave comforting meals that are delicious and easy to make. This is actually one of Angela’s signature dishes so she’s the inspiration behind it, and we’ve tweaked it with some of our favorite things!
Our Vegan Pasta Bake is packed with ingridents, topped with our favorite vegan cheese, and baked to perfection. It makes for a perfect weeknight dinner that freezes and stores very well. Leftovers, anyone?
What ingredients do you need?
Impossible minced meat: It is one of our go-to ingredients when we want to go vegan and replace our meat. While it tastes very different from the beef we usually have but the texture is 100% similar to it.
Choice of vegetables: We uses chopped onion and bell pepper here, but you can add in the things you like such as mushroom, lentils, peas, and more. Sometimes when we are feeling fancy we like to add in some herbs like basil leaves.
Tomato Paste: We use ready-made pasta sauce here, but you too can use tomato pasta and water as replacements.
Cooked pasta: When cooking your pasta at a good amount of olive oil and salt for the right texture and to maintain the colors.
Mozerella cheese: We use shredded mozzarella cheese here.
How to make Vegan Baked Pasta
You will find full instructions and measurements in the recipe card at the bottom of the post. This is a summary of the process to go along with the process photos.
Put the pasta on to cook. When it’s cooked, drain it, cover it (to prevent it from drying out) and set it aside.
Prepare your bolognese sauce. Add chopped onion and crushed garlic to a pot with olive oil and fry until softened. Add chopped bell pepper and cover the pot for a minute and allow the bell pepper to soften. Then remove the lid from the pot and add in the impossible minced meat, stir and cook well before adding in the tomato sauce. We like to stir in the pasta and soak it will the sauce for more flavour.
Assemble it in an oven-proof dish. Filled the dish with the pasta and top it generously with cheese. Bake uncovered at 430°F for 20 minutes until golden on top.
Finely chop the onion and place in a saucepan on medium heat with some oil. Leave to fry for a few minutes.
Mince the garlic and finely chop the red pepper and add to the pan. Cook for about 10 minutes until the onion and pepper are soft.
Add the chopped tomatoes, water, finely chopped sun-dried tomatoes, tomato puree, balsamic vinegar, sugar, mixed herbs, and pinch of chili flakes (optional). Bring to a gentle simmer and leave to cook for 15-20 minutes. It should have thickened and deepened in color, add a little more water if you need to whilst cooking.
In a separate pan, heat some oil. Cut sausages into small chunks and fry until browned and crispy. Set aside.
Make the white sauce. Add vegan butter to a small saucepan on low heat. Once melted add the flour and mix until it forms a roux/paste.
Gradually add the milk and whisk continuously until smooth. Add the vegan cheddar and whisk again until melted and thickened. Set aside.
Cook pasta until al dente. Drain and place in an oven proof dish.
Taste and season the tomato sauce and pour over the pasta with the cooked sausage. Stir well.
Sprinkle the vegan cheddar and mozzarella on top and place in the oven for 20-25 minutes.
The cheese should be melted and the sides crispy and bubbling.
It’s been months since we visited the newly opened Plain Vanilla at Joo Chiat. Plain Vanilla has been one of the cafes that grew up together with us. It is also one of the very first cafes we visited years back when cafe hopping become a trend. Now this locally grown cafe had already a few branches all around Singapore. We got to visit the newest branch at Joo Chiat.
Once you reach the cafe, you are been welcome by a full glass of bakeries. In terms of interior design, the colour tonality of the interior is similar to its revamped Tiong Bahru outlet. Think of patches of red walls, wooden furniture, and indoor plants – it is a very cosy ambiance. The space is split into indoor dining and backyard space with a skylight over the yard. Although it’s a little warm, we enjoy seating outside when we intend to stay at a cafe for a period of time.
It’s not the first time we dine in Plain Vanilla, we always enjoy their bake, especially the cupcakes. On this trip to the Joo Chiat branch, we got ourselves two desserts the Apricot Galette and Caramel Truffle Tart. Apricot & Pistachio Galette ($5) the sweetness of apricot blends well with the roasted pistachio. It has a flakey crust with is good to my liking. Salted Caramel Truffle Tart ($8), start to eat from the center of the tart, you will then be surprised with the runny salted caramel. Don’t worry it will be sweet as it matches well with the dark chocolate of the tart.
Other than the bakeries, they also serve a Breakfast menu (8 am to 3:30 pm) and Brunch menu (11 am to 3:30 pm), with the likes of toast, granola bowls, Eggs Benedict (S$22), Smashed Avocado Toast (S$22) and even handmade pasta. We also ordered some drinks to enjoy with our dessert Summer Fruit ($7) and Piccolo Latte ($4.5). The coffee here is by Allpress, one of our favorite New Zealand coffee roaster brands. We also like the fact that they have free-flow sparkling water as an option for their drinks, while it required us to pay a small amount of fee for it, it is totally worth it!
Plain Vanilla East Coast Address: 199 East Coast Road Singapore 428902 Opening Hours: Monday to Sunday: 7:30 am to 7:00 pm
THERE AREN’T many Parisapartments that we don’t like, but when we come across ones that are Joseph Dirand-esque, like this incredibly chic bachelor pad in the Place du Trocadéro, it’s a very special thing. Designed by Paris-based interior designer Isabelle Stanislas, the 4,800-square-foot pied-à-terre is the ultimate in sophistication with its muted tones, chevron wood flooring and boiserie. It is a study in art and architecture—Salinas opened the living room to the dome above and added a sweeping staircase—as well as restraint and an astonishing amount of wood.
We especially felt in love with the furniture that were used here. Every piece was so unique yet fit the apartment real well. The fury chair gave a fall/winter vibes which is what we really need now. Really want to have a seat on them during the rainy day.
xoxo, Joe
Credit | All shots are used on the mood board via our Pinterest boards.
This butternut risotto recipe is comforting, yet redeeming, and absolutely delicious. It features tender, caramelized cubes of butternut squash throughout. Unlike most risotto, this one calls for brown short-grain rice instead of white. This yields a super creamy risotto full of whole-grain goodness. The lightly nutty brown rice makes this risotto recipe remarkably flavorful, in the best of ways.
4 Ingredients to make Roasted Butternut
We always have been making roasted vegetables or even pumpkin puree, thus roasting butternut has been one of the techniques we are really familiar with. For this roasted butternut, you will need butternut, thyme, sage, and olive oil. Butternut Squash Vs Pumpkin Both butternut squash and pumpkin are winter squash,but butternut squash is available year-round. They’re usually sweeter and more nutritious in the winter because they’re harvested locally, rather than being shipped from further away or grown in less natural greenhouse-type environments throughout the year.
Making a good Risotto
Roasting butternut before making risotto is a common step in butternut squash risotto recipes. This one isn’t. In this recipe, butternut squash becomes a kind of sauce thanks to the fact that it is cooked in the same pot as everything else. We are amazed at the results. Making risotto is easy if you remember these two things.
Use hot stock. It is important to add the stock gradually when cooking risotto. Adding the stock to the arborio rice at a warm temperature prevents the temperature from dropping. The rice will also absorb the stock more quickly, resulting in a creamier texture.
Never stop stirring. It’s therapeutic for some and troublesome for others. There is no way to avoid it. Arborio rice—the kind generally used in risotto— is extra starchy, which means it’s more likely to stick (and burn). Stirring constantly is how the best way to do this.
Risotto is a great side dish to any number of meals. Serve it with a simple roasted chicken, a perfectly cooked steak, or a buttery piece of salmon. Store any leftovers in an airtight container in the refrigerator for up to 5 days. Risotto can also be frozen for up to 1 month. Reheat with a little more broth to bring it back to life.
1 small butternut squash (about 2 pounds), peeled and sliced into ½” cubes
3 tablespoons unsalted butter, diced
1 teaspoon salt, more to taste
freshly ground black pepper, to taste
sage & thyme
Methods
Heat the oven to 220C/200C fan/gas 7. Toss the squash in 1 tbsp oil together with the chopped sage. Scatter into a shallow roasting tin and roast for 30 mins until brown and soft.
While the squash is roasting, prepare the risotto. Bring the stock to a boil and keep it on a low simmer. In a separate pan, melt half the butter over medium heat. Stir in the onions and cook gently for 8-10 mins until soft but not coloured, stirring occasionally. Stir the rice into the onions until completely coated in the butter, then stir continuously until the rice is shiny and the edges of the grain start to look transparent.
Pour in the wine and simmer until completely evaporated. Add the stock, a ladleful at a time, and stirring the rice over a low heat for 25-30 mins, until the rice is cooked al dente (with a slightly firm, starchy bite in the middle). The risotto should be creamy and slightly soupy.
At the same time, gently fry the whole sage leaves in a little olive oil until crisp, then set aside on kitchen paper. When the squash is cooked, mash half of it to a rough purée and leave half whole. When the risotto is just done, stir through the purée, then add the cheese and remaining butter and leave to rest for a few minutes. Serve the risotto scattered with the whole chunks of squash and the crisp sage leaves.
I’ve seen Hello Arigato pop up multiple times on my Instagram feed. Whenever I pass by the street of Joo Chiat, the seats of Hello Arigato are always full and a long queue forms outside them. For those who are unfamiliar, Hello Arigato is a new-ish cafe located in the Upper Thomson area. They are known for their thick Sandos, stuffed with Wagyu and more.
The team behind the venture is not new to the food business though. They are also behind The Refinery and thus are considered experienced in offering modern Japanese and brunch fare. With Scandinavian-style interiors, the café was smaller and narrower than what I have expected though. Likewise, the place is already full even before lunchtime, and we could only get a table outside the cafe. If you have a pet, the outdoor seats here are a great choice for you.
To start, we got the popular Gyu Sando ($26). This was the most expensive sandwich on the menu, so my expectations were pretty high. The bright pink center of the beef was the first thing to catch my eye—we requested for our meat to be cooked to medium rare. The sand is made with a slab of Angus beef sirloin, a generous spread of caramelized sweet onion jam, and Japanese milk bread.
We also ordered a Sakura Ebi Udon ($22). First of all, I love how it is still piping hot when it was sent to the table. This creamy really blows our minds, the combination of Shinichi Inaniwa Udon, Creamy Ebi Sauce, Tiger Prawns, Honey Cherry Tomatoes, Pickled Myoga, Ebi Oil, and Scallions really goes well with each other. I was wondering why didn’t anyone mention this at all.
Guests can also expect new bakes and creations in the Joo Chiat outlet which houses their Bakery department. Expect sweet treats of Sticky Bun ($6), Miso Brownie ($8.50), Miso Banana Cake ($7), Cookie Arigato ($5) Burnt Basque Cheesecake ($8.50), and Yuzu Meringue Cake ($9).
Located on the upper hills of Cannes, the home boasts dramatic views of the Bay of Cannes, the Lerins Islands, and the Esterel Mountains. It also sits on 150,700 square feet of private grounds with exotic trees and shrubs planted in the 18th century.
The monochromatic palette of sand tones and beige hues makes every object and piece of made-to-measure or vintage furniture pop. This scheme is complemented by touches of green introduced on the kitchen credenza wall—which features glazed zellige tiles—and in the primary bathroom, where Caprini and Pellerin installed handmade feather tiles to echo the outdoor palm leaves. The use of five main materials—ash gray Dordogne stone, travertine stone, oak wood, walnut wood, and bronze—also contributes to a cohesive feeling.
xoxo, Joe
Credit | All shots are used on the mood board via our Pinterest boards.
Bugis is one of our favorite places to visit since young for shopping and food. After shopping, we like to walk to Jalan Besar for more amazing places. Jalan Besar is a one-way road in Singapore that connects Kallang and Rochor. While literally meaning “Large Road” in Malay, Jalan Besar is often used to refer to the immediate areas around the road. Jalan Besar is mostly known for its local restaurants and cafes with trendy flairs.
These conserved areas also boast colorful architecture and vibrant locals that are a feast for the eyes. You can never go wrong with visiting the area. So, if you’re in the neighborhood and looking for things to do, here are some of our suggestions for you to check out!
Double Up Coffee
Double Up Coffee which is located at Jalan Klapa, is considered quite a hole-in-the-wall. As there isn’t a shop name located anywhere, with just a big logo welcoming us, we almost doubt ourselves if we are at the right place.
There are two halves of Double Up Coffee. Outside, you would spot three chairs of solid colors of red, yellow, and blue, along with a table repurposed from a skateboard. It suggests funkiness and young vibes. Walking in, the mood changes with a light grey cement coffee counter, and light wooden chairs, but most customers were sitting back facing the wall on a row of concrete seats. Don’t be surprised to spot Double Up coffee beans in many of the small cafés. As they are one of the best roasteries in Singapore.
Double Up Coffee Address: 7 Jalan Klapa, Singapore 199319 Opening Hours: 10am – 6pm (Mon, Wed – Sun), Closed Tues
Madu Bakery
As we stepped into the bakery cafe, the first thing that hit me was the aroma of garlic. Next, the only thought we had was how this place looks right out of a furniture catalogue or a Pinterest board — the beige-woody interior was so aesthetically pleasing and strangely calming.
We headed straight for the glass display case where their seasonal bakes were laid out for customers to choose from. These aren’t on the menu though, so you’ll have to go over to see what’s available!
Madu The Bakery Address: 421 Race Course Road Operating Hours: 10 am – 8 pm, Tuesday to Sunday. Closed on Mondays.
Haus 217
Designed by the people behind ANDSOFORTH and Warehouse16, Haus217 is a brand new venue in Singapore that takes on the Japanese lifestyle concept of Wabi Sabi, which is to embrace imperfection. Haus217 is located within a 60-year-old shophouse, and its interiors feature meticulously-crafted stained wood accents, reminiscent of European travel homes.
On random days of the month when there are no bookings for their event venue, HAUS217 will be transformed into a cafe with art installations. In late May, we got our chance to make a visit before it went into hiatus for reformation. For this current pop-up concept, we booked tickets where they are priced at $8 per person, with $8 credits given to spend (technically free to enter).
HAUS217 Address: 217 Lavender Street, Singapore 338772 Opening Hours: 10 am – 4 pm, only by reservation (Currently on hiatus)
Class Exhibition at Design Center
During the Night Festival, one of the highlights events was most of the museums and centres are open out to late at night instead of closing during the evening. We then come across an exhibition located on the second floor of the National Design Center – Class Acts. We were attracted by the orange translucent “curtain”, which very clearly explained the exhibition, a history of Singapore creatives pioneers.
National Design Center Address: 111 Middle Rd Operating Hours: 9 am to 9 pm
Asylum Coffeehouse
Asylum Coffeehouse is located along the road of Jalan Besar; with its blue and red heritage shophouse set along Jalan Besar (near Petain Road), Asylum Coffeehouse has the typical white and woody (well, MUJI-like) interior, with natural light streaming in.
With a cozy environment, great coffee and pastries, and friendly staff, it checks off most of our requirements. Despite the short time we spent in the cafe, the interior was welcoming and facilitates communication between baristas and staff. There’s probably a crowd near the counter that’s directly in front of the door that the cafe must manage.
Asylum Coffeehouse 311 Jalan Besar, Singapore 208970 Mon-Sun, 8am-4.30pm
It’s not a surprise of our love for coffee, as seen on our list most of them are coffee roasteries. We have been searching for interesting coffee and bean. Let us know in the comment below if you like us to share with you our favorite coffee in Singapore.
We’re getting back to minimalism again! Striking a balance between simplicity and lifeless can be a bit hard to pin point. After we’ve decluttered and edited down our stuff, we have to think about how we use the space. How do we create a minimalist home that’s cozy? It comes down to the details. And that’s where warm minimalism comes in.
If you’re looking for a luxe, tidy but lived in feel, warm minimalism is something to look into. A style that will make your home feel more elegant but cozy too.
xoxo, Joe
Credit | All shots are used on the mood board via our Pinterest boards.
Salmon is our favorite fish to work on, not to mention it’s easy to obtain in the local market, it is also easy to work with using different cooking methods. This Thai-inspired Salmon Coconut Curry has tender pan-seared salmon in a creamy red curry coconut milk sauce. It’s flavorful and comforting!
It’s one of my favorite sauces. we can’t resist a good coconut milk sauce. It is a symphony of flavors dancing on your tastebuds with a symphony of Thai red curry paste, garlic, onion, fish sauce, lime juice, and sugar. Rice is an excellent accompaniment to this coconut curry salmon. It worked out nicely to eat the leftover salmon cold the following day in a salad. Salmon is kept tender with coconut milk.
Pan-Sear vs Baked Salmon
The perfectly prepared fish is moist, flavorful, and succulent. Salmon is no exception. When fish is overcooked, it dries out and loses delicious flavor. Should you pan-sear or bake salmon? The answer is yes! You can fry or bake salmon, but you can also grill, poach, and broil it. All of these cooking options will leave your fish tasting amazing.
Pan-searing Salmon: Before cooking the salmon, rinse and pat the fillets dry before seasoning it with salt and pepper. Once the preheated pan is hot, add the olive oil to the pan. Place your salmon skin side up (this is important!) and set a timer for 3 minutes. You always start the skin side up because dry spices on the flesh can burn if cooked longer than 3 minutes. Flip the fillet and reduce the heat slightly (to about medium), and cover the pan with a lid. Set the timer for another 2-3 minutes, and you are done!
Baked Salmon: Start by preheating your oven to 375 degrees. Line a baking sheet with foil for a much easier clean-up. Place the salmon fillet on the baking sheet, skin side down. Brush the salmon with olive oil and season it well with salt and pepper. Bake the fillet for 10-15 minutes, and you are done!
What to take note to make it better?
You don’t have to add fish sauce to the recipe, but if you haven’t tried it before, I strongly recommend it. It adds another layer of flavor to the dish, and don’t worry, the flavor mellows out a lot (it smells quite fishy out of the bottle). It also lasts a long time in the fridge.
The coconut milk you buy really matters. We prefer full-fat coconut milk. It’s rich and creamy. Other brands I’ve found can be watery. You can find it in the Asian section of the grocery store along with the red curry paste and fish sauce.
This coconut milk salmon recipe can easily be adjusted to your tastes as needed… don’t be shy to add more of any ingredient – that’s what cooking is all about! If you’re not a fan of the veggies we used here, you can definitely swap them out for something different, just be sure they’re cut up small enough that they cook fast. Peas (or snow peas) come to mind as a tasty addition, red peppers would be delish, and you could even try cut-up asparagus (get the thin kind).
1/2 teaspoon kosher salt (more for a larger filet)
1–2 teaspoons olive oil
Coconut Curry Sauce:
1 tablespoon olive oil
2 cloves garlic (minced)
1 small knob of ginger (minced)
1 tablespoon brown sugar
1 tablespoon red curry paste
1 can of coconut milk
2 tbsp of fish sauce or soy sauce
lots of lime juice and zest
1 red pepper, diced
1 onion, diced
1 tbsp of tomato paste
cilantro, basil, mint, or other fresh herbs
Methods
Salmon: Mix the spices and the olive oil to make a paste. Place the salmon skin side down on the baking sheet. Rub the paste liberally over the top part of the salmon. Pan fry for 6-12 minutes (depending on the salmon thickness and desired doneness – I usually opt for 8-10 minutes).
Coconut Curry Sauce: Heat the olive oil over medium heat. Add garlic, ginger, onion, and red peppers; sauté for 5 minutes. Add brown sugar and curry paste; sauté for 3 minutes. Add coconut milk. Season with fish sauce and lime juice to taste.
Serve: Place salmon over rice. Cover with sauce, lime juice, and fresh herbs.
Remember the Brunt Cheesecake trend back during the pandemic period? This dish brunt cheesecake is so delicious that I even start a mini business of it. My brunt cheesecake consist of cream cheese, sugar & cream, all you need to do is to mix it well and bake it on a low then high temperature allowing the crust of the cheesecake to brunt yet the insist of the cheesecake maintain creamy and moist.
While the trend is dying down, it is still much appreciate by many and thus you can spot many cafe having this item on their menu. However, on of the restaurant decided to open one cafe that solely sell these yummy cheese cake and they are Quiec by Olivia.
Stepping inside, the interior is painted in yellow and brown hues, just like a burnt cheesecake, and it smells like one, especially when each batch of bakes is being replenished on the display. From the tiles on the walls to the floor, four tables and benches, the designs are symmetrical, which somewhat reminds me of a cheese grater with its neat arrangement.
I have tried many version of cheesecake and thus I doesn’t has high expectation on it as how special can a brunt cheesecake be? But these cheesecake blown my mind, I could remember vividly how distinctive and remarkable Olivia’s version is. They uses Valdeon cheese (a Spanish blue cheese made from a blend of goat and cow milk) that give it a savoury note, which change my view on a cheesecake,
Their signature Olivia Burnt Cheesecake can be found here at QUEIC in various sizes: 4” ($15), 6” ($48) and 9” ($78). We order a slice instead where it cost $15. This cheesecake is on top of an almond sable base that is firm and crisp, before scorching the top layer to add a caramelised touch. More like a pie instead of the cake due to the almond sable base, the result is a semi-molten cheesecake at room temperature, creating a myriad of textures from the oozy cheese to the crazy caramelised layer and the crunchy almond sable base.
While many homeowners consider red a challenging hue, the colour actually possesses lots of potential to bring out the sensuality and cosiness of a room. Find out how you can work the colour into your home, without letting it overwhelm your style.
Instead of painting the wall red, these days red tiles was used to add texture to the place. Small rectangle or square are used to bring out the accent of the place. While it is rare to find a red table, red tiles are used instead to bring out the uniqueness of the place.
xoxo, Joe
Credit | All shots are used on the mood board via our Pinterest boards.
Before knowing what is vegan, we had never heard of tempeh. In fact, tempeh was one of the last plant-based “staple” foods we tried. Before even giving it a fair shake, Joe even decided “nope, tempeh is not for her”, as it looks plain and dry. However, with the right cooking method and sauces to accompany it her views on it changes and we know it will change yours too.
Teriyaki Tempeh Rice – this recipe comes together in just 15 minutes and is sure to be a crowd-pleaser in your home! It’s packed with flavor and has a ton of plant-based protein. I’m glad the pictures now reflect how absolutely delicious this recipe is!
This is a healthy, vegetarian/vegan take on beef and bak coy, my Chinese take-out dish of choice growing up. It’s just as delicious and satisfying! And like most of the dinner recipes you’ll find here, this one is pretty easy to toss together — no cooking experience needed. Everything is cooked in one skillet so you don’t have to worry about cleaning a bunch of dishes either. Hooray!
What is Tempeh?
Tempeh is an Indonesian plant-based protein source. Tempeh is made from fermented soybeans shaped into blocks, though store-bought tempeh often contains grains and beans as well. Despite its high protein content, it offers many health benefits as well. As an example, it is packed with calcium, manganese, phosphorus, and iron! We got ours at this premium supermarket Little Farms which have many options for organic product.
They have plain and marinated tempeh for you to choose from. Well, the plain one is a healthier choice and has the flexibility to customize the flavors but on the other hand, it will take a while for the marinate to get absorbed into the tempeh. For someone that like quick meals, we decide to opt for one that is already marinated, and the one we have is the tasty version where it was marinated with soy sauce and ginger.
How do you cook Tempeh?
As we have it marinated, we will skip that step and move on to cooking. Many choose to cook the whole piece and have it cut into smaller pieces only after cooking. However, we like every small piece to be crispy on every side, thus we cut them into long pieces or cubes before cooking them, you can pan-fry or bake them in the oven.
Pan-fry; On a heated pan, drizzle it with a good amount of oil. spread the tempeh evenly on the pan and pan-fry every side till brown. We usually kept ours longer on the pan as we like them slightly crispy.
Bake; Spread the marinated cubes on a parchment-lined baking sheet, and transfer them to a 425-degree oven for 10 minutes. After 10 minutes, remove them from the oven, and brush more of the marinade over the cubes. Bake for another 10 minutes, until the cubes are charred around the edges. Enjoy!
Soul of the dish – Homemade Teriyaki Sauce
Teriyaki Sauce has become one of the most popular seasonings outside of Japan because of its savory taste and versatility. There have been a lot of questions about how to make your own teriyaki sauce without purchasing the store-bought version. Well, you can make them at home, what’s the best thing about homemade teriyaki sauce? The most delicious sauce goes well with anything you serve it with, and it only takes 4 simple ingredients! Keep it on hand all the time since it’s so easy.
Our favorite Homemade Teriyaki Sauce recipe is by Just One Cookbook, while it is already perfect we make a little twist to it based on our taste. You will need;
Soy sauce – If you are more well-off use Japanese soy sauce it has deeper flavors. However, we also do use the Chinese soy sauce sometimes, but the high sodium content may affect the taste.
Mirin – This is Japanese sweet rice wine. It adds a delicate sweetness and fragrance and gives the sauce a nice luster.
Sake – When added to a sauce, sake intensifies the flavors of the other ingredients.
Sugar – Sugar adds sweetness and balances the savory taste of the teriyaki sauce. It is also crucial to give the sauce its sticky texture. We don’t use honey or maple syrup because they have a strong flavor. But, if that’s your preference, go ahead but take care as it burns easily.
This is one of the recipes we like to make when we are busy, as it can be done in just a few simple steps.
Your choice of veggie, we choose bak coy and avocado for ours
Teriyaki Sauce
4 tbsp soy sauce
1 tsp sesame oil or olive oil
2 tbsp maple syrup
1 tbsp apple sauce
½ tsp minced garlic
½ tsp cornstarch
Toppings
Sesame seeds
Scallions
Methods
Prepare the ingredients: Cut tempeh into triangles or squares. Place oil in a pan and sear the tempeh for 3-5 minutes on each side until crispy. At the side, blanch the vegetable in boiling water and keep it aside. Using a mason jar mix teriyaki sauce ingredients.
You always see us raving about Everton Park as it may be one of our favorite places to take a break in Singapore. Recently 46 Mittsu had moved into this quiet estate and of course, we have to give it a try. We had over during the early lunch period and it is already filled with people. Some of the popular items on the menu had already sold out before we reached, so get there early if there’s a specific item you would like to try.
Before heading over we research some of the must-try items and one of their best-selling B.E.C ($14). This all-time favorite sees thick-cut bacon, creamy scrambled eggs, American cheddar, and a secret sauce, served between freshly baked ciabatta bread from local bakery Pelle. We recommend to add-on a hashbrown ($2) and it does compliment the sandwiches/sando really well.
We decide to give the special menu a try too, and the Ric & Tomotry ($12) caught us. If you do not want something too heavy this is something you can choose from, where it contains juicy tomato, sunny egg, and avocado with creamy ricotta cheese, which elevate the taste of each other.
Although they only have a few seats in the store, a camping chair is provided for you to dine in outside the store, which is what we prefer. The sandwiches are served on a tray, which looks like we are really camping.
Do note that 46 Mittsu has been selling out earlier than its stipulated closing time of 5 pm since reopening, so do make sure you arrive early to beat the crowd. Seating is also limited with a few camping-style chairs, so it might be better to dabao instead of dining in.
Another cafe in the area worth trying is O Happi Place, which offers unique gelato flavors in a chic setting. Everton Park is indeed the place I like to spend my afternoon during a quiet weekday.
46 Mittsu Address: 2 Everton Park, Singapore 081002 Opening hours: Daily 8 am to 5 pm (or until sold out) Website
Douglas House is a new six-floor office building in London, designed by Stockholm’s Note Design Studio for The Office Group, and it’s warmer and more inviting than half the houses we’ve seen.
One of the main features is a curved wall of glass bricks, which separates the warm neutrals and desert shades of the common areas from the cool blues of the breakout rooms. The palette, as in any Note project, is impeccable, with pops of ultramarine in the form of Marenco chairs, red stools, chartreuse Muller van Severen lights, and a raft of small accessories.
The studio also made extensive use of surface treatments, like a reception desk fabricated from powder blue Sottsass ALPI veneer and wallcoverings made from recyclable terrazzo-esque Tarkett rubber. Sustainability was key, with Note and TOG retaining as many existing materials as possible, and elsewhere using materials that can be recycled in the future, including steel, glass, and ceramics. A plant-filled “oxygen room” and a recharge room that looks like a James Turrell installation finish off the space. Raise your hand if this is better than working from your couch and working on five days of squash soup leftovers.
Do you want to a place like this?
xoxo, Joe
Credit | All shots are used on the mood board via our Pinterest boards.
Salmon is truly one of the best choices of fish out there! I like how readily available it is, how versatile it is, and how healthy it is for any meal. The recipe we’re sharing today is my tried-and-true easy salmon recipe called Baked Miso Salmon with Scallion Sauce.
Miso & butter marinate salmon fillets, which are then baked until succulent & golden brown. Served with rice and scallion sauce, it is simple and satisfying for the whole family.
The Use of Miso in Japanese Recipes
Miso is made primarily from fermenting soybeans, salt, koji (a fermentation starter), and sometimes rice or barley for 6 months to 5 years.
From miso soup to salad dressing and seasonings /sauce, it is a common condiment that we use every day in Japanese kitchens. The sweet and salty miso also makes a wonderful marinade that pairs particularly well with fatty fish, like cod and salmon.
Miso Butter: Leave the butter on the counter to soften before combining it with the miso paste well in a bowl.
Scallion Sauce: Meanwhile, in a small bowl, combine green onions, ginger, oil, tamari, vinegar, 1/16 teaspoon salt, and 1/32 teaspoon pepper. Set aside (or place in the refrigerator until serving).
Salmon: Preheat the oven to 220C. Meanwhile, season the flesh side of the salmon evenly with 1/4 teaspoon salt and 1/16 teaspoon pepper. Place the salmon skin side down on a baking tray, cover it well with the miso butter, and baked it for 10-12 minutes.
Assemble: Serve salmon and topped with Ginger-Scallion Sauce with/ without rice. We also like to drizzle a little additional glaze over the rice or veggies too.
Just a few decades ago, it was still common to complete an assignment using pen and paper instead of a computer and to play with physical toys rather than a handheld device. Fast forward to today, where technology now plays an indispensable role in our daily lives, and pivotally transformed the ways in which we live, work, play, and socialize. We are more “switched on” today than ever, and connected to a vast network of technology and gadgets than we could have possibly imagined back then.
At On/Off we step into this immersive showcase and explore how everyday technological tools changed and shaped the lives of Singaporeans from the 1970s to the 2000s. Set against the backdrop of the nation’s industrialization and rapid transformation period, the showcase takes visitors through familiar local settings at home, work and other social spaces with a small, yet specially curated selection of technology icons from Singapore’s past. These include the typewriter and personal computer, as well as telecommunications and entertainment devices such as the payphone, pager, and the technicolour television set.
You can look forward to getting to know and reconnecting with some of these technologies, through several themed installations with complementary gamified experiences including an escape room activity.
National Museum of Singapore Address: 93 Stamford Rd Operating Hours: 93 Stamford Rd
This week’s mood board feels very fall-ish. we are into October, after all with Halloween and then thanksgiving just around the corner. it’s rather hard to believe this year is flying by so quickly. but here I am, embracing a new color palette, one that’s appropriate to this time of year.
During the fall I might consider the ochre-colored walls for my room as this bedroom certainly looks dreamy and the deep yellow walls work perfectly with the subtle stripe of pink in the throw. An unexpected but delightful pairing!
And I have been addicted to more cool chairs, this time from atelier de troupe — an l.a. shop! These are apparently called coda chairs and they are simply stunning, tubes and turns abound on these beauties. I must make it a mission to find one of my very own (and in my price range).
What do you think about this color?
xoxo, Joe
Credit | All shots are used on the mood board via our Pinterest boards.
Years back we tested on our very first spam musubi and ever since it has been our favourite to-go snack/ quick bite for the lunch. However, we couldn’t enjoy it as much as we could as spam is one of the unhealthy options and not to mention it is kind of overpriced. Therefore, with A vegan twist on the classic spam musubi, this tofu musubi will win over our hearts!
For those who don’t know what is spam musubi, it is basically big sushi with spam on it with seaweed wrapping over it. You could prepare it ahead without the seaweed and refrigerate it for the next day. Although, we are sure that you won’t keep any after once you did it. All you need is to microwave it for 30 seconds and wrap the seaweed over like an onigiri.
Why did we choose Tofu as a replacement?
Angela has been eating healthier for the past year, where she slowly replace vegan from her protein. With her influence, I got highly affected too. One day I want to make something easy for lunch and the Spam Musubi came across me. We decided to make something healthier instead and thought that Tofu could be the best replacement, like what many other vegan dishes did. The tofu doesn’t taste exactly like Spam, but it provides that salty, smoky, sweet meat-like flavour and texture of Spam.
What Tofu did we choose?
As we are all busy with our new careers and tasks, convenience has become our best friend. However, we always keep in mind that a healthy diet should always be our primary priority. This time we use Spicy Tofu by NutriSoy, which it already well marinated and good to use anytime.
However, if you couldn’t find one you could also marinate them yourselves. Start by getting tofu that is on the harder side. All you need to do is to marinate it with the below ingredients for at least 30 minutes you could get the same spicy tofu that we got from the store.
Spicy Tofu Marinate
1 tablespoon brown sugar
2 tablespoon soy sauce
1 tablespoon rice vinegar
1 tablespoon fresh ginger grated
1 tablespoon fresh garlic minced
2 scallions finely sliced
How to Cook the Tofu?
You can pan cook, bake, or grill tofu after marinating it. For a block of tofu cut into 4 strips:
In a pan, cook for 3 minutes per side until lightly brown.
In the oven, bake for 15 minutes per side at 400F until lightly brown.
On the grill, cook for 5 minutes per side making sure to get some beautiful grill marks on the tofu.
Time to Wrap it Up
Prepare your Rice: Like making sushi, you need to have your rice well prepared ahead, we decide to have normal rice this time instead of adding rice vinegar for sushi rice. Do not leave the rice out for too long as we wanted it to be slightly warm in order for you to shape it. We decided to add some seaweed flavouring to the rice for more flavours, but this is optional.
Shape your Rice: The key point when it comes to shaping rice is to dip your palm in cold water, however, we only want them to be slightly damp and not too wet to prevent the rice from sticking over your hand. The amount of rice depends on how big your tofu is, for us we have around 3 tbsp of rice for a “dough”.
Laying Them: As we are still not skilful enough, we did the wrapping on a plate instead. Stay layering with seaweed, tofu and then rice. Then roll them up tightly, if your rice is still warm, the seaweed will be sticking well.
2 tbsp of seaweed seasoning 2 sheets nori seaweed cut into 1.5″ strips (8 strips needed)
Methods
Lightly oil a non-stick pan and heat over medium heat. Cook the tofu on both sides until it begins to brown, ~3 minutes per side.
Split your rice into 8 equal parts. With wet hands, press each part into the side wall of your tofu container as shown in the photo. Pack it in firmly so it comes out as one piece. Repeat 7 more times.
Top each rice rectangle with one piece of the cooked tofu. Wrap each with one of the nori strips.
If I was to describe my summer this year in one word, it would be “fruits”. Fresh fruits, of course (though that makes two words), and a lot of them (five words now?). June came with rhubarb and gooseberries. Then I spent the month of July busying myself with making the most of short seasons of apricots and cherries (though the latter was mostly imported Bings, I must admit). And come August peaches and blueberries effectively took over my days – when I wasn’t picking, eating, or baking with them, I was thinking about how best to use them at their best.
And one way to preserve the best of the fresh fruits of the season, at least for me, was to make liqueurs with them. You see, I’m not really keen on jams and preserves, and canning generally involves more process (and sugar) than I’d ever like to have with my fruits.
f you are decorating a large and well-lighted room, going with all-warm colors adds a comfortable, welcoming mood. Start with a warm neutral on the walls, like taupe, a warm gray or a warm shade of white, such as ivory with a yellow undertone. Choose a natural-colored leather sofa to add richness and harmonize with a used brick fireplace wall. Pick up the brick red color of the fireplace in striped upholstery that includes the same as the walls for the chairs, and add custom throw pillows in the same fabric for the sofa to add cohesion. Choose an area rug that is either the color of the walls or one that combines the wall color and brick red. Be sure the shade of red harmonizes with the color of hardwood in your flooring. Warm walls plus brick red, natural leather and wood equal cozy to the max.
If you have enough moxie, paint the walls a deep shade of red and cover chairs in the same color—the fabric adds texture and dimension. Cover the sofa in a warm ivory with pink undertones and use that color as an accent throughout, including as painted trim. If they did it in the White House (the Red Room), you can, too. This is statement-making warmth.
xoxo, Joe
Credit | All shots are used on the mood board via our Pinterest boards.
Before the summer comes to an end and we head to welcome autumn, we can’t stop having our favourite activity during the summer – grilled meat “party”. While we can enjoy grilling meat in Singapore as we have no restrictions on the weather, we tend to enjoy grilling meat and vegetables more on the hotter day. This time we decided to challenge ourselves in making 3 different kinds of meat skewers accompanied by different kinds of vegetables and fruits.
Making your Skewers
Choosing the meat: Grilling meat is the best way to lock all the moisture and flavours to your proteins, thus you can choose all kinds of meat that you like, from pork, and beef to mutton and chicken. They are all very good choices when it comes to grilling. However, one thing to take note of is when you come to choose the part of the meat you need to choose one that has fats on it. For us, we choose Chicken Tight, Pork Belly and Pork Tenderloin for our choice this time.
Marinating the meat: Even though we have sauces on the side it is still best to marinate the meat for more flavours.
Honey Lime Chicken Tight: In a bowl, mix 3 tbsp of honey, and 2 tbsp of lime juice and season it with salt and pepper. Brush it over the chicken tight or marinate it in a zip-lock bag. Marinate it in the fridge for at least an hour before skewering up the meat. Remember to keep the remaining sauce as you need them during grilling the meat.
Mexican Pork Tenderloin: This Mexican mix add warm, spicy, and smoky flavour to your proteins. It is made of chilli powder, ground cumin, dried oregano, sea salt, black pepper, ground paprika, garlic powder, onion powder, and crushed red pepper flakes. Brush it over the meat, we like to press and mix with our palms to make sure it is well marinated.
Herbes de Provence Pork Belly: Herbes de Provence is a herb mix we like to use for our steaks, it consists of thyme, black peppers, rosemary, marjoram, aniseed and lavender. It is light yet enhanced the flavours of the pork belly. All you need to do is grind it over the pork belly and let it sit for at least an hour.
Skewering up the meat: Prepare the skewers ahead by washing them and making sure they are dry. You can use the wooden and metal skewers if you can cook on the stove, however, you are encouraged to use the metal skewers on fire as you will burn the wooden ones.
Cut the meat up into smaller pieces and skewers them up evenly to your skewers. You may find it difficult to poke through the pork belly skin, thus you can remove them if you like.
Grilling them: When we want to have a fast meal we will grill our meat on the stove in the grilling pan. All you need is hot the pan and drizzle over some oil, before cooking the meat. Make sure you cook them thoroughly as we don’t want undercooked food. For the chicken tight, brush the remaining sauce over twice when cooking, as the honey it the tip of making sure the chicken tight is golden brown.
What to have on the sides?
Back in the day, we like to skewer up the meat and vegetables together. However, there are times our friends skipped them as they don’t like the vegetables. Thus from then, we decided to put them on the sides, as everyone can enjoy what they like!
Bell Pepper: Put a net over your stove, and roast your pepper over it. Turn your peppers from time to time and your peppers will be puffy from the air inside, but once removed from the heat and cooled a bit they will deflate and become wrinkly.
Pineapple: When we decided to have fruit for the platter, the first thing that comes to our mind is the pineapple, it is sweet and sour best side is when you have a whole plate of meat. We grilled it over the pan when cooking the meat.
During the Night Festival, one of the highlights events was most of the museums and centres are open out to late at night instead of closing during the evening. We then come across an exhibition located on the second floor of the National Design Center – Class Acts. We were attracted by the orange translucent “curtain”, which very clearly explained the exhibition, a history of Singapore creatives pioneers.
As someone who only listens to pop music, my understanding of indie music and its history of them is little to none. It’s a very small exhibition showcasing a few of the music scenes of the past. It’s heartwarming to see all the images or videos of their existence of them making me want to research them more.
As it is a National Design Center it is also a place to showcase or highlight the design scene we have in singapore, from artitacture to products, and even packaging. Away from the Class Acts Exhibition, there has a place beside it showcasing a history of important design moments. Well, the place is not big you can enjoy a whole hour there. They even provide a flat the seat for you to seat, a great place to stop over if you are around Bugis.
National Design Center Address: 111 Middle Rd Operating Hours: 9 am to 9 pm
A modern penthouse apartment by Nina Mair Architecture + Design located outside Innsbruck, Austria was converted into an urban loft that embodies the Alpine lifestyle. In addition to oak marquee, Kanfanar stone, linen, and wool textiles, the interiors feature a warm, pastel color palette.
Furthermore, the home was designed around a central nucleus that allows residents to adjust the rooms according to the season and position of the sun. Depending on the room’s purpose, such as cooking, dining, resting, or bathing, natural light is captured appropriately or avoided.
In keeping with the natural Alpine environment outside, the kitchen is made from native Kanfanar stone and the floors are made from oiled wood. There is also custom oak furniture custom made for the interior. This generous space is filled with light and enhanced by thoughtfully placed openings.
What do you think about this apartment?
xoxo, Joe
Credit | All shots are used on the mood board via our Pinterest boards.
Ding Tai Feng’s Honey Kaofu is one of my favourite dishes – not only is it vegetarian friendly but it is something that I will keep on munching while having conversations over meals. Every time, I told Joe that I wanted to try to make it at home. However, for the last couple of years, we were unable to do that. We do not know where to get the main ingredient Kao Fu, the wheat gluten. We attempted to make it ourselves but so far we weren’t satisfied with it yet. But a couple of months ago, we found it at a Chinese supermarket (Si Jia Ke), and without much thought, I just grabbed a bag from the freezer.
Braised wheat gluten, known as Kao Fu in Chinese, is widely known in Shanghai. The method is pretty simple like our granny old braised vegetable recipes. All you need are 6 ingredients and a pot to make this comfy dish.
Ingredients needed for braised Kao Fu
Not much technique is needed for this dish. Thus when it comes to the preparation of the ingredients, we always take more time in it. For this dish 6 main ingredients are needed, Kao Fu, dried shitake mushrooms, dried wood ear mushrooms, dried lily flower, roasted peanuts, and ginger.
Kao Fu; as mentioned we picked this wheat gluten from the Chinese supermarket (Si Jia Ke)’s freezer. As it is frozen, you need to de-froze it and soak them in warm water till the puff rises up. Then cut them into a 1-inch cube for later use. If you are lucky to pick up some fresh Kao Fu, there’s no need to soak it.
Dried Shitake Mushrooms; for our old reader, you should be familiar with these dried shitake mushrooms, as we love to braise them in our Asian food. We like to soak them ahead in the water overnight, while you can just soak them till they are slightly soft, but soaking them overnight for a richer flavour and smoother texture.
Dried Wood Ear Mushrooms; play an important role here, they give the crunch that you need for this dish. You can easily find fresh ones in the local wet market. However, we have some dried ones at home, thus this time we use this. Unlike the mushroom, you do not need to soak it overnight. Soak in warm water till it is softened, which usually takes 30 minutes or less.
Dried Lily Flower; when it comes to Asian vegetarian food, this dried lily flower is commonly found in many dishes. Like the wood ear mushroom, soak them in warm water till they soften before use. Remember to use warm water instead of cold ones. As warm water help to remove the impurify of these dried ingredients. Instead of cooking the straight lily flower, we tied a knot to make it nicer.
Roasted Peanuts; for those who are allergic to nuts, you can remove this from the recipe. However, it does add a good texture to the dish. We got the raw peanut from the wet market’s dried goods store as it is much more affordable and roasted in the oven for 20 minutes at 180C.
Ginger; while the seasoning gives flavour to the dish, the ginger help to remove the raw flavours we have in the wheat gluten and dried ingredients. It does affect the dish’s taste if you don’t add a slice of ginger.
While most of the ingredients can be prepared 30 minutes beforehand, you could also soak them ahead, drain the water well and store them in the fridge for later use.
All you need is a Clay Pot
We like to use clay-pot when it comes to braising our food. The clay generally takes longer to fully heat than a metal pot, but once it does, it retains that heat and allows for steady, gentle cooking. Thus a piece of good equipment to simmered, stewed, or braised your food.
Now that you have your ingredients and equipment ready you can start to cook them.
Heat oil in your wok over high heat. Add the ginger and fry for 30 seconds. Add the wheat gluten, and cook until slightly browned about 2 minutes.
Add the mushrooms, wood ear, lily flower, and peanuts. Mix everything well. Then add the Shaoxing wine, light soy sauce, dark soy sauce, sugar, and water.
Stir well and bring to a boil. Cover the pan, turn the heat to low, and simmer for about 1 hour, stirring every 15 minutes to prevent sticking. Serve warm or cold (this is usually served as a cold dish).
Today is Mid-Autumn Festival, at here we hope everyone stays happy and healthy. The possibilities are endless – share with us your version! Take a photo of yours, send us an email, tag us on Instagram, tweet us, anything. We love to see yours!
(about 5” x 5” each: Soak in warm water until soft)
12 dried shiitake mushrooms (soaked in warm water until soft)
1/2 cup dried wood ear mushrooms (soaked in warm water until soft)
1/2 cup dried lily flower (soaked in warm water until soft)
3 tablespoons oil
3 slices ginger
¼ cup raw or roasted unsalted peanuts (shelled and skins removed)
3 tablespoons Shaoxing wine
3 tablespoons light soy sauce
1 tablespoon dark soy sauce
3 teaspoons sugar
3 cups water
Methods
Once the Kao fu is soft, rinse it under running water. Then cut each piece into 1-inch by 1-inch squares. Rinse the mushrooms, wood ears, and lily flower. Drain and set aside.
Heat oil in your wok over high heat. Add the ginger and fry for 30 seconds. Add the Kao fu, and cook until slightly browned about 2 minutes. Add the mushrooms, wood ear, lily flower, and peanuts. Mix everything well. Then add the wine, soy sauce, sugar, and water. Stir well and bring to a boil.
Cover the pan, turn the heat to low, and simmer for about 1 hour, stirring every 15 minutes to prevent sticking. Serve warm or cold (this is usually served as a cold dish).
Singapore Night Festival returns after two years of hiatus. A long-awaited event that Joe and I are both looking forward to attending. Joe and I both have a lot of editing to do while busy with our work, so this visual journal post will probably come later. Because the event occurred during the rainy season, we were unable to visit all the locations. There is a wide spread of various locations for the event this year. We decided to compile our favorite ones in this post.
Let’s start with one of our favorites – NOCTURNE: Conversations with Waterloo is influenced by the feeling of wanting in on a conversation you’ve overheard. Along some benches sits 2 statues made of wire, capturing mid-conversation moments that we joined in on for a fun snap. We love the yellow light frame, which acts like a photo frame for the pictures.
Moving on to the Bugis area we spot the Terrarium which was located in the National Design Centre. The indoor exhibit was wonderfully air-conditioned, for a respite from all that walking, and it had a hint of whimsicality – a must-have for any stellar exhibit in our books. We love the light show showing how the cute otter “conque” our city Singapore. Down to the road, we found Glitches of You by Amanda Tan featuring glitch art projected onto the Stamford Clock Tower. The Night Festival 2022 this year covers lots of areas, from City Hall to Bugis to Plaza Singapura. Thus we missed our chance to visit An Ocean Without The Anchor by Speak Cryptic and Paddy Fields by FARM located toward City Hall.
While the Peranakan Museum is under construction now, the Armenian Church district is still as busy like past years. Two of the exhibition that caught our eye was the PALIMPSEST by William Chan and Brandon Tay and Latent (BBB edition)by Chok Si Xuan. Walking down the street makes us recap back the past exhibition throughout the years. Making us realize how many of the small exhibitions by the Singapore Night Festival impact our lives. Every small corner is filled with interesting memories and experiences.
This year’s festival also covers up Fort Caning Hill, walking toward the Park and down to the National Museum of Singapore, we visited the must-watch mural light show. This year it features a visual narrative of Singapore’s origins and history dating back to the 14th century – Stories from Forbidden Hill.
Ending our night at the SMU Greens with this engaging installation Fēcundus by Twardzik Ching Chor Leng. We have fun with these inflatables that represent rice kernels. One little fun fact about the installation stems from the meaning of Bras Basah, which means “wet rice”.
Our evenings can be filled with the “usual dinner and Netflix” but, this August, we brighten up our night with colorful and interactive art installations at the Singapore Night Festival 2022. Although it is not our favorite among all the years it is a great time to spend our night there.
Tomatoes tend to make the most of the warm weather, with a peak season that begins in July and lasts well into the fall, when the frost comes. As one of the most popular garden vegetables, many people have realized you can usually taste the difference between a fresh tomato and a commercially-grown one.
If you have a lot of these little red gems on-hand, you’ll want to know how to make sun-dried tomatoes in the oven. It’s a great way to make them last longer and add flavour to so many dishes. But don’t be intimidated — making this homemade sun-dried tomato recipe is surprisingly simple!
You can make batch after batch of these oven-dried tomatoes, and have loved tossing them in everything from salads to soups, pasta, pizzas, frittatas, sandwiches, biscuits, pestos and more. We’ve also found that — if you happen to make an extra batch while you’re at it — people love receiving these little gems as summertime gifts. And if you pop a freshly-dried batch in the freezer, they can keep there for up to 3 months! Let us get started now!
This Marinated Tomatoes will be the perfect side dish for the tiring weekend. We probably won’t be stopping anytime soon because it’s convenient, low maintenance, and juicy and delicious. If you’re fancy enough to have side dishes right now, don’t let me stop you from making marinated tomatoes and eating them as a side.
The extent of our “cooking” on a daily basis is soaking tomatoes in garlic, salt, olive oil, lemon juice, and herbs for a little while. Using marinated tomatoes, you can create the illusion that you have cooked something wonderful, when in fact you have just been enjoying the nice weather instead
Tomatoes Confits are the sweetest, meltiest, most delicious tomato recipe. Garlicky, soft, juicy, and packed with thyme flavour, tomatoes made this way can literally elevate any kind of meal. Perfect as an appetizer, on bread, bruschetta, or on top of freshly baked rosemary focaccia bread. These confit tomatoes are even great on pasta, or with pan-fried tofu. The key to the dish is ripe cherry tomatoes but more importantly, the extra virgin olive oil. Luscious sweet tomatoes and creamy buttery garlic are slowly cooked to perfection and packed with tons of flavour.
Using the Cherry Tomatoes Confit, you are able to use them in different dishes. One of those is this Stuffed Portobello Mushroom, the tomatoes confit are stuffed together with veggies and cheese, making for a great appetizer that’s perfect for all occasions. A great and delicious way for stuffing big mushrooms, simple to make and always a crowd favourite! We know that not all are a fan of mushrooms, but personally, it is our favourite as it is versatile in cooking.
If you have prepared the cherry tomato confit ahead and store them in the fridge for later use. All you need for this recipe is 10 minutes. Here, we’re tossing cooked pasta with slow-roasted tomato confit and chopped fresh basil. You could also heat the tomato confit in your pan with some garlic for extra deep flavour.
Seasoning is key with this recipe. You need to season the tomatoes before they go into the oven, and you need to season the pasta water. Once you combine the two, you need to check for seasoning again. We found that we needed to add a couple more pinches of salt to really make the flavours pop.
If you want to try something more complex you could also give Roasted Tomato Pesto Chorizo Pasta a try, the combination of tomatoes, pesto and chorizo is a perfect match.
If you have read our 10 Easy Summer Salad posts you will surely spot this salad – Mixed Tomato Feta Salad. This salad is like a fattoush, but without the cucumbers. It’s like Panzanella, without the giant croutons. It’s a Greek salad without the grape leaves. It’s got all sizes of beautiful tomatoes cut into attractive halves and wedges.
It’s got a fragrant dressing built on za’atar, the Middle Eastern dry spice made with sesame seeds and thyme and sumac and other things depending on who made it or where you got it. It’s got a little lemon to dial up the natural acidity of the tomatoes, honey to amplify their sweetness, and garlic to coax out their savoury flavours. It has it all.
Tomatoes, brie and bread are something you will see in our kitchen, they may consider a staple to us. Thus we decided to grab all these ingredients and create a toast for a lazy afternoon. So you see, it’s clear we all need this toast in our lives today. We are hoping that you all have these ingredients on hand so that you can make this toast for lunch, as a snack or even for dinner.
While we like to eat tomatoes as a whole, we also like making them into sauces. And when it comes to tomato sauce, we love matching it with seafood like mussels, prawns and clams. Caramelized onion adds a subtle sweetness, fresh tomatoes add tanginess, while citrus rocket pesto (which is optional) kicks up the flavour by adding the perfect amount of heat and heartiness. Serve this with crusty bread to mop up all the juices, this is the perfect dinner. If opting for gluten-free, try adding cannellini beans for a little extra heartiness instead of the bread.
Lastly, Burrata with Peach and Cherry Tomatoes Salad is bursting at the seams with fresh peach, creamy burrata, and juicy tomatoes. Although it looks like it can be served as the fanciest restaurant, it actually takes only 15 minutes to prepare. Whip it up for your next gathering and watch your guests’ eyes widen!
There really is nothing quite like a carefree Saturday evening with the sun shining, and nothing much planned for the day except a trip to the beach! When I was younger I probably looked for every opportunity to visit the beach to experience the sunshine and sand. Maybe I can build a sand castle or pick up some seashells. But there are no seashells on any of the Singapore beaches. All we have is sand, seaweed and people but stunning beaches never stop us from visiting them.
We do like to visit the beach on weekdays or Saturdays afternoon. Taking a break from all the work we have, packed all the equipment and food that we need and off we go to the beach. However, we do recommend a hearty lunch before setting off. Even though we prepared lots of food, we got so hungry when we are under the hot sun.
After a few tries to the beach, we are used to what to bring and avoid bringing for the trip. Can’t wait to share with you on how we prepare for our beach day. From the gadget needed for the trip to food to bring. Although we like the beach and sun, but we are not the bikini girls like many. Thus we always tend to dress in our most comfy yet stylish clothes. Let us know what’s your favourite way to dress up for the beach.
Even though it was always crowded at the beach, but lying down listening to the waves of the sea. The noise of the surrounding become quiet and we could lay on the sand all day. While the monsoon season is around the corner, we can’t wait to visit the beach more often before it gets wetter.
It’s been a daunting week with new challeging coming into our life. However, we always make sure time were free for some cooking and “experimenting”. While we want something fun, we try to make it easier for more time to spend together. This Marinated Tomatoes will be the perfect side dish for the tiring weekend. We probably won’t be stopping anytime soon because it’s convenient, low maintenance, and juicy and delicious. If you’re fancy enough to have side dishes right now, don’t let me stop you from making marinated tomatoes and eating them as a side.
The extent of our “cooking” on a daily basis is soaking tomatoes in garlic, salt, olive oil, lemon juice, and herbs for a little while. Using marinated tomatoes, you can create the illusion that you have cooked something wonderful, when in fact you have just been enjoying the nice weather instead! Let’s get started!
Preparing your tomatoes
We used the 500g of multi-coloured grape-sized tomatoes, but any cherry or even baby tomatoes would work well in this recipe. 1) Rinse tomatoes and cut them in half. It is easiest to slice with a serrated knife and we slice them through the centre because they look prettier. 2) Add the sliced tomatoes to a glass mixing bowl or container. Add the chopped basil leaves and red onion then pour over 1 1/2 to 2 cups of (2:1 olive oil and balsamic vinegar) or just enough to barely cover the tomatoes. Stir and cover to marinate.
How long should I marinate it?
It is recommended that the tomatoes marinate for at least two hours in order to make them more flavorful. Serve them at room temperature after 4 hours covered – if you have leftovers, chill them afterwards. If refrigerated overnight, they stay fresh for a long time.
If you have leftover tomatoes or want to serve them with breakfast, try serving them as bruschetta. All you need are some toasted baguettes. So easy and good! We hope you enjoy this recipe.
500g of cherry or grape tomatoes, halved or quartered
1red onion, sliced
1 cup of olive oil
3 tbsp of balsamic vinegar or lemon juice
1 tablespoon freshly minced herbs (we like basil leaves)
salt to taste (I use about 1/2 – 3/4 teaspoon kosher salt)
Methods
Toss tomatoes, grated garlic, olive oil, vinegar, herbs, and salt together in a jar. You’re done.
Now that the marinated tomatoes are good and tasty, let them sit for a while. Ideally, you should let them soak up all the goodness for 3 to 4 hours on the counter, but you can also leave them for up to 24 hours if you’re going to mix them into something, like a salad. Bring them back to room temperature for ideal serving conditions!
A few trips down to Joo Chiat where it’s one of the places in Singapore where you can find lots of trendy cafés, we always passed by Homeground Coffee Roastery and want to give it a try. When you look up “where to visit in Joo Chiat?” this cafe will surely pop up in your search. However, due to its popularity, there’s always a long waiting list. Yes, after a few trips down we still couldn’t get a seat!
During our latest trip to Joo Chiat, we went to try our luck, and the news came out that they are closed down and moving away. But it was not all bad news, they are going to move to somewhere near Outram Park, at the same time near to us too! Hooray!
Muji-like Interior
Knowing that they are reopened, we head over during the 2nd week of their opening. We were welcomed by the friendly staff and cosy atmosphere. Compared to their old place at Joo Chiat, they have a different vibe to it. It is bright and modern muji-like. The large coffee bar caught our eye as it allows for many to watch their baristas at work – who are dressed in MUJI and overall give a contemporary meet down-to-earth vibe.
Michelin Standard Food
The main dishes are served in sharing plates format, with some of the stand-outs being Tajima Wagyu ($48 for 100g), Beef Tartare ($29), Baked Brie ($19), Pork Belly ($18), Quinoa Tofu Fritters ($12), Charcoal Grilled Chicken ($29), to Poisson en Paiolotte ($36).
As there are so many options for the food we op for a suggestion from the staff and Tajima Wagyu was been recommended. We were questioned when the staff walked toward us with a box. Yes, they served the dishes in a customised box, when they open it you will smell the amazing rosemary smoke from it. It was accompanied by 3 different sauces, salt, gochujang and yuzu sauce. There was a nice smokiness, and they tasted differently with different kinds of sauce.
If you visit the café alone, they are also small plates that you can enjoy. We ended up giving the Brie Cheese($18) a try! Every dishes was like a performance, the staff touches the brie at our table to give the brie a toasty touch. It was served with a toast on the side and we really wish they have more of it.
After the food, we end it with coffee (how can we miss it!) You really need to experience the coffee at the bar table. As the bar is evenly split to feature coffee made with immersion methods (mainly iced filter coffees) and coffee made with percolation methods using the Origami and Kalita drippers. We were told that the coffee menu changes occasionally to reflect the best coffee of the current season, so you can discover a new favourite every time you come. Lovely space – we would come again.
Retail Experience
Something new about Homeground is that they have a retail corner, not only you can purchase their coffee bean off the shelve, but you could also experience the tools they have before purchasing them. They have a huge range of tools, from Origami and Kalita drippers to Handpress. You can pick up the tool you are interested in and with guidance from the staff, you are been teach how to correctly use the tools. Lastly, purchase it if you are interested in your experience. This service really amazed us thus we ended up getting a hand press.
All the staff is so patient with us and assisted us warmly during our trip there. Can’t wait to head back again!
Yellow is one of the brightest colors to decorate with. It’s the most vivid color in the spectrum and the most noticeable to the human eye. Depending on which shade of yellow you use, you’ll convey feelings of either happiness or frustration in your designs.
There is bright yellow and here we have pale yellow. This pale yellow can invoke feelings of freshness and joy. Who wouldn’t want to wake up to those feelings? If you’re interested in creating a mood that’s refreshing yet still calm, decorate with light shades of yellow. This is a particularly great option if your bedroom is darker and you want to brighten it up to fight off gloominess.
Inspired by the Korean Bibim Naengmyeon we created this fusion dish – Korean Cold Soba. Replacing the buckwheat noodle with Japanese Soba, this noodle dish became more accessible during the humid summer. It’s cold, spicy, sweet and tangy. Everything you need is all in one bowl!
Compare buckwheat noodles with Japanese soba, it is less accessible to obtain. In most of the supermarkets, I had to have a bigger selection of Japanese items, whereby for Korean ingredients I have to visit a Korean supermarket for items.
What is Bibim Naengmyeon?
Bibim Naengmyeon is Korean buckwheat cold noodle, served with gochujang, kimchi, pear, hard-boiled egg and some meat. Where many are more familiar with one that is served with iced and beef broth aka Mul Naengmyeon which is more refreshing. However, we are sure with this spicy chilled bibim sauce and sweet, tangy and crunchy kimchi, the Bibim Naengmyeon is a hearty, satisfying meal. The combination of these two is simply irresistible!
Replacing the Noodle with Soba
Both Korean buckwheat noodles and soba noodles are made with buckwheat flour, however, the texture of both noodles is very huge. The Korean buckwheat noodle uses a mixture of buckwheat and sweet potato flour while soba uses only buckwheat flour, thus the Korean buckwheat noodle is chewier in terms of texture.
The soba noodle has an earthy, somewhat nutty flavour to buckwheat soba noodles and they can be served hot or cold. Depending on the brand, you should follow the instructions on the package when cooking dried, packaged soba noodles. Generally, soba noodles cook in boiling water for about seven minutes. To prevent them from sticking together, stir them occasionally while cooking. You want them to be tender but firm and chewy, so cook them until they are al dente. If you plan to serve them hot, rinse them after cooking in a colander under cold running water to stop the cooking process.
Spicy & Tangy Korean Sauce
For the traditional Korean cold noodle, gochujang is used, however, to make the dish more interesting we add sugar, chilli flakes, minced ginger and roasted sesame seeds to make the dish deeper and flavourful. While the usual way of serving is to top it onto the noodle, and the consumer will mix it before they eat it. For us, we mix the sauce with the noodle first letting it marinate before serving it with the toppings.
Share with us your version! Take a photo of yours, send us an email, tag us on Instagram, tweet us, anything. We love to see yours!
Bring a large pot of water to boil. Follow the instructions on your packet of Korean cold noodles for the length of cooking.
While the water is boiling, assemble your choice of toppings.
Place the packets of broth flavouring into the bowls, along with icy cold water. Reserve a few ice cubes for when you serve the noodles.
When the noodles are done cooking, immediately drain and rinse them in running cold water. Divide them among the four bowls and use a pair of scissors to cut clumps of noodles into more manageable lengths.
Known as Genkan in Japanese, the entrance features a nameplate, and a longitudinal window just like an enlarged mailbox against a light-coloured wall.
Stepping through the wooden door, I felt that I had just entered a Japanese Omakase restaurant, with a single long wooden coffee bar counter elevated like a sushi bar. With 5 bar counter seats and a communal table that can seat another 5 pax at the rear end of the compound, DAWN is not a huge space to begin with so you might expect some waiting time.
I liked the raw, unfinished textured concrete walls which creates a natural vibe, coupled with distressed limestone table top and warm lighting for a cosy experience.
I ordered a Pour-over; Jimena Rivera ($12), with a hint of fruitiness, which suits my taste. It is know as geisha of the filtered coffee where you can see from the price. It is so smooth to consume that it even suitable for anyone. I went for a second cup of coffee and ordered an Iced White ($6.5) which also has a hint of caramel and chocolate, plus a hint of tartness from the berries. Good choice for those who want a quick drink. There are also a good range of cakes and spotted the Plum Cake ($6), it taste so fluffy and not too sweet, perfect for match to have with the coffee.
Overall I enjoyed this place, as it is small a little bit of waiting is needed during the peak hours.
DAWN Address: 78 South Bridge Rd, Singapore 058708 Opening Hours: 8am – 5pm (Mon – Sun)
The dining table is one of the undisputed, much-needed protagonists in most homes. We spend hours sitting around it, eating, chatting and bonding over meals with family members. It is therefore important to choose just the right table to complement the style of your home,ensure it meets all functional requirements and most importantly, makes you feel comfortable too. Given all these considerations, you can almost never go wrong if you choose round dining tables. They offer multiple advantages and fit into any type of space, large or small. This versatility has made them very popular, with good reason!
When tomatoes are in season, it’s the perfect time to include them in just about every dish. If you have a lot of these little red gems on-hand, you’ll want to know how to make sun-dried tomatoes in the oven. It’s a great way to make them last longer and add flavour to so many dishes. But don’t be intimidated — making this homemade sun-dried tomatoes recipe is surprisingly simple!
You can make batch after batch of these oven-dried tomatoes, and have loved tossing them in everything from salads to soups, pasta, pizzas, frittatas, sandwiches, biscuits, pestos and more. We’ve also found that — if you happen to make an extra batch while you’re at it — people love receiving these little gems as summertime gifts. And if you pop a freshly-dried batch in the freezer, they can keep there for up to 3 months! Let us get started now!
3 Ways to make Sun-dried Tomatoes
Dry them out in the sun – The obvious way. Simply arrange on a rack, sprinkle with salt, and place in the hot sun. Unfortunately, weather can be unreliable and humidity can be a problem.
Dehydrator – Homemade sun-dried tomatoes can be made in a dehydrator, but it’s a speciality tool that not everyone has. If you do, you can follow the oven-dried tomato recipe below but dry in the dehydrator for 6-8 hours instead.
Oven – Our favourite method! No special tools are required and everyone has one. Get instructions for how to make sun-dried tomatoes in the oven below!
Choosing the Right Ingredients
As this is a simple dish, we usually pay more attention to the ingredients that needed to be used;
Tomatoes – We used cherry tomatoes, but Roma or grape tomatoes are great to use. San Marzano tomatoes are also excellent because they don’t have a lot of pulp or seeds. Small to medium tomatoes have less water and seeds, meaning they dry out faster and hold their shape better after drying, so we don’t recommend using ones larger than Roma tomatoes.
Sea Salt – Helps get the extra moisture out of the tomatoes, and adds flavour.
Olive Oil – You can use this for serving or storing, but it’s optional. If you do use it, get a high-quality extra virgin olive oil.
Italian Seasoning – Optional, but adds extra flavour! Use store-bought or make homemade Italian seasoning. You can also just pick individual dried herbs, such as oregano, rosemary, thyme, or basil.
How to make Sun-dried Tomatoes in Oven?
Prep your tomatoes. Super simple — just slice the tomatoes in half lengthwise*, spread them out in an even layer cut-side-up on a parchment-covered baking sheet, then season with salt.
Slow roast. Now comes the patient part — the tomatoes will need to slow-roast in the oven for about 2.5 to 3.5 hours at low heat (250°F), or until they reach your desired level of dryness. You don’t need to flip or rotate the tomatoes during this time, but I do recommend keeping an eye on them near the end to ensure that they do not burn.
Serve or store. Then once your tomatoes are done, they’re ready to serve or add to a recipe right away! Or see below for storage instructions.
How to Store Sun-dried Tomatoes?
As we are making them in a huge batch thus there may be some leftovers for later use, and below are the ways we store them to keep them fresh;
Refrigerate sun-dried tomatoes. Place them in a small jar then drizzle with olive oil (you will need quite a bit) until the tomatoes are completely submerged. Place a lid on the jar to seal, then refrigerate for up to 4 days.
Freeze sun-dried tomatoes. Spread the sun-dried tomatoes out in an even layer on a parchment-covered baking sheet or plate. Then transfer to the freezer for at least 2 hours, or until the tomatoes are frozen. Remove and transfer the tomatoes to a freezer-safe bag, squeeze out any extra air, and then freeze for up to 3 months.
There are so many delicious ways to cook with sun-dried tomatoes! We especially love adding them to salads, soups, pasta, pizzas, frittatas, sandwiches, biscuits, pestos and more. Can’t wait to share with you our recipe for using them. The possibilities are endless – share with us your version! Take a photo of yours, send us an email, tag us on Instagram, tweet us, anything. We love to see yours!
Lychees are delicious tropical fruits that can be enjoyed all year long. This fruit is sometimes spelled litchi or called alligator strawberry, and it is native to China. Although you could fine the fruit all year long but the one between May to October is the best. This fruit is covered with an inedible stone, which is the fruit’s seed, underneath the hard, bumpy husk. The flesh is tender and white with a strawberry-watermelon flavour underneath the hard husk.
You can eat lychee raw on its own or add it to fruit salads, sauces, desserts, and beverages. This time we decided to make a refreshing Lychee White Tea to cool down the hot summer! For this Lychee White Tea drink you will need 3 main ingridents; Lychee, White Tea and Thyme to make this simple and refreshing drink.
How to Prepare the Lychee
Start by choosing a good Lychee Make sure the fruit has bright, vibrantly colored skin and is larger than one inch in diameter. Generally, the skin of lychees is red, but some varieties are orange or yellow with a pink hue. Gently press your thumb on the skin to check for ripeness. It should give a little when you squeeze it. You can tell if it’s overripe if it’s too soft. You will be able to smell lush, floral scents emanating from ripe lychees. If the husk or fruit of the lychee is brown, cracking, leaking liquid, or smells fermented, it is spoiled.
Prepare the Lychee It is necessary to peel the lychee and discard the husk and stone. The white flesh is the only edible part of the seed, which is slightly poisonous. You should treat it gently since it is a delicate fruit, and you should work over a bowl to collect the juice.
Brew the Tea of your Choice
To match with the delicate lychee we decided to use white tea for the tea base as it is a light tea with subtle yet indulgent flavours. The white tea has a smooth and soft texture which will compliment the lychee well without covering the fruit taste. When it comes to tea, we like to stick with our favourite local brand TWG.
As it is rare, refined, and not always easy to find white tea. White tea should be brewed correctly to avoid mistakes. The perfect cup of white tea can be brewed and enjoyed using these tips.
During our trip to the tea house the experts recommend that the brewing time for white tea be between 2 to 3 minutes. As if you under brew it may taste bland and lack of flavours, while unlike the green tea you will have a bitter taste when you over brew it. It is also ideally to brew the tea with water that is at the temperature of 70-80 degree, as boiling water will burn the delicate white leaves. We like to prepare the tea ahead allowing it to cool down before making the drink.
Making the Lychee White Tea
Now that you have all the ingridents being prepare you can start making the tea. In a cup put in the flesh of the prepare lychee, using a muddler to smash and mix the lychee, you want the juice of the lychee for your drink. We really found the muddler very useful in making all kind of drinks from tea to cocktail, which is why we highly suggest you to invest in one. Now layer the ice, tea, thyme and decorate it with the lychee. Isn’t this drink simple to make? We like that very few equipment is needed for the drink.
Does the white tea disputs sleep?
We all know that there is some caffeine in the tea, taking example of my mother she is one of the case where she is very sensitive to it. However we reassured you the amount of in the white teais usually lower than in other types of tea. Not to mention much lower than in a cup of coffee! Thus this is a good tea choice for a relaxing evening, as times white tea (and tea in general) is a relaxant for the body rather than a stimulant (a property that coffee is famous for).
The possibilities are endless – share with us your version! Take a photo of yours, send us an email, tag us on Instagram, tweet us, anything. We love to see yours!
Brew the tea leave in a pot of 100 ml water for 2 to 3 minutes. Strain and leave it to cool for later use.
In your cup, place the lychee and smash it with the muddler till you have most of the juice from the lychee. Then layer it with the ice, tea and granish it with the thyme leave and lychee.
Everyone who knows me knows how important sleep is to me. Sleep is something I love, from needing eight hours of sleep to sneaking naps when I have the chance. Thus when I came across this lifestyle brand in Bali called Sleeping Culture, they have all sorts of home decor from eco bedding to loungewear. As the brand is from Bali, it straight away gave a Bali vibe to each and every item they created.
I love the tone they used in their textile, the ashy undertone makes it so pleasant to look at. And each of them gave a calm and comfy vibe that makes me want to sleep on them right now. Not that they have a whole range of bedding textiles, but they also have some pottery that I didn’t want to miss it too. Now I am tempted to get them online or during my trip to Bali.
Ochazuke (お茶漬け) – usually served in one bowl, it consists of steamed rice with savoury ingredients, partially infused with green tea. Ocha means green tea, and zuke means “submerged”. It is more commonly eaten as a quick meal or as a filling snack at the end of a meal in Japan rather than as proper mealtime food.
Ochazuke is the kind of comfort food that we crave because it is soothing to eat and easy on the stomach. My midnight hunger pangs would always be satisfied with this rice dish after a long day. We immediately felt comfortable when we tasted the warm tea and rice and it instantly soothed our busy day. There is no easier way to make a meal than this!
Choose the Tea
To make Ochazuke, you can use various types of green tea, such as Genmaicha, Sencha, Hojicha, etc. Usually, dashi broth is used instead of green tea when you order Ochazuke in Japanese restaurants. Most of the green tea tastes wonderful with this dish, thus you could grab anyone that you could find. We use one that has roasted rice in it which adds a malt taste to the dish that we like about it.
For best flavour, bring spring or freshly drawn filtered water to 85 C into a pot with 2 tbsp of tea leaves. If you don’t have a thermometer, you can achieve the temperature by letting boiling water cool for about 2 minutes. Steep it for 3 minutes before enjoying them, and do only prepare the tea last as we want to serve it hot.
Choose your Topping
In order to make a dish more flavourful, toppings play an important role. Thanks to the versatility of the Ochazuke recipe, you can add any toppings you like. The following are some good options you can use in your kitchen:
Saba / Salmon – is a very popular ingredient used in Ochazuke, not only it is easy to cook, but it also adds a wonderful touch of fanciness to Ochazuke. We got our salmon at Isetan where it is well prepared and seasoned with miso. All we need is to cook them in the oven for 17 minutes at 170 C. You can place it as a piece or break it into smaller flakes and mix it in the rice.
Umeboshi – these plums are commonly used in Japanese cuisine, they taste salty and sour which will make your dish more appetite. Not to mention umeboshi is one of the popular toppings to be used in this dish. As it was said that the effects of citric acid (クエン酸) on plums are said to be good for restoring energy, preventing heat stroke, and keeping obesity at bay. It’s quite hard to find them in the local supermarket thus we always head over to Mediya Supermarket or Don Don Donki for them. Look for one that is seedless as it is easier to enjoy later.
Eggs – who doesn’t like eggs? I’m sure we all have eggs in our pantry thus this is a great option we have nothing at home. We like to pan fry them thinly and slice them into thin stripes before topping over the rice. Seasoning it with salt is the key in making the eggs.
While the topping is all we need additional seasoning and sprinkle help to complete the dish. Below are some of the options we like to use:
Nori – is dried seaweed that you can sprinkle over the rice before pouring it into the tea. It is a typical rice seasoning in Japan.
Chirimen Sake – boiled and completely dried salmon. We found this at Isetan Supermarket and were told that they are rich in calcium and taste good with rice and soup.
Instant Flavouring Pack – these were commonly found in Japan where they like to add this special powder to their rice. They have assorted flavours from plum and salmon to nori. It will instantly enhance the flavour of the rice right away.
There are many other toppings you can use for this dish, and the options are unlimited. All you need are rice, topping and green tea, the combination will make you your comfort food.
Suggested Combination of Ochazuke
As mentioned there are unlimited combinations of Ochazuke, thus you can create whatever ways you like to your preferences. However, below are examples of how we do it:
We hope you enjoy making and eating this quick and easy Japanese Ochazuke! Take a photo of your version, send us an email, tag us on Instagram, tweet us, anything. We love to see yours!
We are not professional cooks/chefs; we are two foodies who enjoy trying out recipes at home based on what we have eaten, seen, and are inspired by the world. When we are out of ideas on what to cook we read books and head over to the internet for inspiration. However, when it comes to Asian food, there are always fewer options. As our grandmothers passed away and our mother grew older, we attempted to recreate as many of their recipes as we could. Nonetheless, we like to learn more and share our experiences along the way. Thus in the past year, we are glad that there is this Chinese platform called Little Red Book, which is similar to a combination of Pinterest and Youtube, where you could find many kinds of Asian inspiration there. We get to interact with and learn from great creators. Watching short vlogs of bloggers who share their lifestyles is one of our favourite series.
The expert home cook’s kitchen is one of the aesthetics we admired; they all have a variety of jars on their shelves. That was common in Chinese and Japanese households, and both food cultures have had a strong influence on us. These jars, hold preserved food, homemade infused liquors, and more. This allows them to keep their food for longer, particularly seasonal ingredients. We decide to try these Mandarin Orange Infused Liquors because we have plenty left over from our Chinese New Year in early February.
Getting the Right Ingredients
There are only 3 basic ingredients to make homemade fruit-based liquors, you will need your choice of fruits (this time we use mandarin orange), rock sugar and white or yellow alcohol with a high percentage level.
If you have once tasted the skin of an orange, you will know that it tasted bitter yet we don’t want bitterness to destroy the wine. However, the skin is the key to this homemade wine, as it is so fragrant compared to the flesh. Thus in order to reduce the bitterness, during the cleaning of oranges use plenty of salt to scrub the skin of the orange. 1) It will help to reduce the bitterness of the orange. 2) The salt act as a scrub to the orange to remove the dirt on it. Once you clean it well, let the orange dry as much as you can, before cutting them into wedges.
Sugar: Rock Sugar
Sugar plays an important role in homemade wine, when a mixture of sugar and wine is added to a jar, sugar can be used to encourage secondary fermentation of the liquors. Talking example in making red wine, the riper the grape, the more sugar in the fruit there is to convert to alcohol. Thus, winemakers sometimes add cane or beet sugar before fermentation is complete to boost alcohol levels when grapes are not as ripe as they would like. As sugar content in the dosage will determine the sweetness of the final product, thus for those who don’t like it to be too sweet can reduce the amount by 20%.
Some of the makers use white sugar, however, we prefer the sweet taste of rock sugar which taste more natural and sometimes like honey. Read more to find out how to choose the correct rock sugar.
Liquors: Shuang Jin Chiew (Asian Version of Volka)
Choosing your infusion is the first and most obvious step. The most common liquors, such as vodka, tequila, rum, whiskey, and gin, make great choices. Liquors that are more complex, like mezcal, are harder to work with.
We use Shuang Jin Chiew which is 100% fermented from rice, the Asian version of Volka. It features crystal texture, distinctive flavour of rice, rich taste as well as a long-lasting aroma. It’s essentially a blank canvas that can take on any flavour combination. Tequila and rum are easy to try, too, if you’re not a fan of Shuang Jin Chiew/ vodka.
Now that you have all your 3 ingredients well prepared, add the orange and rock sugar to the jar, then fill the jar with your liquor of choice. Seal the jar with an airtight lid and store in a dark, cool place until it’s ready to strain.
How long should you infuse the liquors?
Alcohol with orange infusion can be infused for up to a week. It will taste better the longer it is infused! If you’re not sure, open the jar after 24-48 hours and smell it. Typically, if the infusion smells very good, it’s good to go. Then let it infuse for another day or two and check again. A general rule of thumb is 3-5 days for most infusions. Don’t worry – even if you use fresh fruit, nothing will go bad. Because alcohol prevents mould from growing on the fruit, it can be stored for a long time even after straining.
The white liquors turn orange after the long process of infusing. You could enjoy them on the rock like our father did or make them into tasty cocktails for your summer party. The possibilities are endless – share with us your version! Take a photo of yours, send us an email, tag us on Instagram, tweet us, anything. We love to see yours!
A Beginner’s Guide to make Infused Liquors at Home
Ingredients
5 mandarin, washed and sliced
200g of rock sugar
600ml of Shuang Jin Chiew/ Vodka
Methods
Wash and slice orange. Add to a clean glass jar with rock sugar top with vodka and seal with an airtight lid.
Store in a cool, dark place for at least 3 days, but up to a week. Strain into a measuring cup or glass bowl through a fine mesh sieve and discard the orange. You may need to strain a few times or use a cheesecloth to remove all sediment. Seal in a clean jar and store in the pantry.
We visited a hidden textile studio days ago and really impressed with the place. During our conversation with the artist/ owner regarding where her idea came from, she explain that when she is doing renovation for her shop she find that the painting of walls is really harmful both to the earth and herself, thus she decided to use clay/mud on her wall, it is non-toxic and good for her and the earth. Using mud/clay on the wall transforms the place into an entirely different place with the accompany of some wood. It feels really down-to-earth and peaceful during our place there.
As mentioned, a new wall finish can transform your home. Finishes protect walls from the elements and from daily wear, and they play an important role in regulating indoor temperature and humidity. Natural finishes, which undergo minimal processing and are generally nontoxic, can be made from clay, lime, chalk, casein, rock dust, earth pigments, and natural plant extracts such as oils and waxes. These naturally beautiful materials bathe walls in color and texture while balancing relative humidity, creating a more comfortable indoor environment.
The West Coast doesn’t have that many buzzy cafes, although some have sprouted up around One North and Holland Village. Wonderfully, there is now one tucked away in the leafy suburbs of Faber Drive.
If you’re familiar with Gelato Labo at Jalan Besar, they need to open another outlet next door to GLASS Roasters. Gelato Labo and GLASS Roasters have teamed up to offer a menu that is different from their Cavan Road outlet. It would probably be along the same line of coffee with gelato as a coffee affogato.
It is hard to overlook the fact that this minimalist interior style has caught on in many other cities, from Tokyo to Melbourne, with its sparkling clean white tiles and unfurnished concrete ceiling.
On a weekday, Glass Roasters often feels quite serene because of its relatively out-of-the-way location while offering limited seating. I think that’s part of what made it feel like an overseas cafe.
We were recommended Taro Latte ($7.5) by the chef, and love how fragrant the taro tastes in the coffee and they complement well with each other. On the other hand, Angela ordered a Chia Latte ($5) and we are really with it as it tastes just what we like. The mixture of aromatic herbs and spices is the perfect ratio. They strive to work with smaller farmers to source coffee from, and they are currently using Colombian beans, though that can and will change from time to time.
As the place is small, they don’t serve much food there, all they have is Banana Bread ($4.5). While it looks simple but is good!
Regular customers walking in with a quick chat makes the entire atmosphere feel a bit cosier. I enjoyed that it wasn’t overcrowded, which made for a wonderful time to spend a morning.
Beyond that, we genuinely do love the aesthetics of the place.
For those of us in the East craving a caffeine fix, fret not as you can also find Glass Roasters and Gelato Labo at 18 Mohamed Sultan Rd.
Glass Roaster Address: 108 Faber Drive Operating Hours: 9 am – 6 pm (Closed on Tuesday)
It’s easy to fall into a greige trap: tasteful, restrained, but perhaps a bit more subdued than intended. When a room calls for a bit of energy to liven it up, consider adding a pop of color to bring things to the next level. Whether it’s a vibrant piece of art, a side chair upholstered in an eye-catching fabric, or even curtains that draw attention, a colorful element can give a room a much-needed jolt.
See how some of our favorite designers used a pop of color to create memorable spaces throughout the home, and get some inspiration for your next project.
Lately, we have been exploring new food in Singapore, especially bakeries and coffees. This time we decide to visit this anticipating bakery which is formerly a home-based business – MADU The Bakery. Now it has opened its physical store along Race Course Road in early May.
As we stepped into the bakery cafe, the first thing that hit me was the aroma of garlic. Next, the only thought we had was how this place looks right out of a furniture catalogue or a Pinterest board — the beige-woody interior was so aesthetically pleasing and strangely calming.
We headed straight for the glass display case where their seasonal bakes were laid out for customers to choose from. These aren’t on the menu though, so you’ll have to go over to see what’s available! Their selection of savoury sandwiches isn’t out on display as well, since they are all made to order.
We decided to go for the Umami Mushroom Bun ($6) that came blanketed in a generous amount of bonito flakes. Encased in the bun was a mix of Shimeji and Shiitake mushrooms and Wakame which gave each bite a burst of savoury notes. The brioche bun was coated in a crust of nori and a sprinkle of furikake which added a nice crunch. This stuffed bun would make for a satisfying light meal but if you’re looking to dig into the plethora of bakes on offer, we would suggest sharing this with a friend or two.
Other than bakes from the shelves they also have sandwiches from the shelves and we choose Nori Jambon ($14.9). You can choose between Cisbatta and brioche for your choice of bread for the sandwiches and we have brioche for ours. The star of this sandwich is the nori butter which is so flavourful that completes the dish.
Besides gobbling down the delectable spread of bakes, we thoroughly enjoyed our time there thanks to the friendly staff. You can take my word when we say we will definitely be back again for more!
Madu The Bakery Address: 421 Race Course Road Operating Hours: 10 am – 8 pm, Tuesday to Sunday. Closed on Mondays.
We’re having a craving for summer and some beach vibes for too long now, so we’re super happy to finally be in the beach again. Until now there wasn’t any real summer feeling at home as it is always raining and feeling wet.
When we thought of beach, the sea and the sand came into our mind, and we always crave for some pizza when we are heading over there.
Yes, it’s true, even I get tired of cooking sometimes and will opt out with a good piece of brioche toast. Sometimes it is as easy as mashed avocado and furikake, or sliced heirloom tomatoes with olive oil, basil and dukkah, but lately, it has been this simple recipe for Mushroom Brioche which feels more like a meal and less like a snack because it’s warm, comforting and full of umami flavour.
Mushrooms on toast is a hearty savoury dish that can be made quickly. Using ordinary cultivated mushrooms, it’s cheap and delicious, and ideal for breakfast, lunch, dinner, or as a late snack. The amount of mushrooms needed for two servings is one pound. It is important to use a variety of mushrooms for the best texture and flavour. For this recipe, we use Maitake, Beech and Oyster mushrooms available at the market.
Types of Mushroom
It is best to use a variety of mushrooms for the best flavour and texture. For this recipe, we use Maitake, Beech, and Oyster mushrooms that are available in markets.
Maitake Mushroom; the Grifola Frondosa species is also known as “hen-of-the-woods,” “ram’s head,” and “sheep’s head.” Popular for centuries in Japanese and Chinese cuisine, the maitake generally grows at the base of oak trees.
Beech Mushrooms; this variety of mushrooms (also called Clamshell or Shimeji) grows in clumps and boasts quarter-size caps and a crunchy texture. They boast an umami flavour and must be cooked to be enjoyed – when they are raw they are tough and bitter. To cook trim away the bottom and break into individual stems.
Oyster Mushroom; Available in either the thin, petal-like white form or the “king oyster” variety with long, broad stems and brown heads, these mushrooms have a delicate, sweet flavour that goes well with stir-frys.
You could also use more varieties of mushrooms or replace them with other mushrooms you find.
How to make Creamy Mushrooms?
To sear mushrooms, pan-fry them in batches over medium heat (in batches to prevent them from steaming). Adding garlic, chilli flakes, herbs of your choice, and butter will enhance the flavour. Season with lemon, salt, and pepper and stir well
The cream can be added at this point, but we find that butter makes the mushrooms nice and creamy. To spice up the dish we also like to add in some white cooking wine and steam it for a while before serving.
Spoon the creamy mushrooms onto toasted bread smeared with cream cheese (optional) and serve.
What is brioche?
Brioche bread is French bread and a cross between a pastry and bread. This is because the bread is enriched with butter and eggs. It belongs to the family of viennoiseries (think croissants, Danish pastries, sweet rolls etc.). It’s a very buttery, soft and delicious bread and can be made into sweet brioche or savoury brioche.
We got our hands on a loaf of brioche from our local bakery, Mother Dough one of the best bakeries in Singapore. The brioche is so soft and buttery, perfect to eat with the creamy mushroom. Heat the bread on your toaster or the oven till it is slightly crispy on the skin before serving it with your mushroom.
Tips on making Mushroom Toast
Never wash your mushrooms as this can make them very water. We like to clean mine with a damp paper towel to wipe any dirt off
When sautéing the mushrooms, never add any salt until the mushrooms are fully cooked and browned. Mushrooms release a lot of water, and adding salt speeds this up and can make them watery
Cooking the mushrooms on high heat is also recommended to make sure they are nicely browned and sautéed
I love seeing your creations and remakes, so be sure to tag @leplaincanvas and share your Creamy Mushroom Brioche photo on Instagram so I can share the love
Did everyone set up a cafe this year and decided they were either going to be along East Coast or Jalan Besar? These two locations seem to have a genuine buzz lately, as new-wave coffeehouses have set up shop in other corners of these popular areas.
And one of them is Asylum Coffeehouse; with its blue and red heritage shophouse set along Jalan Besar (near Petain Road), Asylum Coffeehouse has the typical white and woody (well, MUJI-like) interior, with natural light streaming in.
The Beauty of a Simple Menu
The Jalan Besar cafe doesn’t have a wide menu, with typical drinks such as Black ($4), White ($5-5.50), Pour Overs ($6), Mocha ($6) and Hot Chocolate ($5.5). They also have oat and macadamia options for those who do not take dairy. We ordered ourselves a cup of pour-overs each, each of the cups has interesting flavours where it may be too intense for us but it sure woke us up.
While we didn’t get any food but you can expect sandwiches from the popular burger hawker, Hambaobao. They have a Turfoieken ($19), which consists of Turkey, Foie Gras and Chicken in sourdough with homemade Aioli and Apple Chutney. The other sandwich is the Cubano ($16), a Mojo pulled pork ciabatta sandwich with gherkins, swiss cheese and mustard.
Asylum is definitely one of those places we might think of when we are craving a good cup of tea. There are already many Coffee Snobs Singapore members heading over to try their weekly speciality beans, making the place a hot favourite.
With a cosy environment, great coffee and pastries, and friendly staff, it checks off most of our requirements. Despite the short time we spent in the cafe, the interior was welcoming and facilitates communication between baristas and staff. There’s probably a crowd near the counter that’s directly in front of the door that the cafe must manage.
And come nightfall, this minimalist café ditches its simple aesthetics to unveil a secret identity – as an entrance to multi-sensory dinner experience Restaurant Absurdities, dreamed up by local theatre company Andsoforth.
Asylum Coffeehouse 311 Jln Besar, Singapore 208970 Mon-Sun, 8am-4.30pm
Nowadays, radiant and intense shades aren’t very common. It’s difficult to find a space where this type of aesthetic can be used well. Keep in mind that these shades stand out on their own and attract the eye in a more direct and forceful way. We’re all guilty of following conservative decor procedures that create less risk, but deep down can be boring in the long run. Therefore, it’s time to make a change and find other ways to modify the appearance of our homes.
Lemon Yellow – This color is among the vibrant and strident warms. Let’s be clear if we use this as the main color in our decor, it’s not always pleasant. In fact, it can become overwhelming and draw too much attention. As a result, we should use this color sparingly or for an objective purpose.
The Chinese-style Spicy King Oyster Mushroom Salad is a delicious, refreshing cold appetizer. There’s only a little prep involved, and it’s sure to satisfy. If you’re like me, you’ve already incorporated king oyster mushrooms into your regular mealtime rotation because they’re so easy to prepare and versatile! With Sichuan chilli and red & green chilies, we’re making a spicy salad filled with gingery, garlicky goodness.
In the summer, people like to make cold salads 凉拌菜 (liángbàn cài) with whatever they have on hand to minimize cooking and heat. In fact, the concept is similar to making salad, but lettuce is not the main ingredient. We’re using king oyster mushrooms in this recipe, but you can use any vegetables you prefer: carrots, celery, zucchini, cucumber, broccoli, cauliflower, eggplant, peppers, or string beans. There are also some traditional Chinese ingredients you can add, such as tofu, seitan, five-spiced tofu, bean threads, seaweed, wood ears, noodles, and so on.
King Oyster Mushroom
King oyster mushrooms have a lovely name in Chinese called “leg mushrooms,” describing their lovely shape, similar to chicken legs, as well as their special texture. Similar to chicken, it has a lovely flavour and texture. Kung pao mushrooms and deep-fried mushrooms can also be made with it.
Is it better to steam or boil?
For this salad, steaming is the best way to avoid the mushrooms absorbing too much water during cooking. When mixing with the seasonings, wait for a while until all the flavours are well blended, then mix in green onions and peanuts.
How to prepare it?
The king oyster mushroom should be slightly washed and any dirt on its surface should be removed. Then halved. Place in steamer and steam for 10 minutes until softened. Steaming can avoid the mushrooms from absorbing extra water in the mushroom and thus can present a stronger flavour from the seasonings. Let the mushroom cool down before tearing them into smaller strip.
Seasoning is Key
To complete this dish the seasoning is key and you may need a bit time to prepare them. What you need are;
Fresh chilli; we use both green and red chilli for the colours and bit of heat
Toasted peanuts; you could get the ready toasted peanuts from the supermarket to save time. For us we get the raw peanuts from the wet market and toast it in the oven for 20 minutes at 200C.
Minced garlic and ginger; this both are the basic yet key to making chinese food, it added frangant to the salad. Do not minced them too fine as we still want a bite of them
Spring Onion/ Corriander; the key to preparing them is make sure they are dry well before chopping into diced as you want chruncy vegatable
Seasoning; oyster sauce, sesame oil, salt and sugar, sichun chilli powder helps to elevate the dish
The sequece of combining them is imporant, start with add fresh chilli, sichun chilli, spring onion, garlic and ginger. Then drizzle hot oil on surface to work up the aroma. Try to spread the aromatics. Add oyster sauce, sesame oil, salt, light soy sauce and toasted peanuts, mix well. Set aside for 5 minutes. Let the sauce and the mushrooms combine well.
The spice and juiciness of the mushroom taste exactly like what we have in the Hotpot store Hai Di Lao, we always have been craving for it when we wanted something vegan and spicy. Now it can be easily made at home.
Steaming Slightly wash the king oyster mushroom and remove any dirty on surface. Then halved. Place in steamer and steam for 10 minutes until softened.
Shredding Transfer out, slightly cooled and then shreds by hands.
Drizzling hot oil Add salt, sugar, dried peppers, fresh pepper circle, pepper powder, garlic and ginger. Then drizzle hot oil on surface to work up the aroma.
Other seasonings Add oyster sauce, sesame seeds, sesame oil, light soy sauce, mix well. Set aside for 5 minutes.
Presenting Mix in chopped spring onion and coriander. Transfer to serving plate and decorate with chopped spring onion on top .
We recently compiled a list of cafes to visit in Singapore based on area. Everton Park, which had lately been transformed into a hipster hotspot, took us several weeks to find out. One of the places to go this weekend is O Happi Place, a cafe with a delightful mid-century modern décor that serves a variety of ice cream sandwiches, gelato flavours, and more. We were surprised at how well made this place is, from renovation to the food.
First of all the menu, we were impressed by the wide variety of flavours to choose from. From classics like Dark Chocolate and Matcha to local flavours like Kopi C and Ondeh Ondeh, O Happi Place has it all. We ordered a scoop of Bergamot Orange ($6.70) and Waffles with Pistachio ($9.90). While the Pistachio is not as good as our favourite gelato store Apairy, the Bergamot Orange do amaze us with its flavour. The refreshen of the orange is just a hint on our taste buds.
Other than gelato they also offer a few choices of drinks, and we had Ice Lemon Tea ($4.50) and Blue Pea Tea ($4).
Located in a mature estate, which usually has a higher population of elderly residents, this considerate design welcomes families to have a gathering here with both the young and old. The cafe is designed to be spacious, with a wide entrance and a large door to allow easy access for wheelchairs or prams.
O Happi Place Address: 5 Everton Park, #01-22 Operating Hours:
Housed in a historic Art Deco tower, The Robey might be exactly what you’d expect from a design-centric landmark hotel in a hip neighborhood—but that doesn’t make it any less appealing. Its 69 guest rooms are decorated with a minimalist blend of mid-century modern and industrial furnishings; the color scheme is an Edward Hopper-inspired palette of dark gray, burgundy, and cream; and the sparse, white bathrooms boast Le Labo products and denim bathrobes.
The common spaces include a French-American café on the second floor, a rooftop cocktail bar, and a soon-to-open Cabana Club with a terrace pool. At The Hollander, which is billed as a high-end hostel, the aesthetic is similar—albeit somewhat sparser—and there’s an airy coffee shop on the ground floor.
Baked Potato with Prosciutto in an exceedingly pan is flat-out, it’s one of my all-time favourite potato dishes. we often prepare them, and they’re excellent for occasions where you wish a fast, simple, but incredibly delicious entremots.
This hot potato salad is amazingly simple and loaded with flavour. We make it often after we have a lazy day because it’s simple to create but so tasty. This dish can even be made before time and reheated easily either during a pan or maybe within the microwave – just what you wish if you’re making a variety of side dishes.
The Best Types of Baking Potatoes
Nothing really compares to our love of potatoes. Potatoes are our comfort and celebration food. We cook them in every possible way, from an easy baked to a layered gratin, to a stretchy aligoté. And as a cook, we’ve come to understand a number of the subtle differences between the assorted forms of potatoes. Our three go-to potatoes are Russet, Red, and Yukon Gold. We love all equally and for very different applications. And for this case we like us use Russet for baking.
Due to their thick exterior and fluffy, starchy interior, russet potatoes make the tastiest baked potatoes (once baked, of course). The waxy potatoes should only be cut in half and roasted with some rosemary. While you have good potatoes now, some steps are needed to make sure the potatoes are used well.
Scrub the skin well: Those Russets you’re about to eat came from the ground and are probably still covered in a considerable amount of dirt. Give ’em a rinse, people!
The key to crispy skin: is to have dry skin before baking, and you definitely want to eat the skin. It’s got all the flavour. After you give the potatoes a good scrub, make sure to dry them thoroughly with a clean dish towel. Moisture will result in soggy sadness.
Season it well: You’ll also want to coat them with olive oil. Not only does it help the skin crisp up even more but it makes it taste better. Rub the potatoes all over before baking, then season generously. Without enough salt, they’ll taste boring and plain.
Bake it at high temperature: And high heat makes all the difference in the world. We’re talking 220°C high. Any lower than that, and you’ll likely be tucking into leathery, crinkly skin.
What you’ll need
The wonderful thing about this easy potato side dish is that most of the ingredients are in the title – aka relatively few – and few ingredients often equals easy to make, just like this recipe. Other than potatoes here are the other few ingredients that you need.
Prosciutto: the thin prosciutto becomes super crunchy and adds a great contrast to those soft potatoes. You could swap this for bacon or pancetta, even ham.
Red Cheddar Cheese: This bold flavour is perfectly balanced by the light creamy flesh of the potatoes
Chive: this is the perfect herb to go with cheese. It just adds a light fresh touch.
Oil and sea salt flakes round out the ingredients list.
Spicy & Sour Mayonnaise
Roasted white and black sesame for crunch
Spicy & Sour Mayonnaise
The highlight of this dish is the sauce, while sour cream is the perfect match for potato, this spicy & sour mayonnaise spices up your summer. All you need is mayonnaise, hot sauce (we use Cholula, you can use sriracha as a replacement too) and juice of a lime. The ratio to the ingredients is 4:2:1, mix them well in a bowl. When the sauce is done you can serve it together on the potatoes or you can scoop the sauce into the piping bag as we did.
How to make them
Lay the clean and cut potatoes on the baking tray, drizzle them with plenty of olive oil and season them with season and pepper. Bake it in the preheated oven for 20 minutes, till soft.
Insert the thin prosciutto in between the potatoes and sprinkle as much cheese as you like to cover the potatoes. Bring it back to the oven and bake for another 8 – 10 minutes till the thin prosciutto turns crispy and the cheese melts. Switch the oven to broiler mode and bake for another 3 minutes for the cheese to turn golden brown.
Drizzle the prepared sauce over and sprinkle the sesame seeds and chive. Tattda now you are done!!
If you’re after a delicious but quick and easy side dish, these perfectly cooked One Pan Baked Potato with Prosciutto are just what you need. This potato dish is especially great for gatherings where you want a quick and easy but insanely tasty side dish recipe.
Lay the clean and cut potatoes on the baking tray, drizzle them with plenty of olive oil and season them with season and pepper. Bake it in the preheated oven for 20 minutes, till soft.
Meanwhile, in a bowl, combine mayonnaise, Cholula hot sauce and lime juice, mix it well. When the sauce is done you can serve it together on the potatoes or you can scoop the sauce into the piping bag as we did.
Insert the thin prosciutto in between the potatoes and sprinkle as much cheese as you like to cover the potatoes. Bring it back to the oven and bake for another 8 – 10 minutes till the thin prosciutto turns crispy and the cheese melts. Switch the oven to broiler mode and bake for another 3 minutes for the cheese to turn golden brown.
Drizzle the prepared sauce over and sprinkle the sesame seeds and chive. Enjoy!
After a two-year hiatus, i Light Singapore is back to the city. We are back to immerse in the creative artworks of professional and student artists that hope to raise awareness of sustainability and inspire environmentally-friendly habits.
Each edition of the i Light Singapore festival starting this year will be anchored on colour from the visible light spectrum. For 2022, the chosen colour is violet. Violet is the colour which has the shortest wavelength with the most powerful electromagnetic energy in the visible light spectrum. Violet is also a colour that signifies the awakening of the senses, akin to the spark of an idea in one’s mind.
The artworks showcased at i Light this year are created by local and international artists who showcase their creative interpretations of topics that aim to encourage conversations about our lifestyles and consumption behaviour to build a more sustainable future. Below is some of out favourite shots from the event.
This approach is evident in a serene Brooklyn apartment that is a part-time residence for a couple with a blended family. They admire what the wife calls Mellone’s “fairly restrained palette” and his sense of proportion—an important skill, given the apartment’s eleven-and-a-half-foot ceilings—and they were intrigued by the shelves of old National Geographic magazines in his own New York apartment, “a great idea for our young grandchildren,” who live nearby, the husband notes. (Mellone had previously designed the interiors of a house on Lake George, in New York State, for the husband.)
The apartment is filled with modernist design. At the apartment’s entry, a wood console designed by Mellone stands next to a Pierre Jeanneret chair and a rug by Marion Dorn. In the living room, Mellone established a “center” with a grouping of three cubelike 1960s armchairs (and a solid component) by Bernard Govin. Two sofas, designed by Mellone, mingle with chairs designed by modernist masters like Maxime Old and Poul Kjaerholm, tables by Ico Parisi, a 1930s tea cart by Alvar Aalto, and a bookcase designed by Mellone to hold the couple’s own collection of National Geographic magazines. On the far side of a large structural column that is wrapped in a vintage French pine screen, the dining area has a Pierre Chapo table and Jeanneret chairs. Mellone installed Venetian blinds to disguise the fact that the windows don’t go all the way to the ceiling. Works by contemporary artists including William Kentridge and Françoise Grossen are part of a diverse collection assembled by the wife.
Designed by the people behind ANDSOFORTH and Warehouse16, Haus217 is a brand new venue in Singapore that takes on the Japanese lifestyle concept of Wabi Sabi, which is to embrace imperfection. Haus217 is located within a 60-year-old shophouse, and its interiors feature meticulously-crafted stained wood accents, reminiscent of European travel homes.
On random days of the month when there are no bookings for their event venue, HAUS217 will be transformed into a cafe with art installations. In late May, we got our chance to make a visit before it went into hiatus for reformation. For this current pop-up concept, we booked tickets where they are priced at $8 per person, with $8 credits given to spend (technically free to enter).
Stepping inside, the interior is decked in the Japanese lifestyle Wabi-Sabi which is to embrace and appreciate the beauty in imperfection. Stones, crafted stained woods and the deliberate unfinished surface of the walls are used to create a natural habitat, and the extensive use of textured glass allows natural sunlight to enter the space. With a single art installation in the centre of the room, furniture pieces are arranged around it to recreate the vibe of an art class in school.
Seasonal bakes are sourced and available on different days and timings, specially curated to bring something new for diners. There was Rose Lychee Cake ($8), Hojicha Roll Cake ($8) and Red Velvet Cake ($8.50) during our visit. As we have a full meal previously thus we only order the Rose Lychee Cake and some drinks along. On the other hand, a limited savoury menu is available such as Bolognese ($16), Fennel Meatballs ($18) and Salad ($12), and takes quite a while to prepare.
Slowly sip the coffee and enjoy the art installation right before our eyes, and enjoy the natural habitat created in the house (HAUS).
HAUS217 Address: 217 Lavender Street, Singapore 338772 Opening Hours: 10 am – 4 pm, only by reservation (Currently on hiatus)
It’s the time of the year to celebrate the little joys of Summer. After spending hours looking at various photos of pale sandy beaches and crashing ocean waves, we started noticing the beauty of certain pigments. So, this Monday we wanted to dedicate the Slowdown to two timeless colors that continually catch our eye: BLUE AND BEIGE.
“Color is the keyboard, the eyes are the hammers, the soul is the piano with its many chords. The artist is the hand that, by touching this or that key, sets the soul vibrating automatically.” ― Vasily Kandinsky
Lately, the rising of the temperature makes you feel flushed and burning all the time. Wondering what to drink to stop the thirst through the hot summer? Below you will see our top favourite fruits to be used in the summer, assorted citrus (orange, lemon, lime), peach, and strawberry. You could also see our favourite ways of using soda water and sparkling water for the drinks. So here are our Top 10 Refreshing Summer Drinks that we always like to rotate the drinks for the summer!
Peaches are one of the fruits we love to have during the summer, not only does it taste good, the colour of the peach in the drink just made our day. Peaches add sweet, mellow roundness to traditional lemonade for a refreshing summertime beverage.
For this Cajun Peach Lemonade recipe, you can make the peach syrup ahead and store them in the fridge. When you are ready to enjoy them, simply rim the glass with some cajun spice and it’s inevitably going to sprinkle down into your drink, giving it the perfect amount of spiciness. Stir in white rum or bourbon for the grown-ups!
Limequats Sparkling Water with Honey will be the instant cure for your dry throat and immediately reduce your body heat. While many don’t know actually limequat helps to quench our thirst when we are thirsty and hot for the summer. Unlike drinking harmful artificial drinks to quenches our thirst, the summer drink can help you make your best choice, even though scorching temperatures.
Matcha has always been our favourite ingredient to be used in food and even drinks. Not that it tastes nice it also have good benefits for our body. You can make use of matcha to spruce up your soda or sparkling water – Sparkling Matcha Green Tea. It’s made with matcha tea powder and soda or sparkling water for a bubbly and refreshing drink. You only need a few minutes to create this drink and it’s absolutely perfect for warm days when you don’t feel like sipping hot matcha tea.
The weather is really bad during this time of the year. It is hot and humid and gets rains from time to time in Singapore. We always have this traditional Chinese home remedy for cough relief as this Summer Fruits Drink is inspired by it.
Steamed or boiled pear with rock sugar is a delightful dessert very easy to prepare. This time we added in our favourite fruit making it more flavourful. Usually, all you need is a pear, but we added apple, lemon, dates and rosemary for more flavour. The original recipe is to serve the drink warm, but you can leave it cold in the fridge for this summer too.
You can never think of making Thai Mango Sticky Rice into a drink, but surprisingly it works well. Thai Mango Sticky Rice is a sweet snack that combines the richness of sticky rice, the sweetness of ripe mangoes and the creaminess of coconut milk. However, rather than eating them, we will be enjoying them as a drink. Turning the sweet dessert into a refreshing drink for the summer. It consists of mango white tea, topped with coconut cream, sticky rice ball, vanilla ice cream and mango. It is refreshing and tasty at the same time.
The Osmanthus is good to have during this hot and wet season, it is the best natural remedy to keep at home. It is a well-known herb that can improve skin, detoxify the body, reduce thick saliva in the throat and boost lung health. It is great for all seasons, Osmanthus tea is often consumed when one suffers from dry skin or hoarseness.
Thus this Sweet Osmanthus Soda will be the prettiest and simple beverage to serve during this humid weather or the hot Summer. All you need is the homemade Osmanthus Sugar (aka Honey Syrup)and you can make this glass of sweet osmanthus soda in the least 5 minutes.
Not many are a fan of all kinds of fruits, for us, kiwi and pineapple are a no-no, as they always left a tangy feel on our tongue. However, kiwi is a delicious fruit with a unique taste. The green kiwi juice has a tangy taste that is great for making a refreshing Kiwi Soda. For a deeper taste experience, we pair it with lime and mint. Green kiwi juice can be very sour and you need to balance the sour taste with some sort of sweetness. We use soda compared to the usual sparkling water.
Food is like an art, there is no 100% of procedure to follow. Coffee is like a cocktail, a good mix you will get a glass of magic. While lately, we realised coffee and fruit juice share the cup in a most refreshing twist – you will be in love with this Green Citrus Coffee. Ready yet, to embrace the joy of mixology.
What could be finer than this summery Strawberry Gin Smash? This wonderful recipe comes from my favourite the Kitchn with its brilliant ideas. According to to the Kitchn a ‘smash’ is a ‘thing’. It is a cocktail involving herbs, sugar, fruit, and booze – which ones seem to be up to you. This pretty drink speaks for itself, with its super tasty mixture of lime, sugar, strawberries, gin, and a fashionable mint sprig garnish.
Lemon is one of those juice that just goes down so easily, especially on a hot day with friends. So why not use lemon as a base for punch? That’s exactly what we have done with this number. Think mildly boozy, bubbly adult lemonade with a soft earl grey undertone. Since this is a punch, you can use an ice ring to freeze a large block of ice; otherwise standard cubes work, too (We like to freeze fruit and herb in the ice). This is a good drink for a party in the summer.
Here are our top 10 favourite refreshing drinks for the summer. We hope you enjoy them like we enjoy our summer.
Sandwiches and sammies seem to be all the rage these days. Korio at Telok Ayer might not be well known unless you work there. It was considered far down the rabbit hole until you got curious and dug it up. Located in the middle of Far East Square, at the end of Amoy St., This may not interest you if you are not a morning person, as they only operate for six hours.
I’m glad that Joe decide to get up early for me to get a taste of Korio, they served artisanal doughnuts, sammies & coffee. We have the Grilled Cheese ($14) which was paired with a tangy sourdough, complemented with a jammy, slightly tart, and acted as a counterbalance to the decadent melty cheese. You should also order the Breakfast Sammy ($14) sees an entirely new set of ingredients. Eggy, fluffy brioche slices, with a creamy egg mayo slathered on, and a slice of savoury luncheon meat snuggled between—a classic flavour with nothing to complain about.
Their doughnuts are also one of the signatures in their stores, it looks so fluffy. The choice of brioche seems to give the doughnuts a fuller flavour, as well as a softer texture. Can’t wait to try them all on our next visit. Please make sure to visit them early as it closes as early as 2 pm.
Now built-ins (as with many midcentury elements), whether beds, benches or dining room tables, are popping up everywhere in new builds and renovations. They’re particularly good for creating effective storage or adding useful elements in tight spaces. Not only so, but it is also a good way to customise some unique pieces that only can bring out your characteristic to your house.
At this apartment 116 located in Shanghai, China uses 3 main elements, white, wood and stainless steel to bring out the characteristic of the house. We especially like the customise shelves from this apartment, the combination of wood and stainless steel works really well here.
Ler us know in the comment below what do you think?
There are more than 101 ways to cook eggs. Each method is different from the other. Some of these methods require skill and experience, and even special tools, while a handful can easily be done by anyone. Cooking eggs is probably the first thing that you learned when you started to learn how to cook. In fact, the egg is one of the easiest ingredients to work with in the kitchen. It is one of our staple ingredients.
We got interested in cooking at a young age. Back then, we started to learn basic things; one of them is frying eggs for breakfast. Frying an egg might sound simple, but it can be challenging if you are doing it for the first time. After practising which resulted in something like a dozen burnt eggs, we got the hang of it. I became aware of the many ways to cook eggs and this time we are going to share with you our top 4 ways of having our eggs cooked – fried, soft boiled, hard boiled and scrambled.
You can enjoy these eggs alone, however, to have a complete breakfast we like enjoying them with these waffles – crisp on the outside, and fluffy on the inside.
How to make Waffles?
When we made these Easy Waffles from Martha Stewart, consider this our new, go-to waffle recipe when we want to start our day off with it. No fussy steps or unexpected ingredients are required here, which means we can whip these up whenever your cravings hit.
We love our waffles “fresh-off-the-iron waffles”, although it may take more time by preparing the ingredients, on our good day it takes less than 15 minutes! You must be wondering if you can make the batter ahead to save time in the morning. We would not make all the batter in advance as a batter with baking soda needs to be cooked shortly after mixing.
However, a solution to this is you could also make the waffles ahead and freeze them. To reheat, microwave them for about 15-20 seconds just until they’re no longer frozen. Then pop them in the toaster or toaster oven until they’re hot throughout and crispy!
How to Cook an Egg (4 Ways)!
Sunny-side up
This type of fried egg gets its name because the bright yellow yolk shines brightly on top. It’s briefly cooked over a moderate flame to gently set the whites and is covered the entire time. This cooking method traps the steam, which cooks the top of the egg without flipping over. The process takes about 2 to 3 minutes.
If you don’t have a lid for the pan, just cover it with the bottom of a larger pan or use a lid from another pot. You can also fry the egg over medium-heat uncovered, reduce the heat to low after a few minutes, and baste it with extra fat like butter to finish cooking the albumin proteins on the surface.
Scrambled Egg
Scrambled eggs are one of our favourite ways of cooking an egg. The perfect scrambled egg should be all the egg pushes into a pile and stays together, indicating it’s cooked ie. there’s no raw, runny egg leaking around the edges, and also the surface is shiny so you can tell it’s still custardy and moist. Compare to the other 3 methods, scrambled egg is one that we took a long time to perfect.
Gordon Ramsay has the best recipe for making scrambled eggs, all you need is your trusted pot and spatula. Start by putting all the ingredients (other than seasoning) in a cold pot. Start mixing all the ingredients and whisk it well on high heat. After 30 seconds, also start gently folding the eggs over (ie scoop and gently flip). Keep pushing/folding for 60 seconds total cook time or until raw runny egg no longer spreads out onto the pan and you have a pile of the soft, custardy egg.
Tips: If you are unsure about the doneness, remove it from heat while mixing. Remember only to season them when your eggs are only going to be done.
Hard-boiled Egg
A hard-boiled egg is a result of boiling an egg for a long period of time. First, boil the eggs. Place them in a pot and cover them with cold water by 1 inch. Bring the water to a boil over high heat. Then, let them sit in the hot water. As soon as the water begins to boil, turn off the heat and cover the pot. Leave the eggs in the hot water for anywhere from 8 to10 minutes, depending on how you like your eggs. The 6-minute eggs will have vibrant, creamy yolks, while the 10-minute yolks will be paler and opaque, with a chalkier texture.
Soft-boiled Egg
Soft boiled is the opposite of hard-boiled. Using the same boiling method, eggs are placed in boiling water and cooked for a short period of time. The egg white is slightly cooked leaving some parts liquid. It will also produce liquid egg yolks. First, heat the water. Bring a medium pot of water to a boil over high heat. Reduce the heat to medium, so the water maintains a gentle boil. Then, add the eggs. Using a slotted spoon, carefully lower the eggs into the simmering water. Set a timer for 7 minutes.
For both hard and soft-boiled eggs. While the eggs cook, prepare the ice bath. Fill a large bowl with cold water, and add a handful of ice. When the timer goes off, remove the eggs from the hot water, and immediately add them to the ice bath. Allow them to chill for at least 3 minutes to stop the cooking process. Then finally, peel the eggs!
Perfect Tips for Cooking Eggs
Buy the eggs in advance. If I’m cooking sunny side up eggs, fresh eggs will yield the best results every time. But if I’m hard boiling them, the opposite is true! Boiled farm-fresh eggs are more difficult to peel than older eggs. If you want to make perfect hard boiled eggs, it pays to buy them in advance and cook them after a few days in the fridge.
Store the eggs upside down. This tip comes from Jack’s mom, who makes the BEST deviled eggs for family gatherings. In order for the yolks to land right in the centre of the hard boiled eggs, she recommends storing the raw eggs upside down before you cook them.
Hoe you have all your ingredients ready, assemble them and enjoy them with a cup of tea for your breakfast. To spice it up we enjoy them with our favourite avocado, but you can have them with tomatoes, vegetables and even bacon.
Crisp on the outside, and fluffy on the inside, these waffles are delicious topped with your choice of eggs. The perfect start to any weekend morning!
Ingredients
Butter Waffles
1 cup all-purpose flour, spooned and levelled
2 tablespoons sugar
1 teaspoon baking powder
1/4 teaspoon salt
1 cup milk
2 large eggs
4 tablespoons (1/2 stick) unsalted butter, melted
Methods
Butter Waffles
Preheat the waffle iron according to the manufacturer’s instructions. Whisk flour, sugar, baking powder, and salt; set aside.
In a small bowl, whisk milk and eggs; pour over flour mixture, and whisk gently to combine (don’t overmix). Gently whisk in butter.
Following the manufacturer’s instructions, cook waffles until deep brown and crisp. (For a standard waffle iron, pour a generous 1/2 cup of batter into the centre, spreading to within 1/2 inch of the edges, and close; the waffle will cook in 2 to 3 minutes.) Serve with your choice of eggs.
Matcha has always been our favourite ingredient to be used in food and even drinks. Not that it tastes nice it also have good benefits for our body. While we are still new to matcha we only use it to make Matcha Latte and desserts. However when we are getting better at using this ingredient we tried making more variations like Matcha Pumpkin Nut Milk, Matcha Espresso, Coconut Matcha Pines and more.
This time we decided to make use of it to spruce up your soda or sparkling water – Sparkling Matcha. It’s made with matcha tea powder and soda or sparkling water for a bubbly and refreshing drink. You only need a few minutes to create this drink and it’s absolutely perfect for warm days when you don’t feel like sipping hot matcha tea.
About Matcha
If you’re not familiar with matcha, you can read more over at this post. The trick to a good matcha drink is matcha powder. Matcha powder is one of those ingredients that you should spend a little bit extra on and get a high-quality brand because it can vary hugely in quality. Generally, the lighter-coloured matcha powders are of better quality and always choose an organic brand so you’re getting the cleanest matcha and the best taste.
A little note about making a good match is that you might want a matcha whisk. For those who are using matcha power and make matcha often, we recommend investing in a bamboo whisk called a chasen. Its special design breaks up clumps and creates a frothy layer of foam on top of the tea. If you don’t have one, use a regular whisk or an electric milk frother instead. Whisking or stirring with a fork or spoon will not work here.
Which Sparkling Water did we use?
Sparkling water, often sold as sparkling mineral water, is a product that comes naturally carbonated. The carbonation comes from a natural spring or well. Sparkling water also contains calcium, sodium, and magnesium. These minerals could be an excellent addition to your dietary plan.
For this case, we use S’ PELLEGRINO Sparkling Natural Mineral Water which comes with a unique blend of minerals, fine bubbles and subtle nuances that we like. There are times when we replace the sparkling water with tonic water too, adding a little bitterness to the drink.
Creating the Layers
To make this an Instagram-able drink, creating the layers is an important step here. After many trials and errors, one tip that you need to know is to use A LOT of ice!! Also, the cold helps. Start by making the matcha before the layering starts. The order of the ingredients also makes a big change here. First, pour the maple syrup, then the ice. Then, slowly pour the sparkling water. The slower you pour, the more distinct the layers will be! Then, pour the cooled matcha over the top!
We love discovering and sharing simple recipes that you can make at home. They make for a healthier option than store-bought products. Not that you can save money but also the environment.
This term refers to the dominant furnishings of the mid-20th century—simple, functional wooden pieces made from teak and curved designs reigned supreme. We have always been a fan of mid-century furniture and recently the modern mid-century. This time we came across this kitchen at Santa Monica with a hint of mid-century modern sensibility in it.
Some highlight that we like about this kitchen is how the white oak cabinets are painted “Blanc,” from Le Corbusier’s Polychromie Architecturale line by Drikolor. A custom white oak butcher-block island and cork flooring add warmth to the space. The handles are inspired by Charlotte Perriand’s. They did our own version of her vertical cabinet pulls. A mix of metals— stainless steel on the countertops and along the side of the island; a copper backsplash and vent hood, unsealed to allow for oxidation—plays nicely.
One of our highlights in May is a stopover at this pop-up – Monde D’Hermes Kiosk by Hermés at Marina Bay Sand. Inspired by newsstands that are peppered throughout Paris, the kiosk has been swathed in the house’s unmistakable, quintessential orange hue.
The pop-up is centred around the latest edition of the French house’s bi-annual magazine, Le Monde d’Hermes, which is usually dished out to customers and VIPs. Head over to the kiosk to get your hands on a complimentary copy, which features witty and refreshing content surrounding the Spring/Summer 2022 collection.
We got a chance to meet the various characters that are stationed at the kiosk. ‘Mr Kiosk’ – the host of the pop-up who will gladly share just about everything there is to know about Le Monde d’Hermès with us is one of our favourites. Plant fanatics like us met ‘The Gardener’ who were on-site to attend to an array of mini potted plants (we took basil, mint and more) and to mete out gardening advice, all for free.
Looking up online there are even ‘The Portraitist’ who will create lovely portraits of attendees, ‘The Poet’ who will personalise a haiku just for guests or even ‘The Sculptor’ for his balloon creations. Sadly we didn’t get to meet any of them.
It is one of the perfect Instagram shots against the picturesque Marina Bay skyline we have during May. Comment below are tell us what is some other even we should visit?
Grid patterns and crisp lines are softened by an earthy color palette in this hotel interior in Chengdu, China, by local firm Archetype Design Organization. Located in a building from 2002 that was previously used as shops and offices, the 3,209-square-metre Buda Hotel is sandwiched between the city’s busy Yizhou Avenue and a quiet community neighborhood.
The exterior of the hotel is clad in a charcoal-colored calcium silicate board. An entranceway clad in walnut paneling and rectangular mustard yellow tiles guides travelers inside. The mustard tiles continue inside the hotel’s lobby where they stretch across an arched ceiling that the architects said was installed to evoke a homely atmosphere.
The jump in colours is to define the relaxation and cuteness of the hotel, and we chose yellow to keep the visual temperature of the hotel. The choice of mustard yellow tiles is to increase the meticulous experience while ensuring the durability of the hotel. It also forms a strong contrast between the hotel and the surroundings
Tomatoes, brie and bread are something you will see in our kitchen, they may consider a staple to us. Thus we decided to grab all these ingredients and create a toast for a lazy afternoon. So you see, it’s clear we all need this toast in our lives today. We are hoping that you all have these ingredients on hand so that you can make this toast for lunch, as a snack or even for dinner.
Personally, as mentioned we always have a wheel of brie and a loaf of bread on hand. And the heirloom tomatoes, well we never let those dwindle down to even one before restocking my pantry. We just have to eat them while we can!
Having the right ingredients
One of the beauties of this recipe is how simple it is to make with just four ingredients!
French baguette – Store-bought baguettes can range widely in taste and texture. Choose one that is of the heartier size. You only need a flute-size loaf, so make good use of the rest if you buy a full-size baguette. You can also use another hearty bread or a mini cocktail loaf. Sourdough is another alternative you can use for this recipe.
Heirloom tomato: Choose tomatoes that feel heavy, full of juice and that give ever so slightly. Heirloom tomato varieties can come in so many beautiful colours and shapes but only go for the ones with smooth, taut skin — not wrinkly.
Brie/ Camembert: Surprisingly, Brie cheese is becoming more and more affordable these days. The small wheels tend to be very handy but note that there is a larger proportion of rind in a small wheel as opposed to buying a larger wedge. If you don’t love the rind, you’ll need to trim it off, reducing the amount of usable cheese. A larger wedge may be a better deal for you than a small wheel.
Nuts: We use what we can grab in our pantry which is almond and sunflower seeds. In most of the time we prefer walnut, however, you can grab nuts that you like for a little crunch for the toast.
Brie vs Camembert
If you love creamy, earthy French cheese with a bloomy rind, you’re probably familiar with Brie and Camembert. Spread over a piece of crusty baguette these fragrant cheeses are delicious in the funkiest of ways (which is what we doing here).
The flavour profiles of Brie and Camembert are quite similar. Both are typically described as tasting earthy, nutty, fruity, grassy, and even mushroomy. The variations in taste are subtle, but Brie is milder with a creamy, buttery taste, while Camembert has a deeper, more earthy and intense flavour and aroma.
While both Brie and Camembert are cow’s milk cheeses, though one has a higher fat content. As cream is added to Brie (though not to Camembert), giving it a higher milk fat content, and a creamier texture. So which of these are you a fan of?
How do you make this toast?
You can turn this into a full tomato sandwich, but we love leaving them open-faced. We line slices of brie on sliced bread then drizzle with a little olive oil and thyme leaves. After some time under the broiler, the bread toasts and the brie melts into the bread.
While this happens, get the tomatoes ready. My best tip for tomatoes is to season them. In fact, I love adding a sprinkle of salt to the slices and leaving them for at least 5 minutes. The salt draws out excess water and makes them taste better.
After it is done sprinkle the toast with nuts (almond and sunflower seeds) and drizzle with honey. Add the sliced tomatoes and lightly drizzle with olive oil. Sprinkle with salt and pepper. Now you can enjoy them!
Enjoy the toast as soon as you are done. We hope you will enjoy this simple Brie and Rainbow Tomato Toast for a quick lunch.
Place the bread on a baking sheet and rub each slice with a little butter (or you can use olive oil). Place in the oven and toast for 3-5 minutes. Remove from the oven and evenly divide the brie among the toast. Add the thyme. Place back in the oven and cook another 5 minutes or until the brie is melted. During the last minute, turn the oven to broil and broil for 30 seconds to 1 minute. Remove from the oven.
Sprinkle the toast with nuts (almond and sunflower seeds) and drizzle with honey. Add the sliced tomatoes and lightly drizzle with olive oil. Sprinkle with salt and pepper.
You may just walk past Double Up Coffee at Jalan Klapa, considered quite a hole-in-the-wall. That what’s almost happened to us. As there isn’t a shop name located anywhere, with just a big logo welcoming us, we almost doubt ourselves if we are at the right place.
It is located right opposite Kumoya known for its character cafes. Both cafes are the opposite ends in styles anyway – one known for cutesy cartoon-themed food; the other coffee focused.
There are two halves of Double Up Coffee. Outside, you would spot three chairs of solid colours of red, yellow and blue, along with a table repurposed from a skateboard. It suggests funkiness and young vibes. Walking in, the mood changes with light grey cement coffee counter, light wooden chairs, but most customers were sitting back facing the wall on a row of concrete seats.
Placing their focus on their coffee-related offerings, Double Up Coffee serves up specialty coffee using blends roasted by local micro-roaster and cafe, Bearded Bella, whilst also offering a small menu of non-coffee items and bakes as well. We had ourselves a Double Up ($7) and a filtered coffee ($6), which both tasted really good.
A spot that puts in the effort in serving their patrons the very best, Double Up Coffee is a space with potential; yet another one of those spots to keep a lookout for, and somewhere which we would most certainly make our visit again. We wish the folks behind Double Up Coffee all the best in what is to come!
Double Up Coffee Address: 7 Jalan Klapa, Singapore 199319 Opening Hours: 10am – 6pm (Mon, Wed – Sun), Closed Tues