Notice: Function _load_textdomain_just_in_time was called incorrectly. Translation loading for the acf domain was triggered too early. This is usually an indicator for some code in the plugin or theme running too early. Translations should be loaded at the init action or later. Please see Debugging in WordPress for more information. (This message was added in version 6.7.0.) in /home/u340358266/domains/leplaincanvas.com/public_html/wp-includes/functions.php on line 6170
Notice: Function _load_textdomain_just_in_time was called incorrectly. Translation loading for the sitka-core domain was triggered too early. This is usually an indicator for some code in the plugin or theme running too early. Translations should be loaded at the init action or later. Please see Debugging in WordPress for more information. (This message was added in version 6.7.0.) in /home/u340358266/domains/leplaincanvas.com/public_html/wp-includes/functions.php on line 6170
Notice: Function _load_textdomain_just_in_time was called incorrectly. Translation loading for the health-check domain was triggered too early. This is usually an indicator for some code in the plugin or theme running too early. Translations should be loaded at the init action or later. Please see Debugging in WordPress for more information. (This message was added in version 6.7.0.) in /home/u340358266/domains/leplaincanvas.com/public_html/wp-includes/functions.php on line 6170
Notice: Function _load_textdomain_just_in_time was called incorrectly. Translation loading for the sitka domain was triggered too early. This is usually an indicator for some code in the plugin or theme running too early. Translations should be loaded at the init action or later. Please see Debugging in WordPress for more information. (This message was added in version 6.7.0.) in /home/u340358266/domains/leplaincanvas.com/public_html/wp-includes/functions.php on line 6170
Notice: Function _load_textdomain_just_in_time was called incorrectly. Translation loading for the kirki domain was triggered too early. This is usually an indicator for some code in the plugin or theme running too early. Translations should be loaded at the init action or later. Please see Debugging in WordPress for more information. (This message was added in version 6.7.0.) in /home/u340358266/domains/leplaincanvas.com/public_html/wp-includes/functions.php on line 6170 LePlainCanvas – Page 12 – Illustration & Lifestyle Inspiration
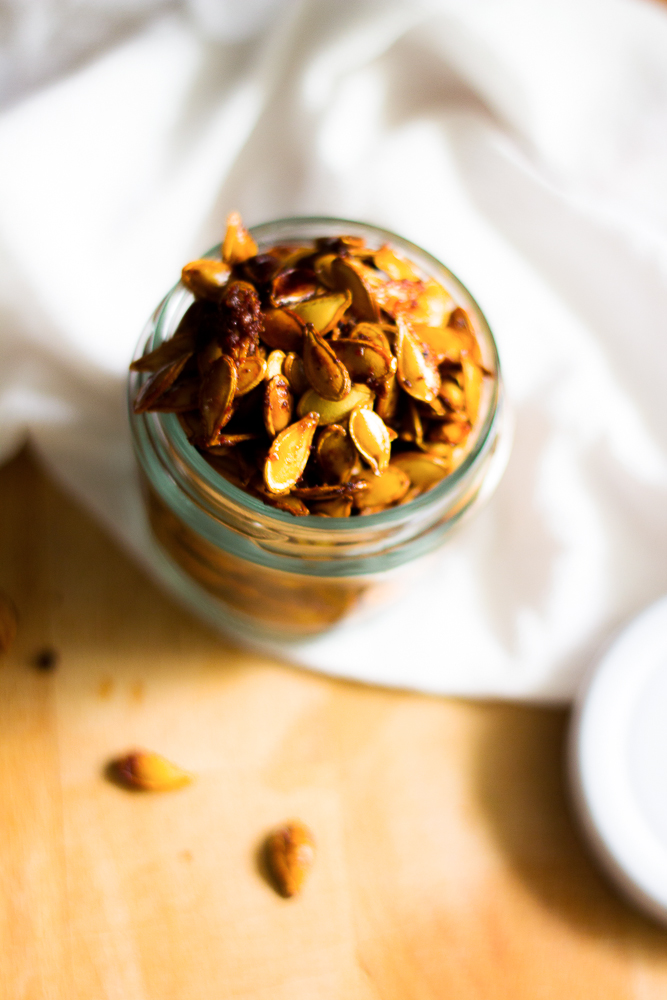
Lately, we haven’t been doing too many DIY projects. Thus, decided that we needed to get a move on and start doing some of those wonderful projects that we’ve been pinning to all of my Pinterest boards. One project that we’ve always wanted to do was painted plates for the kitchen.
Lucky for us, we’ve had these white plates that have been sitting around just waiting to be painted. The first thing we did was to soak the plates in some hot water and vinegar. Next, we just wiped them down with a paper towel and had clean and clear plates. Wallah! Ready to start making some DIY Painted Kitchen Plates.
This time we needed some plates for the Cinco de Mayo Party that we have this early May. For the party we have are having a bright orange and pink theme. To neutralise it we decided to paint some green cactus.
Materials |
Plates ( It can be glass or white ceramic plates like us
Acrylic Paint (Use any brand paint that is suited for ceramics painting)
Paint brushes
Printer/Paper
Clear coat spray (optional)
Vinegar (optional)
Water (optional)
Method |
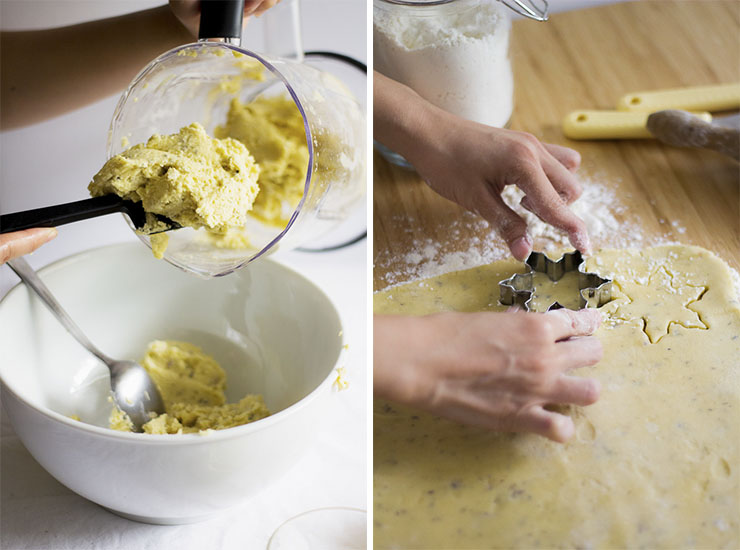
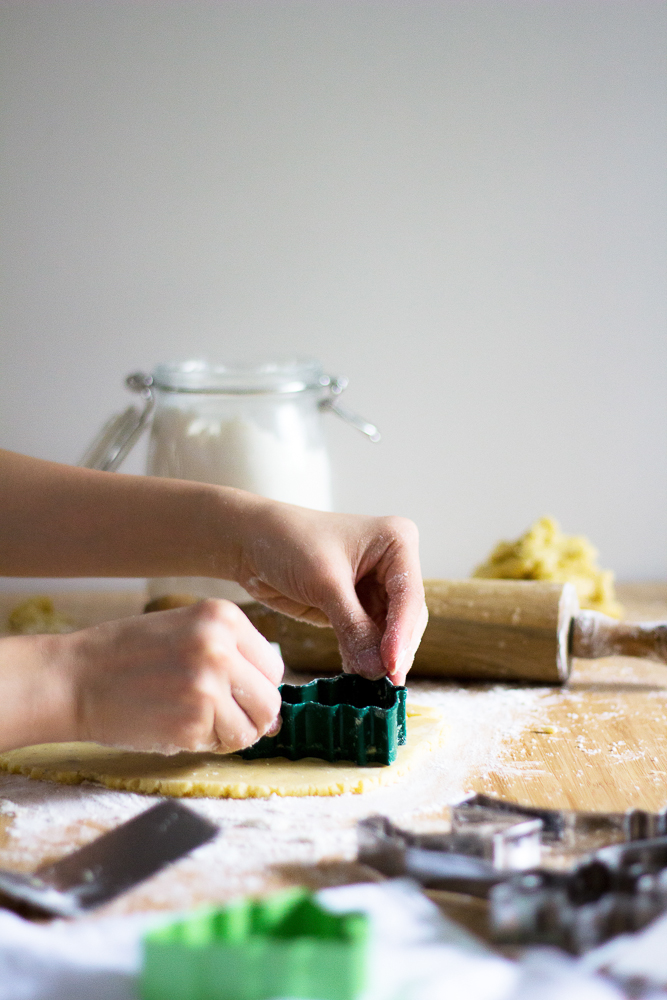
After cleaning the plates with vinegar, you can start creating this amazing plate.
For us, we start by painting the base shape of the cactus and let it dry. After two layers of paint let it dry for 5 hours. Next, you can add in the needle details we another colour.
After letting it dry completely, spray 2 coat of clear coat spray.
Hope you like them! Share with us your version! Take a photo of yours, send us an email, tag us on Instagram, tweet us, anything. We love to see yours!
I am never a girl that wear a lot of hats but they are one of my favourites accessories. Nevertheless, when it come to Spring and Summer it’s one of my accessories around the year. There are different kinds of hat, some make you look sweet but some make you look chic.
Fedora has never looked good on me while my love with those floppy hats it’s never essential for a daily wear. However, a good felt Fedora makes your casual outfit look chic. Therefore I enjoyed wearing something simple, chic with a flat brim. Wearing them just give you a sweeter look with your spring dress.
I’m also excited to try some Boater Hat; both felt and straw materials look just great for this Spring. Wearing them just give you a sweeter look with your spring dress.
To all the mom’s in the world, Happy Mother’s Day.
It has been an another great year having you at our side. I am also thankful for having you in my life. Sorry that I have been making you worry about me and the family. After all the work in the day, you still have to clean up the house. So that we are able to stay comfy and focus on our work.
Sorry for shouting back at your when you nag, but you are just worry about me. Sorry for missing our family time, as I need to work on my dream. I am a big girl but I still can’t help much with the family. Sorry and thank you, I love you.
In this Mother’s Day, I delicate this carination flower for you.
One of the things we love best about living in my neighborhood is the almost daily conversations that everyone has about fresh produce. Nope, not the weather. Fresh produce. But during the weekdays, it is blissfully chill and much quieter. But the other bonus is that all of the weekend’s produce is a mega discount.
We bet this mango salsa would be fantastic on fish tacos or just about any fresh, Mexican-themed dish, really. We can confirm that it goes well with chips, guacamole, and black bean tacos. You could also serve it with salad or just eat it straight out of the bowl as a salad. It’s that good. If this recipe gets you hooked on making homemade salsas be sure to check out my other salsa recipes.
We can’t even count the number of times that we have made mango salsa throughout the years. As far as fruity salsas go, it’s easily my favorite. And whenever we serve it to a crowd, others apparently share the love because it always disappears in a snap.
We took it to my neighbor night gathering last week when we were celebrating Seis de Mayo (yes, extending the Cinco de Mayo Mexico food extravaganza as long as possible). And before we hardly had a few bites, it had disappeared. Everyone loves mango salsa!
The good news is that it’s also ridiculously easy to make. And if you want to go the minimal route, you can make a fantastic version with just 5 ingredients!
Ingredients |
2 ripe mangoes, peeled, pitted and diced (about 3 cups)
1 small red onion, peeled and diced
1-2 jalapenos, seeded and diced
1/2 cup chopped fresh cilantro, loosely packed
juice of one lime
Method |
Toss all ingredients together until combined. Season with salt and pepper if needed. Serve immediately, or refrigerate in a sealed container for up to 3 days.
For those who like to try above recipe
Hope you like them! Share with us your version! Take a photo of yours, send us an email, tag us on Instagram, tweet us, anything. We love to see yours!
Flowers would be the most beautiful table centerpiece you would ever have. They’re elegant while it can be fun at the same time. During the period of spring, blossoms will be part of our everyday life. It’s something you won’t want to miss seeing in your house, especially you are hosting a party.
We held a Cinco de Mayo Party at last weekend and everything was amazing. However, it becomes perfect when we have this flowers as our centerpiece. We found some great pink and orange flowers at our local market. Adding some greens to it as a finish touches.
To hold all this beautiful flower you would need a vase along with water (obviously)! However, you can’t always have a vase in your hand every time, like us. Thus this time we suggest to use empty cans for the vase. It gives a raw, rustic look. As our flower are all bright in color, the vase just carries them well.
You may think it will be difficult to handle all the decoration and flower may cost. We’re not THAT crafty — but centerpieces and decorative flowers are easier to manage than you might think, and DIY-ing it can potentially save you a fair chunk of change.
We hope this gives you a few ideas as to what to take to your next Cinco de Mayo and also a little insight into my world. Hope you like them! Share with us your version! Take a photo of yours, send us an email, tag us on Instagram, tweet us, anything. We love to see yours!
Today’s color trend is a fun lime green tone with a strong vintage vibe. Some might call it a chartreuse but Pantone calls it ‘Golden Lime’. This color fits in perfectly with modern designs and vintage style interiors. Thus, anything mid-century modern is going to pair well with this color trend. Now for the fun part. Let’s take a look at some inspiration featuring ‘Golden Lime’.
This lime green color makes perfect accents in dark rooms. Such as having a dark navy blue wall color and rustic leather pieces to replicate this look. Or a well placed the lime green piece in a white room with black accents is just perfect!
Nothing says modern like a lime green and black color combo. Really, just a few pops of white add brightness to the look. However, if you are not a fan of black, don’t worry. Just a touch of lime green with orange can also add a welcoming touch to this beautiful white living room.
Or a simple tall golden lime curtains really accentuate the height of the room. Thus, nothing fancy is really needed.
Week and weeks pass, but every day just seems the same to me. I am just as busy as usual. Like this painting, it is just another flower water painting from me. So for today #themooninsight I have painted another flowers painting. Recently, I don’t have lots of time for painting but when I have time I like to paint the flower. It is still spring, a time where flower blossom.
Anyway back to the topic, recently I am still working on Le Plain Canvas and the product company (I and my friends created). Today I would like to share a happy news with you. EGGY held his first public launch at the Innofest 2017 on 3rd and 4th May 2017. It is just a very huge step for EGGY and the team. Please stay tune for more latest news.
There was a time when Cinco de Mayo meant tequila, nachos, and, well, more tequila. But, as we are trying to stay healthy, we’ve dialled back the drinking and dialled up the family-friendly fun so that we can all enjoy a Mexican fiesta on the fifth of May (which is today)!
Fiestas aren’t just for Cinco de Mayo! A south-of-the-border party theme is a great choice any time you want to kick back with a pitcher of margaritas and good amigos. Snag our ideas for decorations, cocktails, appetisers, main courses, and desserts. So now let’s get started by sharing ours!
First and foremost, Cinco de Mayo means Mexican food. If it does in yours, too, set up a colourful taco baralong with recipes for taco fish, lime chicken, chunky salsa, and a mini soda bar. You may find that even your picky parents are more willing to try some new things when they are displayed beautifully like this. We love that you can choose to make this as fancy or as basic as you’d like, using homemade or store bought ingredients, with as many toppings as you have time to put out.
Let’s have an overview of list of food we have on our taco bar;
Battered Tilapia Fish
Grilled Chicken Fajita
Homemade Mexican Guacamole
Mixed Salsa
Tacos & Tortillas
Mexican Shrimp Cocktail
Tropical Lemonade
We also have a wide range of side for our family, allowing a theme to mix and match to their preference.
We have 2 kinds of mains to choose from, Battered Tilapia Fish and Grilled Chicken Fajita.
Battered Tilapia Fish: The fish cooks up in literally minutes, so it doesn’t take long to get these beautiful bowls on the table especially if you are using leftover rice. The sauce takes 30 seconds to mix together. This recipe is customization with whatever ingredients you have on hand. Other fish options are mahi-mahi, cod, or halibut.
Grilled Chicken Fajita: They were really simple and fun to make. We made my own fajita seasoning with a blend of chilli powder, cumin, garlic powder, and salt. After seasoning tossed the cubed chicken in it. Then we put the meat on a skewer with a mix of yellow, and green bell peppers, and red onion. We gave the kebabs a little sprinkle of salt and sent them out to be grilled. The nice thing about skewer recipes is that they cook pretty quickly on the grill since the meat is already cut into small pieces.
To accommodate the mains we have different sides for it. Start with Homemade Guacamole is definitely a staple of Mexican cuisine. Even though Guacamole is pretty simple, it can be tough to get the perfect flavour. With this authentic Mexican guacamole recipe, though, you will be an expert in no time. You’d better make a double batch. Of all of them.
We also couldn’t be missed to have the Mixed Salsa. A pile of fresh veggies and best lime dressing to make one of the best chips dips – EVER. Mark my words, after one taste you will be shovelling chip after chip piled high with the stuff into your mouth.
We also prepared bowls of cilantro, cheese and different sauces for the tacos bar! You can start by sitting the tortillas, guacamole, and mixed salsa on the table when the skewers finished cooking and then we pulled everything off the stick (Or place the juicy battered fish on top), wrapped it up in a tortilla and dug in!
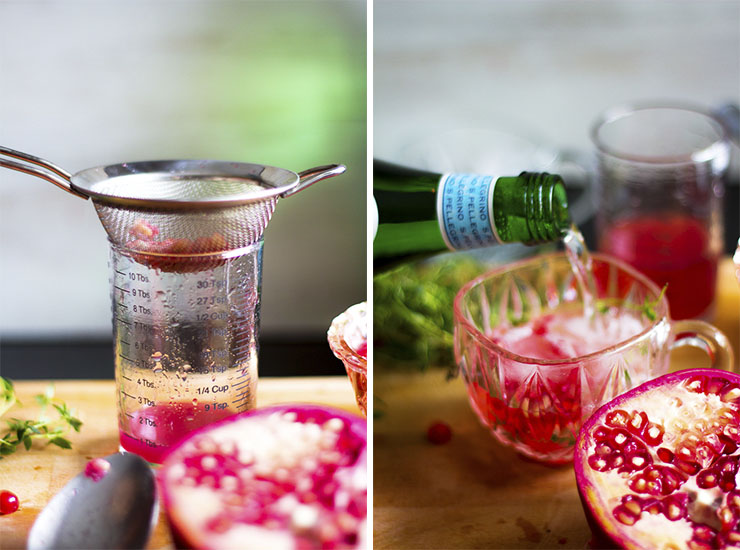
So now, Cinco de Mayo is rolling around and we’re getting into the Mexican food mood. Mexican Shrimp Cocktail is almost like a “salad in a glass”. A chock full of crunchy vegetables and shrimp in a spicy, tangy tomato sauce. What’s not to love?
We’re an onion-lover from way back, but it can be on the strong side for many people. Rick provides a great tip in the Panna app for removing some of the bites. After chopping the onion, place in a sieve and rinse it briefly under cold running water. Enjoy!
It wouldn’t feel like Cinco de Mayo without festive beverages and we especially love the kick of a good margarita to get our party started. Thus we also prepared a topical lemonade and Mexican beers for the family.
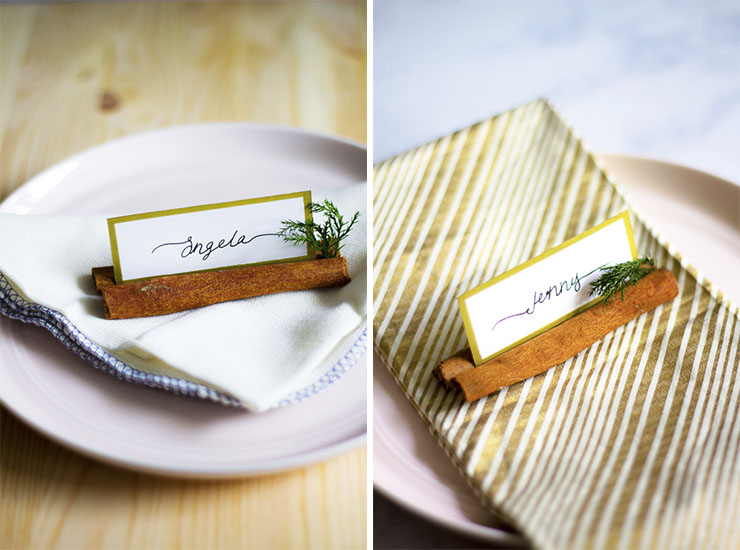
Cinco de Mayo is all about the fun and bright colours. Thus we also set out a colourful tables setting for our guest! Start by making an invitation card for the guests to your Cinco de Mayo bash with these festive cards – a flower wealth water painting card.
With the same flower water paint, we did a menu to highlight the different dishes that we have made for the party. Leave us some comment is you want the template for this printable.
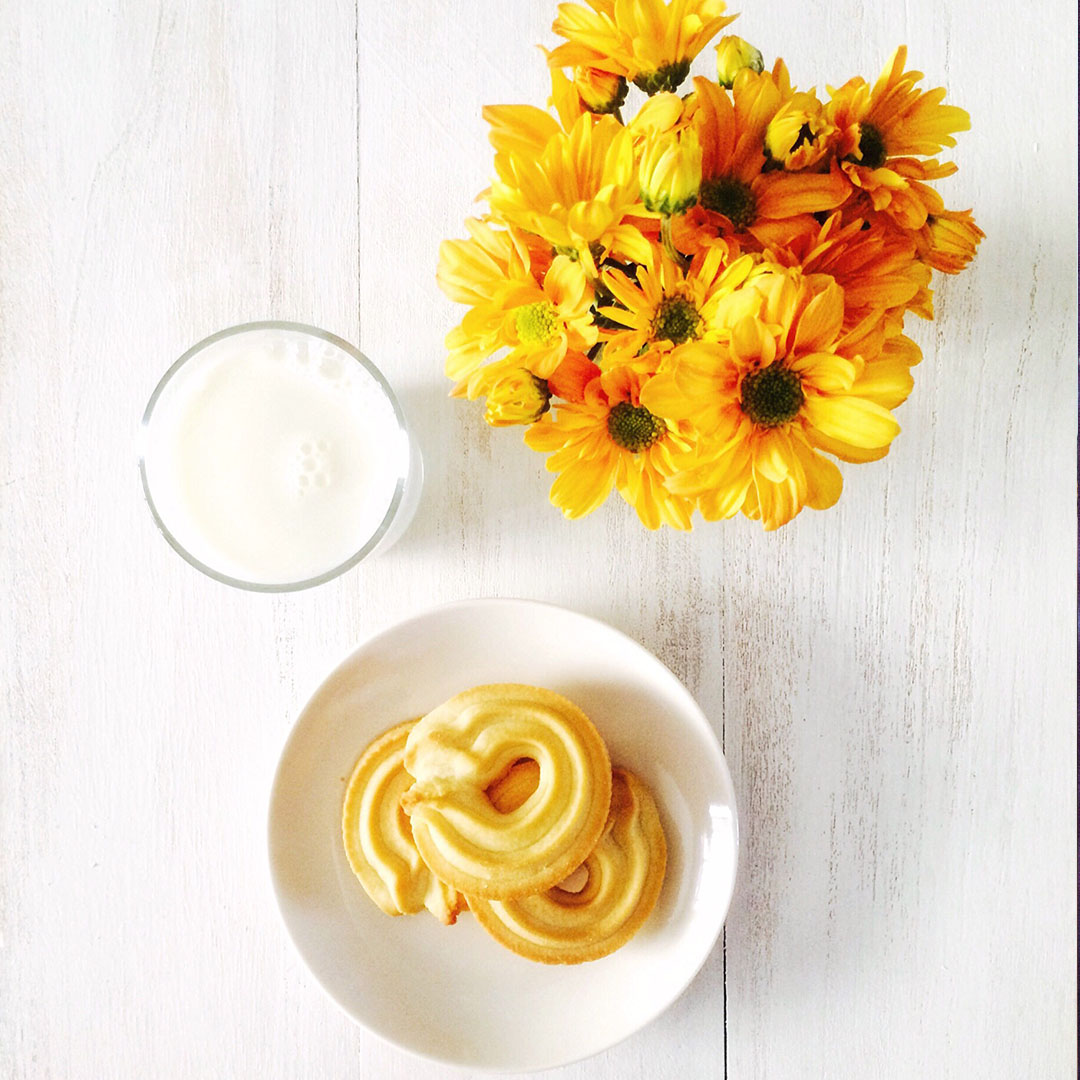
We also painted cactus to our plates as a fun and bright elements! Pink and Orange is the main colour for the party as we want to bring more warms to the family.
We hope this gives you a few ideas as to what to take to your next Cinco de Mayo and also a little insight into my world and how we do a picnic. Hope you like them! Share with us your version! Take a photo of yours, send us an email, tag us on Instagram, tweet us, anything. We love to see yours! A Happy devil, and let us know what else you come up with!
Although the 52 weeks project, #APaintPortrait have already come to an end. However, with your support this week I would love to have a special portrait dedicate to Sonia, who is one amazing individual, also a photographer.
I enjoyed her particular style, it is very fresh and pure. Being able to connect with her for a long time allows me to be fascinated with her work again and again. Through her Instagram’s account, you will see her perceptive is unique and charming. I truly enjoyed the interaction with her as she is such an inspiring individual.
Honestly, I would say that this portrait that I painted for Sonia could be one of the most challenging ones among all of the 52 portraits. Because I decided to challenge to work with lots of shadow and lighting. I might not have been working on this style before. Therefore, exploring a new style teaches me new things which are beneficial to improving my skill.
Oh, that cozy feeling of being tucked into a protected, enclosed loft or bunk bed. It brings back fond memories of childhood plays and teenager dreaming hideaway marathons. This loft bed is very appreciated features in micro homes as well as in guest houses. A loft bed allows the maximization of usable space by freeing up floor space and offering a sleeping area with all the necessary elements.
A loft sleeping area can serve as a charming feature in the case of a home with a high ceiling. This way it won’t feel like a dark and tiny attic space but rather as an airy and charming bedroom.
A different type of setting where a loft bed would be a perfect design choice is a room that’s narrow. In such a case, placing the bed on the floor would occupy pretty much the whole room. However, if the bed is raised on a platform. You can use the floor space for something else. There’s enough room left for a small sofa and a desk.
“On the mountains of truth, you can never climb in vain: either you will reach a point higher up today, or you will be training your powers so that you will be able to climb higher tomorrow.”
So when you are with people, no matter in school or during work. People always try to backstab you to be better. They got credit for what is not done by them. They got you blame for what not causes by you. Doing all this they though that it is able to protect themselves but hurting another. However, what they don’t know the truth will appear someday. And their lies will never help them achieve what they wanted.
Only hard work and perseverance. No one will ever help you cross the mountain. You are unable able to cross it but hurting anyone.
Up until this week, I always thought the best Tiramisu I ever had was in Scotland at this sweet little restaurant. But after tasting our own version of this classic dessert, I’ve changed my mind. We have made it at home for a few times and it was always very creamy and delicious, but I was never thrilled with how it held up.
So we started trolling for recipes to see what we might be doing wrong. And let me tell you there are as many different Tiramisu recipes as there are Italian grandmothers, each with their own little twist. Some which weren’t tiramisu at all.
What we did find was a recipe that took me back to a time when life was simpler. When the food had become something almost magical to me, something that resonated deep down inside of us. Something that we knew we could do and be good at.
And with all that we had gone through, we were amazed we could still do anything, life had been rough. Life had been a series of ups and downs, but through it all, we could cook, and no matter how bad things got when we were in the kitchen and creating meals, life was good and we were happy.
And that got me through it all. But again we digress, somethings are better left unsaid. But sometimes we feel compelled to tell our story, we just hope you can bear with me through those times.
One of the life’s simpler pleasures had always been dessert, in whatever form it took, and my first introduction to Tiramisu would be in the form of a pudding, without the ladyfingers. That silky delicate cream overflowing with flavour would offer that “Taste of Heaven” and have you begging for another serving.
We think saying it had a velvety texture would have been a good way to describe it, but it was too loose for anything but a dessert glass. There isn’t a classic recipe for tiramisu as such, as there are many varying versions both in Italy and around the world, but the following one is, we think, the nicest we’ve come across.
For lovers of strong coffee, dark chocolate and the rich creaminess of mascarpone it is one of the nicest, easiest and most popular desserts of the party season.
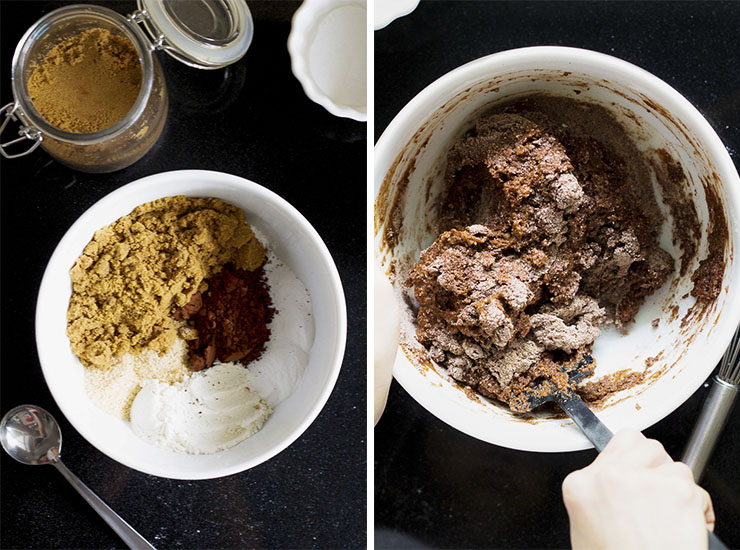
Ingredients |
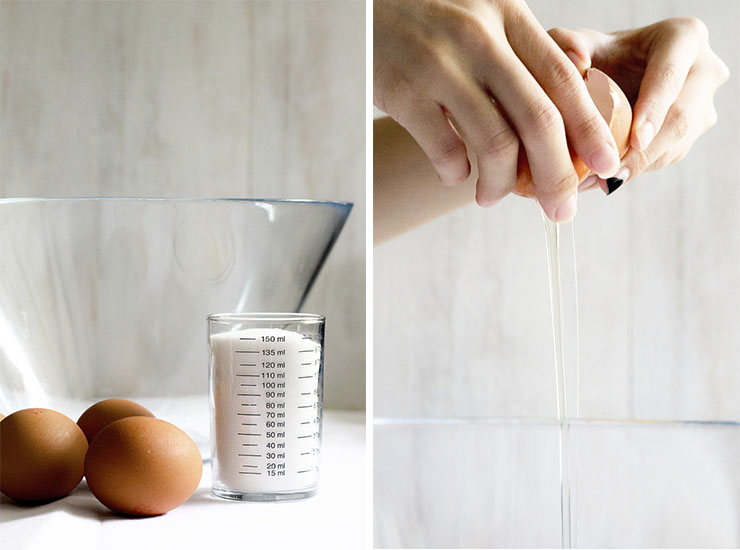
6largeegg yolks
1cupsugar
1 1/4cupmascarpone cheese – room temperature
2cupheavy whipping cream
2 -7ozpackages Italian Ladyfingers(Savoiardi)c
1cupcold espresso
1/2cupcoffee flavoured Liqueuroptional
1ouncecocoa for dusting
Method |
Combine egg yolks and sugar in the top of a double boiler, over boiling water. Reduce heat to low, and cook for about 10 minutes, stirring constantly. This is your sabayon, remove from the heat and whip yolks until thick and lemon-colored.
Add Mascarpone to whipped yolks, beat until combined. In a separate bowl, whip cream to stiff peaks. Gently fold the whipped cream into the mascarpone sabayon mixture and set aside. The mascarpone does not have to be at room temperature. Take it out of the refrigerator as you gather ingredients to make the recipe.
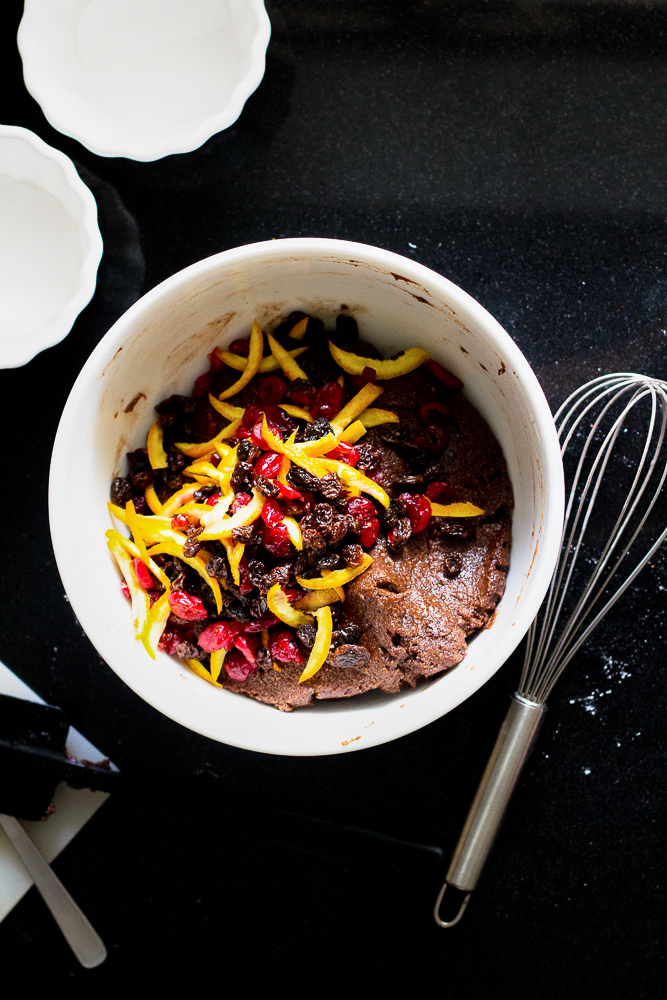
Mix the cold espresso with the coffee liquor and dip the ladyfingers into the mixture just long enough to get them wet, do not soak them!
Arrange the ladyfingers in the bottom of a rectangular baking dish (or container similarly sized. Spoon half the mascarpone cream filling over the lady’s fingers. Repeat process with another layer of ladyfingers and cream.
Refrigerate 4 hours or overnight.
Take a photo of yours, send us an email, tag us on Instagram, tweet us, anything. We love to see yours! Let us know what else you come up with!
This week would be the final portrait for the 52 weeks project – titled, A Paint Portrait. This week I would love to dedicate this portrait to this dear friend – Yosua. He is someone who spread happiness around with his genius smile and encourages people through his words and actions. Little you know he also a fighter in life who inspired me to live happily each day.
Without his knowledge, I couldn’t share his full story. However, if you get to know him you will be truly touched with what he has been gone through. He let me know understood that we need to value each day to the fullest.
Despite the fact that we might be weak for the challenges we facing. And, the fear in our heart but we need to do our best in every way and that’s the right way of life.
Winnie the Pooh once said, “Don’t underestimate the value of Doing Nothing, of just going along, listening to all the things you can’t hear, and not bothering.”
Yet, sadly to say that this week is the final portrait for the 52 weeks project, #APaintPortrait.
I’ve not yet decided if I’m running a new 52 weeks for the #APaintPortrait project though I believe it will be something more challenging that I would like to have more interaction level with my arts, design with my audience.
We usually have seen these terrazzo flooring in commercial interiors, from hotel lobbies to corporate offices. But did you know that modern terrazzo floors are becoming increasingly popular at home?
Traditionally this solid flooring consists of marble chips suspended in cement, then ground and sealed. However, today’s terrazzo flooring includes a range of other materials, including epoxy bases and recycled glass flecks. Thus today we will be sharing how this solid flooring option can be shared in other places other than the floor.
This modern terrazzo is back and these this you can use them on your walls instead, especially in the bathroom. For those who are not a fan of big changes you at use this pattern on the shower curtain instead. They are best when come to matching with white and wood.
Terrazzo floors are durable, long-lasting and low-maintenance. It can provide a green option for eco-conscious design enthusiasts, especially when created from recycled content. Here are some modern interiors featuring terrazzo!
Spring is my favorite season of the year. It is a season that I love to head out for a walk or a hiking. This is also my favorite season also there’s lots of pretty flower in the market for me.
Painting flower in spring is awesome too, as they are all colorful and bright. Thus you will be seeing different flower water for The Moon’s Insight recently. Sorry but not really since I am enjoying myself.
“Just living is not enough, one must have the sunshine, freedom, and a little flower.”
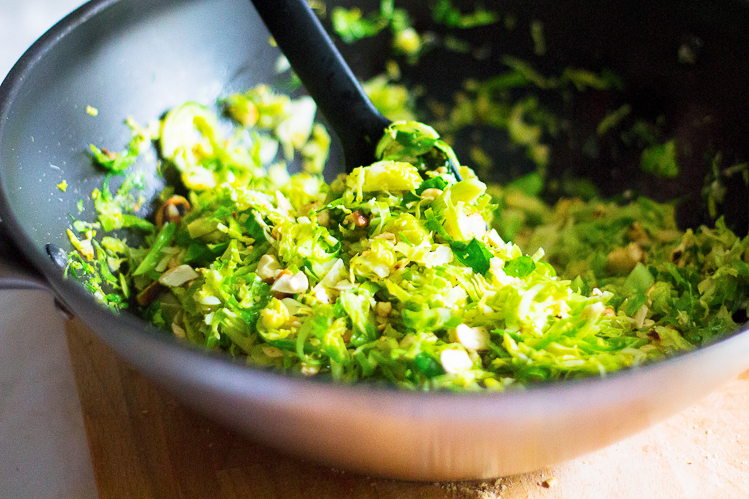
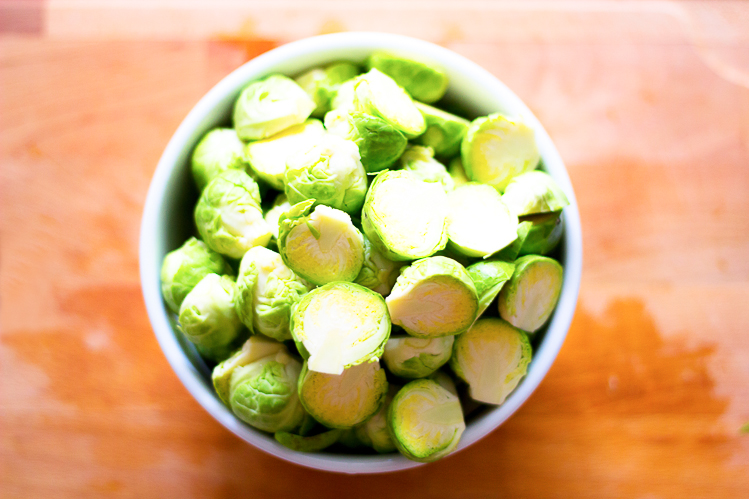
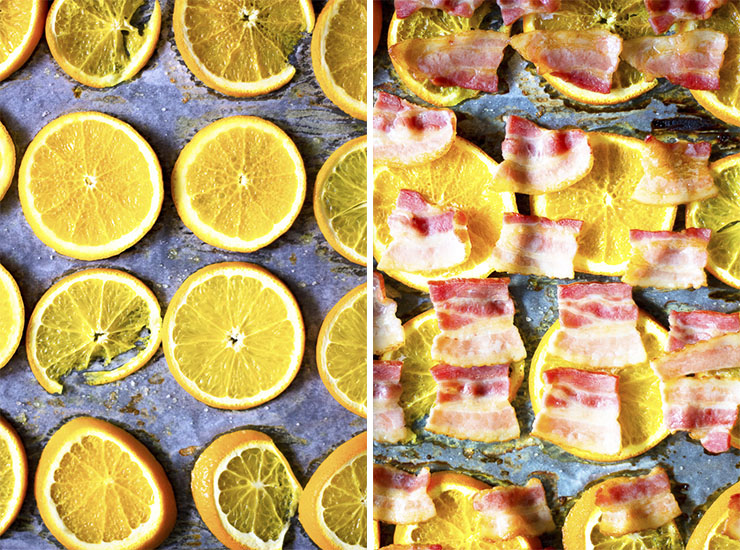
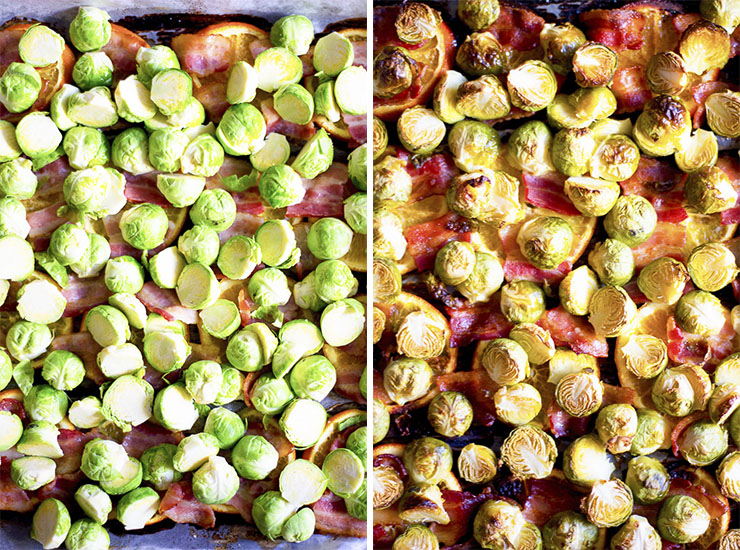
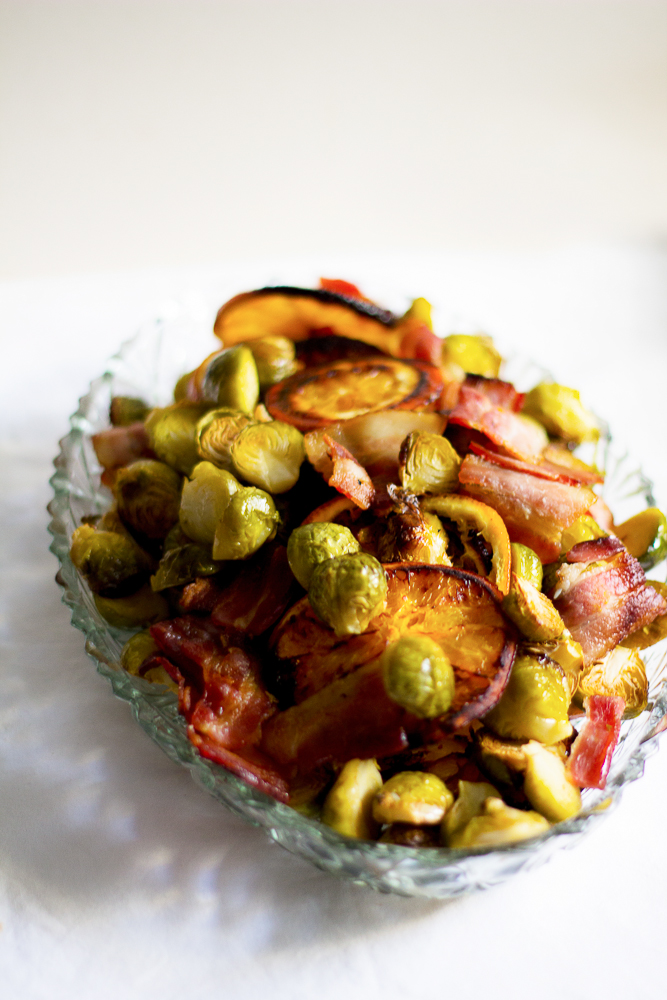
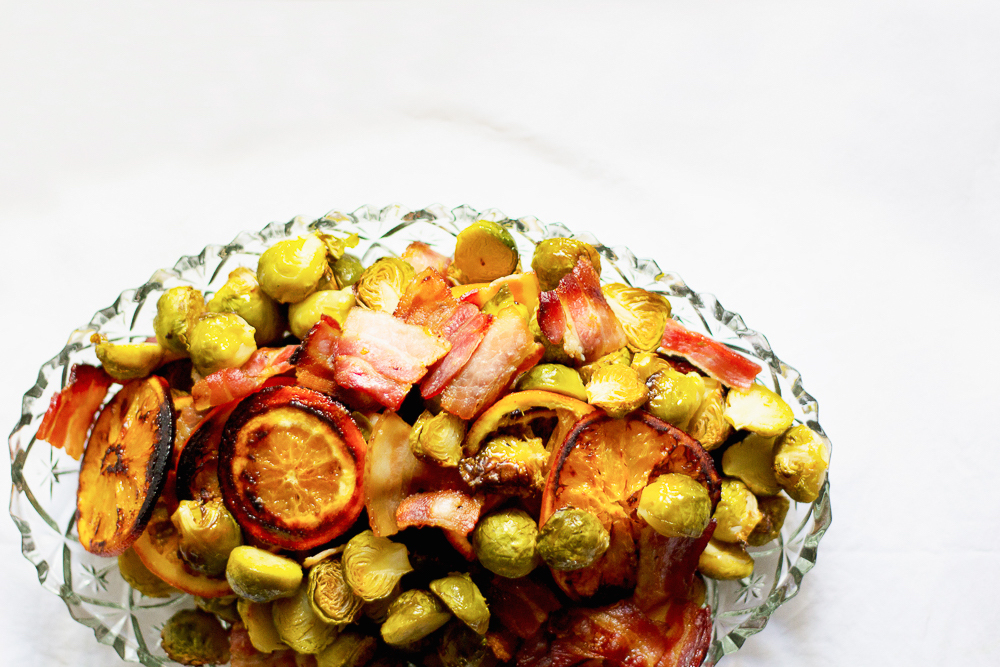
It’s always great to have a cleansing after the feast especially we just had the Easter over the last weekend. It’s the best to have some greens to clean our belly. We would love to introduce you our favorites, Bacon Bussel Sprouts – it might sound or look greasy but actually, it is not at all. It’s my favorite combination for salad and I believe that you will like it as well…
Preparation for salad could the most easier dishes you could make. Simply wash the vegetable, prep the mains and lastly mix the sauces. Sound easy, doesn’t it?
These brussels sprouts are roasted until golden and caramelized, then doused in a maple-balsamic vinaigrette and topped with crisp bacon and toasted pecans. They’re so addictive, it’s hard not to eat the entire lot standing at the stove before you serve them.
These oven roasted Brussels sprouts are super easy to prepare. Moreover, it makes a delicious side dish alongside steak or even lamb. Especially, any leftovers are delicious added to salads as well!
Ingredients |
Method |
Cook bacon in a large skillet over medium-high heat until crispy. Remove to a paper towel-lined plate, then roughly chop. In the same pan with bacon fat, melt butter over high heat.
Add onions and Brussels Sprouts and cook, stirring occasionally, until sprouts are golden brown, 8 to 10 minutes. Season with salt and pepper, to taste, and toss bacon back into a pan.
Serve immediately.
Take a photo of yours, send us an email, tag us on Instagram, tweet us, anything. We love to see yours! Let us know what else you come up with!
We have been neglecting this session a lot considering to our previous post but we promised that are more exciting projects coming up. One of the section of our craft making is to share with you some of the deck’s creation we made. We believed that you could simply make it yourself with items that you could find at home.
Now it is spring, which means it’s prime flower season! And why not keep some of those flowers on your desk for months to come? In less than an hour, you can have yourself a brand new mouse pad that isn’t ugly or a basic/plain color.
We love making things to give our desk a little bit of spark if it doesn’t spend us too much money. It’s always good to make thing our own self, especially the pretty one. All you need is your favorite fabric and a few inexpensive supplies. Here’s how:
Time: 30 minutes + dry time Materials: fabric mod podge, cork round, fabric, scissors, sponge brush
I’ve made a cork mousepad before, didn’t like the wear of the spray adhesive after 6 months (caused some discoloring on the black fabric). Fabric Mod Podge is a much better glue for this project! I picked up the fabric from Minted. The heavier the better so that the glue doesn’t bleed through.
Cut your fabric to fit your cork round, leaving about 2″ of overhang. Apply glue to cork and smooth fabric on top. Fold the excess fabric over the edge, smoothing underneath. I chose to hide the extra fabric under ribbon so the bottom is completely flat (no fabric). You could also glue the second cork round to the bottom, placing the extra fabric in-between if you didn’t want it to show on the bottom.
Let dry overnight before using and that’s it!
Much better than a store bought mouse pad, don’t you think? Plus I can’t get over the colors + flowers for spring! Don’t you find it easy make your own mouse pad? This wasn’t just a mouse pad, it also could use it as a pin board.
Take a photo of yours, send us an email, tag us on Instagram, tweet us, anything. We love to see yours! Let us know what else you come up with!
This week, this amazing friend whom I painted, she was one of a unique individual. She is one of the energetic people I ever met, I knew her through an event and she is really amazing! Her passion in work and handling event is just inspiring. That’s why I would want to dedicate this painting to her in my life journey.
Speaking of the event, I have been working in the event industries for almost 4 years in counting. I wasn’t always keen on working in the event but it turned me to someone who doesn’t know anything till something I’m confident to work on. It builds my confidence in designing.
Yet there is still the frustration that I faced – the artworks to handle. Esecapilly you need to handle plenty of artworks and the sizes of it. Therefore, it’s has been the insane past week, it has been crazy with new coming works that I didn’t foresee that stretches from last week till this week.
But it always would have been easier if I did all the work from the start myself (but simply can’t). As a designer what I most disturb by is the messiness file from another party. It could be a madness if someone is disorganized! It wasn’t all about me being OCD but packing files are the basic rules of all. I’m looking forward to sharing some design tips with you.
Pantone, Flame “a gregarious and fun-loving” orange color. So we came up with some playful ideas to help you celebrate your quirky side using this great color. Something about this vibrant hue gave us a retro European vibe. Thus we pulled together an inspiration board that develops this living room theme.
With a color as vibrant as Flame, a little will go a long way. You can consider small pops of this color as accents against a more neutral background. For example, having the seat in creamy white with an orange cushion. Or even a bright orange sofa for your monotone living room, it surely brings life to your home.
And speaking of décor, there are tons of amazing flowers that can add fiery bursts of orange around your event, like Parrot Tulips, Ranunculus, and Dahlias, to name a few.
If you are an audacious person, try to paint your walls into the color flame. It surely brings out your personality when you are having a house party!
It’s not really Easter’s Day yet (tomorrow) but I can’t wait for the celebration. Even though it seems like I have a long holiday, but I can’t seem to have any rest. Since last year march, I have been working with a group of my friends in a startup company – minnimi. There are lot’s of up and down, even now seems like problems really love us. Still, with our commitment and perseverance, I am pleased to say we are going to move on to our next milestone. Where I can’t wait to share them with you.
Still, I will work hard with Angela to produce more amazing work and inspiration for you guys. It may be hard at some time, but success is never easy.
Last year we have our Easter Tea Party at home with few of our friend. Although it is our virgins experience but a good one. Thus this year we want to make it even better. This time of year, the urge to go outside increases by the day. There’s more sunlight, birds are chirping and, flowers blooming. What better way to welcome spring than with a picnic prepared from the heart? Therefore, we are going to prepare a picnic for Easter’s Day!
The first thing when it comes to preparation of picnics is to decide a venue. The wonder of the picnic is that you can enjoy it just about anywhere. Taking the advantage of living in Singapore this beautiful city, we decided to head down to Garden by the Bay.
It’s a must to keep your picnic simple for transportation. As it may take awhile to reach those isolated picnic spots (which happened to us). Thus we are very happy that we found super cute picnic basket and lined with fabric down the Arab Street. These help us to ensure all picnic foods are easy to transport and not too heavy to carry. Let’s be honest, though – the real difference between a good picnic and a half-baked one lies in what’s in the basket.
For us, we start to set a theme for the picnic we have decided on Mediterranean. Forgo the usual pastel and vintage theme for Easter. We are drawn to warm texture and blue decorative accents. These accents remind us the sea and sky which compromise the greens well. The blankets and utensils are one of the main items we got to help achieve this theme.
This thin covers we purchased at Spotlight where it caught our eyes when we first spotted are the best buy we ever have. We also found these set of enamel dinner white plate with blue rim and cups are also one of the main items for this picnic.
Since it is Easter we decided to use egg as our main ingredient for food. For us, we like to choose foods that served all at the same time. As the fun of a picnic is to spread all the food on the blanket and let everyone laze around, helping themselves. Let’s have some tips for you before we share you the rest of our easter picnic!
Plan carefully how much food you may eat. Take too much and you have to carry it all back.
Enamel plates – light, unbreakable and much more practical than paper ones. For a start, they don’t go soggy when you put dressed salad on them. However, you can still opt for paper or plastic plates and cutlery as easier to carry.
Wet wipes and bin bags. You never think you’ll need them, but you always do – picnics are messy! Make sure the perfect picnic spot remains a perfect picnic spot.
The sun may shine so take sunglasses and sun block.
A good, reliable bug spray, just in case.
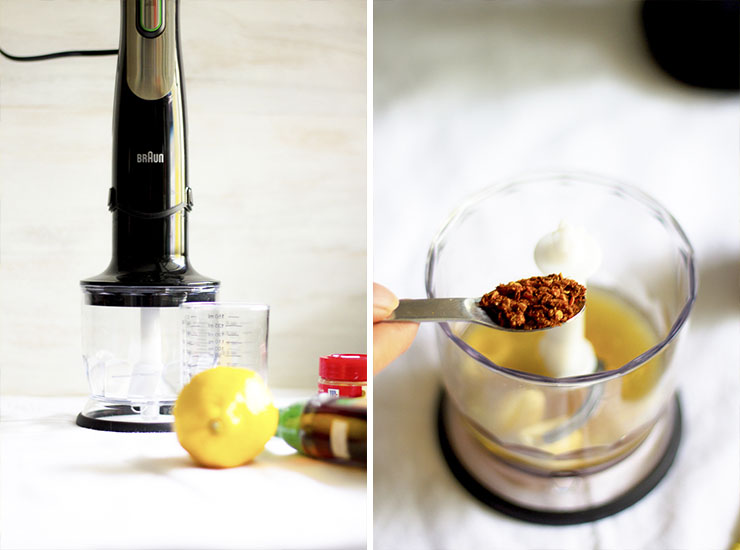
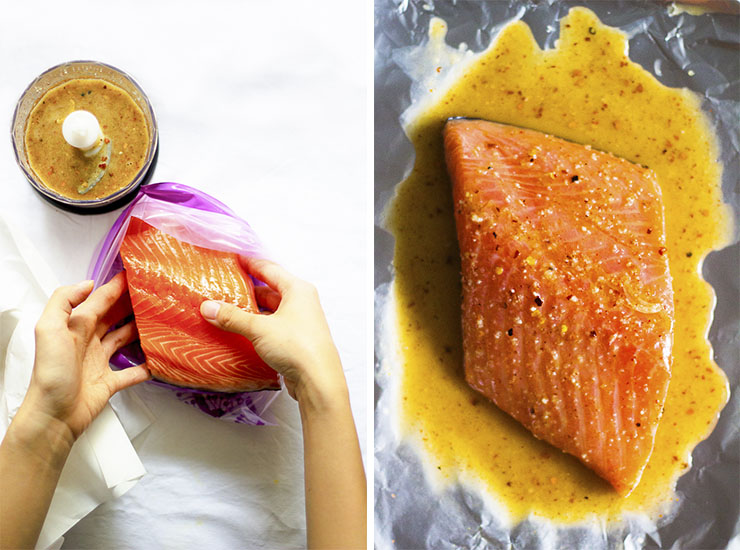
Let’s start with our main dish Salmon Spinach Pie, it seems a little fancier than it really is. This golden brown of a Salmon Spinach Pie with a Lattice top, juicy filling and all are a beauty. And guess what? We all do love it! Most importantly it easily comes together in just under 60 mins. Avoid ice cream, sticky puddings, and cakes – apart from that, they are fragile to transport wasps and other insects love them. This pie tastes great and transport easily, we never regard on having these Salmon Spinach Pie.
How could you miss out Deviled Egg for Easter’s Day? Deviled eggs are pure genius. As they take hard-cooked eggs and elevate them into an elegant bite that’s worthy of any appetizer plate. From spring picnics to Easter brunch, afternoon snack time to Sunday supper. It surely is the crowd-pleasing party snack on that day.
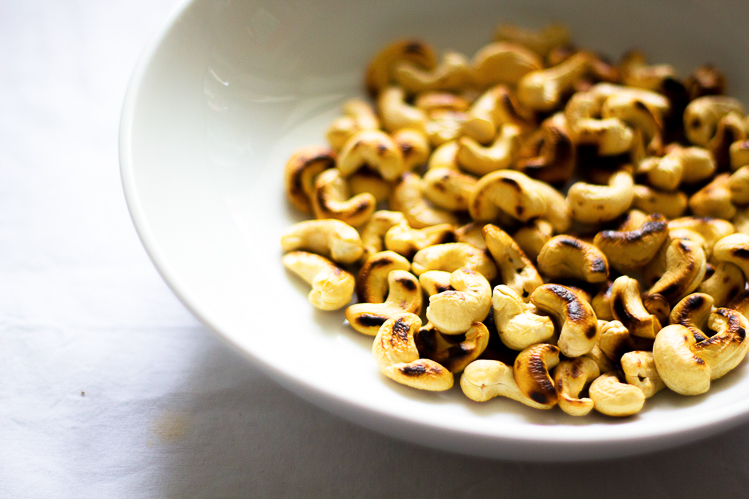
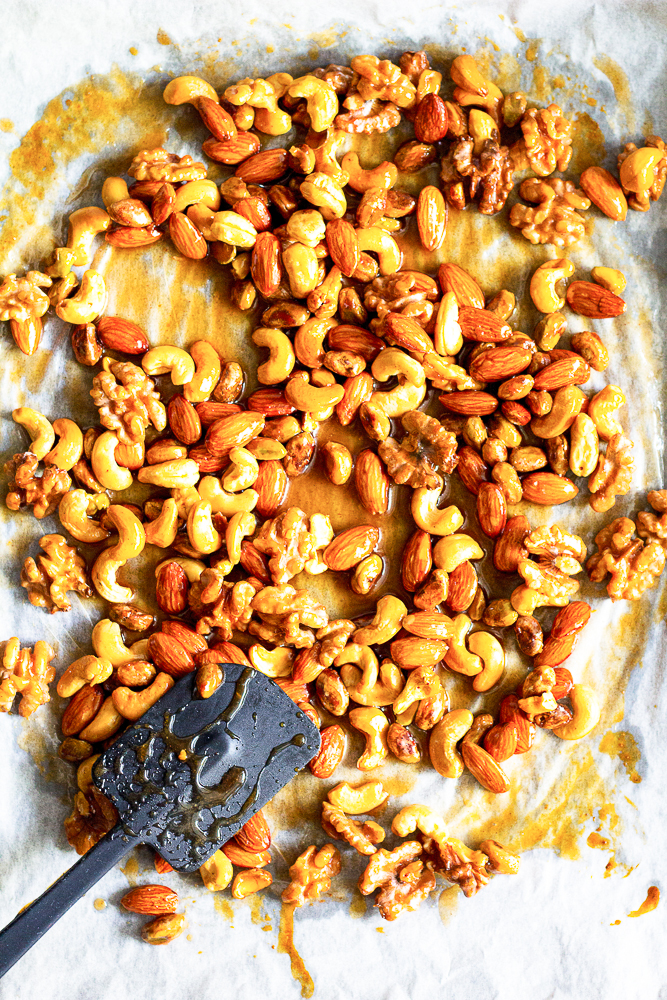
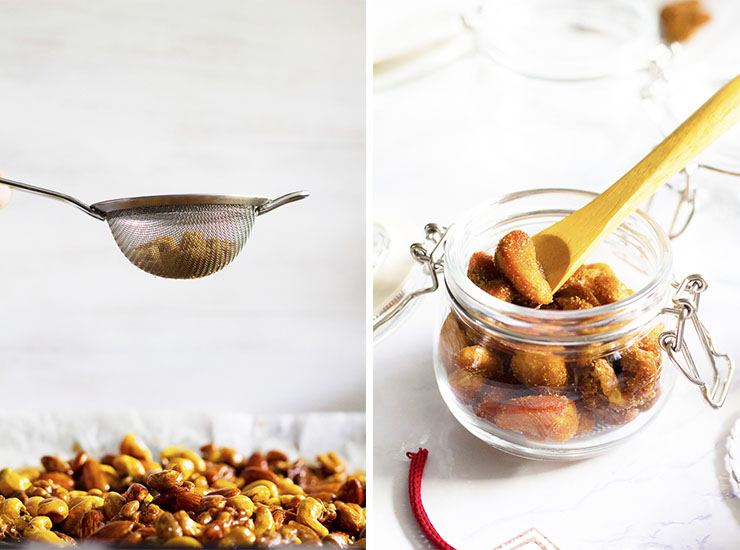
A big bowl of hand-prepped mixed salad, ready to dress is a must for this spring – Kale, Grapefruit, and Honey Roasted Cashew Salad. After having all the egg-ish dishes these citrus salad are the best for this Spring season. Moreover, the citrus is the most common and affordable all seasonal fruits. Being an indispensable source of nutrients, they help the body to maintain its immune function.
We also prepare milk pudding and watermelon for our desserts and to quiche our thirst under the warm weather. Insert this wooden ice cream sticks to the watermelon ensure that we have a better grip on it without getting our fingers dirty. We never forever our choice of drink and snack for this picnic.
End off the preparation by getting some flowers for the picnics. We even hand made some of the flower wealth hair accessories to spice up the picnic. These flower wealth hair accessories are easy to made. All you need are a fresh flower, wires, and some twisting and you are good to go. Leave us a comment if you would love to have a tutorial.
We really have a lot of fun on that day, enjoying the food and the companion. Chatting and each other is all we needed.
We hope this gives you a few ideas as to what to take to your next picnic and also a little insight into my world and how we do a picnic. Hope you like them! Share with us your version! Take a photo of yours, send us an email, tag us on Instagram, tweet us, anything. We love to see yours! A Happy devil, and let us know what else you come up with!
A good pie recipe is great to have in your repertoire, because, to others, it seems a little fancier than it really is. Usually, people like having the crust on the bottom of the pie. However, for us, we have them on top. The options for fillings are endless, from ham to sun-dried tomatoes and goat cheese. Thus, this golden brown beauty of a Salmon Spinach Pie with a Lattice top, creamy filling and all. And guess what? We all do love it!
What we love about this pie/quiches is that they easily come together in just under 60 mins, and make a great option for a tasty breakfast, or for a quick-fix lunch paired with a salad. One of my favorite ways to enjoy it is for brunch during the weekend. But it would also make a nice starter or side for any weeknight meal.
The possibilities for quiche fillings are endless. For this spinach and salmon quiche, I’ve used 8 very simple ingredients including fresh eggs, cream, milk, spinach leaves, salmon fillet, Parmesan, onion and fresh aromatic herbs such as basil.
If you want to jazz up the recipe, add some other veggies to the quiche, pumpkin would make a great addition this time of the year. Play with the cheeses too, I like to stick to one or two, I usually go for grated Parmesan or cheddar, soft goat cheese or crumbled feta. They’re all easy to find, with flavors that work well in a pie/quiche.
Ingredients |
1 sheets (350g approx) savory short pastry
1 medium onion, finely chopped
500g bag spinach, tough stems removed and roughly chopped
5 eggs
500ml cream
200g salmon fillet
1/2 cup grated Parmesan cheese
freshly ground black pepper and a little salt
Method |
Preheat the oven to 180 C.
Gently cook the onion in a frying pan with a film of oil until tender. Add the spinach to the pan and cook until wilted and excess water has been evaporated. Whisk the eggs and cream together in a bowl until combined.
Arrange the onion and spinach mixture over the pastry base. Distribute the salmon through the dish and then sprinkle with Parmesan cheese and dill. Season with pepper and a little salt. Pour over the egg mixture. We did a woven lattice pie crust for the pie, and give it an egg wash.
Now you can bake it in the lower part of the oven for 30-40 minutes, remove from the oven while there is still a slight wobble in the filling in the center. This will set as the quiche sets.
Share with us your making! Take a photo of yours, send us an email, tag us on Instagram, tweet us, anything. We love to see yours!
April has been a special month for me; it’s the beginning of Spring and also my birthday month. I just celebrate my 28th birthday on Monday. So far, it was wonderful as I wasn’t panic like my past year. Maybe the reason is this year I’m overwhelmed with activities. While a busy schedule doesn’t allow me to take a breathe at all.
I really want to lead a simple life and there are many people around inspired me to do so. And one of it this lovely lady I knew via Instagram, @hiraeko. Through her feed, some things I’ve learned about living the simple life is to be a minimalist as much as possible.
Here are some tips that I thought it may helpful.
one / Decluttering your home and workspace can lead to a less cluttered mind. Clean visual distractions pull on us in more ways than we realize.
two/ A quiet unrushed morning is a thing to treasure. I learned to wake early so that I have some quiet time to read, write, and have a proper breakfast.
three / Simple, whole, healthy food is not only much healthier than junk food: it’s a pleasure.
four/ Pay attention to how much time you are spending producing things. Study for ways to cut down on time you think is being abused on unnecessary things.
five / Write a diary and reflect every day and by end of the month you’ll realize you need doesn’t need some of those unwanted
How could you miss out Deviled Egg for Easter’s Day? Deviled eggs are pure genius. As they take hard-cooked eggs and elevate them into an elegant bite that’s worthy of any appetizer plate. From summer picnics to Easter brunch, afternoon snack time to Sunday supper. Moreover, deviled eggs are more than up for the occasion as they are crowd-pleasing party snack.
Part of the eternal appeal of deviled eggs is their sheer simplicity. It is because you doesn’t need much to make a good deviled egg. Here we use just a generous spoonful of mayo and a dollop of mustard mixed into the yolks — that’s all you really need! Mayo takes the already creamy yolk and makes it even creamier and more decadent while the tangy yellow mustard takes the richness.
Some important tips for you when it comes to making this;
Hard boiled Egg – Cover the eggs with water, bring the water to a boil, and then let the eggs sit off the heat for about 10 minutes. This makes whites that are firm but still tender and yolks that are set but still creamy.
When filling the mixture – The only other tricky moment with deviled eggs is actually filling them. You can certainly use a spoon, but it’s worth considering using a bag to pipe the filling. It’s a lot neater and easier than it might seem. As usual, you don’t even need a real piping bag! As you can just scoop the filling into a plastic bag, squeeze the filling into a corner, and snip off the corner. Isn’t it party-worthy deviled eggs, zero fuss.
As a holiday, Easter ends up using a lot of eggs. Whether for Easter egg hunts, egg dyeing, Easter baskets or table decorations, you’re probably going to hard boil a few eggs this season. We’d like to urge you to put all those eggs to good use and devil them! We found some of our favorite deviled egg recipes of all time to totally indulgent.
Ingredients |
Method |
Place eggs in a single layer in a saucepan and cover with enough water that there are 1 1/2 inches of water above the eggs. Heat on high until water begins to boil, then cover, turn the heat to low, and cook for 1 minute. Remove from heat and leave covered for 10 minutes, then rinse under cold water continuously for 1 minute.
Crack egg shells and carefully peel under cool running water. Gently dry with paper towels. Slice the eggs in half lengthwise, removing yolks to a medium bowl, and placing the whites on a serving platter. Mash the yolks into a fine crumble using a fork. Add mayonnaise, mustard, salt, and pepper, and mix well.
Evenly disperse heaping teaspoons of the yolk mixture into the egg whites. Sprinkle with coriander and serve.
Hope you like them! Share with us your version! Take a photo of yours, send us an email, tag us on Instagram, tweet us, anything. We love to see yours! A Happy devil, and let us know what else you come up with!
This week mood board we will be sharing you our favorite event of the year – Easter’s Day. It is a special week, thus today we will be you a bunch of lovely Easter’s Mix table idea! It’s one big happy day so decorating for Easter for us is something that brings us lots of joy.
Whenever I think of Easter’s Day the first thought that came into my mind is Alice in the wonderland. Thus this time I want to share with you – Easter’s Day with the vintage. For Easter table, I loved to use natural elements like moss, eggs, nests, & so on. I also wanted to incorporate some bunnies but in the most neutral way possible.
To create a simple vintage Easter’s Mix for your table. You can start by laid down a moss table runner down the center of the table. Placing turquoise plates on top of the white ones it will help brighten up space. To add some fun to the table decor you can place nest on the plates (with eggs piled on the nests).
Don’t miss those little small details. These little details will certainty make your day a special one. Now grab your eggs and paints and start decorating them now.
There is still some days away from Easter’s Day. Although, I don’t really celebrate Easter’s Day but it’s a day I love. As it is a day that I like to have fun with. With the eggs and the rabbits, it is totally so adorable. I couldn’t control myself.
Back in the days when I am a kid, I always jealous of kid that will hunt for eggs. Same for during Halloween Day they go around the neighborhood and ask for candies. It always makes me sad that we don’t have this culture in Singapore. Now I am all grown up I try to enjoy this day in my own way. For
Now I am all grown up I try to enjoy this day in my own way. For now, let’s use draw a rabbit first!
Happy FRIDAY! I know it’s not Throwback Thursday… But, why can’t it be Throwback Friday Too!?!?
It’s almost Easter Y’all! Thus, today’s we will be having a #throwback post and it is the Easter Edition! Easter is only a weeks away. Last year we have our very first official Easter’s Day celebration, time really does pass fast. It is our very first post for Le Plain Canvas, thus it is very memorable for us.
Last year we have a mini Easter Tea Party having Carrot Caramel Pecan Cake and lots of interest small craft. Even Ms. White Rabbit are invited and having fun with us. Here are some adorable pictures of last years bunnies having fun!
one / Carrot Caramel Pecan Cake
If we had to choose a favorite cake, it would be carrot cake, hands down. But not just any ordinary carrot cake; it must be chock full of goodies. For an extraordinary version, how about a Caramel Filled Carrot Cake with Cream Cheese Frosting? Traditional carrot cake studded with pecans, spread with sweet cream cheese frosting and topped with a layer of salted caramel sauce and sea salt becomes a showstopper dessert for any occasion.
two / Napkin Ring
Theses adorable Easter Bunny Napkin Rings add character to any table this spring. They are simple crafts made of burlap, cardboard and only cost $0.40 each to make. I hope you trying making this easy Easter DIY project and add some bunny whimsy to your Easter table decor.
three / Paper Nest Mache
These miniature papier-mache bowls -– in the shape of bird nests -– are perfect for presenting your Easter goodies. Not only are these decorative bowls precious, they’re practical — put shredded paper (from your home office, or recycled packing material) to good use.
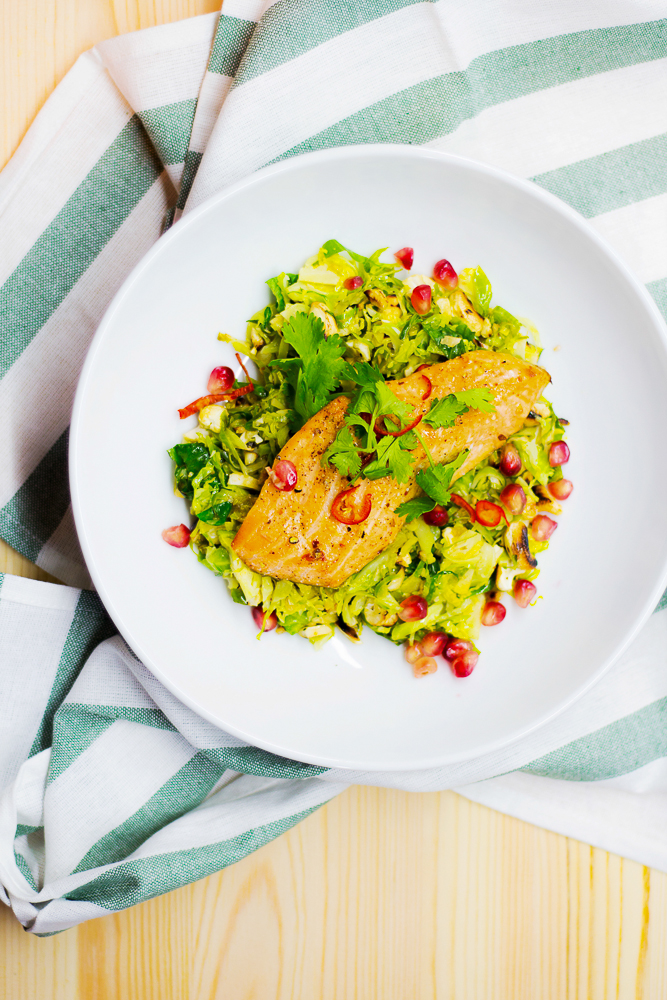
four / Salmon Bacon Salad
Seared salmon fillets and an arugula salad are both flavored by bacon, for a quick, satisfyingly flavorful meal. Top it up with a fried egg for the easter day!
five / Angel Egg Table Deco
Brighten up the Easter with this Angel Egg, custom you Angel’s Face. You can Egg them up after the party too.
Share with us your version! Take a photo of yours, send us an email, tag us on Instagram, tweet us, anything. We love to see yours!
This week, I would love to share with you this amazing press & editorial photographer, Jordan. I just admired his work, if you want to see all of them you might not able to find it in his Instagram feed but instead his personal website and VSCO. What he capture just captivating, precise and a very moment of the second just tells us so many stories.
This is the charm of the photography, the document of the life of anyone, anywhere, anythings and it doesn’t require a great technique or gadgets. Using a great camera can enhance the resolution of your shots but it’s nothing compare to what an image tells.
I always enjoy seeing pictures and depict based on my imagination, and that’s why it lure me to it. It’s nothing like what commercial photography could bring you. Seeing at different pictures inspired me and let me understand how big the world is.
A Paint Portrait is coming to an end in the next few weeks but I think there is nothing can stop me to keep on painting and illustrating. So stay tuned for more of my works coming up!
Detox salads don’t have to be dull and unappealing! Try to make this revitalizing and light Kale Salad with Juicy Grapefruit, and Olive Dressing. If you’ve been eating well lately (just like me), you probably need some. As, this salad is designed to wipe the slate clean, to energize you and to make you feel good! It’s also delicious and easy to make and kale olive dressing is so good! You can actually make a double batch and use it for other dishes (e.g. pasta).
We’ve lately begun consuming citrus fruits like lemons, oranges, and grapefruits for this Spring season. They are traditionally among the most common and affordable all seasonal fruits. Being an indispensable source of nutrients, they help the body to maintain its immune function.
Though this is the first time we use kale as the greens for our salad, and it was a fabulous experience. We don’t know how to appreciate before but now Angela just in love with it. Yet, after making the salad we found out that we have to remove the stem of kale and chop them into smaller piece. Since the stem of the kale is hardly edible. Now we know, thus (you better) don’t make the same mistake like us.
We heard that the kale have a chewy texture. Hence what happens when you add MORE crunch? Other than kale and grapefruit the last main ingredient for this dish will be the (our favorite) cashew nut. Crunchy, honey roasted cashews and sweet juicy squash. Pretty sure that quad is all we need for Thursday.
Ingredients |
1 pink grapefruit
2 tablespoons extra-virgin olive oil
Kosher salt and freshly ground black pepper
8 cups thinly sliced kale
1 cup of Cashew Nuts
Method |
Using a sharp knife, cut peel and white pith from grapefruit; discard. Working over a small bowl, cut between membranes to release segments into bowl. Squeeze juice from membranes into another small bowl; add any accumulated juices from a bowl with segments (there should be about 1/4 cup juice total). Whisk oil into juice and season to taste with salt and pepper.
Place kale in a large bowl and drizzle 3 Tbsp. dressing over. Toss to combine and let stand for 10 minutes while kale wilts slightly. Toss once more, then arrange grapefruit segments and chopped cashew nut over kale. Drizzle with remaining dressing and serve.
Share with us your making! Take a photo of yours, send us an email, tag us on Instagram, tweet us, anything. We love to see yours!
Lapis Blue and Flame – that we mention in the previous are full of vibrant energy and life, while staying true to Pantone’s overall Spring 2017 theme of natural colors. We all have an instinct to base our lifestyle’s color design in a dependable shade or two. It is an opportunity for you to try new things and branch out. A great way to bridge that gap and put a bold spin on an “anchor color” is the rich, radiant Lapis Blue.
Unlike Niagara, there is nothing sedate about Lapis Blue. Rather, one can assume it takes its name from the semi-precious Lapis Lazuli – a strong blue stone that signifies truth and enlightenment. It’s rare to find a color that is so rich and yet so dependable in color design. As such, Lapis Blue is a versatile shade we could easily recommend for nearly every room in your home.
The same basic principles apply for wardrobe design. Lapis Blue has the ability to be a staple, “base” color from which to design the rest of your attire. It also has enough jewel-tone richness to be the statement color against other.
Succulent and Catus is my favourite time of all year. The greeny of the plant just brighten up my day and give me healthy eyesight.
Pass week I have been busy with my long term project. And recently it has been doing quite well. However, I always remind myself don’t judge each day by the harvest you reap but by the seeds that you plant. Only constantly of working then will see the success.
Mandarin Oranges and Lemon are one of my favorite things about the spring produce season. My family and I for that matter can eat dozens of Mandarin Orange a week. It’s always so sad when they stop appearing on the grocery store shelves. Time to make the most of them, right?
This lemonade does just that. Mandarins have such a concentrated sweet flavor that is more intense than a regular orange, so I thought they would be delicious in a lemonade. And I obviously have some sort of obsession with lemonade. And, as with every lemonade I make, I think this one might be our new favorite.
Most homemade lemonades are simple enough, as is this one. It starts with a lemonade base, a simple syrup made of fresh lemon juice, sugar, and water. That’s cooled and mixed with juice mandarin oranges(clementines work too!) and crushed mint. I used a new, white mortar and pestle to crush the mint for these lemonades. Now the bowl is stained green. But it was totally worth it.
Mint and mandarin are dreamy together. I think I’ll be freezing mandarin juice just so I can drink this all spring long.
Ingredients |
1 C. Freshly Squeezed Lemon Juice
1 C. Sugar
1 C. Water
½ C. Freshly Squeezed Mandarin Orange
12 Mint Leaves
Water, to dilute
Method |
Combine the lemon juice, sugar, and water in a saucepan and bring just to a boil.
Remove from heat and let cool. Pour into an airtight container and chill completely.
Crush the mint leaves using a mortar and pestle.
Combine the chilled lemonade base, crushed mint leaves, and mandarin juice. Add water to taste.
Serve over ice.
Hope you like them! Share with us your version! Take a photo of yours, send us an email, tag us on Instagram, tweet us, anything. We love to see yours!
This week, I would love to share with you this young beautiful photographer, Grace. Perhaps recently, she wasn’t being active on her Instagram as much as before. Thus, when I just found out about her, I fall in love with her wondrous images.
When I don’t paint, I take photographs and that is me. First got my camera at the age of 6. It’s a film mini camera, everything is exciting to me, it took me very long to decide to take each shot as I want to keep to shot forever. Nothing compared to the digital photograph right now, I would say I love film more.
Taking an image, freezing a moment, reveals how rich reality truly is. That is why I enjoy taking, I believed that is why grace could take breathtaking images. The love for each moment…
I (we) have an obsession of gorgeous studio and work desks. That’s the reason why I always strive to ornamented it better every day. I search for inspirations through many amazing interior’s websites, magazines and of course Pinterest is my best friend forever. Moreover, there are brilliant millions of ideas from all over the world. Please share with us which do you like the best?
I always believed that a beautiful spacious space urges us to produce better works. Therefore, as a visual person that I appreciate beauty moment through films, photography, arts and especially architect and spaces.
Consequently, it’s very important having a good condition of work space as it allows one produce work effectively. As I hate crowded by unwanted things, therefore organizing is essential. Here are some of our favorite inspiration from the community how you can keep things in a stylish way, there included Oh Happy Day, Lebenslustiger studios…
They say that time flies when you’re having fun, and yeah “they” right! Exactly one year ago today, on March 25, 2016, we hit that “publish” button on our very first blog post. Today, we’re taking you on a little trip down memory lane. We’re also giving you a sneak peek into some upcoming projects that we can’t wait to share!
We always wanted to share our ideas or what inspired us with crowds. Even though, one year ago when both of us was fed up with our life. Hence, we are ready to make a change after a period of procrastinating, and terrified beyond belief that we would fail. We took a giant leap of faith that day… not knowing what would come of it. As it makes change our life bits and bits.
Either way, we’re happy that we pushed that button. We’re happy that we took that leap of faith, and jumped into the world that we knew nothing about. We’re happy that we stepped way out of our comfort zone and allowed ourselves to grow in ways that we never even knew was possible before.
With only a year of experience, we will, of course, have a few struggles that we’re going through right now.
Time Management
Our biggest struggles are time management. Although our work is flexible since we control our own hours (sometimes), we somehow end up working day and night. We just don’t seem to have enough time every day despite the fact that we sleep for only 4-5 hours.
We feel very guilty that we spend most weekends working, instead of spending time with our family and taking them to places. However, our family is very understanding and supportive, and even offer to help (when they are in the mood).
Communication
We can say that both of us, we are two individuals and leading a different lifestyle. Joe, she loves working at night, work independently and doesn’t share her though through word much. However, Angela gets used to working in the day (for her sake of health) and like to communicate and have a discussion. Even though we are very close but the way and idea how we communicate always become one of our biggest issues. Even now, we still facing the issue, but we better that conflict makes us better and stronger.
Throughout this short period of time, we learned and got inspired by you – our reader. However, the best part for this one year are we learn more about each other. Thus we would love to continue this journey with you. There are a lot of exciting new things happening here at Le Plain Canvas in the near future! We’ve spent the past year creating content and providing value to the community. We wholeheartedly promise you that will never stop, but with continued growth comes new challenges and opportunities as well.
Website Redesign
You may have noticed recently, that we’re changing the look of our blog graphics bits by bits. This is all leading up to a massive site redesign the following month. For a long time, we’ve been feeling the itch to make Le Plain Canvas more user-friendly. We want it to be easy to navigate, and even more representative of my brand’s personality. Above all, we want the blog to evoke a sense of community, encouragement, and passion. I’ll be trickling out some small changes here and there, but I’m aiming for a full overhaul by the first half of the year, so stay tuned!
Building Community
One of our main goals since the very beginning was to make Le Plain Canvas a community of like-minded folks working towards their goals and dreams. Thus this year we are ready to introduce our mailing list, in order to bring the latest news for you and also to bring you together.
Le Plain Canvas’s “untitled” Shop
We have been asked time and time again if we would ever consider creating the calendar and printables using some of the designs from our artwork. The answer is YES! However, there is still a long way for us to create this. Thus it is important to have your support. If you’d like to get the latest updates on the shop, be sure to follow the new @leplaincanvas account on Instagram. There’s not much there yet, but the last quarter of the year we will be having exploding with activity!
This “little” blog has grown into so much more than we could have ever imagined over the past year.
We can’t even begin to express the depth of gratitude we feel for each and every one of you. You have thanked us over and over again for the inspiration and motivation that we provide here. But I honestly feel that you have inspired and motivated us.
xoxo, The Sisters (Angela and Joe)
You have been there for me, nurtured me, and fed my soul in more ways than you will ever know.
Hello, Folks! Today is really a special day, as we are celebrating the 1st birthday of @leplaincanvas. Firstly we would like to thanks, all reader and follower for all the support. Throughout, this one year there are a lot of ups and downs. We also went for a pause at the end of the year due to the hectic schedule.
However, I am very pleased to enjoy this journey with my beloved sister @angelalsn. I maybe getting busier in the next few months, but I will still do my best to share more good ideas and post with you. HAPPY ANNIVERSARY!
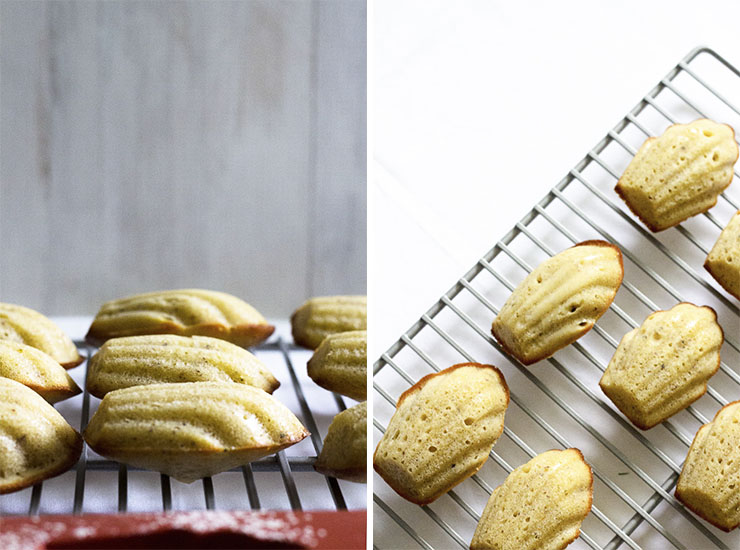
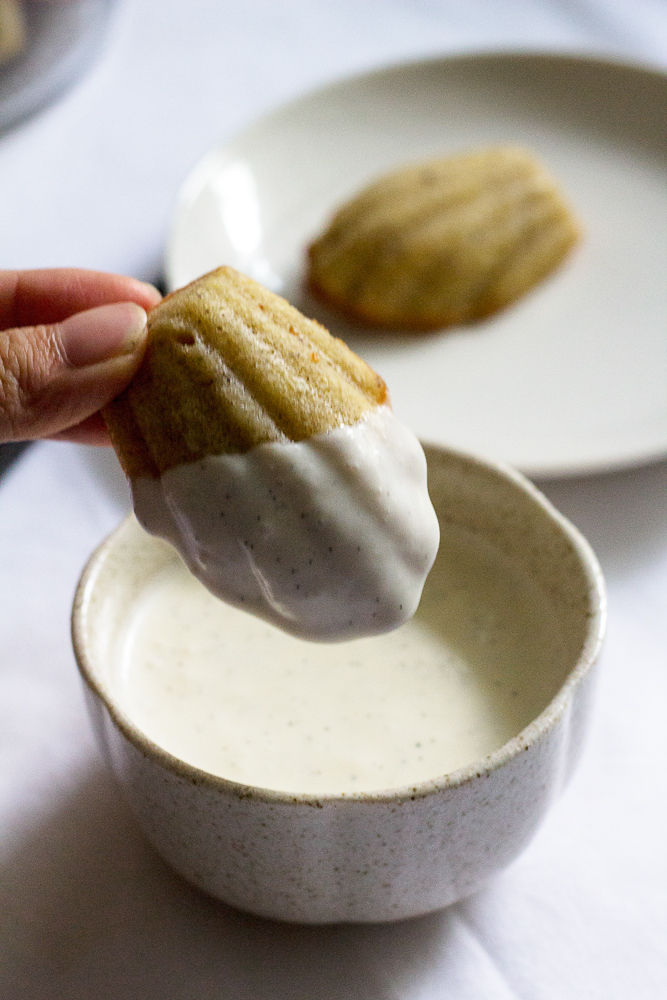
These Lemon Flora Cupcakes are so light in flavor and will have your taste buds dying for spring! The sweet lemon cupcake with the light vanilla frosting is such a delicious and fun combination!
So these cupcakes are totally getting me in the mood for spring! I know it’s still March, but we’ve had such crazy weather this winter that our bulb flowers are already starting to come through and have been for weeks now. I’m pretty sure we’ll have tulips by the end of the month. It’s nutty!
The flora is also wonderful with the lemon. It complements the floral element really well. The lemon is incorporated into the cupcake with some fresh lemon juice and lemon zest. For the frosting, I used pink pigment extract and a sprinkling of candy pearl for decorating.
Lets us start the sharing with buttercream. So to create this amazing flora with buttercream, you have to choose the perfect recipes for it. As it plays an important role in this recipes. For us, we chose the Meringue Buttercream, as it is thick and firm, perfectly for the floral piping.
Butter Cream
Ingredients |
1 1/4 cups granulated sugar
1/4 cup water
4 egg whites (about 1/2 cup)
1 teaspoon vanilla extract
1 cup (2 sticks) unsalted butter, cubed and softened at room temperature
Pinch of salt, optional
Method |
Combine sugar and water in a medium-sized saucepan. Heat over low heat, stirring with a metal spoon, until the sugar has dissolved and the syrup is clear. Increase heat to medium-high and allow syrup to come to a boil.
Meanwhile, place egg whites in a stand mixer fitted with a whisk. Beat the mixture until whites are almost able to hold soft peaks.
Then immediately remove from heat and slowly drizzle the hot syrup into the bowl with the egg whites. Once all the syrup has been added, keep mixing until the bottom of the bowl feels cool to the touch and the meringue has cooled down to body temperature.
Add butter one cube at a time, beating well after each addition. Beat in vanilla and salt. Add in your favorite coloring and have fun with it.
Italian buttercream is creamy, velvety, and delicious. Because it’s made with Italian meringue, it’s a lot lighter in color than most buttercreams and it looks almost pure white against a dark chocolate cake. It also holds up pretty well in warmer temperatures, so if you’re planning a summer party outside, this is your go-to buttercream! However, it will tricky to master it, thus I have some tips for you:
Mix continuously to prevent the eggs from scrambling – don’t pour the syrup on the whisk. As the syrup may splatter against the sides of the bowl; instead, aim for a spot close to the whisk.
The mixture may start to look as if it’s separating, but don’t panic! Just keep mixing and whipping until the buttercream comes together and becomes smooth and gorgeous.
Use immediately or refrigerate in an airtight container or a zipper-lock bag in the fridge for up to two weeks or in the freezer for up to two months.
Cakes or cupcakes decorated with buttercream generally keep up to 3 days, stored in an airtight container in the fridge. Serve buttercream at room temperature.
Your can pre-made a batch of buttercream to store before you need to use them. For the lemon cupcakes, it is rather simple to be made. Mix up all the ingredients in a bowl, and off they go into the oven.
Vanilla Cupcake
Ingredients |
6 tablespoons unsalted butter, room temperature
3/4 cup sugar
6 tablespoons sour cream
1/2 teaspoon vanilla extract
1 tablespoon grated lemon zest
3 large egg whites, room temperature
1 1/4 cups all-purpose flour
2 teaspoons baking powder
1/4 teaspoon salt
¼ cup milk
1 tablespoon water
3 tablespoons fresh lemon juice (1-2 lemons)
Method |
To make the cupcakes, preheat the oven to 350°F (176°C) and prepare a cupcake pan with cupcake liners.
In a large mixing bowl, cream the butter and sugar together until light in color and fluffy, about 3-4 minutes. Add the sour cream, vanilla extract, and lemon zest and mix until well combined. Add the egg whites in two batches, mixing until well combined after each. Scrape down the sides of the bowl as needed to be sure all ingredients are well incorporated.
Combine the dry ingredients in another bowl, then combine milk, water and lemon juice in a measuring cup. Add half of the dry ingredients to the batter and mix until well combined.
Follow by adding the milk mixture and mix until well combined. Lastly, add remaining dry ingredients and mix until well combined. Scrape down the sides of the bowl as needed to be sure all ingredients are well incorporated.
Fill cupcake liners about ¾ full. Bake for 15-17 minutes, or until a toothpick inserted comes out with a few crumbs. Remove cupcakes from oven and allow to cool for 2-3 minutes, then remove to cooling rack to finish cooling.
Pipe the frosting on top of the cupcakes using a closed star piping tip. Top the cupcakes with a sprinkle of candy pearl.
Hope you like them! Share with us your version! Take a photo of yours, send us an email, tag us on Instagram, tweet us, anything. We love to see yours!
As an artist, I do have my very own style in my pieces, and I’ll leave to my audience to interpret based on their perception. However, at the very end of the day, I don’t need someone to question my arts or response to as it is subjective. That’s being an artist – after all, nobody can instruct what Picasso or Andy Warhol does!
Hence, as a creative, I don’t own the whole pieces, I have a team to work with, to brainstorm and having inputs of ideas. My thoughts have to be objective and it’s not about just myself. It’s all about exchanging values and ideas to produce a commercial product that makes sure all the audience buy it. It will never be all about you anymore, whether you love it or not.
Old times, when I’m emotional I might be irrational but now I always convince myself to be objective when I design it, it will strive me to make it better.
This week, I would love to share with you this young lovely individual, Oreana. She has a unique style through her shots and I love her colorful, spontaneous as it all reflect her culture – Mexico. Not everyone will understand but nobody can question or doubt with her very own style. Am I right to say so?
Pardon, I might be side-track from times but what I’m trying to convey here is that we should build up a welcoming community when there is no online abuse will be the best for the generation. We should be objective instead of being subjective to matters whenever we are.
Pink Yarrow is only for the bold individual that are ready to make a colorful statement with life! If you love pink, then Pink Yarrow is the quintessential hot pink to play with. It is a captivating and stimulating color that lifts the spirits and gets the adrenaline going. With all the energy and excitement reserved for your life, what a perfect color to theme your house around!
We felt that you will never go wrong when you match Pink Yarrow, Black and White together. Therefore, let’s check out some ways to utilize this special color for your life:
You can nestle this hot pink among other, bright navy and walnut wood and use it as a pop of color. Or, try it with having the pink as the sofa and the cushions in black like we’ve done here. Make a bold statement with your white chair with some amazing hot pink carpet – aren’t these pattern details absolutely amazing?! Try covering your cardboard in pink and table in white, it will, of course, stand out a lot. Finally, what better place to add a little of the tropical item to your room, this pink lotus surely make your day! It’s almost too pretty to let it wilt.
So today I have tried using water color pencil for this art piece. And amazingly it created a nice texture for the rose. Which is what I didn’t imagine. There is nothing more difficult for a truly creative painter than to paint a rose. Because I first to forget all the roses that were ever painted.
Rose are beautiful, it does also smell great. It is more beautiful with its thorn. As thorn defends the rose, harming only those who would steal the blossom. So that more people can enjoy the beauty of the rose.
These tarts are a delicious way to load up on your greens and a lot of protein to boot. This simple, and simply delicious recipe. While baking green cupcakes or whiskey laced desserts may be the more popular way to celebrate St. Patrick’s Day. Even though, don’t really celebrate St Patrick’s Day. I don’t think they could be any more delicious than a naturally green tart seasoned with freshly grated Parmigiano-Reggiano cheese and a crisp fresh onion.
This is a classic combination for a quiche, but it’s lighter. Although we’re calling this a crustless quiche because it doesn’t have a pastry crust, it does have a crust of sorts. The flour mixed into the egg mixture separates during baking and forms a very thin crust along the bottom and sides of the pan. It’s not the same as a “real” crust, but it does help keep the quiche slices together neatly and adds a bit of substance to what would otherwise be just some baked eggs.
You can use just about any base you want for this dish, which means you’ll get a lot of variety with just one basic recipe. I almost always have onions and fresh spinach on hand, as it’s a popular combination in my kitchen. Some diced up sausage, ham or leftover, shredded chicken would work well in here, too. I like the feta cheese on top for extra saltiness and flavor, but again, you can opt for a different type of cheese if you prefer (parmesan and cheddar are nice) – or even skip it entirely if you want to go cheeseless. Regardless, it’s always satisfying to make and eat.
This can be a simple dinner or an easy breakfast dish, but it can also be served as an appetizer or first course by slicing it thinly for several guests.
In a large mixing bowl combine the chopped onion, eggs, cottage cheese, grated cheese, pepper, and nutmeg. Mix with a spatula until blended. Set aside.
Heat a saucepan of water fitted with a steamer basket over medium-high heat. Make sure the basket does not touch the water. Place ¼ to ½ of the spinach in the basket and steam until is wilted. Remove the spinach to a strainer and repeat with the remaining spinach until it is all cooked. Drain the spinach well then press it with paper towels until you remove as much moisture as you can. Rough chop the spinach and add it to the cheese and egg mixture. Fold with the spatula until combined.
Line a large rimmed baking sheet with foil. Place the six 4½ inch tart pans (with removable bottom) on the baking sheet and fill with the spinach mixture. Press the spinach and cheese mixture into the tart pans smoothing to level the top.
Bake for 35-40 minutes or until just set in the center and lightly browned on the edges.
Remove from the oven and allow the tarts to cool for 5 minutes before removing from the pans. Serve warm or at room temperature. Garnish with edible flowers or additional grated cheese if desired.
Hope you like them! Share with us your version! Take a photo of yours, send us an email, tag us on Instagram,tweet us, anything. We love to see yours!
I simply couldn’t believe it already mid-March, my to-do-list just need to accelerate in order to keep up with my schedule. During the past 2 weeks, I had an eventful course of agenda. Being able to enjoy many moments despite all the nervousness and deep down, believed that I actually want to achieve it badly.
This is quoted from Rick Warren, “Transformation is a process, and as life happens there are tons of ups and downs. It’s a journey of discovery – there are moments on mountaintops and moments in deep valleys of despair.”
Mentally, I do believe that currently what I’m going through this a process. I’m looking forward to new journey even though my fear tends to stop me from doing it. Hence, the brain is an amazing part of me. As, it gathers my will power to fights against both the emotion and thoughts.
Enough of me.
This week #APaintPortrait featuring Ed, Edoardo a friend from Instagram. While, Ed is always such an amazing one, a fellow full of ideas and innovation whom I always get inspired with.
By having a conversation with, you can discover that he is such a persistent person in his own way. Which, I admire his focus and passion with his amazing thought in his life.
This is a painting that I would like to delicate to him despite a long delay, I hope that he will like it!
While Spring is around the corner and we are all excited about it already. Early spring flowers are the surest sign that warmer weather is coming. After a long winter (monsoon season over at Singapore), it’s time for spring landscaping! The flower has always been our must have during spring. No matter is it on the table of our living room or in our food. Having flower in our room just brighten up our day.
Other than enjoying the sight of flowers, this spring it is also a good weather to experience new stuff. Here is a list of what we would be doing this spring.
8 things you must do this spring!
Expanding our herb garden – we got some seed and equipment from the farmer market last winter. It has been an overdue promise to ourselves, thus we are going to accomplish it now.
Go on a hike – it has been awhile since we hike cause of the weather. But it’s spring now and we couldn’t have any more excuse not to do it.
Spring clean our workplace in your house
Speaking of plans, start thinking about your summer plans
Brighten up your home decor and share the before/after results
Create a mood board out of our favorite spring colors – start from the color Primrose Yellow
Celebrating Easter and 1st birthday of Le Plain Canvas!
Make fullest of your only spring this year!
Please share with us on your plan for spring. We are happy to hear them and even tried some of them out – since we might miss out some important stuff!
As the weather warms up, we find ourself shifting focus from chocolate and caramel desserts to lighter-flavored sweets. We love fresh berries and these mini fruit tarts really let the juicy fresh fruit shine.
We also love mini desserts this time of year. Entertaining tends to take a more casual turn with dinner and drinks on patios and decks, running around outside until dark, and bite-sized desserts seem both fancy and casual to me. You can grab one (or more!) as you’re passing by the dessert platter and there’s just something so pretty about a collection of little tarts piled up on top of each other. These would be great for those end-of-year or graduation parties we all seem to have this time of year.
This is also an awesome recipe if you don’t have a lot of time on your hands, mainly because everything can be made ahead of time and assembled in minutes before serving!
Tips from the two sister: The dough for the pie crust and pastry cream filling can both be made ahead of time and refrigerated for up to 2 days, so all you have to do is bake and cool the pie crust, pour in your pastry cream filling, arrange the sliced fruit and add a finishing glaze if desired. Place it in the fridge until you are ready to serve and that’s it!
This is also an awesome recipe for girls tea time gathering. For those who want to spend more time on makeup and hair. Rather than the preparation of food.
Ingredients |
2 c. milk
1 1/2 tbsp. vanilla bean paste or pure vanilla extract
6 egg yolks
2/3 c. sugar
1/4 c. cornstarch
1 tbsp. unsalted butter
1 pint fresh cranberries, strawberry and peach
pastry dough
Method |
Roll the dough flat, cut them out using a cookies cutter. Place them in the tray and press it down. Bake until golden brown, about 15 minutes. Remove from oven and cool in pans 5 minutes. Use a knife to pop out the crust cups and cool completely on a wire rack.
Meanwhile, for the custard, put milk and vanilla bean paste in a medium saucepan and bring to a boil over medium heat. Whisk the egg yolks and granulated sugar in a bowl until light and fluffy. Add the cornstarch and whisk until no lumps remain. Whisk in 1/4 c. of the hot milk mixture until incorporated. Whisk in the remaining hot milk mixture, reserving the empty saucepan.
Pour the mixture back into the saucepan. Cook over medium-high heat, whisking constantly, until thickened and slowly boiling. Remove from the heat and stir in the butter. Spoon into the cooled crust cups and let sit at room temperature about 20 minutes. Top with fruits and refrigerate until ready to serve.
Hope you like them! Share with us your version! Take a photo of yours, send us an email, tag us on Instagram,tweet us, anything. We love to see yours!
Happy International Women Day! A day to celebrate all fantastic women in the world, be it you’re successful career women or a mother you deserve a special day like today. You all earned all the applause from the world. You’re just an extraordinary individuals contribute to the world in your very own way.
Sometimes, I question myself how do we define beauty? However, we can’t. Shouldn’t we agree that it’s all about perceptive and how individual value it as everyone has a different definition? For us, beauty is about being comfortable in your own skin. It’s about knowing and accepting who you are. When we talk about the beauty in life, it’s all about how we live in and enjoy every moment of it in the most beautiful way – just like a painting.
While this week we are featuring this amazing lady whom I believed that she understand the beauty of life. Seeing through her shots via her Instagram, she just portray a life in a painting. The small details she shows tells me how delicate she is. I admire her way of seeing the thing and slow living which someday I wish I could learn from her.
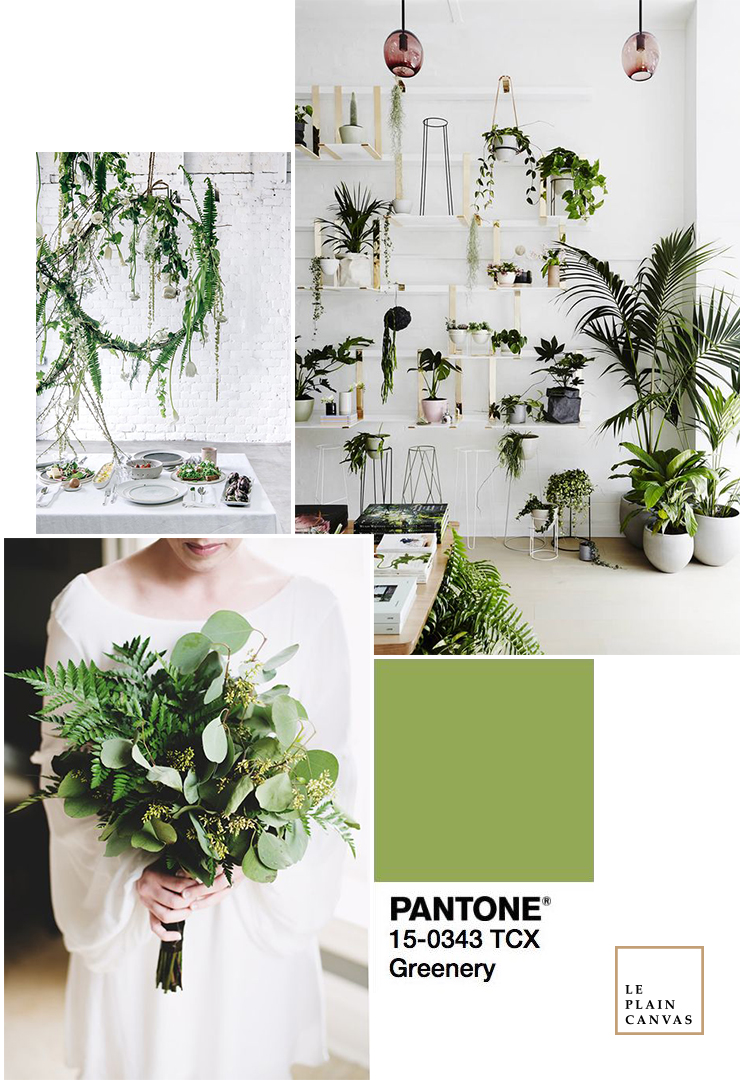
Greenery has been one of our favorites during this spring, as it evokes Granny Smith apples or butter lettuce. However, the other tone that caught our eyes in the Pantone’s Spring 2017 Fashion Color Report: Primrose Yellow.
Primrose Yellow sparkles with heat and vitality, conjuring thoughts of a warm, sunny day. It’s a cheerful pop of color in the palette. In furnishings can have a similar effect on a room, when used in moderation. When using Primrose Yellow for home, it feels like a palette cleanser. It’s a color that can go hard-edge eighties, which makes it an ideal backdrop for avant-garde furniture pieces.
Where there are pops of yellow, it adds so much interest to the home. For us, we also love pairing the shade with rich blues, emeralds, and jewel tones for an “impactful and bold” look.
Sometimes just a little pop of color is more than enough.
We always felt that it’s impossible after we failed. As you feel that you have already tried and that’s enough. Yes, it true. However, in the world, there is infinite possibility. Nobody will think of lightbulb before the candle. Learn from the mistake, have a fresh start and it will be your infinite possibility.
Believing time is on our side is difficult because the lens of our lives is too narrowly focused. We see only what is in our direct view, whether trials or bliss. We hold so tightly to the positive experiences for fear we won’t have another just as good and those that are negative we hope will disappear.
You are born with infinite possibilities. Take responsibility for turning these possibilities into reality, and you will be bestowed with success, love, and eternal peace.
Today’s recipe has a special place in my heart! These easy British Scones remind me of one my favorite vacation destinations: London. My sister and I love everything British: the accent, the weather, and especially the food. Yes, I’m serious, I love British food.
Scones with clotted cream and jam were definitely our favorite treat for tea time! But they’re not always everywhere in our sight so we came up with our own recipe.
These scones are the height of scone perfection, a pastry dream-come-true, should you be as odd as we are and occasionally dream a little dream of scone. They are moist and structured, but still soft and light, ever-so-slightly crisped exterior. They have just the right level of sweet, and we didn’t need to sugar or glaze or really anything them to make them work. Sure, the book/online offers variations on the recipe, but the basic one, the very first one, is all we would ever need.
And now, with my scone quest fulfilled, we can move onto bigger and better things, like pickle parties and planning Sunday night’s dinner. And by “planning” we mean, “taking Monday off.”
Plain, meaning without added fruit, but light, airy and just the right amount of crusty surface makes these scones the perfect backdrop to preserves and clotted cream.
You can make them with buttermilk and natural yoghurt in place of the milk, and you can use 1 level teaspoon of bicarbonate of soda and 2 level teaspoons of cream of tartar with plain flour if you want to experiment, but the recipe below seems equally good to us and the ingredients are always available.
Here’s your basic “start here” scone recipe!
Ingredients |
3 cups of all purpose flour
1/3 cup of caster sugar
2 tbsp of baking powder
1⁄2 tsp of salt
8 tbsp of unsalted butter (1 stick), cut into 1/2 – inch pieces and softened
1 cup whole milk
2 large eggs
Method |
Adjust oven rack to upper-middle position and heat oven to 200 degrees. Line rimmed baking sheet with parchment paper. Mix the flour, sugar, baking powder, and salt in a bowl. Add butter and using the finger tips fully incorporated and mixture looks like very fine crumbs with no visible butter.
Whisk milk and eggs together in second bowl. Set aside 2 tbsp of milk mixture. Add remaining milk mixture to flour mixture and, using rubber spatula, fold together until almost no dry bits of flour remain.
Transfer dough to well-floured counter and gather into ball. With floured hands, knead until surface is smooth and free of cracks, 25 to 30 times. Press gently to form disk. Using floured rolling pin, roll disk into 9-inch round, about 1 inch thick. Using floured 2 1/2 –inch round cutter, stamp out 8 rounds, re-coating cutter with flour if it begins to stick. Arrange scones on prepared sheet. Gather dough scraps, form into ball, and knead gently until surface is smooth. Roll dough to 1-inch thickness and stamp out 4 rounds. Discard remaining dough.
Brush tops of scones with reserved milk mixture. Reduce oven temperature to 170 degrees and bake scones until risen and golden brown, 10 to 12 minutes, rotating sheet halfway through baking. Transfer scones to wire rack and let cool for at least 10 minutes. Serve scones warm or at room temperature.
These scones are so easy to make! We like to make the whole recipe and freeze most of them. Then when we want one we defrost it, most times we let them sit on the counter for a few hours, and it tastes like fresh out of the oven!
We hope you like them! Share with us your version! Take a photo of yours, send us an email, tag us on Instagram,tweet us, anything. We love to see yours!
Title: Dear Jill and Kai Instagram’s account: @jellynaeb @mrkaing
As a creative, when works growing busy each day, times it gets out-of-control. With works collapsed on me, I became annoyed easily even to my love ones. I feel like deadlines are making me suffocating.
Despite, calming myself down yet things never seem to better at all. This reminds me of a good friend who undergoes panic attack in the past with all stress and works pressing at her. Properly, that the past for her as I’m still struggling.
This week featuring, Jill, one amazing friend I’ve worked with. While we only spent a short period of time working with another but it seems like we knew each other for years. Ultimately, we know each other for a couple of years now; I witness her loving marriage and all wonderful news she shared. She is always my “darling”, who shown me her supports and encouragement in life.
Recently, what make me so happy at work is to discovered she is pregnant! I could start imagine months later or even years later, a beautiful child of her will call me Aunt Angela! It’s very exciting news as I always believed both Jill and her husband will have most beautiful children!
This portrait is a belated gift I painted for them since their wedding (which was long delayed), I hope that she will love it. However, I realized I need to get really to update a new portrait with their member in the frame.
Tall ceiling, large windows with plenty of daylight shine in, and there are lots of spaces for creativity. You could enjoy the different possibilities a loft brought you. That’s why we love lofts, they are beyond wondrous. This week we weren’t sharing ideas but our personal desire for these beautiful houses.
There are different looks but one of our favorites is with white interior! Small loft studio dwellers, take note – you can live in a bright, airy space. With the lights shining in, white just expand and brighten up the spaces. Seamless shelving (and lots of it) mixed with zinc storage boxes (very Parisian chic) makes for a tiny flat that feels roomy yet stylish.
Sometimes when we feel that white is a little boring. We use glass-doored cabinets to highlight favorite items, like the shells and ironstone to add bits of texture.
xoxo, Angela
Credit| All shots used on the mood board via my Pinterest boards.
If you have read all my post, you will know that my life quote is “Keep trying, that’s the only time you don’t fail.” Some of my friends said that they tried but the result always ended not well. What for keep on trying when you won’t get the result that you want. That’s when the time I say, that’s because “The Best is yet to come.”
That’s when the time I say, that’s because “The best is yet to come.”
You will never know what is going to happen in the next moment. You may become a millionaire just a blink of an eye. Who knows right?
Our all time favorite Japanese meals will be Chirashi Bowl – also called chirashizushi. The word “chirashi” means “scattered,” so this is primarily a big bowl of rice mixed with seafood especially fishes, vegetables, and additional ingredients of your choice. We love this dish a lot because it always filled with all our favorites in that delicious one-bowl meal. Therefore being inspired by the Chirashi Bowl, we decided to share the making of our version of Avocado Sushi Bowl with you.
If you’re in the mood of avocado, no raw fishes yet sushi, you will love this! There are almost no limits to what ingredients go in Chirashi, therefore, we adopted the idea and make our Avocado Sushi Bowl. There are many variations to the sushi bowl, let’s start with the rice. Traditionally sushi rice is used and the rice needs to be made ahead and cooled before using. So make sure you prepare the rice first!
Vegetables, seafood, prepared foods, fish roe, tsukemono (Japanese pickles,) and eggs of your choice. You can use a lot of things or just a few things. Remember that this is a versatile dish, so don’t worry if you can’t find a lot of the ingredients that I used.
We have been thinking, “what is a sushi bowl without wasabi?”, thus it is a must for us to have it. However just having the wasabi at the side make it taste dry. Therefore, we decided to make a Wasabi Mayonnaise Sauce for this recipe. This sauce is very easy to make. For above version, you will need 3 tbsp of Mayonnaise and also 1 tbsp of Wasabi. Mix them up and create the best sensation you will ever have. If you are a wasabi lover, add more of them to the mayonnaise. You will love it just like us.
Ingredients |
Sushi Rice:
2 cups of sushi rice – note, you can use brown short-grain rice if you want.
1 cup rice vinegar
2 tbsp. sesame seed (optional)
Wasabi Mayonnaise Sauce:
3 tbsp of Mayonnaise
1 tbsp of Wasabi
Some topping suggestions:
Hard-boiled eggs
Umeboshi (Japanese pickled plum)
Seaweed
Sea Urchin
Mushroom
Sweet Beancurd Skin
Method |
Cook the rice and let stand for 10 minutes. Add to a bowl with the rice vinegar and mix well. Add the sesame seeds and the rice seasoning if you desire, and mix well.
Mix up the 2 ingredients for the sauce.
Done preparing all the ingredients that you need? Now you can serve them in a pretty small bowl and drizzle the sauce on it. 楽しんで!
We hope you like them! Share with us your version! Take a photo of yours, send us an email, tag us on Instagram, tweet us, anything. We love to see yours!
If you’re anything like me, dry hands and feet (and dry skin in general) is a problem for you. It is very important to use a body scrub. You scrub something that exfoliates and it removes dead skin and your skin looks and feels better.
However, we are alway sceptical about using it. Does we really need it? I think it was basically that the scrub was so expensive. Moreover it was being touted as being some kind of miracle. Like it was a previous concoction that would transform your life. Or at least it would transform the life of your hands and feet.
Well, I just loved how my hands felt and looked after rubbing that scrub all over my hands and rinsing it off. Smooth and revitalized and younger-looking. However, I didn’t like the price or the ingredients they have in the market. Totally not health, thus we decide to make our own version.
We all know the basic ingredients needed for a scrub Epsom salt and Baking Soda. But what makes this special is the simple yet delicated ingredients we have added.
Coconut milk is extracted from the meat of the coconut and is packed with vitamins. Not saying that it is very nourishing. The natural fatty acids in coconut milk can soothe irritated skin, which makes it a great remedy smoothed on a sunburn.
Karmakamet Lavender essential oil is one of my very favorites! This essential oil is steam distilled from the flowering tops. The fragrance of lavender is calming and relaxing.
Use whatever containers you like, provided you make them airtight. You could use repurposed Starbucks Frappucino bottles for a very cute (and smaller than the quart size) milk bottle containers. But if you don’t want to spend the cash on containers, just use clear plastic goodie bags. Be sure to add some kind of label so they know what they’re getting.
All in all, you’re not going to spend more than $2 or $3 per batch of milk bath (plus container), but you’ll need to buy the ingredients for more than one batch.
Ingredients |
1 cup Epsom salt
1 cup powdered coconut milk
1/4 cup baking soda
1/4 cup lavender flowers
4 drops lavender essential oil
Method |
Combine all ingredients in a large mixing bowl. Store in airtight containers. You can made them into bathbomb too! Just follow the method we used for Valentine’s Rosa Bathbomb. For bath, add 1/4 cup mixture to hot running water. Relax!
This will be a prefect gift and also for yourself to relax. We hope you like them! Share with us your version! Take a photo of yours, send us an email, tag us on Instagram, tweet us, anything. We love to see yours!
Title: Dear Sherman and AnAn Instagram’s account: @shermanthm @heavenlyplace
When will be my holiday? These days I have been questioning myself. I haven’t been away for a trip but I do have breaks! Especially yesterday I took a half day off from work went to my nephew’s place. He has been a charm to me and melts my heart. He’s just too lovely but super hyperactive that I have to admit I’m no longer young! Even so, it never stops me from visiting him soon.
While this week A Paint Portrait I would love share this charming couple that melts my heart as well. They are such a lovely couple to me! Months ago I proposed to work on #APaintPortarit, and Sherman agreed to participate in the project, he sent me tons of references and all shot featuring his girlfriend. I thought it was a sweet act of him, I believed when the portrait is out (which is today), the girlfriend would be quite surprised (why a stranger painted them).
I enjoyed both Sherman and An An Instagram as they love traveling together and make their breakfast! It seems the most simple of life but I thought many of us actually have taken for granted. That’s the reason why they always motivate me in my life. To me, Instagram is a community to know and learn from groups of people that shared same hobby or liking. Thus, from time to time the community has lost it track but there is where people like Sherman and An An still remain the same.
“You don’t need a lot to be happy”, that is what they show me through their way of life.
This week mood board I would love to introduce this charming Pale Dogwood! Anyway, who doesn’t always impressed with all the names and the colors from Pantone? As for me, I definitely do. They are just way beyond imaginative, the name of the colors just unprecedented. Sometimes, I wonder how does the team name these names!
Pale Dogwood is a quiet and peaceful pink shade. A soft touch infuses an aura of purity and conveys innocence. This color adds to the earthy tones we will be seeing this spring by adding a healthy glow.
From a purely aesthetic point of view, millennial pink is an easy color to look at and wear. It’s obviously not a bright pink. It’s not fuchsia. It has a certain innocence, it’s unobtrusive, it’s very subtle. There’s kind of a healthy glow that’s attached to shades of pink like that.
Credit | All shots used on the mood board via my Pinterest boards.
It’s been awhile since I post for #themooninsight. It’s been a hectic month for me, thus sorry for the missing. The past month I have been thinking a lot, about time managing and also on what I want to do. However, the first step for me is to say you can in order for me to continue my journey.
We tend to worry when we are lost or trying new things. As we are uncomfortable with the new environment, we try to avoid it. Staying in your comfort zone does not make your life stable. Only the keep on learning and improving do.
After weeks of indulging delicious food over the festival holidays, we decided to eat cleaner and give our stomach a healthier choice of food. So we decided to do some homemade granola bites. It is a great everyday snack and something good to grab on the go.
These no-bake granola bars would also make great “energy bites,” too, if you’d rather roll the dough between your palms to make one-inch balls. If you appreciate and like the Monster’s Krispie Rice, you’ll love these!
Here, you see chopped almonds, dried cranberries, and also raisins. The possibilities are endless — all you need to know is the base. Oats, butter, honey and brown sugar. After that, add what you like.
Even though all the steps sounds easy to make. However, there are points that you have take notes of too, as it does get wrong too.
After a few tries, we’ve found that it’s really important to press the granola mixture into the pan. We’ve actually spent about a minute pressing before — the harder and longer you press, the less chance you’ll end up with granola instead of granola bars.
The honey and brown sugar really helps with keeping the bars together. We add some to the granola mixture while it is still warm.
Finally, we like to refrigerate the granola mixture for about 2 hours. This hardens everything and makes it easy to cut the granola mixture into bars. Right out of the refrigerator the bars will be hard since they are cold. Leave them out for an hour and they will warm to room temperature and become a little softer and chewy.
The bars keep at room temperature for about 1 week (if they last that long). Just make sure they are tightly covered or sealed in a container.
Ingredients |
2 1/2 cups (230 grams) old fashioned rolled oats
1/2 cup (80 grams) whole almonds, coarsely chopped
1/3 cup (113 grams) honey
1/4 cup (56 grams) unsalted butter, cut into pieces
1/4 cup (50 grams) packed light brown sugar
1/2 teaspoon vanilla extract
1/4 teaspoon kosher salt
1/2 cup (60 grams) dried cranberries, coarsely chopped
1/4 cup plus 2 tablespoons (65 grams) raisins
Method |
Combine butter, honey, brown sugar, vanilla extract and the salt in a small saucepan over medium heat. Cook, stirring occasionally until butter melts and the sugar completely dissolves.
Pour butter mixture in to bowl with toasted oats and almonds. Mix well. Let cool about 5 minutes then add ccranberries.
Transfer oat mixture to lined pan then use a rubber spatula or damp finger tips to firmly press the mixture into the pan. (Press hard here, this way the bars will stay together once cooled and cut — We press for about one minute to be extra safe).
Cover then refrigerate at least 2 hours. Remove block of granola mixture from pan then peel away aluminum foil. Cut into 12 bars.
Store bars in an airtight container for up to one week. For the softest bars, keep at room temperature. For slightly harder bars, store in the fridge.
We hope you like them! Share with us your version! Take a photo of yours, send us an email, tag us on Instagram, tweet us, anything. We love to see yours
Some might hate Valentine, hence it’s also someday special for many others. For me is another day of making my love ones around feel in love again. However, I must say that it is an excuse for me to bake, or give them a gift! I enjoyed being Cupid giving out a gift that I made myself since school days! You can say it’s a habit or just crazy ideas from me that I want to share! I always believed in everyone deserves having something special on a special day!
Over the past weeks, we have shared a few blog posts on making your Valentine special! For those who has missed it, here is the recap. Bake some Strawberry Jam Sandwiches Biscuits for your loved ones to surprise them your baking skill. Handmade some Valentine’s Rosa Bath Bomb to make them feel comfortable in the bath! And, never ever forget to host your very own Valentine’s Friendship Brunch with your girlfriends and let them know that they are special as well!
Thus, if you think that our Valentine’s day posts didn’t inspire enough, we have gathered a mood board for your last minute preparation. May these thoughts inspire you to surprise your Valentine!
Receiving lovely message hidden in cookies surely makes me overjoyed. Convey your love message through this DIY conversation heart sugar cookies by Lovely Indeed.
The Valentine’s by 100 Layers Cake Let hosted a lovely Valentine’s Day party for kids, is so beautiful that you only can say valentine is not only for the adult!
Host Valentine’s dinner for your loved ones, be inspired by the amazing beautiful table setting created by Calder Clark, Rue Mag.
Valentine’s Day is coming in 2 day time. However, have you girls prepare your chocolate for your crush yet? Don’t be shy to tell your loves one your love them because you will get an unexpected reply from them. I promise!
Love is our true destiny. We do not find the meaning of life by ourselves alone – we find it with another.
Most of the time when thinking of Valentine’s Day, the majority will automatically go to romantic love between significant others, but what about the love shared between best girlfriends? And, on such day there are still plenty of ways to celebrate. While, Valentine’s Day means much more than hearts, chocolates, and roses. The affection they feel on that day extends beyond lovers to their close friends and family too.
Both Angela and I thought of put together some fun ideas so that you can enjoy this love-filled holiday with your friends, best friends or even your family. After all, there are plenty of ways to spread the love on February 14th, whether you’re in a relationship or not. So after much consideration, we decided to have Valentine’s Day Friendship Brunch.
Enjoying an afternoon tea while perched on a gilded hotel armchair is a fine British tradition, but hardly sustainable as a regular pursuit. Throwing your own brunch party means you can stick to your own budget, plus you can select your favorite finger food. Therefore, let’s get started!
Start by extending your table and throw on a table cloth. In a few weeks back, we got a few crates from a garage. We went on fabricating it but sanding away the rough surface. End it with our very own lace tablecloth on. This help to create an English and vintage atmosphere. Pop some cushion on the ground and you are all good to go for your next preparation.
Most importantly in the brunch party is to have a centerpiece for your table. For us we owned a 2 tiered cake stand in pink and polka dots. Otherwise, use your best crockery and make it a little more special with lace-like doilies, folded napkins and name place signs. On our 2 tiered cake stand, we have a variety of savory and sweets on it.
On the bottom tiered we have made – Orange and Cranberry Tea Sandwiches, Ham Tea Sandwiches and also English Cucumber Sandwiches. The sandwiches are cut into small pieces, it allow everyone to have bites of everything and yet not getting tired of having it.
On the top tiered it consist of the sweets – Mini Fruit Tarts and also Buttercream Lemon Cupcakes. What is a brunch party without bright and yummy fruits? Thus we headed to the market in the morning to grab some fresh one. The Mini Fruit Tarts recipe opened up my eyes to the adorable-ness that are little tarts made with cookie crusts using a muffin tin. This little dull is so easy, crunchy and creamy to be made. I couldn’t resist them at all.
Even though, this may not be the first time we made this Lemon cupcake. Yet, it’s the first time we created this buttercream recipe. There are different types of buttercream, however, we felt that the Swiss Meringue Buttercream works best for this recipe.
Besides, don’t forget your teapot, teacups, cutlery and cake slices for serving. For a modern girl like us, we used jar and glasses for this hot afternoon to serve our Mandarin Orange Juice. Since it is Chinese New Year season thus we have lots of leftover Mandarin Orange. Adding lemon juice and mint into this drink just simply make the afternoon a refreshing one.
“Do you feel like something is missing? Hmmm.. I think you forget to mention about Scones. Why isn’t it on your tiered cake stand?” Don’t worry that’s the first thing that came to our mind when we mention about brunch party. It doesn’t take long to whip up but if you want to get ahead, freeze a batch and defrost them in a low oven. Serve warm with lashings of jam – decant a pot of homemade preserve into a pretty bowl. Not forgetting the clotted cream. Ending the preparation with a cheese, ham and sausage platter and our party is all good to go.
This may sound like you’re going to have a hectic preparation for that day. But no, most of them you could make it days ahead. Just a few touch-up and simply wear your perfect dress and enjoy the rest of the afternoon. If you do also wish to give your friend a little gift, wrap our Valentine’s Rosa Bath bombs up into small packages with a name tag along with it. Perfect isn’t it?
We hope you like them! Share with us your very own Valentine! Take a photo of yours, send us an email, tag us on Instagram, tweet us, anything. We love to see yours!
We have a treat for all the ladies and lover today. A recipe for a homemade gift you’ll that’s perfect for pampering the ones you love – Rosa Bath Bombs!
These little treats pack a powerful punch when added to a warm bath. Place them under running water and they’ll dissolve and fizz and create a wonderful soaking environment. Even if you don’t have a bathtub, these bath bombs can still be effective in a shower. The water will help dissolve the bath bomb and release the aroma of the essential oils into the steam. Best yet, you can add whichever scents you choose.
Since it is for Valentine’s Day, we used roses because it’s romatic and invigorating. All also we make them into small little heart, using the silicon heart molds. It will be really lovely when you see little hearts floating in the water.
Actually, we went to make some of these around last year and a couple different tutorials we tried did not produce very good results. But hey, if at first, you don’t succeed, sometimes you just have to try again.
Now that I’ve found a method/recipe that works, I’m thinking I should have some friends over for a make-your-own-bath-bombs party. Added bonus: It seriously makes your whole room smell amazing while you make these! However for now, let’s make some for our lover first!
Ingredients |
1 cup baking soda
1/2 cup Citric Acid
10 drops essential oil (we used Rose)
1/2 tbsp of carrier oil (such as Jojoba, Almond, or even coconut oil like us)
spray bottle with water
rose petals
gel food coloring (totally optional)
silicone mold
Method |
In a medium bowl, mix together the baking soda and citric acid. You can strain them through a sieve for a finer consistency if desired.
In a small bowl, stir together your carrier oil and essential oil. Add to the medium bowl of powders and stir until well mixed. Add mica powder for coloring if desired.
Using a spray bottle of water, mist the surface until slightly damp. Mix until it’s the consistency of slightly wet sand— it should clump together when pressed. DO NOT OVER SATURATE! If it’s too wet it WILL fall apart when you are taking it out of the molds.
Pack into molds. I used both silicone for small heart shapes and a muffin tin for larger ‘pucks’. Be sure to add the mixture to the top of the mold and really pack it in there.
Cover mold with a paper towel, and carefully turn upside down over a baking sheet covered in another paper towel. Gently tap the bottom of the mold if needed, and unmold the bath bombs. Cover with paper towels and let dry overnight.
Package in an airtight container or bag so that your DIY bath bombs don’t lose their fizz, and enjoy!
We hope you like them! Share with us your version! Take a photo of yours, send us an email, tag us on Instagram, tweet us, anything. We love to see yours!
My 52 weeks of the journey is coming to an end soon, there are only 11 more portraits to post! After this, I might continue new #APaintPortrait project or I will start a new project. However, nothing has decided yet but I’m looking forward to expanding my illustration’s works. Making every journey a good one.
This week A Paint Portrait I would love share this lovely lady that I admire. It’s featuring a voyager that has to be my inspiration – Laura, she has been leaving her footstep around the world. And each moment she captured she just brought me a deep impression!
With her, as my inspiration from time to time, I knew myself. All I wanted was to live a life where I could be me and be okay with that.
I had no need for material possessions, money or even close friends with me on my journey. During the journey, I might be lonely and helpless without them but all I wanted was my art and the chance to be the creator of my own world, my own reality. All I want the open road and new beginnings every day.
Wouldn’t you agree with us? It’s just exciting to welcome the cooling breeze during this season! The smell of blossom just brings live into our daily life. Just the other day while we’re having a tea over at our patio, our garden begins fills with blossom.
The scene’s just beautiful! Even though they look much subtle right now. However, mom said, soon, when the spring comes they garden will be filled with colors.
We always enjoyed having flowers at home, it brings in liveliness. They brighten up the room and gives a little freshness to it. They just seem like the best remedy for our expression. Simply with a stalk of flower on the desk just make our day. Change a different flower weekly, it will give you different expression and mood once in awhile.
Change a different flower weekly, it will give you different expression and mood once in awhile. Different colors represent different mood, we love pink blossom especially the peony thus let us what is your favorite?
When comes to February, the first thing that comes to our mind is Valentine Day. Valentine Day doesn’t only mean couples, it is a day for your love one. Moreover, our sweet tooth is at an all-time high each year around Valentine’s Day. When we making Valentine’s Day cookies last week, we also wanted to make some to our mother. However, here’s the thing: he/she doesn’t like chocolate or anything too sweet. So, to make a set of cookies that everyone would love.
It wouldn’t be Valentine Day without Jam Sandwich Biscuits — they are a staple on the biscuit platter. Strawberry jam sandwiched between two buttery cookies are simply delectable this time of year.
The fun part is using mini cookie cutters to make shapes in the center of the cookies for the jam to peek through. If you don’t have cookies cutter you can use a cup like what we did. Since it is Valentine Day used a mini heart for a few. You can use any flavor of fruit jam — homemade tastes even sweeter! You can also try our Homemade Orange Marmalade with this recipe, it will definitely bring our another flavor.
Tips from the sisters: don’t make holes in the center of all the cookies. I nearly did before I realized if I sandwiched two cookies with holes together the jam would fall right out! Blonde moment. So cut holes in the center of half the cookies and keep the other half of the cookies whole. Use a cookie with a hole and a cookie without a hole for each side of the sandwich and you’re good to go!
Make sure you don’t add jam all the way to the sides of the cookie, so when you press two cookies together you don’t squeeze some of the jam out to the edges. A little goes a long way. The cookies keep great for a week or so in an air-tight container in the fridge but are best within the 12 days.
Ingredients |
2 1/4 cups (11 1/2 oz./260 g.) all-purpose flour
1/4 cup (1 oz./30 g.) cornstarch
1/4 tsp. salt
3/4 cup (6 oz./185 g.) unsalted butter, at room temperature
1 1/2 tsp. grated lemon zest
1 cup (8 oz./250 g.) granulated sugar
1 whole egg plus 1 egg yolk
About 2 cups (1 1/4 lb./625 g.) strawberry jam or other fruit jam
Confectioners’ sugar for dusting (optional)
Method |
In a bowl, sift together the flour, cornstarch, and salt. In another bowl, using an electric mixer on high speed, beat the butter and zest until light. Add the granulated sugar and beat until completely incorporated. Add the whole egg and egg yolk and beat until light and fluffy. Reduce the speed to low, add the flour mixture, and beat until just incorporated. Gather the dough into a ball and divide into thirds. Flatten each third into a disk. Wrap separately in waxed paper and refrigerate for at least 1 hour or up to overnight.
Preheat the oven to 350 degrees F (180 degrees C). Lightly grease baking sheets.
Dust 1 dough disk with flour and place between 2 large sheets of waxed paper. Roll out the dough 1/8 inch (3 mm.) thick. Using a 3-inch (7.5 cm.) decoratively shaped cutter, cut out cookies. Transfer the cookies to the prepared baking sheet, spacing them about 1/2 inch (12 mm.) apart. Refrigerate for 10 minutes. Gather the dough scraps into a ball, wrap in waxed paper, and refrigerate.
Bake until the edges of the cookies are golden, about 10 minutes. Transfer to wire racks to cool. Repeat with the remaining 2 disks, then roll out, cut, chill, and bake the scraps in the same manner.
Spread the jam on the bottoms of half of the cookies, spreading it lightly at the edges. Top with the remaining cookies bottoms down. Dust the tops with confectioners’ sugar, if desired. Store in an airtight container in the refrigerator for up to 1 week. Makes about 3 dozen cookies.
They taste so good and are really easy to make. We hope you like them! Share with us your version! Take a photo of yours, send us an email, tag us on Instagram, tweet us, anything. We love to see yours!
What a great month it is – January! Let aim to make our February ever greater! After 3 weeks of hiatus, this week A Paint Portrait I would love share this gifted illustrator that I respected. It’s featuring an illustrator that have to be my inspiration – Silver, also a film lover, traveler.
She is such a free soul with a gifted talent of telling a story in each of her photographs. I envy her simple life where travel about in the southeast Asian.
Thus, have you ever question yourself what kind of the life would you want to lead on? By, knowing what you know now and what you have been through, would you do it the same? As for me, I look at the alternative – a very simple life. It would have been nice to have a simple life. To believe and that is how one would want to move on?
Life is as simple as these three questions: What do I want? Why do I want it? And, how will I achieve it? And, if you can answer these question, you might lead a simple yet a happy life.
This week I would love to share with you some amazing work desk or studio inspiration I have in mind. I love eye-pleasing, organized space and of course, it must be practical yet attractive! With having a messy studio is annoying for me as I couldn’t concentrate, and most of the time I would have brian-block.
I’ve rounded up a handful of my absolute favorite desk items. And also, am sharing some ways I’ve been styling (and organizing) my desk recently for inspiration. For those who are like me, who like to stick up your favorite images, quotes or design on the wall. Here is some inspiration of studio for you. This studio, mood board helps you to collect ideas and bind them together. As it always brings liveliness to your boring desk.
For the different individual, you could display differently like the mood board I share. For those who love a messy person like me, start off by having a full wall of pin board and a few pin. You are able to freely adjust and mind-mapping with a lot of freedom. However for the minimalist, you can clip your inspiration up using a string. This is good for those who need a clear view of the inspiration.
Gather some equipment (MT tapes, transparent tapes, wooden-clipper, strings) now, and try out different method and you will get the style that suits you the most!
I realized that I appreciate making and eat, there’s no specification, I do not have any craving or preferences, I just love good food. I enjoyed Chinese cuisine, and among all I love dumplings. Each dumpling filled with juicy fillings; steam marinates minced meat, prawn and chopped cabbages just taste marvelous with the thin layer of skin! And, steam dumpling, it’s one of the kinds that I can’t refrain from.
This week we would like to introduce our Pork and Shrimp Steamed Dumplings. Also, Pork and Shrimp Steamed Dumplings are also known as “Shao Mai”. It is one of the popular Dim Sum of all time.
We born in an Asian family with a strong association with a Chinese background. Our grandparents pass on their traditions to our parents than to us. If you ask which is my comfort food, I would say any mom cooked dishes. They have a strong flavor of home that passes on from generation. My passion for culinary begins when I was 14 – 15 years old. I start learning cooking from my mom and take charge of preparing meals for my family. Especially to feed both Joe and me however soon it has become an interest for us spending time in the kitchen.
While making dumpling is only of my mom specialties. It’s just like the Italian’s ravioli, wrapping their filling into the pasta dough! My mom makes all kind of dumping; steam, boiled, fry and fried. Thus, we like to share you this pork and shrimp steamed Chinese dumplings also know as Hong Kong dim sum, “Shao Mai”. They are juicy and full of flavors.
We’ve been making some variation of this same recipe for as long as I can remember, and I’ve been eating them and sharing them for just as long—a quick meal on a lazy weeknight, an appetizer at one of my parents’ dinner parties, a well-deserved after school snack, or a taste of home at college. Let get started with this juicy “Shao Mai”.
Ingredients |
(30 pieces, portion for 4-6 pax)
Pork and Shrimp Steamed Chinese Dumplings:
30 Shaomai Skin
1/2 egg yolk
1 tbsp Starch potato powder
300g minced pork
200g prawns, shelled and minced
6 dried shiitake mushrooms
lettuce for garnishing
Marinate sauce:
1 tsp soy sauce
1/2 tsp sake
1 tsp sugar
1/2 tsp salt
1/2 sesame oil
Method |
Combine the ground pork, shrimp, chopped shiitake mushrooms, egg yolk, starch potato powder and all the seasonings together. Mix well and set aside.
To makeShao Mai, make a circle with your thumb and index finger; lay the wrapper on top, nudging it down to create a cup. Add 2 teaspoons filling, then pat the filling down with the back of a spoon. Fold the overhanging wrapper edges down, leaving the filling exposed. Press the wrapper firmly around the filling. Pat the top and bottom of the dumpling to make it flat.
Arrange the dumplings in a steamer (lined with parchment paper and lettuce at the bottom) and steam for 8-10 minutes.
They taste so good and are really easy to make. We hope you like them! Share with us your version! Take a photo of yours, send us an email, tag us on Instagram, tweet us, anything. We love to see yours!
With 2017 around the corner, why not freshen the house for a brand new year ahead? If you’re thinking about giving your humble abode a mod new look for next year, you should totally go for Kale. It’s a very earthy and soothing shade. It might appear a little dark, which usually gives the impression that it’ll make things look old, but there are many ways to play around with this soon-to-be popular color in a youthful home.
To put some green in your living room, it all depends on the size of it. If the size of your living room is on the average or small side (like ours), you could opt to have ‘spots’ of Kale in the space. You can have items such as pillows, carpets, or tables in the hall with a light background. For those with large living rooms, you can either paint one of your walls in Kale or get a wallpaper with designs in similar tones. Due to its slightly dark hue, the walls can create a cozy and relaxing effect in your spacious living area.
You must have some green in your bedrooms. It’s known that the color green can help people relax and rest. It’s also a refreshing shade, exactly what you need when you wake up every morning. Get some bed sheets or blankets for your bedroom. Trust us, it’s a very welcoming sight after a long day at work.
We would also like to jazz things up a little with trendy dining ware. We usually stick with the silver, white porcelain, or glass dining pieces. However this year we would like to get some green plates and cutlery to set a more upbeat mood.
Yes, we’re serious about Kale; and no, we’re not talking about putting fresh kale all over the house. It’s not the vegetable we’re referring to, but the color Kale.
While drinking water is really important, it an essential for every day. However, water is always not the best alternative we like. Moreover, there are other healthy alternatives if you don’t like water, like coconut water, natural juices, and smoothies. Thus, if you wanna be healthy, please avoid alcohol, store-bought juices, and fizzy drinks. All this drink, they’re full of sugar and other nasty ingredients.
Furthermore, one of our favorite parts of all seasons are the moments spent enjoying a delicious drink on the balcony with our mother. Whatever, it’s all good (wink!). Most everyone agrees it’s quintessentially day to sip fruity, refreshing beverages in the different weather. Most importantly we do have a whole bunch of drink recipes that fit the bill. From summer cocktails to winter cocktails to that perfect glass of lemonade. Also, we sure do have one drink that suits yours taste buds.
For all the pitchers of tea we’ve made, we found one lemon and one orange just right for a citrusy summer drink. It doesn’t matter the size, one each will do. This tea can be made up to five days ahead and stored in an airtight container in the refrigerator.
La La La La La ~~ Sing a happy song!! Nice twist for making a Lemonade all smurfy! Two additional tips for you when comes to making this. The first tip is to have some simple syrup off to the side. Then taste the finished lemonade, and add some simple syrup to taste. The second tip was to freeze some of the lemonade in ice cube trays. That way your lemonade will not become diluted when served with “ice”!
The yellow-green color you see is all natural, created by blending fresh ginger and cucumber together. Some more, we found blending the cucumber was the fastest way to infuse it into this drink. As for soaking, it required a lot more cucumbers and more time.
If you’ve never made mojito before then you’ll be surprised how easy it is. Muddle fresh mint and lime juice then add white rum, cranberry simple syrup, and stir. Top it off with ice cubes, sparkling water, and garnish with a few mint leaves, fresh cranberries and a slice of lime.
This Pomegranate Thyme Fizz Cocktail is a perfect drink for parties (think: big beautiful punch bowl that maybe I could borrow from you some time). As well as, it tastes just as nice without the liquor if you’re looking for a solid non-alcoholic option for teetotalers. You could also substitute rosemary, mint or thyme for a totally different flavor profile.
They taste so good and are really easy to make. We hope you like them! Share with us your version! Take a photo of yours, send us an email, tag us on Instagram, tweet us, anything. We love to see yours!
The enthusiasm with this year Pantone announcement it is just beyond amazing yet. While going through those shades, we decided to select several to share with you folks. Apart from the love with Greenery, there’s another colour we love this season.
It’s Hazelnut, a refined, subtle, earthy tone we loved. Most of you will agree that it is a stand alone colour which is the best combination with earthy, rustic tone. Moreover, you could describe this colour as light brown, pale brown, caramel brown or camel tan. As it has a natural feel to it and adds a warm glow to any interior space. There are so many different ways you can work this hue into your next project. Here are some ideas you might like…
If you are a simplistic lover like us, you will be in love with Hazelnut. Hazelnut is a wondrous colour to work around with white, textured materials. Add white accents with slip covered seating and accent the room with green plants. So cosy! Or even add a touch of warmth to a white modern living room with a camel brown throw, to bright up the whole room.
Hazelnut is a wondrous colour to work around with earthy tone especially the white. It works with different textured materials as well, each will bring out a different touch of it. Hazelnut is all seasonal colour; Winter, Spring, Summer, and Autumn therefore for those decide to choose a colour for you living room, you could consider this! It’s a wonderful way to incorporate the cosy brown hue into your home design colour scheme.
Angela seems to be always famished upon her awaken, and the promise of a good breakfast is enough to get her out of the bed. Breakfast, it’s our favorite moment of the day! It breaks our overnight fast and gets our metabolism running again. Failing to eat breakfast can lead to us feeling lethargic, a slow metabolism, weight gain, and general unhealthy eating habits. This is a proven science. Yet many of us still leave the house without making sure that our tummies are happy (for me sometimes).
The biggest problem when it comes to eating breakfast (or not eating breakfast) is that we don’t give ourselves enough time. Most of us are always in a rush in the morning and convince ourselves “we will get something on the way”. Although that’s fine, I think when the time comes, we usually end up getting ourselves convenient foods which don’t add any nutritional value into our system. While we love spending extra time in the morning to prepare waffles, pancakes, or green juices. However, when we’re busy we prefer a healthy breakfast that will take less than 20 minutes to make. You feel us?
Therefore to welcome the year 2017, let pick some of our all time easy and favorite breakfast. Hopefully, you’ll find some ideas and inspiration for their morning meals. We hope that you find them useful and convenient for you and your family! Let get’s started!
The salad is something that we never get’s wrong for a breakfast. For those vegans who wanted to try some fishes, the will be the best starter. As the sweetness of the salmon simply just melts slowly in your mouth.
Avocado is one of Angela favorite food. Therefore there is always a jar of homemade guacamole in the fridge waiting for her. Just two scope of guacamole and top it with tomato and bacon, you are all good to go.
You can pre-made this Corn Chowder days ahead, cool them and freeze them up. When you are ready to enjoy them, heat them up in a pot, season it with some salt and pepper. Sometimes, we love to eat it with the Avocado Toast when we want a full meal. They are one of the best combination we ever have.
Thus, we love to challenge you to have breakfast every day. Share with us your version! Take a photo of yours, send us an email, tag us on Instagram, tweet us, anything. We love to see yours!
When Pantone releases their latest colors trend of 2017 I was in thrilled. Greenery will be one of my favorite scheme tone ever. I love what greens brought in my daily life. There is a whole list of it and I do not know where to start but I know I will end it by sharing you our inspiration mood board for the week! I shall begin;
No 1. Greenery is beautiful. It’s not only the pleasant looking scenery but the calming scheme that has brought into our life. I would say greenery just represent me, I couldn’t stop laughing but I even had “forest” as a nickname when I was a kid. I assume people surrounded me viewed me as an organic, greenery, and floral characters since young. It’s part of the green’s family, that is no reason for me to hate it, don’t you agree!
No 2. Greenery, it’s a light pale green. Smoothing to our eye, that why I love it even more.I think the trend of bringing Greenery in could inspire many individuals; creatively or environmentally. In fact, it actually urges me to get a few more pot of plant for our grander to give more punch of the greenery look. One of the biggest projects that we would touch on would be upgrading our patio garden, and planting more edible plants. We love to share our thoughts and experience with you all via our blog.
No 3. Even though it’s still on discussion list but one of the biggest projects that we would touch on would be upgrading our patio garden. Having more organize planting system with more edible plants. We love to share our thoughts and experience with you all via our blog. We hope that you would like them!
Last but not least I would definitely like to get involved in more greens project to please the eyes of our viewer. Also, as an environmentalist, I would like to do my part to convey my message out through our work.
It’s a brand new year, forget about all week blues! Let’s celebrate with a beautiful greenery year! Happy New Year!
We guessed that no one would like to say goodbye to this year Christmas. For us, we have been thankful as it’s all about giving to others and extra food for our stomach! Sadly to say, even though the Christmas is over. It’s still a holiday season that you never get enough of good company and good food. After all, New Year is on the way, which is tomorrow!
During this Christmas, we decide to put on our apron and get ready the baking tin for the festive season. Over the weekend, we decide to bake some mini Bon Bon Chocolate Strawberry Cake after the feast.
The result was unexpectedly good, both of us were satisfied with the final outcome. That is the reason why we would love to share with you this mini Bon Bon Chocolate Strawberry Cake recipe. It is not a bad idea to make it for New Year party to welcome 2017!
I would like to say compare to me, Joe is born to be a baker. She was so talented with the flours and sugars. When those staples come across it just turn into magic.
Most importantly, this cake is dark, moist, rich and incredibly decadent. Seriously, it’s the best chocolate cake I’ve ever tasted. The Green Mountain Coffee’s Blend plays a very important role here because it blended amazingly well with the cocoa. As it helps to create the most intense and delicious chocolate cake yet you won’t be tired of it. It’s the perfect sort of cake for a New Year Eve, the best cake I have ever tasted. Make sure to enjoy it with a very large glass of ice cold milk – or coffee!
Ingredients |
1 3/5 cups plain flour
1 teaspoon baking powder
1¾ sticks unsalted butter, at room temperature
5/8 cup caster sugar
2 large eggs
1 teaspoon vanilla extract / vanilla paste
200ml of espresso
3 tbsp of cocoa powder
2 tbsp of rum
3/4 cup semi-sweet chocolate chips
Whipping cream
Strawberry for garnish
Method |
Preheat the oven to 170 degrees Celsius. Grease and line the bottom of a 8 x 4-inch loaf tin.
Melt the chocolate chips using double boiled method, till smooth. Set aside to cool down.
Measure plain flour and baking powder in a small bowl. Stir with a fork/spoon/whisk to mix them all together. Set aside.
Place the softened butter and sugar in a large mixing bowl. Beat, with an electric mixer, for 5 minutes, scraping the sides down occasionally. Add in the eggs, one at a time, beating well after each addition. Add in the melted chocolate, espresso and your choice of alcohol – for us we used rum. Then beat in the vanilla extract, followed by the cocoa powder.
Sift in the flour mixture in two batches and fold the flour in gently.
Transfer the batter into the loaf tin and bake for 60 to 90 minutes until a skewer inserted into the center of the loaf comes out clean. Let the cake cool completely in the tin.
Turn the cake out and peel off the parchment paper. For us, we wanted a smaller cake. Thus using a 5″ round cutter we make 4 of them. Turn the cake right side up.
Now whip you whipping cream to a high peak, garnish with a strawberry. Slice and serve!
Share with us your version! Take a photo of yours, send us an email, tag us on Instagram, tweet us, anything. We love to see yours! Enjoy your last bits of 2016.
This week A Paint Portrait I would love share one of the talented creative that I admired for a long time. It’s featuring a creative that have to be my inspiration – Megan, an amazingly creative, cat lover.
While people might misunderstand most of the creative being hard to deal with. Even though, I wouldn’t be denied the fact, I am. However, we are motivated by the desire to achieve, not by the desire to beat others. Thus lately I discovered that my desire to achieve tend to hurt others who worked with me.
Despite all, I won’t deny that I’m either walking in the light of creative altruism or in the darkness of destructive selfishness. Times I realized that I couldn’t distinguish what I want, as I’m still searching for it. Finding myself. I’m not Christ, I’m not perfect, so I stop trying to be perfect. I merely a human being that trying to explore for the dim of light. To find the right path and make thing right.
Wow, can you imagine! Today is the last Monday of 2016. Thus, we decided to take a day off from sharing our usual inspiring mood board but reflect our year together. We have been through 365 days, 52 weeks, 12 months this 1 year. We were grateful for our journey with people we met. The love we received from our family and friends! This is our 2016 on the records, even though there are 5 more days to go but we could predict that with more good food, good gathering, and a little work to clear off the thought of our worrisome. #alwaysworking
January
Started 2016 with a confusion of what are going to happen in a brand new year. However, the excitement just slowly filled with joy and adventures. Joe began the year with picking up a new skill. Learn film photography and we decided to take photos of each other.
March
After a busy start of the year, finally, we got to have a break during the early Spring. We took the spare time to get really to launch Le Plain Canvas! A space that we proud to share our thought.
.
May
While spring turned to summer pretty quickly, we are busy with the mini makeover at home with the help of our uncle. Had brand new walls, ceiling, sofa, cushions, fabrics, lot more of shopping and making on our own.
July
Fully embraced the heat (and mental health) with street parties, rooftop dinners, ice cream excursions, and planning jaunts for the upcoming month.
.
September
We began our trekking back in August, and it has slowly become monthly activities during the weekend. Back in September, we decided to challenge ourselves to one of the highest submit in Singapore – to Bukit Timah Hill.
November
November is a special month, it’s busy but I still decided to host a birthday’s retreats for both my Mom and Joe’s during their birthday. Last year we host on the birthday’s week of Joe’s 23rd birthday, therefore, this year we host on our mom’s birthday! It was a heart-warming family staycation at Fairmont hotel. We enjoyed the stay as it feels like home!
February
Wasn’t the best month of the month (due to ongoing workload). Yet during the holiday, we are able to spend some quality time, visiting families and friends that we haven’t been seeing for awhile. As well as, having a good trip down the park for a picnic (with our parents).
April
During our free time from work, we embrace ourselves with photography, cooking, exhibits to begin our Spring. One of our favorite exhibits would be the Future World exhibition, it just keeps us mesmerizing. The lights just inspired us from the work we are doing right now.
June
Works getting busier for both of us especially when Joe started her new job. We see each other lesser but we never will skip our breakfast together (if possible). .
August
It’s one of our favorite events of the year – The Color Run 2016. We registered as early as, upon the announcement has been made. It was fun just like last year but this time we enjoyed it better with the after run party! However, after the run, we knew that we need to spend more time to exercise.
October
Beginning of the Autumn, there were lots of We are glad that we didn’t miss this beautiful exhibition. The bright color of the structure just stops us from leaving that place. .
December
Had a crazy, crazy month at work wrapping up photo shoots and designs, and spent way too much time stressed and not enough embracing the holiday vibes (it has been really hot during this December!) BUT had some fun too: enjoyed gatherings, shopping for gifts for friends and family (really enjoyed the fun of packaging)!
Something we’re proud to mentioned, both of us pick up news skill and one of it would be taking images with playing the shutter speed. We are surprised and happy with the result.
Over the weekend, we had a few couple of gatherings for this festive holiday. We meet up friends, cooked some good food, popping bottles at home and we were thankful for the love ones by our side. Before the year end, we had a few thing to clear from our bucket list. However, mainly we just looking forward to the new year begin with a new goal. Thus, We wouldn’t be denied the fact that we’re scared but we believed that with the positive, happy vibes everything will be fine! But personally, 2017 looks really promising; work is aligned, plan and schedules were planned, have decided a few trips ahead, maybe one with the family and a host of other things we haven’t even thought of yet… Life is unpredictable and full of surprise, we just looking forward to the chances given and move on!
So cheers to us, our health, and our sense of adventure. Happy New Year!
P.S. Please continue to look forward on our website for more artwork, inspiration, and recipes. We are excited to step on our new journey for new adventure, bring more fun and inspiring work to you – our readers.
If you’re anything like us, gift wrapping traditionally happens at 9:00 pm the night before Christmas. When in a flurry of Santa wrapping paper purchased from the drugstore at the last minute. Sure, it does the job in a time crunch. However, isn’t there something special about a gift that was wrapped with care?
One of our favorite parts of Christma is the gift wrapping. We absolutely love finding new ways to make presents look pretty under the tree. Such as, a few years ago we cut branches of holly and slipped them under brown string – we have to admit it was soo prickly. As our poor family couldn’t fully appreciate the beauty of it! We still absolutely love the idea of wrapping presents with natural items. For example, using simple brown paper and string. Sometimes you could even use muslin and decorate with whatever is in the garden (with thorns). This makes the presents smell lovely too.
For us, we used a few evergreen sprigs from our backyard to add a dainty wreath as an addition items for the present. Start with using a piece of short wires serves as the ring and support for the wreath. Then with the evergreen branches wrapped around it ending with a ribbon.
We took the time to create wrapping that’s as beautiful as the gift inside — all with minimal effort, cost and DIY skills. Take a look at this clever DIY gift wrap ideas. Share with us your version! Take a photo of yours, send us an email, tag us on Instagram, tweet us, anything. We love to see yours! Happy Christmas!
It’s not really Christmas yet, but first I still would like to wish everyone a Merry Christmas! So after Christmas, New Year is waiting for us right at the corner. This year has been a great year for me, however, I know they can be better. I try out different hobbies and I made lots of new friends. This year been great when I step out of my comfort zone. Such as when I started a conversation with people I first met and also when I tried to travel to a new place alone.
Let’s bring back the topic, what will be doing on Christmas Day? For me, I and my sister will be cooking a meal for our family. It has been awhile since we sat down together and have a proper dinner. It is the time we will have a good gathering and sharing session. How about you? If you are still not sure on what to cook for that day, it is still not too late to start the preparation now.
Below are some of the recommendation for you, these recipes are delicious yet they won’t take up much of your time. I am sure that your family will like it.
The sun finally feels like it is beginning to come out of hibernation, indulging in a few more precious moments with me each day. The cloudy English skies and brilliant fogs, while a novelty at first, grew to become oppressive. We soon felt as withered as the waning plant we kept in my windowsill; the plant turning a shade of brown as it slowly tossed its leaves to the floor. Each day the sun stayed hidden behind the clouds, my energy drained ever so slightly from our limbs, taking a small part of my spirit with it.
The sun, we have discovered, is the cure to the simplest case of winter blues.
With a feeling of spring in the air, we were taken back briefly to the flavors of last summer and a resplendent glass of my summer drink of choice — Orange and Lemon Iced Tea. Even though it is too soon to dream of enjoying a glass while basking in the hot summer sun, we could not resist but bring the flavors together in a new form.
This soft biscuit is a clean slate in terms of flavor. The buttery, sandy texture of shortbread, while lovely on its own, lends itself well to simple mix-ins. The zest of a couple lemons and the subtle scent of lavender brought a feeling of spring into my kitchen, the aroma hanging in the air long after the cookies emerged from the oven.
These Lavender Lemon Biscuits brings a bright and also refreshing flavor to a winter’s afternoon. The classic sandy texture of soft biscuits meets lemon zest and lavender buds. The lemon is the predominant flavor while the lavender imparts a subtle tone to the overall profile. To add extra sweetness, the cookies are rolled with lemon-scented sugar before heading into the oven. These shortbread cookies are best accompanied with a warm beverage and visions of spring.
Notes for the sister: Please be sure to use culinary lavender and not lavender labeled for another purpose, which may be sprayed with pesticides or coated in inedible solutions. Edible lavender can readily be found in most health food stores.
Ingredients|
1/2 cup butter, room temperature
Zest of 2 lemons, divided
2 tbsp of lavender buds
1 teaspoon vanilla extract
Pinch of salt
1 cup (125 grams) all-purpose flour
1/3 cup granulated sugar
2 tsp of baking powder
1 egg yolk
Method |
Preheat oven to 180 degrees C. In large mixing bowl, mix the lavender and lemon zest in the granulated sugar. Leave it for 20 minutes for it to infuse.
Start by mixing the flour, baking powder, and salt evenly in a food processor. Then add in the soft butter, beat the mixture it until looks like a coarse sand before adding in the sugar mix. Lastly, add in egg yolk and vanilla extract, mix it until the dough comes together. Wrap using a clear wrap and leave it in the fridge for at least 2 hours.
When it is done, on a lightly floured surface roll out shortbread until 1/4-inch thick. Cut out shapes and transfer to a baking sheet. Bake for 8-10 minutes.
Share with us your version! Take a photo of yours, send us an email, tag us on Instagram, tweet us, anything. We love to see yours! Happy Christmas!
Like what we have shared, we love brussels sprout. We also know it’s a little late for brussels sprouts season. Moreover, most of you are probably too focused on asparagus right now to think about wintry vegetables. Despite that, we’re happy to eat Brussels any time of year!
You would also enjoy a meal like this any time of year – grilled salmon, roasted vegetables, and cashew all tossed on a plate. There’s nothing revolutionary about this dish. Some more, you’ve likely seen or made a version of it once or several times before. However do trust us it’s a great recipe to have in your collection because it’s simple, healthful, flavorful, and satisfying!
Recently we start to fall in love in tossing roasted brussels sprouts with cashew and eating them just like that. We don’t often like coordinating main dishes with side dishes because it involves too much work but everything about this dish flows easily together, doesn’t take long or dirty too many dishes, and most importantly tastes so good you’ll want to add it into your meal rotation no matter the time of year!
Today we’re talking about this healthy and delicious dinner of Maple Chilli Roasted Salmon with Cashew, Brussels Sprouts. Disclaimer: there might have been quite a few more sprouts before I started taking pictures but I couldn’t stop eating them! Ooops.
Our favorite thing about this dish is that it requires the smallest amount of effort. The hardest part is having all the Brussels Sprouts in half and also making sure we don’t burn the cashew. Let us get started!
Ingredients |
500g brussels sprouts, trimmed and halved
2tablespoons olive oil
kosher salt and black pepper
2 tablespoons pure maple syrup
2 tablespoons whole-grain mustard
1 1/2pounds skinless salmon fillet
80g of cashew
2 tsp of dried chili
1 red chili
Methods |
Preheat your oven to 200 degrees. Meanwhile, blend the maple syrup, dried chili, olive oil, whole-grain mustard, kosher salt and black pepper together till smooth in a food processor. Prepare your salmon, removing all the bones. Marinate it will the sauce for at least 20 minutes or even overnight. Leave it on the foil and bake it for 40 minutes until it caramelized.
While baking the salmon you can start to cook your vegetables. Start by roasting your cashew nuts in the pan on a low heat till golden brown. Leave it aside to cool. Cook the brussels sprouts with garlic, seasoning it with some lemon juice and salt and pepper to taste. Chop the cashew into smaller pieces, mix it with the brussels sprouts.
When the salmon are done you are ready to serve. Garnish it with some coriander and sliced chili.
Share with us your making! Take a photo of yours, send us an email, tag us on Instagram, tweet us, anything. We love to see yours!
Add a little name card to your Christmas table for a pretty way. To let your guests know where they’re sitting.
We thought we could use cinnamon sticks as the base since they are “holiday neutral” and could easily add a little something to both Thanksgiving and Christmas! The cinnamon will add a winter element that looks pretty and smells delicious to the Christmas table. This super simple cinnamon and Christmas leaf place card will take next to no time to create and will turn your table into a winter wonderland.
Different napkin detail can bring out different styles on the table with the same decoration. However, both will tell us how much would that fabulous scent have you anticipating your dinner? Again, achievable after a simple shopping trip – perfect!
Materials (To make one) |
2 cinnamon sticks
Paper
Hot glue gun
Gold & Black markers
Christmas Tree (Options)
We started with a bag of cinnamon sticks we picked up and a Christmas tree that was laying around the house. We took two cinnamon stick holding them side by side. Then we put a dab of hot glue on both ends gluing both sticks together.
Notice how there’s a little gap in between the cinnamon sticks? That’s just how you want it! We move on making the name card. Start by cutting a small rectangle out, using a ruler as a guild we draw a border using gold markers. After that, you can start your calligraphy work now.
Once the name cards were done, we slipped them in between the 2 cinnamon sticks that we glued together. The gap in between the sticks allows for the paper to slide right in and fit snug so it stays put! Add a little embellishment to the place cards, which is totally optional! Then we just snipped pieces from the Christmas tree that we had laying around and stuck the piece in between the 2 cinnamon sticks. It still looks cute without an embellishment, or you can add something completely different for yours – totally up to you!
This DIY will be the best idea for those last minutes-er. These names tags have us feeling festive and ready to celebrate the holidays! How about you??Share with us your making! Take a photo of yours, send us an email, tag us on Instagram, tweet us, anything. We love to see yours!
I have so many things to say about brussels sprouts and I have no idea where to begin. I know where to end and that’s the part we give you a really wonderful and easy recipe for the brussels sprouts this holiday festival. To be true, at first I’m worried to handle these little guys but sooner or later I just love them. And, here is the list of reasons why I love Brussels sprouts so much:
I first ate a brussels sprouts dish was back in a Christmas gathering 3 years ago. It flavour just surprising, I never ate such thing before. Alright, I will not lie to you, I had attached by their look since they like look miniature cabbages. I love beautiful things.
When I first get to know, they did got me into lots of trouble! Since they are less juicy that cabbages, it was quite difficult to cook them, however, if you cook them well they do have lots of potential in all ways.
Don’t you agree that brussels sprouts have the most adorable look ever? Despite, they are small in size yet they could bring out so many flavors in various ways.
I like them because, brussels sprouts can make into different dishes – boiling, steaming, stir-frying, grilling, or roasting. And my favourite ways of making it are both stir-frying and roasting.
It is interesting to study their origins as well, brussels sprouts from New Zealand are smaller in sizes and lighter in their greens while the Netherlands ones are bigger in sizes and have darker leaves.
I love brussels sprouts so much. I could eat it every day.
That’s is why this Christmas how could we left out Brussels Sprouts with Oranges and Bacon!
Brussels Sprouts with Oranges and Bacon – it has been on of my favourite warm salad these days. I came to enjoy the sweetness from the orange and the fragrant from the bacon. With these two combinations, the brussels sprouts just taste fantastic. They have it own explode flavour, that you can’t stop having it.
Even it is a salad dishes but, we highly suggested to serve it while piping hot, as they will taste better while it is hot!
Ingredients |
1/3 cup extra-virgin olive oil, plus more for brushing
2 small oranges, cut in half, then into 1⁄2-inch slices
Kosher salt
3 to 4 strips thick-cut bacon, cut into 1⁄4-inch pieces (1 cup)
1 1/2 pounds brussels sprouts, trimmed and halved
Method |
Preheat oven to 220 degrees. Brush a rimmed baking sheet generously with oil. Add oranges, in a single layer, turning to coat. Season with salt and drizzle with 1 tablespoon oil; roast 15 minutes. Add bacon and roast until crisp, about 12 minutes.
Toss brussels sprouts with remaining 4 tablespoons oil; season with salt. Add to baking sheet; toss to combine. Roast, tossing once until sprouts are tender and browning at edges and oranges are deeply caramelised, 25 to 30 minutes more.
This week #APaintPortrait I would like to share this lovely friend from Japan, Tokyo, Erika-San. She is great from I knew for years, a sweet talented lady of cooking. It’s always pleasant to see her Instagram for amazing inspiration at her home and cook.
Maintaining a friendship is also as important as a relationship. How do you survive when the person who knows you best lives thousands of miles away? For us, we try to keep up to date with each other daily life and shares mail – sending interesting stuff we found in our country. All these small actions brought us together, even we are living in different country.
“There is magic in long-distance friendships. They let you relate to other human beings in a way that goes beyond being physically together and is often more profound.” – Diana Cortes
Much like the Cucumber Ginger Mocktail we shared last week, this cocktail is — first and foremost — refreshing as heck. It’s seasonal and festive, but it’ll save your stomach from all the heavy eggnog and Irish creme. That might be flowing a little too freely at your holiday celebrations during the coming week.
This Pomegranate Thyme Fizz Cocktail is a perfect drink for parties (think: big beautiful punch bowl that maybe I could borrow from you some time). Moreover, it tastes just as nice without the liquor if you’re looking for a solid non-alcoholic option for teetotalers. You could also substitute rosemary or mint for the thyme for a totally different flavour profile.
Though it’s a simple cocktail to create at home, pomegranates aren’t the most cooperative thing in the fruit bowl. So in the spirit of holiday generosity, first we’d like to share the ultimate method to harvesting those delicious seeds in under 60 seconds. Keep in mind that we had two dozen pomegranates to seed at the time and didn’t figure this trick out until about an hour in… do not make the same mistakes we did.
To remove pomegranate seeds:
Start by lightly circle the pomegranate with a knife to create two halves (don’t cut all the way through). After that by using your fingers, pry the pomegranate open. Take one of the halves and gently pull it in various directions to stretch the inside parts out a little bit and break some of the bonds between the seeds and the rind. Flip the pomegranate seed side down in your hand and then beat the outside of the pomegranate with a wooden spoon over a bowl, turning as needed. Lastly, pick out the few pieces of pulp that might end up in the bowl. That’s it. Magic!
Using a muddler (or in our case, a metal spoon and strainer), muddle the pomegranate seeds and thyme together. Strain the juice into a glass. Add gin or vodka and ice, top with ginger ale and garnish with fresh thyme and pomegranate seeds as “sprigs of holly.”
This makes for the perfect house cocktail for all of your holiday soirées, but you don’t need to have a gathering to enjoy this pretty drink! Share with us your making! Take a photo of yours, send us an email, tag us on Instagram, tweet us, anything. We love to see yours!
It’s time for some Christmas Vibes and it’s clear from a quick look around the inter-web. In the inter-web, you can see that we are creeping closer to the holidays. Next week will be the last week all about Christmas nights on the blog. Be sure to stop by!
Dress up a simple place setting, it sounds like a very simple task but it is the most tricky thing to do.
You can dress your table with a stunning centrepiece. Such as bringing the outdoors in with a woodsy, nature-inspired centrepiece. Moreover, you can treat your guests to the luxury of using different plates and bowls for each course. And also serve soup in simple wooden bowls, follow with a salad on a delicate ironstone plate and finish with dinner on a square wooden plate. A crystal goblet adds a touch of elegance, but the wheat pattern ties into the natural theme. The silver, white and gold colour palette provides a pleasing colour contrast.
For those who love subtle seasonal touches, like sprigs of holly tucked into silver napkin rings, a mini poinsettia centrepiece and garland wreaths along the sideboard, give this simple table setting quiet sophistication.
Happy Monday everyone!!
xoxo, Joe.
Credit | All shots used on the Christmas mood board via our Pinterest boards.
Time files, December just jump quickly before we realised it, leaving only 7 days more to the Christmas. For those, who are worrying there wasn’t enough time to prepare the feast on the Christmas’s day. Do not have to worry about it. Sides are the most simple yet tricky dish to choose from. As we need it to accommodate the main that we are preparing.
Therefore this time we are sharing with you an all-time favourite dishes from our family – Creamy Scalloped Potatoes. Most importantly it is using the most basic ingredients you have in the kitchen. This Creamy Scalloped Potato is the most creamy, delicious scalloped potatoes are all an all time dinner favourite. The dish can be largely assembled ahead: Leave off the last portion of cheese, cover the dish with plastic wrap (pressing it directly onto the surface to prevent a skin from forming), and refrigerate it for up to one day. Remove it 30 minutes before baking, sprinkle with the remaining cheese, and bake as instructed.
Tell us, who doesn’t love potato dishes. Creamy Scalloped Potatoes is all time favourite, despite their look. Since they weren’t the glamorous but they taste just amazingly gratifying. We’re always satisfied to make this recipe at home, as everybody just washes the oven dish, with their spoon. Especially my dad who is a traditional Asian-man, he only enjoyed rice at his meal. However, while we prepare this, he simply enjoyed it so much that he will clear the left over.
Ingredients | (serving 10)
1 clove garlic, lightly smashed and peeled
Unsalted butter, room temperature, for pan
8 medium Yukon Gold potatoes
2 cups heavy cream
2 cups whole milk
1 tablespoon lightly packed fresh thyme leaves
Coarse salt and freshly ground pepper
1/8 teaspoon freshly grated nutmeg
2 1/4 cups Gruyere, coarsely grated
Method |
Preheat oven to 375 degrees. Rub the bottom and sides of a 3-quart baking dish with garlic; reserve garlic. Brush pan generously with butter. Peel potatoes and slice the potatoes into thick slices.
Transfer potatoes and garlic to a large pot with cream, milk, thyme, 1 tablespoon salt, 1/2 teaspoon pepper, and nutmeg. Bring to a boil over high. Reduce heat to medium and simmer 1 minute. Let cool slightly, about 10 minutes.
Spoon one-third of potato mixture into prepared dish. Sprinkle with one-third of the cheese. Repeat layering twice more. Loosely cover the dish with parchment-lined foil.
Bake until potatoes is tender when pierced with the tip of a knife, 35 to 40 minutes. Remove foil; turn oven to broil. Broil until potatoes are bubbly and browned in places, 3 to 5 minutes. Let cool 15 minutes before serving.
Tips from the sisters |
From our past experience, while slicing the potatoes, keep the slices about 1/8 of an inch thick so that they get cooked thoroughly. You could add in more cheese for a stronger flavor.
Share with us your making! Take a photo of yours, send us an email, tag us on Instagram, tweet us, anything. We love to see yours!
Counting down to 8 more days to Christmas, so have you plan what you are going to do yet? For our family, we are preparing to have a Christmas feast. Just a little feast, chatting and movies to fill our day up.
The definition of joy is a feeling of great pleasure and happiness. What are the things that make you feel pleasure and happy? For me it can be very simple, seating alone at Starbucks (at the window seat), have a cup of coffee and do some painting. This certainly made my day a good one.
However, to some, it is very hard to find joy, why? Is it because there is nothing that will make them happy or they simply doesn’t satisfy?
“Without pain, how could we know joy?’ This is an old argument in the field of thinking about suffering and its stupidity and lack of sophistication could be plumbed for centuries but suffice it to say that the existence of broccoli does not, in any way, affect the taste of chocolate.” – John Green
When it come to Christmas pudding is definitely a “Love it or hate it” affair. However, we decided to challenge ourselves to create a Christmas pudding recipe with a twist, something that even Christmas pudding-haters will fall in love with. Both of us come to an agreement that our Christmas pudding was to “add chocolate!!!” as it makes it even more festive. Then, we paired it with orange to create our very own mini Chocolate Orange Christmas Pudding. How could anyone resist this combination?
For those who doesn’t know why Christmas pudding is one of the favorite in the UK. As it is a British tradition for making the Christmas pudding. This tradition dates back to Victorian times when everyone in the household gives the Christmas pudding mixture a stir and makes a wish! Although we are not British nor it is our tradition to do so. We find it fun to having it! Despite my pudding is quite non-traditional, it’s been very satisfying to create my own Christmas pudding from scratch.
Whilst stirring the fruit, spices, and liquor together, it’s very hard not to feel festive and uplifted. We even decided to go with mini Chocolate Orange Christmas Pudding instead. For those of our family and friends whom never try previously, it is the best mass for a gift this holiday season.
We know that many of you, tradition be damned, are resistant to Christmas pudding, and we do understand why however you must try this. Until you do it yourself, you probably think all that dried fruit is, well, dry, and the pudding heavy. Yet this is far from the case: the fruit is moist and sticky, and the pudding mystifyingly, meltingly light. I shall stop talking and let’s begin!
Ingredients |
60 g plain flour
3 tbsp arrowroot powder
2 tsp baking powder
¼ tsp xantham gum
120 g dark brown muscovado sugar
3 tbsp cocoa powder
150g fresh white breadcrumbs
½ tsp ground mixed spice
½ tsp ground cinnamon
Zest and juice of 2 oranges (approx 100ml orange juice)
60ml vegetable oil
80ml water
4 tbsp rum
100 g dark chocolate chips
350 g brandy soaked mixed dried fruit & citrus peel
100g pitted dates chopped into small pieces
Method |
To prepare the pudding mixture
If you can’t get hold of ready-soaked mixed fruit, prepare it the previous day by adding the mixed fruit and peel to a bowl with approx 3 tbsp brandy. Leave overnight. Prepare a 1-litre pudding basin by greasing it with vegetable oil and placing a circle of greaseproof paper at the bottom.
Mix the flour, arrowroot powder, baking powder, xantham gum, cocoa powder, sugar, breadcrumbs, and spices together in a bowl. Stir in the orange juice and zest, vegetable oil, water and orange flavoring. Fold in the dried fruits and the chocolate. Transfer the mixture to the pudding basin.
To steam the pudding
Tear off a large square of the greaseproof paper and tin foil, placing the greaseproof paper on the bottom. Create a pleat by making a 1-inch thick fold in the center of both layers. Place on top of the pudding tin and scrunch the foil around the sides to secure. Tie securely with a piece of string.
Fold the excess paper and foil to help make it water-tight. Create a handle by tying another piece of string to one side of the tin (where you made the knot from the previous string) and tying it on the opposite side so you can easily lift the pudding out of the pot.
Place a trivet or upturned saucer at the bottom of the pot (I used a small heat-proof container lid) and place the pudding on top. Fill the pot half way up with hot water and bring to a simmer. Cover the pot with a lid and leave to steam for 3½ hours.
After 3½ hours, lift the pudding out of the pot and leave to cool for a few minutes, until the pudding starts to shrink away from the sides of the tin. Carefully, using a spatula knife, loosen the pudding from the sides and turn over onto a plate.
Tips from the sisters |
For those have never made a Christmas pudding, please don’t be put off by the eight hours’ steaming – it isn’t any work, it just sits happily on its own getting the long slow cooking which is what gives it such wonderful flavor and character. If you can’t get rum, use any sweet liquor instead.
This pudding can be stored in the fridge, for up to 6 weeks, however, do wrap it tightly for the freshness. To serve, you can eat it as it is at room temperature, or re-steam it for 2 hours to serve warm. Add some melted chocolate sauce or a scoop of ice cream for an after feast dessert!
Share with us your making! Take a photo of yours, send us an email, tag us on Instagram, tweet us, anything. We love to see yours!
Who doesn’t love a little chew on a good walnut or almond at Christmas with a mug of hot choco? Or delving into a bowl of mixed unshelled walnuts and pistachio in the early evening. While cracking them with the old-school nutcracker and combining with a strong cinnamon flavor – hot apple cider.
While, for those who couldn’t decide what to get for your Christmas’s gift, why not make it your own. This year, instead of buying a whole load of expensive packets of roasted spiced nuts or honey-roasted ones, make your own!
We love this recipe – it is so much more satisfying to serve up nuts that you have roasted yourself, but it’s also super simple. You can even keep them in an airtight jar for a week, so make them ahead or give them to someone as a little gift. In fact, we have already roasted two rounds this time of the year and deliver to our family and friends for an early holiday’s goodies.
This is a new take on our much-loved recipe. A sweet and salty blend with the heat of cinnamon and the aromatics of butter and honey. Therefore, it is the perfect snack for any occasion: cocktail parties, pre-dinner or as a gift. Honey Roasted Nuts keeps popping up lately on garbanzo beans, veggies, and other dishes in our house and it sounded perfect for a bowlful of warm, toasty mixed nuts.
Ingredients | 400g 6 mini jars
1 tbsp butter
1/4 tsp vanilla extract
2 tbsp water
1/4 tsp salt
2 tbsp brown sugar, plus 1 tbsp extra
160g honey
1/4 tsp cinnamon
100g raw nuts (we used almond, cashews, walnuts and pistachio)
Method |
Preheat the oven to 180ºC. Place a medium pan over a medium heat, add the butter and honey and cook until the butter has melted.
If using bigger nuts, roughly chop some of them up into halves and quarters to make them more bite size. Place all the nuts onto two large roasting trays. Carefully divide the melted butter and honey mix between the two, then scatter over the paprika. Toss to coat all the nuts, then cook for 20-30 minutes, or until golden all over. Carefully shaking the tray every 10-15 minutes to make sure they cook evenly.
Share with us your making! Take a photo of yours, send us an email, tag us on Instagram, tweet us, anything. We love to see yours!
This week A Paint Portrait lets me share one of my favorite portraits that I’ve painted. It featuring a close friend of mine – Sophia, whom I could always rely on. Trust is the glue of life. It’s an essential ingredient in effective communication. It’s the foundational principle that holds all friendship. In a friendship, trust is something that is easy to find yet hard to maintain. However, Sophia is a friend that I could put my trust on. As she cares and listens to me like no one could. I won’t be meeting another one like her anymore.
When talking about trust, I came by a message quoted by Marla Gibbs. She once shared, “I truly believe that everything that we do and everyone that we meet is put in our path for a purpose. There are no accidents; we’re all teachers – if we’re willing to pay attention to the lessons we learn, trust our positive instincts and not be afraid to take risks or wait for some miracle to come knocking at our door.” It’s so meaning and inspiring. It let me know that we need to lead a life with helps from people and we will never could be alone.
Who doesn’t love to receive gifts! I (we) love receiving gifts especially those that wrapped nicely. Those beautiful packaging just so lovely what more I enjoying spending time thinking how to package and design the gift before giving to the recipient.
A simple touch of the package could make the gift look like a magic! It makes you would want to patiently unwrap it and looks forward to seeing what is in there. The joy of giving it works well on these food treats as well!
Have you tried one of our favorite festive baking – Hazelnut Madeleines that we shared last week? If you plan to bake some cookie or Madeleines as a gift for friends, you wonder have to pack them nicely. Here is one of our suggestion that you would like to go with!
When gift-wrap your food is always good to have a layer of plastic sheet / baking paper allowing it to help absorbing excess oil from the food. Preventing it from staining the brown paper.
Both of us love to collect washi tapes, especially those from MT Washi Tapes – however, we do not have a main store in Singapore, therefore, we would search around for special design. The ones we using above was found at Crate and Barre their Christmas’s baskets. Many different stationary or home stores carries MT Washi Tapes but it requires you to spend the time to search for these little helpers.
Supplies |
Wax papers / Baking papers
Brown Papers /
MT Washi Tapes
Pen Knife
Scissor
Strings
Method |
Start by cutting the wax and brown paper into a long rectangular shape, with 3 equal ratios of square.
With the brown paper as the outer layer and the wax paper as the inner. Fold 2 of the square, tape the side of it using clear tape to secure it. Now cut the 3rd square into half to create a lid.
You now can fill the “goodies bag” with all your snacks and gift. After you are done, close the lid and secure it with some cute strings. Seal it up with the washi tape at the intersection point. And you are all done.
Share with us your making! Take a photo of yours, send us an email, tag us on Instagram, tweet us, anything. We love to see yours!
For those who love pumpkin recipes, a very valuable thing to master this step of making homemade pumpkin puree. As soon as I see those little sugar pumpkins (also called pie pumpkins) show up in the market, it’s time to made some homemade pumpkin puree.
Fresh pumpkin isn’t to be feared, even if you have canned pumpkin. There are a few different ways to prepare from-scratch pumpkin puree at home. It’s great to make this recipe ahead and freeze so that you’ll have plenty on hand to add to seasonal sides or your go-to pumpkin pie.
Listing off all the things I can now make with my fresh batch of homemade pumpkin puree. There are so many things you can make…from savoury dishes to delicious desserts—the possibilities are endless. Typically, you should be able to find sugar pumpkins beginning in September. Where I live in Singapore, I’m only able to find them during the fall but perhaps they may be a bit easier for you to find at other times of the year where you live.
Before I forget, as in most cases, homemade pumpkin puree tastes so much better and fresher than the canned stuff. When you see how easy it is to do, you’ll never look back. You can use the pumpkin puree in any recipe that calls for canned puree. As a general rule, 3 pounds of fresh pumpkin will yield about 3 cups of mashed and cooked pumpkin.
Some of the tips when making pumpkin puree:
Use only sugar/pie pumpkins to make puree for recipes and not use carving pumpkins (the larger kind used to carve a jack o’ lanterns). Although, I haven’t tried it myself, but I’ve read in multiple articles that carving pumpkins produce bland, stringy puree. It doesn’t taste good.
From our photographs, the colour of the puree will be paler than the canned ones which tend to be darker in tone. This is because the pumpkins used for cans is a different sugar pumpkin variety.
The puree will be a little runnier than the canned ones which are more “packed,” this will not affect your recipes but if you prefer yours to be less runny, line a colander with a cheesecloth and put your finished puree in. Place the colander over a large bowl and let it sit for a while so the extra moisture drains out.
For this recipes, you don’t require many ingredients as the only thing you need is the just pumpkin! Starts by preheating oven to 200C.
Cut the pumpkin in half. Using a metal spoon and/or your hands, scoop out the seeds and strings. (Do not throw away your pumpkin seeds, as you could check on our Roasted Pumpkin Seed recipes) Place pumpkins skin-side up on a baking sheet. Roast for 50-60 minutes or until flesh is soft and fragrant.
After removing from the oven, allow the pumpkins to cool until they can be safely handled.
Use a metal spoon to scoop out the flesh. Puree the flesh of one pumpkin at a time in a high-speed blender. Puree’ on low speed, then increase to high for about 20-30 seconds. Periodically, scrape the container down as the pumpkin really sticks to the side. Blend again for 30-40 seconds, stopping to scrape when needed, blend until smooth. Pumpkin can be pureed using a food processor as well.
I like to store my puree in freezer bags at 400g each. This is the same amount one would find in a can of pumpkin puree’. I’ve frozen my puree up to 4 months and have had good results.
An alternative freezing method that I’ve used is to freeze the puree’ in ice cube trays, pop the puree’ out when frozen and place in freezer bags. This is convenient when making smoothies or you need a smaller quantity of pumpkin.
For two sugar pie pumpkins, I yielded three freezer bags of 400g each.
Don’t you find that it is simple in making? Why not start making some delicious dishes with this easy making pumpkin puree. Following are the recipes you might want to try out with.
While I was searching inspiration for baking designs I found all these adorable ideas. They are so beautiful and lovely, don’t you think so?
When coming to this festival holiday the most exciting thing that happening since I was a child was to have all this delicious sweets and delights delivered out from the bakery. Whenever I visit a bakery, my face will stick on their cakes display panel. All cakes and pastry they look extremely beautiful like the jewel and crystal in the fancy glass case. I was a greedy child that wish to have them all but in the end my mum only allow each of us to get one!
Even though I love cakes and pastry from the bakery, I must not forget to say my mum make amazing dessert and cakes too. Every holiday, both Joe and I will set the dining table waiting patiently for her delicious making. When we get older we love to make ourselves, try different methods, making different dessert every year for the most important day – Christmas.
I must say every holiday there were lots of baking in our kitchen, therefore investing a good oven is essential for us. Finally the end of last year we got one amazing built-in oven. It’s like a dream come true for us! And, that is one thing that I never would regret it even though it is costly at that point of time.
Why not start some baking during this holiday season, never have an empty table without food. We are sharing many more baking ideas during this holiday season, follow our blog and stay tuned more thought!
Happy Monday!
xoxo, Angela.
Credit | All shots used on the Christmas mood board via our Pinterest boards.
Making a good mocktail, it can be tasted as good as a glass of cocktail. Even though it will be different but the flavor will be astonishing still. I love to experience a variation of mocktails since I do not like to drink booze.
While, I’m pleased that Angela fancied them whenever I made it. Ever since I begin to experience a different kind of recipes at home. And, she just wants more from me.
As we like both cucumber and ginger as they are inexpensive and easily get from the market. They have lots of advantages and here are some of the reason why we like to use them in our drink
Cucumber will keep you hydrated and allow you to flushes out toxins. If you are too busy to drink water or find water tasteless, you might want to try to have cucumber instead.
Cucumber has a fresh taste.
Ginger helping in indigestion and nausea. Therefore, it is excellent after the meal.
We would love to drink Cucumber Ginger Mocktail.
Cucumber Ginger Mocktail is fairly simple to make it as you can prepare Cucumber Ginger syrup ahead for days. When coming to a special day, you can have it served with tonic, it will a beautiful glass of bubbly mocktail for the guest.
For those who doesn’t want to serve it with carbonated drinks, you can mix it will chill plain water. We promised that this tastes refreshing for a hot tropical island (Singapore) like us.
Share with us your making and take a photo of yours, send us an email, tag us on Instagram, tweet us, anything. We love to see yours!
It has been a tough week for December. There is lot’s of tasks and errands for me to complete. Sometimes I have been wondering is it because I really have a lot to do or am I bad at time management. However, how could I have a balanced life? How could I stop myself from procrastinating? How could I have a good sleep? As I almost don’t have any “ME” time for myself.
So recently I have tried to sleep and wake early to complete my stuff. Lavender really helps me a lot, it helps to calm myself down. Sometimes you really need to care less. As one do make a difference but it doesn’t do much.
Speaking about gatherings – before the year end there are Thanksgiving, Christmas, many Lunch or Dinner Party, as hostess, it necessitates preparing a spread for our guest to make them feel like a home. For me, I always thought that a starter is the most essential for a gathering. Upon entering a house, you will be welcome with food and drink, and what is better than that to kick start any conversation.
I enjoyed food a lot, as I think that is one of the things that is the most important to me in my life. They give me happiness that you can’t get anywhere while nothing could give me. Therefore, when coming to food, both of us will give in plenty of thought and effort in it.
We enjoyed creation – in the design and putting our imagination in every pieces or idea. That why we emphasis on hospitality for guests, despite, we do not have luxury time for it, always. Here, we like to suggestions for those occupied hosts or hostess, many considered that it always difficult to prepare all by themselves. However, the ideas and procedures we are sharing it just take you 15 minutes.
Even though snacking is the best entertainment but we need to take note of the state of health as well. Therefore, you could consider to made these Sesame-Chia Seeds Crackers along with the addictive dips for the guest upon arriving – it would be a gracious hospitality.
Ingredients |
For the Sesame-Chia Seeds Crackers:
2 cups, whole wheat flour
1 teaspoon, salt
½ tablespoon dried parsley
1 teaspoon, dried oregano
1 teaspoon, red chilli flakes
230ml, warm water
1 tablespoon, olive oil
Garnishing for Sesame-Chia Seeds Crackers: (Mix the ingredients together)
2 teaspoon, white sesame seeds
1 teaspoon, nigella seeds
2 teaspoon, black sesame seeds
Method |
In a bowl, add flour, salt, parsley, oregano, chilli flakes, olive oil and mix. Add 1 cup of warm water and knead into a smooth soft dough. Cover with a damp cloth and let the dough rest for 20 mins.
Pre-heat the oven at 180 degrees centigrade. Divide the dough into 6 to 7 equal sized smooth balls. Take one ball, dust it with flour and roll it out into a thin disc of either oval or rectangular shape. Roll it out as thin as possible. Carefully spread the rolled out disk on a baking tray or cookie tray.
Brush the top with little water and sprinkle the seed mix on the top. Bake for 10 to 12 mins or until light brown and crisp. Take it out and cool completely.
Serve them with Hummus or with any other dip of your choice. For us, we serve it with our Chive and Blue Cheese and Almond Pesto dips.
For the Chive and Blue Cheese Dips:
250g of Cream Cheese
2 tbsp of Blue Cheese
a handful of Chive, chopped
Firstly we start by preparing chive and blue cheese dips as it is a very simple one. As you just have to mix the above ingredients in a bowl and you are all done.
For the Almond Pesto Dips:
2 cups of green vegetables (we used basil leaves and baby spinach)
The preparation of this almond pesto dips maybe a bit complicated than the previous one. However, if have the hang of it, it is as simple as a piece of cake. For this pesto, you have to slightly roast the almond in the oven or a frying pan till golden brown. Next, put the roasted almond and rest of the ingredient in the blend. Mix it till smooth, now you are ready to go off for your party.
Share with us your making! Take a photo of yours, send us an email, tag us on Instagram, tweet us, anything. We love to see yours!
Madeleine is a traditional small cake from Commercy and Liverdun in northeastern France. They are small sponge cakes with a shell-like shape, traditionally flavored with just vanilla, but some also include lemon zest, which is also one of our the favorites.
Madeleines!! We are ridiculous, disproportionately excited by these little cakes. Sunday was a pretty amazing day; my house was full of endless conversation and baked goods. We baked, photographed, shared stories, and surprisingly ate! I’ll post all the recipes eventually, but for today, with autumn finally here and a cup of tea in hand, these hazelnut madeleines are just perfect.
So we wanted to start my Christmas inspired baking with simple, sweet, light and airy madeleines and they are unbelievable yum! This one has hazelnut infused with the sweetness of nuts giving it a wonderful twist and the sweet and spicy aroma of hazelnut, rum and vanilla are just delightful! The basic madeleine is just the right kind of sweet with a cup of hot coffee right? This one infuses nut and alcohol to give a delicious twist to the French Madeleine.
Personally, we think they are miniature versions of cupcakes which look like cookies! What do you say? Not really sure why they are classified as cookies! Yes, we know some cookies are soft and gooey as opposite to crunchy and chewy but Madeleines are light and airy, soft and spongy like cake! Yup we are going to say they are like butterfly kisses sent from a cupcake Ok so here is how we made them!
Ingredients |
15g melted butter, for greasing the tray
15g flour, for flouring the tray
155g caster sugar
155g butter
80g flour, sifted
80g hazelnut meal
3 jumbo eggs (approx 200g)
1tbsp Chocolate alcohol
Method |
Melt the butter over a gentle heat, keep heating until the butter turns golden brown. Remove from the heat and pour into a bowl. This stops the cooking and prevents the butter burning, leave to cool a little.
Put the eggs in the bowl of a stand mixer if you have one, or use a handheld electric mixer, add the sugar and whip until thick and pale. Add the flour and ground hazelnuts and gently fold in. Add the Chocolate alcohol and melted butter, mix until combined.
Cover the surface with plastic wrap and refrigerate for somewhere between 2 hours and overnight. When you’re ready to bake, preheat the oven to 180ºC.
Generously butter your madeleine tray, dust with flour then tap the tray on your bench to remove the excess using a piping bag, pipe the batter into the trays, filling each shell 3/4 full, if you don’t have a piping bag just use a couple of spoons.
Bake in the center of your oven for 12-15 mins, the madeleines should be brown and crisp around the edges, and spring back when lightly pressed in the center. Tip the little cakes onto a cooling rack, allow to cool for five minutes or so dip the base of each cake in the rum chocolate then press into the chopped nuts, consume as soon as possible!
How to make the rum chocolate?
120 ml thickened cream
1 tablespoon chocolate alcohol
Whisk the thickened cream into soft peak for about 20 minutes. Add in the chocolate alcohol and whisk it for another 10 minutes. To store it, cover with the lid and store in the fridge, it will keep for 2 weeks.
Some tips from us (the sister) before we end this post;
Use room-temperature eggs as they expand in volume when beaten. If you forget to take them out of the fridge, submerge chilled eggs in warm water for several minutes.
Rest the batter in the refrigerator for at least one hour. 3 hours is ideal. I usually just refrigerate the batter overnight. It helps to create the bump to form.
Don’t be shy on butter when coating the mold. It helps you take Madeleines out of the pan after baking as well as achieving nice golden color.
Use a 1 Tbsp. measuring spoon to transfer the batter. It’s the easiest way to measure the exact amount of each mold and not overfill.
Share with us your making! Take a photo of yours, send us an email, tag us on Instagram, tweet us, anything. We love to see yours!
Now, pumpkin seeds are the anomaly here because in my mind they taste nothing like pumpkins. Even though they; well make pumpkins. Or come from them? Chicken and the egg scenario here, people. Anyways, getting off track. Besides being delicious when roasted, they also bring back sweet memories of roasting them with my mom after carving pumpkins with my sister. This Sunday was a rainy, rainy day- and roasting up some seeds while staying cozy inside just seemed like the right thing to do.
Thus, I present you with the BEST roasted pumpkin seeds ever!!
Some tips for you before we dig into the flavor recipes, we want to give you a quick tutorial for how to roast pumpkin seeds. It’s a breeze.
First up, obviously, you need some raw pumpkin seeds. You can fish these out from the pumpkin you save them from the pie pumpkins you roasted to make a puree.
The next step is cleaning the excess pumpkin from the actual seeds. I recommend picking out any big chunks you can and composting them or feeding them to your roving flock of chickens (which is kinda the same thing as composting).
Once you have the seeds mostly separated, fill up a big bowl of warm water and dunk in the seeds. Use your hand and swirl them around a bit to loosen any pumpkin guts remaining. Then, let the seeds rest for about five minutes or so. In that five minutes, magic happens! The seeds all float, and the remaining pumpkin guts sink.
Remember to pat it dry with a towel before you put your olive oil and seasoning.
Ingridents|
1 cup raw pumpkin seeds
1 1/2 teaspoons olive oil
1/2 teaspoon garlic powder
1/2 teaspoon cayenne
1/4 teaspoon sea salt
1/4 teaspoon paprika
Method |
Wash your pumpkin seeds off to get rid of as much pumpkin goop as possible. You can leave some in like me, you get to taste some pumpkin in it.
Toss your seeds with your olive oil and spices and spread out evenly on a parchment lined baking sheet.
Bake at 300 degrees for 40 minutes, taking them out and stirring/flipping halfway through.
Let cool for a minute and enjoy!
Well, that was fun! I loved making all these roasted pumpkin seeds (and eating them, too!). I hope you like them, too. And I hope you’ll experiment and make up your own creations! You really can’t go wrong here, so don’t be afraid to have some fun. Share with us your making! Take a photo of yours, send us an email, tag us on Instagram, tweet us, anything. We love to see yours! Happy fall, friends!
This week A Paint Portrait lets me to share why I really love this amazing individual, Mey. Mey has a unique taste with her perception and through her arts, you will find it so quiet and peacefulness.
While some people have a mistaken idea that all thoughts disappear through meditation and we enter a state of blankness. There certainly are times of great tranquility when the concentration is strong and we have few, if any, thoughts. But other times, we can be swamped with memories, plans or random thinking. Seeing her shots it just makes me feel that way.
Somehow each of her photographs tells a story but it a story that up to our imagination, we will not know until she reveals it!
When it comes time to decorate our house We like to use something a bit more unique, something creative, something we made. Our decorations don’t have to be fancy or expensive. In fact, we love when we see some innovative twists on basic decorations. As they inspire us to comes up with something new for our house each year.
No place for a Christmas tree at home? This simple Christmas Tree Garlands will be the easiest and simple this to put at your home. Garlands can be more fun as an adult to make than it was as a child making garlands out of construction paper. Garland making is pretty simple and can make for a fun Girls Night In. All you have to do is gather a bunch of garland making supplies, a few bottles of wine, and girlfriends for a fun night of holiday cheer and creativity. Some eggnog and Christmas cookies might help, too.
We’ve got the tutorial on how to make your own adorable, old-fashioned garland. To create this you might need a bunch of tips and tricks. As it isn’t as easy as you might think! Plus, how to keep it fresh for years.
To store garland tangle-free, carefully wind them around cardboard wrapping paper tubes.
Garland has more impact when it is doubled up.
All you need for this project is some construction paper and strings. Start by cutting the paper into a square, the bigger your square is the bigger you got. Start by creating guiding lines by folding the paper in half in both horizontal and vertical way.
To create a more guiding line by folding into a triangle allowing your to have a perfect Christmas Tree. Leave the paper in a triangle shape. This time hold onto the center line and fold in making a square. Do it on the other side.
On this small square, fold the sides into the center line, creating a small triangle. Do in on both sides for the front and back.
Cut away the extra parts leaving the folding triangle. When doing with kids please supervise them and be careful with the scissors.
Here comes the tricky part, stuck in the triangle to form a square back.
Make 3 symmetrical cuts at the two sides and start folding one after another. Fold it slightly to create the tree shape. Do it for the bottom 2 slot for all sides. And now you are off to go.
String it up equally to create this beautiful garland or you can make different sizes and color, leaving it as a centerpiece for your table. This garland may require you sometime yet you won’t regrets as the result will be stunning.
Decorating for Christmas is always more fun with friends, so stay tuned for more post on the food you can make for your Christmas party! And, best of all, after the holidays, you can carefully wrap up the garland and display it again next year.
Share with us your making! Take a photo of yours, send us an email, tag us on Instagram, tweet us, anything. We love to see yours!
Nobody would want to miss a Pumpkin Pie during Thanksgiving! It is the best seasonal food you would want to have a taste! For those, do not want to spend time making the pie crust, grab your pen and paper and take down this recipe. It doesn’t require any baking – a simple pie to be made, but a tricky one!
We spent the majority of our incredibly awesome weekend before thanksgiving testing pumpkin pie recipes. And when we say awesome, we really mean frustrating because testing the perfect pumpkin pie recipe is a lot more challenging than one would assume. Fresh pumpkin, canned pumpkin, ginger, no ginger, brown sugar, white sugar, cornstarch, flour, no cornstarch, no flour, and O-M-G how do we decorate it and make it look pretty on serving?
But I think we cracked the pumpkin pie code. We grew up in a house of pumpkin pie lovers especially our grandma and absolutely no Thanksgiving was complete without a nap, and then a massive slice and an even bigger serving of cool whip. What we’re trying to say is, our pumpkin pie standards are high. When it comes to this Thanksgiving classic, we’re a huge snob. And now that we’ve found the recipe, we can rest easy at night. And you can too! Because we’re sure finding a tasty pumpkin pie recipe haunts your dreams as well.
The most important ingredients for this recipe is – the pumpkin. Fresh or canned? We have tested this recipe with both and we truly liked the pie using fresh pumpkin better. The fresh pumpkin pie was a little more sturdy when baked for the same amount of time. We prefer the pie to taste grainy and a little… herbaceous? Although fresh pumpkin is used best in savory recipes, not desserts. This is your call, you can use either.
For those who prefer not like to get already-made Pumpkin Puree, you will like to know how to made your own. Stay tuned for the upcoming post on, how to make your own Pumpkin Puree”!
Since this is such a classic recipe, we snapped a lot of pictures of the process as well as the finished products. Yes, just to be sure this recipe was the best of the very best. We’re crazy, as you know. So, what makes it so great?
We love eating the biscuits base, it is soft and less heavy than the tarts shells. Moreover, it is easier and less time consuming. We enjoyed making unbaked cream cheese pie, it’s simple. Our grandma loves this Deep-Dish Pumpkin Pie, it creamy, soft and it just melts the second you put in your mouth.
Ingredients |
1 packet of gingersnap
1 can pumpkin purée (about 2 cups)
1/2 cup packed brown sugar
2 teaspoons ground cinnamon
1 teaspoon ground ginger
1/2 teaspoon fine salt
3/4 cup cream cheese
3/4 cup heavy cream
3 large eggs
1 teaspoon vanilla extract
2 tsp of gelatin
Method |
Arrange a rack in the lower-middle position and heat the oven to 200°C. Blend your gingersnap with melted butter in the food processor till sandy texture. Flatten it to the 9-inch pan and bake it for 15 minutes. Leave it to cool.
Combine the pumpkin purée, granulated sugar, brown sugar, salt, and spices in the bowl of a food processor fitted with the blade attachment or blender. Blend until the brown sugar is completely mixed in and the purée looks glossy. Dissolve the gelatine in 2 tbsp of water over a heat in a pot. Pour the gelatine mixture into the pumpkin mixture.
Whisk in the milk and cream. To warm the eggs and ensure that they don’t cook when you add them to the pumpkin mixture, whisk them together in a separate bowl, then whisk in a few spoonfuls of the warm pumpkin mixture. Slowly whisk the eggs into the saucepan with the pumpkin mixture. Whisk in the vanilla.
Pour the mixture into the biscuit shell, tap the air bubbles and fridge it for overnight.
We set up this Christmas table in my studio, where we also have a handy window seat – used here as a desserts and drinks buffet. For the cozy factor again, we lit up some votive candles inside golden star-shaped holders for the glistening touch. Totally magical!
Share with us your making! Take a photo of yours, send us an email, tag us on Instagram, tweet us, anything. We love to see yours!


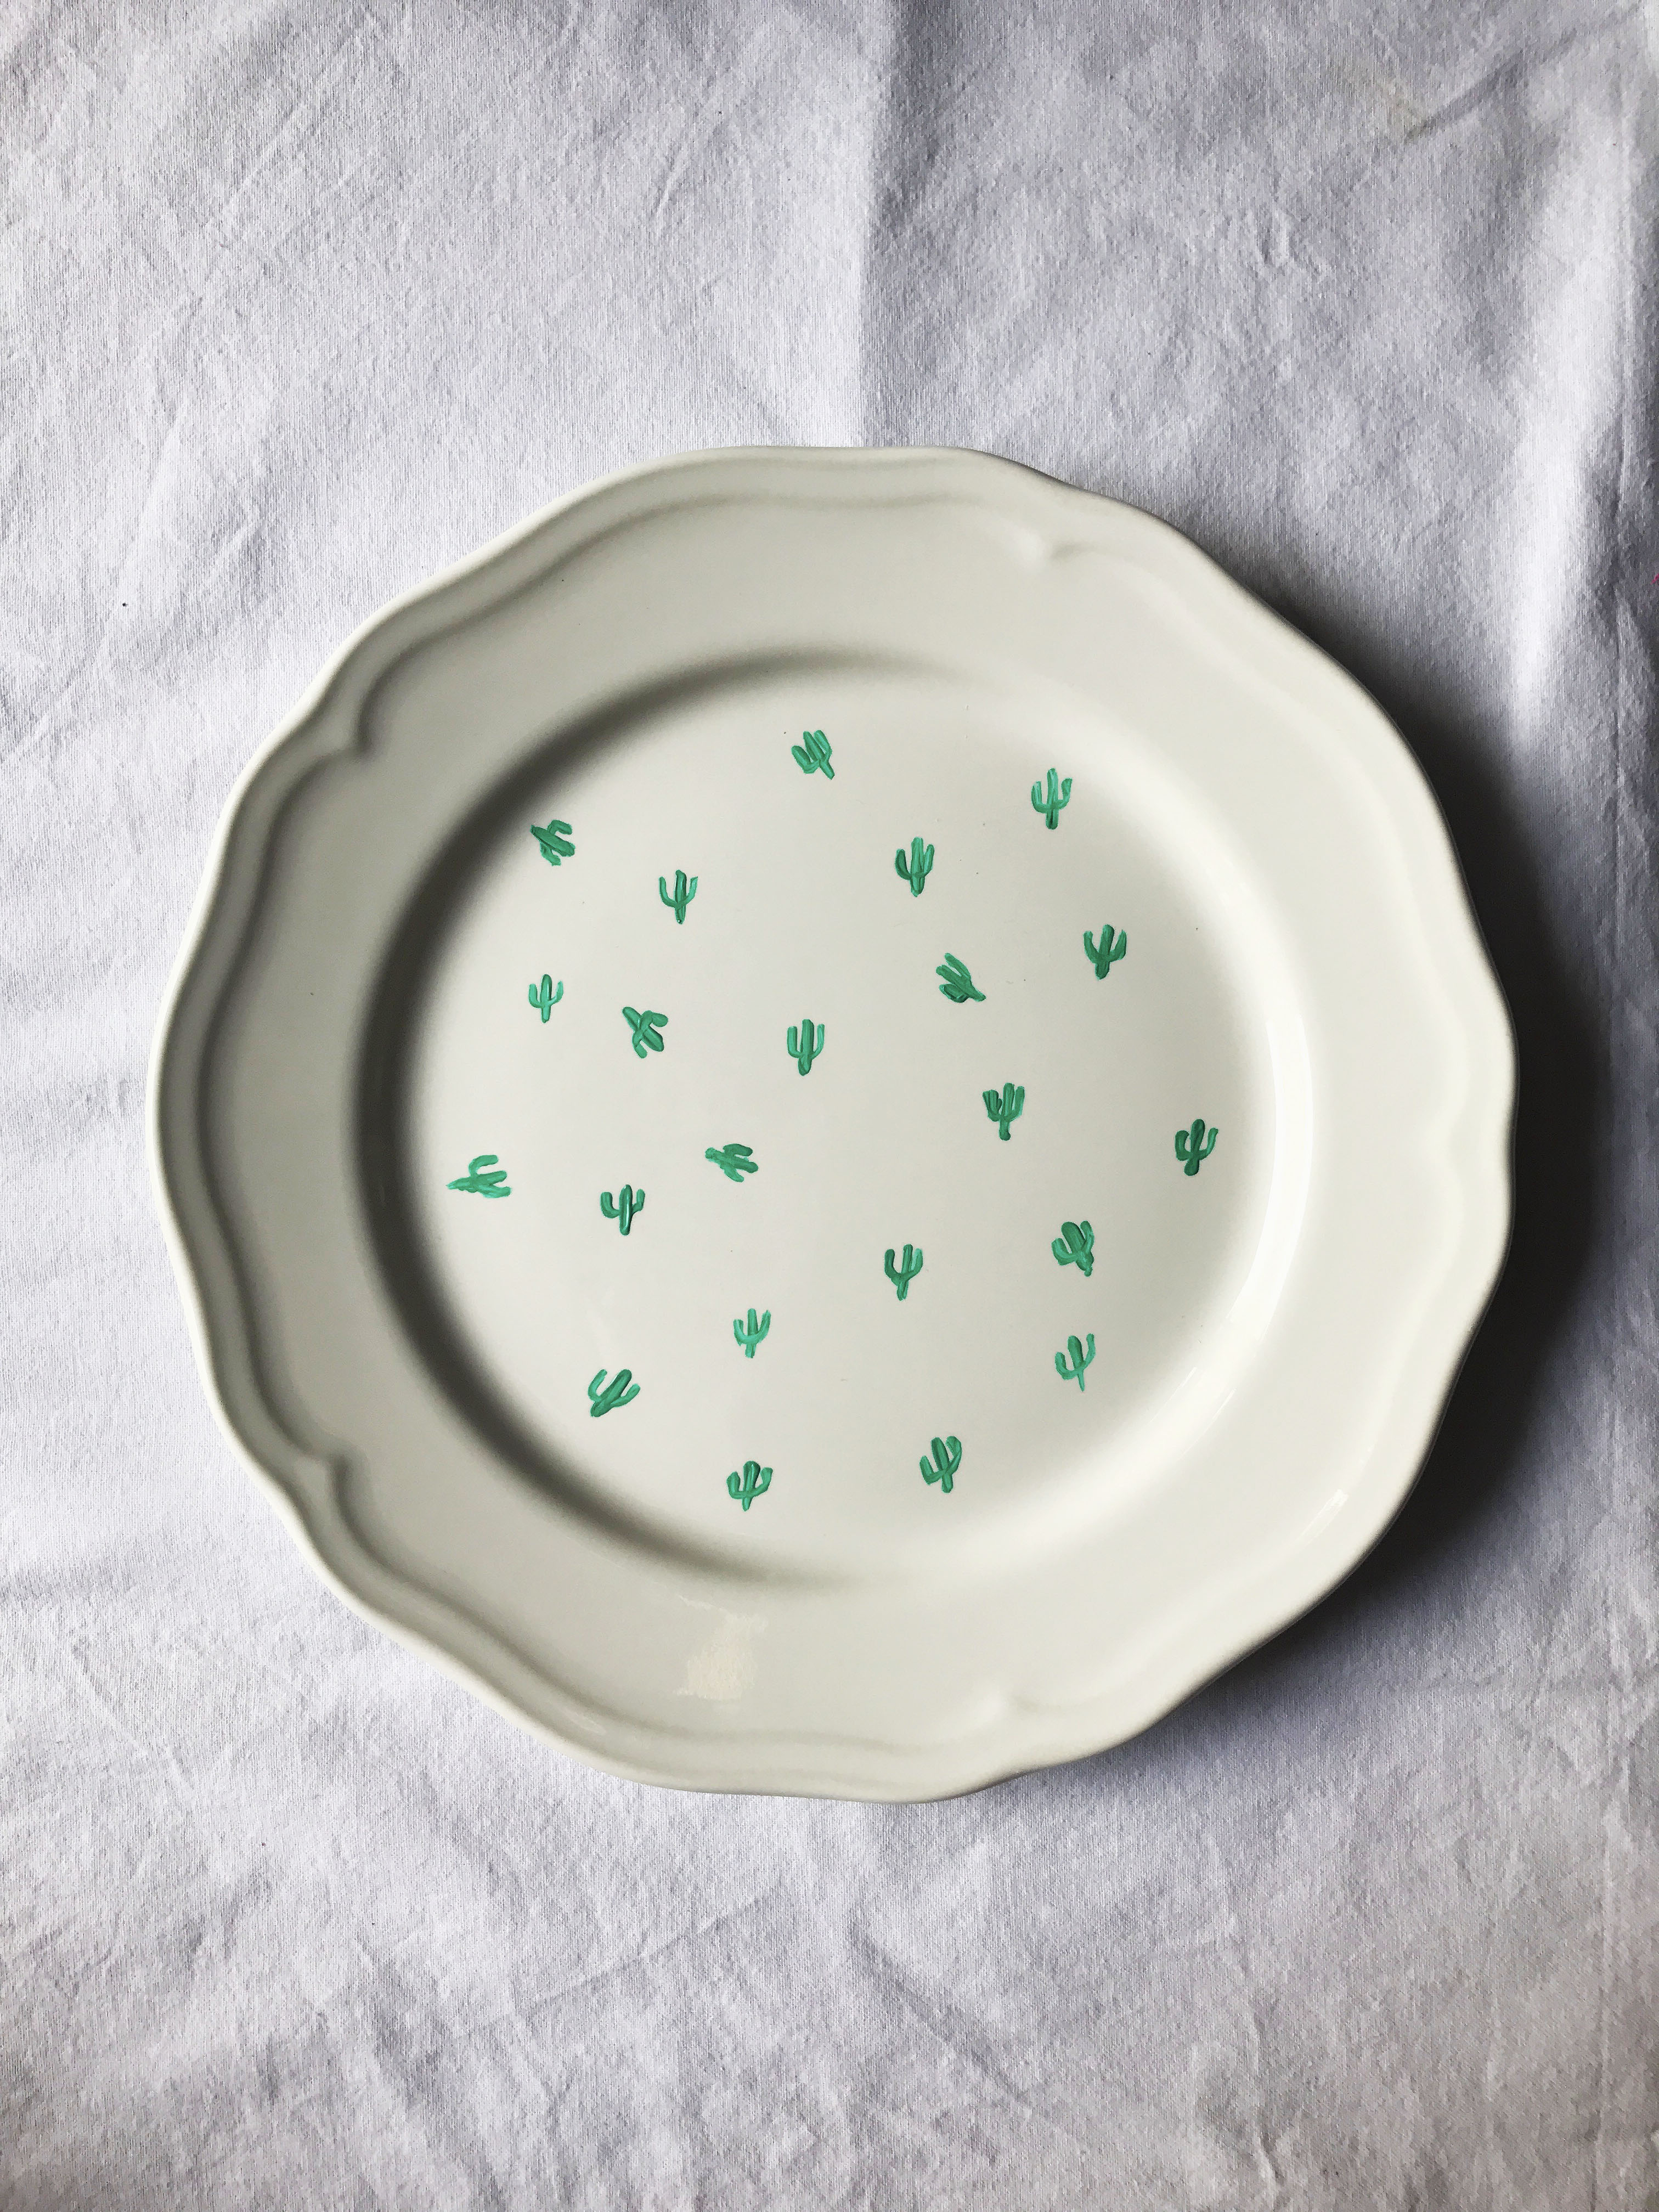
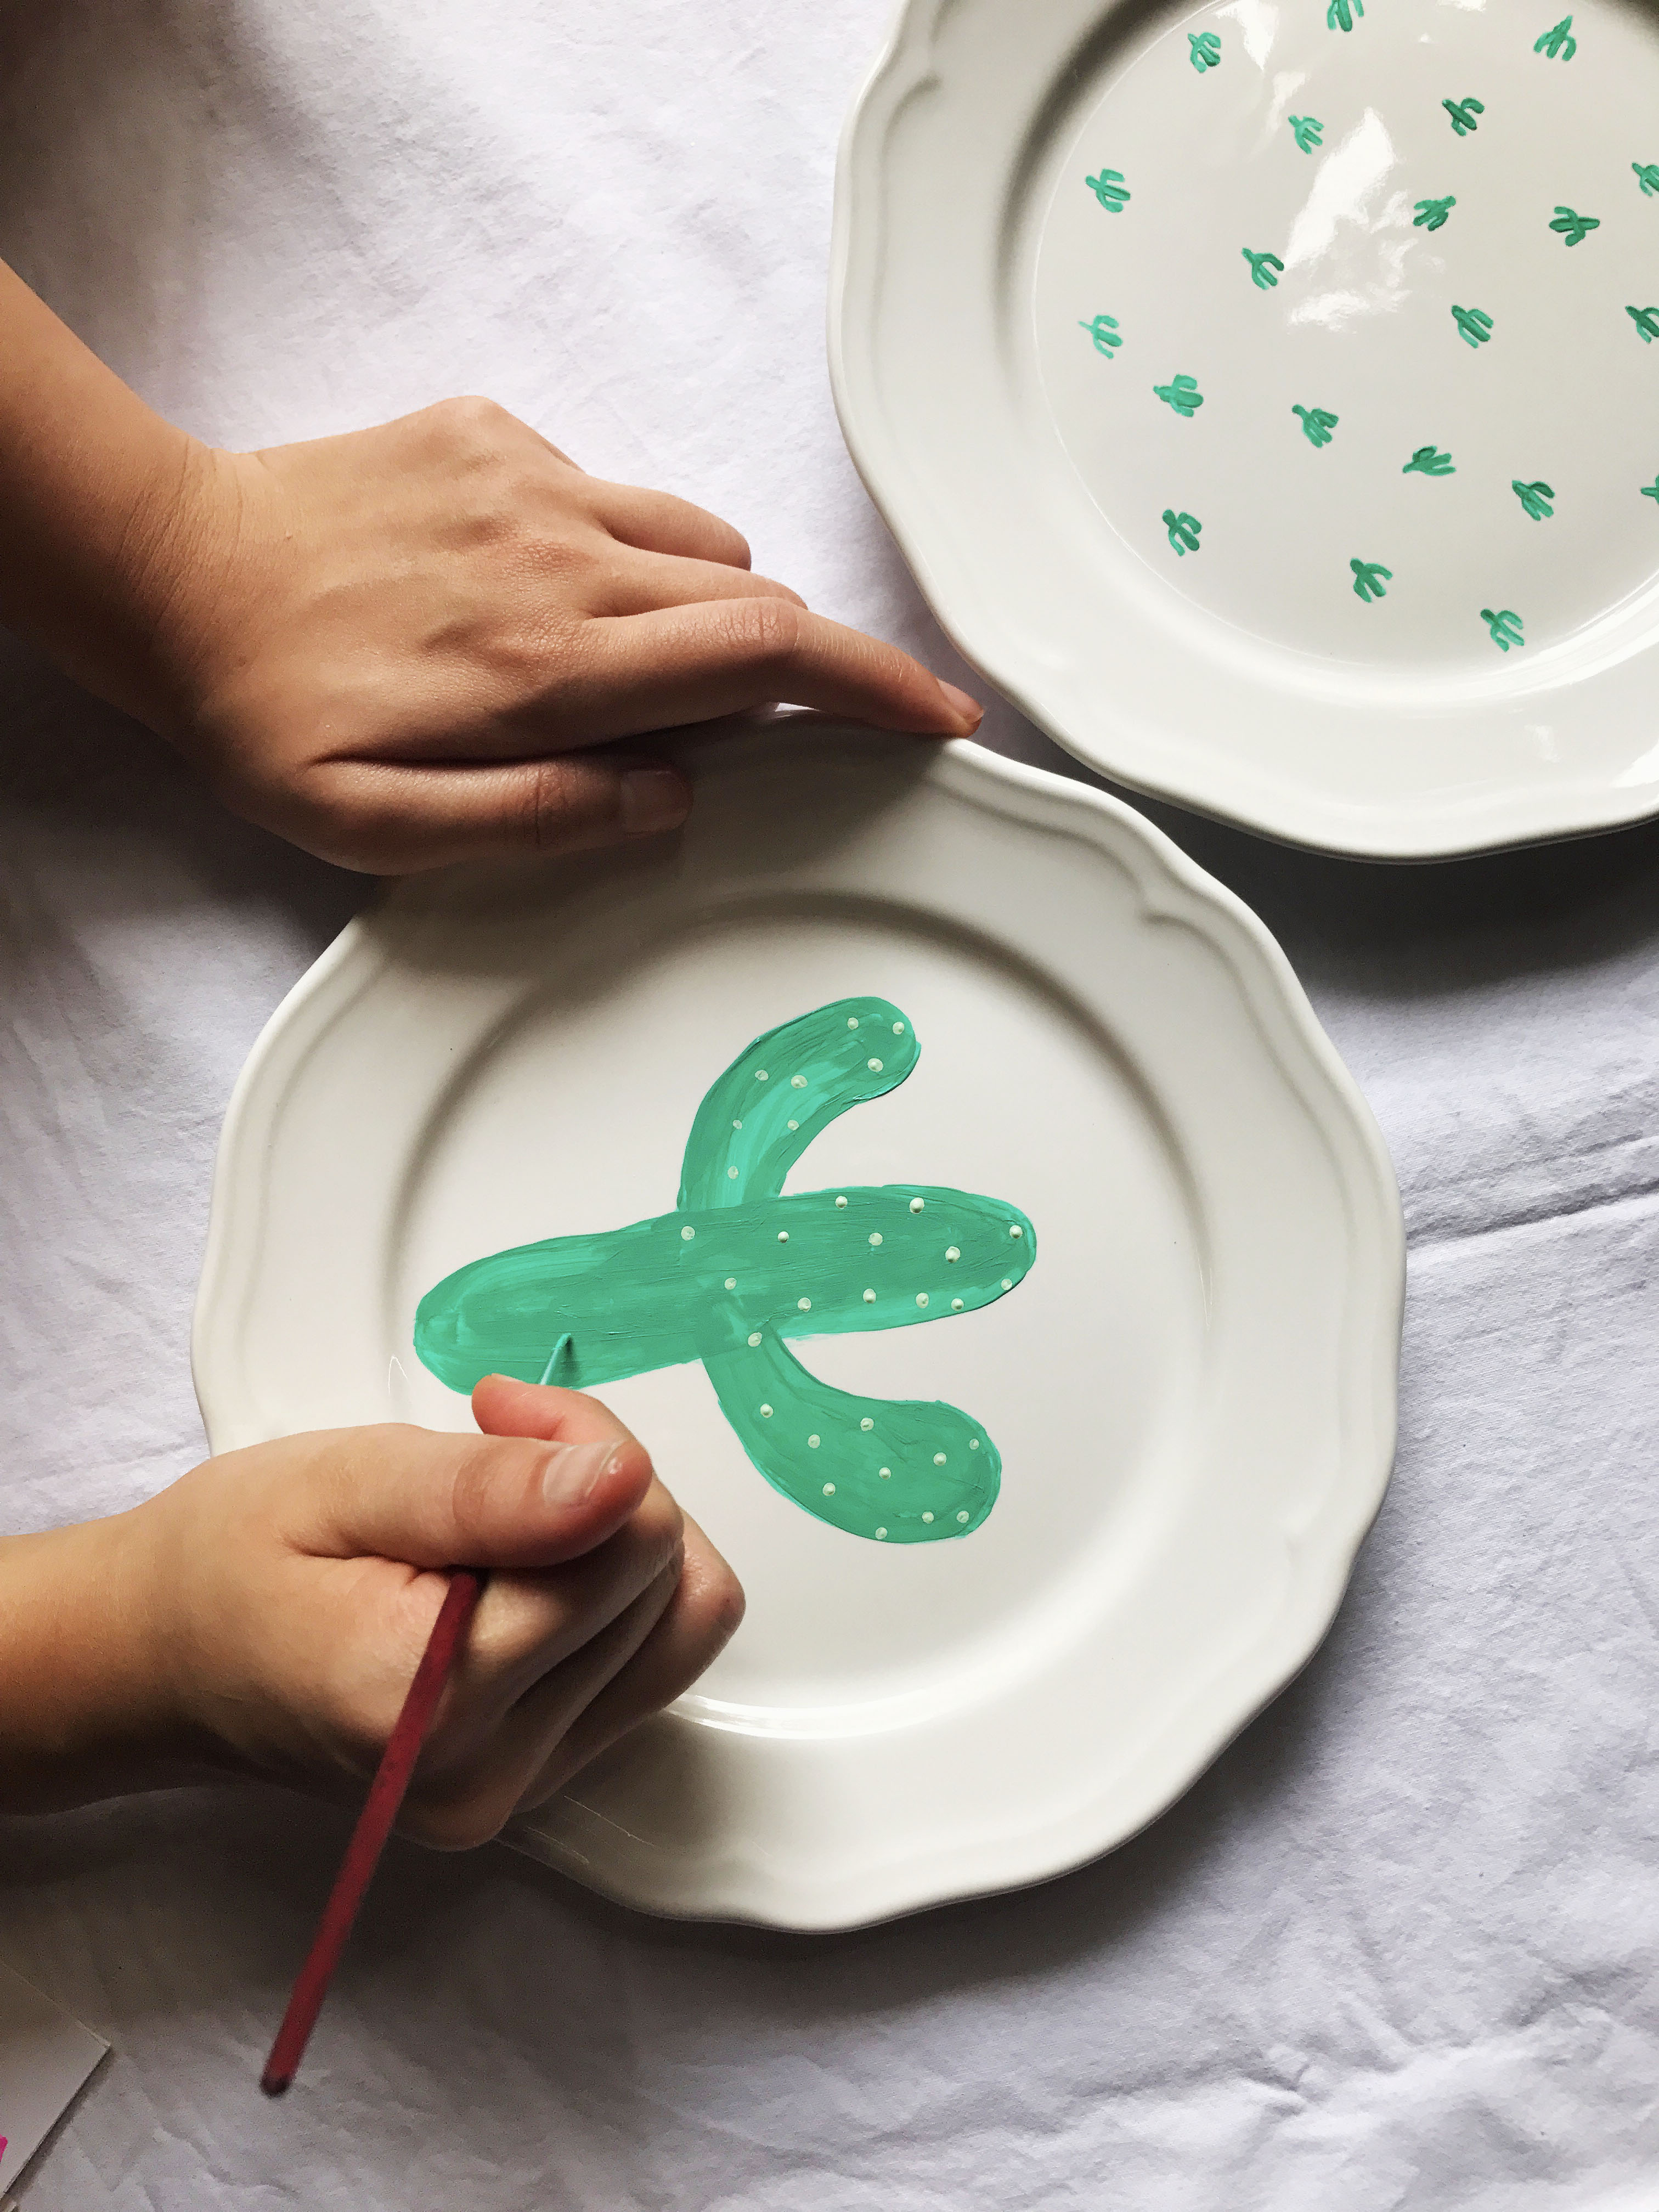


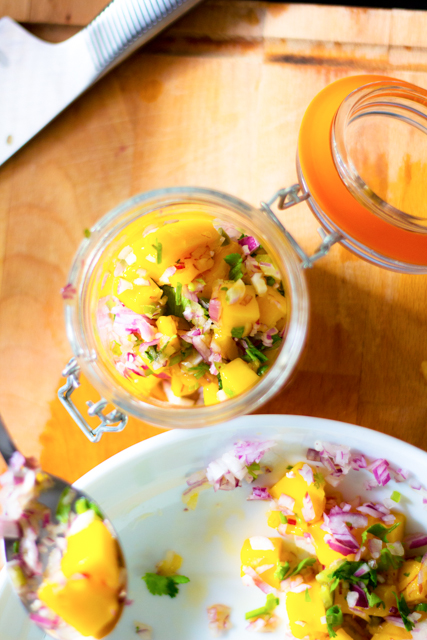

 Flowers would be the most beautiful table centerpiece you would ever have. They’re elegant while it can be fun at the same time. During the period of spring, blossoms will be part of our everyday life. It’s something you won’t want to miss seeing in your house, especially you are hosting a party.

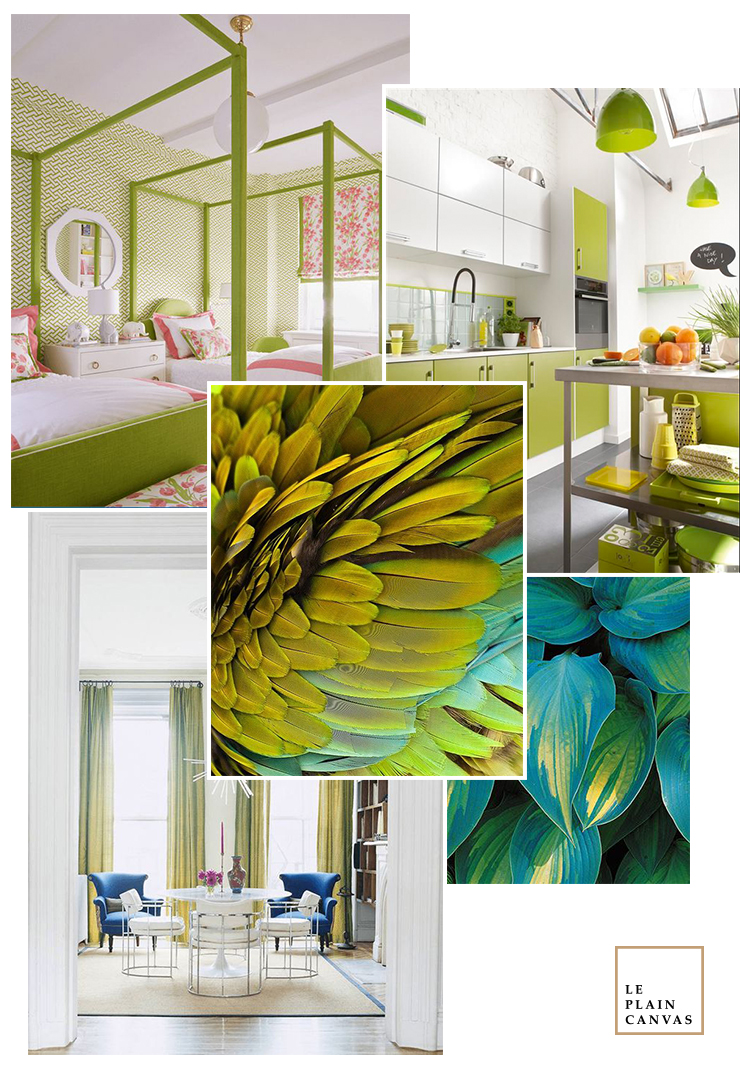 Today’s color trend is a fun lime green tone with a strong vintage vibe. Some might call it a chartreuse but Pantone calls it ‘Golden Lime’. This color fits in perfectly with modern designs and vintage style interiors. Thus, anything mid-century modern is going to pair well with this color trend. Now for the fun part. Let’s take a look at some inspiration featuring ‘Golden Lime’.
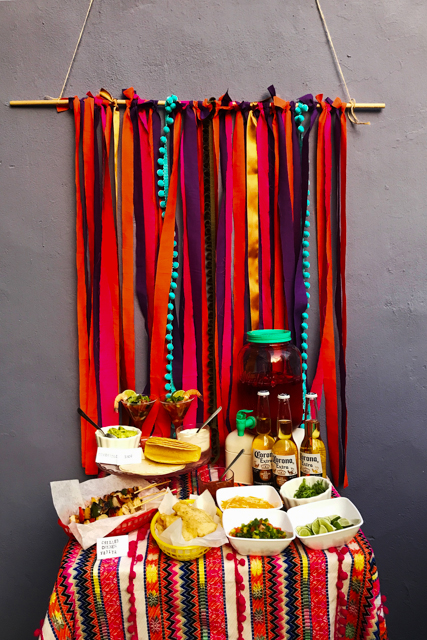
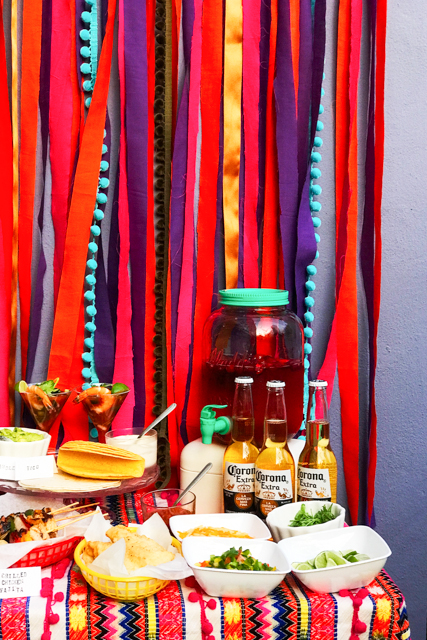
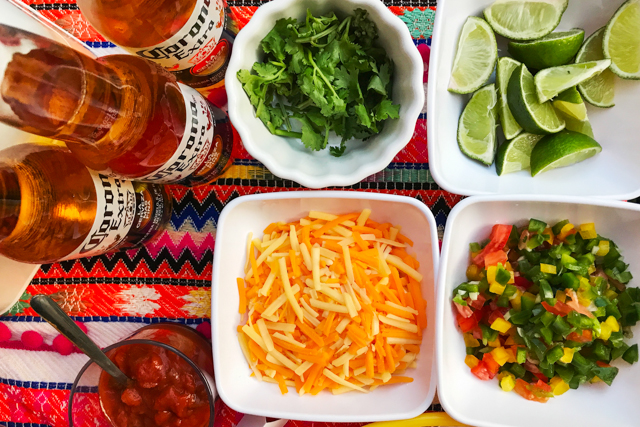

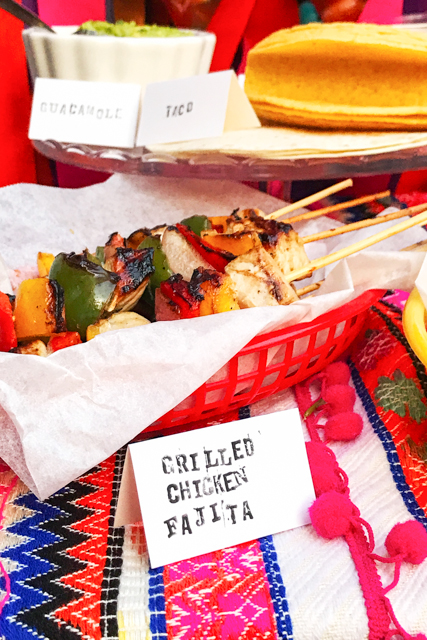

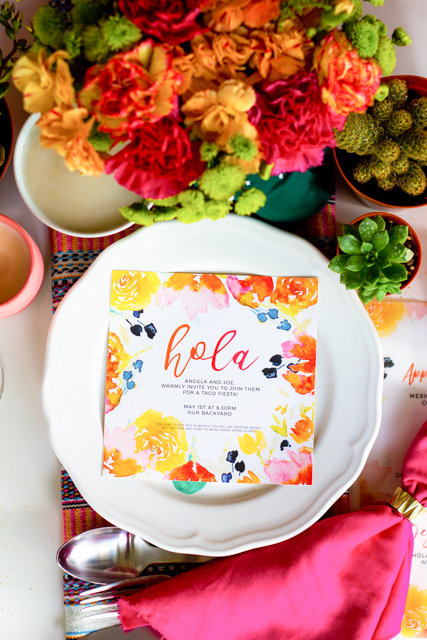
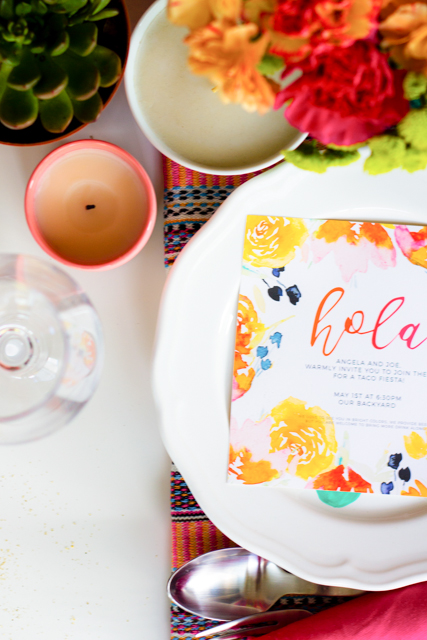
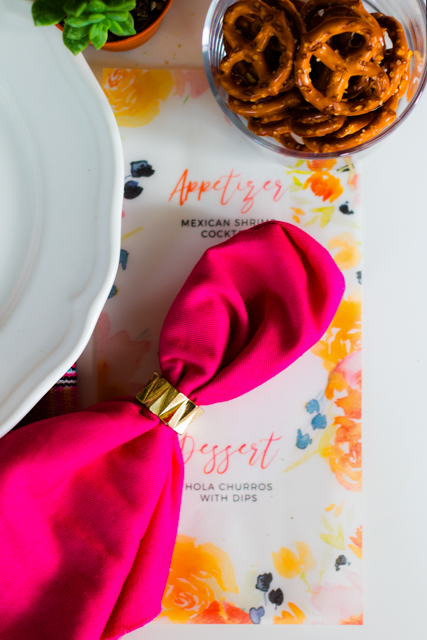


 Oh, that cozy feeling of being tucked into a protected, enclosed loft or bunk bed. It brings back fond memories of childhood plays and teenager dreaming hideaway marathons. This loft bed is very appreciated features in micro homes as well as in guest houses. A loft bed allows the maximization of usable space by freeing up floor space and offering a sleeping area with all the necessary elements.
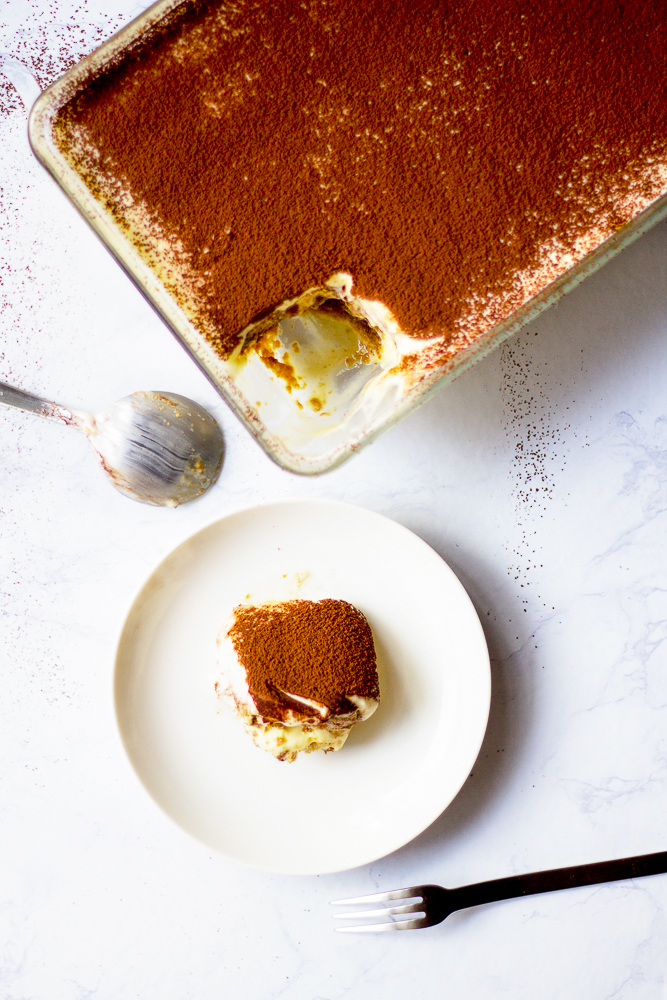
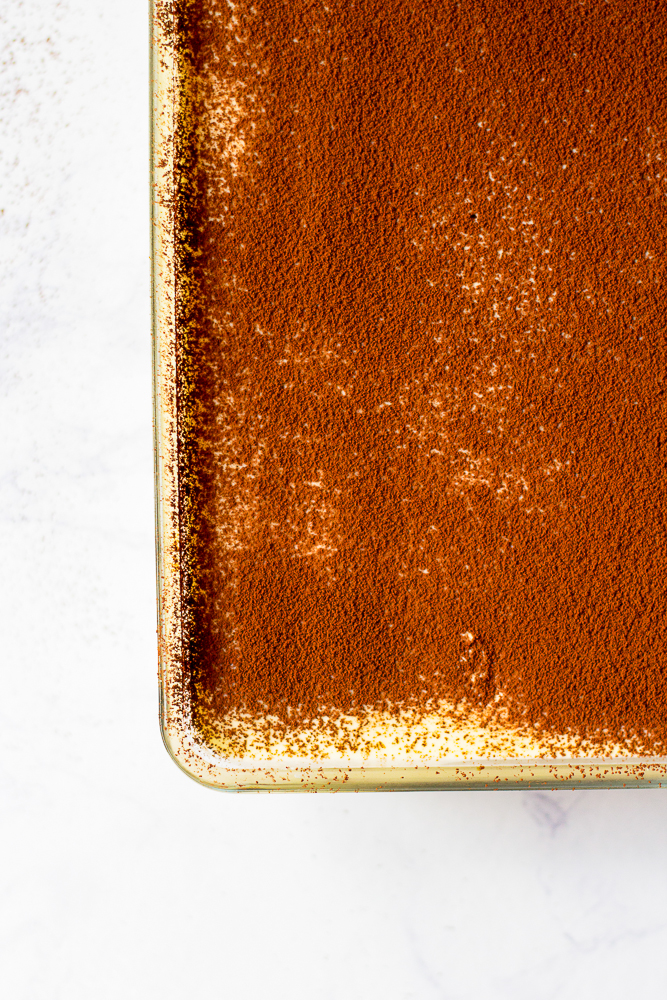

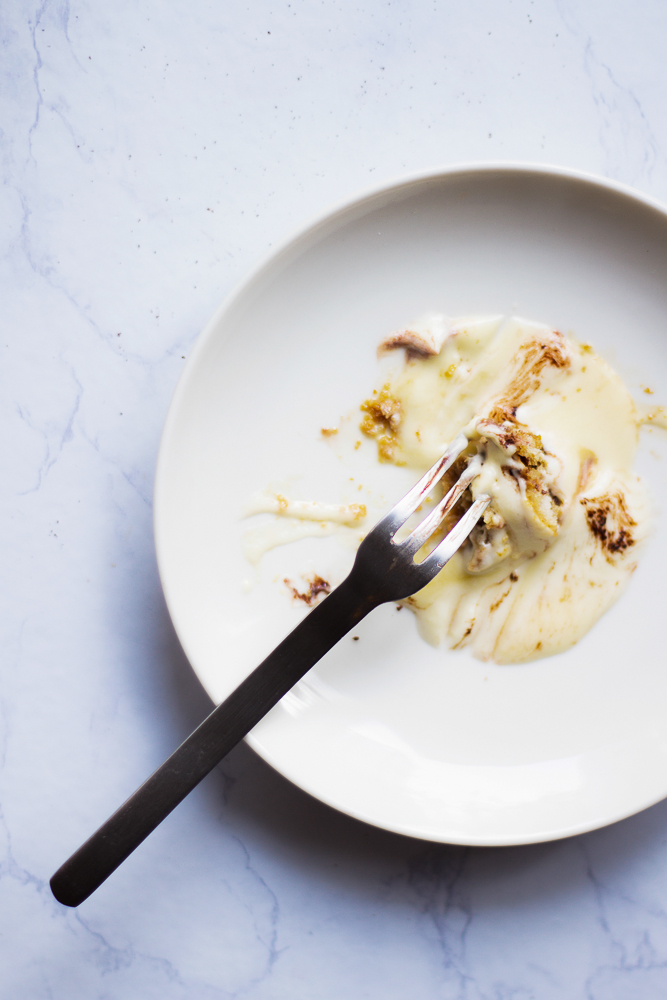


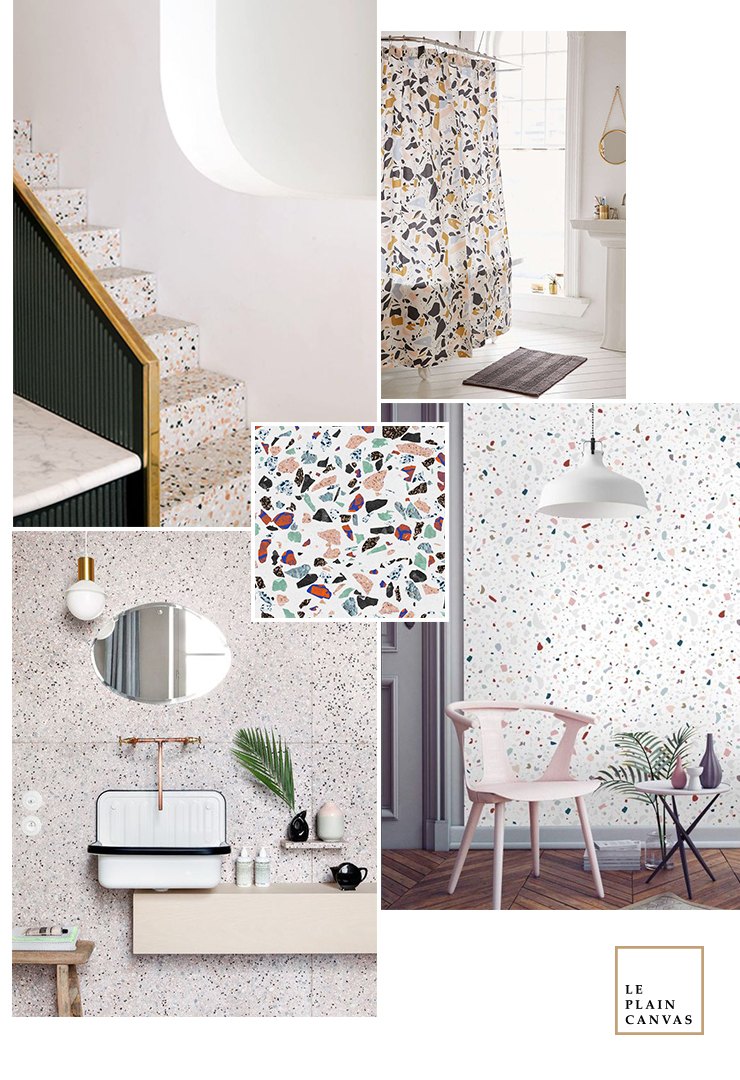

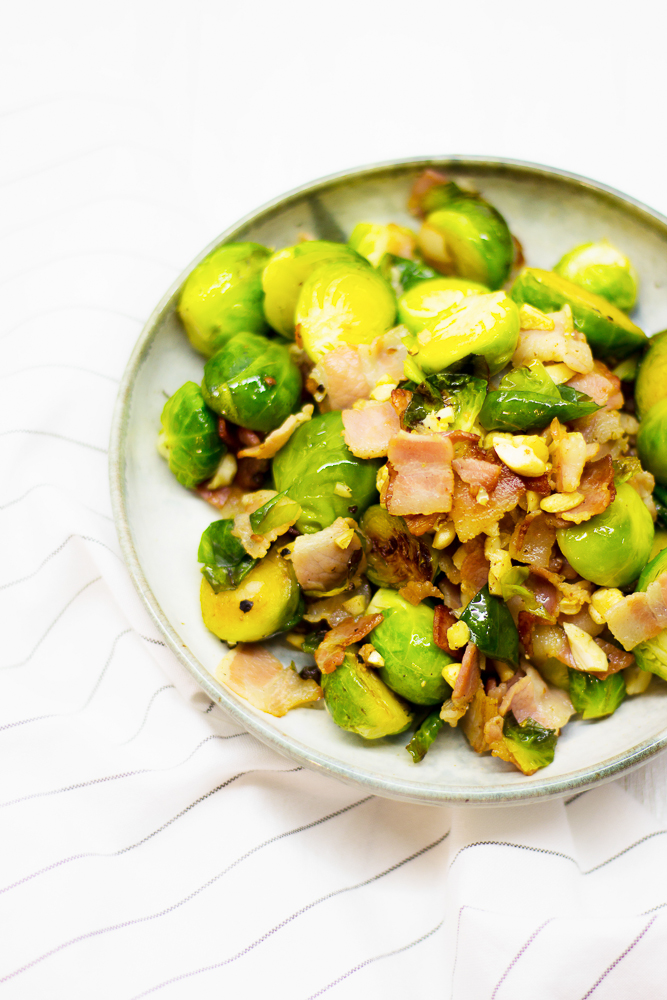
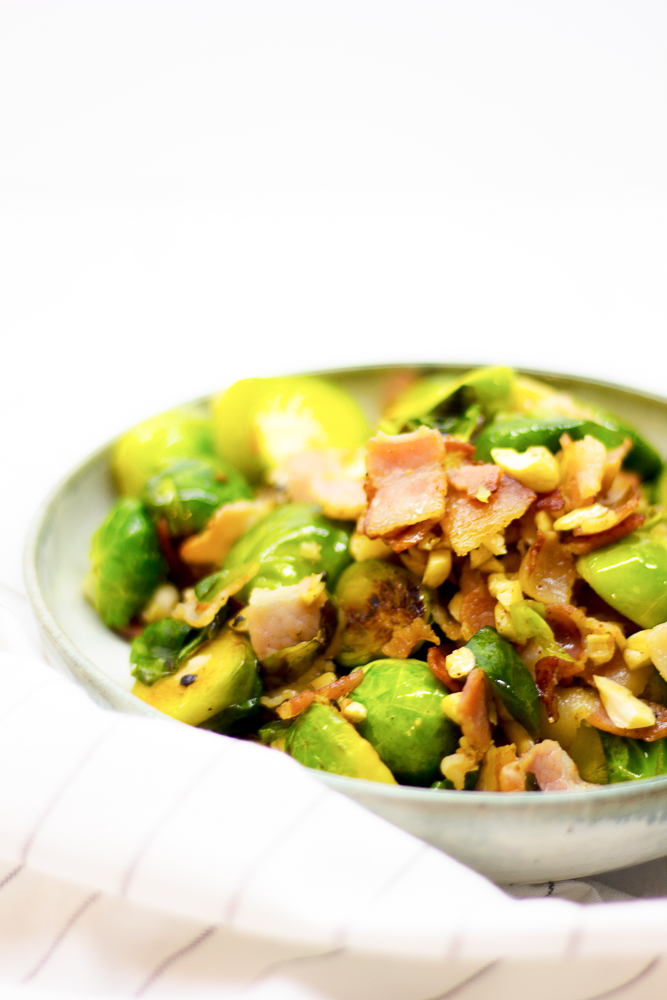
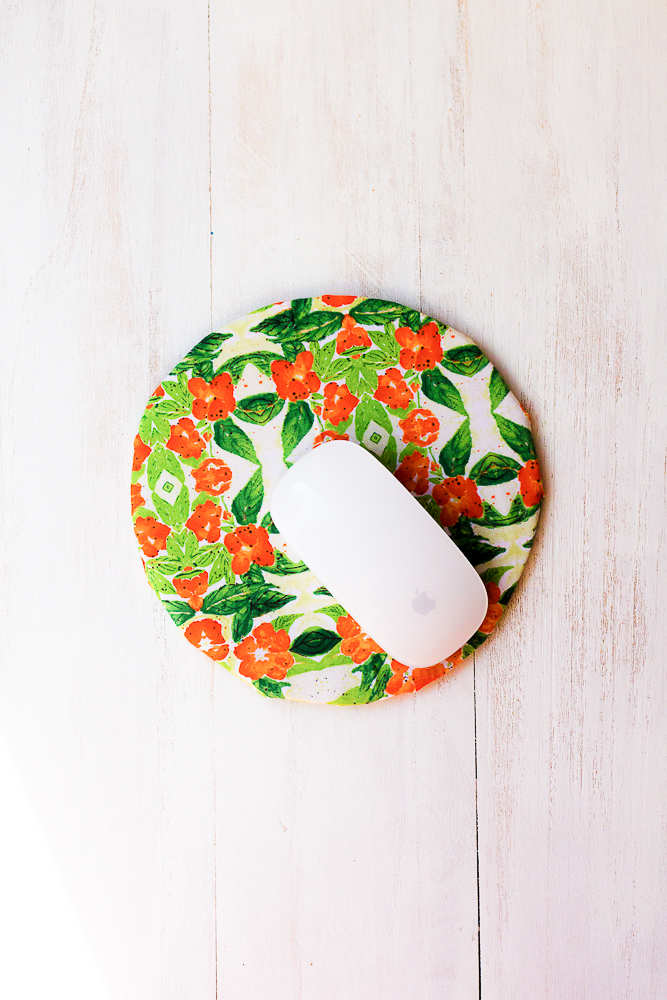


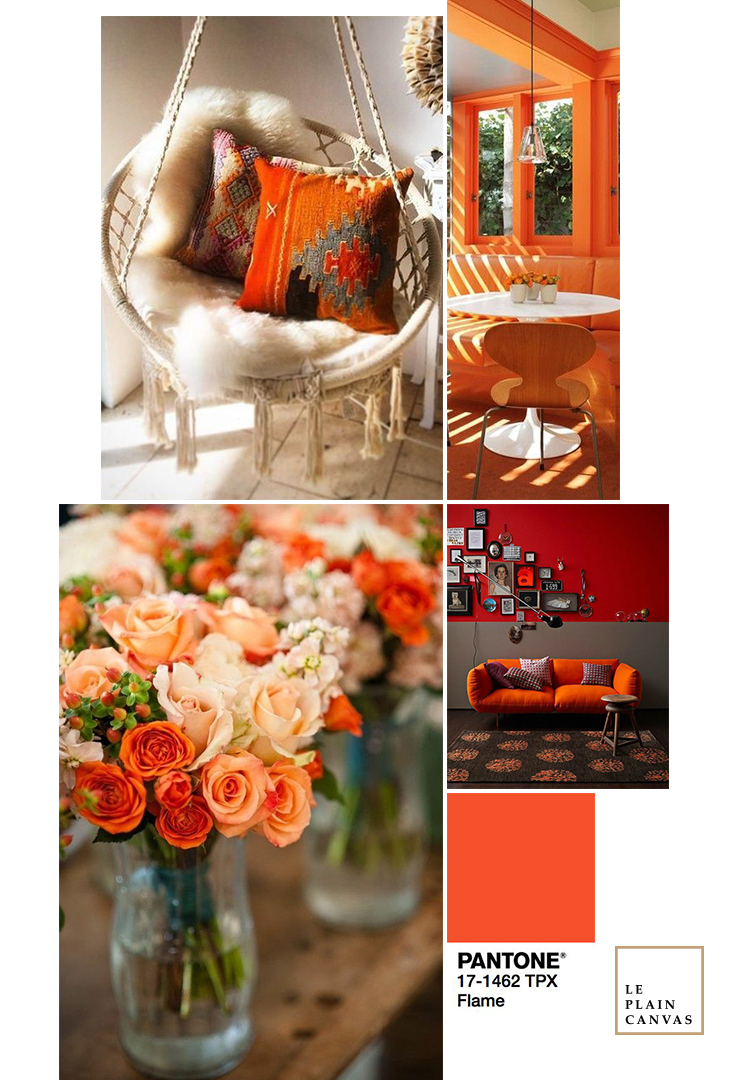


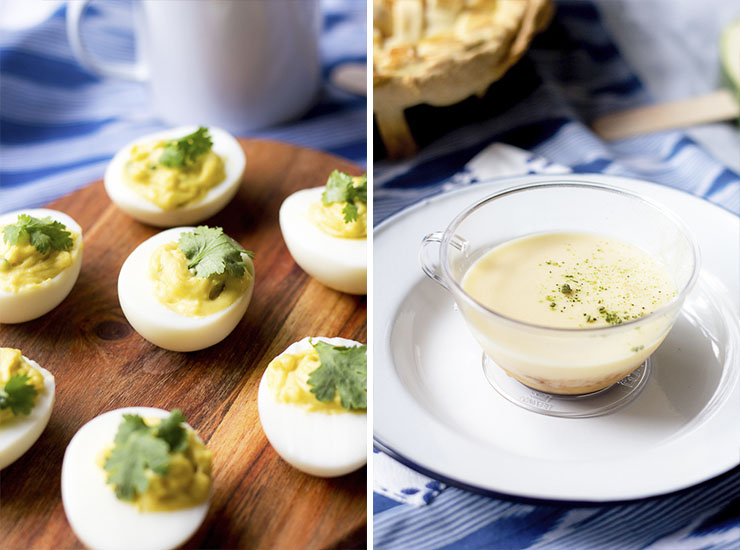
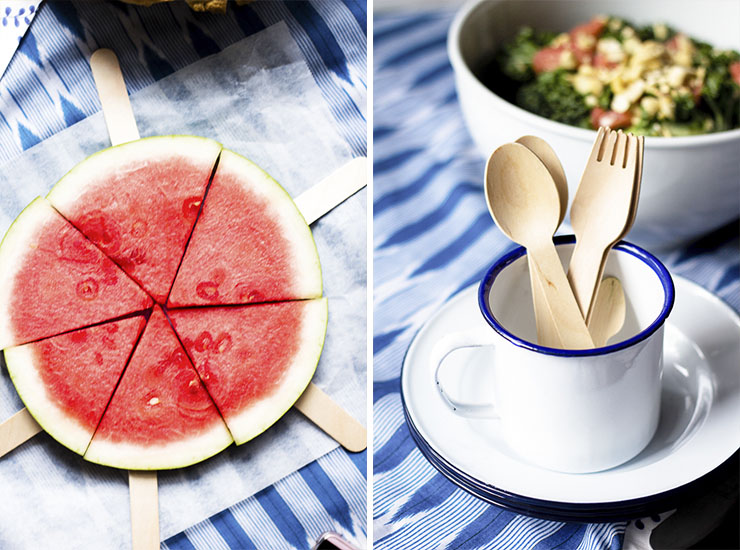
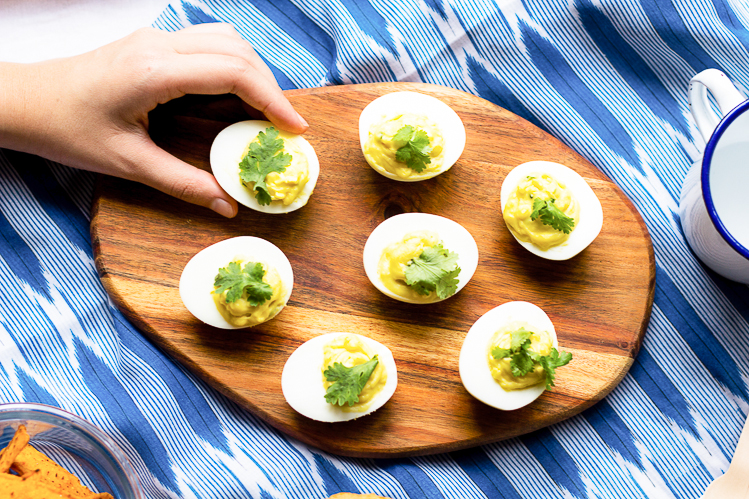
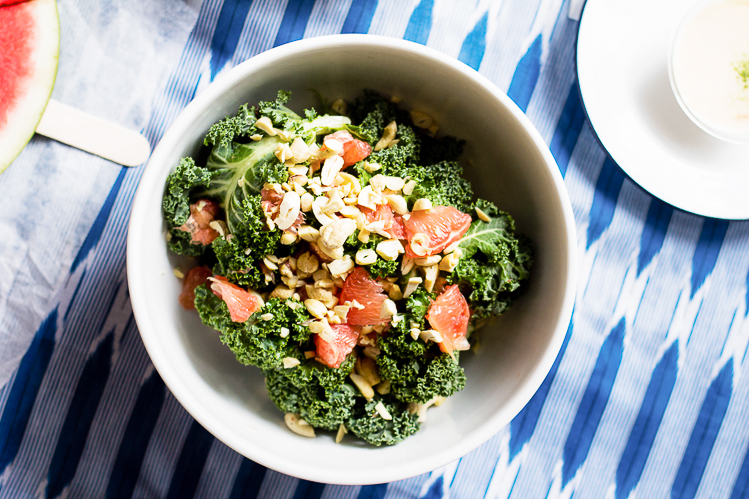


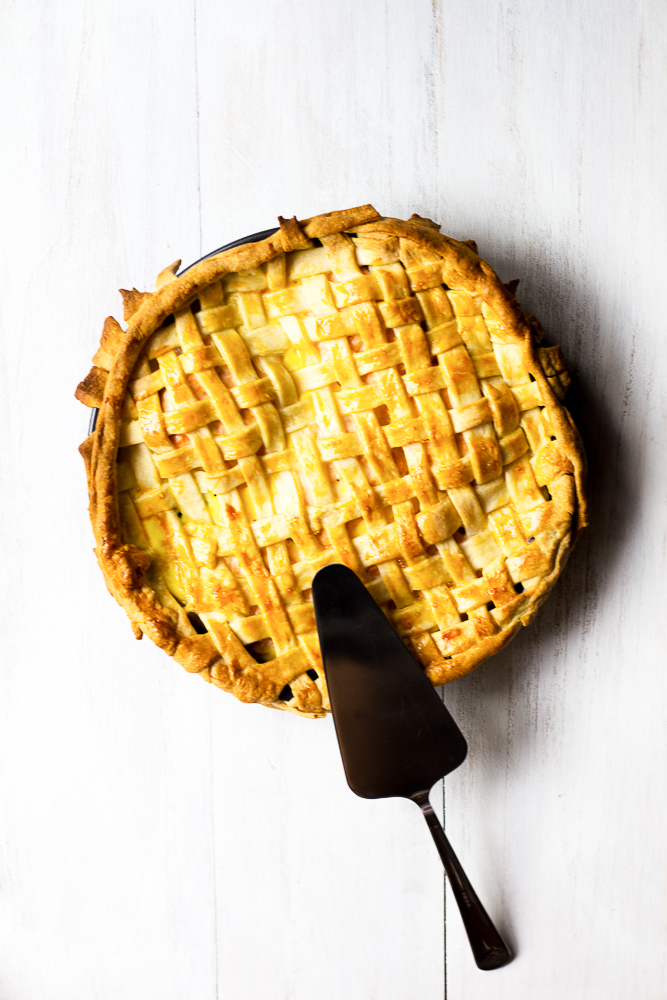 A good pie recipe is great to have in your repertoire, because, to others, it seems a little fancier than it really is. Usually, people like having the crust on the bottom of the pie. However, for us, we have them on top. The options for fillings are endless, from ham to sun-dried tomatoes and goat cheese. Thus, this golden brown beauty of a Salmon Spinach Pie with a Lattice top, creamy filling and all. And guess what? We all do love it!
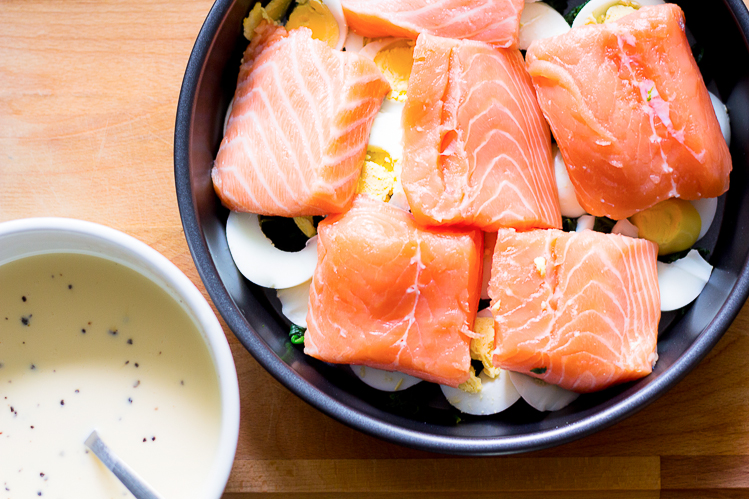
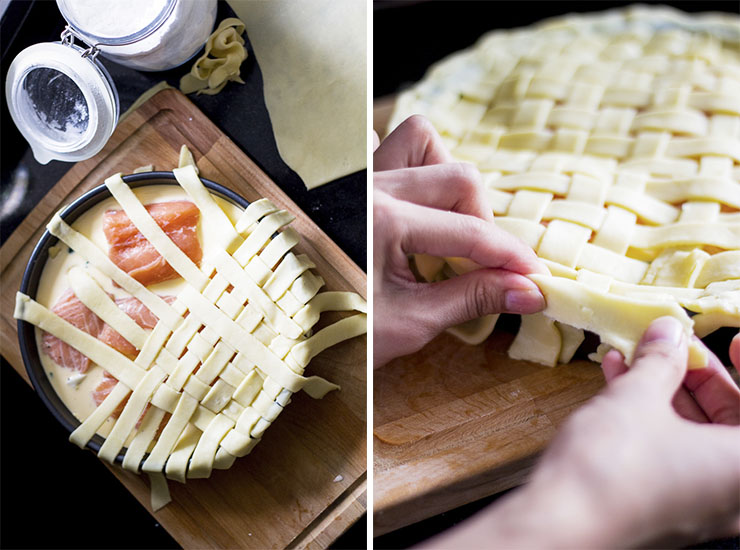


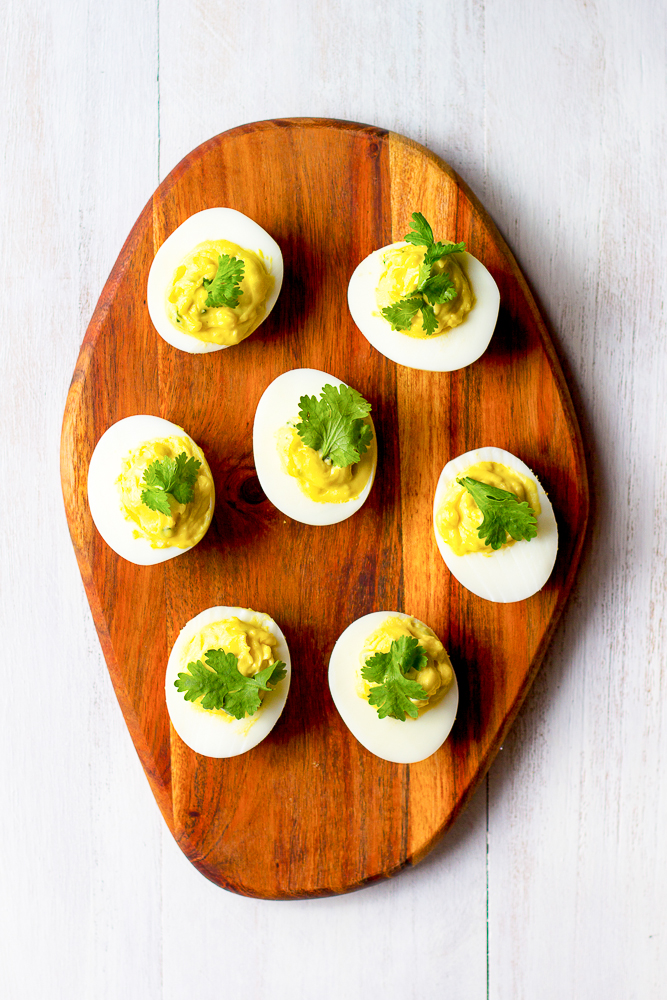


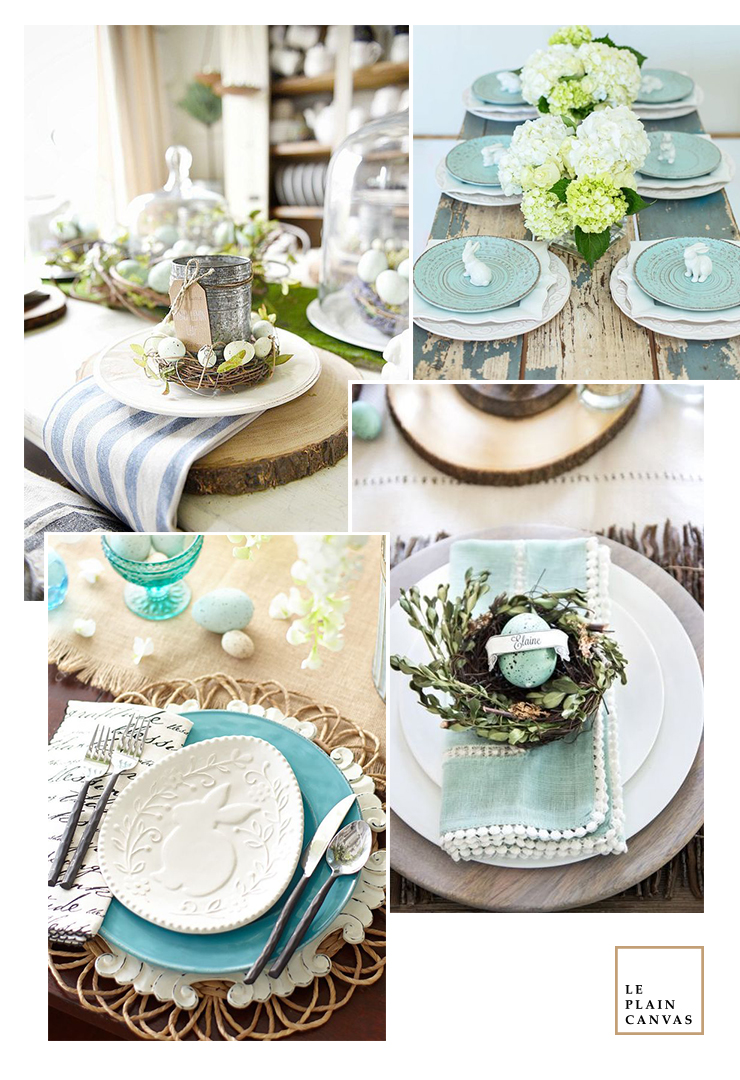

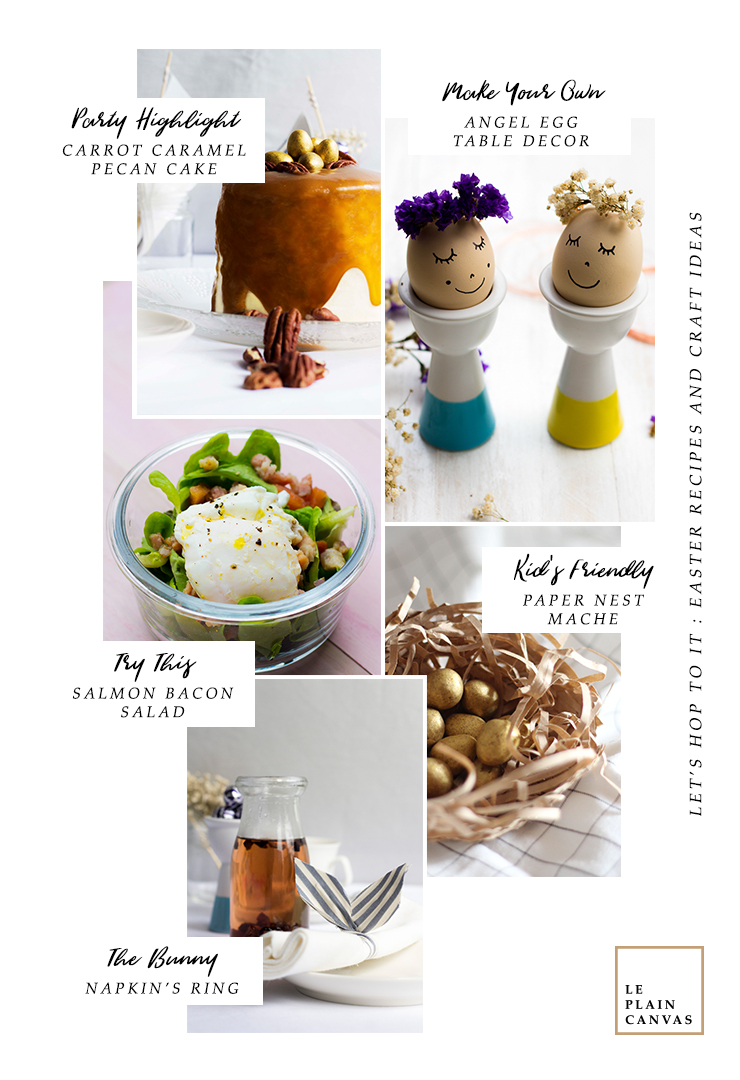


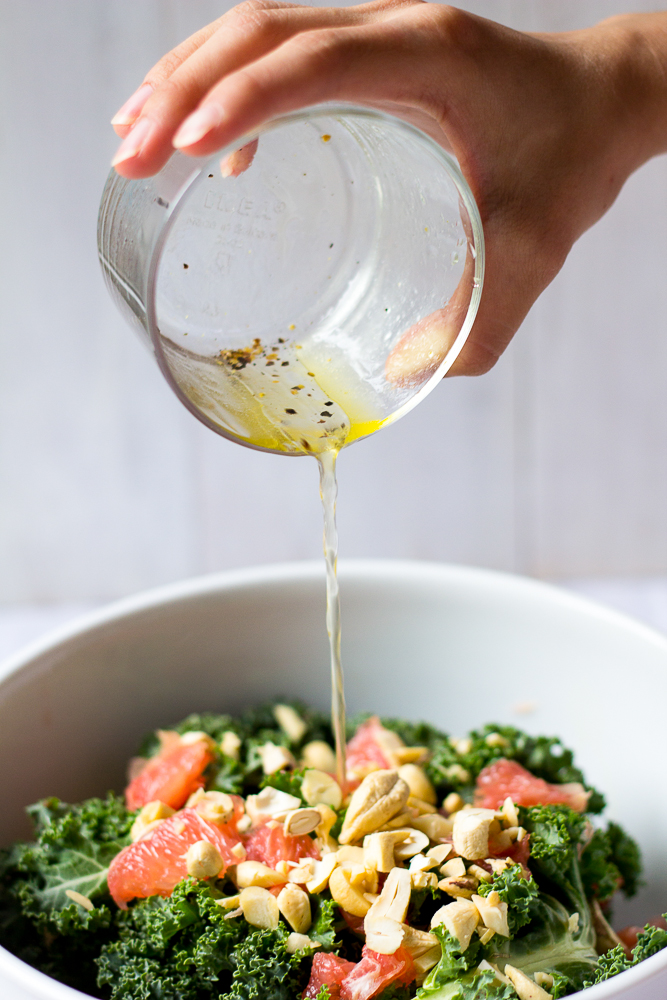
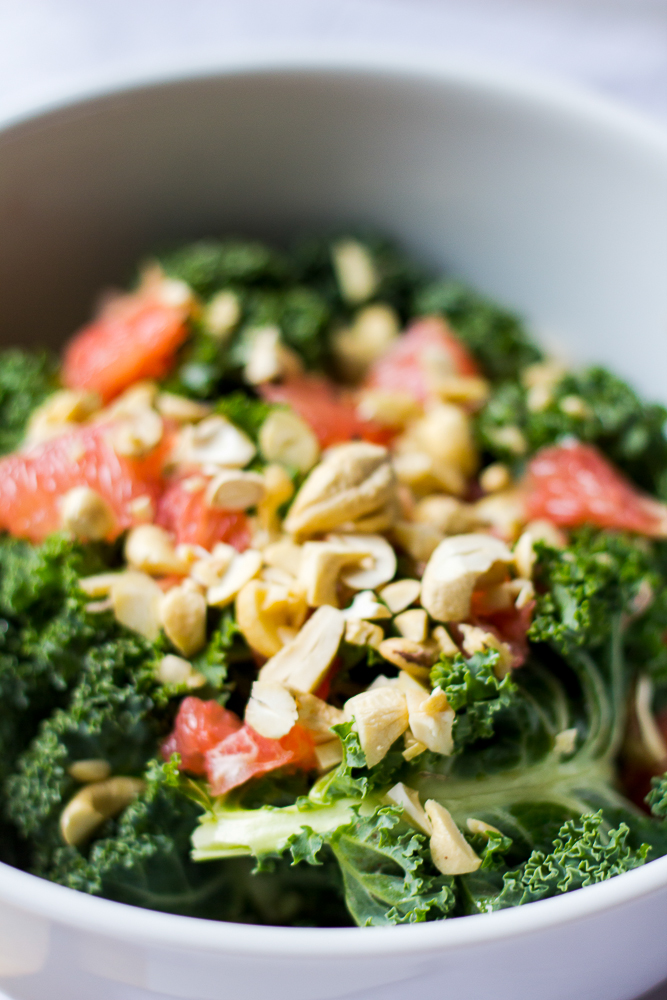
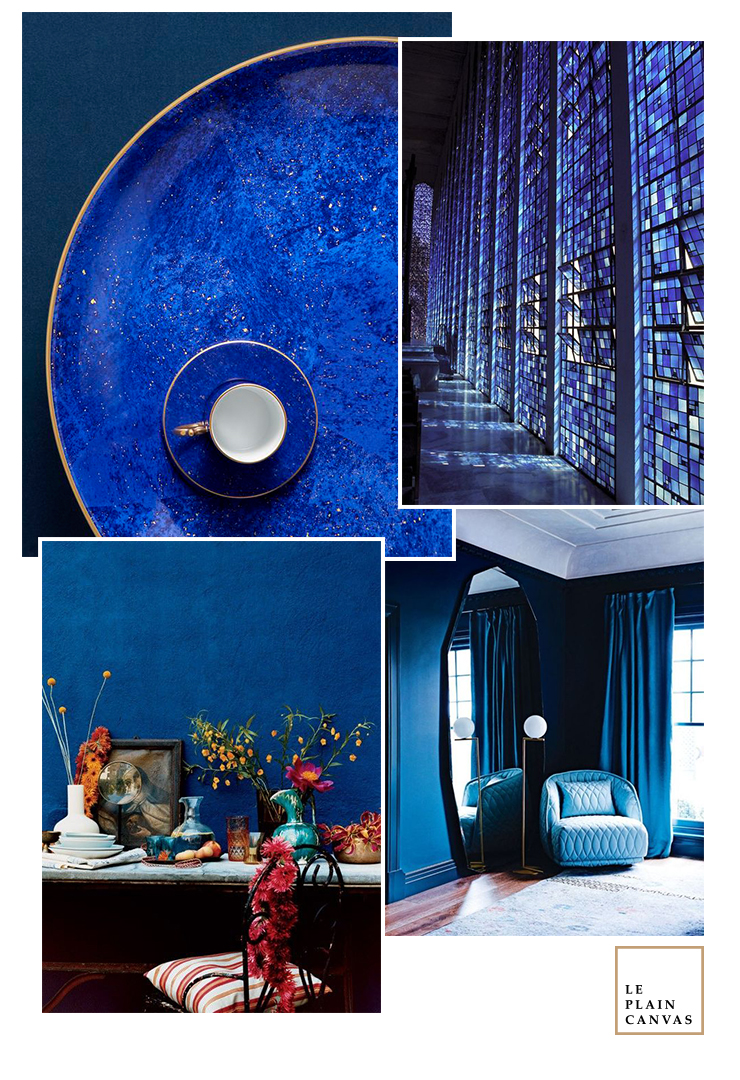


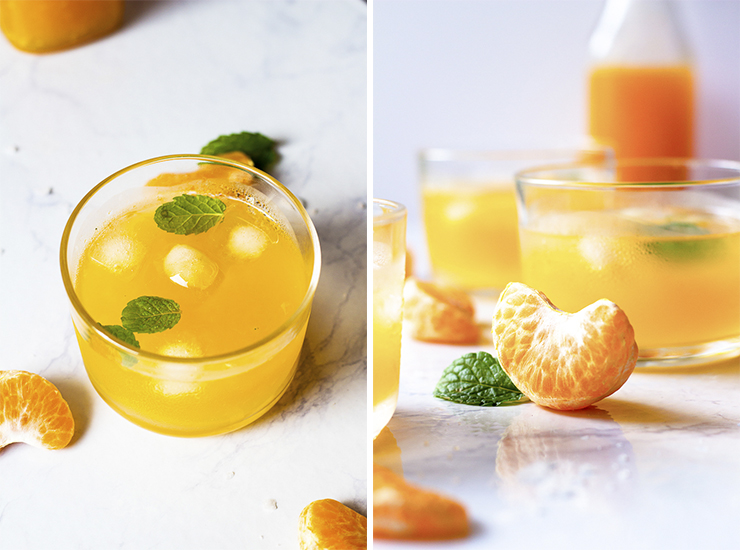


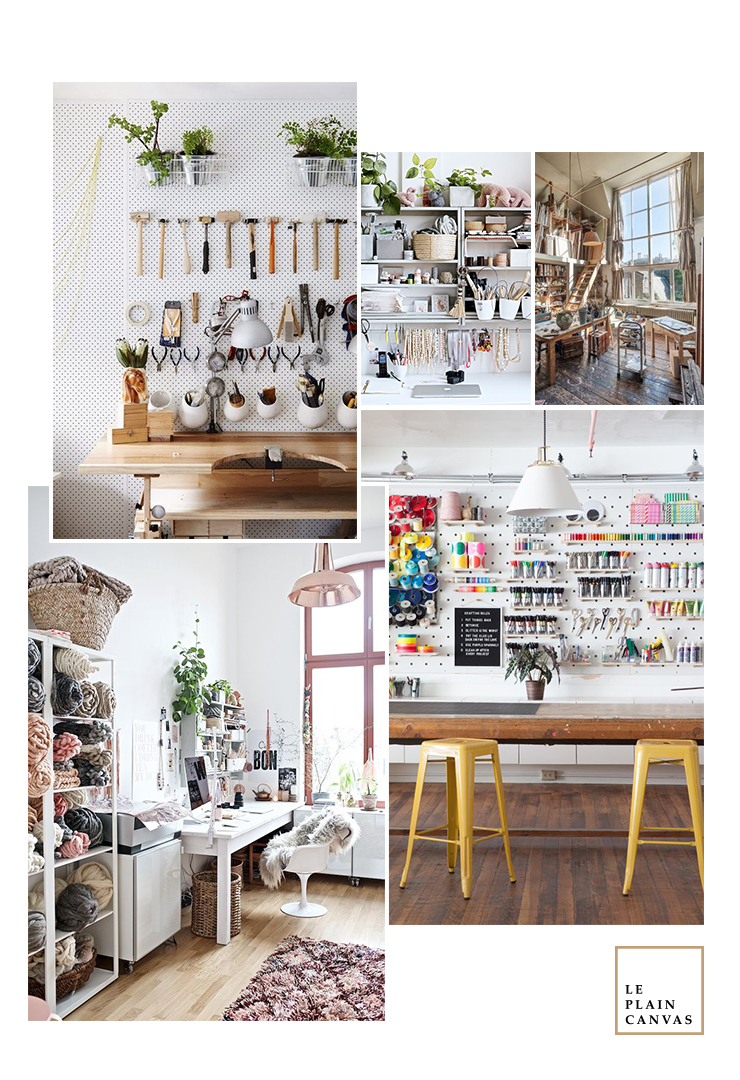


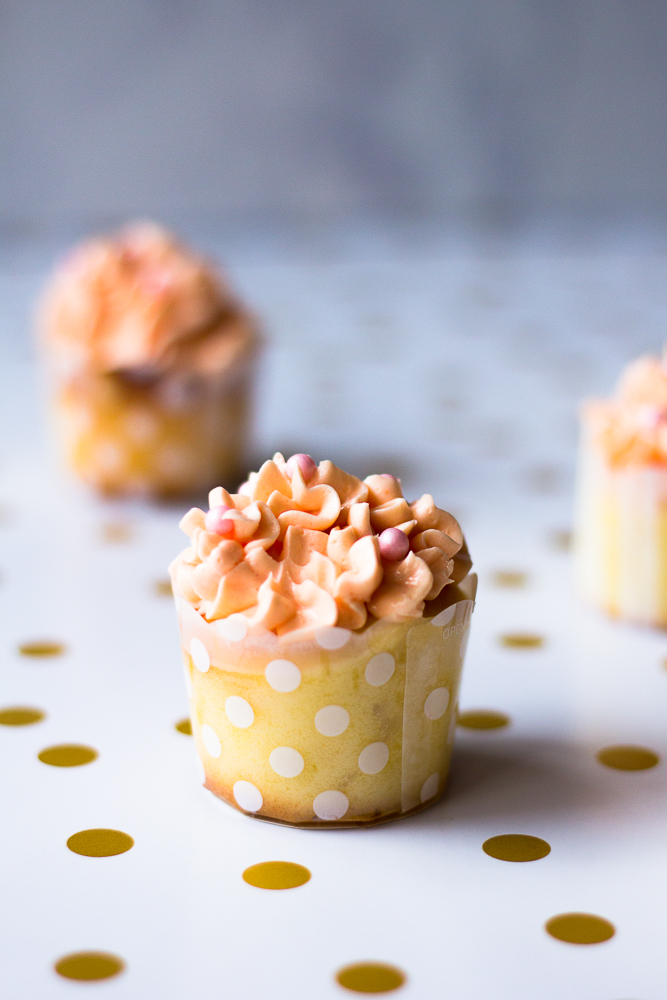


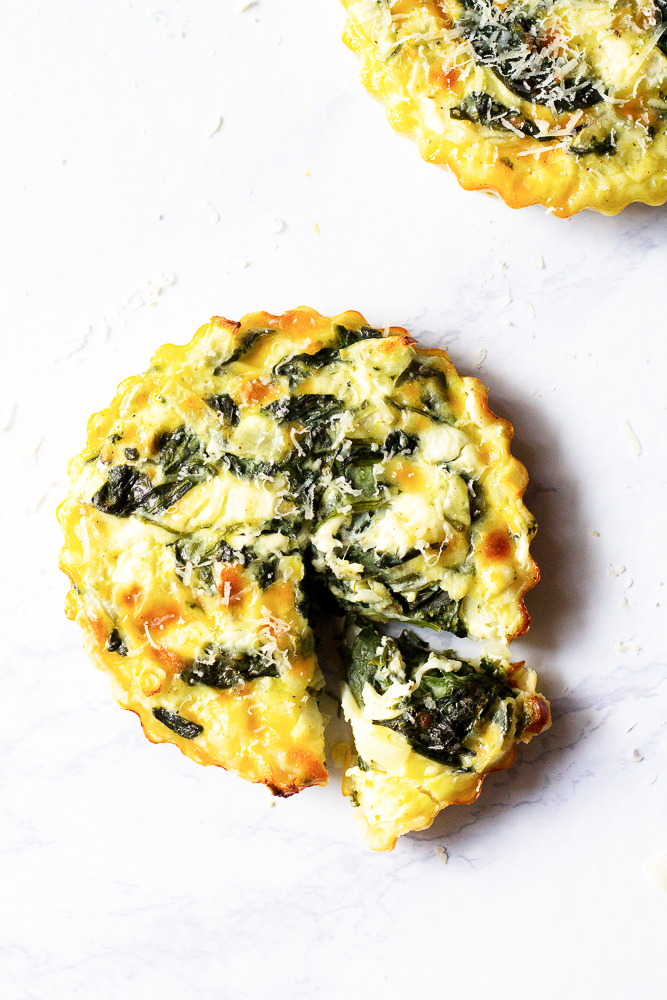
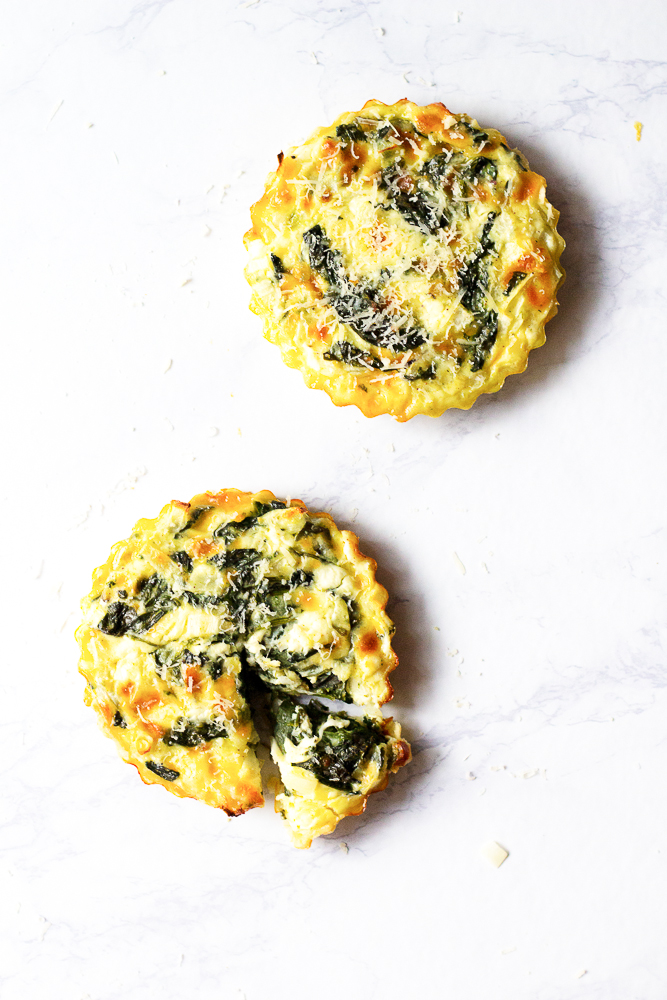

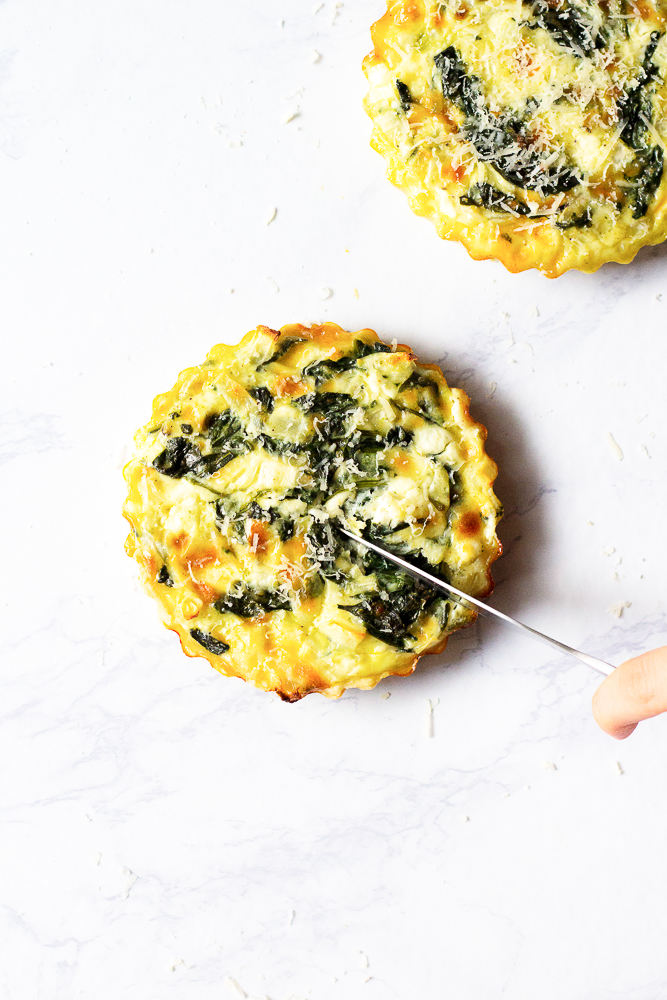
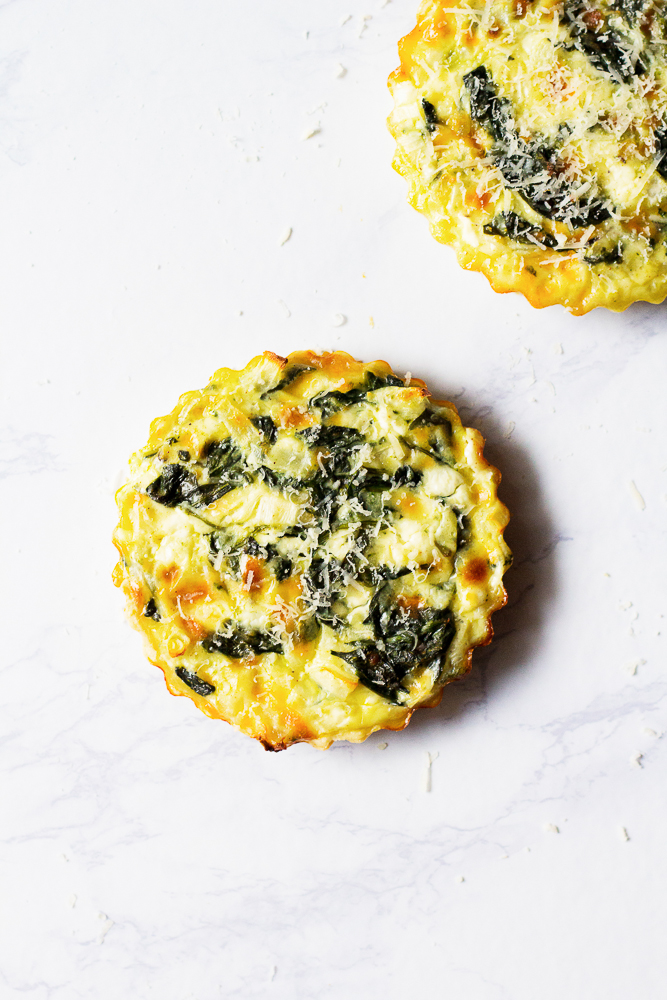


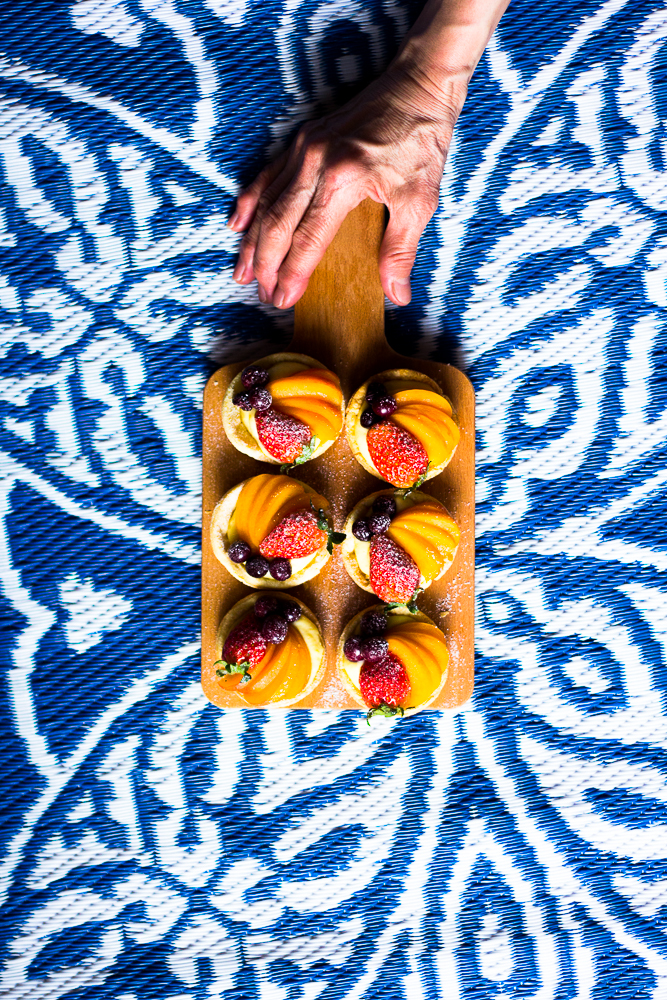

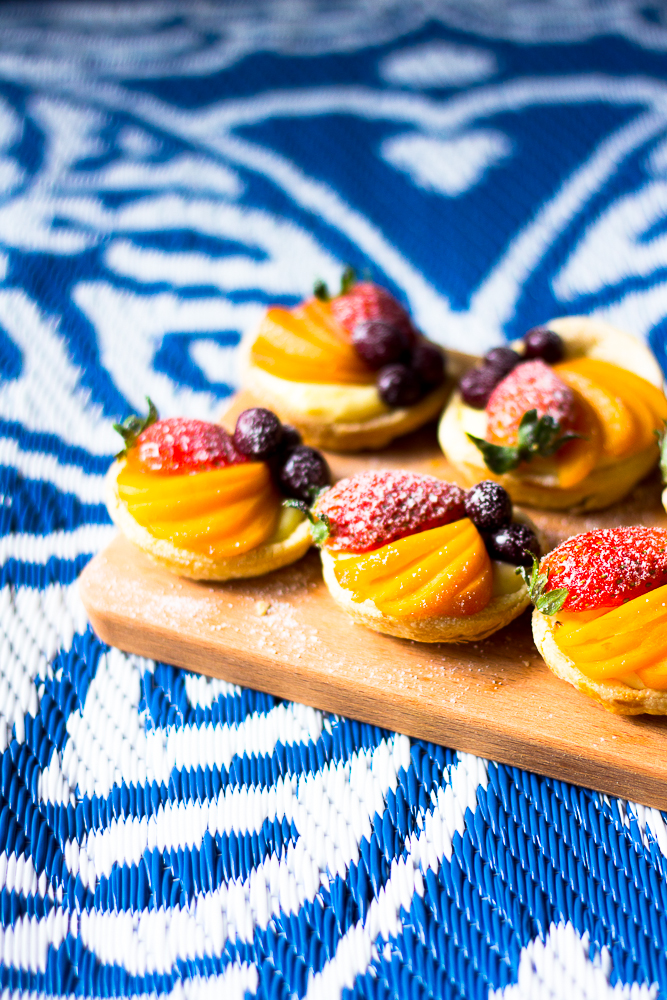


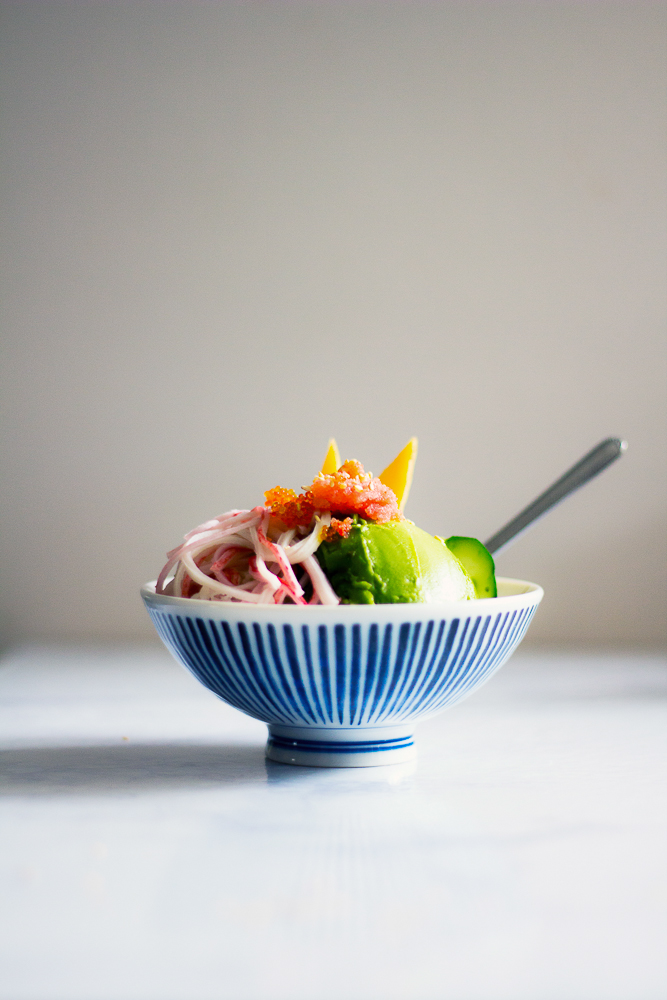

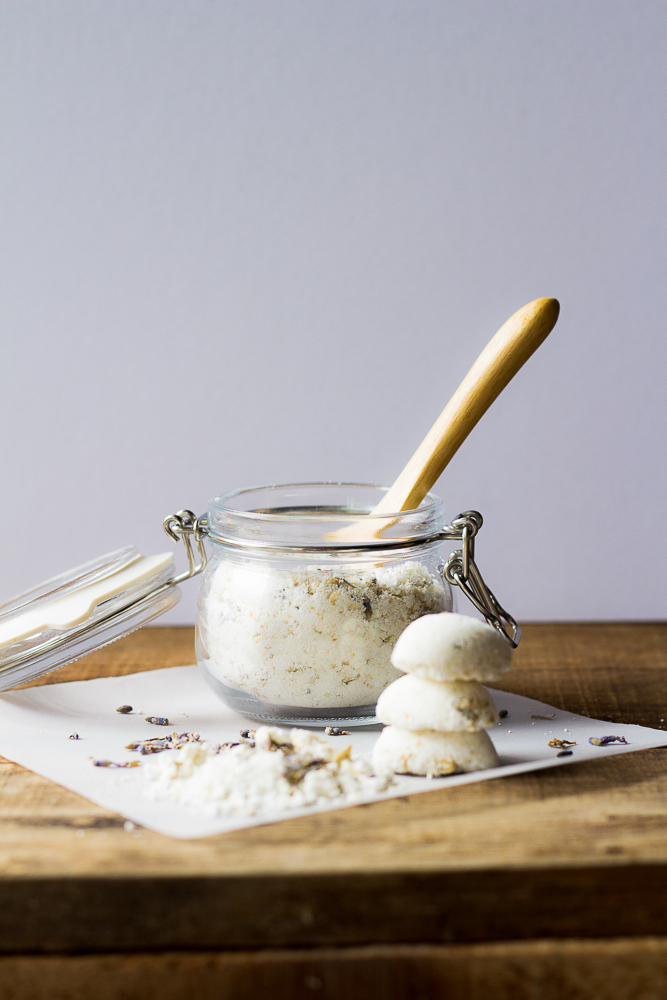
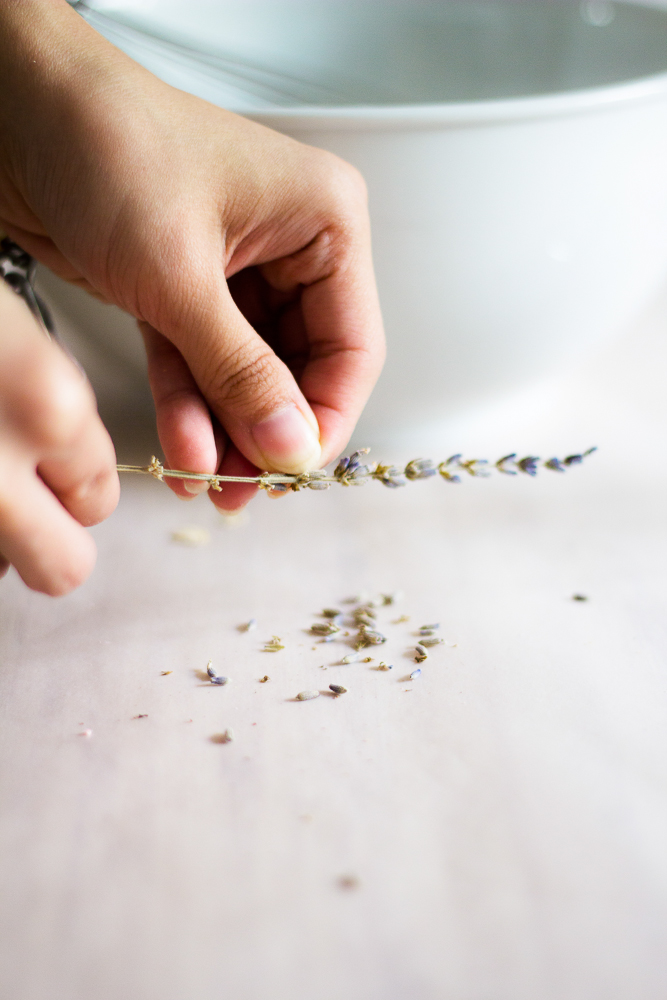
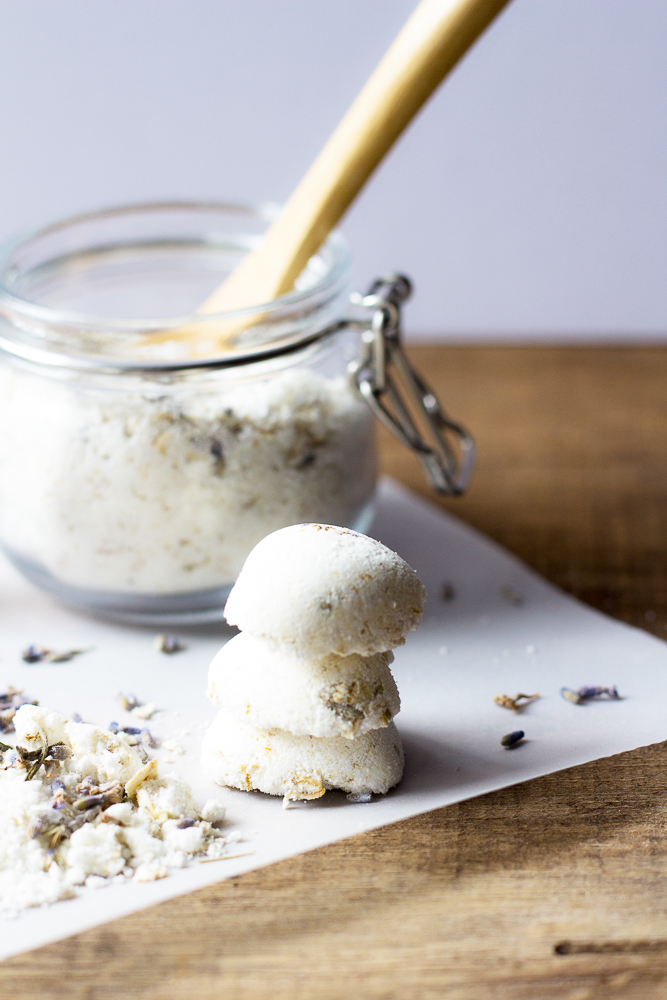


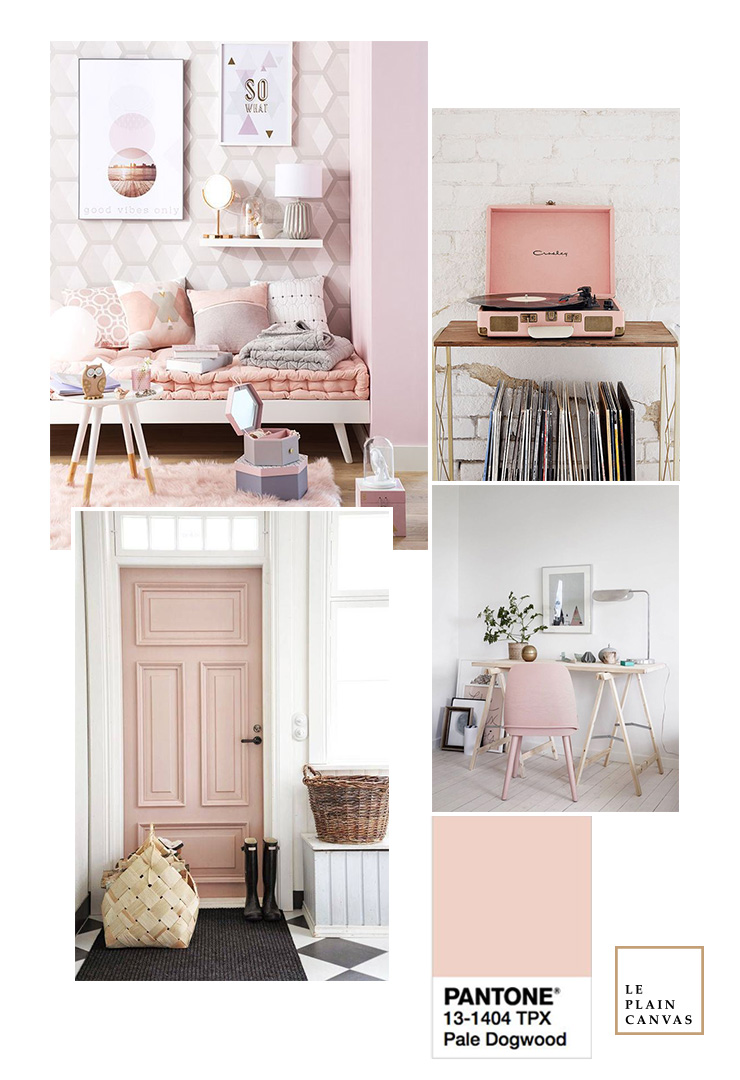

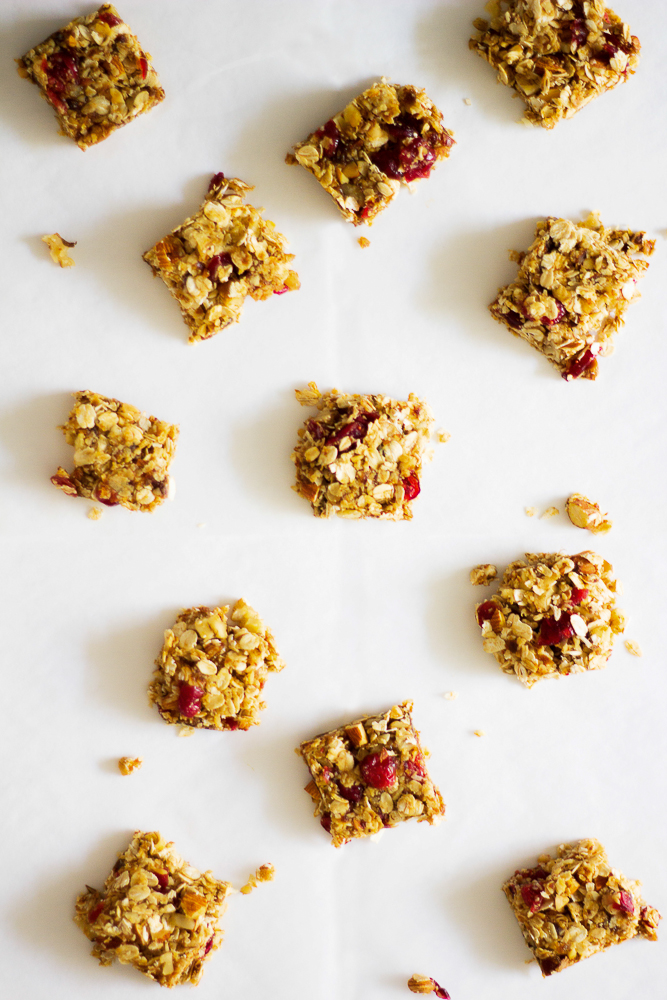

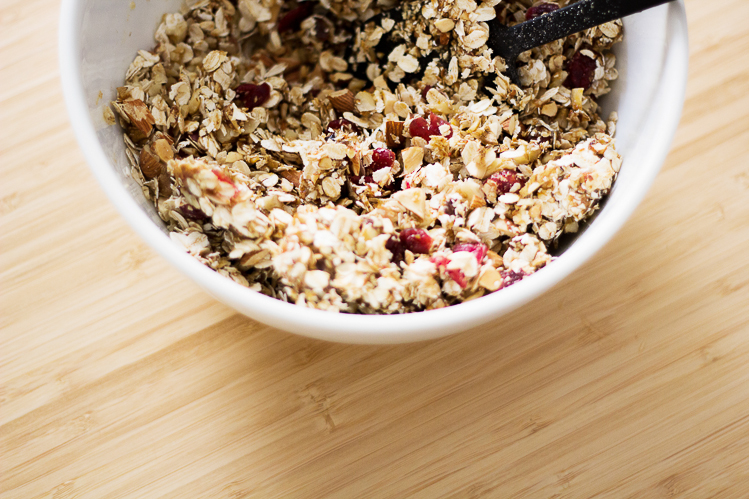

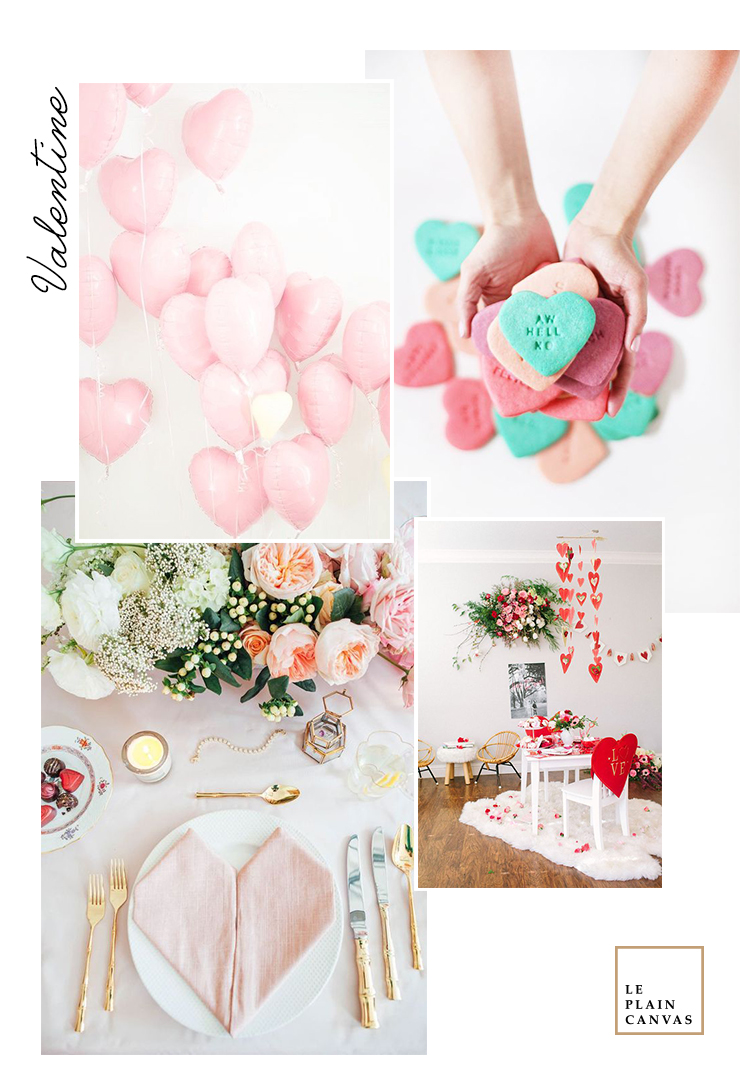


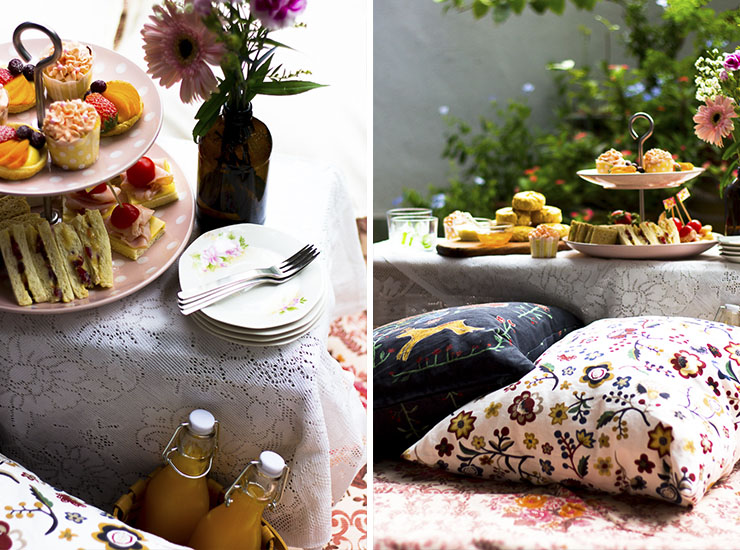
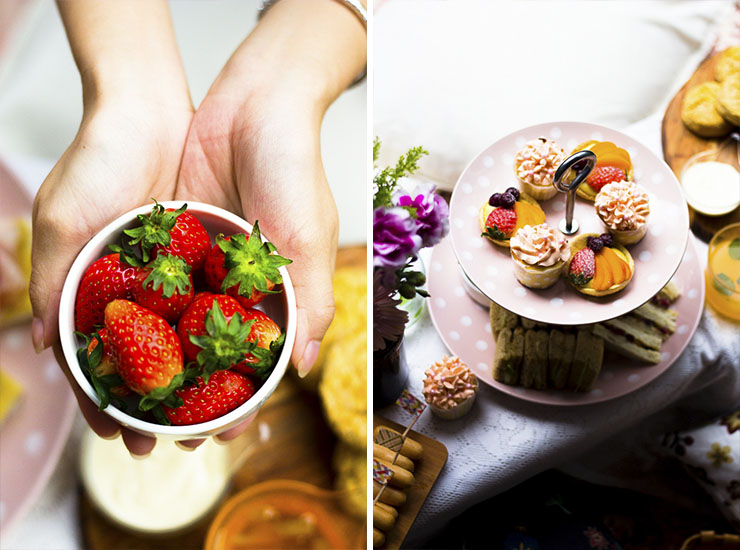
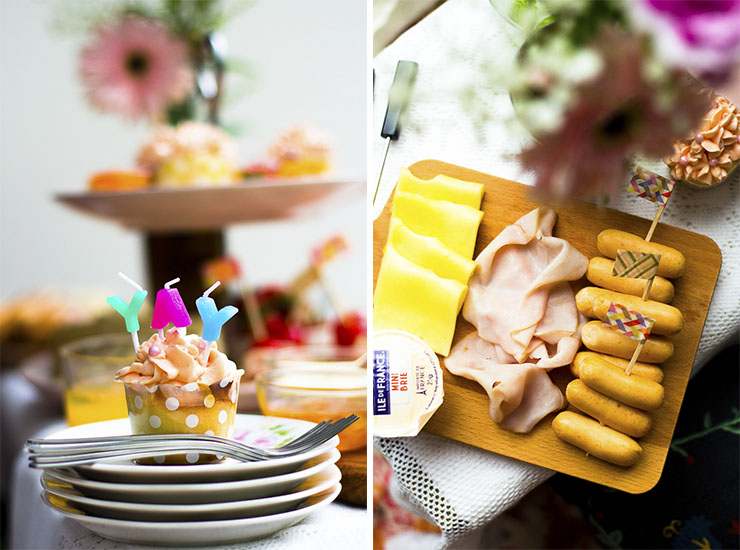


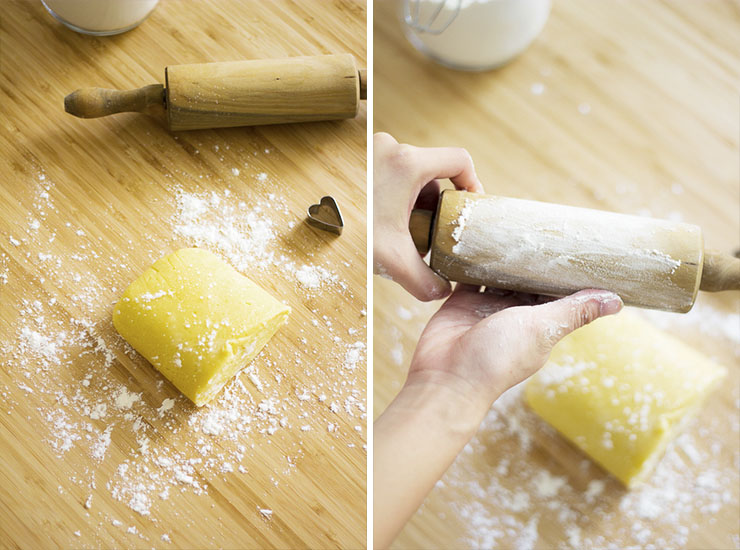
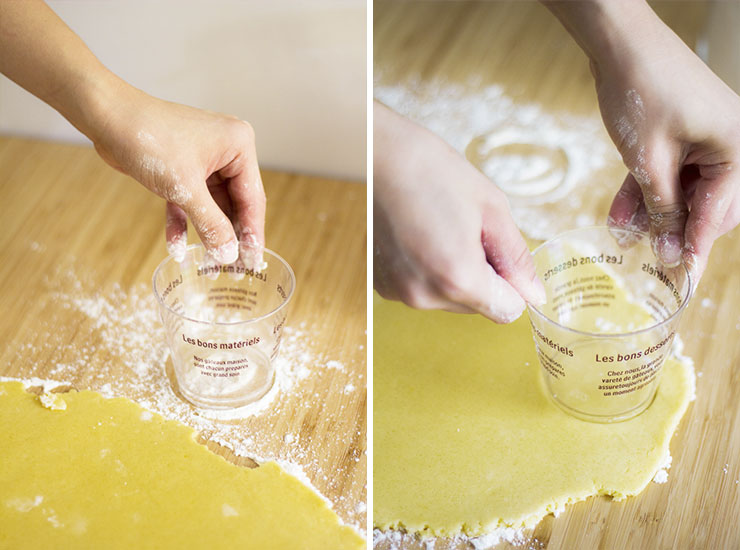

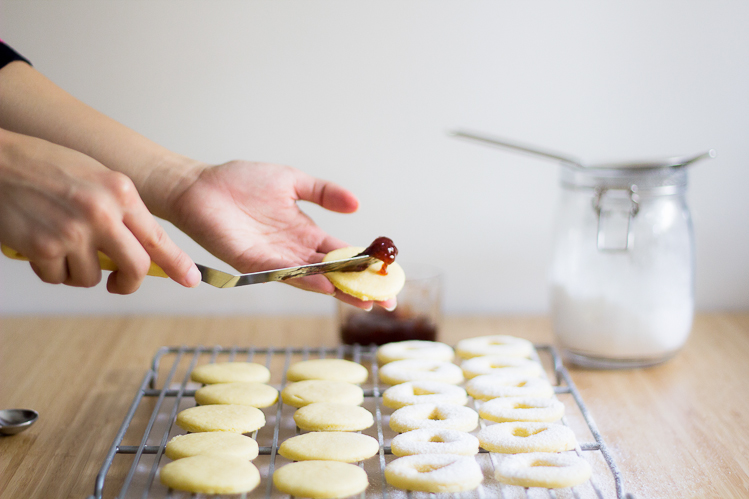


 This week I would love to share with you some amazing work desk or studio inspiration I have in mind. I love eye-pleasing, organized space and of course, it must be practical yet attractive! With having a messy studio is annoying for me as I couldn’t concentrate, and most of the time I would have brian-block.
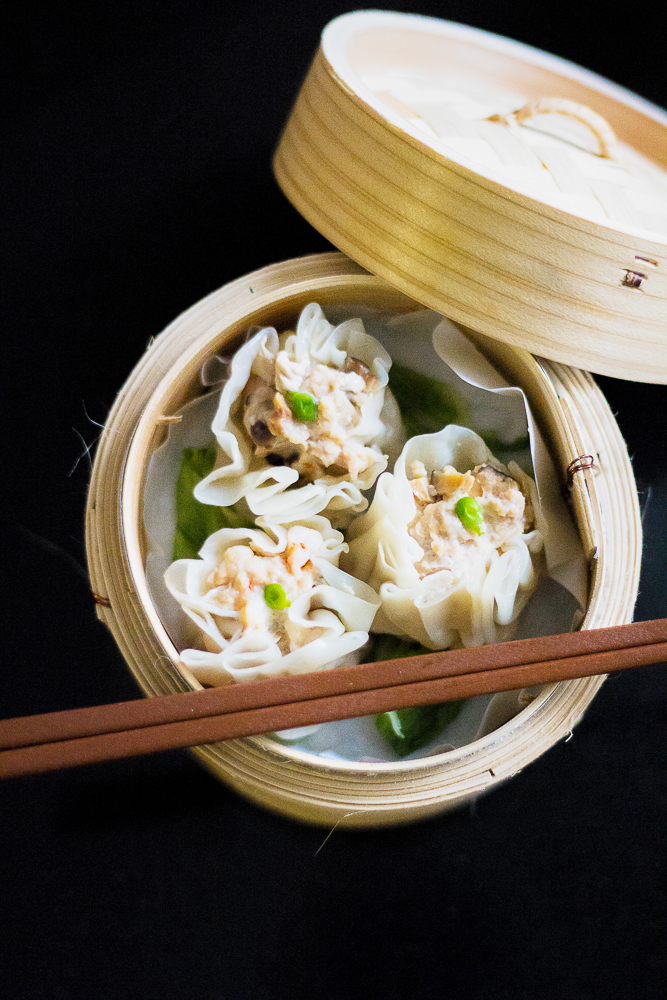
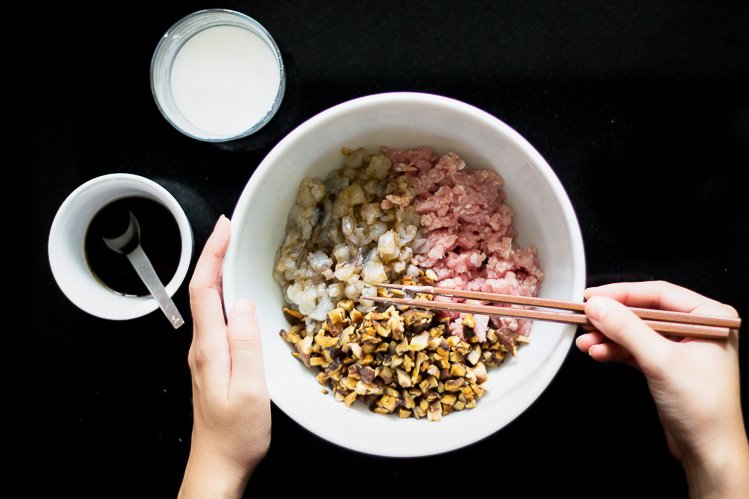
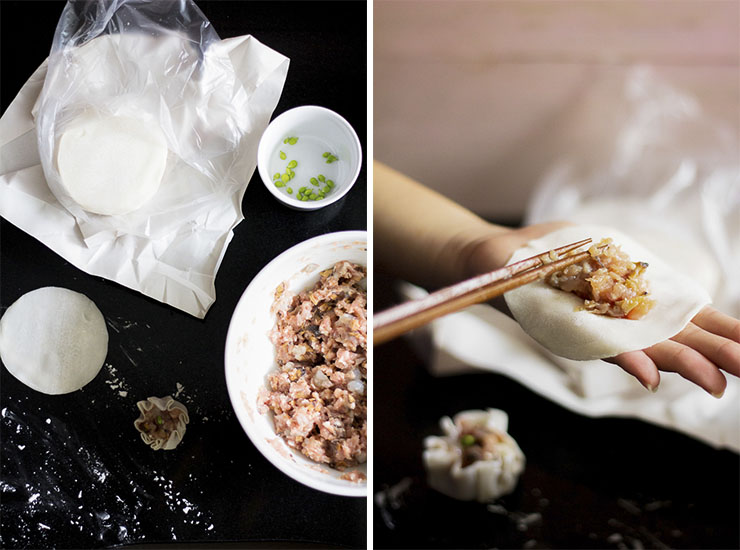
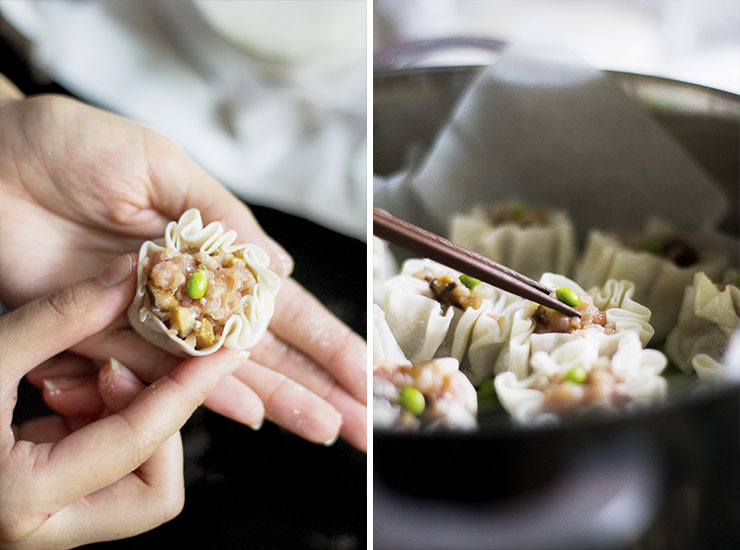
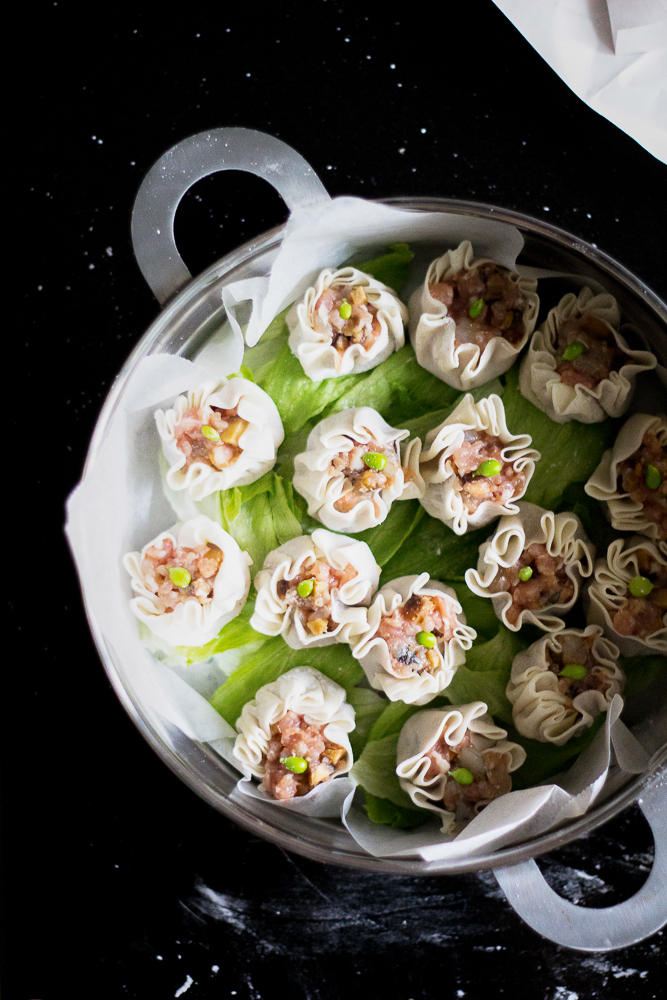


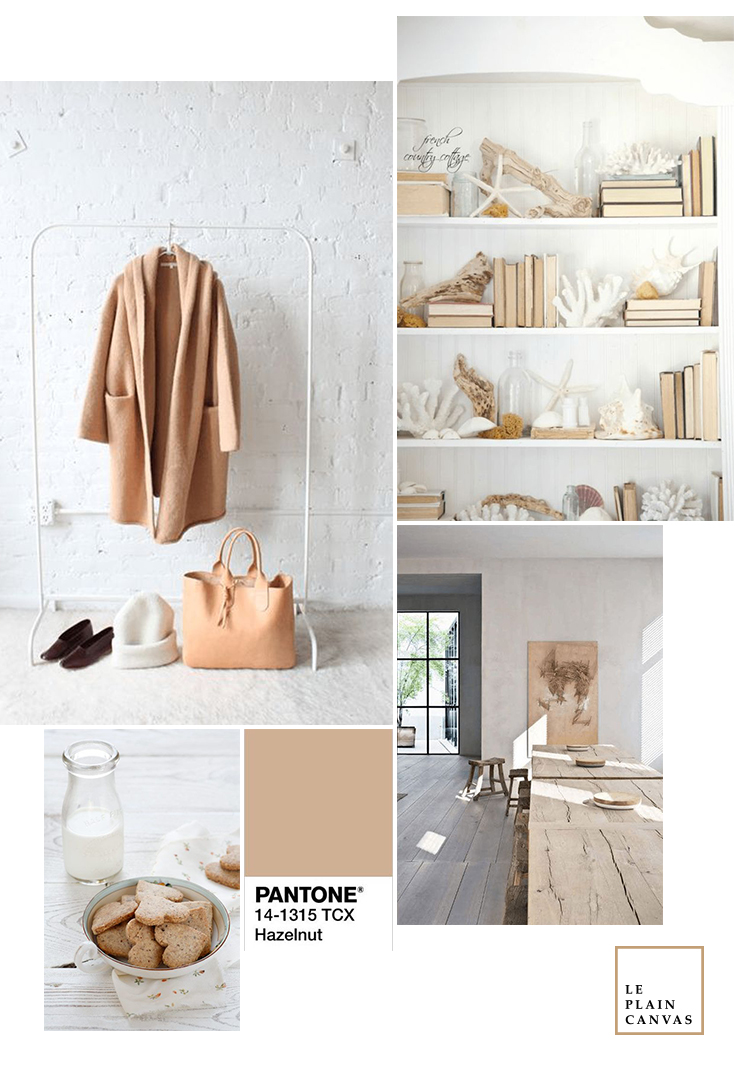 The enthusiasm with this year Pantone announcement it is just beyond amazing yet. While going through those shades, we decided to select several to share with you folks. Apart from the love with Greenery, there’s another colour we love this season.