Notice: Function _load_textdomain_just_in_time was called incorrectly. Translation loading for the acf domain was triggered too early. This is usually an indicator for some code in the plugin or theme running too early. Translations should be loaded at the init action or later. Please see Debugging in WordPress for more information. (This message was added in version 6.7.0.) in /home/u340358266/domains/leplaincanvas.com/public_html/wp-includes/functions.php on line 6170
Notice: Function _load_textdomain_just_in_time was called incorrectly. Translation loading for the sitka-core domain was triggered too early. This is usually an indicator for some code in the plugin or theme running too early. Translations should be loaded at the init action or later. Please see Debugging in WordPress for more information. (This message was added in version 6.7.0.) in /home/u340358266/domains/leplaincanvas.com/public_html/wp-includes/functions.php on line 6170
Notice: Function _load_textdomain_just_in_time was called incorrectly. Translation loading for the health-check domain was triggered too early. This is usually an indicator for some code in the plugin or theme running too early. Translations should be loaded at the init action or later. Please see Debugging in WordPress for more information. (This message was added in version 6.7.0.) in /home/u340358266/domains/leplaincanvas.com/public_html/wp-includes/functions.php on line 6170
Notice: Function _load_textdomain_just_in_time was called incorrectly. Translation loading for the sitka domain was triggered too early. This is usually an indicator for some code in the plugin or theme running too early. Translations should be loaded at the init action or later. Please see Debugging in WordPress for more information. (This message was added in version 6.7.0.) in /home/u340358266/domains/leplaincanvas.com/public_html/wp-includes/functions.php on line 6170
Notice: Function _load_textdomain_just_in_time was called incorrectly. Translation loading for the kirki domain was triggered too early. This is usually an indicator for some code in the plugin or theme running too early. Translations should be loaded at the init action or later. Please see Debugging in WordPress for more information. (This message was added in version 6.7.0.) in /home/u340358266/domains/leplaincanvas.com/public_html/wp-includes/functions.php on line 6170 LePlainCanvas – Page 13 – Illustration & Lifestyle Inspiration
How’s your weekend so far? Christmas is coming nearer and nearer. How the Christmas preparation for your side? It’s okay that you don’t, it not too late to start.
Not into traditional Santa red for Christmas? How about to go a little more traditional with a Gorgeous Sparkling Christmas. Mix in a few different shades of sparkling – from rose gold to champagne – to pull together this tree that truly shines! We started with amazing gold and glittered glass bulbs, added in poinsettias in similar golden hues…
To add more depth and texture use wooden snowflakes, glittered pinecones, feathered picks and more! To complete the rustic and warm feel, you can surround your house with a burlap-wrapped base and neutral gifts.
We are so excited for Christmas, how about you? Happy Monday!
xoxo, Joe.
Credit | All shots used on the Christmas mood board via our Pinterest boards.
It’s already December the last month of this year. It has been a real good year, the world, my family and friends all treat me well. Therefore I am going to maintain this happiness and walk toward a new year.
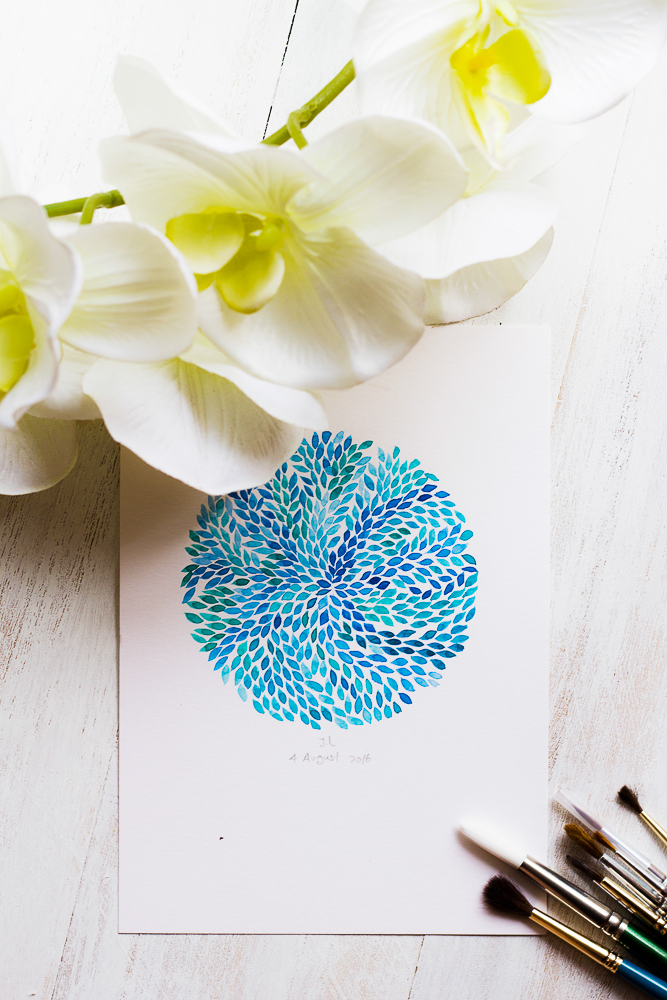
So recently I have been trying different water painting method, wet on wet, wet on dry and more. However, there’s something very new that I m doing right now – which is calligraphy. What do you think? I am still a newbie to it but I believe someday I can master it. In order for me to do so, to achieve my goals. Currently, I’m already planning for my new year resolution, the things I should do and the things I shouldn’t do.
“It is December, and nobody asked if I was ready.” ― Sarah Kay
It’s already December, it means our year will be coming to an end soon. To make our year meaningful and happy, we have been trying to do a lot of new and interesting stuff. Such as we have been rewarding us with good meals, especially for our favorite brunch period.
Rather than making the usual pancake that has butter and maple syrup on top. We decided to make some savory pancake – Savoury Pancakes with Tofu & Spinach stuffing.
This ultra-savoury beauty is full of rich flavours and the heavenly textures of soft, warm vegetables and just melting cheese. Simply gently fry some tofu and finely sliced onion in a drizzle of oil until lightly golden and caramelised, while wilting a few handfuls of fresh spinach leaves. Spoon in your pancake, top with yoghurt drizzle, a pinch of freshly ground black pepper and some finely chopped fresh red chilli for a wonderful kick at the end of each mouthful.
“These pancakes make a versatile base for any spicy filling, and it’s easy to double quantities to feed a crowd – a brilliant option for a reviving post-party brunch. ”
Actually this is a very easy recipe to make, I can say that it’s only the ingredients that looks fancy. There is two parts for these dish – part one is the making of pancake and part two is the making of the filling. We usually like to mixing the mixture for the pancake and leave it to “set” for around 15 minutes. This setting period allows the air bubbles to set and give a soft and chewy texture to the pancake.
While leaving the mixture to “set” we when on to cook our fillings. This filling is fabulously flavorful and has a texture similar to classic paneer, but is 100 percent vegan. If you are like us and are making resolutions for the New Year to eat less meat, this is a perfect recipe to start with.
This is a great thing to have on hand to make a quick Desperation Brunch – so we like to keep some small zip lock baggies of this magical stuff in my freezer. This stuff makes great sloppy joes and last-minute brunch!
Ingredients|
225 g plain flour
3 large free-range eggs
300 ml semi-skimmed milk
2 teaspoons unsalted butter
3 spring onions
6 sprigs of fresh coriander
6 sprigs of fresh mint
2 fresh green chillies
1 teaspoon toasted cumin seeds
¼ teaspoon curry powder
optional: plain yoghurt, chopped coriander and diced red chilli , to serve
Ingredients needed for pancake filling:
400 g fresh baby spinach , or defrosted frozen spinach
vegetable oil
400 g paneer
1 onion
5 cm piece of ginger
3 cloves of garlic
1 tps of cumin seeds
1 teaspoon curry powder
4 tablespoons double cream
1 lemon
Method |
Start by making your filling. Blanch the spinach in a pan of boiling water for 3 to 4 minutes, or until wilted. Drain in a colander, squeeze out any excess water, then blitz in a food processor until roughly puréed. Set aside.
Cut the paneer into 1.5cm cubes. Heat 1 tablespoon of oil in a wide non-stick frying pan, then stir-fry the paneer for 2 to 3 minutes, or until lightly golden. Remove with a slotted spoon and set aside.
Peel and thinly slice the onion, then peel and finely grate the garlic and ginger. Put to one side.
Heat 2 more tablespoons of oil in the same frying pan. Add the black mustard seeds and cumin seeds and stir-fry for about 30 seconds, until they begin to become fragrant, then add the onion and fry over a low heat for about 5 to 6 minutes, or until softened.
Add the grated ginger, garlic and curry powder to the pan and continue to cook for a further minute or so. Then, stir in the spinach and cook over a medium heat for another 3 to 4 minutes.
Add the paneer and cream. Cook, stirring, for 2 to 3 minutes, or until piping hot. Squeeze in half the lemon juice, then taste and season, adding more lemon juice, if you like. Put to one side and keep warm.
To make the pancakes, place the flour in a large bowl and season with sea salt. Make a pit in the center and add the eggs and half of the milk.
Melt the butter in a medium non-stick frying pan (roughly 20cm). Allow to cool a little, then add to the batter along with the remaining milk. Whisk everything until smooth.
Trim and finely slice the spring onions and chillies (deseeding if you like), then pick and finely chop the herb leaves. Stir it all into the batter, along with the cumin seeds and turmeric until well combined. Leave the batter to rest for at least 15 minutes.
Lightly grease the frying pan with oil and place over a medium heat. Once the pan is hot, add a ladleful of batter, turning the pan so it evenly and thinly coats the base. Cook for 1 to 2 minutes, until set and lightly golden. Flip over with a spatula and cook the other side for another minute, until golden.
Slip the pancake onto a warm plate and keep covered with a clean tea towel while you make the rest of the pancakes. You should have 8 in total.
When you’re ready to serve, place large spoonfuls of the spinach and paneer mixture in the middle of each pancake and fold into triangles or roll up to enclose the filling.
Drizzle with a little yogurt and scatter over some chopped coriander and diced red chilli (if using). You could also serve the stack of pancakes with all the accoutrements on the table and just let everyone help themselves.
Tips from the two sisters: Savory veggie-filled pancakes for breakfast or any meal. This is our go-to meal when we come home late and don’t feel like cooking. Experiment with another veggie, meat, and cheese combinations. Whether you’re on a cleanse or just trying to add healthier options to your breakfast table, we recommend choosing high quality ingredients whenever possible.
Share with us your making! Take a photo of yours, send us an email, tag us on Instagram, tweet us, anything. We love to see yours!
We knew that mains are always the highlights of any feast! Hence, how could we neglect the supporters for the show?
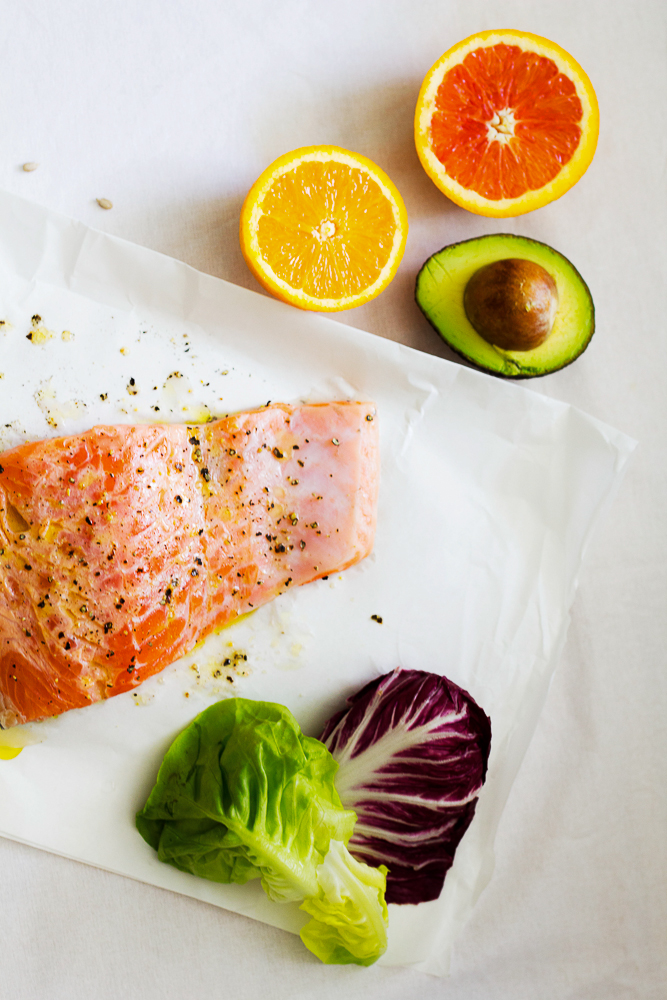
Therefore, here is one of our hot pick for this holiday – Salmon & Ricotta Cups with the Smoked Salmon and crackers. We don’t just simply serve this appetizer just the way they are but we preferred to make this along with a cheese board if possible.
Salmon is one of our top favorite indulgences, along with steak tartare and foie gras. We love salmon served in the traditional manner, alongside ricotta cheese with a generous amount of drills and lemon juice.
Warm, toasted bagels are the best. However for me, just about any crackers or bread sticks will do because it’s mostly about the salmon itself.
(Warning: it also takes less than five minutes to consume an entire bowl, so beware!)
It is very simple in preparation, just poach your salmon fillet and mixed it with other ingredients like ricotta cheese and drills. This is the best recipe when you are preparing a more complex main dish. As it helps you to save time yet it does not look like a “no effort” dish. Below are the ingredients and methods you needs for this dish. You can adjust the amount of ingredients base on how much you need.
Ingredients |
1 fillet of salmon, bone removed
250g ricotta cheese
1 tbsp lemon juice
a handful of dill
Prawn roe for garnish
Method |
Cook the salmon fillet in the pot with the water filled covering the salmon. Cook it for at least 5 minutes, do not overcook it. Dry it with a towel and remove the skin of the salmon.
Break the salmon into smaller pieces and beat all ingredients together until well combined. Spoon into a serving bowl and garnish with prawn roe. Serve with crackers and vegetable sticks.
Don’t you think isn’t it as easy as you can imagine? As you look around a little and you’ll find hundreds of recipes for the salmon spread. While some of them include mayonnaise or yogurt. Others call for fish that’s been, smoked, poached, or pickled. It’s such a flexible, versatile food you can use it with almost anything. Here, we’re keeping it simple. Fresh salmon paired with lemon juice, dill, and low-fat ricotta cheese will yield irresistible appetizers.
Tips from the sisters | No tips as it is as simple as it shown however we suggested you can serve it with some of your adorable tea cups collection! For us, we love our Aladdin glassware.
Share with us your version! Take a photo of yours, send us an email, tag us on Instagram, tweet us, anything. We love to see yours!
Every great dream begins with a dreamer. Therefore, always remember that you have the strength, the patience, and the passion for reaching for the stars for changing the world within you. Thus, these are the way how Neiw inspired me. He is someone who inspired me with his dream as he becoming someone he always dreams of!
Therefore, what I learned from he is following your passion, be prepared to work hard and sacrifice, and, above all, don’t let anyone limit your dreams. As we should believe that imagination is stronger than knowledge. Dreams are more powerful than facts and hope always triumphs over experience.
Even though Thanksgiving has just ended, but it is the beginning of the celebration. Right after Thanksgiving indicates Christmas is coming on its way! While everybody is getting ready for the actual day, for many of you might be like us pondering what to prepare for the feast! It’s a special to gather together with family and friends they’re the reason we treat it importantly on such a special day.
We have many ideas to try out, We planned to prepare ahead to prevent hassle on the actually day! Therefore upcoming weeks, we are sharing quite a few different recipes that we like it a lot to you all. Maybe you could have a try to prepare that for your gatherings or giving gifts!
It has been cold during this festival and what is better than a glass of chilled citrus sweet tea to kick start your feast! It is refreshing, tasteful filled with a great scent of orange, lemon, and Gin! I love this recipe a lot, maybe because of my love for the citrus and Gin. It’s a very simple recipe that you could try with it for any occasions.
Ingredients |
8 cups water
4 black tea bags
1 lemon, juiced
1 orange, juiced
Gin (Personally preferred Bombay Sapphire Gin)
Method |
Prepared a large saucepan, heat water just until it comes to a rapid boil. Remove from heat and drop in the tea bags. Cover and let steep for about 20 minutes.
In a 2 quart pitcher, combine the steeped tea, discarding the tea bags. Stir until dissolved. Continue to cool to room temperature. Stir in lemon, orange juice, and gin.
Refrigerate until chilled. Serve over ice.
Tips from the two sisters |
Here are some tips that I would like to share with, it’s best not to add the citrus until the tea is completely cooled. Even better to chill the cooled citrus tea, as recommended, to let the flavors meld. Also, cooling too fast brings out the tannin, causing cloudy tea. Should any tea become cloudy, just add a little boiling water to clear it up.
For those who decide to serve on any festival’s gathering, this could be preparing a day ahead for any parties. After mixing them with our recipe above, chilled in the fridge for the serving. That’s it!
With shots of Gin, it intensifies the flavor of the glass of ice tea. For those who are planning for different groups of the guest, you could separate the non-alcoholic and the alcoholic drink in two different portions.
Our suggestion is having the non-alcoholic Orange & Lemon Ice Tea in a fruit punch bowl for the younger guest while the alcoholic ice tea in jars. As we take consideration on the weight of the jar for the younger visitor.
Share with us your glass of version! Take a photo of yours, send us an email, tag us on Instagram, tweet us, anything. We love to see yours!
Is everyone getting ready for this Christmas? Well, I’m for sure! Seeing the streets are filled lights while the malls are filled with shoppers getting ready for the special day. While the festival mood is just getting closer, I believed that everyone just gets excited each day!
We just love Christmas, the coziest event of the year! While searching ideas for decoration. Upon chance, I discover this fabulous Santa Red, it is the beloved colors for a traditional household decoration. It matches so well with white walls and any texture.
Do stay tuned for more Christmas’s ideas on our blog as well as on our other social media pages! Happy Monday!
xoxo, Angela.
Credit | All shots used on the Christmas mood board via our Pinterest boards.
Thanksgiving is one of my favorite days of the year because it reminds us to give thanks and to count our blessings. Suddenly, so many things become so little when we realize how blessed and lucky we are. However, I always remind myself to be thankful every day for everything. As we always though that we have the time to be thankful. For me I know, we don’t!
So you may have heard of Black Friday and Cyber Monday. There’s another day you might want to know about: Giving Tuesday. The idea is pretty straightforward. On the Tuesday after Thanksgiving, shoppers take a break from their gift-buying and donate what they can to charity. So what will you do on this Tuesday?
Thanksgiving – celebrated on the 4th Thursday of November – is the most wonderful time of the year. Christmas songs try to say otherwise, but it just doesn’t get better than expressing gratitude for all you have in your life, getting together with loved ones and stuffing yourself silly with one of my favorite Thanksgiving classics.
This year we decided to host our first Thanksgiving Brunch among our family members. As we would like to appreciate the help, the joys each of the family members brought us. We would like to thanks them for their understanding and also ask for their forgiven for the mistakes and trouble we brought to them. Nevertheless, we would also want to be thankful for all the food and love that give us this year as it’s a gift.
The Thanksgiving Brunch we host is rather simple, the menu consists of a simple 3-courses meal. A day that filled with the savory and sweet aromas from all the delicious food we’re preparing. We thought that it can help to reduce other sensory input at the table. After much consideration, we decide to go ahead with the Thanksgiving theme we dream of. Amazing glittering gold with a touch of floral and a hint of Autumn. It gives us a warm and home feeling with a classic touch during this season.
We decided to go ahead with some festival drink homemade Orange-&-Lemon Ice Tea. Following with the starter, Salmon & Ricotta Cups served along with smoked salmon, crackers, and bread stick. Each guest was being served with fleshy made pancake. This recipes are the best combination for each other. It balanced up the palette that we have on the plate. Not saying that they are all easy and simple to made, which means not much preparation are needed.
The joyful noon was filled with laughter and we end the brunch with a slice of Deep-dish Pumpkin Icebox Pie. What is a Thanksgiving without Pumpkin? This time we made ourselves aDeep-dish Pumpkin Icebox Pie using the homemade pumpkin puree that we made. We made this pie 2 days ahead as it required a more time than rest. However, they are worth the time making it.
To complete the thanksgiving brunch, we added a little touch to the plate. We have made a welcome card on each of the plate, you could personalities it by writing the guest name instead. It gives us a welcoming and warming atmosphere. For our Thanksgiving, we have appetizers, dessert, and drinks covered, how about you?
Although it is a short time that we have spent together but a little sharing and giving is all we could ask for. Check out the dream Thanksgiving menu that we served on our Thanksgiving. Too late for Thanksgiving, it is okay. You can use them for your upcoming festival’s brunch too.
Share with us your thanksgiving too! Take a photo of your Thanksgiving, send us an email, tag us on Instagram, tweet us, anything. We love to see yours!
People believe that the heroes are one in many thousands, but I want to say that a sister like you (her) is always one in a lifetime. However, sister always helps you in understanding the world better and also appreciates it more than anyone else. I know it better as that’s how it have been for the past 24 years.
Today is a special day, a day that filled with blessing and love. 24 years ago, I was waiting patiently outside the ward for my mom and going-to-be baby sister to come out. I don’t actually remember how it was but the moment I saw her, I knew she was someone special that I love – she is my sister, Joe.
She is a gift from my parent that never could be replaced. Joe will be always my baby sister who is always cheering me up, loving me unconditionally whatever I am. I would want to give her all my blessing and ask for her forgiven in all the ridiculous that we fight, we joke, we argue for. I will always love you!
Sleeping with a sleeping mask has been so essential for me since the beginning of this year. I’m a light sleeper and it took me hours to fall asleep, however with a sleeping mask, it allows me to have a well rested night. For those who decide to get something comfortable and cheap why not spend sometimes sew your own sleeping mask?
This sleeping mask is also perfect for those who want to catch a small nap when you’re traveling. Whether you are flying a red eye or sharing a cabin by the lake, there are many reasons to shut out the light from the outside world to help catch some quality shut-eye. Sewing a travel eye mask is a super quick and easy project. And, as it only takes a little bit of fabric, it is a great stash-buster too! Whip up a few for the whole family so you can all get some beauty sleep on your next vacation.
Other than using the basic sleeping eye mask shape that we have in the market. We redesigned it to make it in a cloud shape. It gives a dreamy feeling, seems like we will always be having a good dream once we wear it. Thus one of the main points of this project is to use the cloudy eye mask template that we designed. In addition to the pattern, you’ll need some basic tools to get the job done.
Some of the materials needed for this project are;
Cloudy eye masks template
Fabric for the outside layers
Felt/Cotton for the lining
Clear ruler
Pins
Scissors
Elastic (this will be visible, so choose a color you like with your fabric)
Thread (note that there is top stitching so choose your thread accordingly)
Tip: Choose fabrics that are comfortable on your face and also easy to wash, as it will get dirty from mascara and face oils and will require frequent washing.
Print out the Cloudy eye masks template on the a4. Once the size is confirmed correct, using your paper scissors, cut out the pattern for the eye mask.
You will need three layers of fabric for the mask. Pin the pattern to the fabric of your choice. For us, we use two different type of materials for both layers of fabric. Fabric on the outside has a rougher surface, allowing us to do embroidery work on it.
Next, we cut one single layer of the batting of your choice. The batting I picked is a thin layer of felt which worked perfectly. For the felt in the middle, a dark colored fabric is used, as it mimics the darkness of night!
4. Measure down from the top of the mask and pin the elastic in place on the right side of the fabric. Repeat on the other side of the mask. The pattern calls for the elastic to be 13 3/8″ in length. Measure your head to make sure that size will fit you correctly. Remember you will loose 3/8″ on either side for the seam allowance. You want it to be fitted, but not too tight.
For us, we worry that the elastic will tangle our hair thus we sew a border around it using a straight stitch. It also gives more detailed for the elastic.
5. Personally, we have fallen in love with embroidery, therefore, while we were designing this Miss Cloudy Sleeping Mask. We decide to have some embroidery work on it. This embroidery work might be tricky in the beginning. However, after awhile we are sure that you will get hooked to it.
6. We wanted the batting to be on the inside facing my eyes, so we pinned slightly different from what the pattern calls for. The order of the fabric will be the batting, inner fabric, the elastic and lastly the outer fabric (the wrong side up). Follow the shape of the fabric, sew it accordingly.
We like to pin the opening at the top parallel to the fabric’s edge and the rest perpendicular to the fabric’s edge. This tells us that this area is to be left open and the difference in pinning gives us an advance warning to stop. Using a 3/8″ seam allowance, sew all the way around the mask, leaving a 2″ opening at the top along the flat edge.
7. Use the curvy end of a point turner and open up the seams around the entire mask. At the opening left along the top of the mask, fold the seam allowance into the inside. Take your time to finger press the edges as to create a smooth line.
8. Pin the opening closed and press with an iron if necessary. Top stitch around the perimeter of the entire mask, closing the opening left in the top at the same time. Use a 1/4-1/8″ seam allowance and a thread color you like on top of your fabric.
You may also use an iron, give the mask a final press, and that’s it! These turned out so cute and were easy to make! So they would be a great personalized gift for someone special. I’m hoping that my eye mask will make you feel more at home when you’re away and help you to have the sweetest dreams!
Please make them and take a photo, send us an email, tag us on Instagram, tweet us, anything. We love to see yours!
It’s mid of November right now and all of us might not want to admit but this year passes quickly! For us, it has been a challenging year, it has been a wonderful 11 months!
Yet, if it possible, everyone wants it to be better than what it should be. This is a great chance to reflect the past and get your pen to list down your bucket list for the next month or before the year end!
Question: Summaries your achievement in 2016 or list down your goals for the month of the year end.
Angela: “It’s has been an amazing year, yet. I met great people and I’ve been closer to my friends and family. I cleared out bad things that influence me in my life and treasure the good ones. Before the year end, I wish that we could produce more good stuff for our reader.”
Joe: “2016 is a challenging year for me. However, due to these challenges I have, it helps me gain more experience and skills. This year I learn to do water painting and also expand my knowledge for 3D drawings. I met new people who have better influences to me and also I learn to communicate better with people around me. Before the year end, I would like to get connect to a friend I haven’t been contacting for awhile. I also would like to create more arts and inspiration for you.”
Date | 8th October 2016 Starting Point – Ending Point | Marang Walk (Harbourfront) – Normanton Park Duration | 3.15 hrs Length | Estimate 10km
During last October, Joe and I decided to challenge The Southen Ridges; starting from the Marang Trail up to Mount Faber Park, moving toward the Kent Ridge Park. We were disappointed that both Fatin and Mai couldn’t join us this time as we miss the joy they brought us! Getting ready to join #ourhikingstories through the breezes and scenery we captured through our lens.
We would like to invite you to join #ourhikingstories through the breezes and scenery we captured through our lens. Upon entering the trek, there are endless steps up to the hill. Beautiful scenery and fresh air really motivate us to walk more and finish the trek.
The air surrounded us was fresh and clean, unlike the polluted air along the roadside produce by cars.
After conquering Henderson Waves Bridge, instead of turning to the right for the Forest Walk, we climb upon the Hill Top. The view just took us by a surprise – we were stunned by the terrific rustic marble structure.
Eventually, we have reached the Forest Walk after sweating lots. We love the Forest Walk the most, with us spending significant time here exploring each corner of the structure. I must be said that this is one of my favorite part of trekking. The modern structure built in a forest, it is just simply brilliant.
Joe says she will love it more if the Forest Walk is like a rainforest, the were more trees as a shield. However, I told her this is a nature that we can’t enforce it unless she have it man-made it and it will defeat the purpose.
We had our homemade burgers at Hort Park and spend our time at the park. Every weekend Hot Park are crowded with different ongoing events and Farmer Markets. This is the best place to bring your children and family. However, if you are someone who enjoys quiet and just wanted a place for hiking this may not be a good place.
We decide to move forward to the canopy walk. Upon reaching Kent Ridge Park, what we saw the scenes are unbelievable, isn’t it? Extraordinary – the only one word we can use to describe the beauty of that place. Believe or not, we seem like entering into woods in Japan – the woods grow in the special ways. The fairly thin tree trucks are spread evenly and they are just enchanting.
Question | What is the one best thing that you’ve discovered during your trekking?
Joe : This time I discovered that my country really spent a lot of time and money on building gardens and park for Singapore, which is a beautiful thing. As our country is small thus we have less land. In order for us to be able to preserve such an amazing natural allowing us to have a short getaway from the city. Simply wonderful.
Angela : Discovering little along the way, and finding rare interesting plantation through the woods. While you put on your trek shoes, you could walk around freely to enjoy the breeze, stop when you want to. I suggest to stop and always looking for details and you will discover things normally you won’t able to do so.
#BehindPlainCanvas |
The nature walk is really therapeutic perhaps due to the abundance of oxygen produced by the trees. Nature is important to our well-being and we believe in the healing power of nature. Every time we go for nature, we feel so happy and blissful. Actually, happiness is free really.
To be at one with nature, to see animals and birds and to enjoy fresh clean air are something we take for granted. We must continue to ensure the preservation of nature. After all, the forest is the green lung for the earth. Really can’t wait for the next hiking experience.
So far, as compared to the others trek, the Southern Ridges is relatively easier to accomplish. However, we would say they do have much more steps to climb. This trek requires much more stamina than strength. Therefore this will be the best trek for beginner or people who want to go for a short run.
Topaz – the birthstone of November babies. It is believed to balance emotions and thoughts for a harmonious lifestyle. Which fully who I really am.
It’s already November, which means it’s my birthday month. Other than the staycation I have in the previous weeks, nothing really amazes me this month. As I am going to be older again. Time really passes fast, there was one time I ask my sister how old am I this year? The everyday task really messy up my life.
Some things we make for the love of others. We’ve been known to gaze lovingly at ingredients. Wrap cookies in little bows, and present a friend with a box of still warm chocolate chip cookies at just the right moment. Other things we make because we’re a selfish hungry girl. These doughnuts. Oh my God! These doughnuts we made because we’re a selfish girl who loves loves loves doughnuts.
Three facts with our doughnut-making experience:
These puppies took me about 2 hours and 15 minutes from start to finish. We started craving them and when we sunk our teeth into the first warm doughnut bite around 2pm. Worth every minute! Seriously.
These doughnuts are much easier than we expected, just be careful with the oil splash when you are frying it. Worth it. I’d do it all over again.
Glazing the doughnuts is the most fun thing we do, it is like giving the donuts clothes to wear.
If you’ve never made doughnuts before, here is my advice to you: Oh my God! Take the afternoon off. Turn off your phone. Make these donuts. Eat five to eight, and then promptly walk over to your neighbor’s house and beg them to take the rest off your hands.
What is a party when you don’t have delicious snacks? What is a morning when you don’t have a donut in hand? These donuts will the go-for-it-doughnuts we always made when we have parties, picnic and even for our usual morning. These doughnuts is crispy at the outside yet soft and moisture on the inside. The dough is the most simple one you could ever find. But remember you may only need minutes for them to be cooked, so don’t let them burnt!
Doughnuts with peach and mint icing. As soon as we took the first bite they reminded us of a tall glass of fresh peach lemonade. These are so bright and summery, we can’t get enough of them. But they’re baked so that makes them okay to eat for breakfast, lunch, dinner, and midnight snack, right?
These doughnuts are simple yet tricky for some of us, thus some tips for you if you are gonna give these donuts a try;
We used a 3” cookies cutter and a 1″ pastry tips to cut these doughnuts out.
Be sure to generously grease your doughnuts pan with butter and flour or non-stick spray. If you’re using the spray, we suggest using one that is made specifically for baking, since they typically have flour in them, which helps the doughnuts come out of the bowl effortlessly.
Let these doughnuts rest at a dry and warm place for at least an hour.
Don’t over fry you donuts! Set a timer for a minute and keep an eye on them. Once they’ve risen and slightly spring back when touched, they’re done!
Of course, I had to make a few tweaks to make them my own, you know I can’t follow a recipe without adding my own little twist. The smell that will come out of your kitchen when you’re making these peach and mint doughnuts will be enough to send your entire household running into the kitchen to see what you’re cooking. I hope you all give them a try!
Ingredients |
For the doughnuts:
3½ cups all-purpose flour, plus more for dusting
4 teaspoons baking powder
1 teaspoon salt
¼ teaspoon baking soda
⅔ cups sugar, divided
3 tablespoons melted butter
2 large egg
1 teaspoon vanilla extract
vegetable oil, for frying
For the glaze:
7 tbsp of water
½ cup powdered sugar
food colouring
peach and mint essence
Methods |
In a bowl, whisk together the flour, baking powder, salt and baking soda. In another bowl, mix together the sugar and the butter with a mixer on medium speed until the mixture looks sandy. Beat in the eggs, then the applesauce mixture. Scrape the bowl as needed. Beat in half of the flour mixture, then the buttermilk and vanilla, then the remaining flour. Do not overmix.
Place a piece of parchment paper on a baking sheet and flour. Pour the dough out onto the parchment paper, and with floured hands, pat it into a 7×11-inch rectangle. (The dough will be sticky.) Cover with plastic wrap and let it rest for an hour.
When ready to make the doughnuts, heat 2 inches of vegetable oil in a large heavy pot to 350ºF. Line a baking sheet with paper towels and set aside.
Start the glaze by simmering the water in a small saucepan over medium heat until it is reduced to about ¼ cup. Whisk in the powdered sugar until the glaze is sticky and smooth. Add the coloring and essence to your preference.
Flour a work surface and turn the dough out onto the surface. The dough is still a bit sticky, so make sure there is enough flour down so that the dough doesn’t stick. Lightly roll the dough out to a 9×12-inch rectangle. Using a 3-inch doughnut cutter (or a 3-inch biscuit cutter plus a 1-inch cutter for the center) cut out 12 doughnuts. Add 2 or 3 doughnuts at a time to the hot oil and fry until golden brown and cooked through, 2-3 minutes per side. Transfer to the paper towel-lined baking sheet to cool. Repeat with the rest of the doughnuts, including the doughnut holes.
Once cool enough to handle, dip the top of each doughnut into the sugar glaze. Serve the doughnuts warm.
Please make them and take a photo, send us an email, tag us on Instagram, tweet us, anything. We love to yours! There will be more exclusive stories on our #stellerstories and #OurTableStories profile. Please do check it out whenever you can!
Well, who doesn’t love the productions of Disney and at least dream of going to Disneyland once in the lifetime? Certainly, they are all ages favorite and dream!
It is a place filled with magic and happiness for all ages! Plus, I remembered Walt Disney once said, “All our dreams can come true if we have the courage to pursue them.” Which left me a huge impression of having a dream is important since young! Furthermore, is to gather our strength to achieving them.
What is better than pursuing the greatest of what we believe in? As having a dream is a motivation for each and individual of us to move on in our life.
And, I truly believed both Kate and Syamak are two lovely couple that dreams what they believed in and achieving it each of their magical days! You could simply observe it by checking on their Instagram’s accounts – two talented individuals that inspired me!
Lastly, “Remember, you’re the one who can fill the world with sunshine.” – Snow White
Does everyone have a wonderful weekend? We did, our family went for a short staycation the weekend before, and it was wonderful. Angela and I have prepared a girlfriends party while our mother was relaxing by the spa.
We much consideration we decide to have an apricot, mint, and silver theme party. Accompanied with the sweet pastry, stripes, and spring flowers. Thus, today we are going to show you a quick and simple tutorial on how to make these mini pom pom flowers.
These pom pom flowers are best in party decoration, don’t you find them just way adorable?
What I am seeing is a perfect accessory for all kinds of parties and receptions like baby showers, bridal showers, Friendsgiving, Mother’s Day and etc. A pastel theme is most beautifully cater for spring and summer occasions, thus they are great for all year round if you want it!
So let’s pull out all that leftover tissue and make some of these pretty mini pom poms!
This is a very simple tutorial whereby only a few materials are needed:
Fancy tissue papers
Wool strings
Scissor
We found this pretty apricot tissue paper at the craft store after searching high and low, it’s a simple stripe yet gorgeous in shades.
Step 1: Fold 4 sheets of tissue paper a with 7 folds, each fold about 1 inch wide.
Step 2: Tie the folded tissue papers with a wool string. We recommend you to tied it with either white or color string that suits your pom pom. Trim off two sides of the corners into a rounded edge.
Step 3: Open the two side of the rounded edge. While simply pulling apart the layers of tissue, working from one side to the other. Once all the layers are separated, give them a good fluffing with your fingertips. This simple act gives the pom poms a nice, fluffy look. Even though it will take a bit of working with this pom pom flowers, but soon you’ll them all ready to go!
Personally, I have a soft spot with colorful papers and hanging decorations. That make one of my favorite things in the world is garlands.
We’ve been tried coming up with excuses for parties just so we can make them to decor the spaces. While this project is a simple twist on a pom pom garland – by stringing them vertically with paper leaves so they become vines. You can hang them on trees or tie them to a strand across a ceiling to fill up a room.
Therefore, I’m so excited to be teaming up with them today to bring you a quick and easy DIY idea for a perfect backdrop for your next celebration. There will be more creative tutorials coming up!
Please make them and take a photo, send us an email, tag us on Instagram, tweet us, anything. We love to see yours!
If you were given a chance to choose a paid job, what kind of job would you choose? Of course, when we could, we would definitely choose a job that we love, wouldn’t you?
For me, if I get to have a job that paid me well, I would want to be a collector to gather all the prettiest things in the world. Since I couldn’t make the dream came into reality yet. Therefore, I’ll be gathering all inspirations by making them into mood boards like a collector.
Back to this week topic, are you prepared for the biggest festival at all time? Christmas is my favorite period of all year! It’s time to get busy preparing delicious foods, shoppings, decors to decorate your rooms with your favorite designs for the special day of the year!
Share with us your favorite Christmas ideas on our blog, Instagram pages!
The thing to do, it seems to me, is to prepare yourself so you can be a rainbow in somebody else’s cloud. Somebody who may not look like you. I may not dance your dances or speak your language. But be a blessing to somebody. That’s what I think.
“Be thou the rainbow in the storms of life. The evening beam that smiles the clouds away, and tints tomorrow with prophetic ray.”
The week has been buzzing with the breaking news of the new President of United State. It has been a tough year for everyone especially the friends over at U.S. It might not be what everyone has expected (little to I have expected). This might be the first in the history that we had witnessed a crazy battling and dramatic election.
Before we could start worrying any matters that will occur the near future. What could stop you from having a good breakfast to move forward with your every day!
For the busy workers, it surely making a breakfast sound absolutely troublesome (it definitely easy grab along with your way)! However, it is an essential step to kick start every morning, every day of your life!
The past 2 years I have told myself that I would never rush into anything while having my breakfast (it would be great that you could at spend at least 30-45 minutes to finish your meal). In order to have more time sit down to have a proper breakfast without disrupt. While making it quick is the way allow you spending time with a peaceful morning.
Believe or not, it helps me to achieve a better day in my life. Simply a yogurt bowl or a toast will just make the day better (much better).
In order to do that, time-management is very important – spending your night before to prepare could ease up your trouble for the next day. It is a habit for you to practice in a long-term goal.
In the previous post, we have shared the recipe for the guacamole. A simple avocado side to accompany any staples and today, we would love to share with your our favorite Tomato Avocado Toast. It’s fairly simple with taking away your 5 minutes in the morning to prepare.
It common to find tomatoes in our household, we’ll make sure we have tomatoes in our kitchen. Just the other day while we were preparing this dish, we ran out of both the Roma and the Cherry Tomatoes. Therefore, we decide to go along by using the Red Heirloom Tomatoes, it is bigger, less juicy with more fresh bites compare to Roma or Cherry Tomatoes but it tastes sweet and rather crunchy. You may want to cut them into dices and the appearance might not be as pretty as the little beautiful tomatoes that slice into the half but it tastes just the same as it should be. I shall skip the long winded sharing and let’s begin!
Pre-heat the oven. Start by chopping the tomatoes into small cube shape, sprinkle pinch of salt to taste. Cut your bread of choice, spread the butter and bake it for 5 mins. Meanwhile, fry the bacon in the pan till golden brown.
Prepare to serve by layering the cream cheese spread, homemade guacamole, tomatoes at the side and the golden brown bacon. Sprinkle olivie oil, salt and pepper on top to taste.
Tips from the sisters | Always spread a thin layer of butter and toast your bread the last in orderto keep it crispness of the texture.
Please make them and take a photo, send us an email, tag us on Instagram, tweet us, anything. We love to yours! There will be more exclusive stories on our #stellerstories and #OurTableStories profile. Please do check it out whenever you can!
Cheers, Darlings! What are you drinking for Happy Hour to celebrate the weekend?
As an artist, designer, most of us fears of “plagiarism” (neither ways is unforgivable). Although we have the skills, it couldn’t be stolen away, however, the hard work we spent on the works just priceless. When someone just took it as their it just ridiculous.
With the access to technology, it has been always terrifying to know that people grabbing images online and claims that belong to theirs. I believed people nearby us all encountered this issue. This is an unforgiving act of stealing, it belongs and solely to the artist, designer, and the talent individuals. As a part of the community, nobody should be tolerance for such acts.
Hence, this issue shall not be the fear in us to know great good people out there in the cyber world. This week, I would love to share this portrait that I’ve painted for Zi Peng. He is a great adventurer who in love with trying new food, traveling places, and meeting new people. With a great personality that I respect with! Do check out his Instagram!
Don’t you think that they are generous looking? If we would categories cotton for the most comfortable fabric, while velvet will be the most exquisite ones. Believed in your skin, you’ll feel how smooth and silky they are.
Velvet is soft to touch, you’ll need to feel the texture. This distinctive soft pile of woven fabric will definitely make you fall in love with it. Little you know, velvet can be effectively dyed with deep, rich colors – but it also takes very well to softer, more pastel colors too.
Velvet, they are one of our favorite choices for decorating our rooms. Either the rich or the pastel colors, both bring out the highest quality of what it should be!
Consistency is really important is triggering something important to your life. You cannot be successful if you cannot be consistent in doing important things to you . I’ve learned from experience that if you work harder at it, and apply more energy and time to it, and more consistency, you get a better result. It comes from the work.
This is why consistency is what matters the most in triggering something important to your life.
It is okay to have a break but in order for you to achieve what you want, you have to make sure you do it.
“One isn’t necessarily born with courage, but one is born with potential. Without courage, we cannot practice any other virtue with consistency. We can’t be kind, true, merciful, generous, or honest.” -Maya Angelou
These days, when I do not need to deal with works, I tried to lead a slow life. I enjoyed waking up in the morning by freshening up myself with a glass of home-pressed juice.
If time allows, I would spend some time in the kitchen to prepare food myself, it’s just wonderful moments. The sound coming from the kitchen, it filled with all the chopping, tapping and peeping sound that came from all sort of equipment and procedure.
Have you experience something like this before? A day you hate it like forever but another day, you just fall in love before you could realize it? It happened to us, especially myself, I used to hate avocado but I just can’t remember when did I already fell in love with it!
My first experience with avocado is quite extraordinary, it’s creamy, oily with a fresh grass taste. However, right now it just a nature taste that I will consume everyday!
Do not underestimate the green little devil! Avocado could make into all kind of dishes and drinks. While we would love to share one of our favorite – the guacamole dip. It’s everyone favorite, even someone like my sister, Joe who wasn’t a huge fan of avocado, she enjoys having her toast, taco chips or cracker with the dip! It’s a must to serve along with the wheat chips when we having a movie night every Friday!
Ingredients |
3 Avocados (halved, seeded and peeled)
1 lime, juiced
1/2 tsp kosher salt
1 tsp ground cumin
1/2 tsp ground red pepper
1 tsp of green pepper tabasco
1/2 medium onion, diced
1 tablespoon chopped cilantro
salt and pepper to taste
Methods |
In a large bowl place the scooped avocado pulp and lime juice, toss to coat. Drain, and reserve the lime juice for later use, till all of the avocados have been coated. Using a potato masher add the salt, cumin, and red pepper, green pepper tabasco, and mash. Then, fold in the onions, and cilantro. Add 1 tablespoon of the reserved lime juice. Let sit at room temperature for 1 hour and then serve.
Tips from the sisters | While making it, always taste along the way and try if it suits your taste.
Please make them and take a photo, send us an email, tag us on Instagram, tweet us, anything. We love to yours! There will be more exclusive stories on our #stellerstories and #OurTableStories profile. Please do check it out whenever you can!
Cheers, Darlings! What are you drinking for Happy Hour to celebrate the weekend?
Recall what Jamie Oliver once said, “What I’ve enjoyed most, though, is meeting people who have a real interest in food and sharing ideas with them. Good food is a global thing and I find that there is always something new and amazing to learn – I love it!”
The idea behind it is just so amazing! Definitely, this is one of the reasons, both Joe and I set up this website – to share and met people through what we love and believe in – food and arts.
Also, this is how both April and I have met. Eventually, both of us was connected by food, with ideas of healthy living. Eating is not merely a material pleasure for us. Eating well gives a spectacular joy to life and contributes immensely to goodwill and happy companionship. It is of great importance to the morale.
It always a good idea to follow a foodie Instagram page! April, she certainly is such an inspired individual inspiring people through her food and family! Believe or not, she will absolutely cheer your day!
Finally Halloween have come to an end. We both have fun during the Halloween period – all the craft and food, it just brighten up our day. Although Halloween has already ended, but we will still spend the rest of the autumn fully with our heart. We will be enjoying the homemade apple cider with the coffee cup bat sleeve under our warm blanket. Monster’s krispie rice will also be our all time favourite snack for this fall, not only that it is tasty but is yummy to eat too.
Hmm, so now that the Halloween has ended. We are not going to just lay around doing nothing but we will be bring more and exciting inspiration for you.
“Halloween is an opportunity to be really creative.” – Judy Gold
Don’t you think these lightings are trying to seduce you all the time you look at them? While some might not like them like I, however, I believed many just fall in love with them every time they appear! Am I right saying that?
While, looking at these beautiful neon lights, they are like pieces of graphics cut out from the prints. Believe or not, they can be either part of the retro or modern interior designs. In fact, they just match everything and gives your room pop look!
My craving for these stylish lightings, just couldn’t stop as they seem to be part of my living! They give me energy and inspired me daily! Although, normally they served well as a welcoming wall or art pieces at commercial interiors; cafes or bars. But still, who says that it can’t place in our home?
Fall is here so probably it’s time to make your home more cozy and warm. I don’t mean to fire up your radiators but to add some details to your decor that will make it look cozier. For example, you can start with dressing up your cups into some cozy warmers. Some of them are quick and easy to make while for others you should have some skills and free time. Anyway, check them out and start to make your home more cozy for this Halloween! This will be the best mug sleeve for our Homemade Apple Cider drink for this Halloween.
One of the ideas on my boards was a fabric coffee sleeve. It turned out to be a fun and simple sewing project. And, it’s so handy to keep in the office when you go get your coffee so you don’t get yourself burnt! I read an article online that 14 billion cups of coffee are served each year, each wrapped in their own cardboard coffee sleeve. That’s a lot of waste for a piece of cardboard that only gets used for a short time each morning. Why not make your own, unique fabric coffee sleeve to cut back on waste and add some fun color to your white coffee cup!
Since it is Halloween, we also make our cup sleeve into the shape of a bat. This is the best give you can ever make and give it as a gift. It simple and fun to make.
To make one, you’ll need this coffee cup bat sleeve pattern. As when printing any pattern, make sure it doesn’t scale down to print. The pattern should measure 10 3/4″ straight across the top (corner to corner, not on the curve) and 9 1/8″ across the bottom (again, corner to corner). It’s just barely under 3″ wide. I use “borderless printing” in my print options to make sure the pattern prints full size. It is as simple as what I mention above.
Also, I am a huge fan of the $2.70 reusable plastic cup/lid from Starbucks – lightweight, inexpensive, easy to clean and I’m saving, even more, paper.
Even though many people opt to buy insulated travel mugs, but some can’t go in the dishwasher and the cracks and crevices of the slider/flip top lids often don’t get completely clean. Plus, for $2.70 a cup, and a few bucks for supplies to make a DIY reusable felt sleeve, this reusable combo doesn’t get any more budget friendly. Let’s get started!
Place you Coffee Bat Sleeve Template onto your felt, cut fabric using the Coffee Bat Sleeve Template. Cut the Fabric glue of a rectangle.
Iron the 3 pieces together, having the fabric glue at the midden. You can cut out a small piece of fabric for the eyes and mouth or you could spend the time to embroidered them out, like Angela who devoted in embroidery.
And there you have it – your completed coffee sleeve! This project only took us about 30 minutes. Thus, it is not only great for our environment, it makes your cups looking lovely!
Please make them and take a photo, send us an email, tag us on Instagram, tweet us, anything. We love to yours! There will be more exclusive stories on our #stellerstories profile thus check it out whenever you can!
The sizzling sprinkles on your hand and face. We just love how the fresh mint muddled with fresh lime and lime juice, mixing in the cranberry syrup and crushed ice. Garnish it with a couple of fresh lime and your Halloween soiree is complete. Bloody Cranberries Mojito, would be the most welcoming refreshment being served before parties.
I have to say that I’m never a drinker as compared to Angela but I am a celebrator after all. Therefore, after much discussion, we decide to go with this beautiful bloody cranberries mojito for this Halloween. Our bloody cranberry mojitos are perfect for any nights, especially for this year Halloween’s celebration! They can either be served an alcoholic or non-alcoholic beverages – it all depend on your preference.
They are tart, sweet, refreshing, and incredibly delicious – everything a good mojito should be. Before I notice, Angela might have already poured in some rum or gin to elevate her glass of drink.
Our recipe is simple and quick, it only calls for a few ingredients that simply be found in yours home. Bloody Cranberries Mojito also gave us the “It’s officially the holidays!” mood. However, obviously in is not.
The blend of mint and cranberry is sublime and the addition of cranberry to a mojito almost makes us want a few more glasses!
Ingredients |
bunch fresh mint, trimmed
1 lime
2 tbsp of lime/lemon juice
2 tbsp of cranberry syrup
1 bottles sparkling water, chilled
Methods |
Using a wooden spoon or crusher, crush the mint with some sugar/sugar syrup in the bottom of a large pitcher.
Following, add in some fresh lime, concentrated lime juice, with cranberry syrup and water.
Lastly but not least, mixed it along with the crushed ice, shake it well before you serve!
Tips from the sisters | For those who prefer an alcoholic drink, you can add in a shot of rum per serving glass. Thus, we suggest you rub on some salt around the glass for a better flavor. Angela highly recommends the
Please make them and take a photo, send us an email, tag us on Instagram, tweet us, anything. We love to yours! There will be more exclusive stories on our #stellerstories profile. However, please do check it out whenever you can!
Cheers, Darlings! What are you drinking for Happy Hour to celebrate the weekend?
Just a few more days, a new month – November will be right at the corner of our eyes. In this autumn, it is all about Halloween, pumpkin and autumn leaves for me. Autumn is a second spring when every leaf is a flower. There is a harmony in autumn, and a luster in its sky, which through the summer is not heard or seen, as if it could not be, as if it had not been!
We have been sharing a few recipes we made for this Halloween. Including desserts, snacks, drinks and even some decoration, however, what is a party without the main dish?
This Shepherd’s Pie recipe that we’re sharing is inspired by Shepherd’s Pie created by Gordon Ramsay. We have made it similar the way Chef Ramsay makes his thus, in our Shepherd’s pie, there are some slight variances, that has really been love in our home for years now.
Every time we eat this Shepherd’s Pie, it just hits the spot – it’s an ultimate comfort food for our family!
Let’s spend 5 minutes, appreciate that beautiful potato topping right there. Beautiful golden brown tips and the texture is simply amazing, it has a little crunch on the surface, but soft and fluffy on the inside. It almost like a twice baked potato, making me feel guilty for what we had to do next.
This rustic dish definitely isn’t the prettiest dishes at the first look! But what it lacks in it fancy looks, it makes up for with a bold flavor. Worcestershire, red wine, and fresh herbs come out brilliantly in the ground beef mince and vegetable. You have to serve it hot and eat it hot or else it would be a waste!
We would love to share some tips while making the potato mash. Whereas, it all depending on the type of pan or baking bowl that you’re using for the pie. Therefore, we always cook more potatoes and if possible we suggest making extra serving with this Shepherd’s Pie recipe.
It can get a little tricky trying to eyeball the right amount to put on top of the mince. So when in doubt, just scoop more mash and add it to the baking tray!
This Halloween, we are featuring a very special and seriously delicious recipe. It is a new kind of health food dedicated to the simplest of things — a deliciously satisfying, nourishing meal everyone can love; made by people that pay attention to all the necessary steps needed to making a truly chemical-free meal. This Shepherd’s Pie is one of our most popular meals.
Ingredients |
2tbspolive oil
600g lambGround beef substituted is fine
2clovesgarlic
1largeyellow onion
1largecarrot
2sprigsfresh rosemary & thyme
1cupchicken stock
2tbspWorcestershire sauce
8oztomato pasteis fine too
Potato Mash
1.5lbspotatoesabout 5-6 medium potatoes
3/4cupwhole milk
8tbspmelted butter
2wholeegg yolks
5ozfreshly grated parmesan
1tspgranulated garlicoptional
2tspsaltnot needed if using garlic salt
1tsppepper
Methods |
Fill water till it’s about 2 inches higher and bring the water to a boil. Put in the potatoes and cook for about 20-30 minutes.
In a cast iron skillet on medium heat, begin browning your meat. While the meat is browning, mince the thyme and rosemary and garlic. Preheat your oven at 425 at this point as well.
Once your meat is browned (about 5 minutes or so) drain as much juice as possible. The key to a good Shepherd’s pie is keeping the grease down to a minimum. Grate your onion and carrot into the mince. and stir and cook on medium for about 2 minutes.
Stir in your tomato paste, garlic, Worcestershire sauce; about 1 minute. Add fresh thyme, rosemary, salt and pepper. Let this cook down for about 2 minutes. Add the chicken stock and let this cook down for about 15 minutes. You should have reduced the volume by about half. While the mince is cooking, you should start preparing potatoes. Check with a fork, it should easily go through without any resistance. Drain and place in a bowl.
Mash the potatoes, then add egg, milk, granulated garlic, salt, and pepper. Mix in about freshly grated Parmesan. You should have a super thick potato mash. This is important because it helps with spreading, and will make a better pie. Note: If I know the whole batch is going in 1 meal I’ll keep this in a cast iron skillet. It looks a lot more authentic to me in a skillet. With a spatula, spread the potato mash evenly across the skillet covering all your mince. Then, with a fork, fluff the top of the potatoes, and top with the remaining Parmesan. This will give you golden brown bits on top!
Bake for about 15 minutes, or until the mash is a beautiful golden brown. Enjoy!
Please make them and take a photo, send us an email, tag us on Instagram, tweet us, anything. We love to yours! There will be more exclusive stories on our #stellerstories profile thus check it out whenever you can!
In this cold October, one of our favorite drink for this Halloween is Apple Cider. We love making Slow Cooker Apple Cider because we all love the smell of it simmering throughout the day. This hot apple cider warms you up after an hour or two of kicking around in the fall leaves or picking out that perfect pumpkin or trick-or-treating on a perfectly frosty night when you can see your breath.
I know, I know, by now we’ve all seen a gazillion hot spiced apple cider recipes. But this mulled cider, we thought, it’s special because it takes only four whole ingredients – no special mulling spices required. Plus, it utilizes that wondrous kitchen appliance – the slow cooker – so you don’t have to stand over the stove or worry about keeping it at the perfect temperature once it’s ready to be served. It just sits there on your kitchen counter, being awesome, until everyone happily drinks it all down.
Any unsweetened apple juice works well for this recipe, however, you can cold-press it out using fresh apples . You can get fancy with it and use cranberry juice instead. We like our apple cider on the more tart side, if you want it sweeter you can add in sugar, honey or any sweetener of your choice.
If you are feeling extra ambitious you can serve the hot apple cider in a cup and drizzle it with whip cream and butterscotch. And for the adults, you can add a perfect extra little warming factor: rum.
One thing that’s important, though. What makes love most about homemade apple cider is that you could have total control over the amount of sugar and spice in each batch. For me? Apples are sweet on their own, therefore we didn’t add any sugar to our homemade apple cider. You can modify it to your own taste, so let’s get started!
Ingredients |
1 L – apple juice (unsweetened)
4 cloves
cinnamon sticks
small star anises
1 orange sliced (with peel on)
a sprinkle of nutmeg
Methods |
Pour your apple juice into the slow cooker.
Put the spices into a spice bag and add to the slow cooker (or add straight in and strain before serving)
Add in the orange slices.
Turn the slow cooker on High for 2-3 hours or Low for 4-6 hours.
Take spices out before serving. You may top with whip cream, or add your choice of sweetener if desired.
So, how easy does this sound? And, most importantly, aren’t the cinnamon sticks pretty and the mugs cute? Your house will smell like Fall all day long. And yes, it’s amazing.
Please make them and take a photo, send us an email, tag us on Instagram, tweet us, anything. We love to yours! There will be more exclusive stories on our #stellerstories profile thus check it out whenever you can!
Craving for some fun during this Halloween? These Monster’s Krispie Rice let me take my candy eye obsession to a whole new level. You get to go a little crazy with them, which I personally think is awesome. These little monsters are so easy to make, and they look so fun when you set them out on a serving plate. It’s like a little monster invasion sitting there on the table.
These Monster’s Krispie Rice are so simple to make, and they’re completely adorable! How fun would they be for a Halloween party? Or even a monster birthday party? You could wrap them individually in some clear cellophane with a ribbon and a cute little tag to send as a Halloween treat to work. So fun!
I am a little bit of a crispy rice treat snob. I like them to be perfectly soft and delicious! It occurred to me that I had a certain way of making them, and specific tricks I use to make them soft and perfectly delicious, so I thought I would share my tricks! I will also share my recipe at the end in case you need a good one! Just a good plain, old fashioned rice krispy cereal and marshmallows. My cooking blog, dedicated to rice krispy treats, does not have a basic rice krispy treat recipe!
Some tips for you when it comes to making this Krispie Treats,
When adding marshmallows and stir continuously over medium heat until they are soft, swollen, and melty, but not completely smooth. The key is to not overcook.
We also like to have some color to the Krispie Treats. Thus we added drops of food gel coloring to the marshmallow mixtures.
Add your cereal to the marshmallow mixture, no more than a couple cups at a time. Instead of stirring to combine, use a repeated motion of folding and smoothing. When I fold. I bring the mixture from the bottom and fold it into the top, middle. then I smooth and lightly flatten the whole top down. Fold, fold, fold, smooth. Make sure you lightly grease your pan as well as anything you will be using to cover it.
So we decided to remedy that today! Here you go peeps, Mallow and CO’s traditional no frills rice krispy treat. These are my basic ratios that I’ve always found to work great for me. But other than that just the good old gooey marshmallows mixed with the iconic rice cereal. Enjoy!
*We used m&m as the replacement for the candy eye, as we couldn’t find it in the baking store.
Methods |
For the Rice Krispie Treats:
Spray a 9″ x 13″ baking pan with cooking spray.
In a large pot, melt the butter over low heat until melted.
Add the marshmallows and stir until completely melted and combined with the butter.
Remove from the heat and add the vanilla extract and the Rice Krispies. Stir to combine.
Pour the mixture into the baking pan. Using a spatula sprayed with cooking spray gently press down until the pan is evenly coated.
Allow to cool until firm.
For the Monster Coating:
Melt approximately 1 cup of candy melts in a small bowl in the microwave at 50% power for 1 minute. Stir and then continue microwaving at 50% power for 30 seconds at a time until completely melted.
Add approximately ½ teaspoon to 2 teaspoons cooking oil (the more you add the smoother the finish, but go slowly) to the melted candy melts and stir to combine.
Dip the Rice Krispie Treats in the candy melts and set on parchment paper.
Gently press the candy eyes into the candy melt coating to create your monster faces. Gently push the eyes slightly up towards the top of the monster’s “head” to create upper eye lids.
Allow to cool at room temperature for approximately 40 minutes or until candy melts have completely hardened.
Please make them and take a photo, send us an email, tag us on Instagram, tweet us, anything. We love to yours! There will be more exclusive stories on our #stellerstories profile thus check it out whenever you can!
When the doctor shares, “an apple a day keep the doctor away”. While all coffee lovers will say, “a coffee a day keeps the grumpy away”!
Little you know, I’m not an apple lover, people may need an apple to keep the doctor away, however, for me, it is a cup of good coffee to cheer me up. Therefore, it helps to kick start my day, and it helps me stay throughout all day long, without feeling grumpy.
Like me, Karen is a huge coffee lover. From her Instagram’s page, she always shares her best shot of different coffee moment. She loves spending quality time at cafes or at home just for a simple moment. I’m huge fans of Karen I must say, she is so talent and such a lovely lady! So joyful and sweet, therefore, I love her interesting perceptive and creativity! They darling yet stylish! For those who doesn’t know, she actually is @mikathejindo mummy!
Follow her on Instagram’s page, she is such an inspired individual! Believe or not, she always cheer my day!
Muhaha~~ Raise your hand if you can tell me what is synonymous with fall. Well, besides the awesome cooler temps and beautiful fall foliage. I’m talking apples, y’all. I love ’em and now’s the best time of year to enjoy them! This baked apples also remind me of the step-mom of Snow White. Whereby she put all the potion in the pot and make a poison apple. You won’t die eating this like Snow White but you will just get addicted to it and wanted more.
So to celebrate fall’s arrival and the start of apple season, I’m sharing thehands downbest-baked apple recipe that I’ve ever eaten.And on a side note, if you’ve never tried Honeycrisp apples, you are definitely missing out. They’re a bit more expensive that other apple varieties, but oh let me tell you – they are so, so worth it.They’re everything that their name implies – sweet and crisp!
When come to choosing apples for this recipes. A relatively new variety, Honeycrisps have a sweet, mellow flavor. They’re very juicy, and when baked long and slow, their juices bubble and caramelize. These baked apples are best served slightly warm, but they are also great served cold for breakfast the next morning, topped with a dollop of yogurt.
Ingredients |
4 – Honeycrisp apples
1/2 cup brown sugar
2 tsp ground cinnamon
1/4 cup dried raisins
1/4 cup chopped walnuts
4 tbsp of butter
Methods |
Preheat oven to 200 °C.
Slice approximately 1/3 off of the top of the apples and scoop out the core, leaving a well in the center.
In a bowl, mix brown sugar, cinnamon, raisins and walnuts (using a spoon or fork) until blended.
Stuff each apple with 1/4 of brown sugar mixture.
Place apples in a deep baking dish, topping each apple with 1 tbsp of butter and a sprinkle of cinnamon.
Pour about 1/2″ of water into the baking pan, around the apples, and bake for 50 – 60 minutes, until apples are tender.
Serve warm.
Notes from two sisters | Keep an eye on the water level when baking.Add more water, if needed, to prevent the apples from drying out.
Please make them and take a photo, send us an email, tag us on Instagram, tweet us, anything. We love to yours! There will be more exclusive stories on our #stellerstories profile thus check it out whenever you can!
This week will be the last week of the October, and people it’s time to celebrate Halloween. A period where the kids knock on your door to get their candy and the adults get ready for some amazing party. While for those prefer to stay at home, you could have fun as well, set up a mini bar for the Halloween night at home and invite family or friends over for horror movie marathon! We have prepared a series of Halloween’s special, where we share with you some food and decoration ideas. Shall we get started!
Did you know that the balloons are the best tools to aid in your decoration in all kind of your gatherings, parties, and events! While the fancy ones are too expensive, the single colored ones might be way too dull. What if you could add in some surprise element to elevate them, what’s better than doing it yourself?
We all know that it’s always a mess when we throw the confetti but they just gives a spark to your parties! Therefore, we decide to combine the two together, this allows us to add more color and make your party more exciting!
By doing it in one flick of the wrist, thus now it’s time to take it back to its original use and party with it. Confetti balloons make an adorable photo prop for all parties and events. It can add a wow factor to the decor at any location. Forget the flower and confetti tossing; all you have to do is pop the balloons to shower the “stars” with confetti!
Halloween is not only about spooky and giving out of candy but it also all about fun! We are going to keep the fun going because we should have a Halloween month as a reward for October. And the most delightfully festive thing in the world are confetti balloons! They seriously put a megawatt smile on everyone’s face. So if you are throwing a party or surprising, someone, I totally recommend confetti balloons…trust me on this one!
Materials Needed |
Colored paper
12″ Clear balloon
Circle stamps cutter
Funnel (optional)
Air pump
Methods |
Most of these items I got at a party store like the 12″ clear balloon and the air pump. I got the clear balloons a few days beforehand and took them home to fill with pre-cut confetti. With the funnel, put in enough confetti to cover the bottom of the balloon. While the balloon is filled with air, the confetti will stay on the bottom so the more you put, the better the confetti will show in the balloon. Rub around the balloon allowing the confetti stick to the side of the balloon. Tie the end in a knot and then tie on a string. Enjoy!
Tips from us |
However, if you’re punching out shapes instead of just cutting bits of paper, punch through the entire stack of colored/ tissue paper at one time. Not only is it a lot faster, but the punch just performs better and makes cleaner cuts when you punch through the whole stack at once. The tissue paper tends to just tear if you try to punch one sheet at a time.
Thus, if you’re having trouble getting the confetti to stick to the sides of the balloons, create a little static electricity by rubbing balloons on the carpet.
Please make them and take a photo, send us an email, tag us on Instagram, tweet us, anything. We love to yours! While, there will be more exclusive stories on our #stellerstories profile, therefore, check it out whenever you can!
Happy Halloween! Stay tuned for tomorrow for more Halloween special post.
Halloween can be one of the biggest and interesting event of the year. It gives the kids and grownup gets into the spooky fun! Did you know it’s also a season all about pumpkin and autumn leaves? I adore autumn, and it’s time again, people! The parade of pumpkin pies, pancakes, and spiced lattes has begun, proclaiming loudly that fall is here, and Halloween, with its triangle-eyed, orange faces, is right around the corner.
For your autumnal decor to really stand out, the classic jack o’ lantern just doesn’t cut it anymore. From pumpkin patches to pumpkin recipes, to pumpkin carving, this beloved gourd is definitely the “it girl” this season. While a classic carved pumpkin will never go out of style.
Here are some things I love about Autumn that I’m really looking forward to:
Diamonds has always been saying as one of the most precious stone in the world. A diamond doesn’t start out polished and shining. It once was nothing special, but with enough pressure and time, becomes spectacular. I’m that diamond. Every girl need to shine like a diamond in the dark. Don’t be discourage if you are been left alone, or no one know you. It is all this pressure and adventure that you face that make you shine.
“Remember diamonds are created under pressure but hold on it be your time to shine soon.” ― Sope Agbelusi
These black bean burgers have a complex, satisfying flavor and robustly meaty texture that even devout carnivores will love (seriously, try them with bacon on top). The mixture comes together in just 25 minutes and can be used to make patties for cooking either on the backyard grill or indoors in a skillet. Unlike regular burgers, which do best when cooked over extremely high heat, these black bean burgers require a moderate heat so that they can cook through and firm up before the exterior burns.
“You will never want to eat frozen veggie burgers again. These are so easy, and you’ll be proud to have created such a vegetarian delight.”
You might be searching for a vegan burger recipe to take a break from the heaviness associated with eating too much animal protein. So why do most black bean burger recipes still seem heavy? Most of the recipes you will find are a bland mix of beans, grains, and some spices. Our version provides you with an alternative loaded with nutrition and fresh with flavor.
So here’s a question for you: Why does a black bean burger behave so differently from a ground meat burger when you apply heat to it? Cook a hamburger and it changes from being mushy and soft to having a wide variety of textures, with an interior that clings together in springy, juicy clumps, interspersed with pockets of rendered fat and juicy meat. Cook a black bean burger and you may develop a crust on the exterior through dehydration, but the interior remains largely the same: soft, mushy, and uniform.
This recipe isn’t just your basic veggie burger and uses easy-to-digest fresh ingredients and a powerful combination of plant-based protein and fiber. So let’s get started!
Ingredients|
2 cans Black Beans
1 cup Seasoned Breadcrumbs
1/4 cup Grated White Onion
1 whole Egg
1/2 teaspoon Chili Powder
Salt And Pepper
Hot Sauce
8 slices Swiss Cheese
Olive Oil, For Frying
Butter, For Frying And Grilling
4 whole Kaiser Rolls Or Good Hamburger Buns
Mayonnaise
Lettuce Or Other Greens
Sliced Tomato
Methods|
Drain, but do not rinse, the black beans. Place them in a bowl and use a fork to mash them. Keep mashing until they’re mostly broken up, but still have some whole beans visible.
Add the breadcrumbs, onion, egg, chili powder, salt, pepper, and hot sauce. Stir until everything is combined, then let the mixture sit for 5 minutes.
Heat a tablespoon or two of olive oil with an equal amount of butter in a skillet over medium-low heat. Form the bean mixture into patties slightly larger than the buns you’re using (the patties will not shrink when they cook.)
Place the patties in the skillet and cook them about 5 minutes on the first side. Flip them to the other side, place 2 slices of cheese onto each patty, and continue cooking them for another 5 minutes, or until the burgers are heated through. (Place a lid on the skillet to help the cheese melt if needed.)
Grill the buns on a griddle with a little butter until golden. Spread the buns with mayonnaise and hot sauce, then place the patties on the buns. Top with lettuce and tomato, then pop on the lids!
Speaking of which, what are you guys up to this weekend? Anyone have fun cookout/camping plans? Any fun summer kick-off parties? Please make them and take a photo, send us an email, tag us on Instagram, tweet us, anything. We love to yours! There will be more exclusive stories on our #stellerstories profile thus check it out whenever you can!
When we honestly ask ourselves which person in our lives means the most to us? We often find that it is those who, instead of giving advice, solutions, or cures, have chosen rather share our pain and touch our wounds with a warm and tender hand. Nevertheless, I’m also very thankful for those who dislike me as they taught me the lessons from the hardest ways. They help me becoming a better person through my journey; as we all just seeking for a better resolution to move on.
However, I especially want to thanks, those stay by my side. I cannot even imagine where I would be today were it not for that handful of friends who have given me a heart full of joy. Let’s face it, forgiving make life a lot more fun.
When you invite your guest into your house, the first impression is very important. Nonetheless, you are worried about the plain walls you have in your house. Having frames to decorate your room is always a good idea to elevate your house. Displaying your favorite art collection or photographs it just inserts your thoughts into your walls. Those frames can be small or huge while sometimes you can hang on the wall or just put on the floor. They have no rules, therefore, that is the time where you have to put in your creative thought.
Why not get on your feet and look around for some interesting ideas to put in frames? Happy Monday!
Yesterday night I just have a mini Harry Potter movie marathon. I wishes that it is real, that there is really magic in the world. Although, there will be people screaming at me (my mom). To stop dreaming and thinking thing that is so useless as it will never come true.
To me there is no fault to dream. Everyone need it everyday, it’s a necessities. It is one of the thing that help you to move forward to our everyday life. Living in a dreamless place, it’s like living in a zombie body. Simply to say it is lifeless.
“Dreams are necessary. Like the air, without realizing it, I, you, and we all need dreams. The dreams that guide us on what we do today because today is the answer to our dreams the other day.” ― Alanda Kariza
Milkshakes have been such a fantasy to me since young, from a classic milkshake that you bought from McDonald in the olden day to a fancy jumbo milkshakes at cafes these days! They are just unbelievable tasty with a thick creamy texture, smoothie and you just never want to stop.
That means this is a vanilla base milkshake made with bits of Oreo Cookie and homemade Oreo cream filling!!! Yeah, the good stuff in the middle! Then it’s topped with MORE homemade cream filling, some more Oreo cookie bits, whipped cream, and more Oreo cookies! It’s pretty much all of your daily calories in one milkshake. Again, I’m sorry.
This is a nice thick milkshake. And cover the top with whipped cream, finely chopped Oreo cookies and shaved chocolate. It is a thick milkshake, it’s easier to drink this way. YUM! I love this. I don’t know why but ice cream is seriously better with Oreo cookies.
How do you eat an Oreo cookie? Are you a dunk-it-in-milk eater? Break it in half and lick off the cream filling? Break it in half, eat the side without the cream filling before eating the good side? Or do you just bite it? Or perhaps one bite?
Ready to make your own milkshakes? Here’s the recipe for the milkshake which also includes the recipe for making homemade Oreo cream filling:
Ingredients|
4 large scoops premium vanilla ice cream
3 Oreo cookies, divided
3 tablespoons milk, cold
1 tablespoon chocolate syrup, optional
1 Oreo cookie, divided and finely chopped
Methods|
Start by finely chop the Oreo into crumbs, set aside a bit for decoration.
Then prepare the glass by adding 1 tablespoon of chocolate syrup and cover the lower part of the glass with the syrup. Chocolate syrup is optional but it’s a nice way to serve. Set aside.
In a blender, add in 4 large scoops of vanilla ice cream and 3 divided Oreo cookies, so it’s 6 disks, and 3 tablespoons of cold milk.
And pulse and/or blend until homogeneous. Top it with whipped cream, finely chopped Oreo cookies and shaved chocolate. Served.
Please make them and take a photo, send us an email, tag us on Instagram, tweet us, anything. We love to yours! There will be more exclusive stories on our #stellerstories profile thus check it out whenever you can! Happy Cooking!
“Beautiful music is the art of the prophets that can calm the agitations of the soul; it is one of the most magnificent and delightful presents God has given us.” quoted by Martin Luther
Truly, music just allows me to immerse myself into a different dimension. It allows me to stop thinking and just enjoy the music. It gives me a moment of just my own time.Therefore, that’s why Borja inspired me in every way, he is a musician, an artist based Spain. His style in his photography and music truly fun.
Support Siberian Wolves, their latest online records by clicking the link!
Gathering inspiration is part of my daily routine for everyday work. Personally, I love searching around for inspirations through books, physical objects and scrolling on all the interesting web page. I love to look at different artists and designers out there and enjoyed looking into other’s perceptive. It’s up to your surprise that you will see a different world from your own.
Therefore, every week I have discover a new inspiration but this week I have something interesting for you. Look what I have discovered for this week – Axel Oswith and Amanda Kusai are the brains behind The Taable – a multidisciplinary creative hub devoted to art direction and photography.
I’ve fallen in love with them instantly, especially with their creative compositions they used in their work. They are designers currently living in Jakarta, Indonesia. They have devoted themselves to art direction and photography and their works are the minimal compositions of clever concepts. I enjoyed the thoughts they put in each shot.
Why not have a look at their work and cheer your Monday blues away!
Ever hear of the Butterfly Effect? It is the idea that the flap of a tiny insect wing yields large influences at a later state. Such as helping determine the path of a hurricane. In the weather system of your life, who knows what might be a butterfly wing?
One thing we do know is that everything great starts small. Every big dream needs small focus. There is no effort too minuscule, no goal too little, no intention too humble to make a big difference in the world.
Serving steak in our home is all time favorite, we are all beef lovers. That why, making a good steak is essential to make your loved one happy! We studied and practice numerous of time in order to achieve the taste you will in love with. Eating steak is just least a couple of making it, just like the cooking them. But
When you cook them well, they are tender and juicy and I promised that one is never enough. However a classic Beef Burger is high in calories, therefore we decide to make our very own healthy choice. We decided to choose the seasonal fruit – peach. It is sweet and juicy as compared to the onion.
Before we start to make the beef patties, let’s begin with the supporting roles. Getting the buns, mozzarella, peach and spinach ready is essential as they serve an important role, elevate the taste of the burger.
Beginning with the peach and spinach ready by washing them and dried away the water. Then we move on by frying the mozzarella, whereby we coated the mozzarella with egg and breadcrumb mix. We when on preparing the grilled peach. Before grilling the peach, we glaze it with honey and brown sugar to make it brown and glossy.
First of all, the colors and flavors just make me happy. These burgers are so bright and fresh, while still maintaining their hearty deliciousness. We have been dying to show you these burgers, but wanted to wait until closer to fall. So let’s get started!
Ingredients |
Balsamic Drizzle
1/2 cup balsamic vinegar
1 teaspoon brown sugar (optional)
Burgers
1 pound ground beef (I like to use organic 80/20 beef)
smoked salt, chipotle salt or just salt + pepper, for sprinkling
2 tablespoons balsamic vinegar
12 ounces fresh mozzarella, sliced into 8 thick round slices
1 cup Panko bread crumbs
1/4 cup flour
1/3 cup parmesan cheese, grated
2 eggs, beaten
1/2 teaspoon salt + pepper
1/4 teaspoon cayenne
2 tablespoons olive oil
4 large nectarines or peaches, ripe, but firm peaches, sliced into 1/4 inch rounds*
1 tablespoon honey or brown sugar
4 brioche or pretzel buns, toasted (use gluten free if needed)
Methods |
Balsamic Drizzle
Add vinegar and brown sugar, if using, to a small saucepan and bring to a boil. Reduce to a very low simmer and cook for 10-15 minutes, until liquid reduces by about half and is slightly syrupy. Remove from heat, pour vinegar in a bowl or glass to pour, and set aside to cool and thicken.
Burgers
Divide the meat into 4 sections and form into 4 patties (or make 8 slider size burgers). Place the patties on a plate. Drizzle the burgers with balsamic vinegar.
In a large bowl, combine the Panko, flour, parmesan, salt, pepper and cayenne, mixing thoroughly to combine. In a small bowl, lightly beat the eggs. Take each slice of fresh mozzarella and coat it in the beaten egg. Then, dredge it through the bread crumb mix by pressing on both sides to adhere. Repeat with the remaining slices.
Drizzle the peaches with honey (or sprinkle with brown sugar).
Preheat the grill or a grill pan to medium high heat, once hot, season the burgers with salt and pepper and then grill until your desired doneness. About 4-5 minutes per side for medium rare. Remove the burgers from the grill and and cover with foil to allow the burgers to rest while you fry the mozzarella.
Heat a large skillet over high heat. Add 1 teaspoon of olive oil and sear both sides of the peaches for 1 to 2 minutes until just warmed, but still somewhat firm. Alternately you can also grill the peaches directly on the grill.
Add the remaining olive oil to the skillet and when hot, fry the coated mozzarella, turning carefully once or twice, until golden and cheese begins to melt but still retains its shape, about 1 minute on each side. Drain on paper towels.
To assemble, divide the burgers among buns. Top with a couple fresh basil leaves, a slice of fried mozzarella and a couple slices of caramelized peaches. Drizzle with balsamic glaze. Add the top bun.
Speaking of which, what are you guys up to this weekend? Anyone have fun cookout/camping plans? Any fun summer kick-off parties? Please make them and take a photo, send us an email, tag us on Instagram, tweet us, anything. We love to yours! There will be more exclusive stories on our #stellerstories profile thus check it out whenever you can!
You will say “no” for anything but you will never ever resist a Beef Burger like us! Happy Cooking!
While getting a human portrait done has been difficult, I would say getting an animal’s portrait done is even challenging for me. We all know that they have a lot of furs, unlike having the fine smooth skin like us, it requires more time to detailing their feature.
And our beloved Mika, she is just one beautiful 2-year-old Jindo pup from Dallas. She is adorable and creative just like her mom @karen.lao! For the years I have followed their journey they have never failed to surprise me with their loveliness. Just wish that you will like her like I do!
Mauve is the second-highest trending color, according to Pinterest, so hit two birds with one stone by introducing some mauve accents into your gray décor. Trust us when we say they match.
At the moment I am truly loving gray and mauve. The two hues are not harsh, but rather very soothing, natural and organic. These two hues, interestingly enough do not look quiet bad paired up against one another. Room that is overloaded with a massive amount of bright colors can use mauve acting as a balancing color. The two colors can also help tone things down a bit in a room. Pinks and purplish pinks are lovely colors for decorating girls’ bedrooms and baby girls’ nurseries. So, what are your feelings on mauve?
Date | 4th September 2016 Starting Point – Ending Point | Bukit Timah Visitor Centre – Singapore Quarry Wetland Duration | 3 hrs
The beginning of last month, instead of two of us, we get new companies. We put on our trekking shoes and meet up early in the morning at Beauty World MRT Station. The long waited for the hiking trip to Bukit Timah Hill. With the research, we found out that Bukit Timah Summit it’s one of the easy trails for the beginners.
Bukit Timah Hill is Singapore’s highest hill. At 163m, some might not associate the climb up as hiking. But this hill will still make you breathless and your heart pounds faster. Well, it’s easy for our new hiking friends Joe and Mai but not Fatin and I. We truly believed that we had bad stamina, the steep slope have given us a huge impact for the first 5 minutes. It’s so different for the flat path we been through during our last trip.
Tips for you;
The proper way to ascend a hill (same for mountain) is slow and easy if our body cannot acclimatize to new heights even athletes will succumb to fatigue.
Some folks will be running up and down the steps, keep one side to avoid injury and falls to you or them.
After climbing the endless stairs, we finally reached the top, Once you reached the summit everything just worth it. We reached the summit in less than 40 minutes and we decide to keep on moving to our next challenge – Singapore Quarry Wetland. However, we did have a hard time searching for our way especially, we met some monkeys, a lady who pointed us a wrong way where we wasted a lot of time searching.
After an hour of wandering about, thanks to my teammates we are heading a right direction – without them I might head back home. The journey was long but with them, by my side, I’m able to hang in there.
Along the way to Singapore Quarry Wetland, if you pay attention you will see some really interesting plants around. The curiosities of mine just make me so playful wanting to touch everything I see, just like a little explorer wandering in the jungle.
Question | What’s the biggest takeaway from hiking?
Fatin: Definitely perseverance. There’s always that voice in my head that keeps saying “I can’t do this anymore” the entire journey. There are times when I feel like giving up and throw in the towel. But then I’ll think again and tell myself that I’m already halfway through the journey. If I turn back and give up, all of my effort to make it that far would go to waste. So I’ll tell myself to keep going and just take a step at a time cause it will be worth it in the end.
Angela: Getting to know me better. My mind has been strong willed since young but little I know that my stamina is up for different challenges too. I always think that I have the worst stamina among the all of them but with friends on the trek, I’m able to push myself a higher level each time. I believed that next challenge would be better
Joe: Teamwork is something I gain during this hiking. I believe that if I was alone, I won’t be able to finish this trip. It’s only all the encouragement and support I then have the energy and right mind to conquer it. Thus I am able to see the beautiful view of Singapore Quarry Wetland. “Alone we can do so little; together we can do so much”.
Question | What’s an essential item you must bring?
Fatin: Water bottle. Never leave home or start hiking without one. You’ll need it.
Angela: Towel. Actually, I couldn’t decide in between water or towel. As I tried not to drink too much water during the hiking as I’m worried that I couldn’t find any restroom in the middle of the woods. Towel, because I sweat a lot!
Joe: Phone. We almost got lost in the wood due to a wrong guidance from a lady. Therefore, it’s good to have one just in case. You can use it to listen to music and capture amazing photos. For me, I use it to catch some rare Pokemon.
#BehindPlainCanvas |
It was humid, long journey with the steep hill. While catching my breath, we sort of lost our way due to a kind lady who shared with us wrong information. We climbed up-and-down the stairs that were so tall, which required more energy than a normal day. There was recontraction undergoing everywhere but we met new people along our way!
I’m almost breathless every second but this might be our most fun hiking yet. Being with friends make the whole journey so much happier – which it filled with joy and laughter. No matter if it rain or you lost your way, being together we discover places together.
We hope that all of you will continue to support this column, for those who love hiking please share with us your hiking stories by tagging us on Instagram and hashtag #ourhikingstories. We love to know more about yours!
We are all equal in the fact that we are all different but all the same in the fact that we will never be the same. The reality that all color and all cultures are distinct & individual make us united. In the reality that we are all held to this earth by the same gravity. We don’t share blood, but we share the air that keeps us alive.
“It is not our differences that divide us. It is our inability to recognize, accept, and celebrate those differences.”
Are you resting at home for the weekend? Or maybe you’re doing a more casual picnic — just you, a friend, a basket with some sandwiches, and a bottle of Moscato. If that’s the case, let us offer a few ideas for sandwiches, from the sublime yet simple chicken salad and to a tuna – raisin, to an egg salad. Just them in your picnic basket and seat under a tree!
Tea sandwiches have always been our favorite. They’re easy to make, easy to tote, and of course, delicious! Planning a picnic can be tricky. You have to consider the weight, durability, and longevity of everything you pack. Sandwiches are the natural picnic snack choice, but all too often they’re the choice you regret making. Anyone who has had to suffer through gooey tomato run-off and soggy bread knows this to be the harsh reality. Thankfully, not all sandwiches are created equal. There are sandwiches that ideal for picnic munching. Not only do these sandwiches stand up to the rigors of traveling, they also improve the longer they sit.
The 3 simple recipes that we are gonna share with you are Chicken Salad Tea Sandwich, Tuna Tea Sandwich with Raisin and Egg Salad Tea Sandwich.
Chicken Salad Tea Sandwich has golden raisins bursting in each bite. The addition of golden raisins adds a refreshing flavor and texture that transforms an ordinary chicken salad mixture to something really special. A great variation for this recipe is to make it a low-fat recipe by using a sour cream with mayonnaise. I know you will love adding this tea sandwich to the menu at your next tea party.
Ingredients |
1/4 cup plus 1 tablespoon mayonnaise
1/4 cup plus 1 tablespoon sour cream
2 tablespoons chopped fresh parsley
2 tablespoons chopped green onion
1 tablespoon chopped fresh tarragon
1 tablespoon chopped fresh dill
2 teaspoons lemon juice
1/2 teaspoon kosher salt
1/4 teaspoon ground black pepper
Pinch garlic powder
2 cups finely chopped cooked chicken/ tuna
1/4 cup golden raisins
1/4 cup toasted sliced almonds
10 slices white sandwich bread
1/2 cup thinly sliced cucumber
Garnish: thinly sliced cucumber, chive
Methods|
In a large bowl, stir together mayonnaise, sour cream, parsley, green onion, tarragon, dill, lemon juice, salt, pepper, and garlic powder. Add chicken, raisins, and almonds, stirring to combine.
Spread a thick, even layer of chicken salad onto 5 bread slices. Evenly divide cucumber slices among bread slices. Top each with remaining bread slice. Using a bread knife, cut crust from bread; discard. Cut each sandwich into 3 rectangular shapes.
Garnish each tea sandwich with thinly sliced cucumbers, or wrap each with a chive, if desired.
Tuna Tea Sandwich with Raisin are very recipes are very similar to Chicken Salad Tea Sandwich. Just simply replace 2 cups of chicken with 2 cups of can tuna. Compared to chicken salad tea sandwich, it have a much mild and refreshing taste.
Lastly for non-meat eater Egg Salad Tea Sandwich will be the best choice for you! These egg salad tea sandwich always appear to be the first things eaten at picnics. Packing all of that zesty flavor between two slices of bread is sure to bring new life to the ordinary egg salad sandwich. A warm, lightly toasted roll is the perfect compliment to the smooth and creamy egg salad. The little crunch from the sweet relish and a little sprinkle of paprika pull it all together. Comforting, filling and delicious!
6 eggs, hard boiled and peeled
1/4 cup chopped green onion
3 Tbsp Dijon mustard
1/3 cup mayonnaise
1/4 teaspoon paprika
1/4 teaspoon curry powder
Salt and black pepper to taste
Methods|
Chop the eggs coarsely and put them into a large bowl. Add the green onion, celery, red bell pepper.
In small bowl, mix together the mayo and mustard. Gently stir the mayo dressing into the bowl with the eggs and vegetables. Add paprika, curry powder and salt and black pepper to taste.
Spread a thick, even layer of chicken salad onto 5 bread slices. Evenly divide cucumber slices among bread slices. Top each with remaining bread slice. Using a bread knife, cut crust from bread; discard. Cut each sandwich into 3 rectangular shapes.
Best served chilled.
Please make them and take a photo, send us an email, tag us on Instagram, tweet us, anything. We love to yours! There will be more exclusive stories on our #stellerstories profile thus check it out whenever you can!
So after the making of Beetroot Mussel Pasta, we have some leftover beetroot. Therefore, we decided to use them for our pickles series. Ever since the making of Beetroot Mussel Pasta, I have been adoring beetroot. There is something so rich and satisfying about a root vegetable that has a real depth and flavor all its own yet marries so well with lots of other foods, complementing and highlighting the others favor and never stealing the show.
For me, pickled beetroot is a real staple and something I will always make sure I have at hand to liven up a simple bowl of mac and cheese or to lend a spiced tartness to a roast dinner of chicken or pork. Pickled beetroot is one of those things that can really vary in taste and quality when you buy it in the store. Some can almost make your skin prickle with the hit of vinegar, while others seem tasteless and bland. Making your own means you are in control and can make your pickle as tart, spicy or sweet as you wish.
Ingredients|
1kg beetroot
vegetable oil
4-5 tsp coarse crystal sea salt
For the pickling vinegar
1 tbsp black peppercorns
1 tbsp fennel seeds
1 tbsp yellow mustard seeds
2 string of drills
700ml white wine vinegar, plus 3½ tbsp
Methods|
Wash and trim the beetroot, rub each with 1 tbsp vegetable oil, then wrap individually in foil. Roast on a tray at 200C for 1 hr or until tender. Cool, peel, then cut into wedges.
To make the pickling vinegar, put the whole spices in a medium saucepan. Toast over a low heat until they begin to smell aromatic. Add the drills, pour in all of the vinegar, and bring to a simmer.
Pack the beets into sterilized jars, add 1 tsp coarse crystal sea salt to each, then pour over the hot vinegar and seal. Ready to eat in 2 weeks, or longer, if you like.
Notes from the two sisters| Pop on a lid, label and date your jar and let it sit in a nice cool dark cupboard for 3 weeks to mature and really get those flavors to develop. Store for up to 6 months and once opened keep in the fridge and use up within 2 weeks.
Please make them and take a photo, send us an email, tag us on Instagram, tweet us, anything. We love to yours! There will be more exclusive stories on our #stellerstories profile thus check it out whenever you can!
I can’t believe that the time passes so quickly, it has been 26 weeks since we launch #APaintPortrait. The 52-week project is half way through, I hope that you all enjoy all the portraits. Each and every portrait they meant a lot to me, as I’ve spent hours and days to put my thoughts on it.
This week, I would love to share one of my favorite people I knew, I love Britta, she inspired me in my life through her arts, her words and herself. She is a beautiful and amazing individual. She shares with me her ideas and her adventure and gives me warm vibes.
When it gets all crisp and cold there is nothing you want to do more than make your home cozier. And the simplest way to do that is to just start tossing sheepskin rugs around like confetti. Draped over a chair, sofa, on a floor, on a bench- they add fabulous texture and a high-end look while upgrading the fuzzy, awesome factor of wherever they land by like, 100 percent. You’ll be downright anxious to get started on those work projects with a seat like this waiting for you. As soon as the rug in there it sucked every bit of light, brightness, and cheer right out of the room, giving a flokati vibe to it too!
Looking to stay warm on those cool summer evenings while you’re sipping on a colorful cocktail with your family? Faux fur will add just the warmth you need. In this fall isn’t it great to go home lying on this comfy furry rug and blanket. Fur is the one thing that helps to turn the living room to be really light, bright, and cheerful. If you’re going with a neutral color palette, a sheepskin rug is a perfect way to bring texture into space without using too much color.
You don’t really have to wait till winter to wear this fur. This fall you can have this fur to stay with you in style.
It has been a busy week, where I almost think that yesterday is Thursday rather than Friday. When things get overlapped, you will always forget one or two tasks that are needed to be completed. The feeling of forgetting is really bad.
However, we can’t avoid it. It happens all the time as our brain are not built for multitasking. Likewise, they are not built to work early in the morning. Don’t worry if things go as your plan. This is life, what we can do is to prevent it.
Things you can do are;
Plan your next day before you sleep
Write a to-do list (even small errand like clean the table)
Set a phone reminder (for the task that is needed to be complete at a certain time)
Title: Dear Brian Instagram’s account: @innisbrian
These days even we’re getting busier, we’re motivated by every challenge. The fact is I felt happier every day. I felt blessed to do what I’m doing right now each day; be it work or anything that going through in my life.
Bradley Whitford once says, “Infuse your life with action. Don’t wait for it to happen. Make it happen. Make your own future. Make your own hope. Make your own love. And whatever your beliefs, honor your creator, not by passively waiting for grace to come down from upon high, but by doing what you can to make grace happen… yourself, right now, right down here on Earth.”
I think what Bradley Whitford said was very meaningful, make your thoughts into action and that’s just simply simple that you thought!
Just like @innisbrian, seeing his Instagram’s page you just need to believe that you can live truthfully like how he did. Being, so carefree and making every moment a magic!
We’ve just sent away the Summer and there’s no denying, Autumn is on the way. Personally, I love the Autumn as much as the Winter (even though I still love Summer but it’s just different). Since you can see we stayed in a tropical country, it normal for us to long for four seasons. Even though we don’t have four seasons but say who that we can’t inject it into our everyday life? We always can create it with thoughts and decorations!
While researching some Autumn’s inspiration, we’ve noticed a classic trend for all Minimalist. This year Autumn we’ll welcome the sense of delicacy with the touch of cotton, wool, and use of paper (prints). These are the few main elements you can play with. We should never leave out the cozy touch that autumn has given to us. Therefore, we suggest using soft fabric with the touch of greens to give out the warmth in the cooling temperate.
There is 2 kinds of purple dreams for me, mysterious and dreamy. When it comes to mysterious, it is dark purple and misty. It usually occurs in the forest and in the mist there is a haunted house. However, when we talk about dreamy purple. It’s usually dream of me in a field of lavender, lying down looking in the sky.
Ever shades of a color have there own stories. Every side of us have different stories and reason too. “Stars behind cosmic glass, the light behind one’s eyes” -Tracey-anne McCartn
Happy Chocolate Milkshake Day! At the same time, it ‘s still a humid day in Singapore and thus we have prepared this S’more Milkshake for our breakfast. Who says milkshake can’t be healthy and fun at the same time? Just a little bits of chocolate in the morning, it helps energize yourself for the day.
S’mores. Oh, how I love S’mores. But, who doesn’t? If you don’t then I’m sorry we just can’t be friends. The combination of graham crackers, marshmallows, and milk chocolate. How could you go wrong with that? Especially in milkshake form. Heck yeah. This milkshake is sure to fix an s’more craving. There are toasted S’mores blended right in!
Although summer has just left us, but when it comes to nostalgic sweets, S’mores rank at the top of the list. The combination of gooey toasted marshmallows, creamy chocolate, and crunchy graham crackers instantly brings back memories of the carefree days of summer (we still can enjoy the memories of summer).
The flavor of toasted marshmallows — I like mine blackened and crispy on the outside and soft inside, by the way — is everything. It’s a burnt sugar whiff of vanilla coating a stretchy white cloud. It’s summer and time spent outside and crackly campfires and I know this is getting really twee but I don’t care, I just want to stuff everything awesome about them into a frosty glass and slurp it through a straw. I hope you join me.
If you enjoy the flavor of toasted marshmallows you will LOVE these milkshakes. They taste like you are drinking a toasted marshmallow – they’re so good!
This delicious milkshake is the perfect way to cool down and get your S’mores fix this summer. Sipping on these milkshakes inside a cozy blanket fort with my kiddos is one of my most cherished summer memories. How do S’mores help you create summer memories?
INGRIENTS |
6 scoops vanilla ice cream
1/2 cup milk
a mixture of large and small toasted marshmallows
graham cracker crumbs for garnish, about half of one sheet or less
Optional * chocolate sauce for drizzling and 1 extra toasted marshmallow for garnish
METHODS |
Torch the marshmallows with a kitchen torch until they begin to brown.
Place 5 graham cracker squares in a plastic bag and crush until finely ground. Pour the crumbs onto a small plate.
Dip the top of your glasses into the melted chocolate, then into the crushed graham cracker crumbs. Set aside.
Place ice cream and milk in a blender, top with the rest of the crushed graham cracker crumbs. Blend until smooth. If you have to add more milk, you can do so.
Pour into glasses, drizzle with some of the remaining melted chocolate, top with remaining toasted marshmallows, and garnish with remaining graham cracker crumbs. If desired, you can also garnish with whole pieces of chocolate biscuits!
What kind of Chocolate Milkshake did you have for your Chocolate Milkshake Day? Didn’t get to do it? It’s okay, try this recepie now. It is never too late!
Please make them and take a photo, send us an email, tag us on Instagram, tweet us, anything. We love to yours! There will be more exclusive stories on our #stellerstories profile thus check it out whenever you can!
I love sharing my thought through my words in letters, and postcards. They’ll deliver my thought to people that I want to know and love. Back in the olden days, when we were in elementary, we have long holidays and we barely meet our friends. For me, rather than spending on the phone, I love to write letters or send a postcard and the connection just never end. It is not the fastest ways to stay connected but the most efficient way to get to know your friend better. We share all kind of things and I have it kept until now. Those memories just make me love to write to people more!
However, I’m a visual person as well, so it always starts with a picture, and then I get obsessed with the idea, sometimes too much. I have these blank books in which I take notes, and I add postcards and other physical items. That why I love Gizem even more, her project about sharing life’s moments through postcards. It’s just so inspiring! Get to know her, by clicking the link above! Share your thought with her and she will be so welcome to get to you back!
Every one of us struggles to find happiness each day of their life. We fought through the stressful days and become our own warrior. Some of us tried so hard to put on a smile but have you question yourself. How do you fight for your own happiness?
Question: How do you fight for our own happiness?
Angela: “I used to be an over-thinker, I worried about things and upset myself. Now, I have changed, ever since a friend who shares with me her philosophy in life. The word positive has brought me happiness each day. I learn to be happy with regards to any difficulties happen to me. When you have learned to think the thing in a positive way you will be much happier.”
Joe: When I am young, I always had been a follower to people I care. I always try to avoid argument and drama with them, as I want everyone to be happy. Thus I tried to do a thing in their way, making sure it nothing goes wrong. Those days, I don’t even care to explain myself even I’m not in fault. I apologized instead.
However, when I get older, I found out that I can’t make everyone happy. People do things differently; no matter how hard I try, I am not them. Thus argument still happened. This is when I know how to say NO! It is easy to say “yes” but on the other hand saying “no” is hard. As I always scared how people I look and judge about that (saying I’m unfriendly). This is not right, as I’m unhappy.
Now I open up myself by telling my point of view, opinion and how I feel. It’s okay that they don’t listen but at least I try. This is kind of a way how I release my unhappiness and be happy. Most importantly, l love me now.
Share with us how you keep yourself happy? We love to know your stories!
“Every time, I look at a zebra, I can’t figure out whether it’s black with white stripes or white with black stripes, and that frustrates me.” – Jodi Picoult
There will always be 2 sides of explanation or even more for every situation. Like zebra, there is no right answer. It may be right to one, this doesn’t mean it apply to all. Please look in other shoes, and think of them. It may be frustrated but not every individual is the same. We are all unique.
I’ll tie this into cooking in a minute, but I found this framework quite fascinating and it was the first time I’ve ever thought of myself as a “rebel”. The word seems a little dramatic in this context, but this was one of the very few times that I’ve been able to relate to some sort of generalized human personality category.
I fully understand the benefits of having good habits, but I’m finally realizing why I’m more efficient at life without trying to do things in a structured or planned out the way, while the rest of the world seems to live in list-land. I’m talking about this here because the way that we form (or don’t form) habits has a lot to do with how we cook and eat. The resistance of internal expectations is why I’m so drawn to cook intuitively, experiment, and let curiosity guide the process.
I love all turnips, especially the small white Japanese turnips that appear in the greenmarkets in the late spring. Since, turnips are related to the cruciferous family and are a great veggie for cancer survivors who want to make healthy and tasty food choices. This recipe is a little East meets West. It pairs butter and honey along with sake and miso to create a sweet velvety glaze that turns this humble root veggie into a real taste treat.
This recipe is a wonderful way to showcase spring turnips. Miso and butter are a wonderful combination and naturally pair well with turnips. This is a great side dish to serve alongside chicken or tofu and a little rice. Grab a fork!
Ingredients |
1poundsmall turnips, trimmed, scrubbed, cut into 1” wedges
2tablespoonswhite miso
2tablespoonsunsalted butter
1teaspoonsugar
Kosher salt and freshly ground black pepper
2tablespoonsfresh lemon juice
Methods |
Combine turnips, miso, butter, and sugar in a medium skillet, then add water just to cover vegetables. Season with salt and pepper.
Bring to a boil over medium-high heat and cook turnips, turning occasionally, until they are tender and liquid is evaporated, 15–20 minutes.
Once all the liquid has cooked off, keep cooking turnips, tossing occasionally, until they are golden brown and caramelized and the sauce thickens and glazes the vegetables, about 5 minutes longer.
Add lemon juice and a splash of water to the pan and swirl to coat turnips. Season with salt and pepper.
NOTE FROM THE TWO SISTERS: When buying turnips, think small and tender, and choose the smallest purple topped roots you can find. If your turnips come with greens, do not waste them! Wash and chop the greens and add them at the end of Step 1. Cook the turnips with the greens, covered for 1 minute before continue onto Step 2.
Do you have leftover Turnips? Check out the Turnips Pickled we have made last week!
Please make them and take a photo, send us an email, tag us on Instagram, tweet us, anything. We love to yours! There will be more exclusive stories on our #stellerstories profile thus check it out whenever you can!
“The first week of August hangs at the very top of summer, the top of the live-long year, like the highest seat of a Ferris wheel when it pauses in its turning. The weeks that come before are only a climb from balmy spring, and those that follow a drop to the chill of autumn, but the first week of August is motionless, and hot. It is curiously silent, too, with blank white dawns and glaring noons, and sunsets smeared with too much color.” ― Natalie Babbitt, Tuck Everlasting
However, everyone still craves for summer to be longer than ever just before the autumn come. We missed the summer’s memories, even it’s warm and hot. There was tears, laughter but what we missed the most was the joy we have together. A painting for every one that fell in love with the summer.
Enjoy your very last bit of this summer before we say hi again next year!
Centuries of poetry have been penned about the twinkle of starlight; the shimmery, wobbling surface of calm waters on a sunny day, the instinctual allure of diamonds—whether it’s magical or aspirational, there’s just something about sparkle, a mild thrill that makes your breath catch in the best way. It’s sad to say that Summer is going to be over. Our Summer has been fun, days it just likes glittering.
When I am a little girl, sparklers is a must have for me, even until I’m all grown up they are still my best friend. They are playful, shining like the sparkling light and they will never be disappointing us in any happy occasion.
I always have this love and hate relationship with September. As that, it means the summer is ending soon. There is nothing wrong with autumn. Just seeing the rain day make my mood down.
“Outside the leaves on the trees constricted slightly; they were the deep done green of the beginning of autumn. It was a Saturday in September. There would only be four. While, the clouds were high and the swallows would be here for another month. Or else before they left for the south before they returned again next summer.” ― Ali Smith
Have you tried our Purple Cabbage Pickled? If you are not a lover of Purple Cabbage, don’t worry this week we will be sharing you a brand new pickle – Turnips Pickled. Poor turnip. Sort of a wallflower, this drab white vegetable is easily overlooked at the market. The taste is a bit bland. Pickled turnips will certainly not appeal to everyone, but they are a stunning addition to any spread of salads and look great on a plate next to a sandwich. When I put this Pickled turnips turquoise colored dish the effect was quite stunning.
I find these pickles don’t last as long as others, and they’re best enjoyed up within a few weeks after they’re made. Thankfully they’re easy – and inexpensive – to make, so you can whip up a batch in no time. In fact, after my dinner guests wiped me out, I went out and bought more turnips. And now I have another jar in my refrigerator, ready and waiting for the next onslaught of guests.
What once seemed a forgettable, not so interesting vegetable, has now transformed into a curiously addicting, stand-apart-from-the-crowd favorite of mine! The once bland flavor is replaced with a quite assertive tang, prominently of vinegar. With turnips and its other root vegetable cousins now in season, this is the perfect time to pick up a few pounds and start preserving these little lovelies into something special! Let’s get started with this simple and beautiful recipe.
INGREDIENTS |
a pound white turnips, tailed and peeled
1 tsp of coriander seed
bay leave
¾ cup distilled white vinegar
¾ cup cold water
4 teaspoons salt
METHODS |
Cut turnips into wedges or ½” thick slices. Pack tightly in a quart jar with the coriander seed and bay leave.
Mix the vinegar and water; add salt and stir until dissolved. Pour over the turnips. Cover with the lid and refrigerate for three days. Stir, rotating the vegetables in the jar, and don’t hold back from tasting. Refrigerate for three more days, then enjoy.
Stir, rotating the vegetables in the jar and don’t hold back from the tasting. Refrigerate for three more days, then enjoy.
NOTE FROM THE TWO SISTERS: These is simple refrigerator pickles that gain zest, character, and crunch over time. Select turnips that are heavy and hard, the smaller the better. The lift should last a month or so refrigerated. The pickles are delicious on their own or alongside a sandwich, a hummus plate with bread—or served with olives and cocktails.
Do stay tuned for more of our upcoming recipes on how we serve these amazing pickles with main dishes.
Please make them and take a photo, send us an email, tag us on Instagram, tweet us, anything. We love to yours! There will be more exclusive stories on our #stellerstories profile thus check it out whenever you can!
I’m not a person who believe in fate when it comes to friendship. However, I do believe that “no friendship is an accident”. Have you ever wonder how two stranger are brought together and become friends?
This sounded old-fashion, if we were all given a chance to be connect in this wide world but it all depend on us if we grab the chances that have given us. It could be just a second, a moment to get to know this person and chances was only given once.
“Life is what happens to us while we are making other plans.” ― Allen Saunders
Being someone who loves photography, there is always certain style we attached with. But there are people who want to achieve different style for the moment of their story.
They are dark, cold, iron-ish and filled with mystic”, they are just so seducing! Never will I thought that I’ve been attracted to the rustic-industrial style for a while. From the old abandoned buildings to the everyday basic like the kitchen’s photographs attached above in the mood board.
They are so subductive, they seem to like having some sort of power to drew you closer to them as if they are whispering to you. And, that’s the power of what a rustic touch can do or create. That’s why I have fallen in love with them!
Well, I also couldn’t deny the fact that under my colorful personality I do have a dark side as well, I love to express them through my arts.
It’s already coming to the end of August and we’ve been enjoying this month so far.
Somethings exciting just waiting throughout this summer and it all begin with this August. As the first on my list is to kick start my bucket list with my closest friend, Fatin – we are so much alike yet so different, or that the reason we become partner-in-crime in lots of ways! We have a goal is to complete a list of a dream we want to achieve together; travel, skydiving and of course hiking!
Just a couple week ago, she suggested spontaneously to go hiking. And of course, I love the idea of what she suggested since it has been something I always want to try! Since both of us is new to hiking, we decided to start with something much at ease. After lots of researching, we decide to start with MacRitchie Nature Trail. It was famous with the treetop, thus we didn’t plan to go with that as we hear that it was hard for beginners. However, we sort of completed it in the end.
Date | 2nd August 2016 Starting Point – Ending Point | St Therese Home – Island Club Road Duration |3.5hrs
The day itself, we met at 9am and approximately reached at 10 later than we expected. We were excited and I just worried that we will miss the stops to alight. Once you alight at the bus stop, you could spot the entrance immediately. There will be only a path that leads you toward the MacRitchie Reservoir if you are lucky you might spot some goose along the residence area.
Thus, before you realize, the next moment what you focusing will be the panorama view of the reservoir through your eyes. Both of us was excited, we decide to go with the wooden trail with the crowds. We started it to suit our pace, many hikers just passes us quickly. Somehow, we hope there will be someone nearby as I’m really worried about the monkey jumping out from nowhere. Nevertheless, we enjoyed our slow pace, there were steep slopes and rocky path, therefore, please be careful.
Some extra tips for you if you are going;
There will be monkeys in the area. Don’t feed them and don’t eat too openly or they’ll approach you for food. But if you must, like I did, just bring a morsel of food and be very careful no monkeys see you eat.
Also, don’t forget insect repellent and sunblock! I forgot insect repellent and only put sunblock on my face, so now I have bites on my arms and legs and very burnt shoulders. Not a cute look. (based on Joe’s experience)
I find that hiking is far more enjoyable and less painful when there’s company. Make this a group outing and share the pain! The more the merrier! Yay!
The Tree Top walk is one of Singapore’s truly uniquely nature experiences and sadly one of the last few in the Country. The attraction is good for a full half day nature adventure for the entire family.
#BehindPlainCanvas |
I’m a newbie in hiking, this series of our “Hiking Stories” is to share our experiences in hiking monthly of places we visit. Please share with us your version of #ourhikingstories and we could learn more about your journey as well!
Surprisingly, we’ve completed the trail earlier than we expected since it’s the hardest path among all the recommended trails. I’ve completed the first hiking with my best friend, the journey wouldn’t be this awesome without her. And I’m looking forward to accomplished more challenges with her each month. Of course maybe with Joe as well since she did mention she would like to join me!
We hope that all of you will love this new column, for those who love hiking please share with us your hiking stories by tagging us on Instagram and hashtag #ourhikingstories. We love to know more about yours!
Someday I hope people can come as one. Together we share and care for each other. Someday I wish that there will be no war, and people settle things by talking and sharing. By doing so, I think the world will be less stressful and more peaceful. When we start to connect with each other. When we try to understand each other and stay together. We could solve a problem rather than create a new one.
I wish!
“You may say I’m a dreamer, but I’m not the only one. I hope someday you’ll join us. And the world will live as one.” ― John Lennon
From watching the TV show to reading books, we always want to try making our own pasta from scratch. However, due to the lack of equipment, we didn’t dare trying it as we worried the outcome. We’ve been wanting to make this recipe for a while. We’ve been pining away and found a few recipes that looked easy enough to take a go at. After looking at several recipes, we have been dreaming of making homemade pasta.
We always thought pasta making would be hard, but the posts were so pretty and made it look so simple and easy. Several of those bloggers even said it was. Well, wrong. This recipe was not that easy. Maybe it is because it took me a while to get my beet puree and flour ratios correct. But pasta making is hard but fun, but really time-consuming. So pick your battles and only tackle it if you’ve got a couple of hours to devote to the process. Hopefully, this batch of dough will last me a few meals. There was nothing super difficult about it, just takes a little elbow grease and time.
We have always said that the magic of this dish is that it gets people who love beets excited about them all over again. For those who think they don’t like beets, the color is enough for them to give it a try, and chances are they will like it — we know because my sister is a loud and proud beet hater and she will even eat this pasta!
INGREDIENTS |
2 large beets
6 cups of flour + more for rolling out dough
3 eggs
1 tablespoon of olive oil
1 teaspoon of kosher salt
METHOD|
In a blender or food processor, puree beets, eggs, olive oil and salt until smooth. About 1 minute.
Combine beet puree and flour. Start with three cups of flours and mix on slow with the dough hook until well combined. Add a cup of flour at a time until all remaining flour is combined. The dough should be a little tacky, and forming a ball in the mixer and not sticking to the sides of the bowl. If dough is too wet, add more flour. If a dough is dry, add water, one teaspoon at a time.
Next, knead the dough by hand for 5-7 minutes on a floured surface.
Then roll out the dough. Be sure to get it nice and thin. As thin as you can get it without ripping. Use a knife or stamp to cut to your desired shape and size.
Simply add mussel and homemade pesto sauce to the pasta for the best combination. Remember the Mushroom Pasta with Homemade Pesto Sauce, this time using the same recipe by replacing Pistachio with pine nut. This pine nut pesto sauce will enhance the taste and texture of the pasta.
INGREDIENTS|
3 tbsp of olive oil
455g fresh live mussels (washed cleaned and debearded)
1 clove of garlic finely sliced
150ml of dry white wine
1 small knob of butter
2 good handfuls of flat leaf parsley roughly chopped
455g beetroot tagliatelle
salt and freshly ground black pepper pesto ( pesto sauce)
METHOD |
Put the olive oil into a very hot thick bottomed high sided pan and straight away add the mussels and garlic.
Place a lid on and shake for around 20 seconds it will sizzle furiously. Then add the white wine. Replace the lid and leave on the fast heat for about 12 minutes. This will steam open the mussels (discard any unopened ones). Add the knob of butter and the parsley and remove from the heat.
Meanwhile, cook the beetroot tagliatelle in boiling salted water until al dente. Gently toss the tagliatelle and mussels together until the juices just coat the pasta then check for seasoning and serve with a generous spoonful of pesto on top.
The colours are quite interesting and the mussels and pesto work surprisingly well together so it is definitely worth trying and it is very quick to make.
Pease makes them and take a photo, send us an email, tag us on Instagram, tweet us, anything. We love to yours! There will be more exclusive stories on our #stellerstories profile, check it out whenever you can!
Question: When someone asks you, what’s your love? What is the first thing you thought about?
For me, it would be capturing moments. Since I was young, I love to write, I love to draw, I love to hold onto my camera. Then I wasn’t skilled but I fall in love in capturing and document the precious time.
Apart from photography and writing, one of my love must be painting. However, I would never proclaim myself as a painter but I love to express my emotion through my brush to capture the thing I see.
Edvard Munch once said, “Painting picture by picture, I followed the impressions my eye took in at heightened moments. I painted only memories, adding nothing, no details that I did not see. Hence the simplicity of the paintings, their emptiness.”
Stripes stormed the summer in every style you can possibly imagine—some ran horizontal while others vertical; there were thick lines and super skinny ones, too. These bold graphics can run from color-blocked to an amalgam of hues pitted against one another racing in opposite directions. The dizzying yet striking designs offer a more modern way to don the trend, and we’re willing to bet they’ll be everywhere come summer.
Other than seeing stripes in the clothes we wear, you can put them in your home too! Like having stripes cushions and pillows on your sofa or day bed. Or even a sheer curtains for your window in order to give your home a hint of summer and beach feeling.
However, don’t overdo it as you may give a prison feeling to one. Keep it simple we just a few items and you are off to go!
Since young, there is always a mindset of me being a shadow of my sister. As I am always following her along since I was a kid. I follow the way she acts, speak and even the liking of hers. When my mom scold when I have done something wrong, I will say “I learn from sister!”
“I thought the most beautiful thing in the world must be the shadow.” ― Sylvia Plath
The next following weeks, in between we’re going to share a series of our favorite homemade pickles to you. It is easy and tasteful for those of you who are busy however who want to remind healthily. Stop buying commercial jars or cans food, making your own pickles and sauce is very simple, and you could do them all at one go. With proper storage, they could be very lasting.
Another name for this Purple Cabbage Pickled is Red Cabbage Pickled, as it turns red in the pickling brine. As purple cabbage is a PH indicator. It turns red in acidic conditions (purple in neutral, and green or yellow in alkaline, cool huh?). Purple Cabbage Pickled is very simple, and it’s a great addition to so many things. We love it for topping burgers, tacos, and sandwiches, and it’s a great side for anything spicy, and anything Asian.
It’s fun to play with this recipe to get different flavours. You can change the vinegar for cider vinegar and add some soy sauce, and ginger slices for a specifically Asian twist. Moreover, the onion can be changed for black mustard, fennel, or sesame.
When it comes for purchasing fresh vegetables the local wet market is our best choice. How to choose a cabbage? Look carefully, choose the cabbage that is brightly coloured, heavy for its size and with its crisp outer leaves still attached. Do also remember to avoid those that are light, dull and have had their outer leaves removed.
When you have all your ingredients, let’s get started!
INGREDIENTS (2 jars, 270ml)
1/2 Purple Cabbage
1 Onion
400ml of Cider Vinegar
2 tsp of Salt
2 tbsp of Sugar
DIRECTION
The night before you wish to assemble the pickle, slice it very finely and leave in a bowl over night covered with the salt. Mix it well.
The next day, drain the cabbage and leave to drip dry for 2 hours. Add in the finely sliced onion into the cabbage and mix it.
Next in a dry pan big enough to hold all the remaining ingredients, add the sugar & the vinegar. Bring to the boil.
Place the cabbage mix in a jar, then pour the hot pickling solution over the top. Seal and leave in a dark cupboard for a minimum of 3 weeks before eating.
NOTE FROM THE TWO SISTERS: We have tested and tried many times while preparing pickles. We’ve failed numerous of times even we follow suggestion through books and online. Then we realized that the reason we failed is because the temperature of our country. Singapore is hot and humid therefore even we store it in a dark cool place, it spoiled quickly. For those who stayed in the Asia like us, we suggested storing your pickles in the fridge for a longer consuming storage.
Do stay tuned for more of our upcoming recipes on how we serve these amazing pickles with main dishes.
Please make them and take a photo, send us an email, tag us on Instagram, tweet us, anything. We love to yours! There will be more exclusive stories on our #stellerstories profile, check it out whenever you can!
For those of you that follow our site, you must realize that every Wednesday actually is our #apaintportrait column. However, it didn’t happen yesterday and what happen?
Well, I want to take the chance to dedicate “A Paint Portrait” to my best friend, sister, and partner-in-crime – Fatin, @effizzxti. Today, on her birthday I want to surprise her with this portrait along with the message.
Although, we might not know each other for life but she is the one who could understand me. We are so much alike and yet so different and that is why I love her so much! I will never forget the day we met in class, a girl who asked me to call her by an initial “F”. I thought she must be as be weird as I do however both of us mix around better with strange people in our life.
Although she was younger than me and just like my little sister. Yet she is mature and teaches everything that I lack. With her accompany I grow up stronger each day. With her, I dare to do things that I don’t normally do and I truly appreciate meeting her in my life!
William Shakespeare once says, “A friend is one that knows you as you are, understands where you have been, accepts what you have become, and still, gently allows you to grow.”
F, Happy Birthday! A couple of years back you help me celebrate mine 24th, today is yours. While I want to make you a promise, let’s be part of your special day like you did. Till we grow old~
You may say we are one of those thrifty’s girls, both of us love pretty and cute little things from accessories to household needs, however, times we just never want to spend extra money on things if we can save a penny. However the ultimate reason is since young, we love making things on our own with the influence of our mom.
It has been fun making things with her, she is creative and a talent handywoman. She always tell us, “we’ll just keep on trying it even if we failed, at the end of the day you will just gain knowledge from your failure”. She taught us to be innovative, sometimes we laugh at her silliness on her creation but surprisingly it just works! We appreciated that she gave us all the freedom and lead us to where we are right now.
When it come to baking, it is best to use room temperature egg. Thus we don’t know where could we put the eggs as we usually leave them in the fridge. So rather than buying the egg with the cardboard carton that I’ll have to force ourselves to throw out once it couldn’t be used we made this instead – DIY Clay Egg Crate. Something to help me hold all the eggs and as a decorative accessories for our kitchen.
SUPPLIES
Cardboard egg holder (keep it when you purchase of eggs, preferably to be cardboard materials)
DAS modeling clay (air hardening)
Containers (for the painting use)
Sponge / Brush
Martha Stewart Craft – Acrylic paint
Martha Stewart Craft – High Gloss Finish
DIRECTIONS
Cut the excess from off the egg carton until you have the basic shape and roll out your clay.
Lay the clay over the carton and starting in the middle begin to press into the spaces. Don’t worry if you make holes. You can patch these up later.
Once you have the basic shape you need to smooth all of the clay with water. I spent about half an hour just going over to make this as smooth as possible at this stage. This will save you time sanding later!
Leave to dry overnight and then peel off the cardboard from the bottom of the clay. Now sand down the edges, inside, and bottom of the clay carton. Sharpen the edges and smooth the rounded parts.
Paint on a few layers of varnish and leave to dry. Your carton is ready to display your decorated eggs or your jewelry collection. Which ever you wish!
This egg crate is simple and fun to make with the little kids at home. You just have to mold it in shape, dry it and paint it into the color that you like. You can even paint it into chalkboard and have fun writing things on it.
Make them take a photo, send us an email, tag us on Instagram, tweet us, anything. More stories on our #stellerstories, we want to see yours! It would make the day!
The hottest kitchens in town are all installing marble worktops. This gorgeous gray and white shiny stone once considered stiff and cold is having a moment. Just because we missed the boat, it doesn’t mean that we couldn’t apply this trends to our lifestyle.
Moreover, as we grow up so is our style and us slowly moving away from the fun and playful look and into something a bit more sophisticated. Of course, changing up your furniture doesn’t necessarily mean going out and spending loads of pennies on new things. It can be marble accessories like plates, laptop covers and chopping boards placed with enthusiasm throughout our home. Just a few simple marble pieces you are able to achieve the look that you want.
Have you scrolled through this post? Tell me now that you are not beginning to get warm feelings for this cold trendsetter.
xoxo, Joe.
Credit | All shots used on the mood board via our Pinterest boards.
It has been a week since the release of Pokémon Go and I am already addicted to the game. There are both good and bad critics with this game. Some say this is a good bonding game but some say it is turning everyone into walking zombie.
For me, this is a very interactive game. As I am able to walk around the city, finding new Pokémon. This is sometimes I never though I will be doing at all. Moreover, I have been walking more as I need to hatch the egg. This game also allows me to discover a new place in Singapore.
I do admit that I got hit on the wall or trip over as my eyes are on the phone. Thus don’t be like me, remember to be careful when you are playing this game. There is a vibration setting to notify there’s Pokémon around. So you don’t have to keep staring at your phone.
For those of you who have not get try with this game, go try it now. It’s a worth it!
“We do have a lot in common. The same Earth, the same air, the same sky. Maybe if we start looking at what the same instead of always looking at the difference. Well..who knows!” – Meow
Have you tried our last week weekend brunch Summer Steak with Coriander Chutney yet? If you haven’t please try it, we promised that making Ciabatta can be very easy if you follow our suggestion.
Other than seafood just out of the ocean, I can’t wait for all the summer farm produce. All I need is a loaf of great bread for making sandwiches pack for the day. I don’t know why, but even sitting in a beach chair doing not much of anything, digging my toes into the sand every now and then, makes me really hungry. This week, we would like to share another Ciabatta recipe for those who are vegan or prefer having superfood like me.
But I won’t be spending a whole lot of time planning meals – as always, simplicity is key.
This sandwich can be assembled the night before or in the morning in advance of heading out to the beach or wherever summer takes you. I love the way freshly roasted peppers and eggplants smell and taste, but to make things even easier (and keep the oven off), jarred roasted peppers, and roasted vegetables from the prepared food section of the grocery store will make a fine sandwich, too.
Today’s recipes use all of my favorite late summer produce – zucchini, peppers, and eggplant. These are some of our all-time favorites and I hope you enjoy them as much as we do! Let get started with this Toasted Ciabatta with Roasted Summer Veg & Blue’s Cheese sandwich.
INGREDIENTS
50g walnut pieces, roughly crushed
2 eggplants, cut into 1 cm slices
1 zucchini, trimmed and cut into long, thin slices
2 red peppers, deseeded and cut into thick strips
3 tbsp of olive oil
1 tbsp of chopped fresh oregano
blue cheese for garnish
mint for garnish
METHOD
Place a large rimmed baking sheet on middle oven rack and heat to 425 degrees. When the oven has reached temperature, remove the hot baking sheet and pour olive oil over the bottom. Arrange the zucchini, red peppers and eggplant on the sheet; sprinkle with salt to taste and roast 20 minutes, until browned.
Slice the ciabatta in half horizontally and tear out some of the excess dough. Layer the bottom half with the bell peppers, tomatoes, eggplant, blue cheese, oregano, walnut, and mint; grind black pepper over to taste. Close the sandwich and press down firmly.
Toast the sandwich in a hot pan for 3 minutes on each side. Wrap sandwich tightly in plastic wrap and place in the refrigerator. You can keep in the fridge up to 2 days.
NOTE FROM THE TWO SISTERS: We suggest you could try it with the fresh vegetable you could get in the market.
Make them take a photo, send us an email, tag us on Instagram, tweet us, anything. More stories on our #stellerstories, we want to see yours! It would make the day!
Joy is a career strategy for professionals & creatives coaching. I followed her since 2 years back. Following through her journey, she motivates people in everyday life. You might be saying, it’s her job but for me, her genuine of her smile is what motivates people to surround her. And I’m just a lucky individual.
Never could I deny the fact that I’ve spent a couple of weeks to complete this painting that is because I want to make this painting a perfection. I fell in love with her smile, I believed that every painter will be just like me.
Too often we underestimate the power of a touch, a smile, a kind word, a listening ear, an honest compliment, or the smallest act of caring, all of which have the potential to turn a life around. So, don’t forget to smile!
Want to know more about her, do check out her Instagram and her website for more information.
It has been quite awhile, we were thinking to have our bedroom makeover. Since we want to have something organic, simple and soft however not totally black and white. Even though, as a minimalist, we prefer something with a little of colors to enhance our dreams with the unicorns.
While scrolling through Pinterest these days for color’s inspiration, and we spotted this trend with these 3 combinations – Champagne Pink (#F2D0CD), Pastel Grey (#CCCCCC) and Black Olive (#3F3C3F)
The three colors are gorgeous, soft in gentle neutral tones. Doesn’t they just work so well with the different shades of gray?
xoxo, Angela.
Credit | All shots used on the mood board via our Pinterest boards.
When people are having Monday Blue, I am having Saturday Blue. Sometimes I couldn’t understand the word ‘compromising’. What does it mean? Is there really anyone think in my shoe when I don’t or when I get emotional?
Millions of years animal fight for land and food. For now human too. We think that the more we learn or open minded we are, the more humanity we are. No, it is not! Life is a cycle, sometimes we just have to accept the fact that we can’t change the world. However, I think everything happens for a reason. Maybe not for us but the future generation to understand. The only things we can do is to make our life a better one.
This drawing Blue Leaves represented my feeling now. Hoping that someone will understand me even I don’t do the same for them. Where could I find this selfless person?
“In every change, in every falling leaf, there is some pain, some beauty. And that’s the way new leaves grow.” ― Amit Ray
We’ve been enjoying the summer for more than a few weeks already, but it’s right now — when July melts its way into August — that the summer harvest is at its peak. Summer squash is plentiful, bouquets of basil are everywhere, and tomatoes are starting to ripen. It’s at this moment that you should be running into the kitchen to take advantage of the most bountiful time of year. In this heat, I’d like to forgo food altogether, or subsist on only fruit, but my stomach just isn’t having it.
This week we are going to share with you 2 recipes that are quite the basic – it’s simple, easy and we promise that it’s delicious. We decided to share you our all time favorite bread – ciabatta and serve along with a refreshing sauce – coriander chutney! You could always implement both of the recipes into other dishes!
Personally, I have been trying to get over my fear of baking with yeast and making bread in general. “Everyone who tries this homemade Italian bread loves it.” That’s what we feel after we first have ciabatta, thus we can vouch for that.
Ciabatta is, in the words of Field, “a remarkable combination of rustic, country texture and elegant, tantalizing taste. It’s much lighter than its homely shape would indicate, and the porous, chewy interior is enclosed in a slightly crunchy crust.”
Unlike most bread recipes that usually says something like “form the dough into a ball” at some point. This one did not – it is wet and sticky. At first, I was a bit skeptical when we are making it. However, there is nothing for you to worries at all if you keep on practice and follow the recipe. This is an excellent beginner recipe, as there’s not much kneading involved and you just kind of let the dough do its own thing, which is just fine, because trust me, it knows what it is doing.
Ingredients – 2 large loaves |
500g strong white flour
2 tsp of dried fast-action yeast
2 tsp of fine sea salt
Olive oil, as needed
400ml of warm water
METHOD |
Whisk together the flour, yeast, and salt. Pour in the warm water, and beat it well with a wooden spoon.
When the dough is well combined, flour your hands, stick ’em in a bowl, and pull parts of the dough up and slap it back down into the bowl. Do this for another 5 minutes. This will push air bubbles into the dough and create nice holes when it bakes.
Oil a large bowl, then plop the dough into that bowl. Drizzle your olive oil over the top of the dough, then cover the bowl with plastic wrap and cover with at towel. Place the bowl in a warm spot and allow it to rise for 18 hours.
Preheat your oven to 400 degrees F. Line a baking sheet with parchment paper, then sprinkle it with flour. Flour your hands, and shape the dough into a long loaf, about 12 inches long and 4 inches wide. Sprinkle the top of the loaf with a just a touch of flour for strictly aesthetic purposes, then bake for 35-40 minutes, until the bread is lightly golden. If you tap the bread, you should feel like it’s hollow – that’s how you know it’s ready!
A slight twist on the classic, with a dairy-free option if you use coconut yogurt. coriander chutney can be blitzed up in seconds and add a pop to the spiced sweet beef. We love cilantro, ate it with most of the dishes! When we get a taste of the coriander chutney, we could never separate coriander and chutney anymore. What we really love about this coriander chutney is the texture. Don’t get me wrong, we love a good thick chunky chutney. But this particular chutney is wet, and thin, which makes it perfect for dipping.
INGREDIENTS |
large handful of coriander
knob of ginger, peeled and chopped
1/2 garlic clove, peeled and chopped
2 green chilies, deseeded and chopped
1 tbsp of light brown soft sugar
Juice of 1 lime
METHOD |
Blitz all the ingredients together in a food processor with 3 tbsp of cold water and a good amount of salt to make a thin, green sauce. It should be hot, sweet, salty and fragrant.
What is the first time you thought about summer? The first came into our mind is we need food that is refreshing and able to quench our thirst under the hot sun. We tend to eat meat that is less toxic like chicken, therefore, we are going to use beef instead. Moreover, for a meat lover like us, the chicken could never satisfy us. These succulent steak recipes are perfect for summer grilling. Gather some friends, throw some steaks on the grill and get ready for a relaxing beefy brunch. In order to balance up, the heartiness for the steak, ciabatta, and coriander chutney are been used in order to make this dish perfect. So let’s get started!
INGREDIENTS |
2 medium beefsteak
150g of plain yogurt
75ml of coconut cream
1 tbsp of hot curry powder
4 tbsp of mango chutney
1/4 iceberg lettuce, trimmed and shredded
2 tbsp flaked almonds
METHOD |
In a small zip-lock bag, combine 75g of the yogurt with the coconut cream, curry powder, and half the mango chutney. Add the beef steak and leave to marinate for at leave 20 minutes in the fridge.
Place a griddle pan over a high heat and let it get smoking hot. Grilled the beef steak for 3 minutes on each side. For a juicy steak, let it rest for 5 minutes before chopping it into thick slices.
Swirl the remaining mango chutney into the remaining yogurt and spoon over the surface of the bread. Top it with lettuce, sliced steak, coriander chutney and extra coriander leaves, and finish with the toasted almonds and extra slices of green chili.
NOTE FROM THE TWO SISTERS: Now you have this juicy, crunchy summer beef steak for the weekend brunch. Serve it with this Smurfy Lemonade for a chilling weekend. We hope that you like it! Whatever you do, just make them. You can make the Ciabatta bread and Coriander Chutney a week ahead. Store it in a dry and cooling place.
Make them take a photo, send us an email, tag us on Instagram, tweet us, anything. More stories on our #stellerstories, we want to see yours! It would make the day!
So, how’s your August so far? Time passes really fast, it’s already half past 3/4 of the year! At this point in time, it might be the hottest of the month, not to mentioned in additional with the man-made haze contribution around. If you didn’t know, Ghost’s festival is coming and there will be burning incense and papers during the Chinese’s July. I do respect the culture and religions but the actions are just harmful to the current planet, therefore, I really discourage the acts. I just hope people just contribution good things instead of the bad ones. As the earth is just so sick at the moment and she is not getting well anymore.
My apologies but being side-track about the environment. This week the painting that I would like to share was a friend of mine Igor, from Almaty, Kazakhstan. Well, I first ever fell in love with his photographs is all because of his beautiful scenographic shots especially those he took in the mountains at Almaty. Those scenes he took was just breathing-taking – I hope you could have a look at them. Since he hasn’t been online these days but if he does, he will never stop surprise his supporter!
It’s that time… what do you want to do this summer?!
Summer is already here. It’s always been our favorite season. After a seemingly endless winter the freshly warmed weather feels improbable, an impossible reality after months of negative degree days and layers upon layers of clothing. It may sound cliche, but the living truly does become just a little bit easier. We’re no longer bracing for the cold, but embracing sunny days and hot weather with open arms.
This year, we want to get the most out of the warmest months… as summer always hits and fades away quickly. Each year only a few things we hoped for has been done, before knowing the summer is gone. Therefore, we would like to spend and enjoy this summer wisely. While this summer we’ve got a plan and it starts with making a list. Do you have your paper and pen like us? And here is our bucket list for this summer!
Make Lemonade
Have a Picnic
Go out for an Ice Cream
Decorate your room
Learn something new
Drive somewhere
Go to the beach
Watch Sunset
Scream
Give someone a hug
Invent more creative recipes
Get a copy of “Harry Potter and the Cursed Child”
Go on a hike and take a moment to notice the beauty of this life
Bake something new
Do some yoga
Visit a waterpark or amusement park
Watch Suicide Squad (it is coming out on the 4 Aug)
Search out more hidden place (like garden or cafe)
Go Geocaching
Make s’mores
This weekend I have a project for you: Write down your summer bucket list. Start by jotting down everything and anything you hope to do in the season ahead. Then post it somewhere obvious, as where it can’t be ignored. Well, that goes for us and what’s on your list? Let us know in the comments!
“Birds of the same feathers flock together, and when they flock together they fly so high.”
– Cecil Thounaojam
Last week, we talk about being alone. It’s good to have your own time and spaces. However, it can be unhealthy if you don’t get into the social. Thus there’s a need of balanced in everything in one life.
Sometimes, you will meet a person with similarity with you. You will find that you are able to work with them without compromising (which is one of the reasons making life easier and not to be alone). As both (a group) of you have the same aim and mindset, you are able to work towards the same direction. Things get done fast and maybe better.
You may say it’s okay for them to judge or even it’s okay that they don’t understand me. However, deep down in our heart, we are hoping that there is at least one person in life to understand us. At least I do, do you?
“When’re you girls making the pound cake for me? I just crave for it so much” said mom.
Well, this is when you can’t reject your mom request when she specifically asks you to make it. Therefore, we want to take the chance to share with you the mom’s favorite pound cake.
When coming to pound cakes, there are so many options you can come out with – citrus, floral or even honey 🍯. Therefore, today we will share with you the vanilla based pound cake and you could add whatever topping you like while making it based on what you prefer. In order to make the pound cake with more flavors we decide to add in the extra orange peels we had for Homemade Orange Marmalade we made earlier on for the day.
We would do the vanilla based pound cake with the extra orange peels we had for marmalade.We enjoyed citrus as it provides you vitamins and helps in whitening skins. So why not give it a try!
As a comparison to the sponge cake – soft and fluffy, pound cake is dense and chewy but a good slice of pound cake is all moist inside. You might even taste the sweetness of the juice from the cake when you put in your mouth. What we enjoyed the most would be the small bite of the fruits peels in the cake, it just gives elevate the cake with more texture.
Ingredients |
2 sticks butter, softened
1 1/2 cup of caster sugar
3 eggs
2 cups of flour
3/4 cup of milk
2 tsp of vanilla
1/4 cup orange zest
2 tbsp of orange juice
Directions |
Grease bread pan with butter and preheat oven to 300 degrees.
In a mixing bowl, beat butter until light in color {about 3 minutes}. Gradually incorporate sugar and beat until fluffy.
Add eggs one at a time and blend in on low.
Alternate adding flour and milk, add vanilla until smooth.
Add the orange zest and juice, fold in the mixture.
Pour into bread pan and bake for 1 hour 20 minutes {use toothpick test to confirm}.
Allow to cool and top with glaze.
For us, citrus pound cake is the best combination with Breakfast milk tea, so give it a try! However, instead of putting orange peels like what we did, this time, you can put in other dried fruits. Where you can easily get from the baking store or supermarket easily!
Last try it and share your pound cake with us, we love to see yours! Send us an email or tag us on Instagram!
Title: Dear Jordan Frey Instagram’s account: @jordan.frey
You will never believe that it is already coming to the end of the July. While, my life is getting busy, full of surprise (while heading for lunch saw one of a lovely friend at the mall that I haven’t seen her for ver long time) and it never stops me with my painting…
The painting that I’m sharing this week was never been revealed before. Ever since the last completed portrait. Therefore, I would like to take this chance to share it.
The lady in the portrait that I painted named Jordan Frey, she is an amazing one! I have been following her through her Instagram pages for a very long time since I last spotted her. Jordan, she is a freelance fashion photographer is based in New York City. Her love for fashion and photography started when she was young therefore you could see her works with a unique style.
Remember once I had a conversation with her, she did mention how discovers her love for fashion through her lens. For a moment I thought we were pretty similar, as a comparison, I would want to discover people through my brushes! We love Jordon, hope you like her as well! Happy Wednesday!
For those who has been following our blog, you’ll know that we love things that are simple yet with colors. We believed that with a minimum touch of colors it will bring the whole interior entirely differently. As we are talking about country-style, on the contrary, it can be complicated. It might be the last thing we want to compare them with the contemporary-style.
Even though I still fall in love country-style – they always come in bold elements, dominate by raw materials, filled with natural colors. And, bricks wall just made the statement – it just brings the whole atmosphere from the rural European to your home.
Speaking about my love for bricks, I, especially, love the white brick walls. It is pure, and it textures just elevate the look of the room the moment you enter.
My only worries for having a bricks wall is the maintaining, I worry it gets dirty over the time. Such as the cleanliness of the gaps in between the bricks (since I’m a neat freak with a sensitive nose). Of course alternatively, these days we could get wallpapers, I wouldn’t do so as it lost the touch of the bricks where I first for in love.
When I told my friend I’m alone at Starbucks chilling and doing work. They will be worried and asked to make sure if I am alright. For some people, they define being alone as lonely. They though that I am having any emotional breakdown. However, I don’t feel that I am lonely. Actually, I am happy being alone myself doing activities that I like.
I when to google the meaning of lonely and alone (It is not that I don’t know the meaning of it, just to make sure). For, being lonely is an emotion when you are a lack of companionship. On the other hand, being alone means having no one else present, just ownself.
So, why that person feel that being alone is lonely?
For me, I felt that the strongest person on the planet it is people who are alone. I always tell myself, “If you want to be strong, learn how to fight alone.” Doing stuff as a team is must easier and faster. Everyone get to help each other, you also get to learn from one another. But I love to learn and experience stuff in a harder way. (cause I felt that I will be learning more) Most importantly you don’t have to worry about people judging, you can be yourself when you are alone.
Why follow the crowd walking the curve road when the straight road is the better one (at least for myself)?
” Always stand for what is right, even if you are standing alone.”
It has been a traditional every since when we were young that our mom always would prepare marmalade with toast for our breakfast. It always will come along with a cup of English tea. When we were young we weren’t sure why she love to have marmalade but now we do. She defiantly has a sweet-tooth. Like her, as a kid we enjoyed the sweetness of the jelly with the peels in it, however, it got too sweet for me when I got older, therefore we decided to make our marmalade ourselves.
We started making marmalade and jam back in my late 18. We have been researching and tried numerous times during all those years and finally we mastered it. When come to making a good homemade marmalade is very challenging. As mentioned we prefer something lighter in flavor, therefore it mustn’t be overly sweet, with artificially flavored you find in the grocery store. And most importantly, the peels has to be hard and chewy.
The texture of our marmalade resembled the candied orange, and the taste was just out of this world. Simply heavenly. In order to achieve the texture like us simply, you will need some patience.
Some tips for you when making this Marmalade, always stir the Marmalade frequently to prevent it to burnt. Store it in some beautiful air-tight sterilized glass jar. As we are making different jam now and then, we also prefer to tag a label on them so that we will never forget when do we make it. Never you know that Marmalade can be refrigerated up to 1 month or freeze, up to 6 months. Thus, making these jars of marmalade make excellent gifts!
So let’s get started, it can be fun making with your family or friends!
Ingredients |
4 to 5 medium navel oranges
1 lemon, zest finely grated and juiced
6 cups water
5 cups of caster sugar
Directions |
Wash the oranges and lemon thoroughly. Cut the oranges into 1/8-inch slices using a mandoline, removing the seeds as you go. Stack the orange slices and cut them into quarters.
Place the oranges into a stainless steel pot. Add the lemon zest and juice and the water to the pot, set over high heat and bring to a boil, approximately 10 minutes. Once boiling, reduce the heat to maintain a rapid simmer and cook, stirring frequently, for 40 minutes or until the fruit is very soft.
Test the readiness of the marmalade by placing a teaspoon of the mixture onto the chilled plate and allowing it to sit for 30 seconds. Tilt the plate. The mixture should be a soft gel that moves slightly. If the mixture is thin and runs easily, it is not ready
When the desired texture is reached, transfer the marmalade to sterilized* glass container, then seal.
*To sterilize your glass containers and lids, place them in a large pot filled with water (covering about 2 cm above the top level), then bring to a boil. After 5 minutes, remove from the heat, then transfer to a drying rack using tongs. Dry upside down, then fill with warm jam/marmalade and replace lids immediately.
We hope that you like it! Whatever you do, just make them.
Make them take a photo, send us an email, tag us on Instagram, tweet us, anything. We want to see yours! It would make the day! We love when we get to see the dishes you guys make. Lastly, don’t forget to check out more “Behind Plain Canvas” at our Steller!
Never did I know, it’s going to be my 4th years working in the creative industry. Ever since the day I sign up for the job, it seems like each day has been challenging. I never thought it will be easy being a freelance designer, in fact, it’s harder than what many thought.
Quoted from Mahatma Gandhi, “Live as if you were to die tomorrow. Learn as if you were to live forever.”
Once I was being told that I’m a workaholic. That’s truth as I don’t really hang out or sleep in during holiday instead making use of those time to learn new skills. Spending time to research, study and practice my skills whenever I’m free. Therefore, it has been my habit to pay visit to different designers’ websites to learn to and get inspiration from them.
Remembered Richard Francis Burton once said, “Little islands are all large prisons; one cannot look at the sea without wishing for the wings of a swallow.”
Constantly, I always able to learn new perceptive from many designers online. And, one of my favorite bookmarks would be Corina Nika, a designer who based in Kefalonia Island. I enjoyed reading her blog, she always shared wonderful articles as being a freelance designer herself.
Nonetheless, she also own amazing photos – sharing her tropical beach trips, it’s always inspired me and cheer my day!
Let’s face the fact, Pinterest is just addictive as you’re drinking your best glasses of cocktail all night long.
While these days my habit got out of control, I supposed. I’d say I spend a good half of my day scrolling, scrolling, scrolling aimlessly. And, I can’t help but notice a recurring theme in both wedding and interiors world in particular. Then usage for the colors Lilac Gray.
It’s one of the ten Pantone colors for the year, it might not be the most outstanding one as compared to Rose Quartz, Serenity, and Butter Cup it is just a perfect colors if you are looking at a subtle, dusty and, well, gray.
People may have judged you or despaired at what you did. People who don’t understand might even think that what you are doing doesn’t have any prospects. They might think that being an entrepreneur is daydreaming and it’s a waste of time.
Thus, we believe that “be sure of yourself, never be embarrassed or discouraged at what you are doing”. As every individual express differently and everyone have their own strength.
Probably, what doesn’t mean for them, doesn’t mean that it won’t work on you. Always look at the past and learn from your mistake, move forward and work for the better. “Experience is like a jewel, and it had need be so, for it is often purchased at an infinite rate.” – Joe
Using the experience that caters to you and do something big and amazing for yourself.
This year we’ve been focusing on eating healthier – even though we already eat pretty healthily. However, I knew we could do much better. Our family (especially our parent) prefers sugary, calorie-laden snacks rather than real food, therefore, we are working on it. In fact, we don’t buy snacks, except for some special occasion. We feel like it is possible for us to eat healthy at home by moving our hands.
We’ve been adding more fish into our diet. We started to notice that when we bought meat, it would also go to waste. So our family kind of just stopped buying it as often. But fish is something we all enjoy and even fight over.
Whenever we make salmon for dinner, we usually keep an extra piece for breakfast just to make this salad – loaded with good fats and omegas! The well-marbled, pink-fleshed fish but in truth it’s only recently that we’ve stopped refusing salmon’s presence on our plate. It’s quick work with a stocked pantry and especially speedy if you time it with leftovers from a salmon BBQ. It’s bright, briny, and laced with tender herbs making it a pleasure to eat while being incredibly good for you. Thus, making salmon the kind of fish our family like to work with.
Thank goodness we have citrus in the cold weather to brighten things up. We made this Avocado-Citrus Salmon Salad recipe for breakfast the other day and it felt like we were bidding goodbye to cold weather as we enjoyed it. This salad serves as a bit of a summer reset when the inevitable burgers, ice cream cones, and frilly, fruity cocktails outnumber a plate’s green things. Now we can appreciate its delicate sea flavor, tender flesh, and all its valuable health benefits.
Ingredients |
For Salmon |
Two salmon fillets
1 tsp extra virgin olive oil
Juice of 1 lemon
salt and pepper, to taste
For Salad |
3-4 cups mixed salad vegetables
1 large pink grapefruit, peeled and sectioned
2 medium navel oranges, peeled and sectioned
1 avocado, thinly sliced
¼ to ½ cup sliced sunflower seed
Juice of 1 lemon
2 teaspoons extra virgin olive oil
1tsp of raw honey
1 tsp of balsamic vinegar
salt and pepper, to taste
Directions |
Preheat oven to 200 degrees C. Line a baking sheet with parchment paper. Place salmon fillets on baking sheet. Squeeze fresh lemon over the top and drizzle with a little olive oil. Season well with salt and pepper. Bake for 20-25 minutes, or until cooked through.
Place spinach in a bowl or on a large serving platter. Top with citrus, avocado, and cooked salmon. Sprinkle the top with almonds and green onions. Squeeze the fresh lemon juice over the top and drizzle with the olive oil. Season with salt and pepper.
Remove from oven and let cool before assembling the salad.
We also have been observing, some of our family members have had heart trouble. So part of our motivation to eat healthier is in regards to heart disease. When we started reading up on heart disease, we decided it was really time to make big changes. As they say, an ounce of prevention is worth a pound of cure.
We beg you to try this recipe now and make a change for yourself too. We hope that you love this recipe, please share with us your table stories by tagging us #ourtablestories!
Jean Paul once said, “Every friend is to the other a sun, and a sunflower also. He attracts and follows.” It’s so true, I like how Jean Paul quoted it, every good friend you ever meet, they lead you just like the sun while sunflower acts as a symbol.
While lovely Martha is just like the sunflower to me – she has a big heart and that is why people attracts to her. Knowing Martha, she is an amazing baker based in Indonesia. If you by chance looking at her Instagram page, and you can see that she is a huge lover fan of Disney and some popular Japan’s characters. I love her sweet and simple lifestyle, they just look gorgeous.
Each day I visit her Instagram account it will cheer me up with her amazing IG feed. Recently, she has been just promoted becoming a mom, you might want to check out her daughter account as well; @helloadeline_. As she is really cute!
Who doesn’t scream for Ice Cream? We all scream for Ice Cream!
They are colorful and come in varies ways such as waffle cones, popsicle stick, and the classic scoop in the bowl. Eventually, they are our best friend forever which will never hurt our hearts. Moreover, they bring us happiness and would never let us down. They are cold, creamy and flavourful food taste excites all senses especially in the hot summer like now. I’m blaming Pinterest with all delicious looking Ice Cream. Probably, I will need to work-out more often to enjoy more of them.
Therefore, get out now to enjoy your summer with some Ice Cream! Hence, let’s celebrate National Ice Cream Month together!
Happy National Ice Cream Month!
xoxo, Angela.
Credit | All shots used on the mood board via our Pinterest boards.


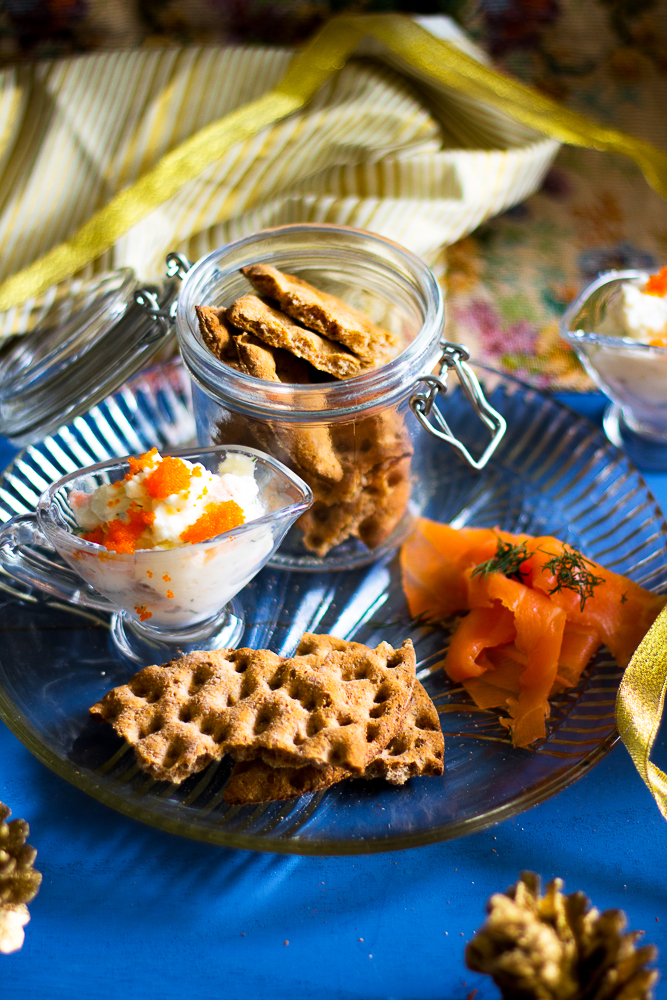
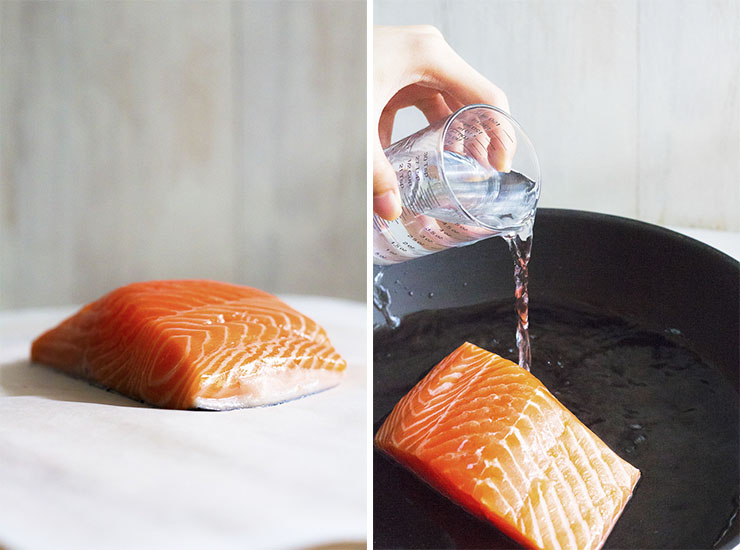
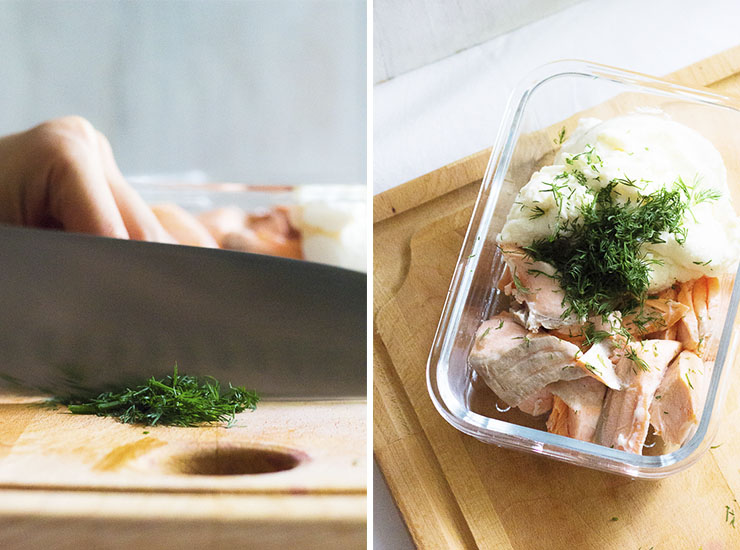

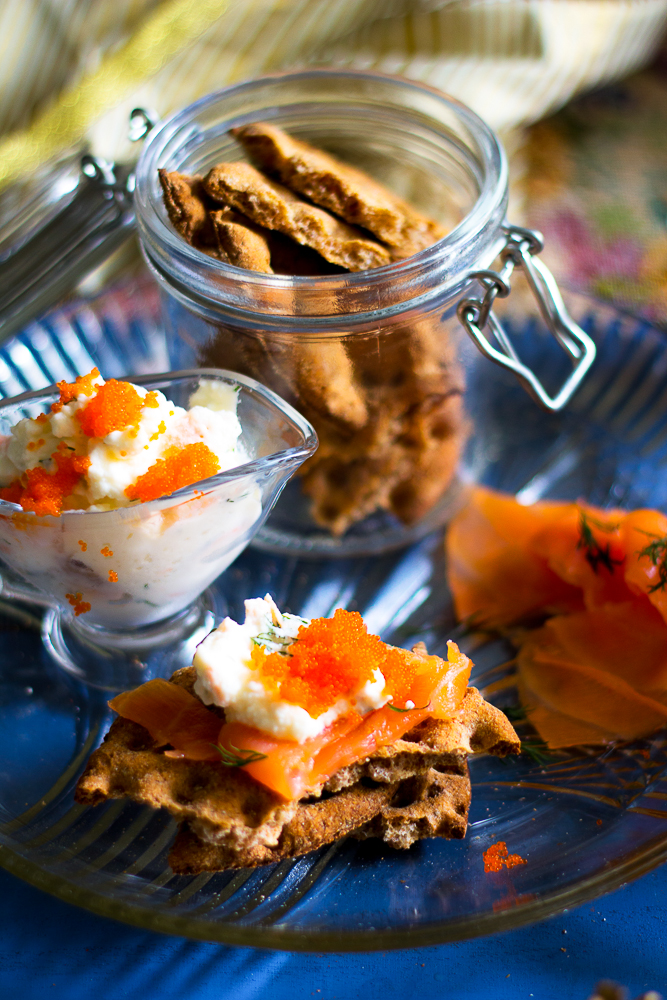


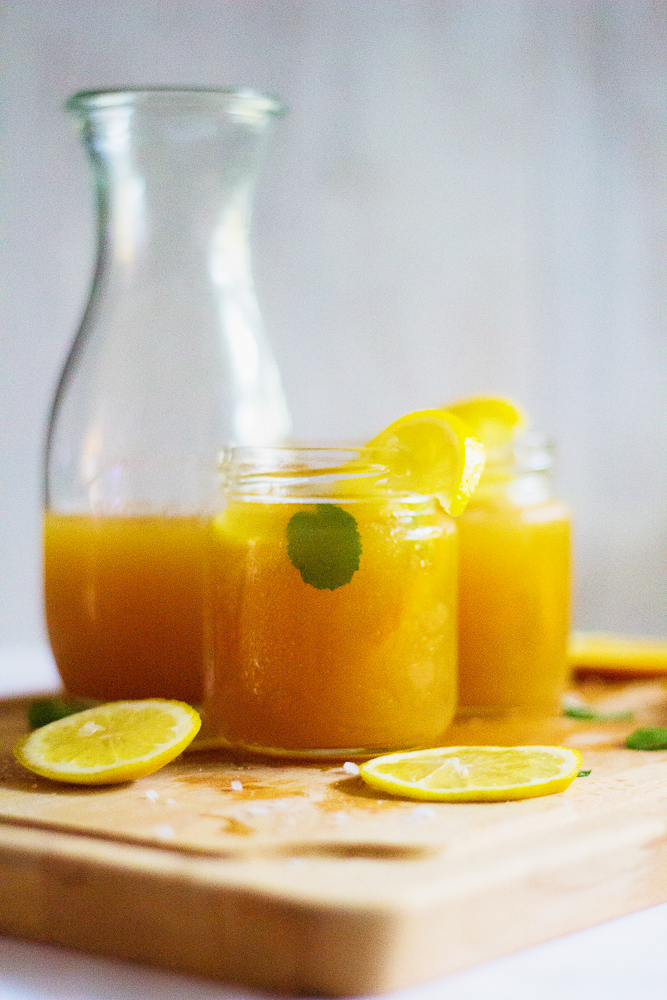
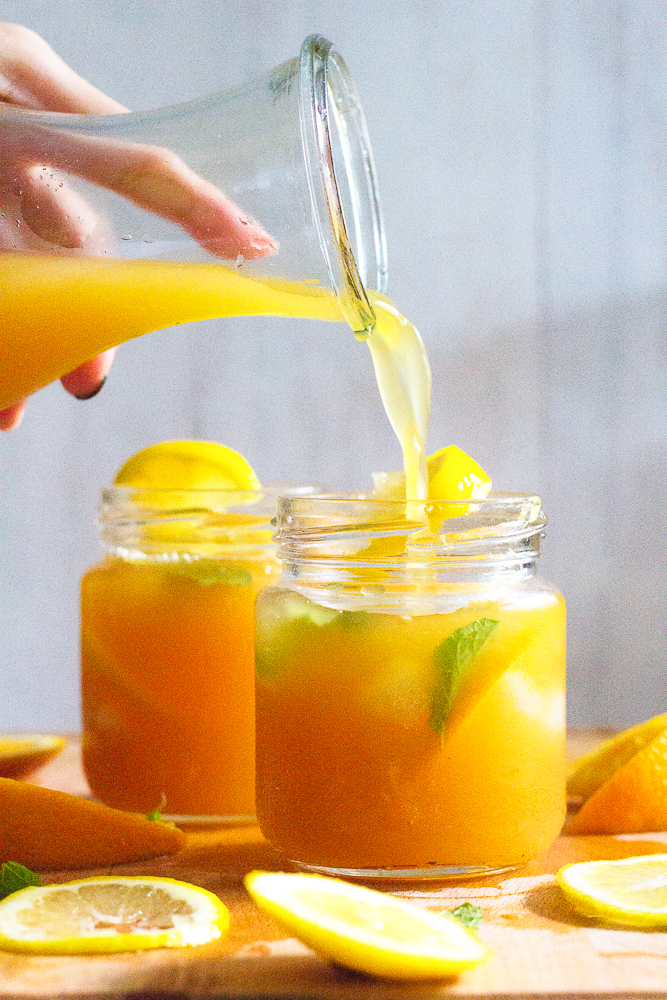


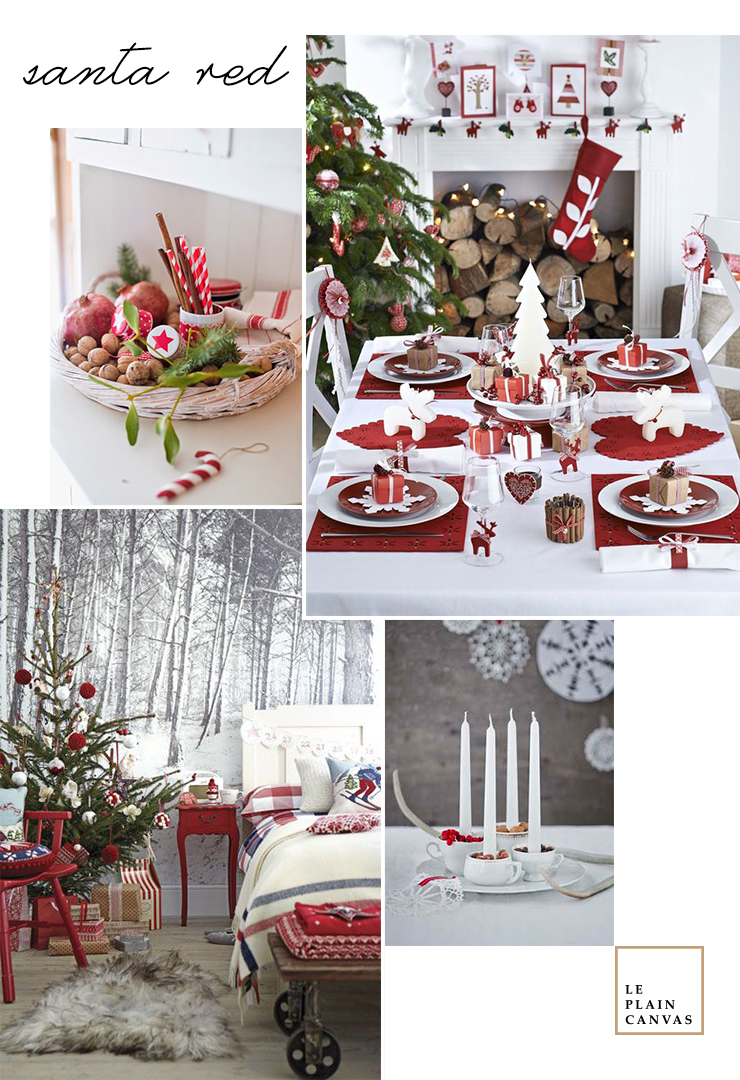


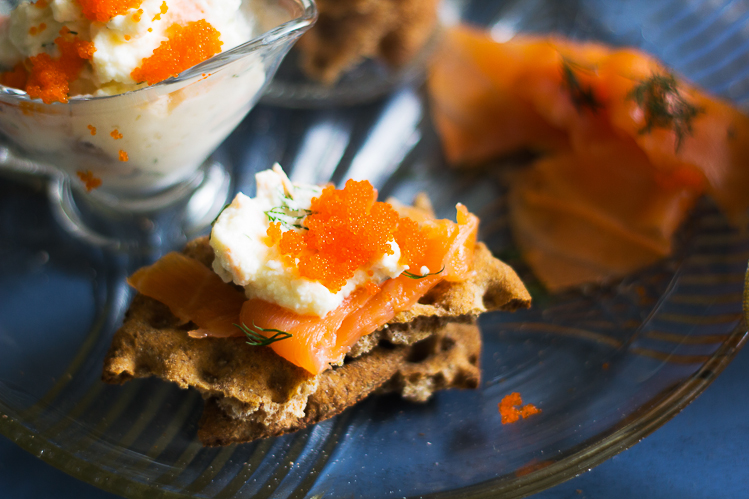


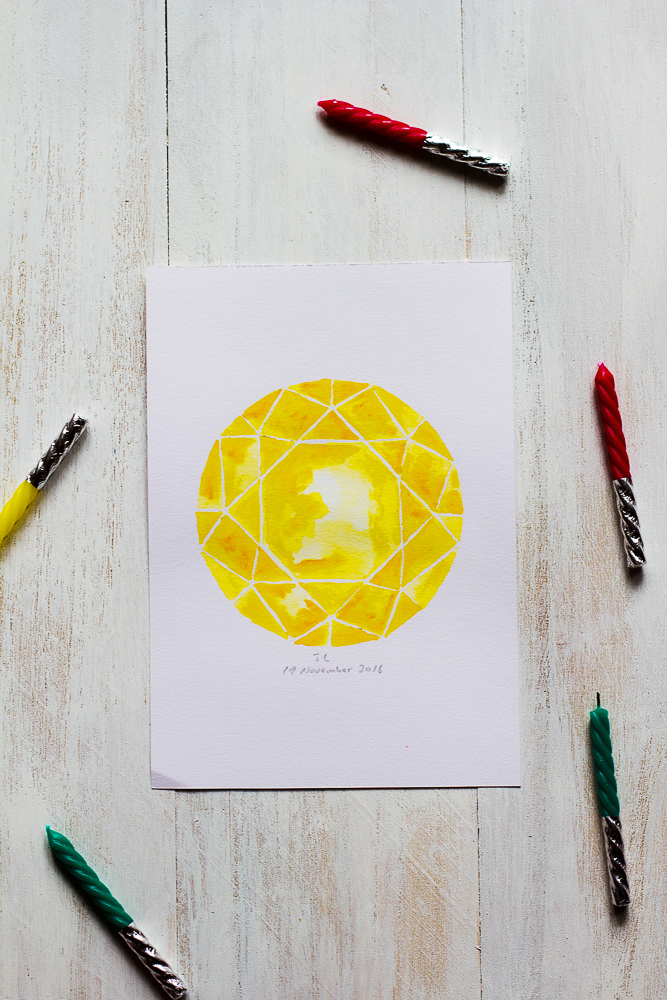


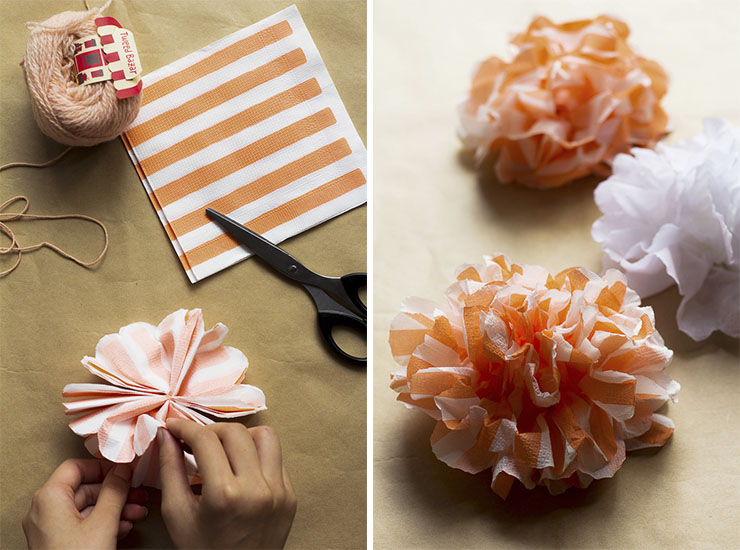


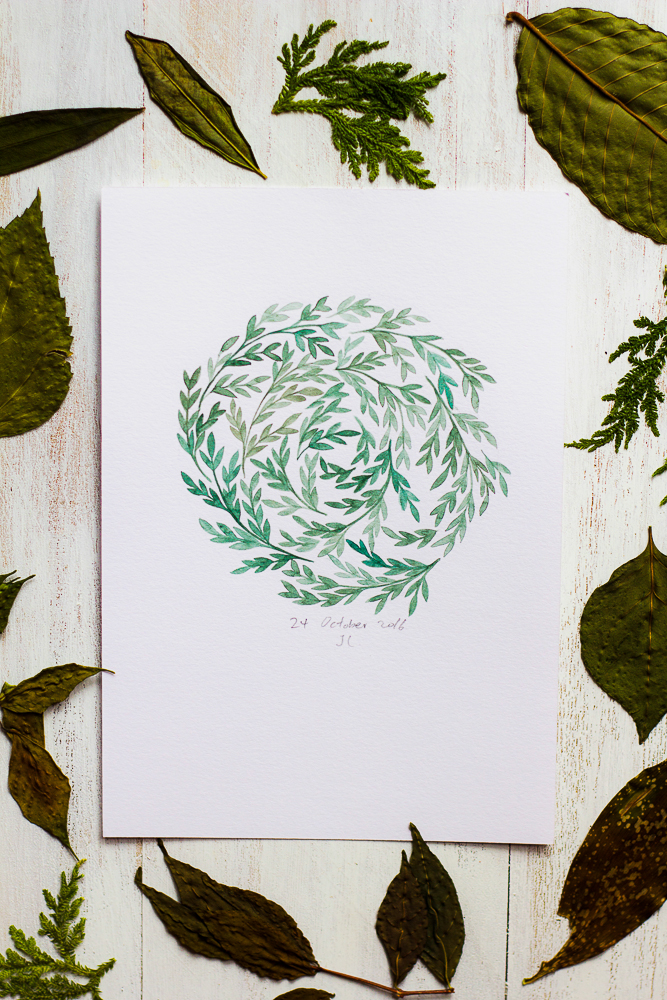
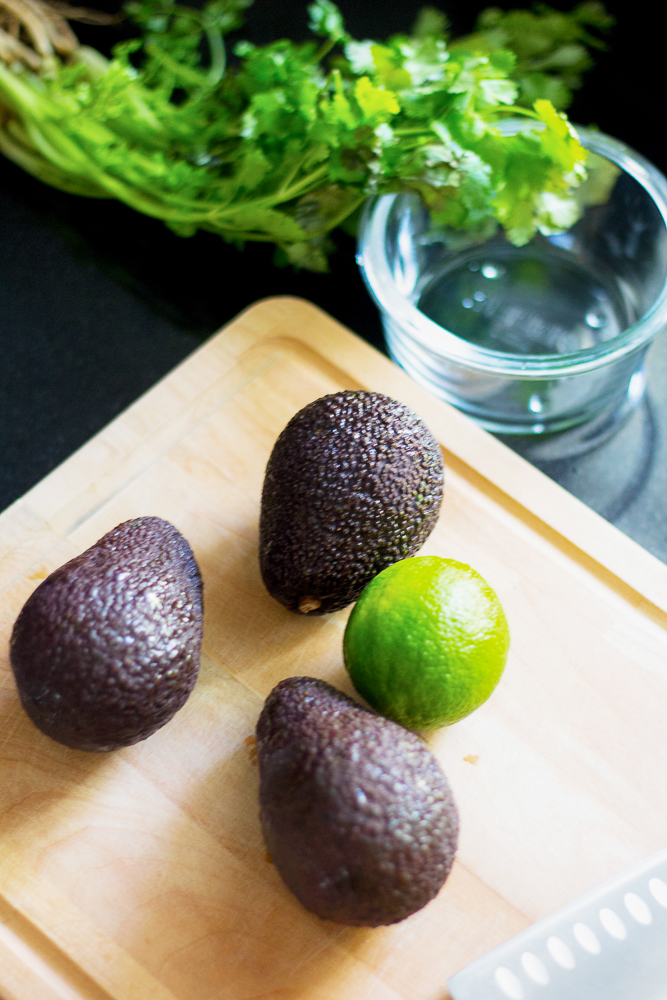
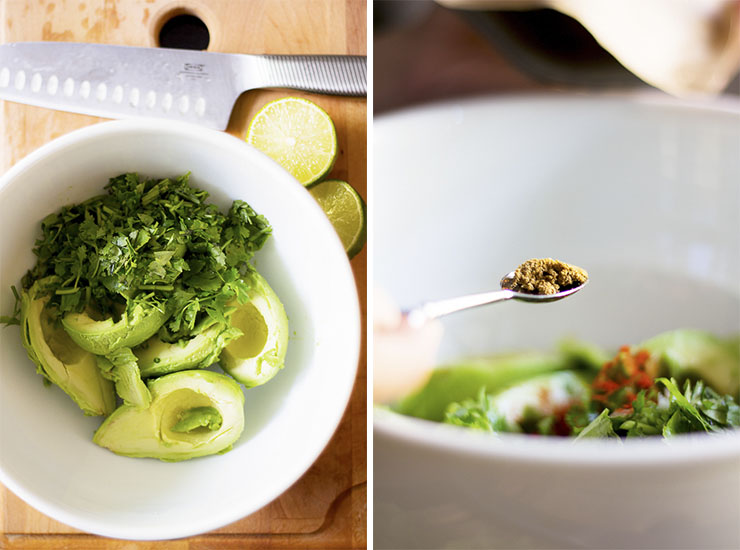
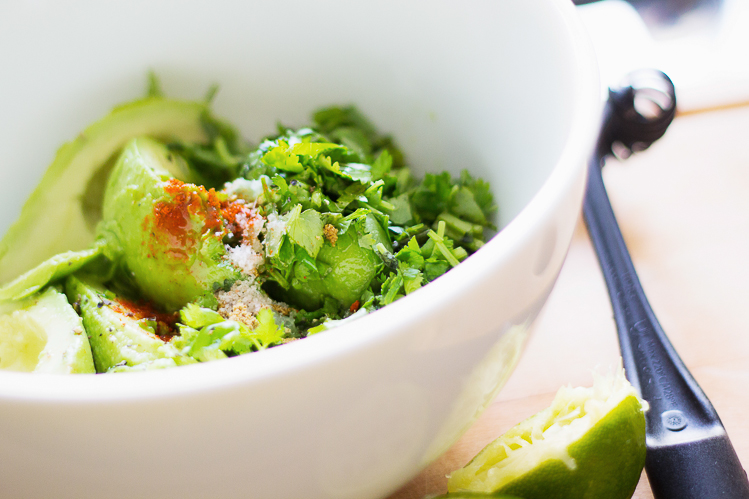


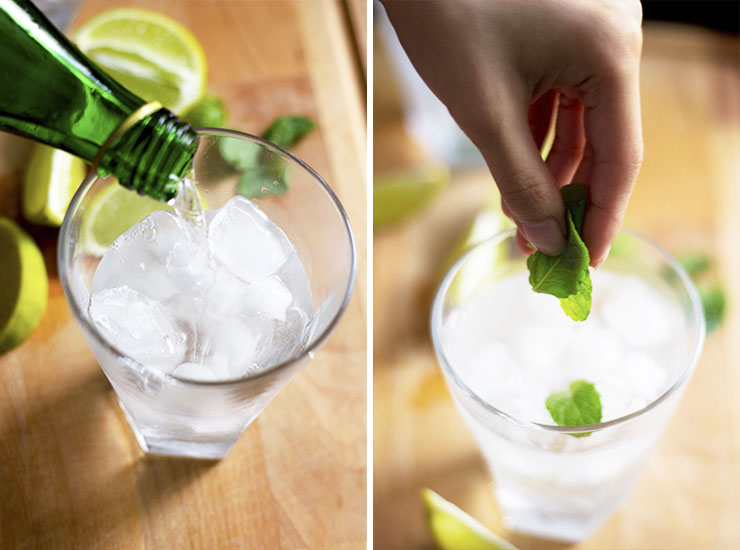


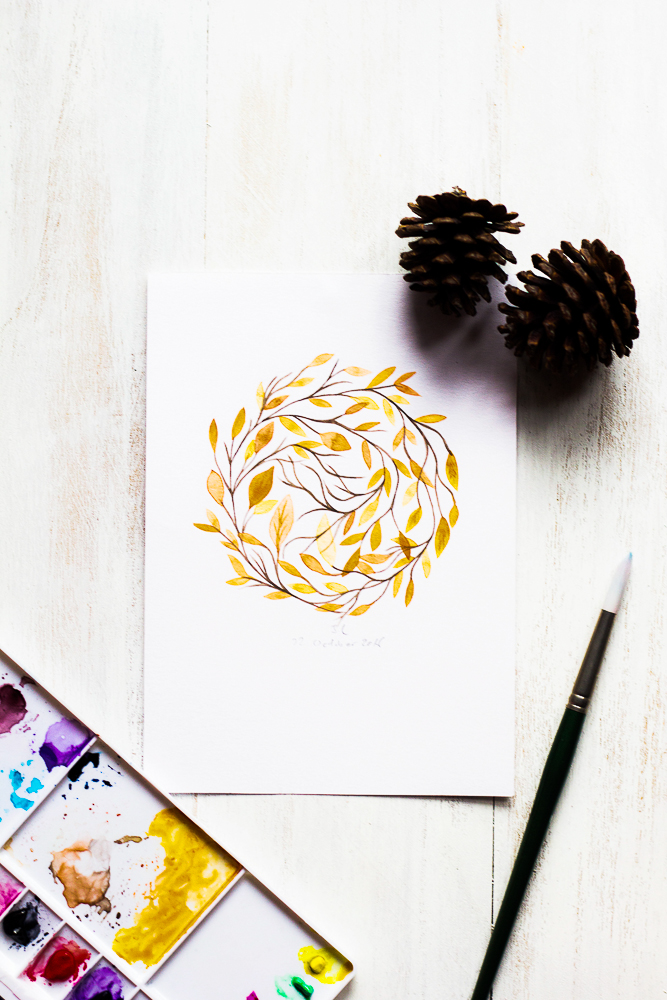


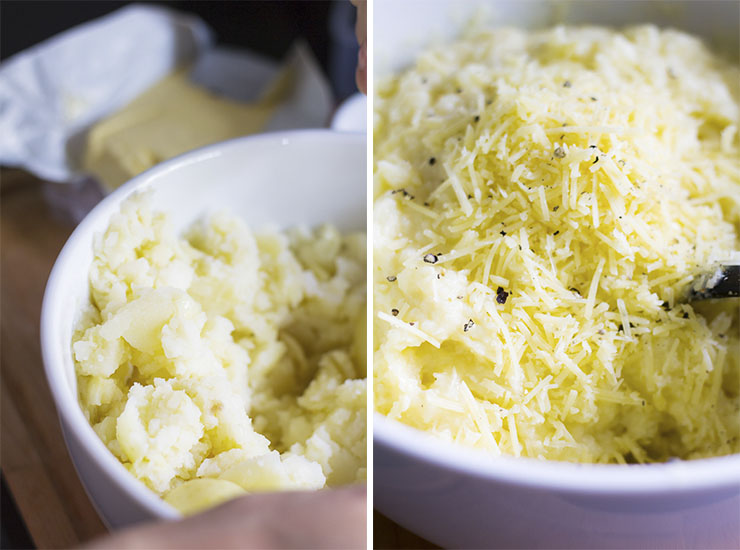


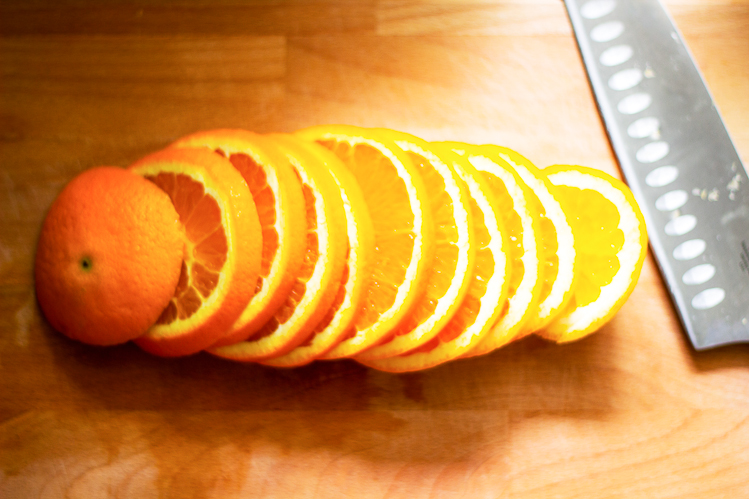

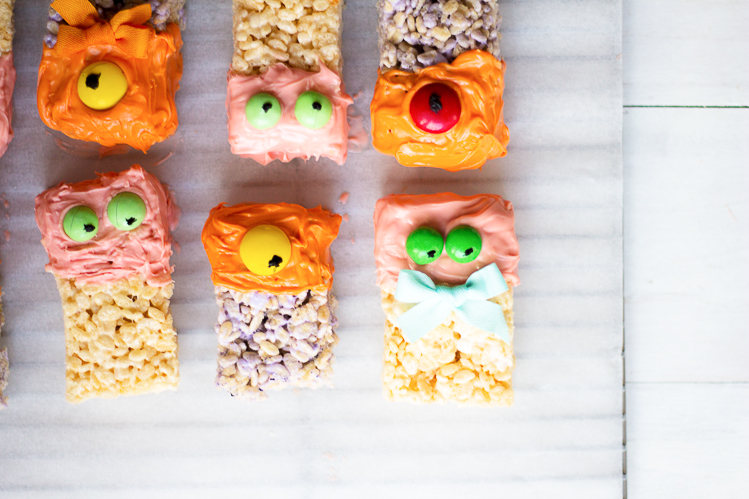

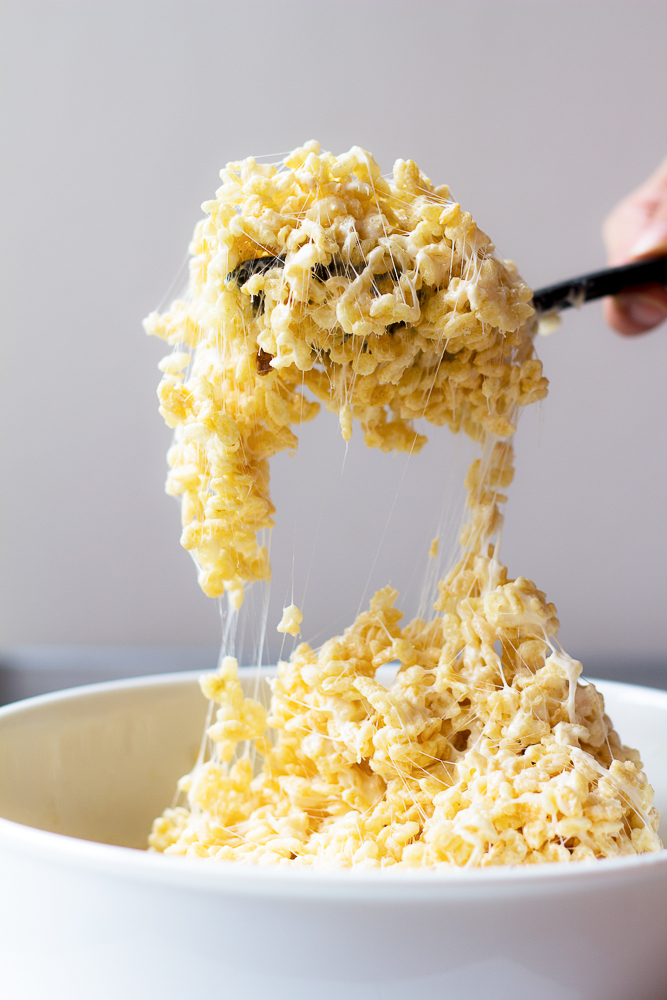
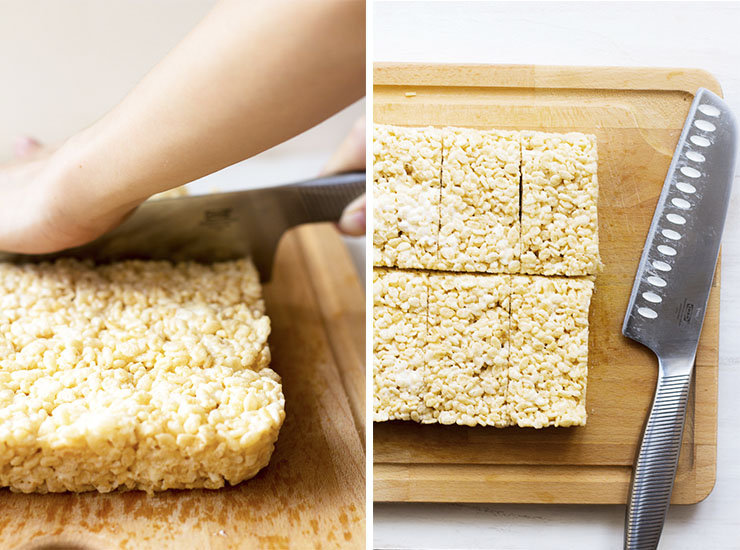

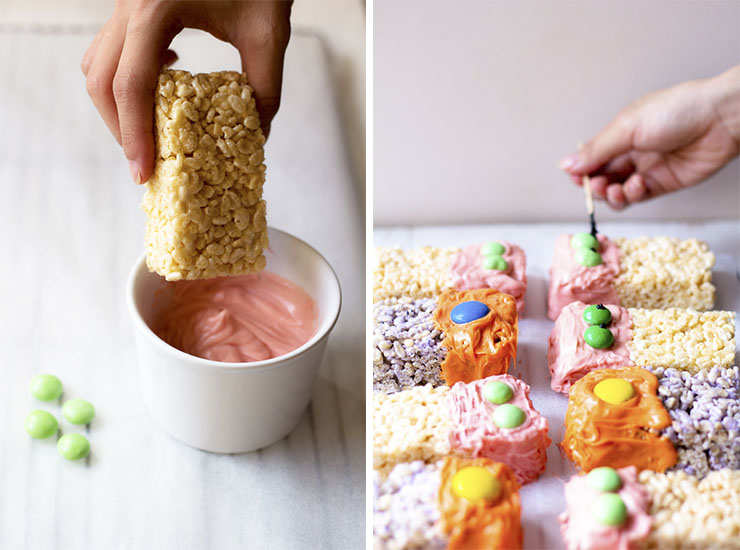


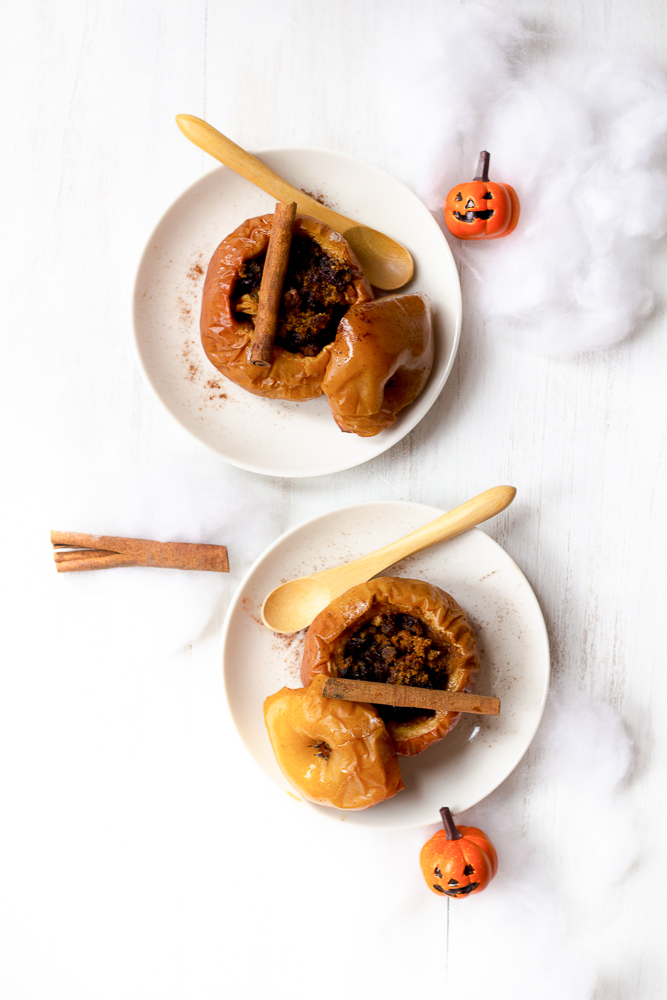
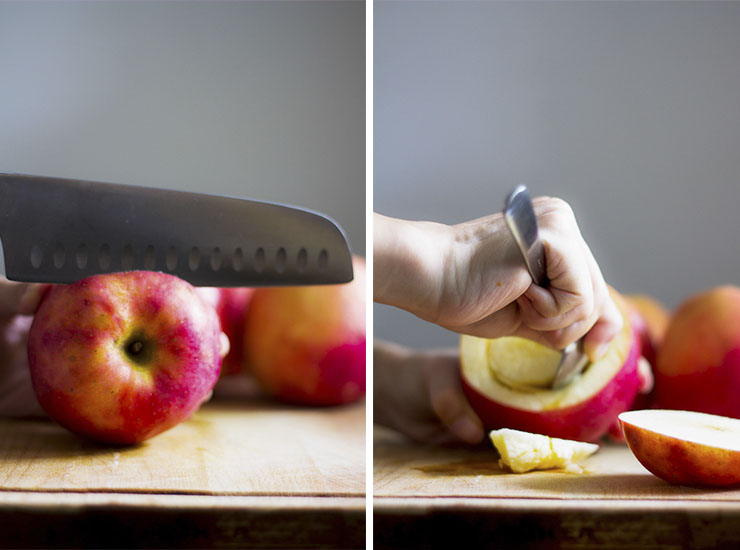
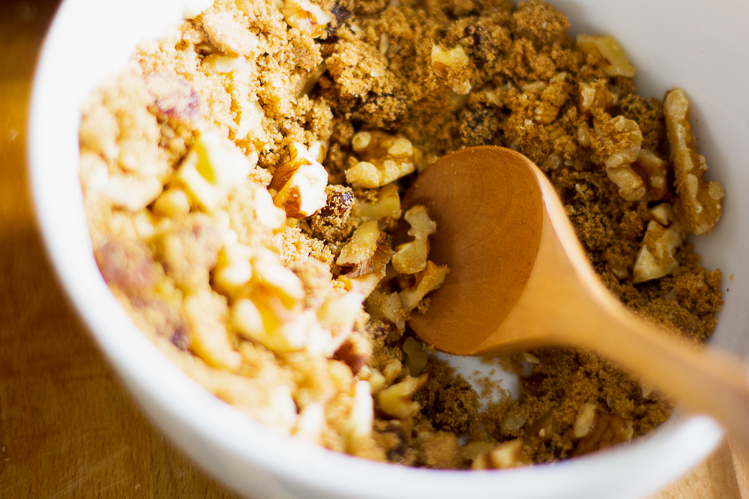
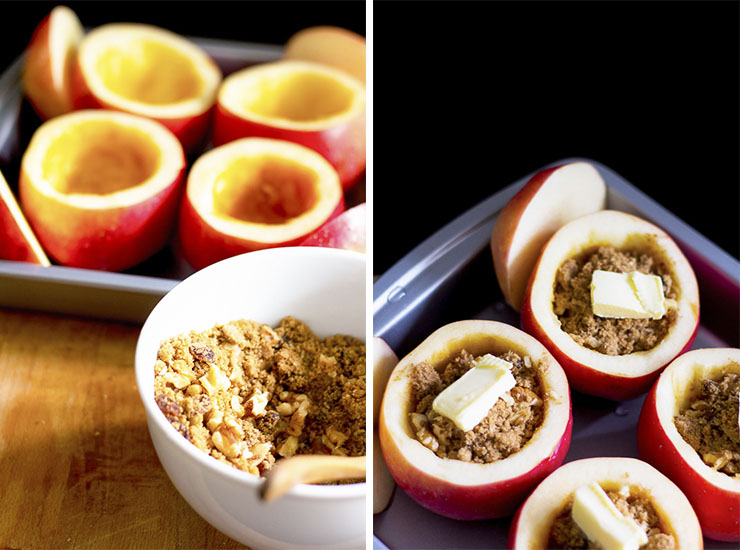


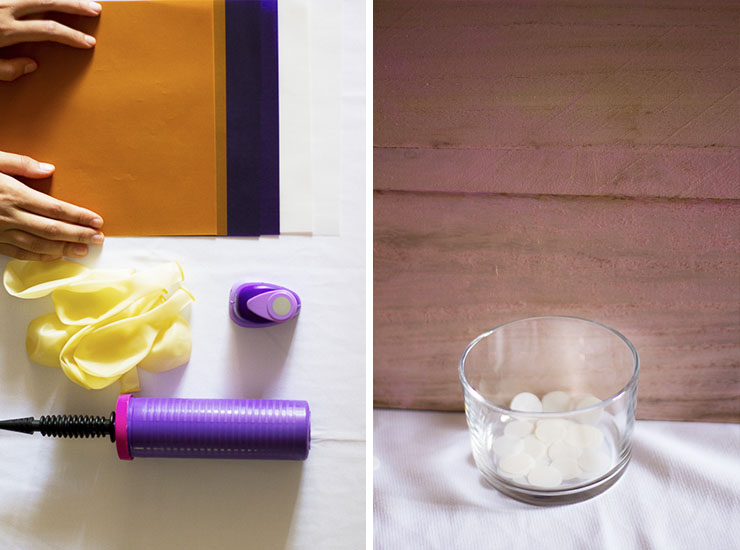
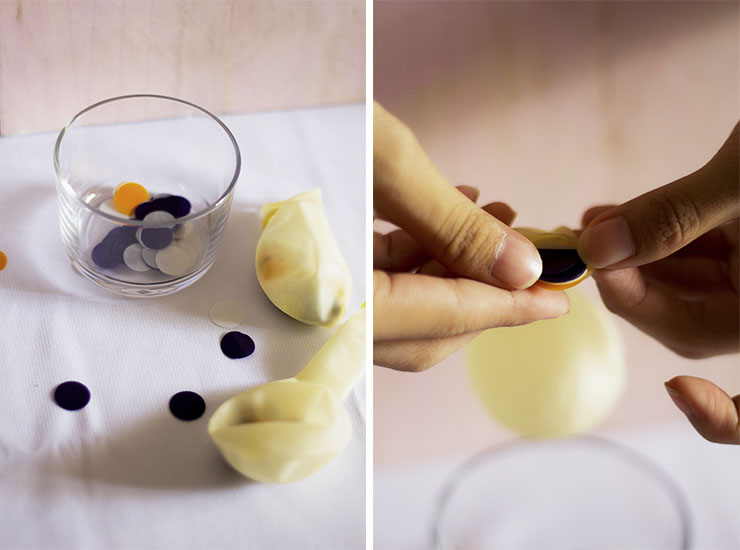


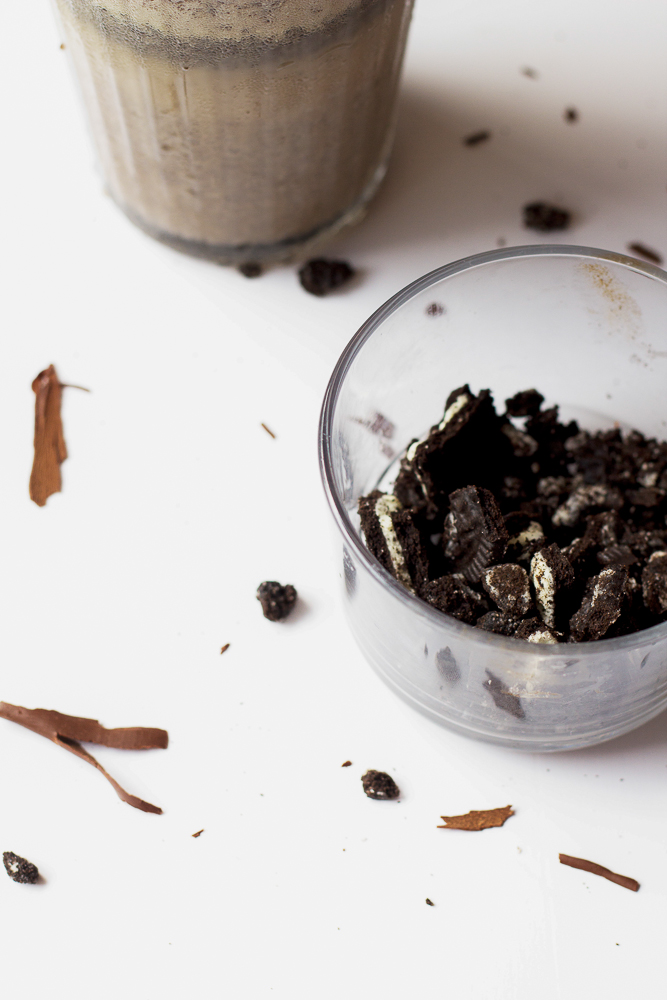


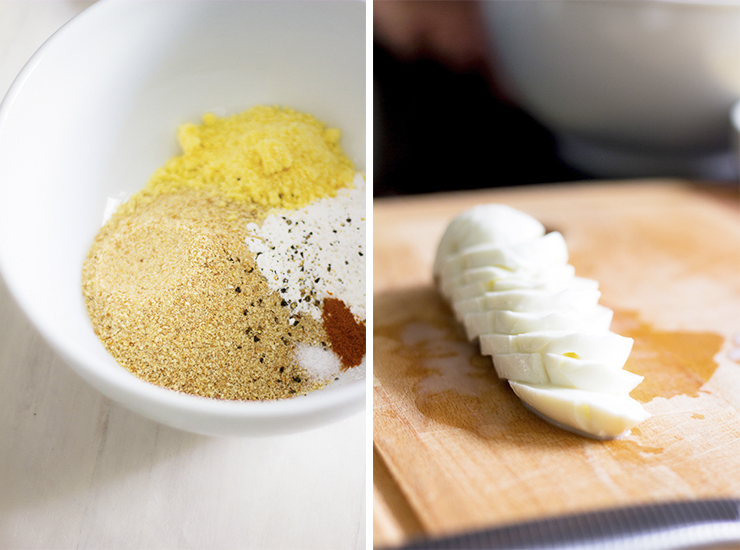
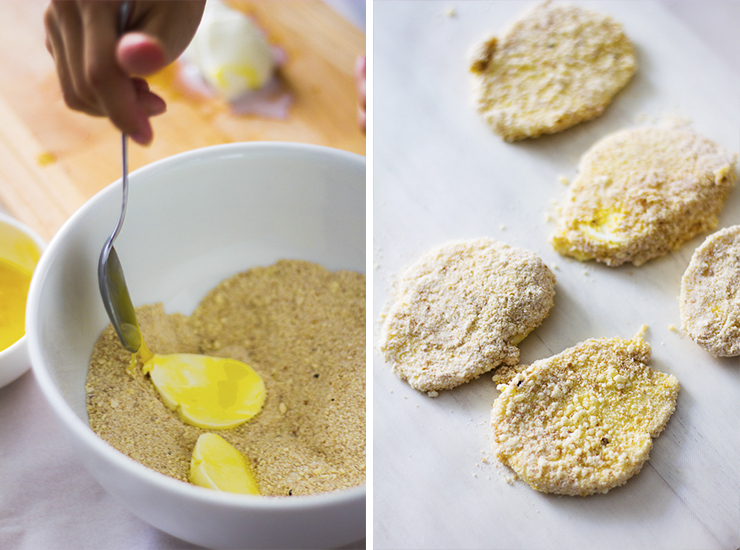


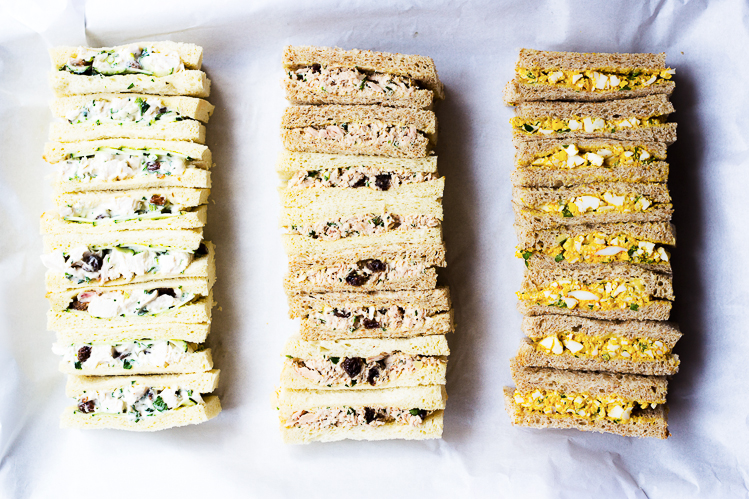


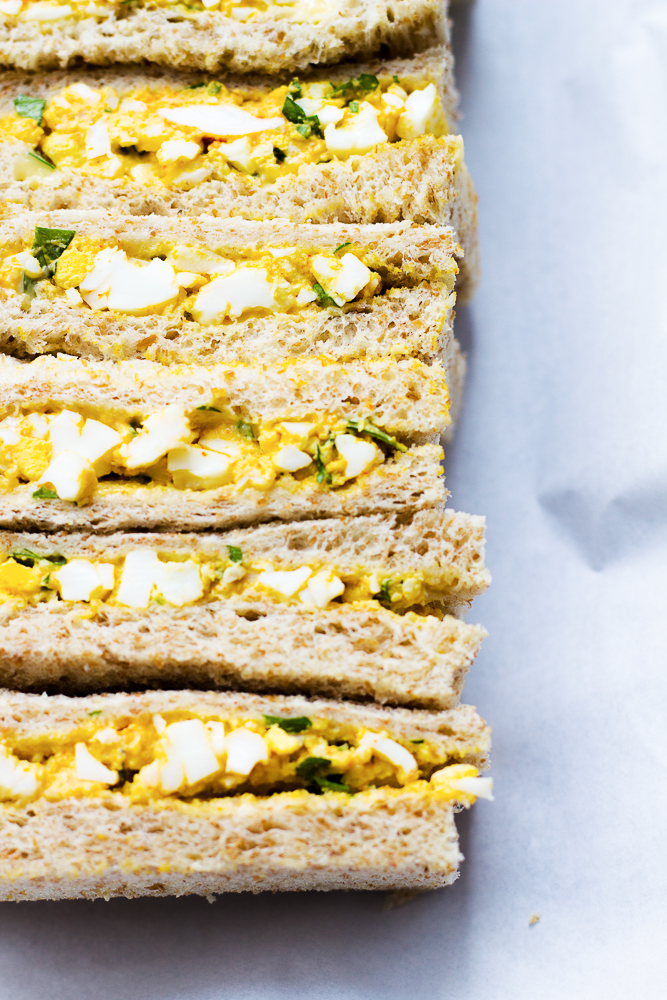

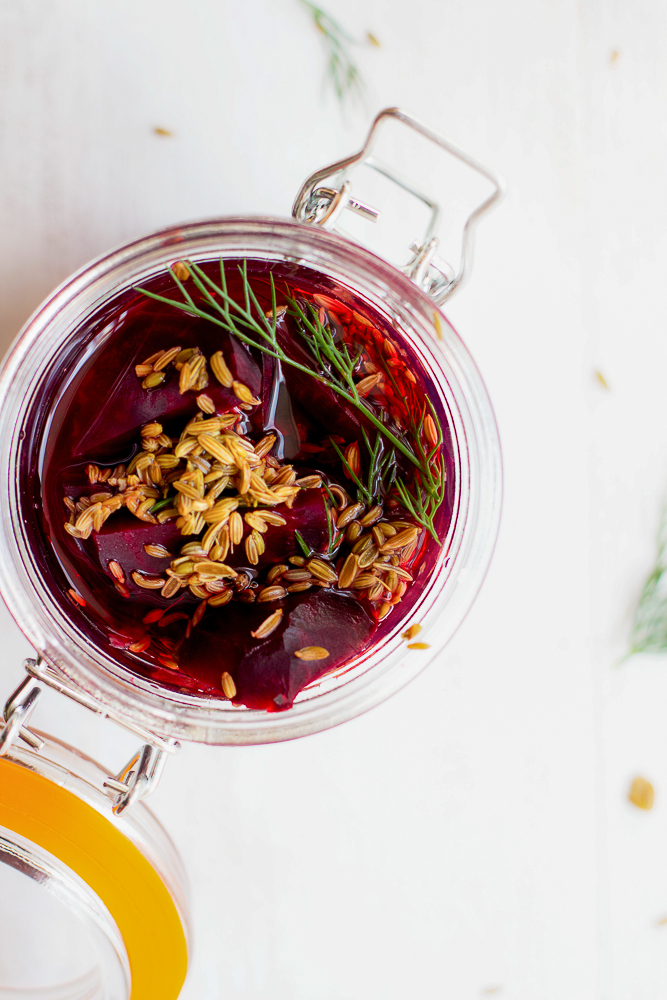


 When it gets all crisp and cold there is nothing you want to do more than make your home cozier. And the simplest way to do that is to just start tossing sheepskin rugs around like confetti. Draped over a chair, sofa, on a floor, on a bench- they add fabulous texture and a high-end look while upgrading the fuzzy, awesome factor of wherever they land by like, 100 percent. You’ll be downright anxious to get started on those work projects with a seat like this waiting for you. As soon as the rug in there it sucked every bit of light, brightness, and cheer right out of the room, giving a flokati vibe to it too!