Notice: Function _load_textdomain_just_in_time was called incorrectly. Translation loading for the acf domain was triggered too early. This is usually an indicator for some code in the plugin or theme running too early. Translations should be loaded at the init action or later. Please see Debugging in WordPress for more information. (This message was added in version 6.7.0.) in /home/u340358266/domains/leplaincanvas.com/public_html/wp-includes/functions.php on line 6170
Notice: Function _load_textdomain_just_in_time was called incorrectly. Translation loading for the sitka-core domain was triggered too early. This is usually an indicator for some code in the plugin or theme running too early. Translations should be loaded at the init action or later. Please see Debugging in WordPress for more information. (This message was added in version 6.7.0.) in /home/u340358266/domains/leplaincanvas.com/public_html/wp-includes/functions.php on line 6170
Notice: Function _load_textdomain_just_in_time was called incorrectly. Translation loading for the health-check domain was triggered too early. This is usually an indicator for some code in the plugin or theme running too early. Translations should be loaded at the init action or later. Please see Debugging in WordPress for more information. (This message was added in version 6.7.0.) in /home/u340358266/domains/leplaincanvas.com/public_html/wp-includes/functions.php on line 6170
Notice: Function _load_textdomain_just_in_time was called incorrectly. Translation loading for the sitka domain was triggered too early. This is usually an indicator for some code in the plugin or theme running too early. Translations should be loaded at the init action or later. Please see Debugging in WordPress for more information. (This message was added in version 6.7.0.) in /home/u340358266/domains/leplaincanvas.com/public_html/wp-includes/functions.php on line 6170
Notice: Function _load_textdomain_just_in_time was called incorrectly. Translation loading for the kirki domain was triggered too early. This is usually an indicator for some code in the plugin or theme running too early. Translations should be loaded at the init action or later. Please see Debugging in WordPress for more information. (This message was added in version 6.7.0.) in /home/u340358266/domains/leplaincanvas.com/public_html/wp-includes/functions.php on line 6170 LePlainCanvas – Page 7 – Illustration & Lifestyle Inspiration
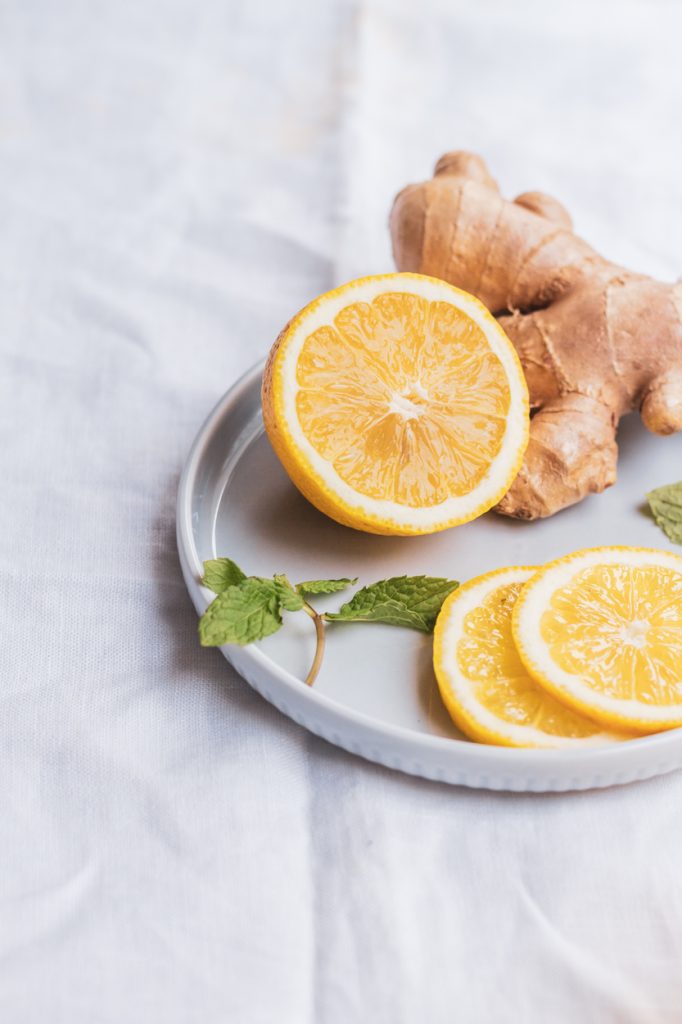
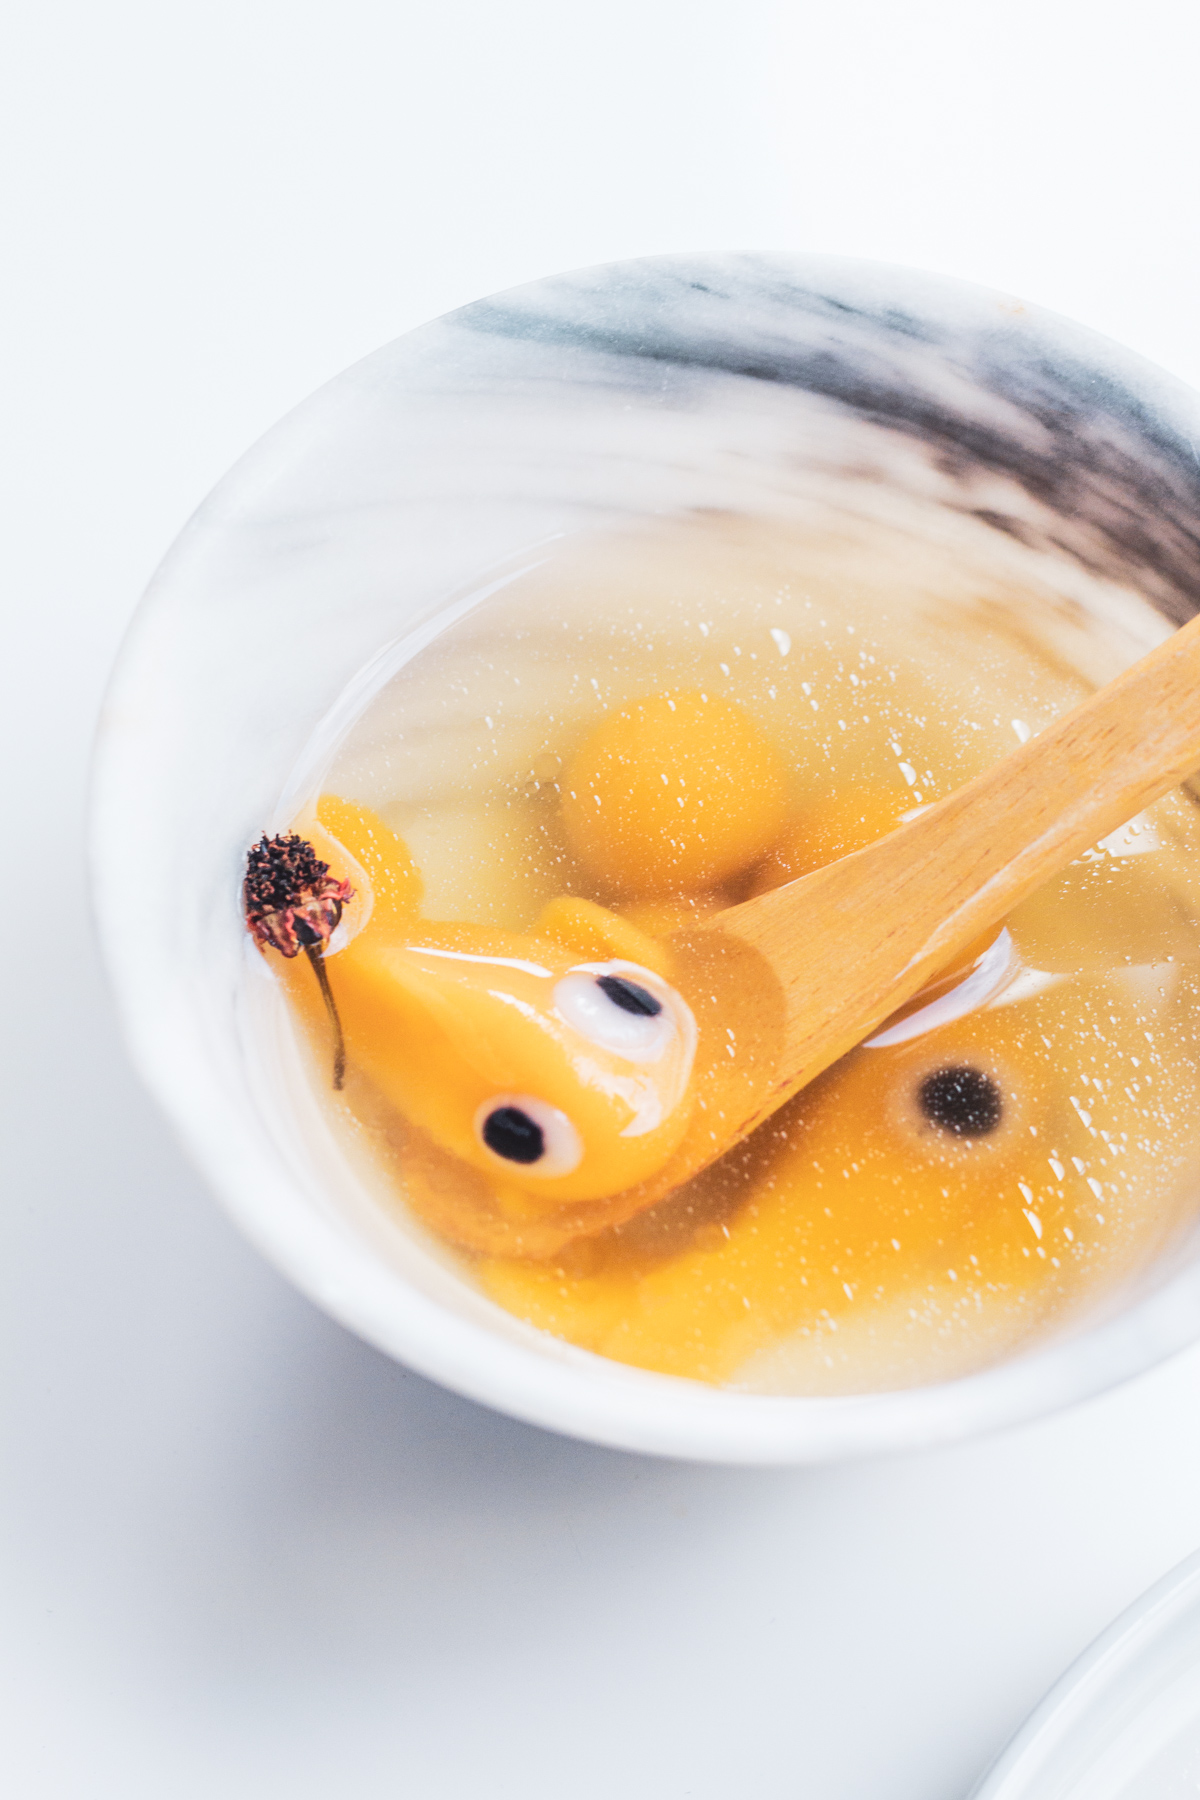
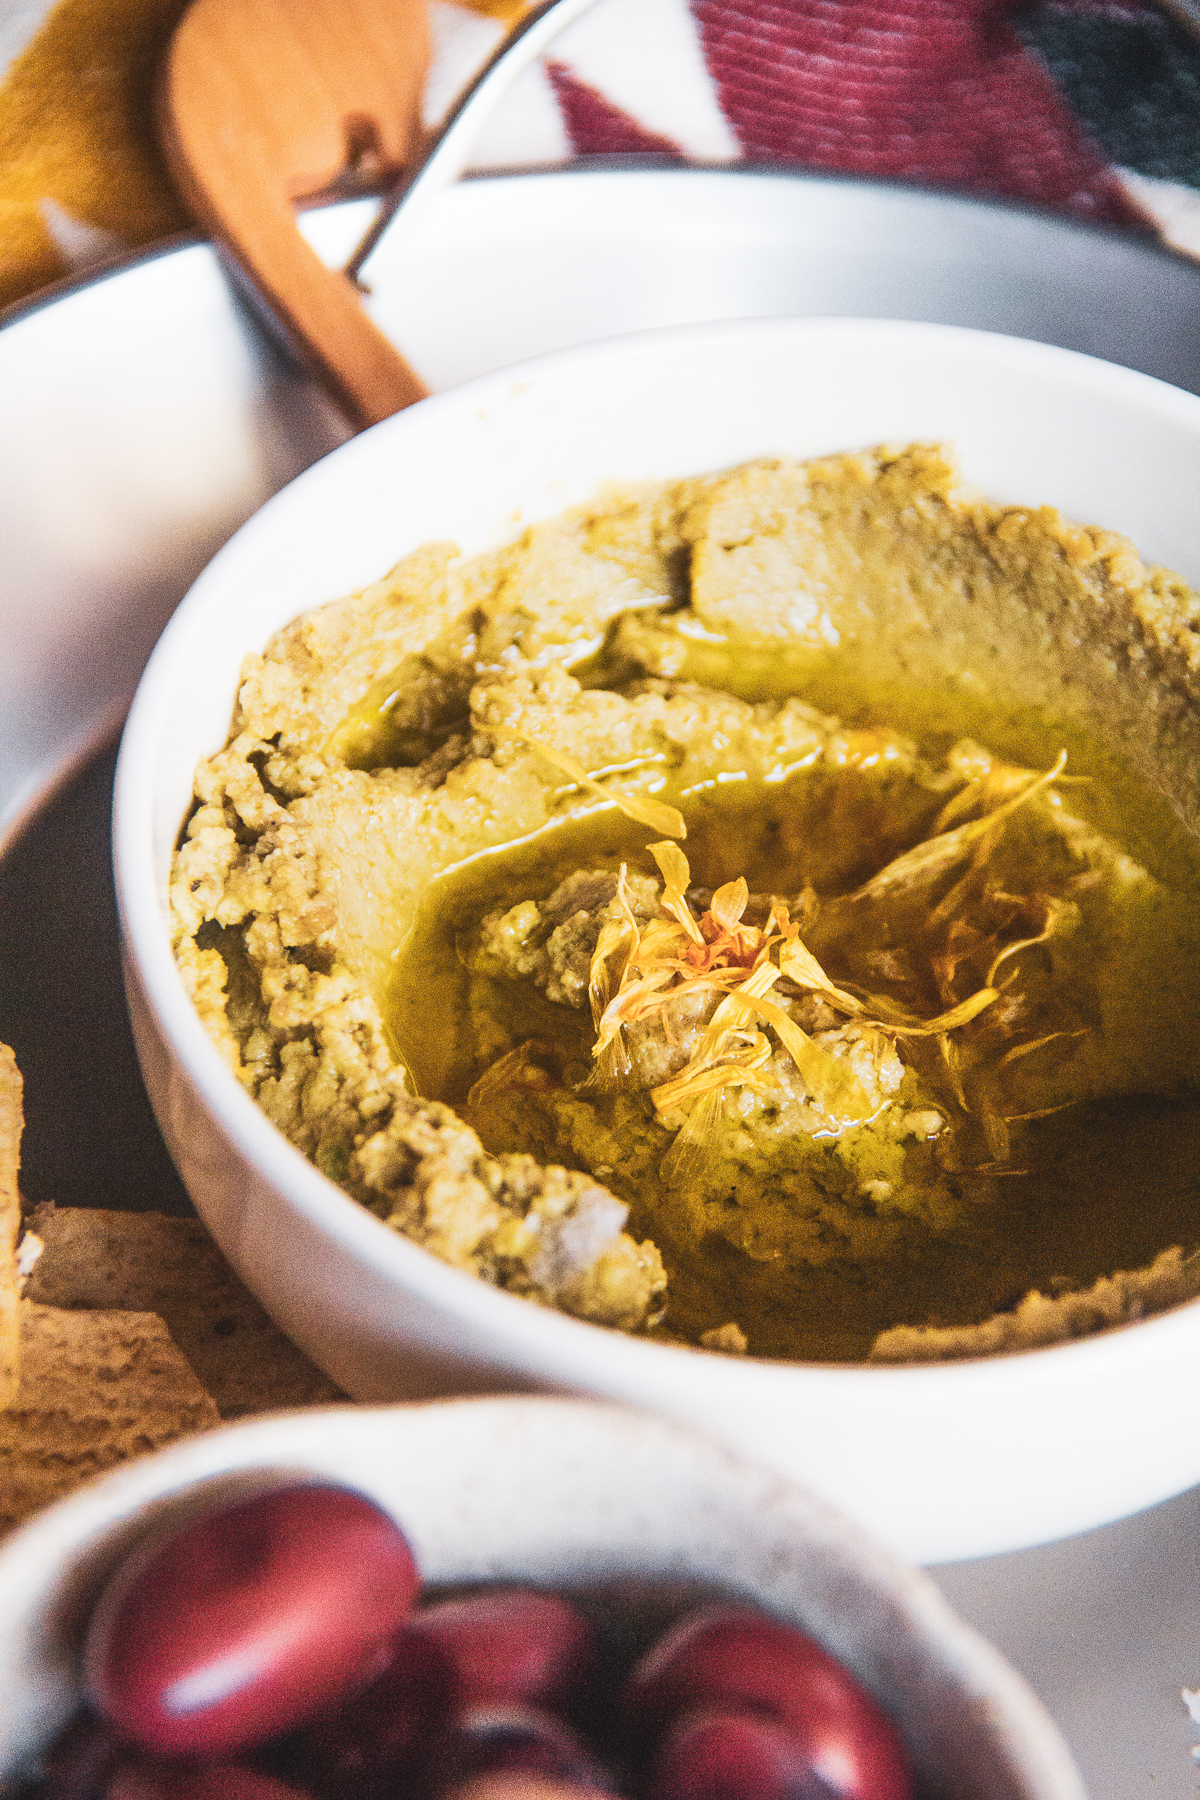
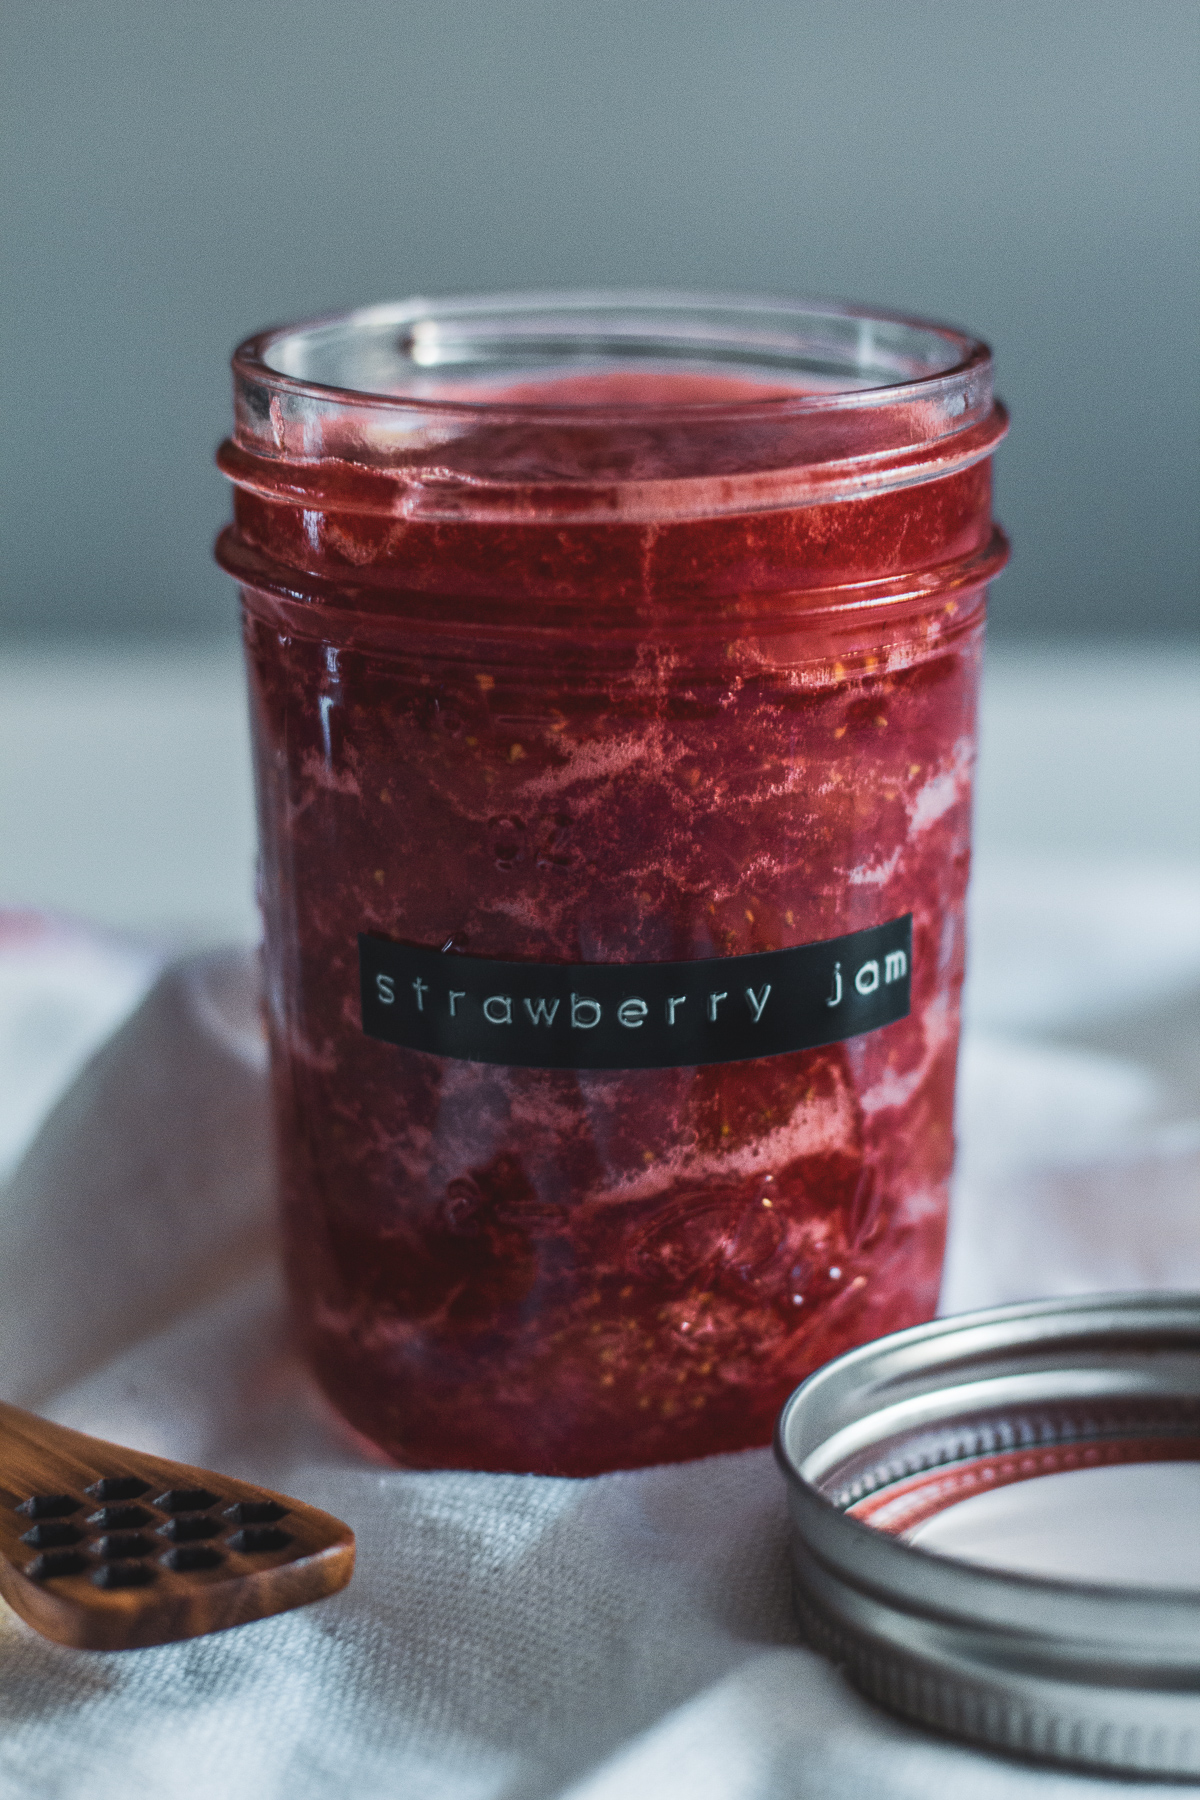
Boosting our immune system should always be a priority, but as it becomes something unavoidable we’re always looking for ways to work immune supporting factors into our daily lives. We want to share with you one of our favourite drink at all time – it is the best remedy for your family who has cold hand and feet or even a weak stomach.
And of course, the topic of our immune systems came up, given the start of the Corvid-19. These three ingredients (Lemon, Ginger, and Honey) are easy to find and can be used in a variety of ways — all of which will give your immune system the support it needs.
Ginger, Lemon & Honey – When these natural ingredients are put together they create a delicious, functional drink that can help you to start feeling better from the inside out.
Benefit of Citrus When we’re exposed to so many people and so many viruses, getting a little dose of vitamin C is incredibly helpful. There are many citruses that give you a boost and the most common that includes Lemon, Lime, Oranges and Clementines. And, we love to use citrus to make drinks, it gives your beverage a boost of fresh taste.
Benefit of Ginger It is one of the best ingredients that you could found on the earth, another one is garlic. Among ginger’s many benefits is its reported ability to help fight infection and ease joint and muscle pain. Also, in Chinese medicine (TCM), ginger helps to warm your stomach and cold limp. In the long run, you will reduce stomachache and build your immune system and strengthen your health.
Benefit of Honey It has lots of benefits, based on the report claiming it prevents cancer and heart disease, reduces ulcers, eases digestive problems, soothes coughs and sore throats. The doctor also recommended that to replace sugar with honey. It is healthier with more benefit.
But the truth is, one single ingredient or one single recipe does not have the magical healing abilities to make you feel better or shed excessive amounts of weight without making other positive holistic lifestyle changes.
The food and drinks we enjoy can certainly aid our body’s natural detoxification pathways, but if you are lucky enough to have a functioning liver and kidneys, your body naturally takes care of the natural detox process for you.
Thus stay hydrated and give your immune system a gentle boost with this naturally soothing, anti-inflammatory Honey & Ginger Warm Lemon Water that can help to aid in digestion, improve the appearance of your skin, and help you get back to feeling your best quickly.
Take a photo of your version, send us an email, tag us on Instagram, Tweet us, anything. We love to see you trying out our recipe!
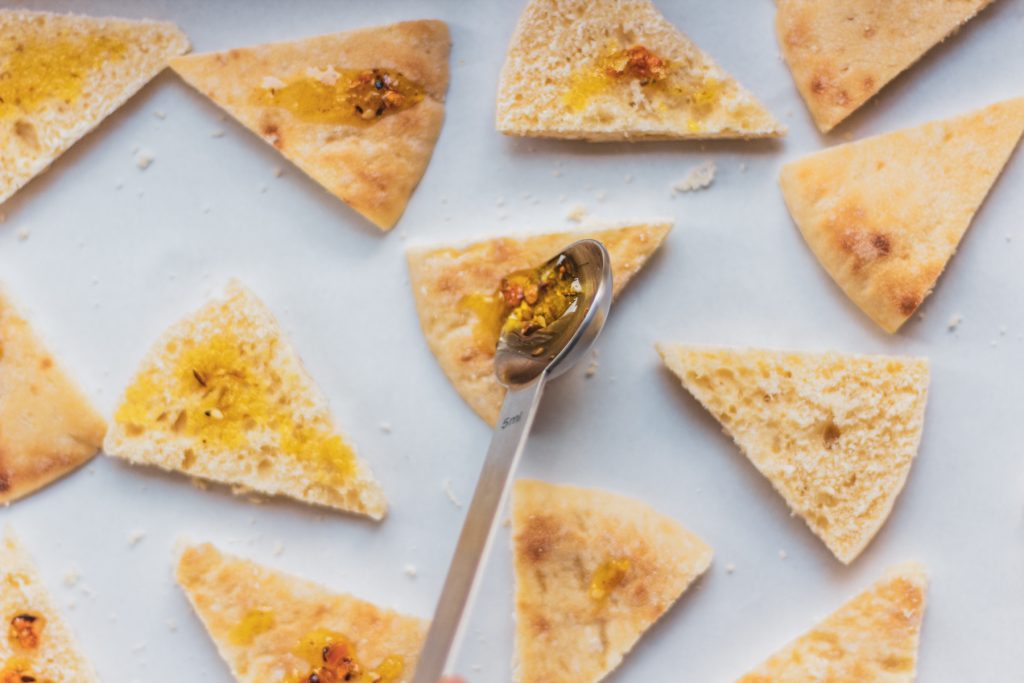
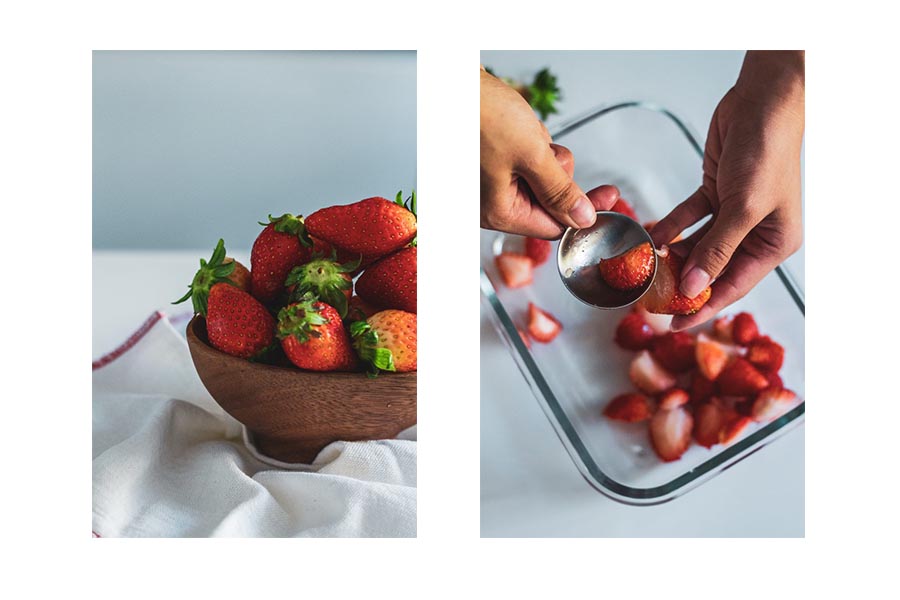
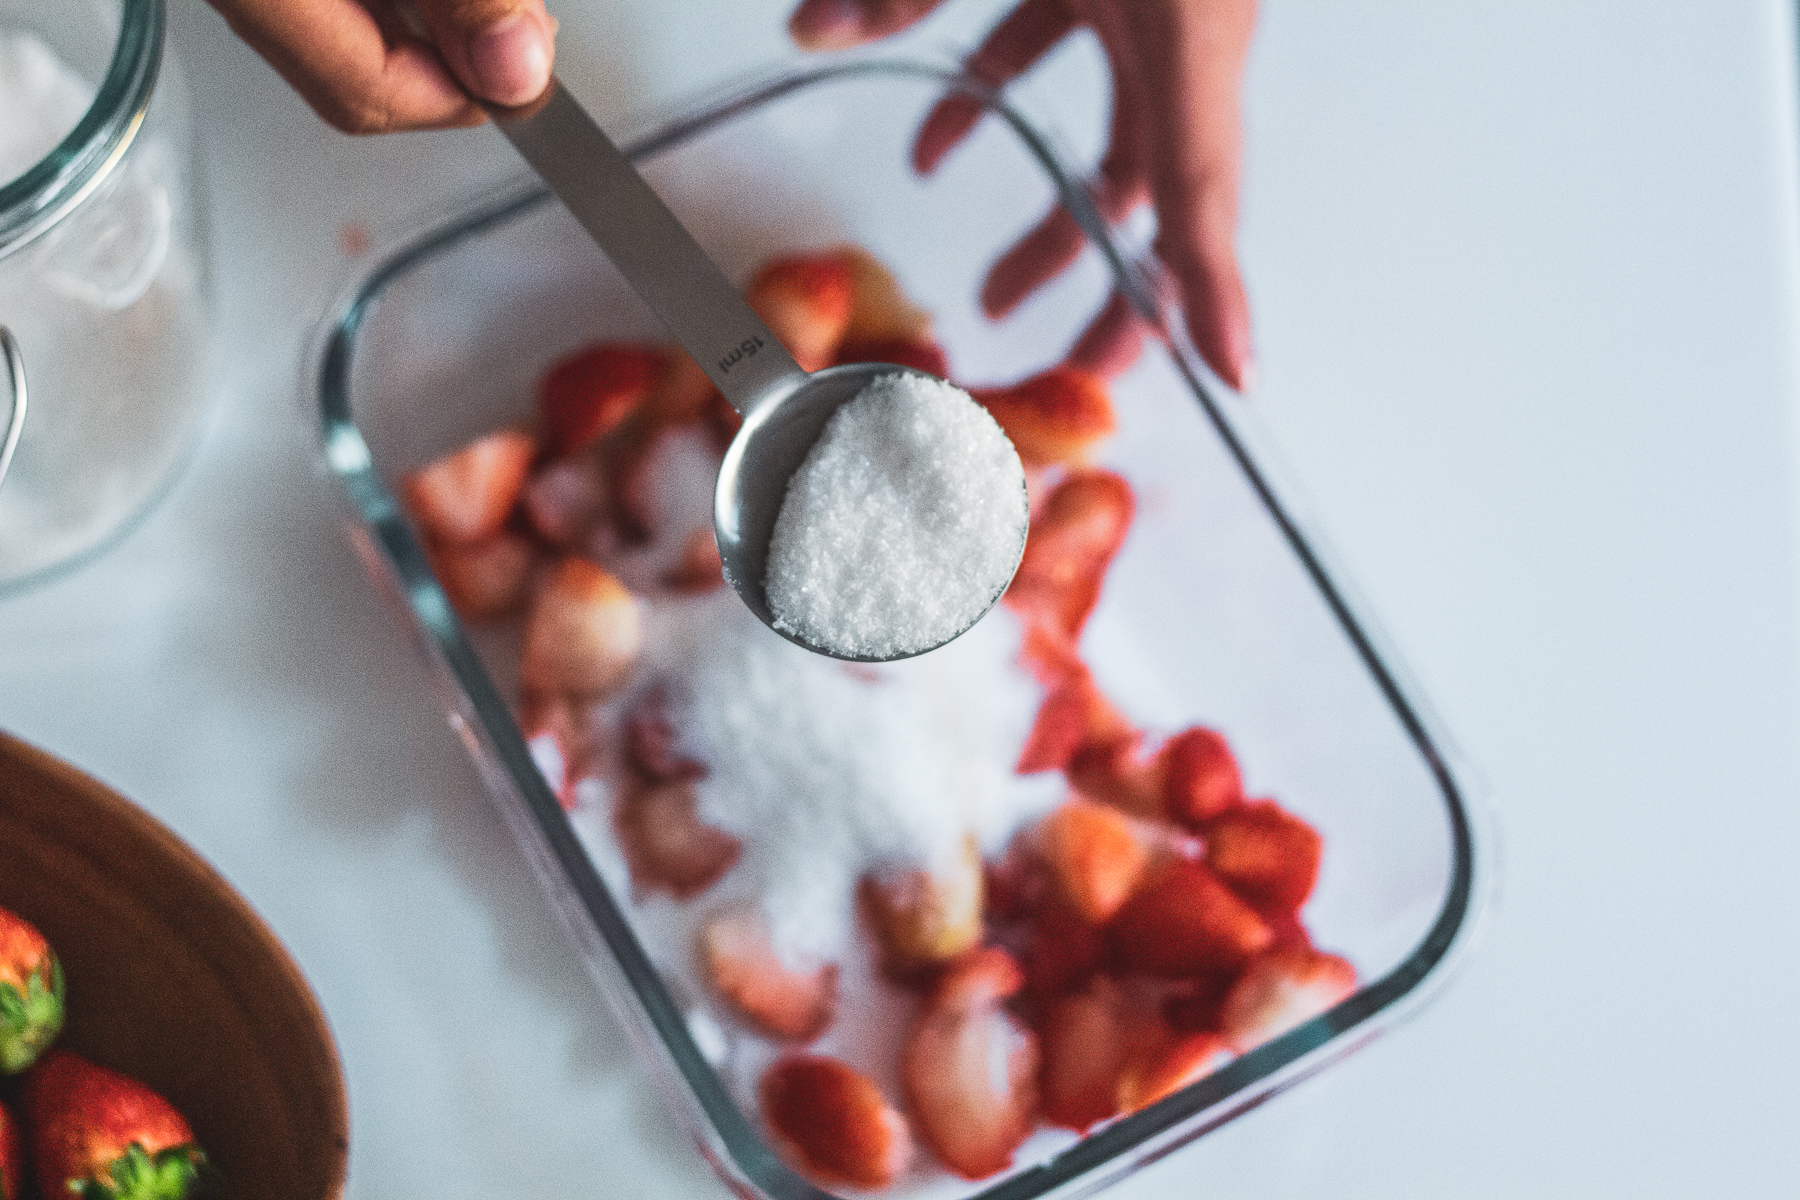
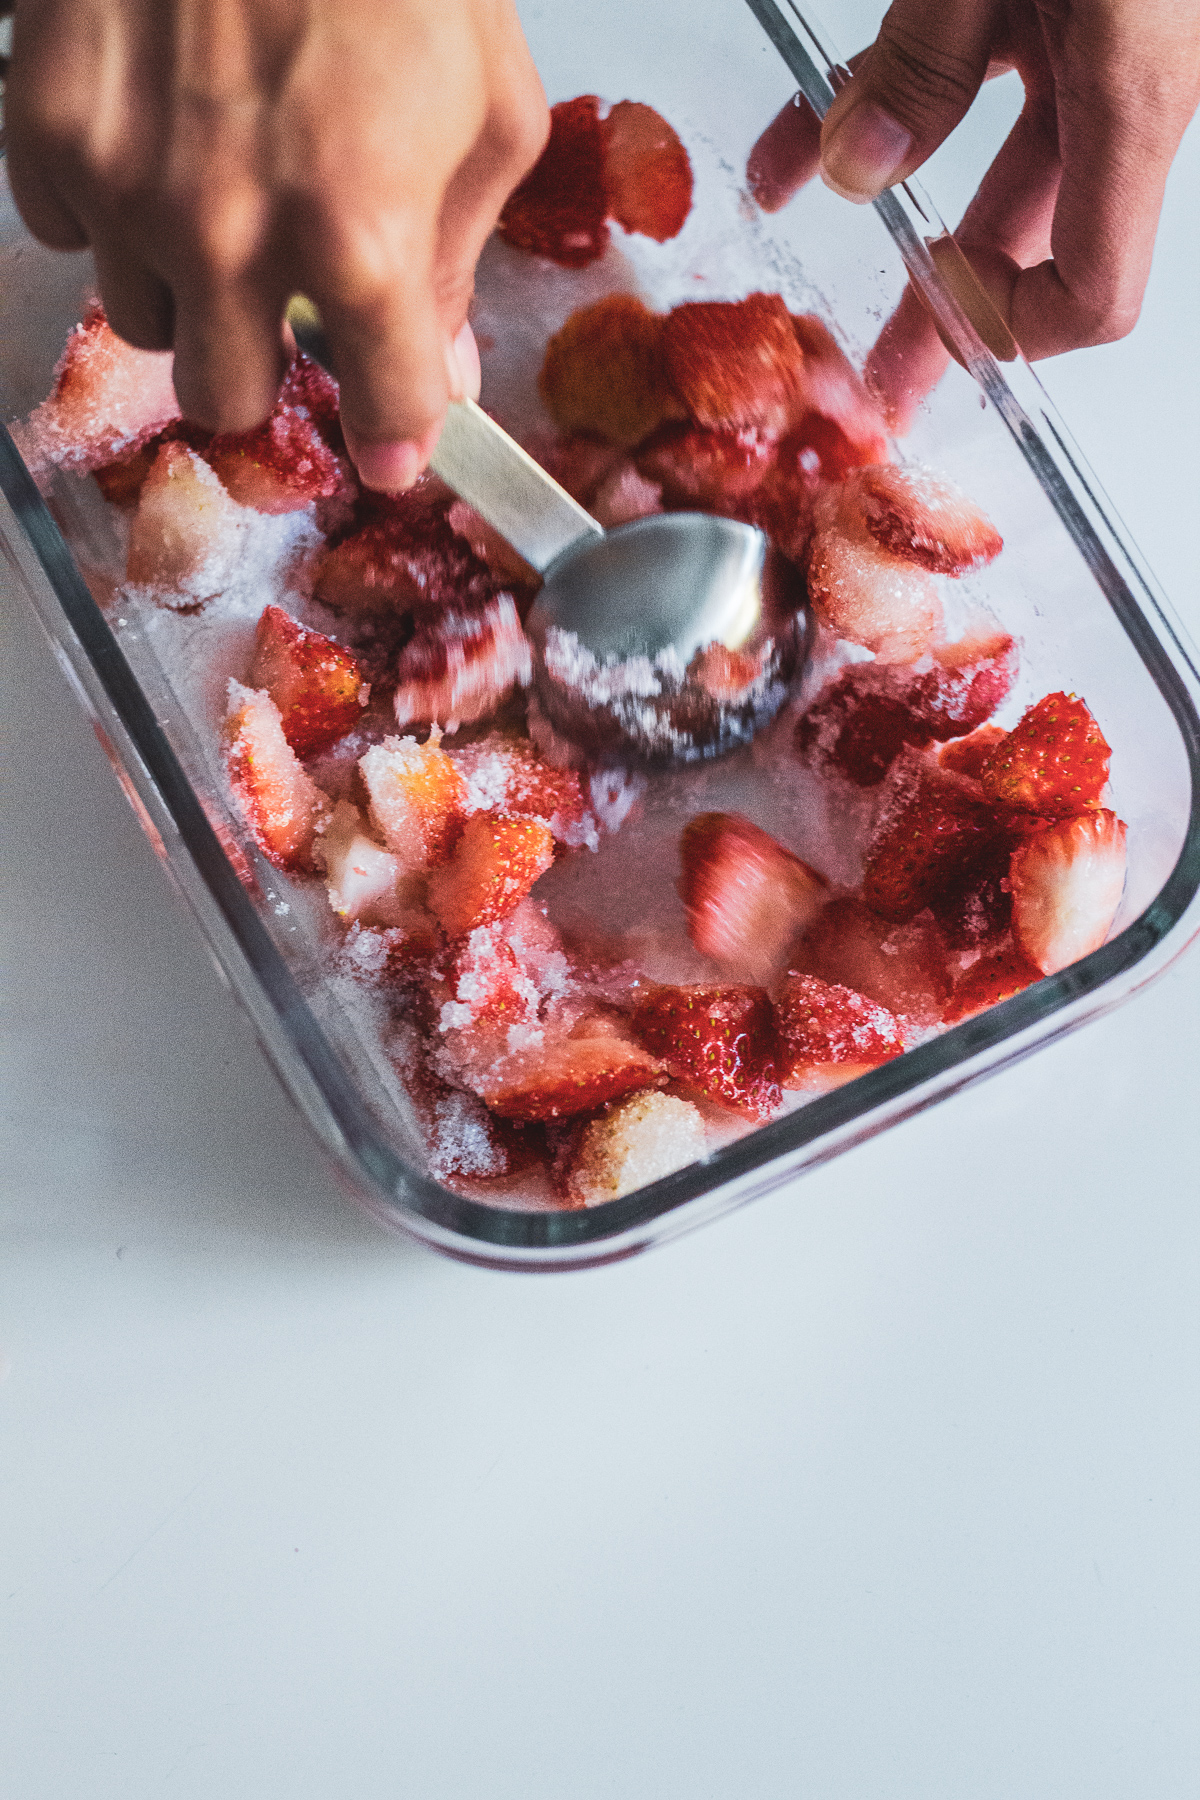
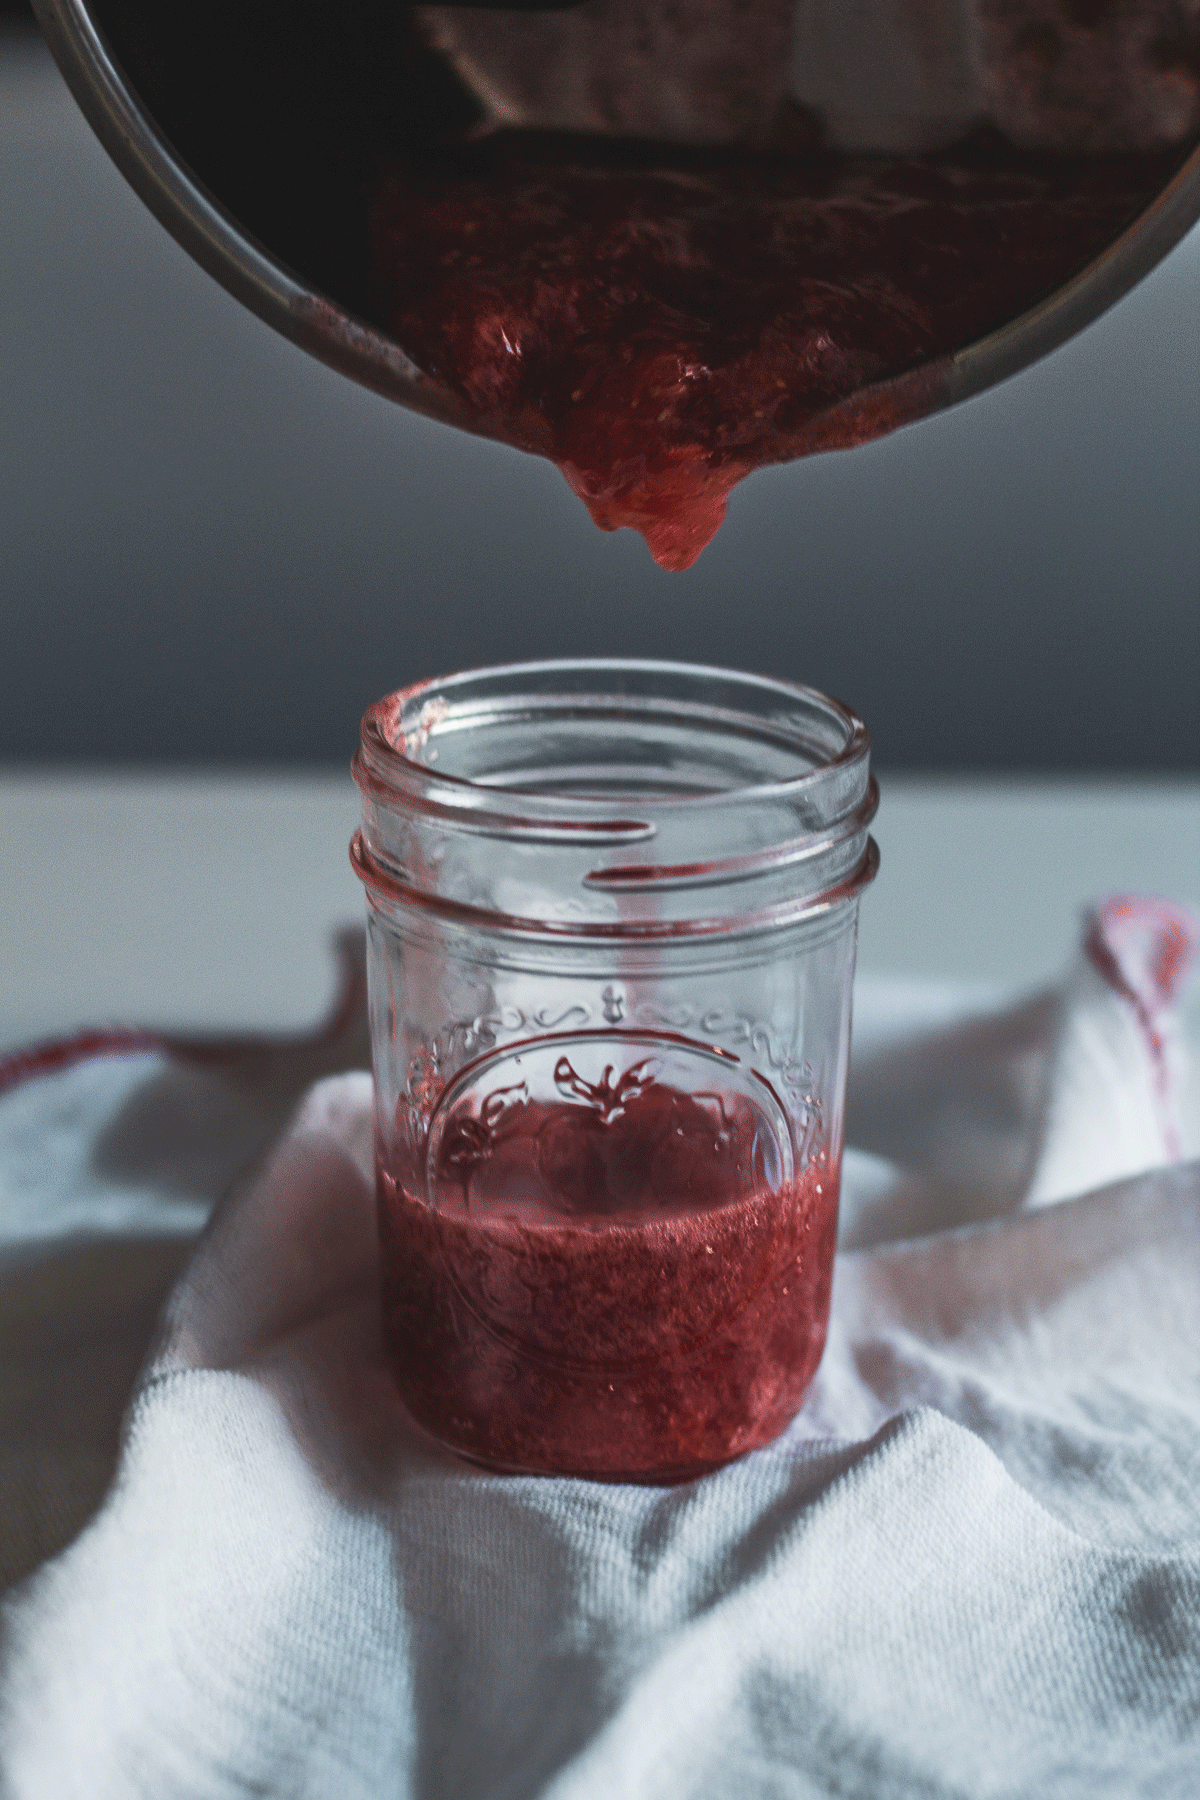
1 inch piece of fresh ginger, peeled and thinly sliced
1 teaspoon raw or local honey
8 ounces nearly boiling water*
Methods
Add lemons and ginger to the bottom of your favourite cup. Pour hot water into the cup. Stir in honey as desired. Enjoy!
Notes
*Temperature Note: Adding raw honey to boiling water will denature some of the most important health-promoting properties. When preparing this recipe, wait until the water is cool enough to sip comfortably before stirring in your honey to assure you are reaping all of the available health benefits (around 180°F).
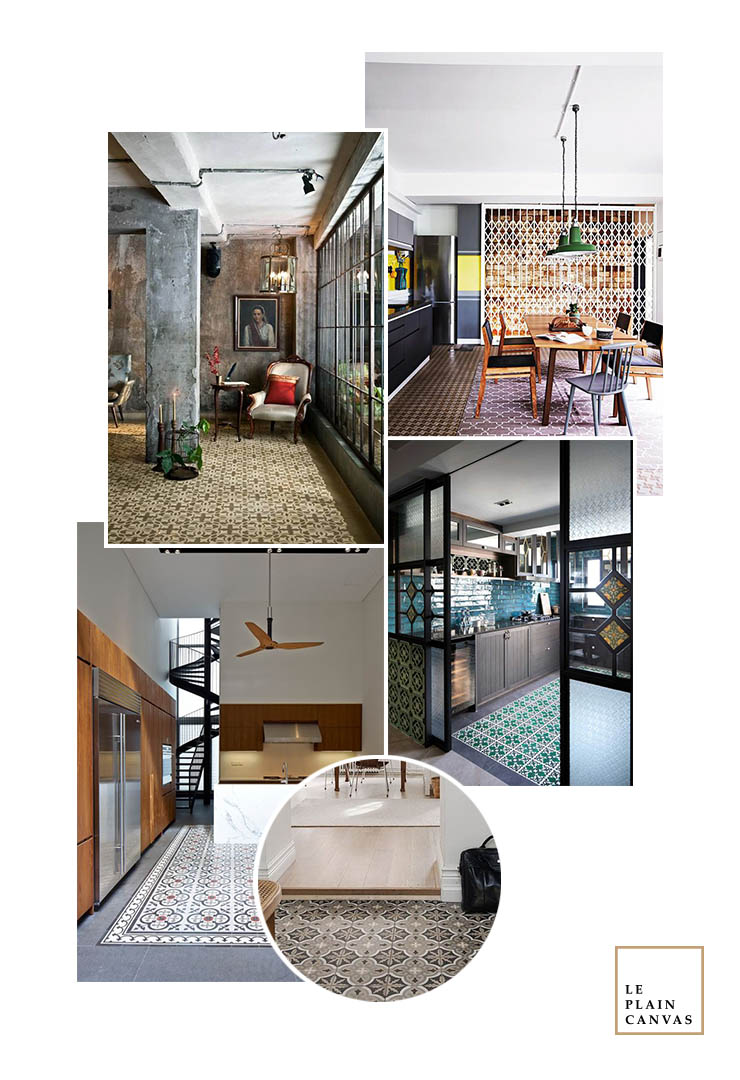
The time of spring is also time for a cozy bohemian room. Taking a bit of a tropical cue with plenty of rattan and natural woods. But for those not ready to take the plunge into summer mode, add a number of velvet pieces in springtime hues to the room it is perfectly blending coziness with airiness. While the winter is long over and the weather is getting warmer, it is also time to add some warmth to the room.
Bohos love their fringe! Fringe rugs, fringe wall hangings, fringe pillows. And, of course, fringe blankets! Toss something like the handwoven casually across the foot of your bed. You’ve got boho-magic. Plants are known for their air-purifying properties, some types attract moisture meaning the prevention of molds, they also lift the energy in their surroundings. So, get more roots people, fill your space!
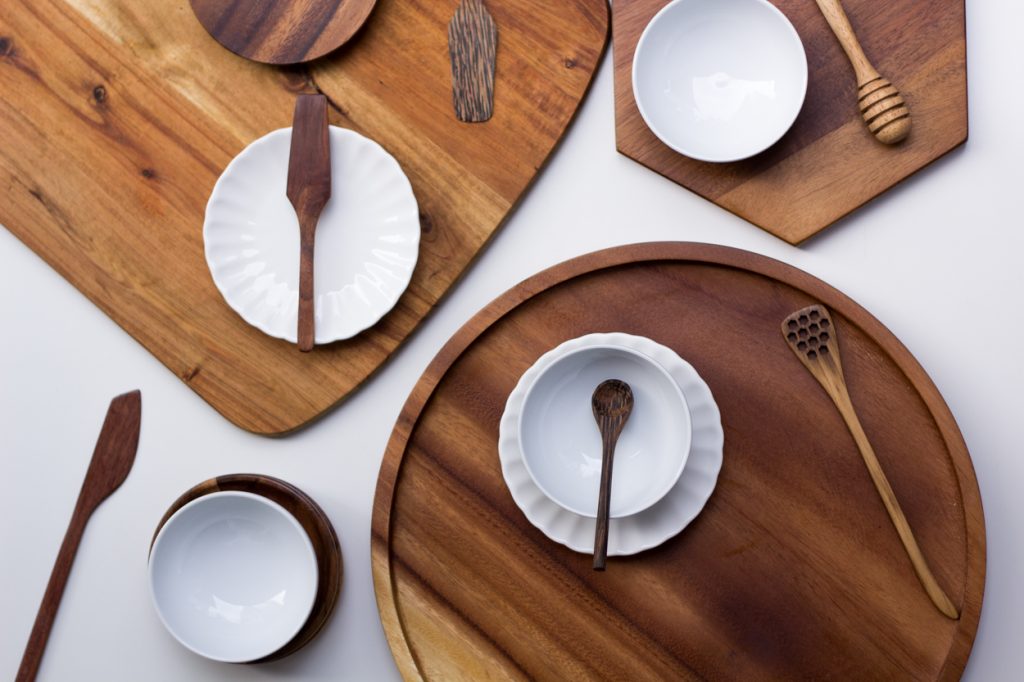
Weekend mornings and you drag yourself from the bed, and slip into the kitchen because, well, you’ve invited family or friends over to brunch. While you are cracking your head what to make – here’s an idea. Why don’t you put together a pancake board?
Meanwhile, it is a new food trend hitting social media just as we speak, pancake boards are perhaps the natural progression from cheese boards, charcuterie boards and even meat boards. It’s certainly a gorgeous, Instagram-friendly way to serve breakfast. So we decide to try it and tell you it is not difficult at all!
Finding the prefect board
A pancake board acts as a frame for the food. You’ll want a surface area that’s larger than a typical cutting board. Joe and I, both of us are meat and cheese lovers and therefore we have been collecting lots of premium boards over the years.
Choose a board that you like, it can be a round-shaped, squares, wooden or even porcelain. Be creative – anything that you found at home that is big enough to put all things in it. We also suggest having some small plates or bowls for a dynamic effect. Be sure to wash your board(s) in hot, soapy water beforehand, or simply cover them with parchment paper.
Filling up the Pancake Board
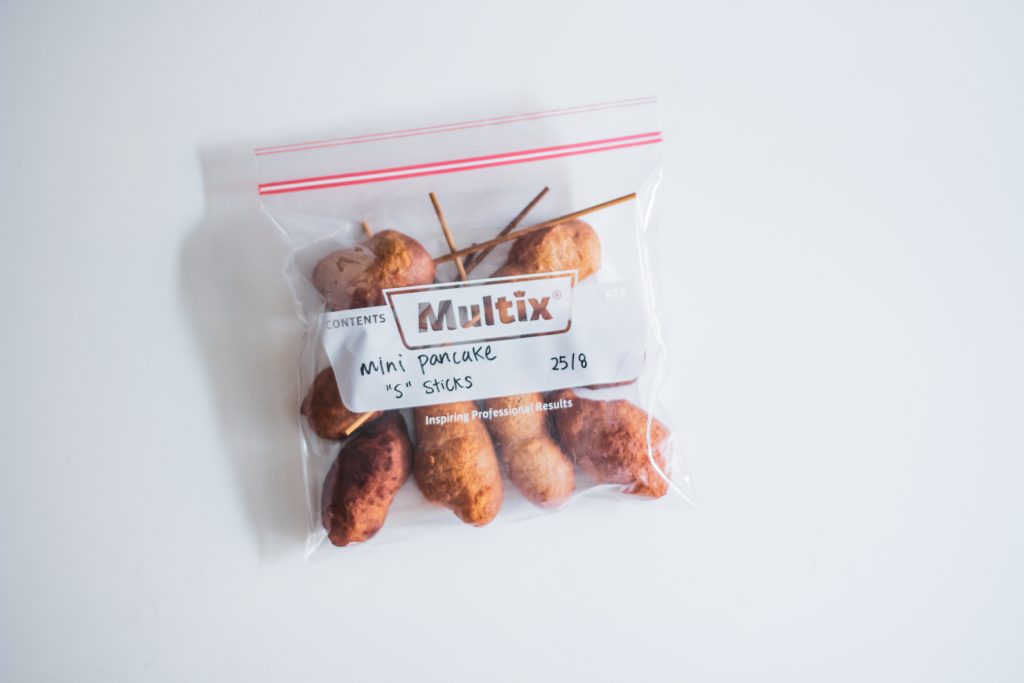
Pancake. Usually, we suggest making bite-size for your pancakes (unless you have an enormous board). Depend on your board size, you make your pancake accordingly based on the spaces you have. We go with bite-size pancakes as our plate wasn’t that huge to fill in all the ingredients we want.
Fruits. Plan ahead and get the ingredients you like – get fruits and spreads you in love with! For this Spring, usually, we banana, grapes, strawberries and berries, also by chance we highly recommend figs, peach and kiwi!
Savoury. Never forgot those prefer savoury, our favourite choice are chorizo, bacon but for the seafood lover, smoked salmon is a great choice as well. These days we avoiding raw food as much as possible for health reason! Roasted nuts (all kind of nuts that you could or you love), cheese and egg are great combos!
Nuts. Serve almonds, walnuts, macadamia nuts, or whatever you’d like. You may want to crush them (either slice with a heavy knife or put them in a resealable plastic bag and hammer them with a meat tenderizer) so they are easier to sprinkle.
Syrup/Jam. Maple syrup or honey and cream is a must! While those who prefer something else you can also consider coffee spread, peanut butter, Nutella.
Whipped cream. Say no more, right? You can make whipped cream ahead of time and keep it in the fridge overnight.
Creating Your Pancake Board, Step-by-Step
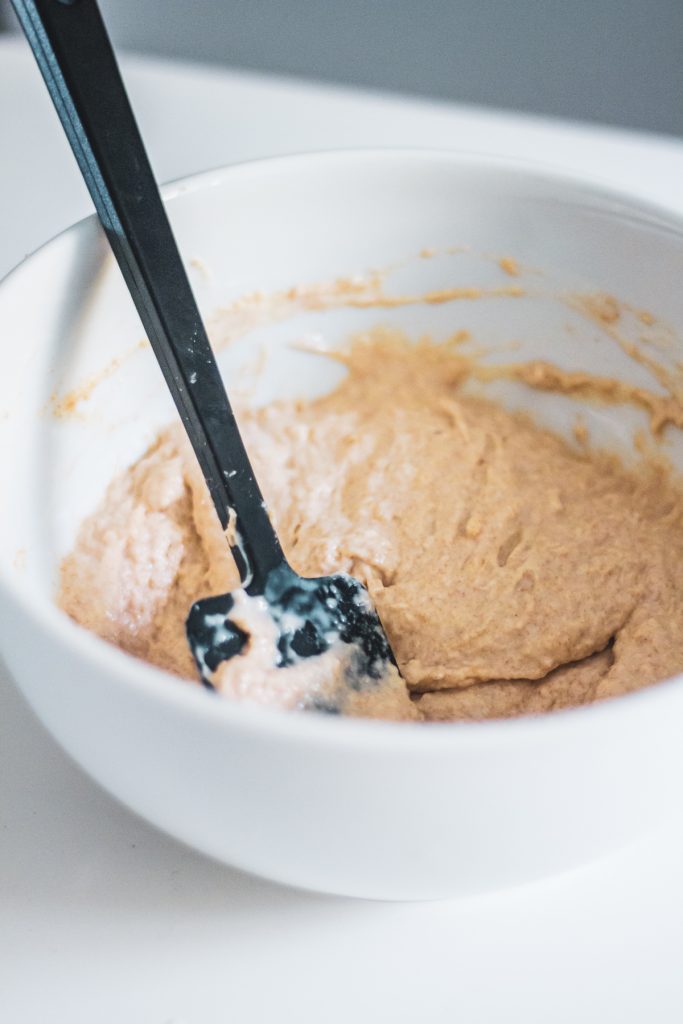
The night before: pancake board make-ahead There are a handful of things you can do the night before to save time in the morning: e.g., prepare the pancake batter (make 2 to 3 batches, then store in a covered container like a mason jar), wash fruit (but wait to slice it), prepare a pan with bacon, whip up cream, make candied nuts, etc.
Map the pancake board You can do this the night before or first thing in the morning, but it’s helpful to get an idea of where everything will go. Make sure you have all the plates, bowls, and serving utensils you’ll need, and arrange them where you want them. Make little notes of where everything goes to be sure you’ve accounted for everything. You may make changes as you start adding the food, but it’s nice to have a place to start.
Pancake day: what to make first Make all your hot items first, like potatoes and bacon, then put them in 80 C oven to stay warm while you make the pancakes.
Arrange cold items on board While your pancake griddle heats up, get out all your toppings that will be okay out of the fridge for the next 20 minutes, such as fruit and syrup. Be sure to take the butter out of the fridge so it can soften. Slice up “finger fruits” like oranges, mango, peaches, etc. and set aside. If you’re slicing apples, pears, and bananas, give them a quick dunk in lemon water so they don’t turn brown.
Make the pancakes Use a ladle or measuring cup to scoop and pour batter onto the griddle to keep your pancake size consistent. And to keep them warm while you make additional batches, arrange them in a single layer on an oiled cooling rack and place them, uncovered, in a warm oven for up to 20 minutes.
Place final items on board If there’s anything else from the fridge that needs to go on the board, like whipped cream, do this right before you arrange the pancakes. Then, add bacon, potatoes, and toppings that go in bowls. Next: pancakes! You can fan them out, arrange them in several short or tall stacks, or whatever you’d like. Lastly, fill in in empty spots on the board with sliced fruit.
We hope you give this gorgeous breakfast board a try, especially for brunch with friends or family. The board is also a wonderful idea for breakfast.
Last May, we travelled with our parent to Taiwan, it’s supposed to be a warm and humid season but sadly it seems that the raining season (there was a typhoon too) hit early. Still our north coastal was so perfect when everything falls into place.
Arise up as early as 6 am in Taiwan, the sky was bright and we were all prepared for the north coastal trip. Despite Summer we still recommend that you bring some scarf or jacket as by the coast you will feel chilling at all time. Our driver, not only puncture but arrives early and picks up us for breakfast. Right after that, we head off to the highway and that how the journey began. Join us with our photo journey for our unforgettable trip!
Our Itinerary
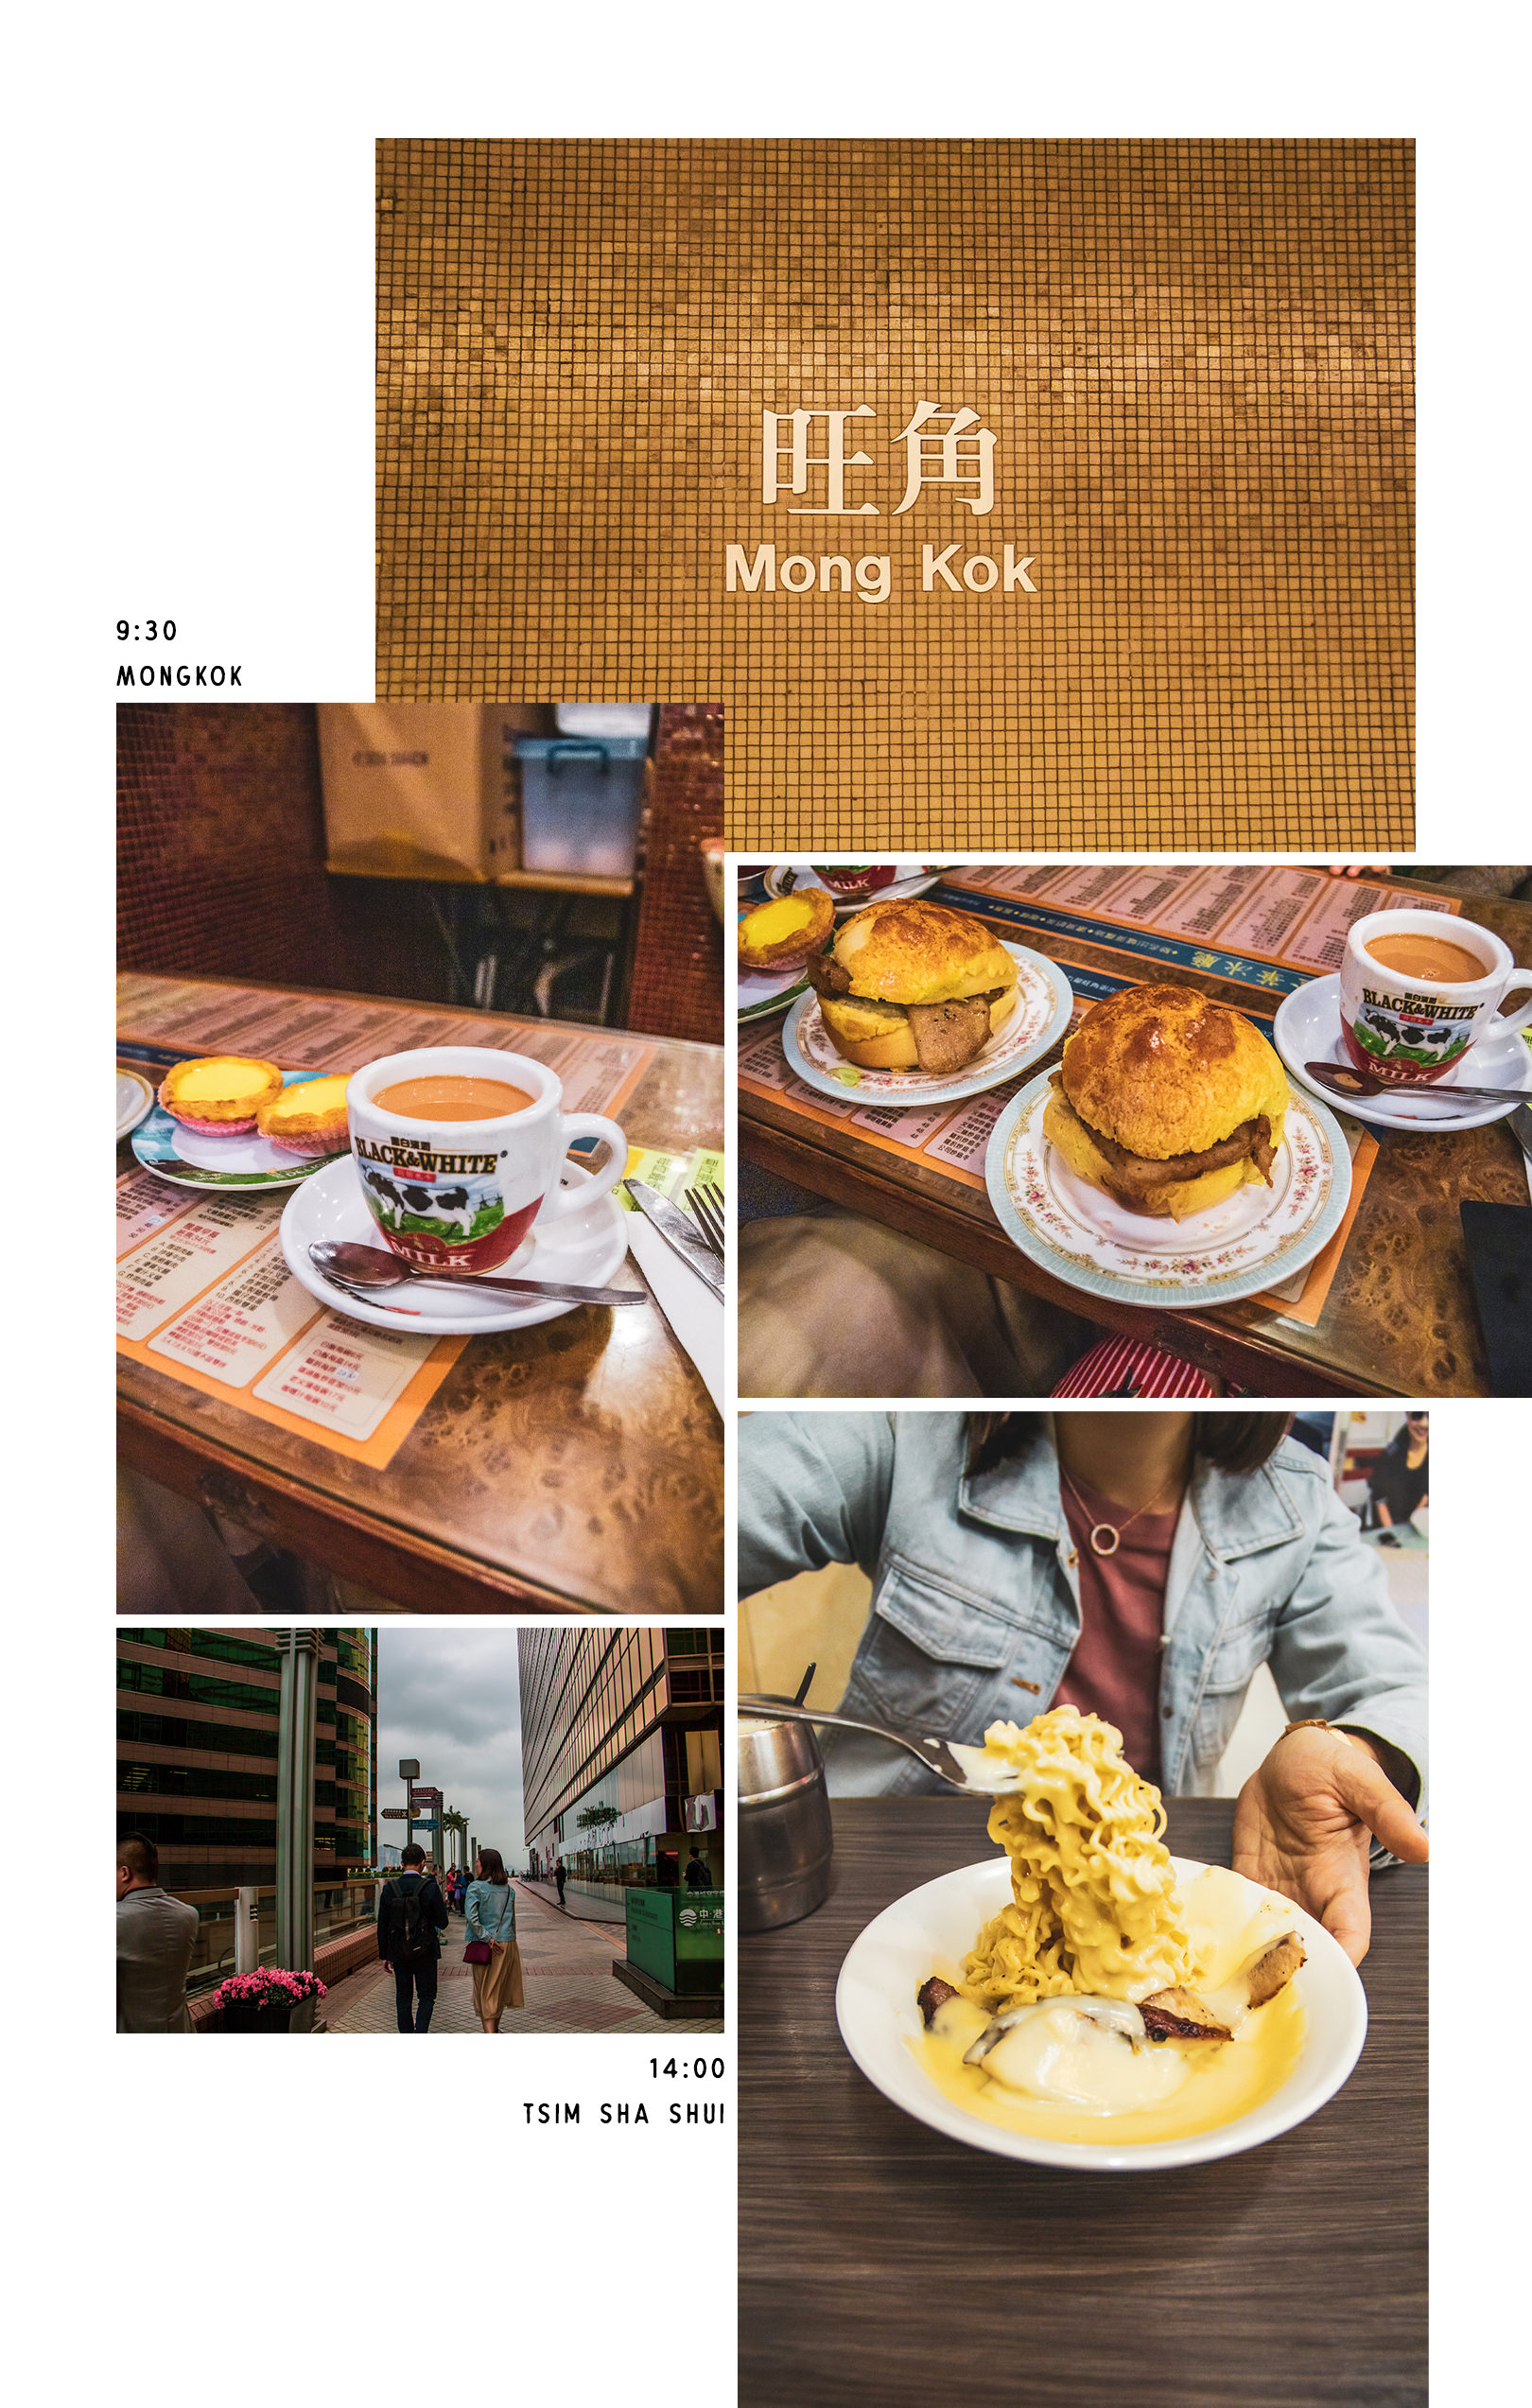
The last day we travel to the Taiwan North Coast covering places like Yehliu Geopark, Shifen, Jiufen Old Street and more! After a long day of sightseeing, we end our day at one of the most famous night markets in Taipei – Raohe Night Market. Starting the day our driver pick up at our Airbnb at 8 am. 9.35 am: Yong He Soy Milk Since we planned on visiting a long list of attractions, we decided to have our breakfast on the go. Initially, we included the famous Founder store of Yong He Soy Milk under Zhongzheng Bridge in our food list. But due to time constraints, we didn’t make it there. We stopped by one of the Yong He Soy Milk chain stores on our way to buy our breakfast.
11.00 am: Camel Mountain (骆驼峰) It took us around an hour to reach the North Coast of Taiwan, during the travel time it is the best for you to get some rest as the day is very long. Before heading to Yehliu Geological Park you will pass by this Camel Mountain where the tourist will skip this stop. We encourage you to skip this place if you have difficulties in walking, as it requests some climbing.
One of the mountain peaks close to the coastline has excellent scenery and looks like a dromedary camel. Rest for a while there and listen to the wave, best experience ever.
Address: Yeliu Village, Wanli Township, New Taipei City(Next to Dong’ao Road)
12.10 am: Yehliu Geological Park (野柳地質公園) Yehliu Geological Park (野柳地質公園) is a cape with eroded rock formations along the Northeast Coast of Taiwan. The rare geological landscape is formed by strong winds, seawater, wave attacks and earth movement on the softer rock layers over the years. Yehliu Geopark is a very popular attraction in New Taipei.
If you’re visiting Yehliu Geopark on a weekend or public holiday, be prepared for a crazy queue to take a photo with the Queen’s Head. This is the most popular scene in Yehliu Geopark. The iconic honeycombed rock has a striking resemblance to a Queen’s head. This is what happened to us.
Entrance fee: NT80 Operating hours: 8 am to 5 pm Address: 207, Taiwan, New Taipei City, Wanli District
1.30 pm: Release a sky lantern The little town of Shifen is perhaps most fondly visited by both locals and tourists who participate in its tradition of releasing sky lanterns along Shifen Old Street as a form of good luck. The sky lantern is a colourful paper lantern that you can write down your wishes on before releasing it to the skies or even as some may say the heavens.
As Shifen was previously a thriving coal-mining district during the Japanese Occupation, decorating sky lanterns takes place along the railway track alongside Shifen Old Street. Do expect to pay at least NT$150 – $200 for a simple sky lantern, which can be purchased from the shops nearby the railway track.
Address: 226, Taiwan, New Taipei City, Pingxi District
3.00 pm: Shifen Waterfall The pass trip to Taiwan we always attempted to go to Shifen Waterfall but we couldn’t make it although it just located a15-20 minutes’ walk away from Shifen Old Street. Take a casual stroll to the Shifen Waterfalls along a paved path where you will find the entrance to this iconic waterfall that has been nicknamed Taiwan’s mini Niagara Falls.
In order to reach the waterfalls, visitors will have to cross a long, wooden boardwalk surrounded by lush rainforests and climb multiple flights of stairs. However, please take care when visiting the waterfall as the attraction is not particularly wheelchair and stroller friendly. (Our parents are too tired to head down but I’m glad that we film the amazing place for them to see)
After about 15 minutes of walking, you will be rewarded with the majestic sights of the Shifen waterfall. Admission to this waterfall is free, by the way!
Address: No. 11, Gan Keng, Pingxi District, New Taipei City 226, Taiwan Operating Hours: Nov to Jan, Daily: 8 am – 6.30 pm, Feb to Oct, Daily: 8 am – 7 pm
4.30 pm: Golden Waterfall + Yin-Yang Sea The day has yet come to the end, we decided to head higher up to the mountain close to the sun. The Golden Waterfall is located near the Gold Ecological Park 黃金博物園區, beside the main road. There are no special parking bays around, so Mr Cola has to park the vehicle along the roadside. Surrounded by mountains on three sides, the Golden Waterfall shine a bright yellowish brown as it contains a high level of copper and iron deposits. When it rains, the rainwater will seep into the old mines and carries these deposits down, turning the grassy hillside into a bright orange colour.
Named a UNESCO World’s Heritage Site in 2002, Jinguashi is a perfect place to relax and enjoy the fresh amazingly fresh air while surrounded by breathtaking scenery. The surrounding mountains offer some of the most untouched and beautiful scenery in Taiwan. I would certainly recommend anyone to include a visit to Jinguashi area if you are in the area.
As we are getting up higher to the mountain, we get closer to the sun. As it is windy that day we didn’t get to feel the heat but we are all sunburn the next day. Remember to bring your sunblock along during the trip.
Address: 224, Taiwan, New Taipei City, Ruifang District
5.30 pm: Jiufen Old Street Whenever we head down to Jiu Fen Old Street it always reminds me of the animation spirit away. The air was alive with the soft hum of voices, punctuated with cries from food stall owners selling everything from fried squid and deep-fried shrimp balls to barbecued mushrooms and stinky tofu.
There was little natural light in the narrow street. The buildings rose sharply on either side, and most of what you could see of the sky was through glass or clear plastic panels, old, dirty and grimy, compounding the old world atmosphere. The bright lights from the shop fronts lit the dim scene and from above, the ubiquitous red lanterns cast their soft glow.
At Jiu Fen Old Street not only you are able to take beautiful and amazing pictures it is also a food heaven.
Zhang Ji Traditional Fishballs (張記傳統魚丸) It does not simply only try the fishballs. In fact, you’d be silly if you only buy fishballs from them. Instead, get the Combination Soup that comes with 3 different types of fishballs — meat encased fishballs (Fuzhou balls), squid balls, and regular fishballs.
From the same stall, you also have to try their Braised Pork Rice (滷肉饭) with Braised Egg (滷蛋). Who would have imagined such simple-looking dishes would taste so good. The Combination Soup cost you NT$50/bowl while the Braised Minced Pork Rice cost you NT$35/bowl.
Grandma Lai’s Taro Balls (賴阿婆芋圓) Taiwanese Taro Balls have since entered Singapore’s market, coming in an assortment of flavours and toppings. But nothing beats eating a bowl of traditional chewy taro balls in Jiufen Old Street amongst the locals at Grandma Lai’s.
7.00 pm – Raohe Night Market 饒河夜市 (*original plan suppose to be Keelung Night Market and driver send us back to our hotel) Ending the day back to the city. One of the oldest night markets in Taipei, the Raohe Street Night Market 饒河夜市 is packed with food, retail and entertainment stalls. Raohe Street Night Market is the epitome of authentic Taiwanese experience.
Fu Zhou Shi Zu Pepper Bun 福州世祖胡椒 One of the must-try at Raohe Night Market, it serves Hu Jiao Bing, a.k.a. Black Pepper Bun (TWD50, SGD2.24) or “Taiwanese Pepper Bun”. It is a piping hot baked bun stuffed with minced meat (pork or beef), scallion, sugar, soy sauce and of course, black pepper. The vendors prepare and bake them in front of you.
As we are all so tired that day, after grabbing our dinner we when back straight to our Airbnb in a cab. Address: Raohe Street, Songshan District, Taipei City, Taiwan 105
Having your own driver is one of the best travel transport in Taiwan as you can plan the itinerary with your driver, they have lots of knowledge and tips.
Meet our driver
We were so blessed that our super amazing driver accommodates to our changes very late minute (from a Thursday to a Friday). As we check the weather app did predict that on Thursday it will be raining but Friday won’t! But we are damn lucky as our driver usually are fully back-to-back with trips yet he willing to bring us around on his off-day during our travel. (Even managed to change the date!) So if you are engaging him, plan and book him in advance!
Hopefully, it will be a helpful post for you! Due to the COVID-19, we should stay at home but since there is so much time when we are at home now, we can plan the trip first instead. Please send us your recommendation so we could exchange and get to travel better!
As we will be staying home throughout the month, doing yoga at home rules. Of course, it’s awesome to practice in a studio with a class to motivate you and a skilled instructor to make sure you’re reaching your potential, but we can’t do that now due to Corvid-19.
In order to opt for the best experience if you take the time to create a space that’s meant for practicing yoga. We may not all have enough room in our homes for a permanent yoga room or even so much as a “yoga corner”, but if you choose one spot to convert into a designated yoga area, your mind and body will become accustomed to it, making it easier for you to relax and focus — every single time.
Find a sunny corner in your house. Most of us do not get enough vitamin D, even when we are outside in the winter! Connecting with the sun, feeling it on your skin, and experiencing an overall feeling of warmth can help bring your blood pressure down and find a way to connect with what’s going on with your body at that moment.
Due to the COVID-19, we have been staying at home most of the time. With so much free time on hand, I decided to spend some time on meditation, where I focus on a single point. This could entail following the breath, repeating a single word or mantra, staring at a candle flame, listening to a repetitive gong, or counting beads on a mala. Since focusing the mind is challenging, a beginner might meditate for only a few minutes and then work up to longer durations.
In this form of meditation, you simply refocus your awareness on the chosen object of attention each time you notice your mind wandering. Rather than pursuing random thoughts, you simply let them go. Through this process, your ability to concentrate improves.
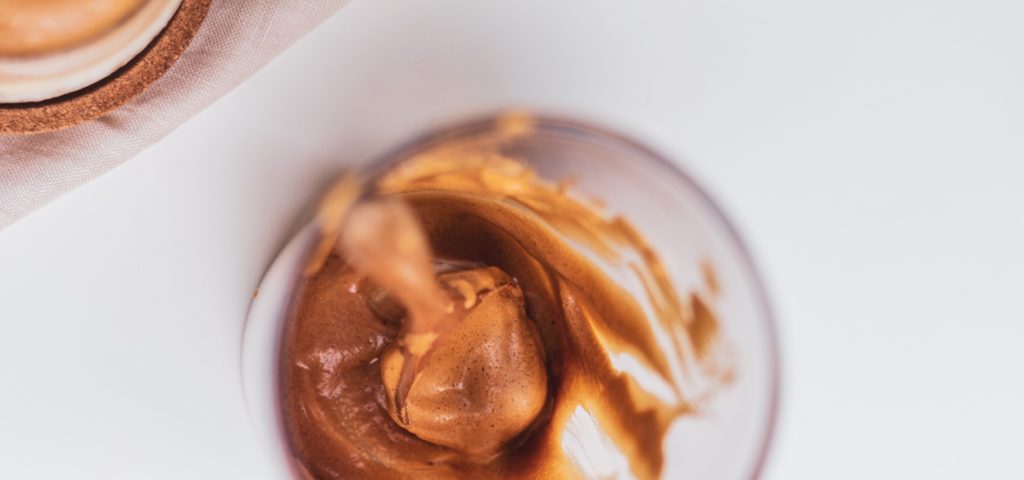
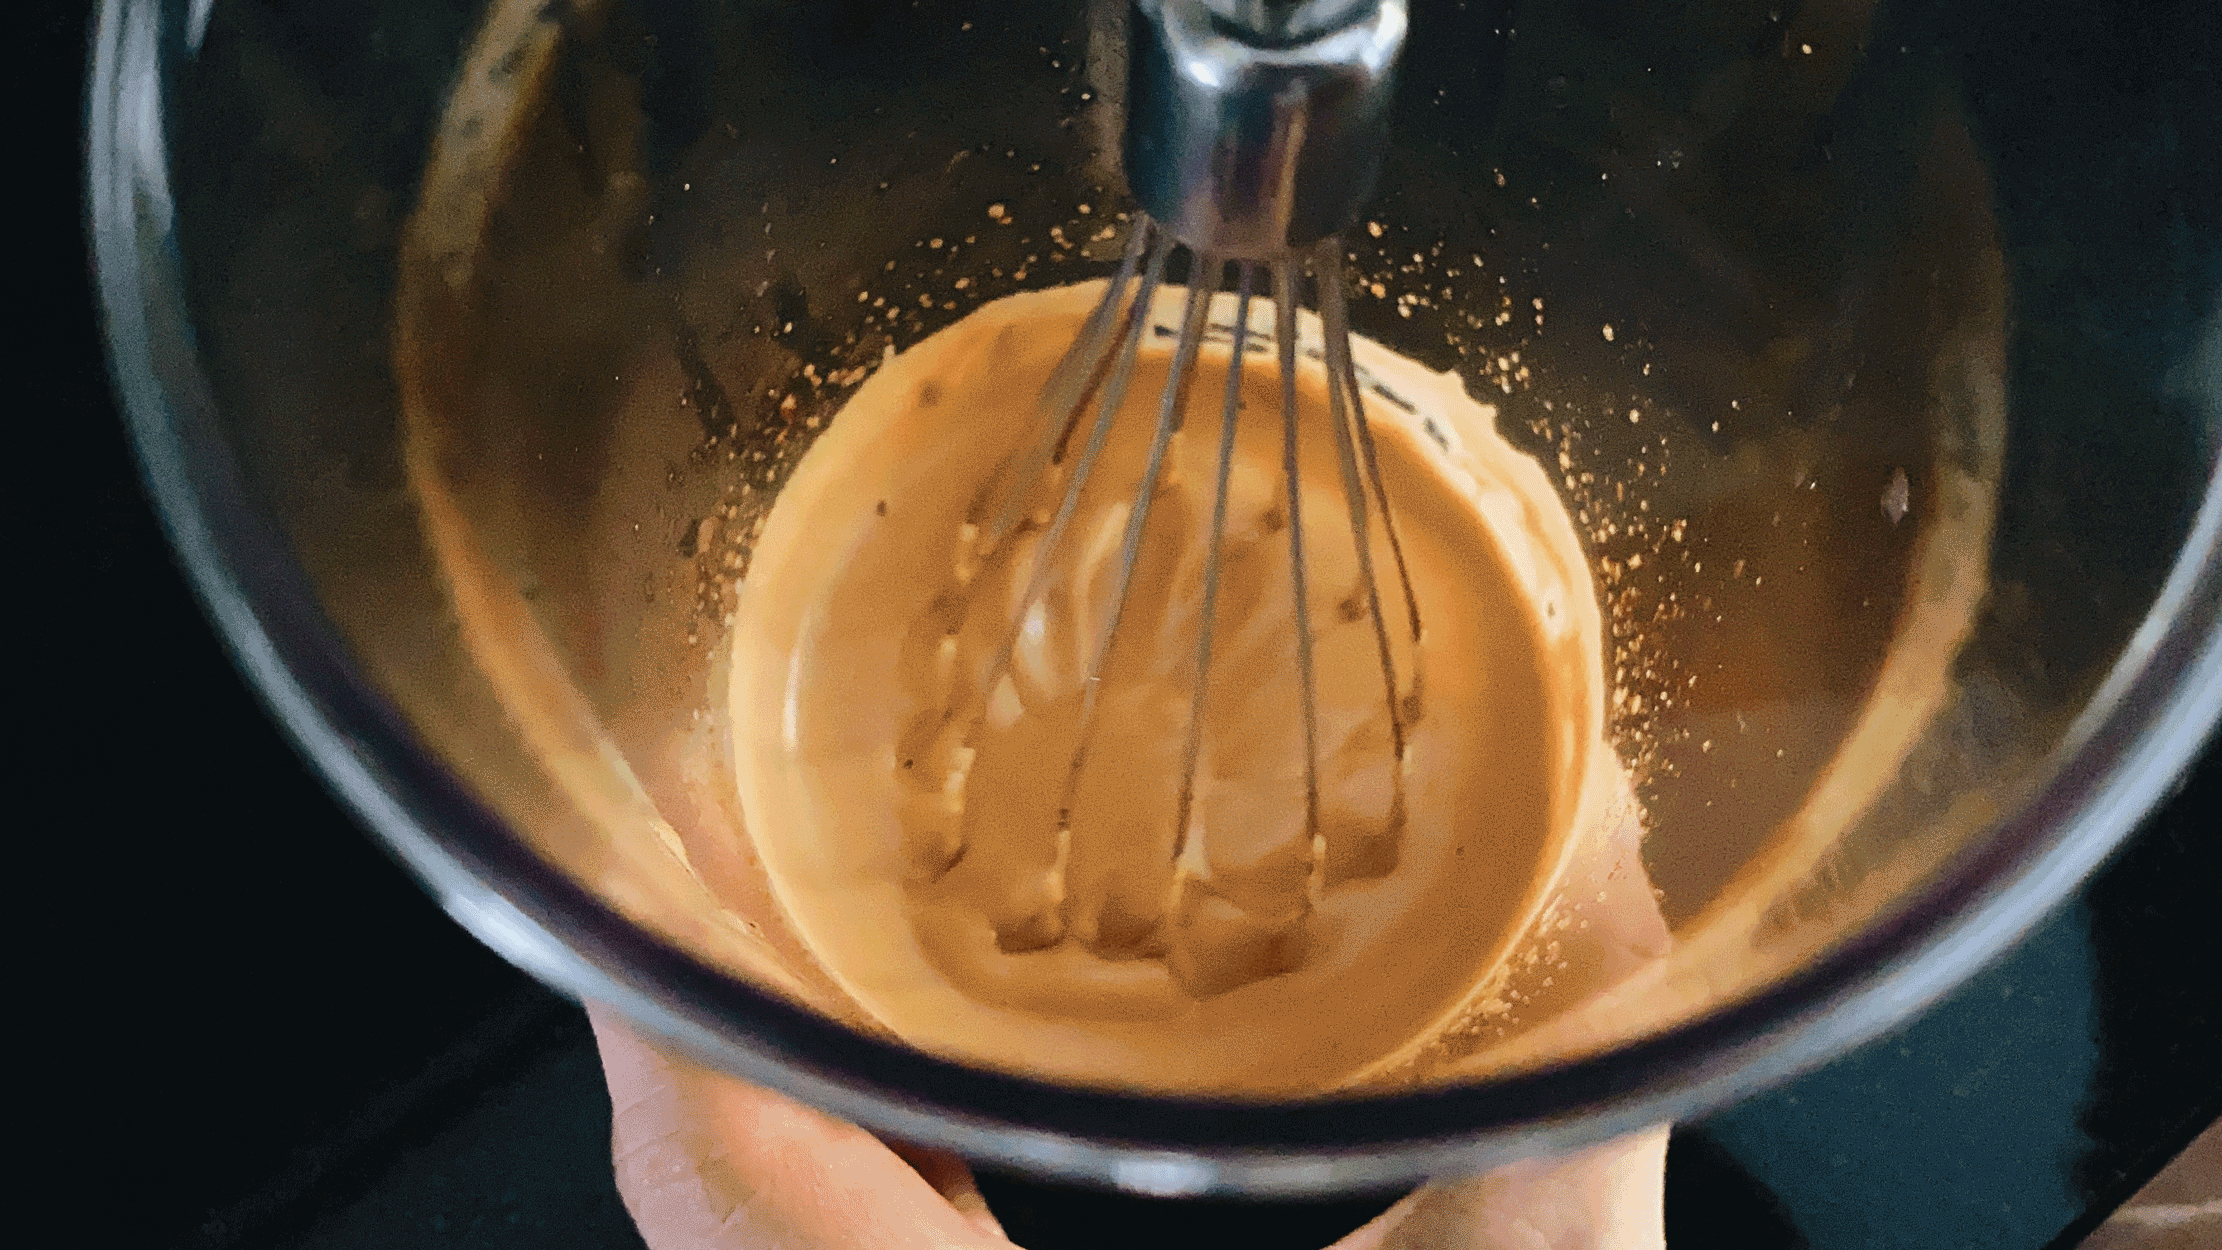
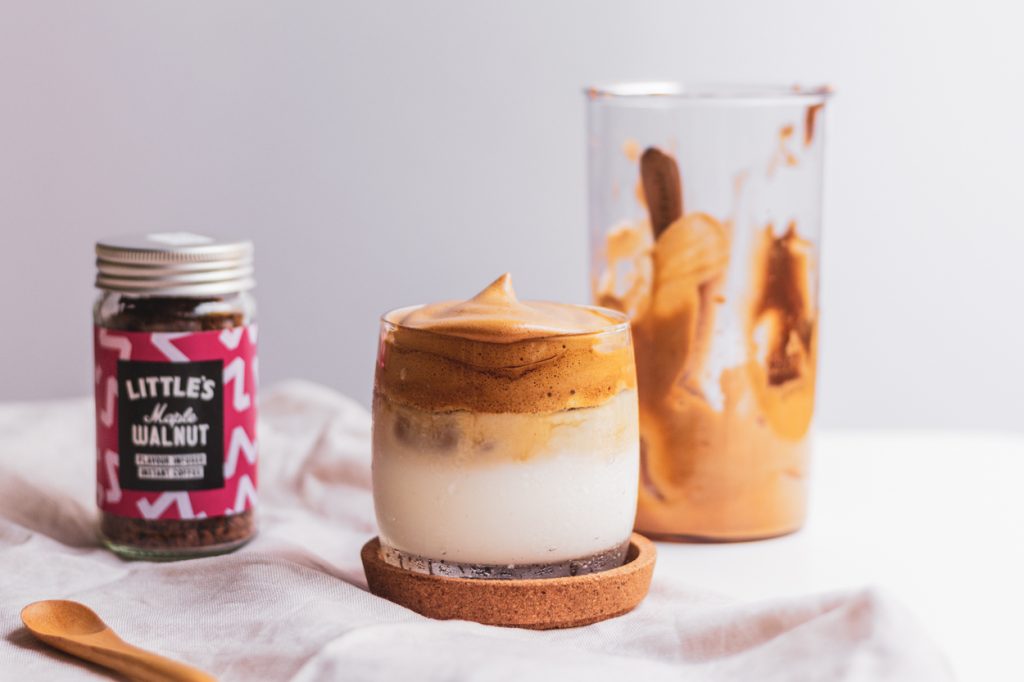
The hashtag #dalgonacoffee has been the biggest trend on social media lately. Especially in these strange times of so many being quarantined at home due to the Covid-19 epidemic, everyone has been a challenge the 400 beats.
Why did it call Dalgona Coffee? The sweet and bitter taste of the coffee foam has is very similar to Dalgona, and the colour too – hence the name. We think it’s a perfect drink for people who miss going to coffee shops and also who have some extra time on their hands. Make this and it will definitely put a smile on your face because it tastes as good as it looks.
Which instant coffee do you use?!
We used Maple Walnut infused instant coffee by Little’s Coffee and it works with decaf coffee too! However, this will not work the same with brewed coffee. We have also seen that it doesn’t work with the instant 3-in-1 mixture, nor Starbucks via Instant.
Tips for making a prefect Dalgona Coffee
Can sugar be reduced? Yes. We tried it with 1/2 the sugar amount but you will only get a soft-peak foam and the colour will be darker – so it kind of works.
Is a special tool like a hand mixer or stand mixer require? Not necessary. You can beat it by your hand but you would need a good round whisk (flat one is not as good) and a big mixing bowl to allow more air into it. Hence, a hand mixer or stand mixer will make your life easier with a smoother beat!
Hot vs. Cold? Of course! Just this morning, we warmed up some milk and topped it with some leftover foam from the day before and it was so yummy!!!
Can the Dalgona foam be refrigerated? Yes, it does last for a couple of days but why not make it fresh!
Do I need to whip it 400 or 4000 times by hand or how long? The number of beats depends on individuals, each of us using different strength and it affects the duration you stir the foam. If you are going to hand-whipped it – it will last you for about 2 and a half minute (roughly 400 beats, without stopping). Just whip it till stiff peaks form and you can determine it by your observation.
Should I whisk longer as the foam is not forming yet? Yes and also no. Making the foam with drip coffee (not instant) will take about 3 times longer in a mixer so sometimes it works but if you don’t see any changes within a minute probably something goes wrong especially the instant coffee you use.
Are you up with the challenge? We are challenging you to make it! Take a photo of your version, send us an email, tag us on Instagram, Tweet us, anything. We love to see you trying out our recipe!
Dalgona Coffee is a latte drink that comes with a velvety smooth and sweet coffee foam on top. The combination of cold milk and bittersweet coffee is simply a match made in heaven. And the best part is that you can make it without any special machines – all you need is some arm muscle and patience.
Ingredients
2 tablespoons instant coffee
2 tablespoons granulated sugar you can use
2 tablespoons boiling water
a pinch of cinnamon optional
1 cup milk of choice I’ve tried it with soy milk, almond and oat milk
Methods
Add all the coffee, sugar and boiling water in a bowl (you can easily double or triple this recipe). Using a hand mixer or stand mixer and whip on one of the higher speeds.
Whip the entire mixture for about 2 minutes. Scrape down the sides and whip any bits that didn’t get whipped.
Add the coffee to a tall glass (about 1 cup) of your favourite milk. I’ve tried it with soy milk, almond and oat milk. If you’re doing iced, add a few ice cubes, then the milk then spoons the whipped coffee on top. If using hot, just add it to the glass.
Using your spoon or straw, stir vigorously to swirl it into your milk.
(It is not a sponsored post – we simply love the Essenza Mini so much that we want to share with you all! )
We have been excited to own our very own coffee machine – Angela has purchased it as a Christmas gift for my family since they all are coffee lovers. We got the Limited Edition Essenza Mini Silver – the design is beautiful, sleek and light, it is perfect for a small home (like us). Basically, everyone in the family is in love with the machine. Although Angela is a tea lover, she said, “occasionally a cup of coffee is perfect for an imperfect day!”
Iced Americano vs. Iced Latte — What’s the Difference?
So, in the name of the heatwave and the assertion that iced coffee should (with no shame) drink all year-round, we’re breaking down the differences between two of the most popular iced coffee drinks out there: the iced latte and the iced americano. To start, we turn to math (don’t panic) in a way that makes it incredibly simple.
That’s it. Same coffee base (espresso, which means the same amount of caffeine), same temperature (chilled + ice), and a simple difference in the type of cold liquid used to fill each drink to the top (milk vs. water). You can technically add milk to an Iced Americano, making it pretty similar to an Iced Latte, but an Iced Latte doesn’t require any water. So, by nature, it’ll always be the creamier option.
So, we want something more flavourful to share with you, thus a classic cup of iced latte.
What kind of milk should you use for an iced latte?
You can use any kind of milk you want from whole to skim cow’s milk to almond, soy, or coconut milk. Or any kind of milk in between as long as you love it!
Heavy cream and half-and-half aren’t recommended for lattes. You’ll be adding 200ml of milk to your iced latte and the higher fat content in heavy cream and half-and-half doesn’t make them a great option for this drink.
With a cup often costing more than SGD$5, coffee dates aren’t the most wallet-friendly option. But what if we told you there’s no need to hit up expensive coffee joints for an intimate heart-to-heart? Thus we are delighted when Starbucks has launched its Nespresso-machine capsules. Honestly making Starbuck coffee have saved lots for us (especially me).
Once you have your espresso brewed, your milk and sweetener ready, fill a glass with ice. Pour the espresso over the ice. Following by adding the sweetener. Last but not least in the milk to fill the glass.
As we said, it’s super easy to make this drink at home!
Iced Latte ratios (keeping in mind that the larger your glass is, the more ice you’ll need to fill it):
12 oz iced latte (tall or small size drink from a coffee shop): 1 shot espresso, 2 tbsp liquid sweetener, 200ml of milk
16 oz iced latte (grande or medium-size drink from a coffee shop): 2 shots espresso, 4 tbsp liquid sweetener, 200ml of milk
20 oz iced latte (venti or large size drink from a coffee shop): 3 shots espresso, 8 tbsp liquid sweetener, 200ml of milk
We hope you’ll start making your own iced latte at home! It’s a classic drink, however, you decide to make it, and it will cost you pennies on the dollar to make at home compared to buying it at a coffee shop!
Let us show you how to make an iced latte at home! Use any flavour sweetener, milk, or boldness of espresso you choose and save yourself a ton of money in the process.
Ingredients
2 shots of brewed hot or cold espresso (approximately 2 oz)
8 oz milk (any variety)
2 oz liquid sweetener, such as a coffee syrup, maple syrup, caramel sauce, honey, or simple syrup
Methods
Pour the espresso into a 16 oz glass filled with ice. (see note below)
Add the liquid sweetener to the glass.
Pour milk into the glass and stir until the milk, sweetener, and espresso are combined.
Notes
You can either brew the espresso directly over the ice if you have an espresso machine or make the espresso on the stovetop and pour it over the ice. The espresso can be hot or cold when pouring it over the ice.
Due to the COVID-19, everyone is encouraged to stay at home and not head out if not necessary. With so much free time on our hand, other than watching Netflix and chill it is always best to hold a book and get into some reading. Which make a reading corner the best place to set up at your home.
When it comes to reading corner the most important point is to set it at the best lightning place. Where your eyes won’t get tired if you’re too focused on your reading. Next is to have a good reading chair, however, we do encourage to take breaks in between your reading. Lastly, add some plant around you, not only it makes your room smell fresh, but green is also good for your eyes.
As the COVID-19 are nowhere to getting better, the best is to #stayhome.
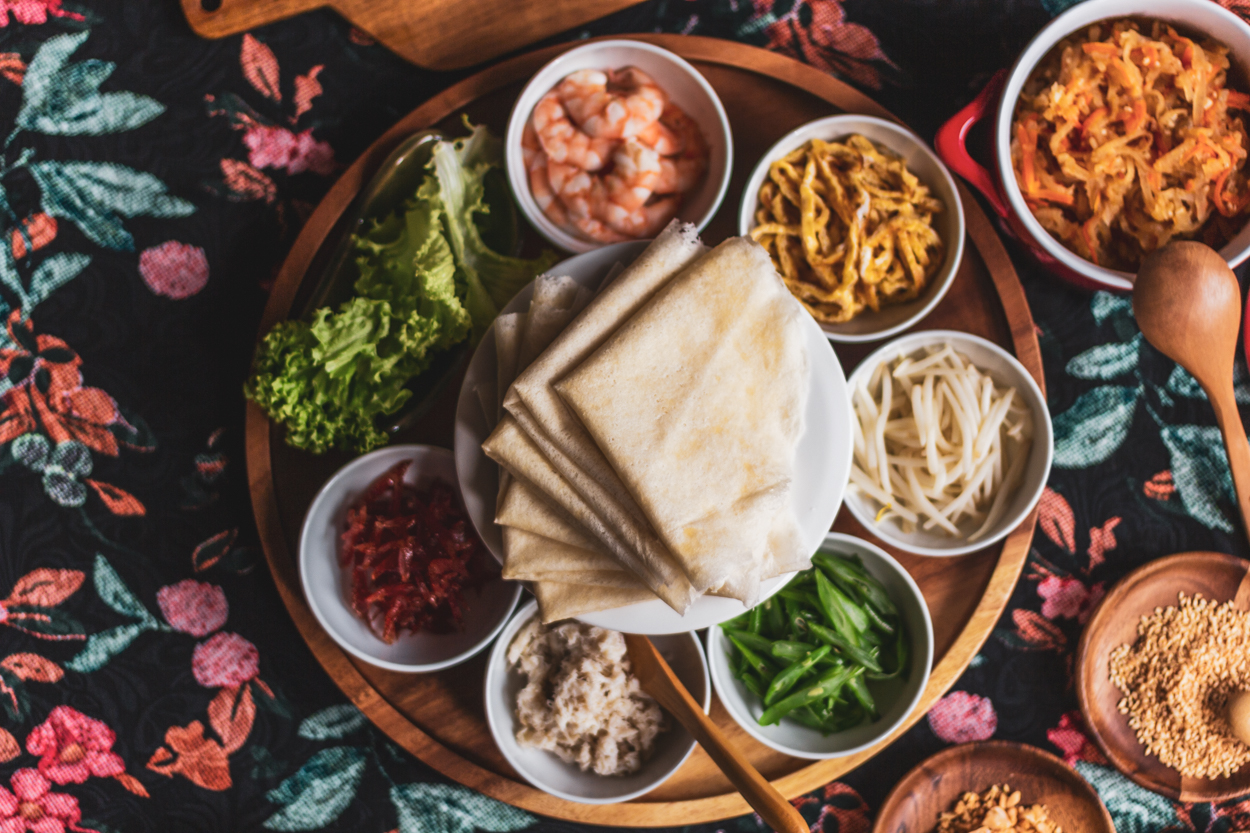
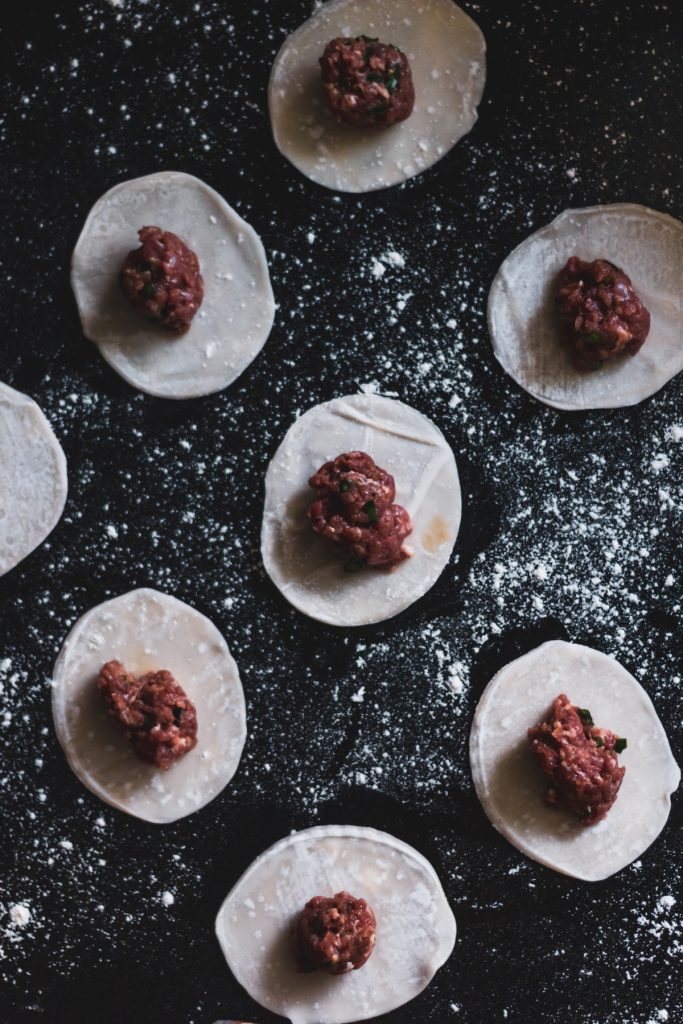
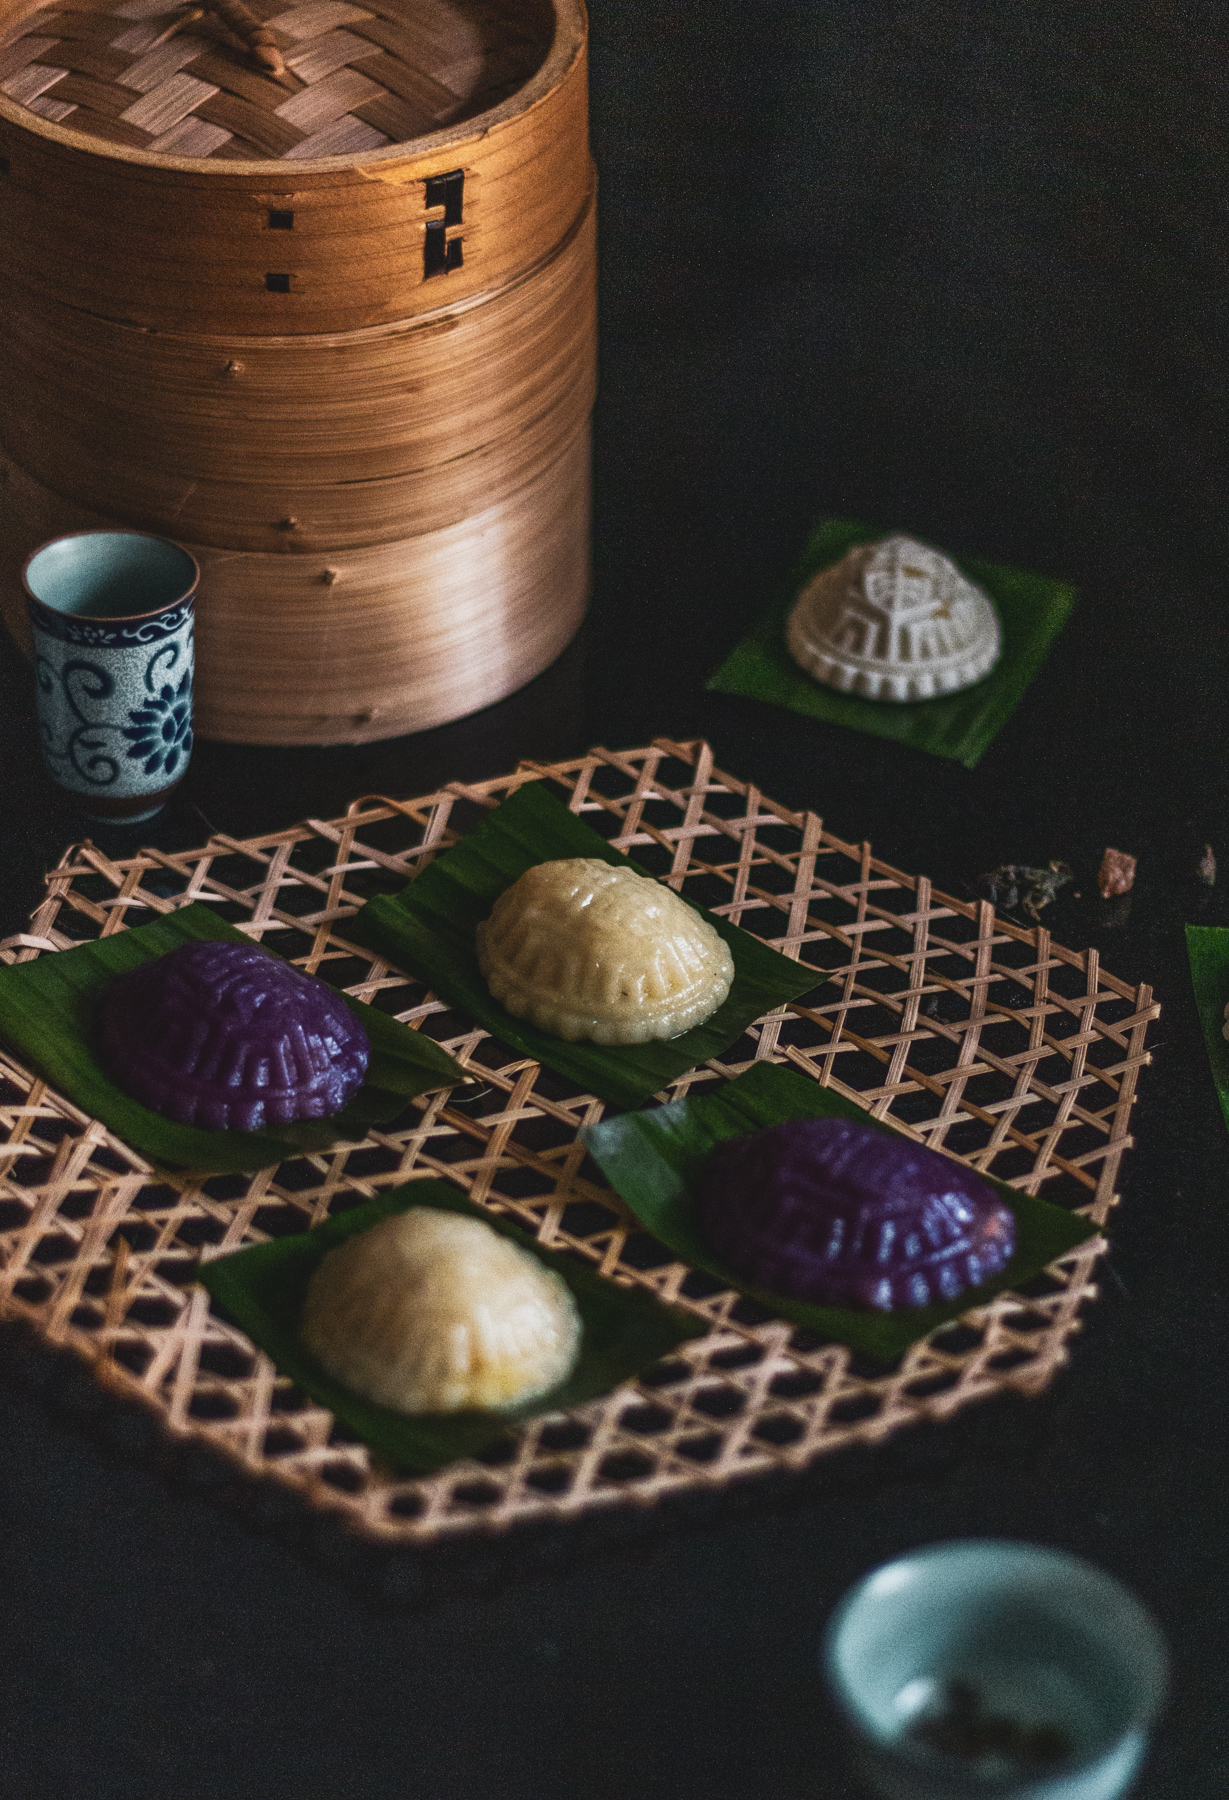
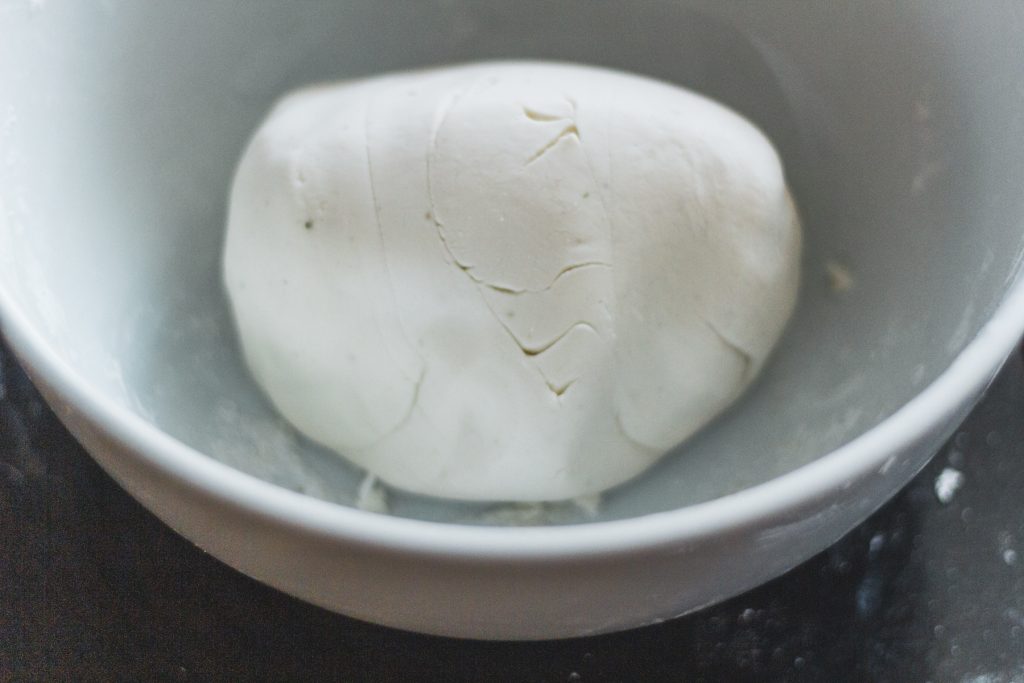
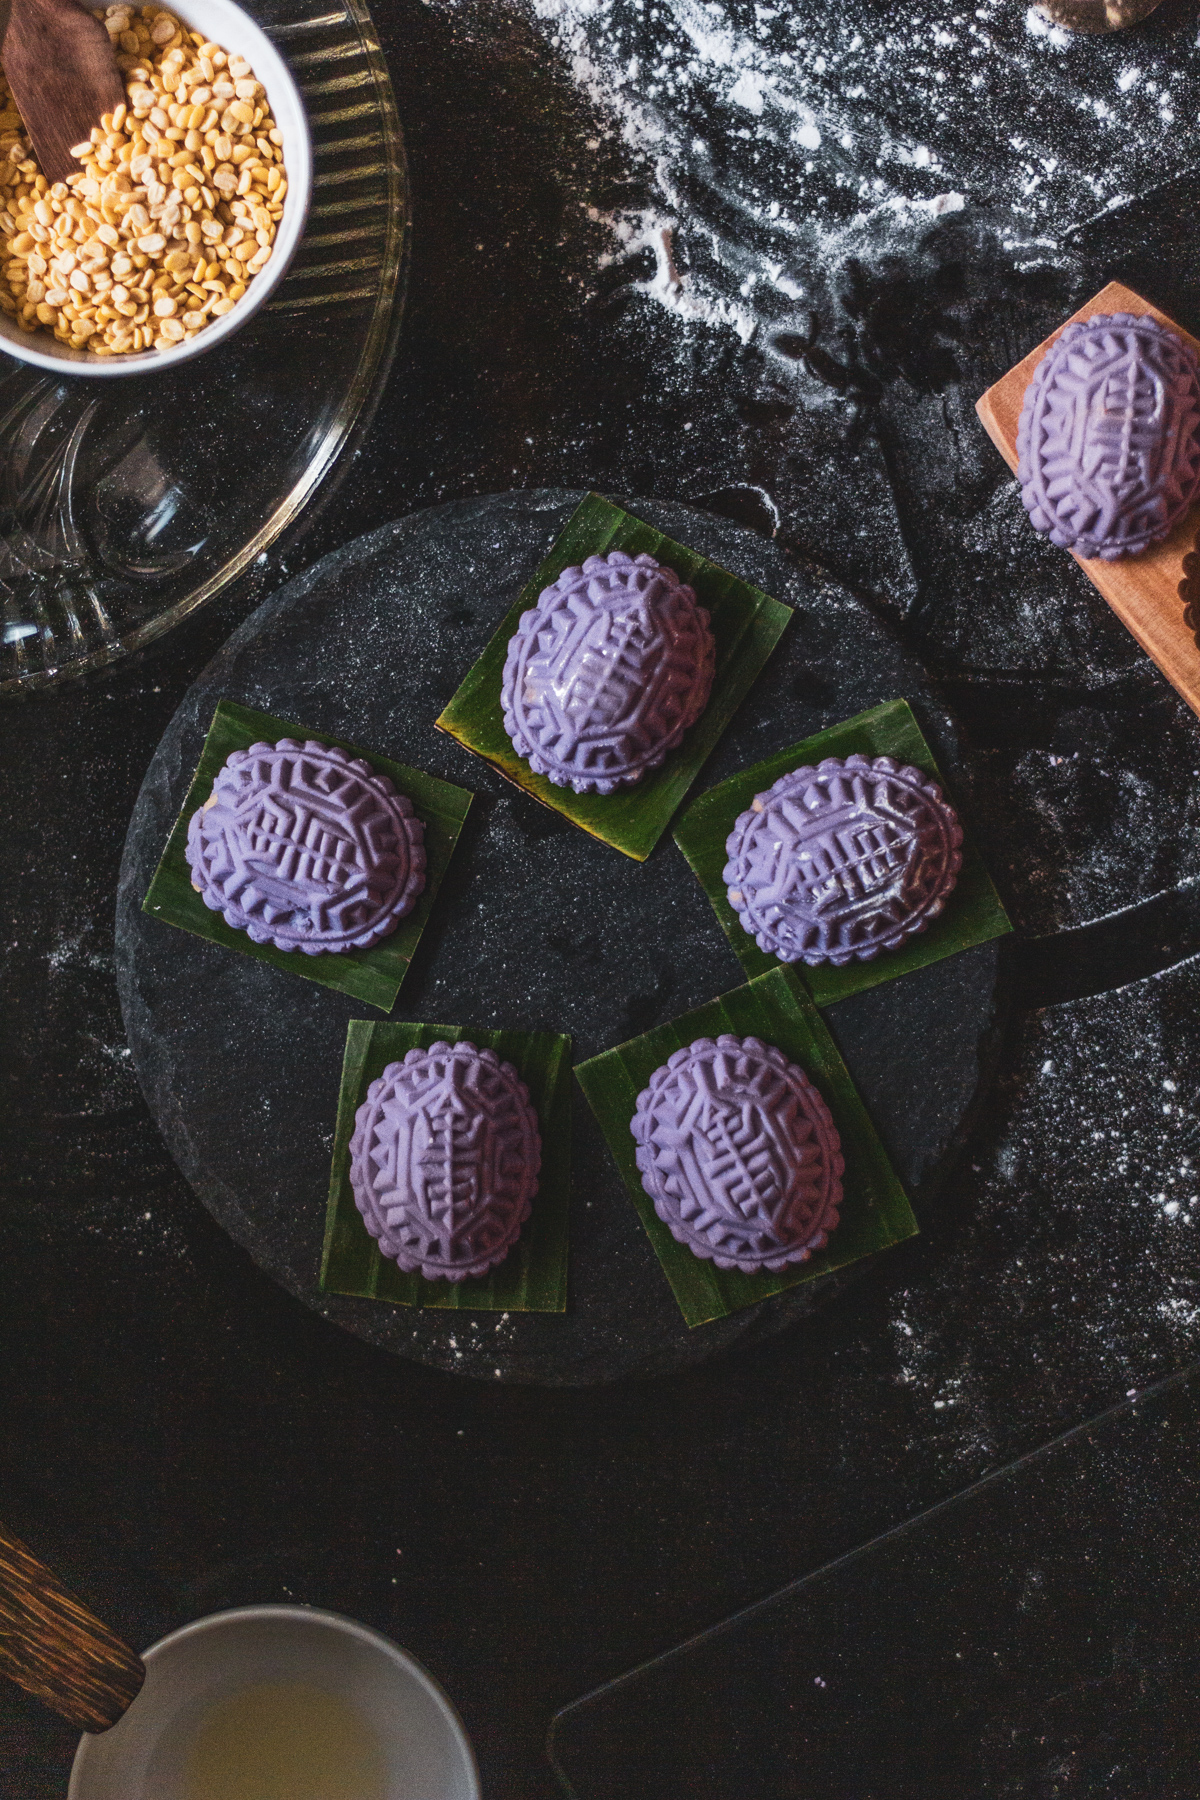
We are delighted to host a Peranakan Popiah Party since with the reduction of hanging outdoor, spending time to make a meal has become so much exciting. We decided to make dinner more interactive with all the restrictions have implemented.
We have the party with both Popiah and Kueh Pie Tee hence we decide to separate both Popiah and Kueh Pie Tee in two different posts as both of us have a concept of presenting them so please pardon us for doing that!
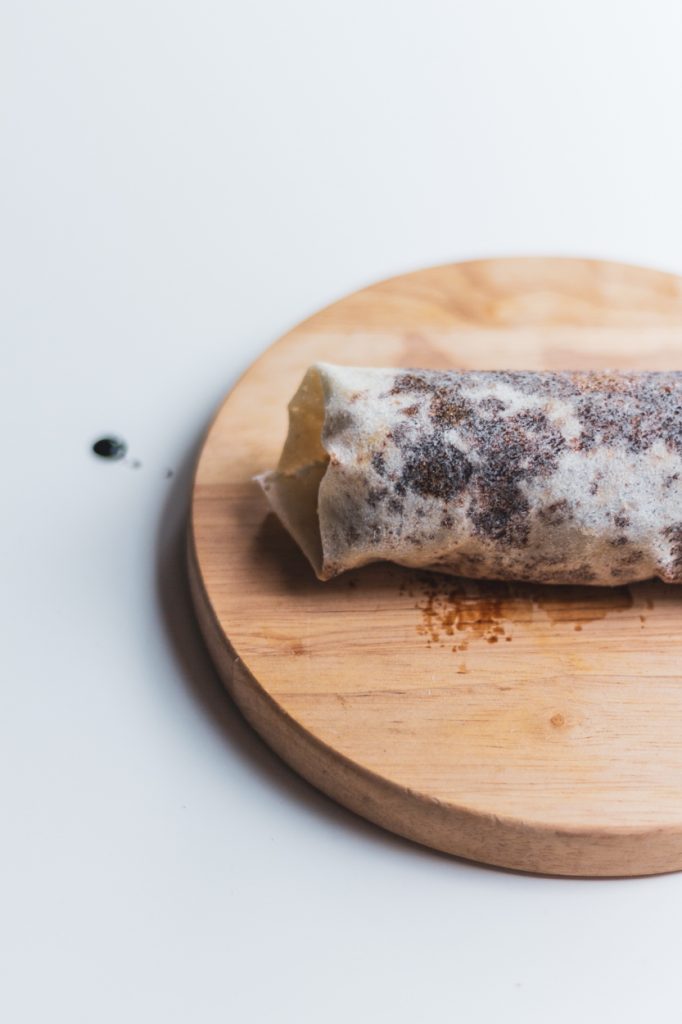
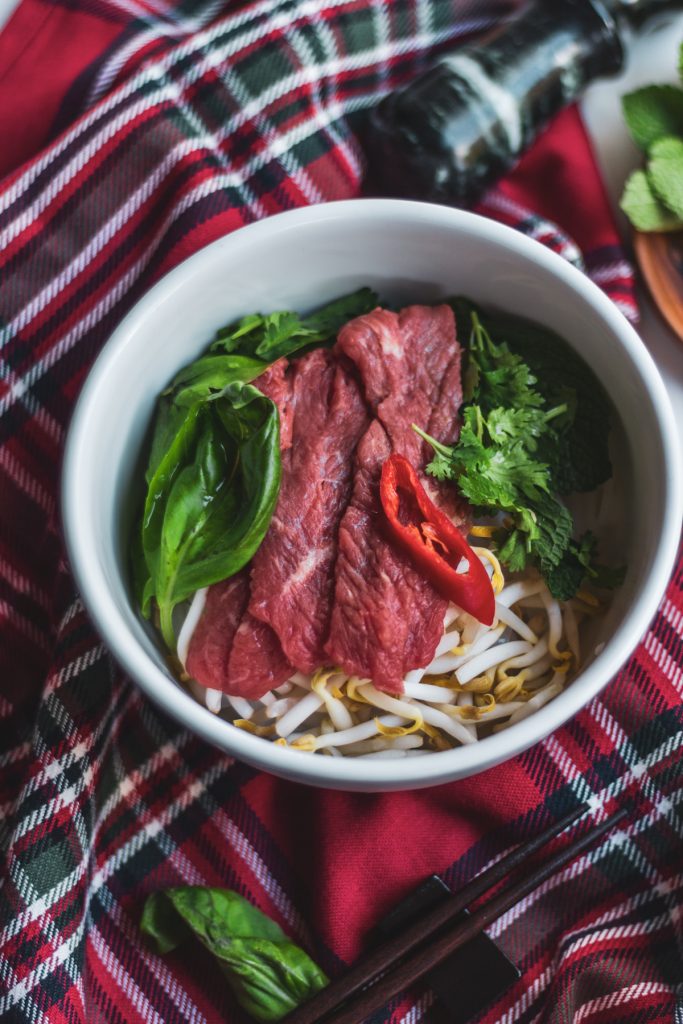
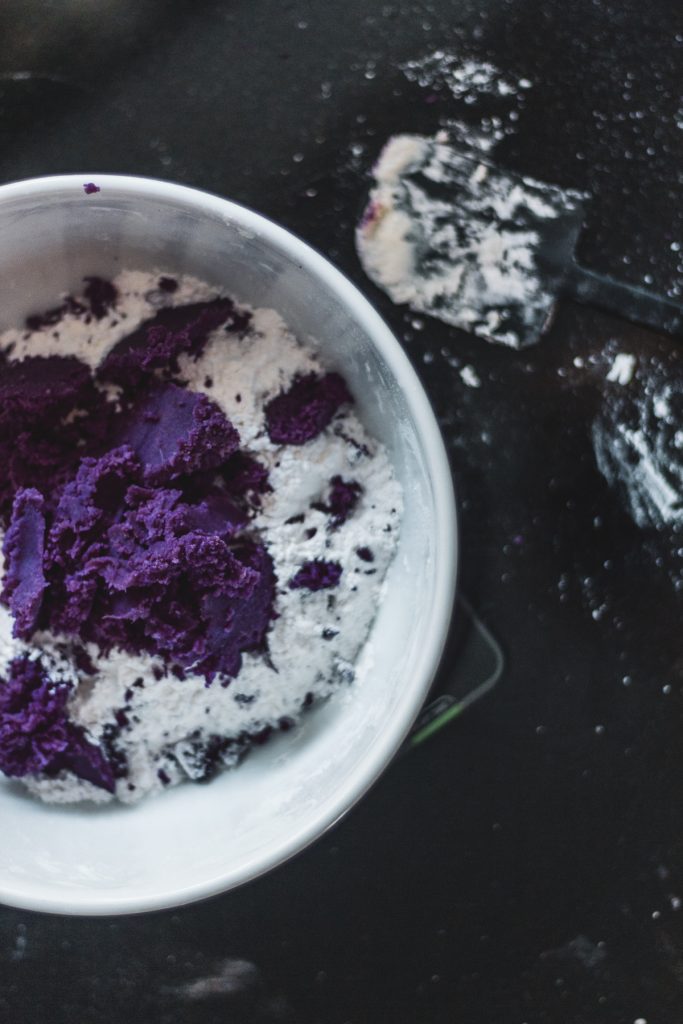
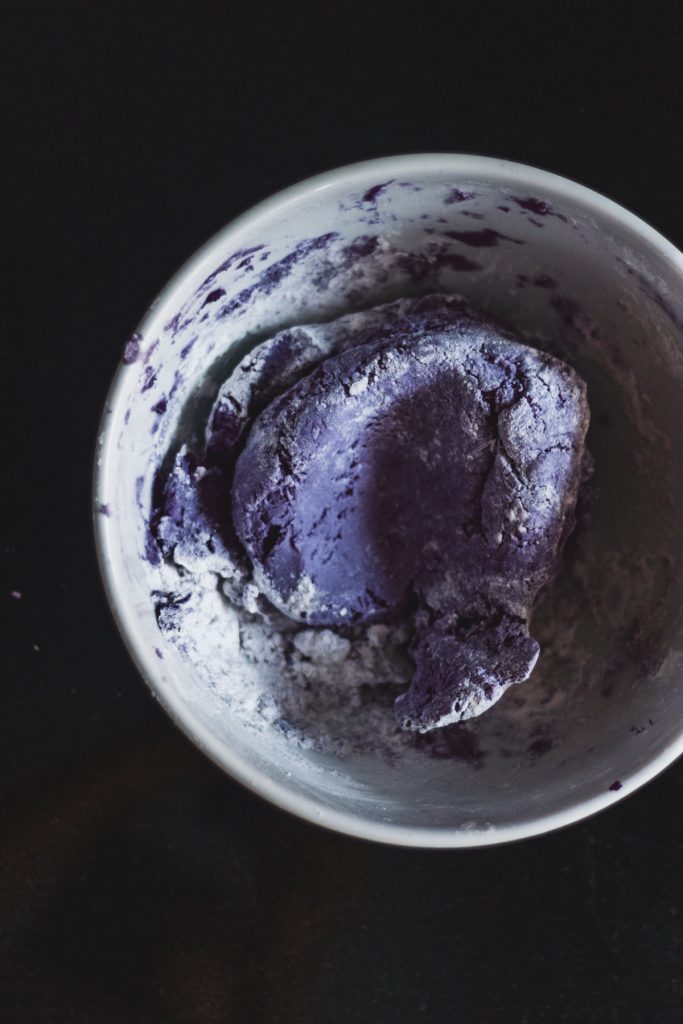
Popiah is like a Vietnam’s spring roll, you’ll wrap vegetables and meat/seafood within a sheet of flour skin. While Vietnam’s spring roll made of rice flour, popiah skins made from plain flour. The popiah comes in two versions: the fried and non-fried. We always prefer both but the non-fried one they always a healthier option today.
It is the first time we making it from scratch but it wasn’t difficult at all. Fillings include omelette strips, cucumber, prawn, crab meat, crispy garlic, peanut, beansprouts, lettuces, braised turnip, carrots in prawn stock, coriander, sweet sauce, and chilli garlic paste. A bit fussy to prep but so worth it!
Preparing the ingredients
While many like to have their popiah as simple as possible, we like to make a “fancy” version for our party. Well, you can have fun in adding or removing the ingredients in terms of your preference. For us, the below filling helps us to create the most “fancy” popiah we ever have.
Popiah Filling; this is the only portion of the popiah that we suggest you prepare it freshly on the day
Eggs; heat oil in a pan. Beat the egg in a bowl, add in some salt for flavour. Fry it till golden brown. Set it aside to cool and cut it into a long strip. If you have a smaller pan, an egg will be enough as we want it as thin as possible
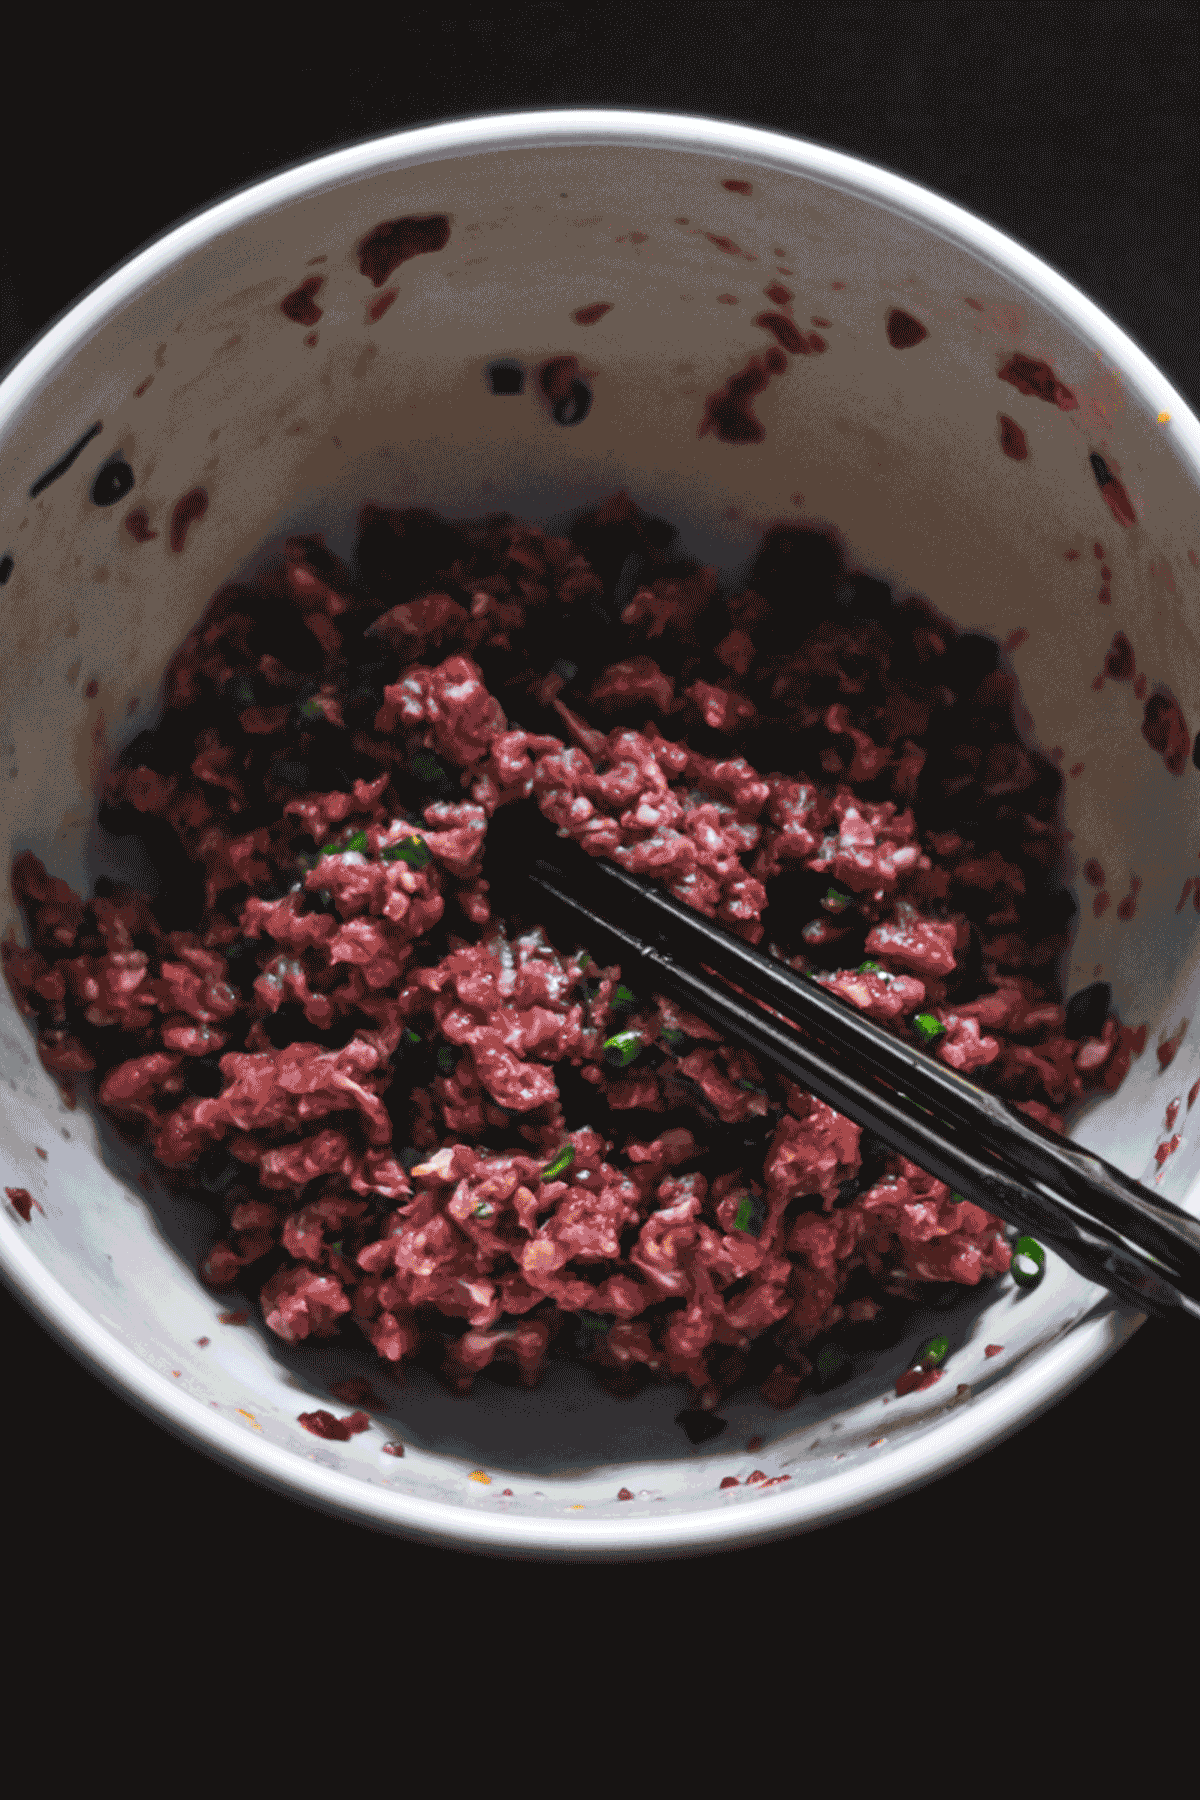
Chinese Sausage; soak it into a bowl of hot water to remove the excess oil in the sausages. It is done soaking when you can see the casing of the sausage popping away. Remove the casing and cut the sausage into the strip. Heat the pan and fry the sausage till fragrant
Fresh Crab; drain the water of the crab, squeeze out excess liquid in the crab. Heat the pan and fry the crab till fragrant
Bean Sprouts; remove the tail of the bean sprouts (optional). Cook it in the hot water for a minute. Drain and set aside
Green Bean; heat the pan and fry the green bean till soft. Set it aside, cut it into strips when cool
Green Lettuce; wash and drain it the night before. Cover it with a cloth in the fridge to keep it cool and crispy
Prawn; deshell the prawn (don’t throw away the shell, keep it to make prawn stock for the popiah filling), cook the prawn and halved it
Coriander leaves; while many have the fear of coriander leaves but it is a must for us to have it in our popiah since the guest will be wrapping it themselves, those who dislike it can omit them
Crushed peanut and white sesame for garnish
Tips on how to easily make good Popiah Filling
Grate the veggies; the majority of the muscle work for making popiah filling is in shredding the turnip, radish, and carrots. While many of the fillings in the store only have turnip and carrot, we added radish to add more sweetness to the filling. Peel the turnip and then use a box grater if you have one to shred it into strips
Use dried shrimp; dried shrimp adds that nice umami flavour to the overall popiah taste
Shallot is the key; you don’t want to miss this, it will change the flavour of the popiah filling
Lose the juice when wrapping; there will be some juice oozing out when you cook the jicama, it’s normal. Just make sure you don’t scoop that juice when you wrap the popiah, or you will end up tearing the wrapper and wet popiah
Head to the end of the blog post for the full recipe for the popiah filling.
How to wrap homemade Popiah?
Place 2 pieces of popiah skin on a clean working surface. (You can use one if your popiah skin is thicker)
Brush the skin with some sweet sauce and chilli sauce(if you choose to use) and sprinkle with some crushed peanuts
Place one piece of green leaf
Scoop about 2 – 3 tbsp of the turnip mixture on top of the leaf – remember to drain the liquid well
Add strips of egg omelette, 1 tsp of crab meat, strips of green bean, cucumber, Chinese sausage, 2 pieces of prawn and 1-2 sprigs of fresh coriander leaves if you choose to use.
Fold the side near you up and then fold the two sides in firmly tuck and roll up tightly.
Trying out making your very own version of Popiah, you could never head out to get it from the store. Sometimes we are never satisfied with just “okay” when we have the best. Take a photo of your version, send us an email, tag us on Instagram, tweet us, anything. We love to see you trying out our recipe!
Fresh spring roll is filled with turnip, radish, carrots, and shrimp mixture. Popiah is one of my favorite street food. Learn how to make fresh spring roll wrappers easily too.
Ingredients
20 spring roll wrapper (we got them at our local hawker centre)
20 pieces of green lettuce
Popiah Filling
450g of turnip (remove skin, sherdded)
1 carrot (remove skin, sherdded)
1/2 raddish (remove skin, sherdded)
50g of dried shrimp (shoaked in hot warm, minced)
1 tbsp of minced garlic
3 tbsp of minced shallot
2 tbsp of light soy sauce
1 tbsp of oyster sauce
1/2 tsp of salt
1 tsp of sugar
1 tsp of white pepper
3 tbsp of water
Sauce (optional)
Chilli Sauce
Sweet Sauce
Other ingredients you can include in the filling (as many or as few as you wish)
2 eggs (beaten and made into omelette and cut into long strips)
freash crab meat (stir-fry till cook)
bean spourt (cook in hot water for a minute, drain)
green bean (stir-fry till soft, sheeddred it)
500g of prawn ( deshell, cooked and halved) – keep the shell for the filling
2 chinese sausage (soak in hot water, remove casing, cut into long strips and stir-fry)
roasted crushed penunt
white sesame
corriander leaves
Methods
Popiah Filling
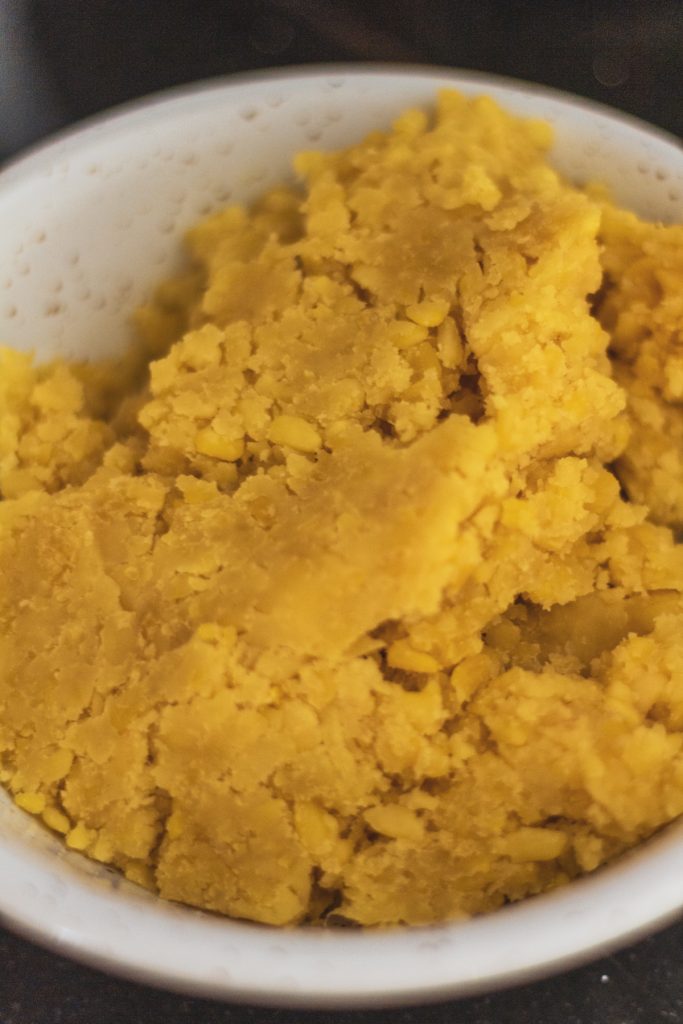
Heat the oil, stir-fry the prawn shell. Add water to create prawn stock, leave aside for use. Heat the oil again, add in minced garlic, add the shallot and minced shrimp. Stir-fry it till fragrance.
Add in the carrots, turnip, raddish and cook it till soft. Add in the prawn stock and continue boil for another 5 minutes.
Now add in the seasoning and continue frying until it is slightly dry. Leave at the side to cool.
Assemble the Popiah
Place 2 piece of popiah skin on a clean working surface or cutting board. Brush the skin with some sweet chilli sauce (if you choose to use) and sprinkle with some crush peanuts if you choose to use. Scoop about 2-3 Tbsp of the yam bean mixture on top of the sauce. Add strips of egg omelette, and 1-2 sprigs of fresh coriander leave if you choose to use. Fold the two sides in firmly tuck and roll up tightly. Cut into desired pieces and serve immediately. Only prepare as many as you would eat. This is not something to prepare ahead of time as the skin will get soggy and tear
We can’t believe that it hit “the” 4th years since the day we decided to start this blog – it has been an outlet for us to share our love for food, art, and lifestyle. It documents how we spend time during our free time to cook, pack and create beautiful things. It is one of a very humble blog compare to those amazing blogs out there but we always want to share and build a relationship with our community. So we excited to know more of you and exchange more. Please drop us emails or connect us via Instagram to help us know what you love to see from us.
This year we decide to celebrate today with a Pan’Cake’, not a sweet one but with our favourite chorizo flavour. For those who want to remake with the recipe, please check out the recipe below! We hope that you will like it, like us. Thank you for your support and have a great day ahead!
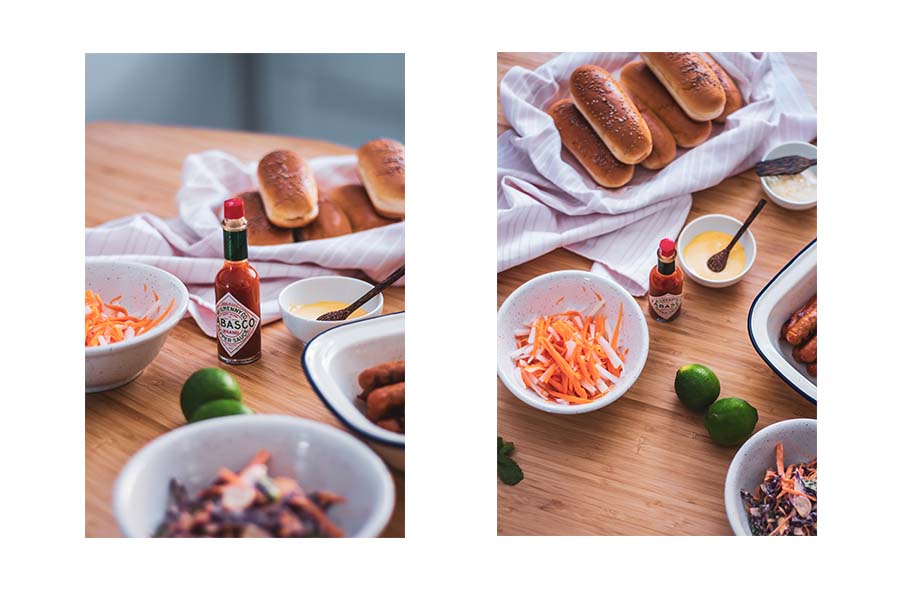
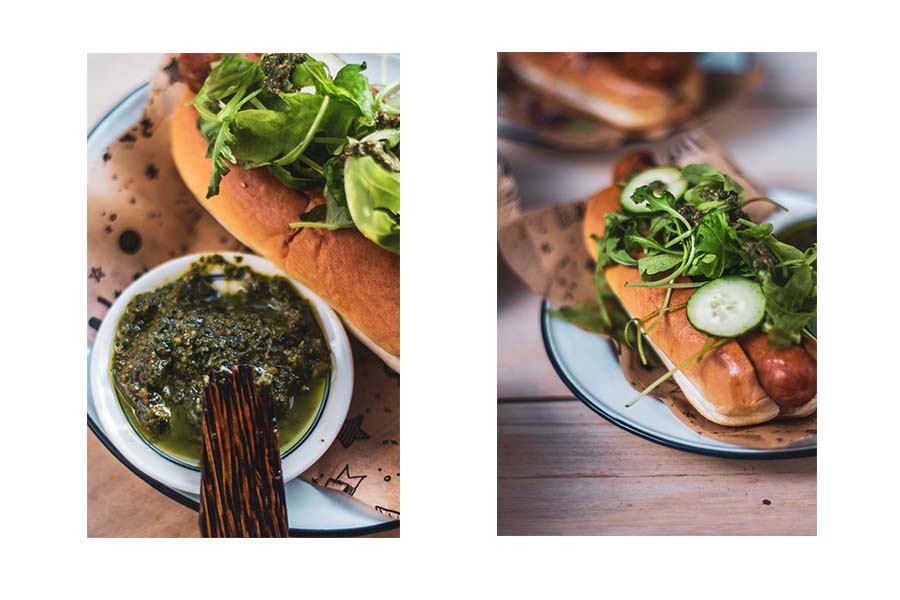
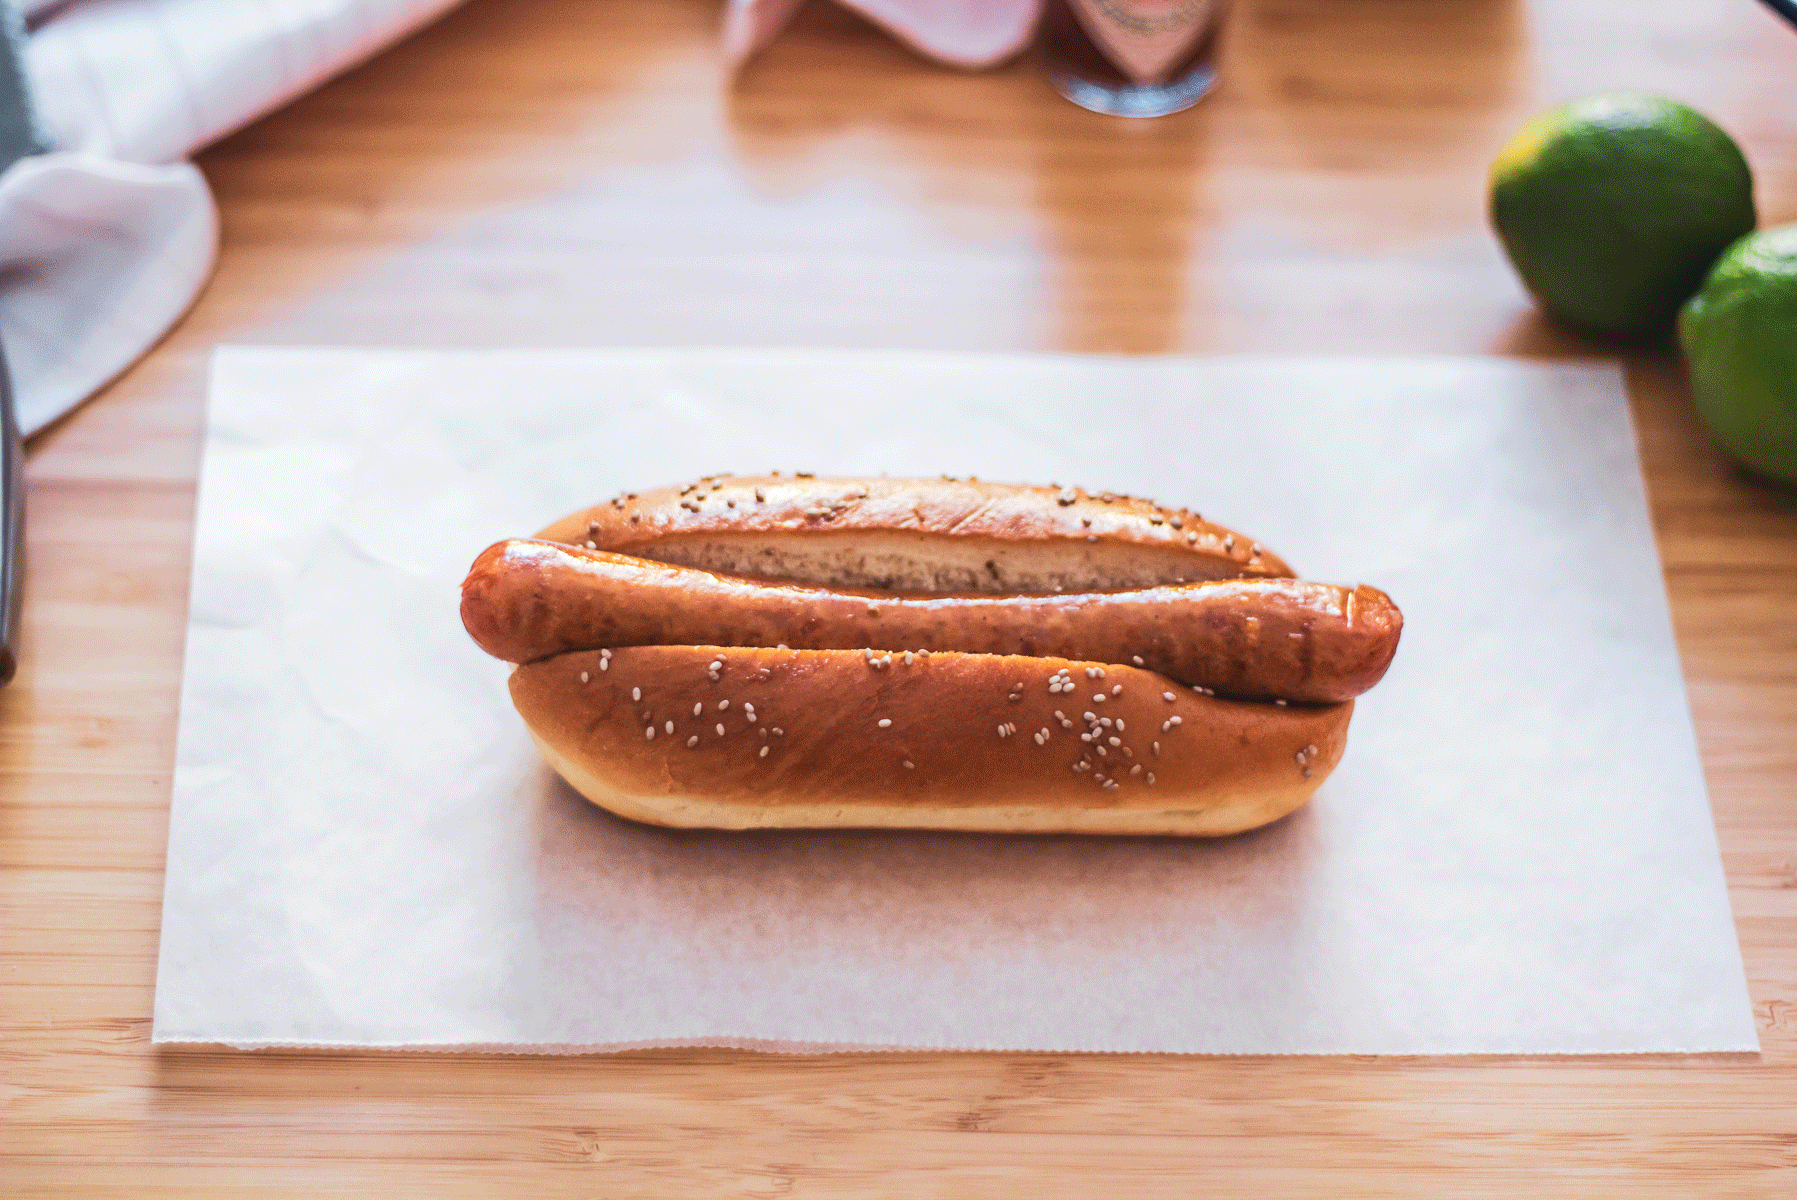
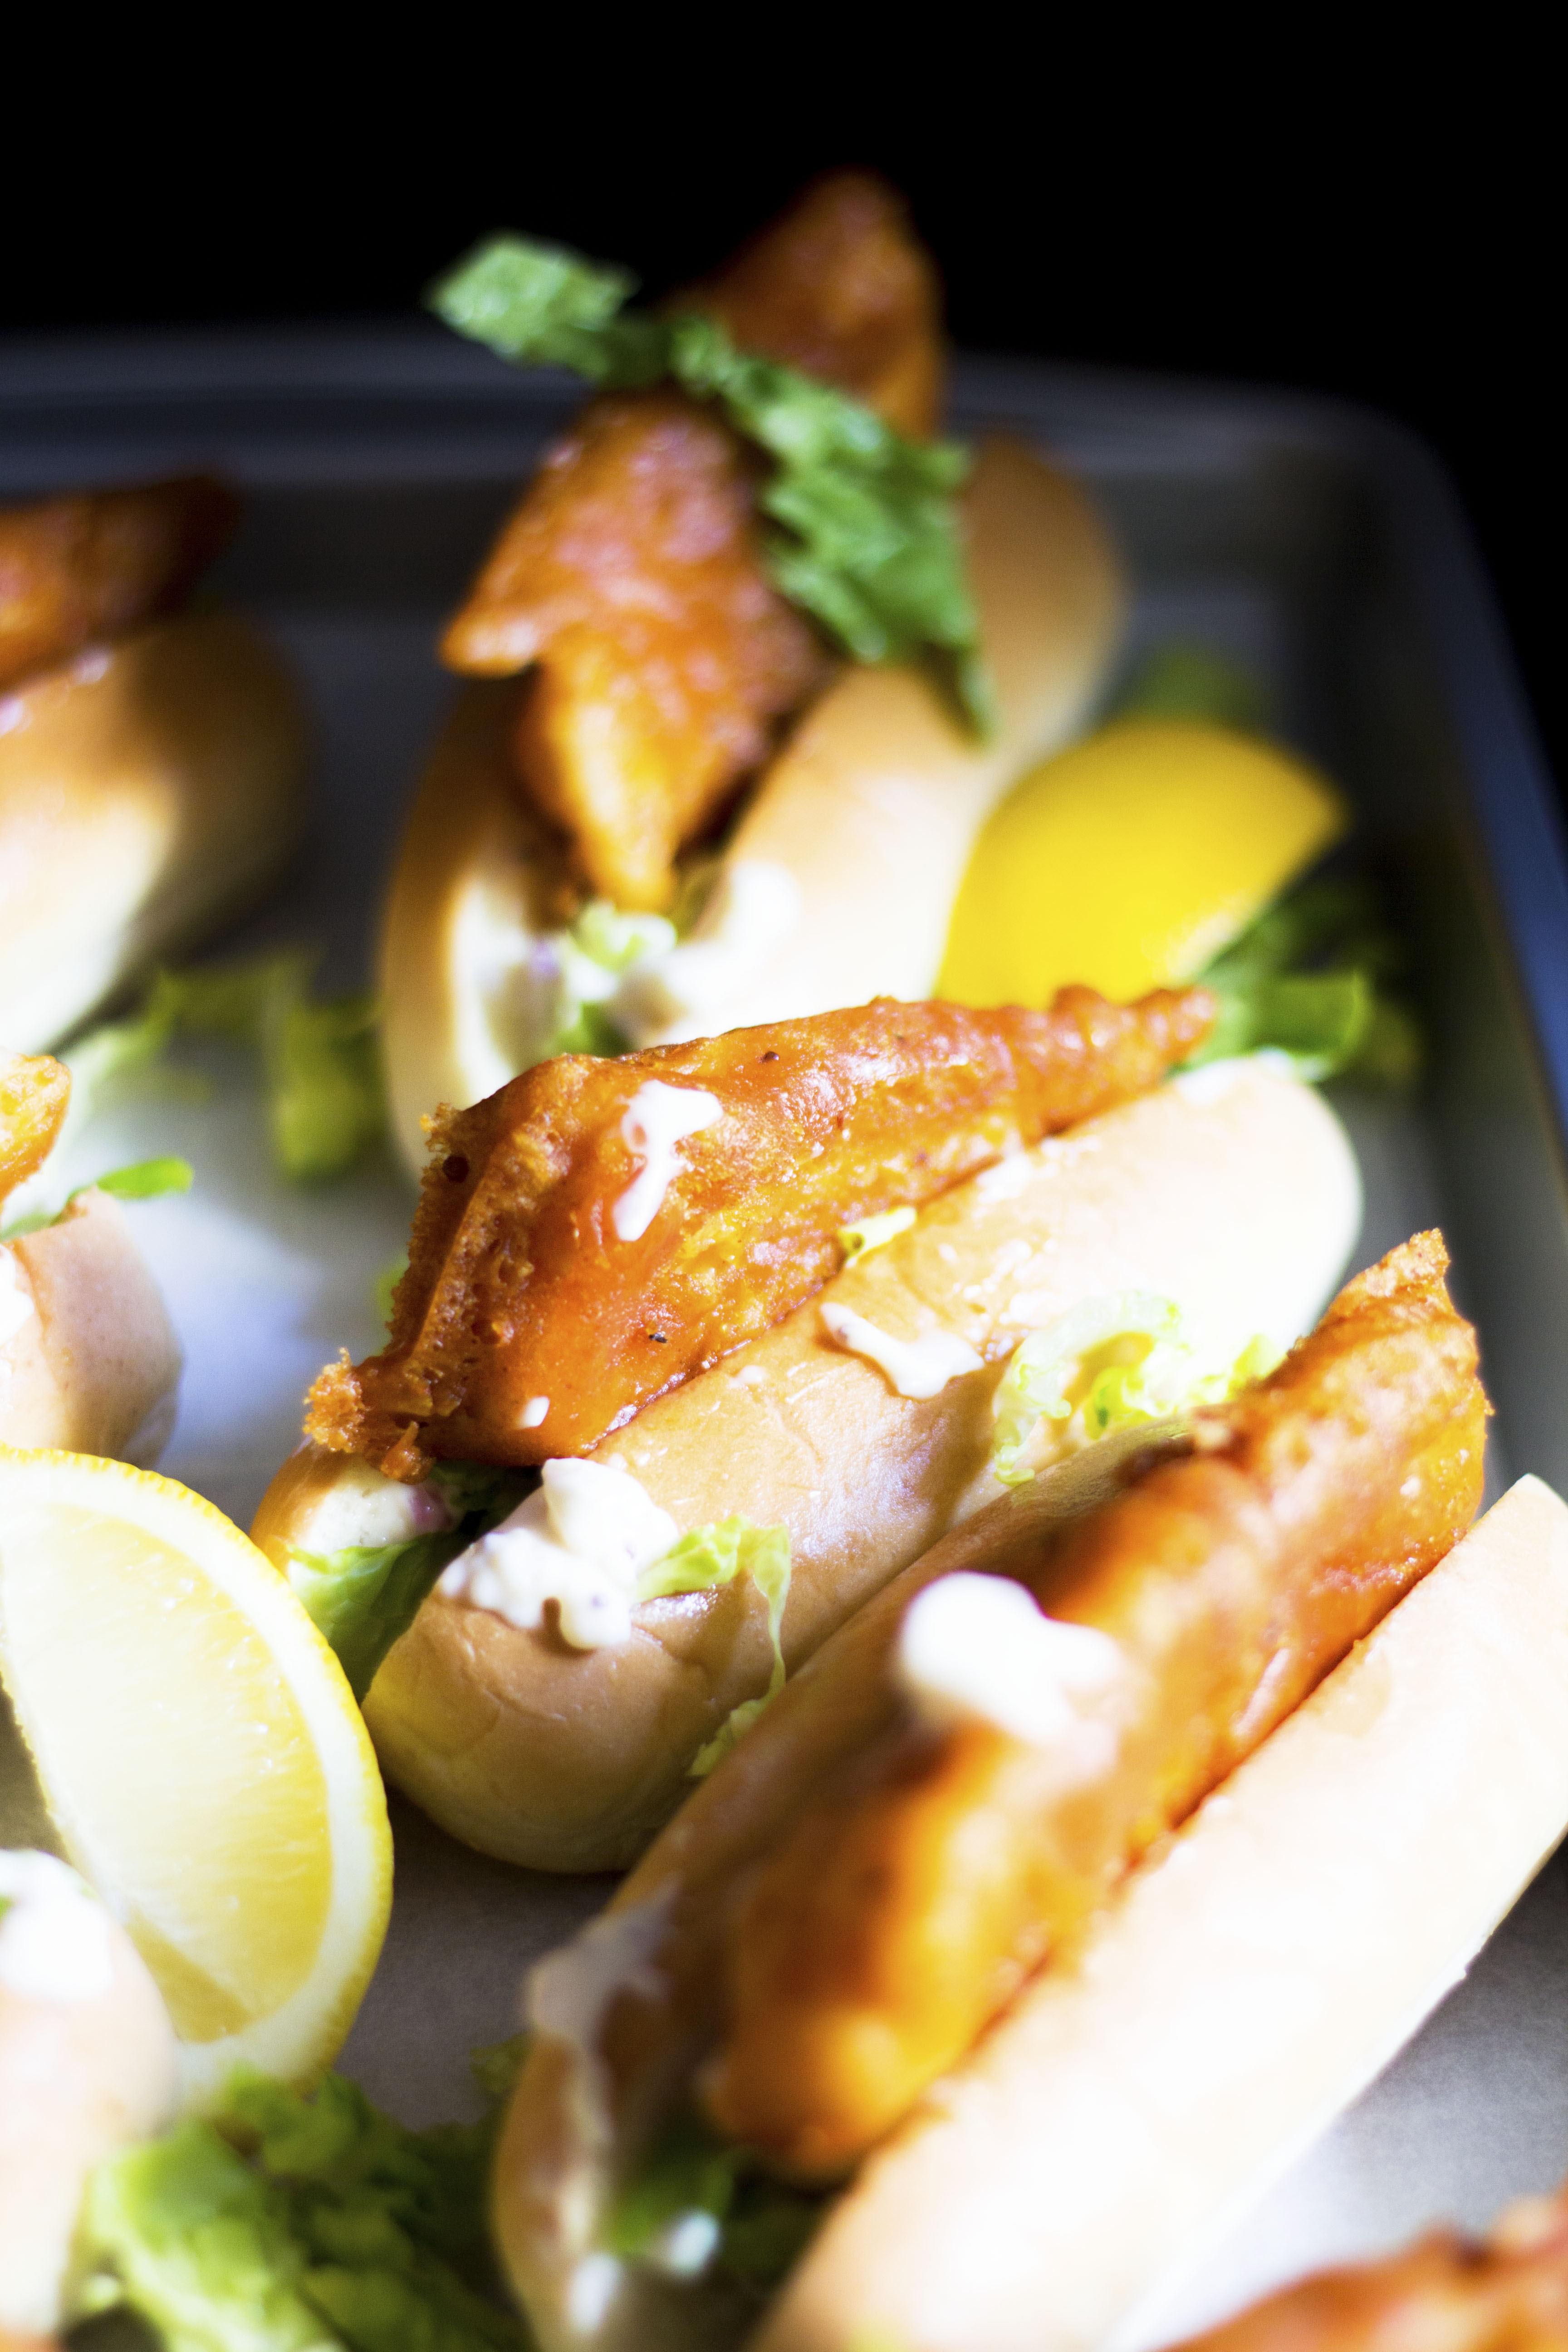
During Covid-19, we try our best to eat healthily to avoid getting sick. Cutting down sugar is one of the ways to help us to have a healthy lifestyle. While sweet pancake is still our favourite, this time we gave savoury pancake a try. We decided to use our favourite chorizo as the main topping this time. Some of our favourite chorizo dishes are Spicy Chorizo Prawn Pasta, Chorizo Hotdog, Roasted Tomato Chorizo Pesto Pasta, and Seafood Paella.
While we were not sure how well chorizo would go with syrup, but OMG, it has an exploding flavour!! Add in the chorizo bits topping, a little cheese, and that salty spring onion butter too? This is a seriously good recipe for pancakes with a twist.
So how do we make these savoury pancakes?
Make some spring onion butter by mixing salted butter with a finely chopped spring onion. You can leave the butter at room temperature, or refrigerate it if you prefer it cold. You could even use the leftover to bake a chicken as we did.
Next, we fry off the chorizo. Once it’s cooked, transfer to a plate.
Then we make the pancake batter by mixing the pancake mixture, egg, and milk.
Once combined, stir in a bunch of chopped spring onions (scallions).
Brush the pancake pan with a little butter and heat until hot. I find a non-stick pan works best for these pancakes (to prevent the cheese that you’ll sprinkle on later from sticking). Then spoon blobs of pancake batter in the pan (about 1/4 cup per pancake).
Cook for about 1 minute, then sprinkle a little of the cooked chorizo and some cheddar cheese onto each pancake, then turn the pancake over and cook for a further minute or two, until the pancakes are cooked through.
Once they’re all cooked, stack the pancakes up and sprinkle on chopped cooked chorizo and a few more spring onions (scallions). Top with the spring onion butter and drizzle over maple syrup/ honey before serving.
Huge thanks for those who have been following us! Please continue to show us your support! Take a photo of your version, send us an email, tag us on Instagram, tweet us, anything. We love to see you trying out our recipe!
Savoury Dinner Pancakes with Chilli Butter. These Savoury Pancakes would make great street food! Simple and quick to make – great for a speedy dinner!
Ingredients
Pancake
1 x 15cm (6″) length of chorizo chopped into small chunks (keep some for the topping)
1 box of pre-made pancake mixture
3 large egg
300 ml milk full or half fat
8 spring onions (scallions) finely chopped (keep some for the topping)
1 tsp unsalted butter
1/2 cup (50g) grated cheddar cheese
Spring Onion Butter
4 tbsp (60g) salted butter slightly softened
1 spring onions (scallions) finely chopped
Methods
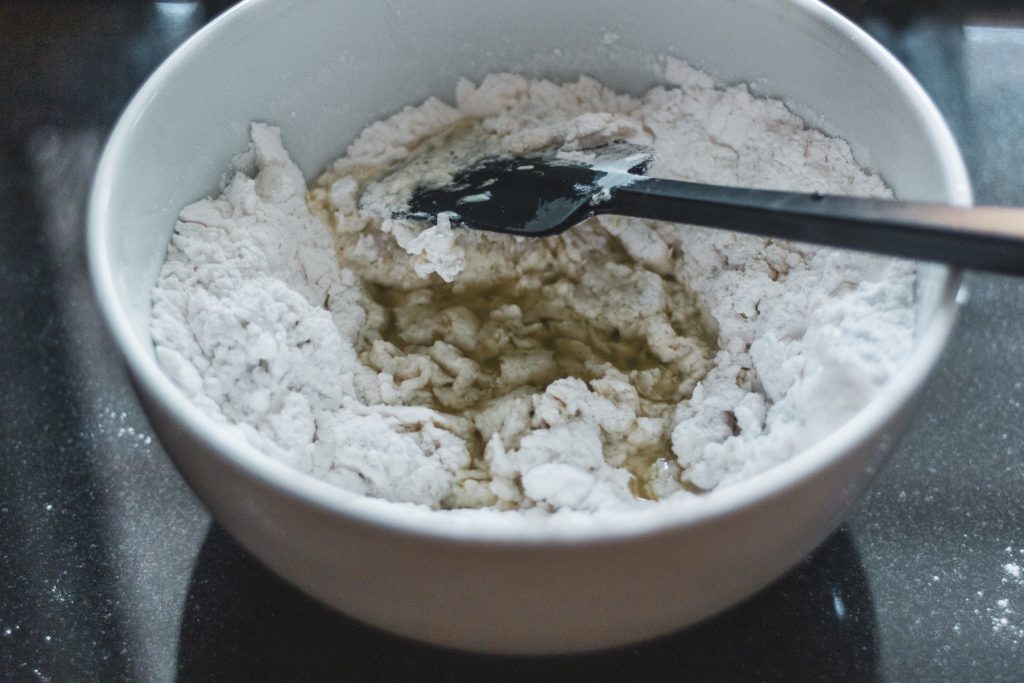
In a large bowl place the pancake mixture, milk and egg. Start to mix slowly with a balloon whisk or fork whilst slowly adding in the milk. You should end up with quite a thick pancake batter. Don’t overmix, it’s fine if it’s still a little bit lumpy. Stir in 3/4 of the spring onions (scallions).
Now make your spring onion butter by mixing the salted butter and chopped spring onion together in a small bowl. Once mixed, place in the fridge to firm up (or you can leave it room temperature if you prefer).
Heat the butter on a medium-high heat in a large non-stick frying pan, then brush it around to cover the pan. Add blobs of pancake batter – approx 1/4 cup (4 tbsp) per pancake.
Fry for 1 1/2-2 minutes, until bubbles appear on top of the pancake. Then sprinkle the cooked chorizo and cheese on top. Turn the pancakes over and allow to cook for a further minute or two, until cooked through. You will probably have to work in batches – as this recipe makes 12 pancakes. Keep the cooked pancakes warm by placing in the pre-warmed oven.
Once all the pancakes are cooked, stack them up and top with crispy chirozo, the reserved spring onions, a spoonful of spring onion butter and a good drizzle of maple syrup.
In recent years, monochromatic rooms have been all over the place. And while these spaces are often quite nice, sometimes they can look a little bland or a little too matchy-matchy. However, lately, monochromatic rooms with bold color schemes have been popping up everywhere. Think entire rooms draped in royal blue, emerald green, and other deliciously bold colors.
It’s no secret that we’re big fans of colorful interiors, so this is definitely a trend we can get on board with. Below we’ve rounded up a few of my favorite bold monochromatic rooms.
WHO has advised the best way to stop Corvid-19 is to be hygienic and boost up your immune system. Here are some tips on how we can protect our loved ones and ourselves! First things first, just to remind everybody this is a virus, not a bacterial infection. Viruses only respond to our immune system, so taking an unnecessary course of antibiotics will not help, but can harm – as antibiotics can lower your immune response by affecting the stomach! The following tips are also helpful as the world enters the (normal) flu season!
What you can do through what you eat?
High levels of Vitamin C – viruses cannot survive in an environment high in Vitamin C. Take 2000 to 3000mg a day and foods that are high in Vitamin C. (If anybody gets a rash or reaction, just reduce its dose.)
Zinc – children up to 12 years – 8mg, Adults – 15mg. If you prepare to have it naturally – foods that are high in Zinc are Ginger, Pumpkin Seeds, Meat (suggest those that are good in quality), Lentils.
Vitamin D3 – 2- 4000iu’s (less dosage for children but higher for adults) and get out and enjoy the sun!! Avoid crowds but do not stay indoor every day, exercise and absorb some natural Vitamin!
Probiotics (multi-strain) – 10-50 Billion cells a day (Strong stomach strong = strong immune system!!) We are having this every day for 1 month now, every day is healthy and strong in the family!
Manuka Honey (UMF +15) – 2 tsp a day – one teaspoon in the morning and one teaspoon at night.
What you can do every day?
Essential oils – EOs are excellent to start burning in your room, homes or even workplace! Our first point of contact for viruses is our nose. If you are burning antiviral essential oils around you this will kill off the virus before it enters your system.
Inhalations with the oils is a great way to make sure that if there is any virus lurking in your nose, you kill it before it has a chance!
Rub your mix daily on the spine and the soles of your feet. Concentrating at the top of the spine, behind the back of your head, on the ‘Big Bone (those who have my book its acupressure point, Du16 point).
What oil you can apply to boost your immune system? – Tea Tree, Lavender, Wild Orange, Lemon, Ravensara and Eucalyptus Globulus – use all or choose three from this list – diffuse in your house, spray into the rooms with a spray bottle and make your own mix (1 Tablespoon of base oil – Olive, Coconut, Almond – add in a mix of up to 10 drops of the above oils).
Nonetheless, drink lots of good quality water! Water is crucial for everything but especially to help flush things out of our body! Keep good hygiene, washing hands after you have been out and wearing a mask if you are going to crowded places (which we highly suggest avoiding if you can)!
Most of all, please do not panic – stress lowers our immunity! And not every fever or flu-like symptoms is the coronavirus, go to a doctor for a proper diagnosis! It is also flu season so be vigilant and smart but doesn’t panic!
It’s a self-care routine for everyone be it if there is a virus or not! Personally, hygiene is just important.
One of the highlights for Khao Kho, Thailand trip was its beautiful scenery. To stay and see the mist floating just beneath or in front of you it is just magical. Originally I thought we could only see it in Hokkaido, Japan but this trip has surprised me in many ways. So we have compiled a list of Khao Kho viewing points for your trip – there are both known and hidden locations for those who are planning your trip!
To plan a Khao Kho trip, please remember that the view is not for all-season – it only happened during early November till early February. It is one of the beautiful seasons to travel to Thailand, it is dry and cool so it is easy for travel. Even though it is supposed to be cooling but never underestimate the sun! As it is located high in the mountains – at least 1000ft, the UV light is very strong, you are easily tanned in no time. But the morning and evening breeze is a charm!
Khao Kho Post Office
You never knew behind that pretty post office is a sea of beautiful mist. You will think that you are in heaven. Khao Kho post office is another famous viewpoint at Khao Kho, where you can see the panoramic view of the sea of clouds in the morning. The best viewing point we have seen in Khao Kho so far. It is less commercialized but the view is equally stunning.
This place is a popular campsite among the locals and maybe full during the peak season, but most tourists who are only after the sunrise and sea of clouds will be flocking primarily to Phu Thap Boek. Rent a tent there for a 50 Thai baht. address: Ban Noen, Lom Kao District, Phetchabun 67120, Thailand
Khao Kho Sea Viewing Point
Although it can be a busy tourist attraction it is also one of the best fog viewing areas. You could also see a small market on the opposite side, selling snack food and souvenir. When exiting there is a slope where you can take awesome jump shots like what we did. (as it is a slope please be careful)
At Khao Takian Scenic Spot you can grab a chance sees a beautiful sunrise and sea clouds. It is our very first sunrise for a long while and it is amazing watching the salted egg yolk to rise.
Remember to check the sunrise timing before you sleep as you don’t want to miss the beautiful landscape. At our time we reached around 6 am and the sun has already been rising. Take a seat at the edge of the cliff for a beautiful shot with the sun and mist.
address: Nong Mae Na, Khao Kho District, Phetchabun 67270, Thailand
Papa Garden Khao Kho
Enjoying a sea of mist when walking up together with the sunrise. Upgrade to Papa Garden Khao Kho for this glamping experience. Great views of the green mountains directly from my bed. We took the front row unit to have unblocked views of the greenery. The property serves mookata as an option for your dinner. Naturally, cool night breeze makes the sleep comfortable.
A well-known restaurant in Khao Kho, Tanrak Talaymok is a favourite not just amongst tourists but locals well. Aside from filling your tummy, the location of the restaurant allows its patrons to enjoy the view of the valley below.
With a sweeping panoramic view of misty hills, make sure you don’t neglect the restaurant’s wide garden area with a well-manicured lawn and vibrant flowers. Accommodation is also available at Tanrak Talaymok for those who are keen on staying longer.
address: Khao Kho, Khao Kho District, Phetchabun 67270, Thailand operating hours: 7 am to 8 pm
Pino Latte
Grab a giant orange bean bag and lounge around the outdoor lawn of Pino Latte Resort & Cafe as you soak in the cool weather. With a view of the Wat Prathat Phasornkaew in the distance and surrounding hills, this chic resort, and cafe a great place to relax with a cup of coffee.
Also serving a good selection of food, pastry, and drinks, it’s no wonder that Pino Latte is a favourite spot for many visitors and locals. If you can’t get enough of the view, you can even choose to stay there!
address: 232 หมู่ 5 ถนนสาย 12 แคมป์สน เขาค้อ Phetchabun 67280, Thailand operating hours: 7 am to 6.30 pm
So, the next time you are flying to Bangkok and in need of a road trip to unwind from the bustling city vibe, there’s an additional option to consider, apart from Hua Hin and Khao Yai. Hopefully, you have better luck in sighting the sea of clouds! So what are the places that you are most excited about? Let us know in the comments. One last thing, don’t forget to share it with your friends and family!
If 2019 was the year of the dramatic fiddle leaf fig, then Hammel expects 2020 will be the year of the much subtler olive tree. Instead of blooming bright green, these trees are a more sophisticated sage. I don’t think Fiddle Leafs are going anywhere but it’s fun to see how these trees add a completely different vibe to a room.
I think the olive tree feels a bit more formal, while the fiddle leaf leans casual–and I don’t think I could pick a favorite! Real olive trees can last for quite a while in a pot but the is faux from right here will get so much compliment. I love it so much!
Supposedly they are perfectly suited for minimal homes as well as cozy and homey flats in the city. But the biggest thing about them is that they seem super easy to care for as long as you place them by a window and water them regularly. I’m pretty smitten. You?
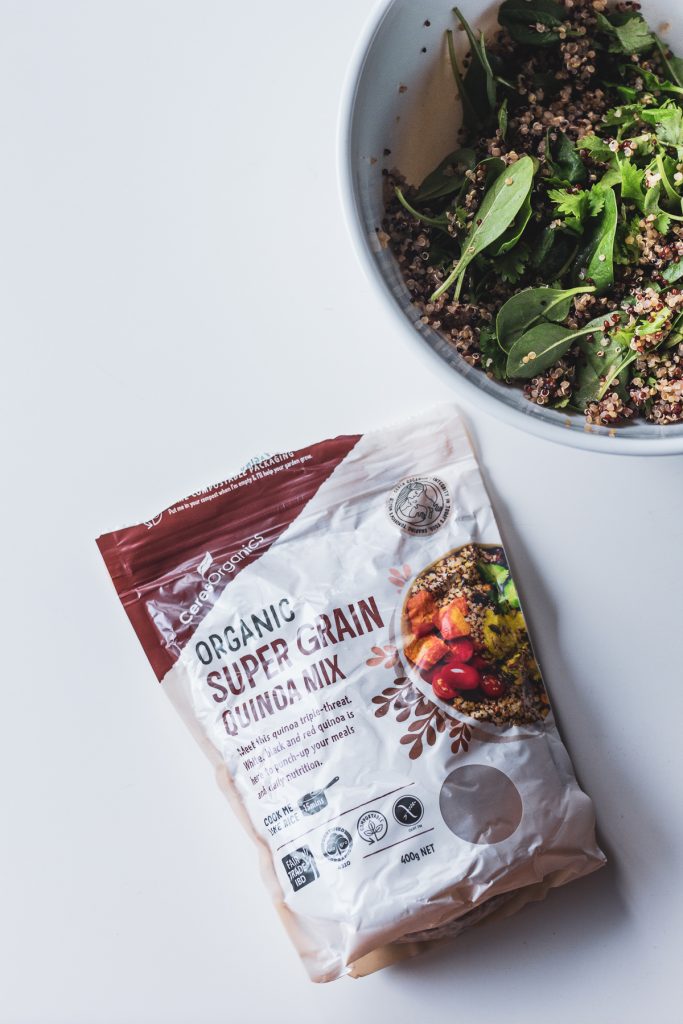
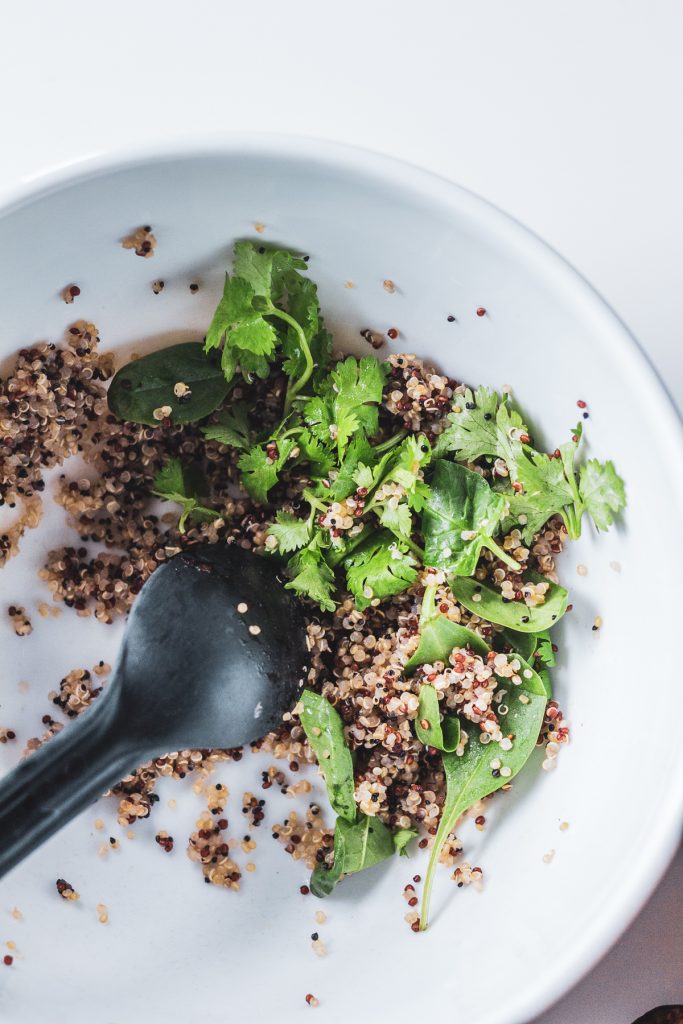
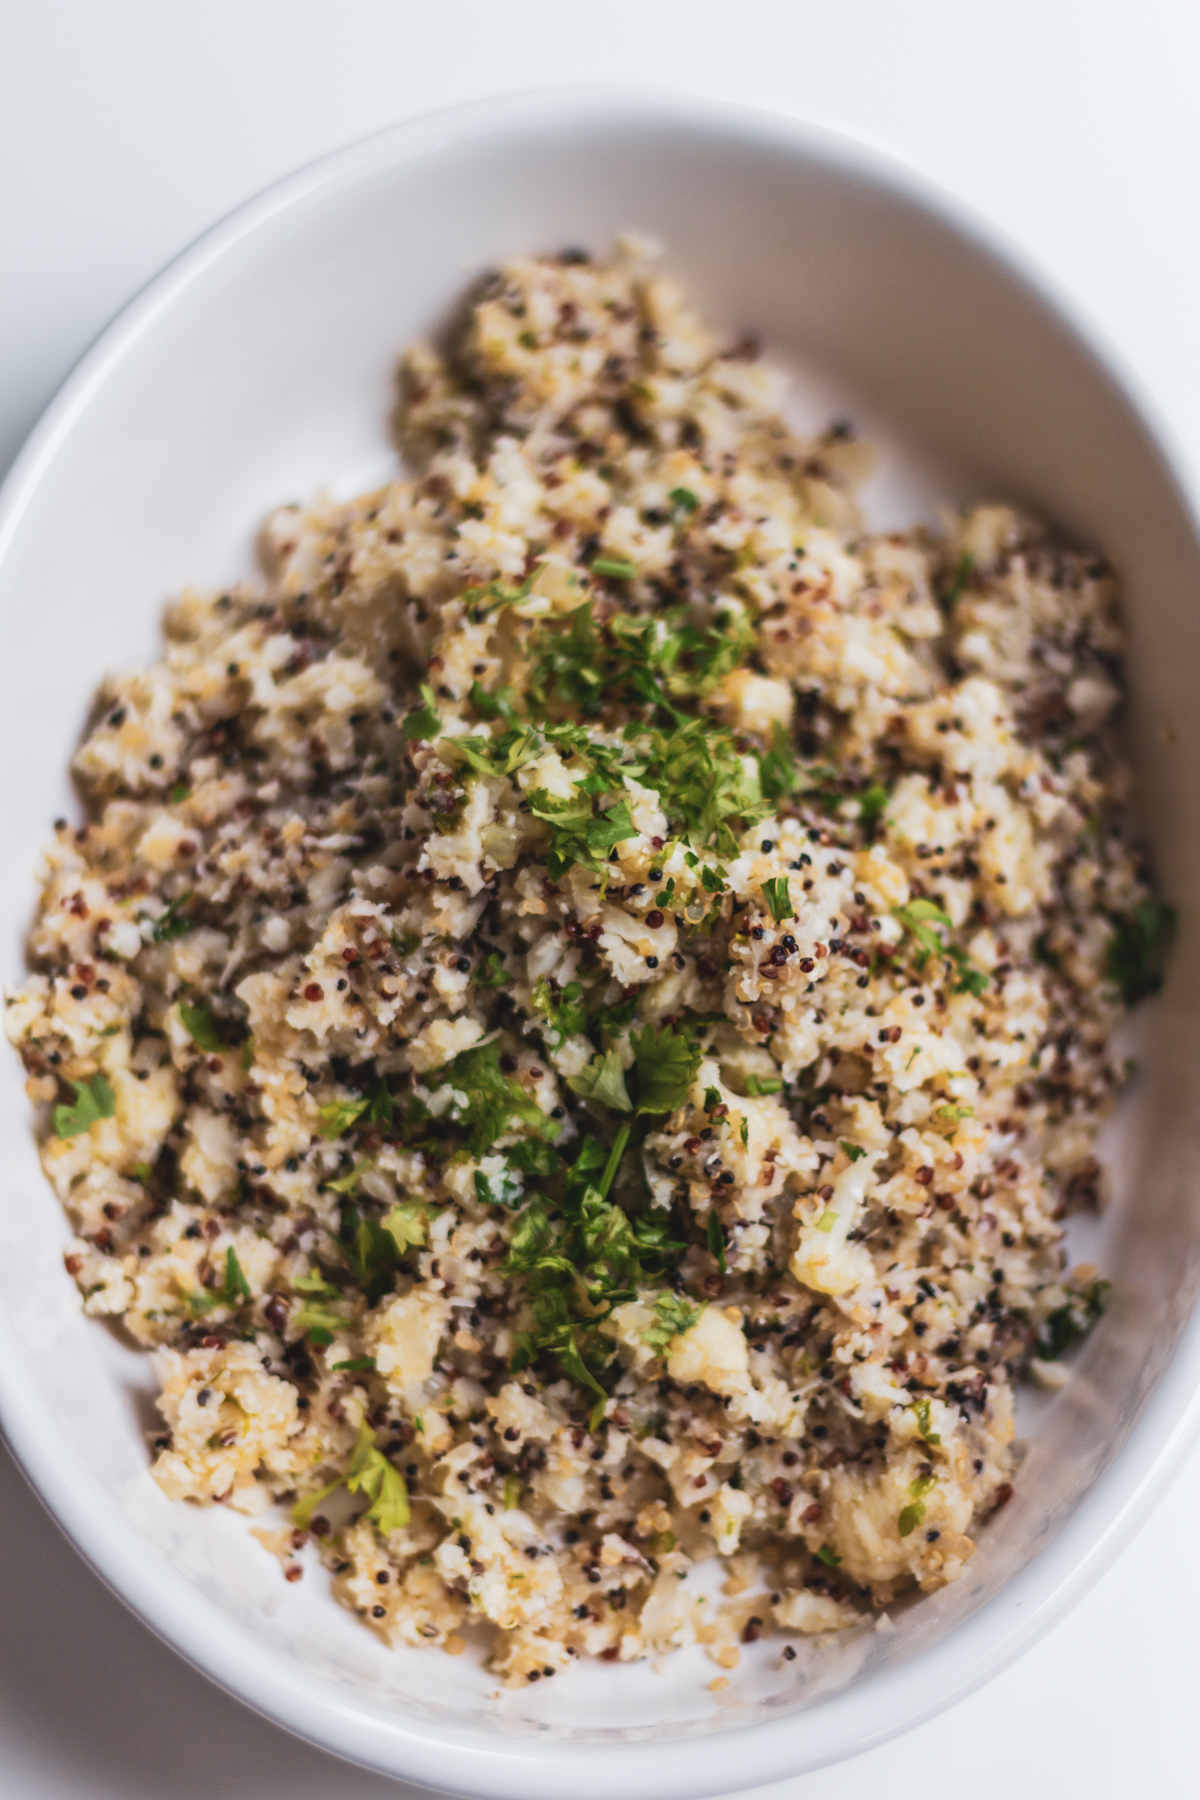
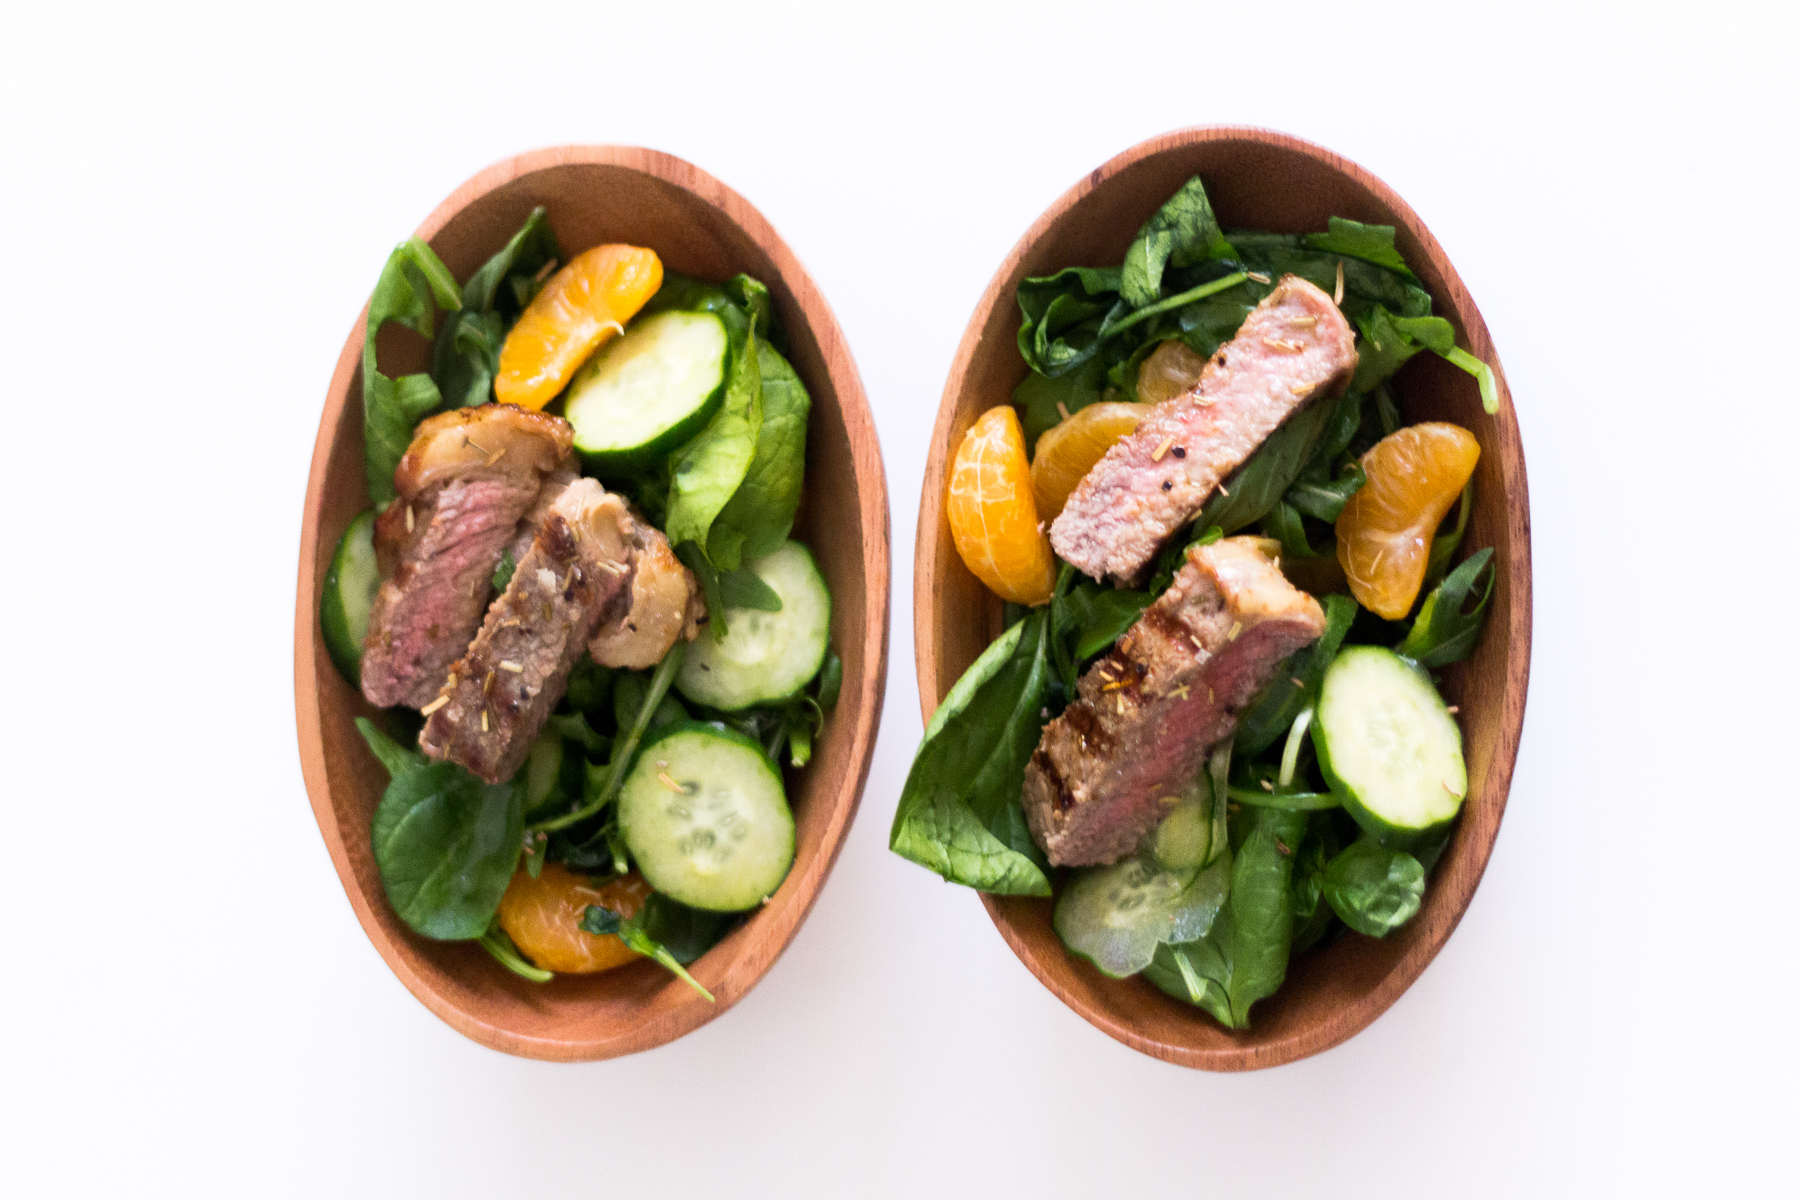
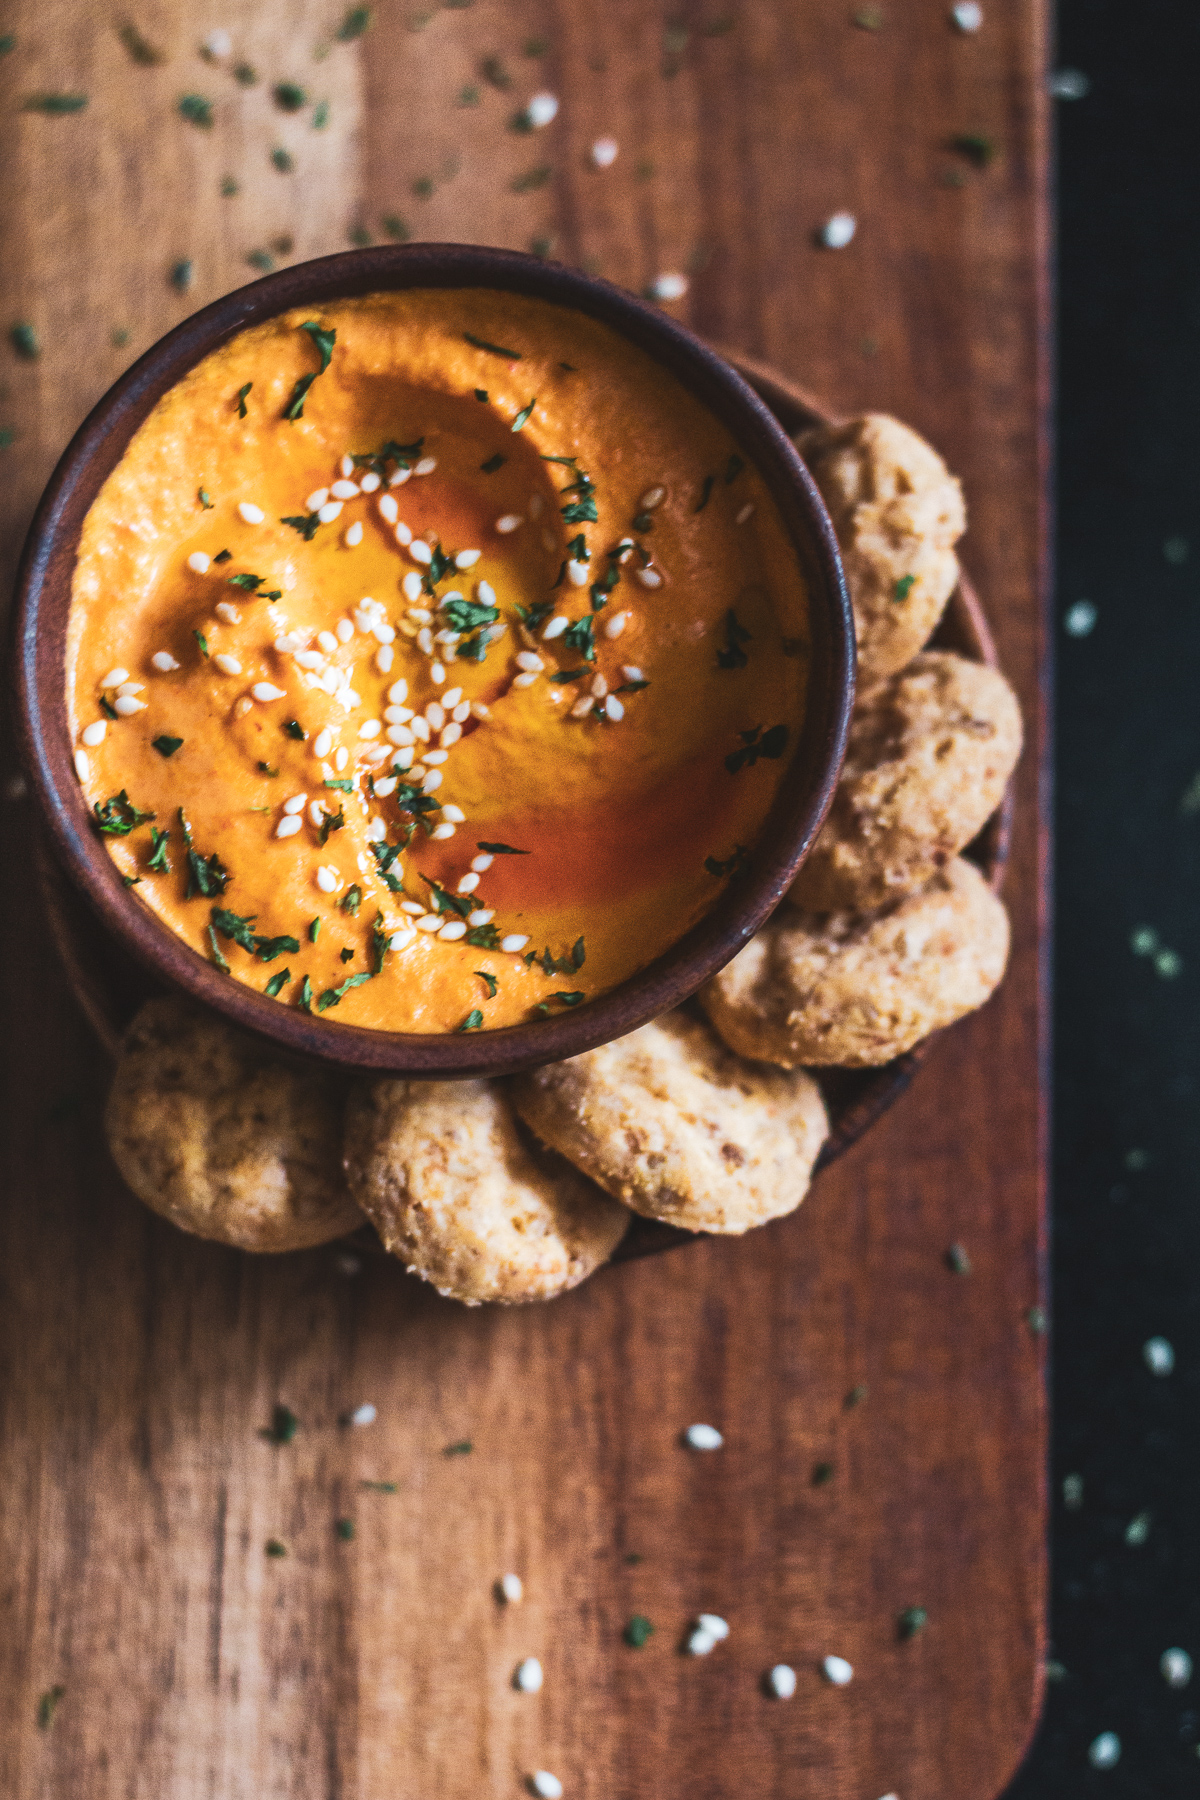
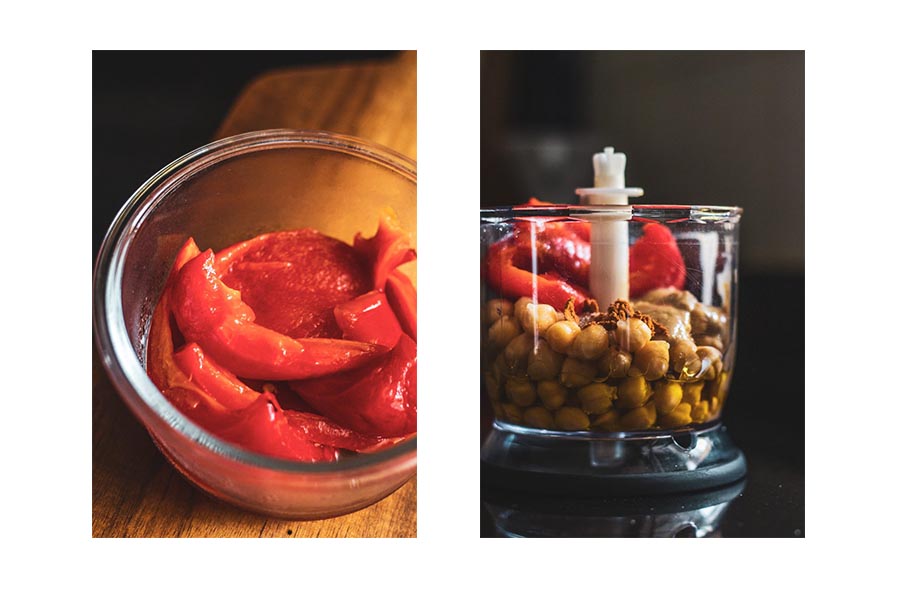
To convince Joe to have a salad is the hardest thing to do at first. Together to experience and try our recipes to cater both of our preference, surprisingly it works for both. We came across this Roasted Harissa Eggplant and decided to combine it with our favourite Spinach Quinoa. making it into a wholesome brunch.
Side note, did you know that eggplant is a fruit? We know. Who knew?? Or maybe I’m the last to know. Here I am all proud of myself for eating a veggie-loaded meal for dinner and it turns out it’s a fruit! Well, it’ll always be a veggie in my heart. Especially since it’s loaded with fibre, vitamin B, folate, and all kinds of nutrition! (Not that that’s what makes a veggie a veggie…but you know what I mean!)
Eggplant, (like and kale and beets) is one of those vegetables people tend to have pretty strong opinions about. You either love it or hate it and that’s that.
I can certainly understand why eggplant can be hard to love, it so often can be bland and spongy when not prepared correctly and quite heavy as well since it soaks up oil so readily. But just like the aforementioned kale and beets, the key to transforming eggplant haters into eggplant lovers is in the preparation. In this case, the secret is to heat.
Roasting eggplant in the oven is so effortless (no salting necessary) and you end up with eggplant that’s delicate and tender, not oily. The screamingly high heat of the oven transforms insides from spongy to wonderfully silky. While eggplant comes in a variety of shapes and sizes we like to stick to the smaller ones for roasting so that they fully cook evenly throughout. Look for ones that have smooth shiny skin and are firm to the touch (soft ones will be spongy).
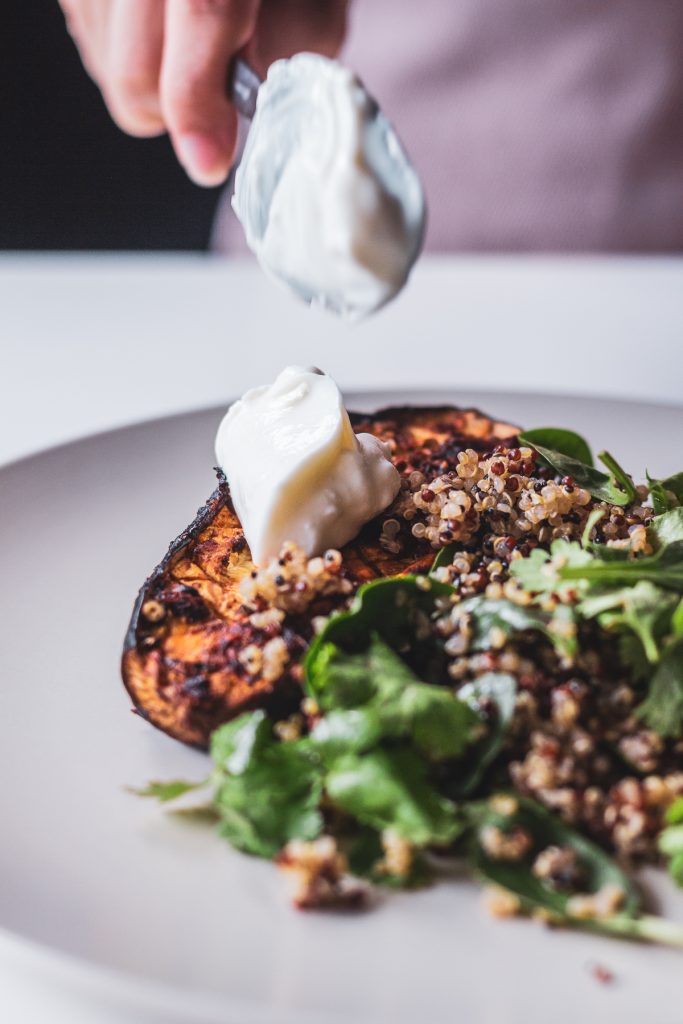
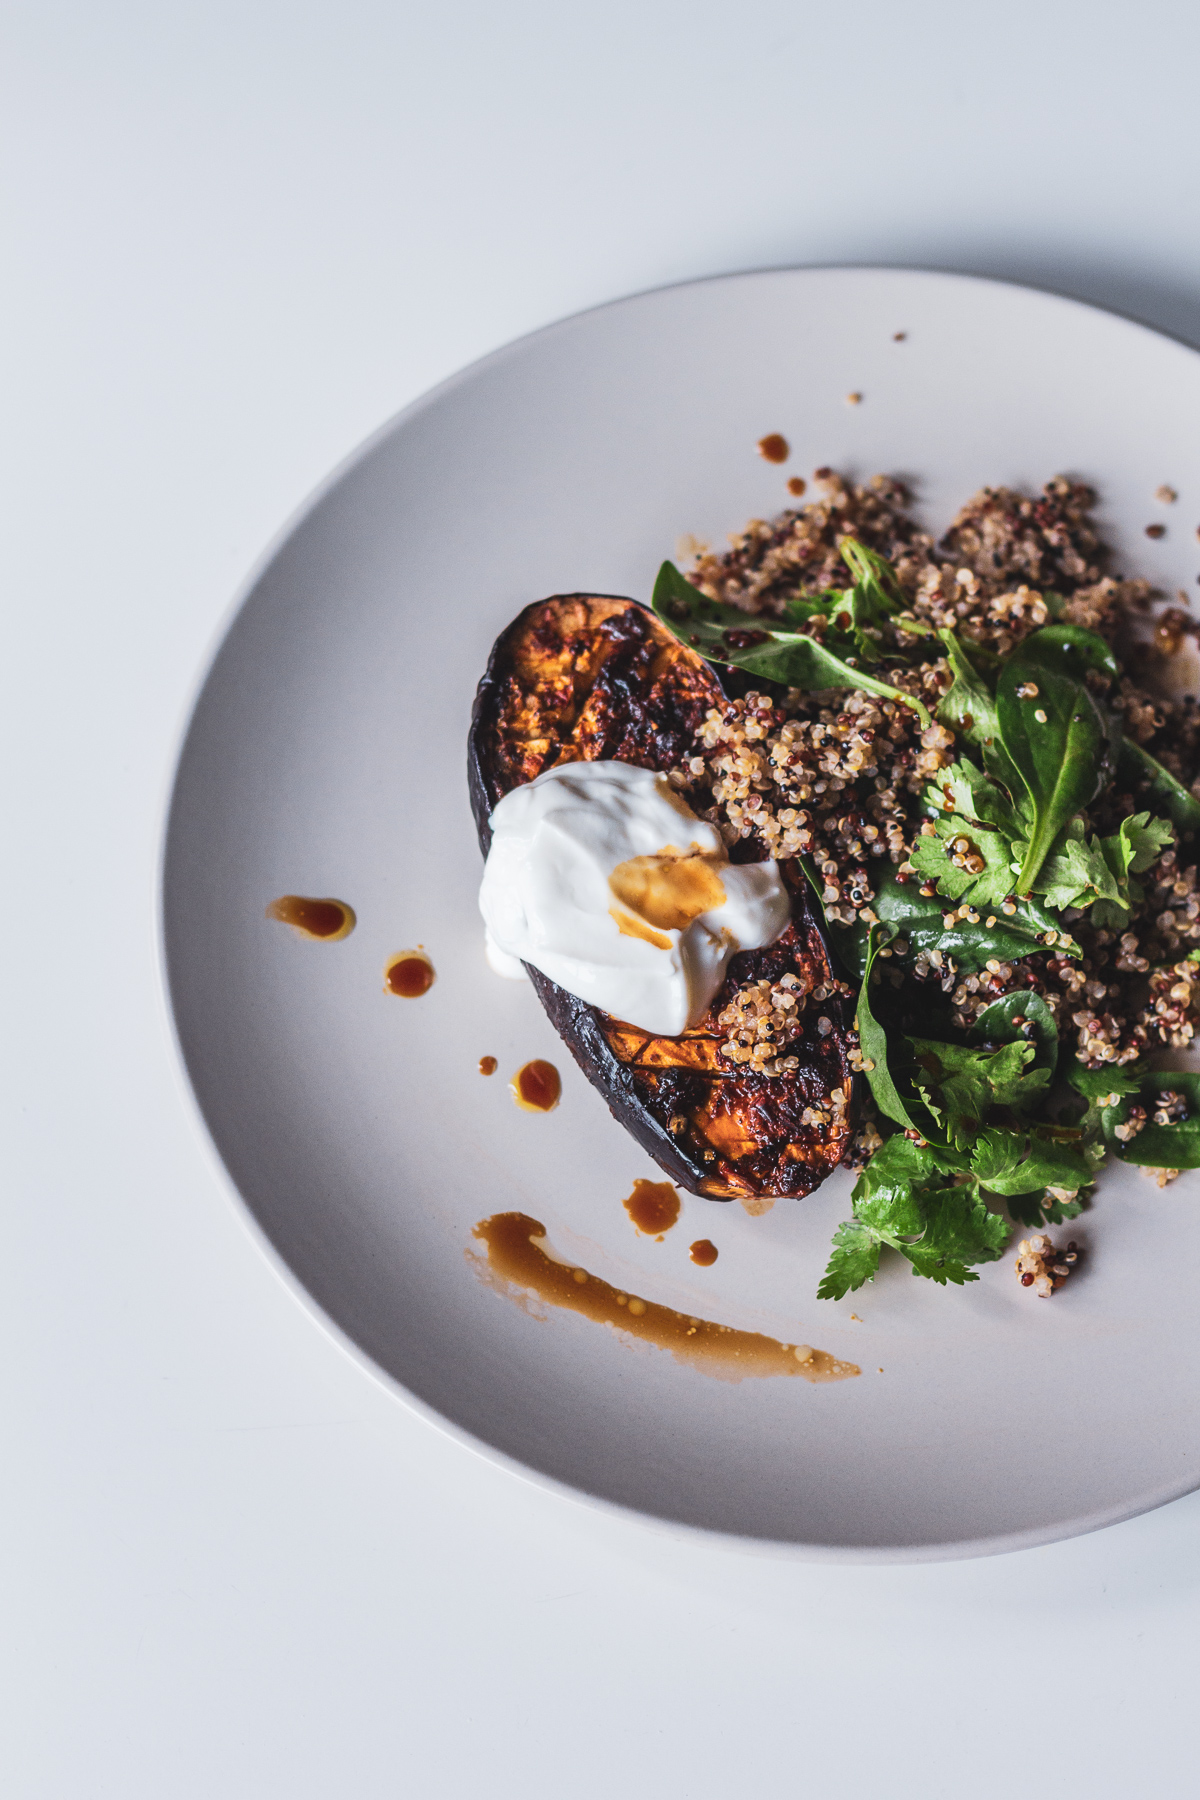
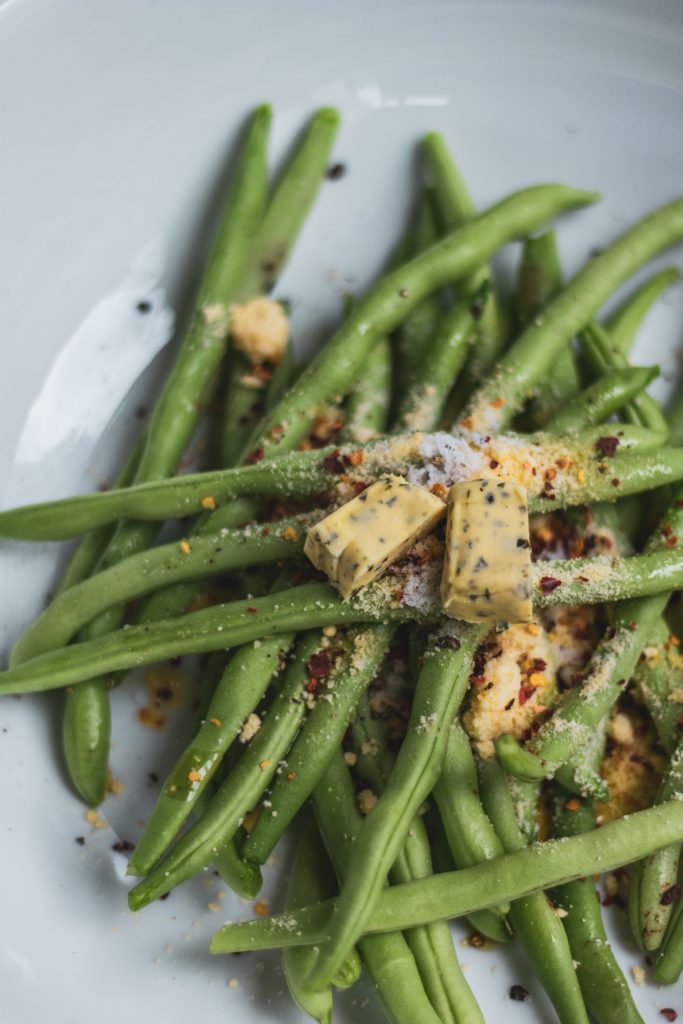
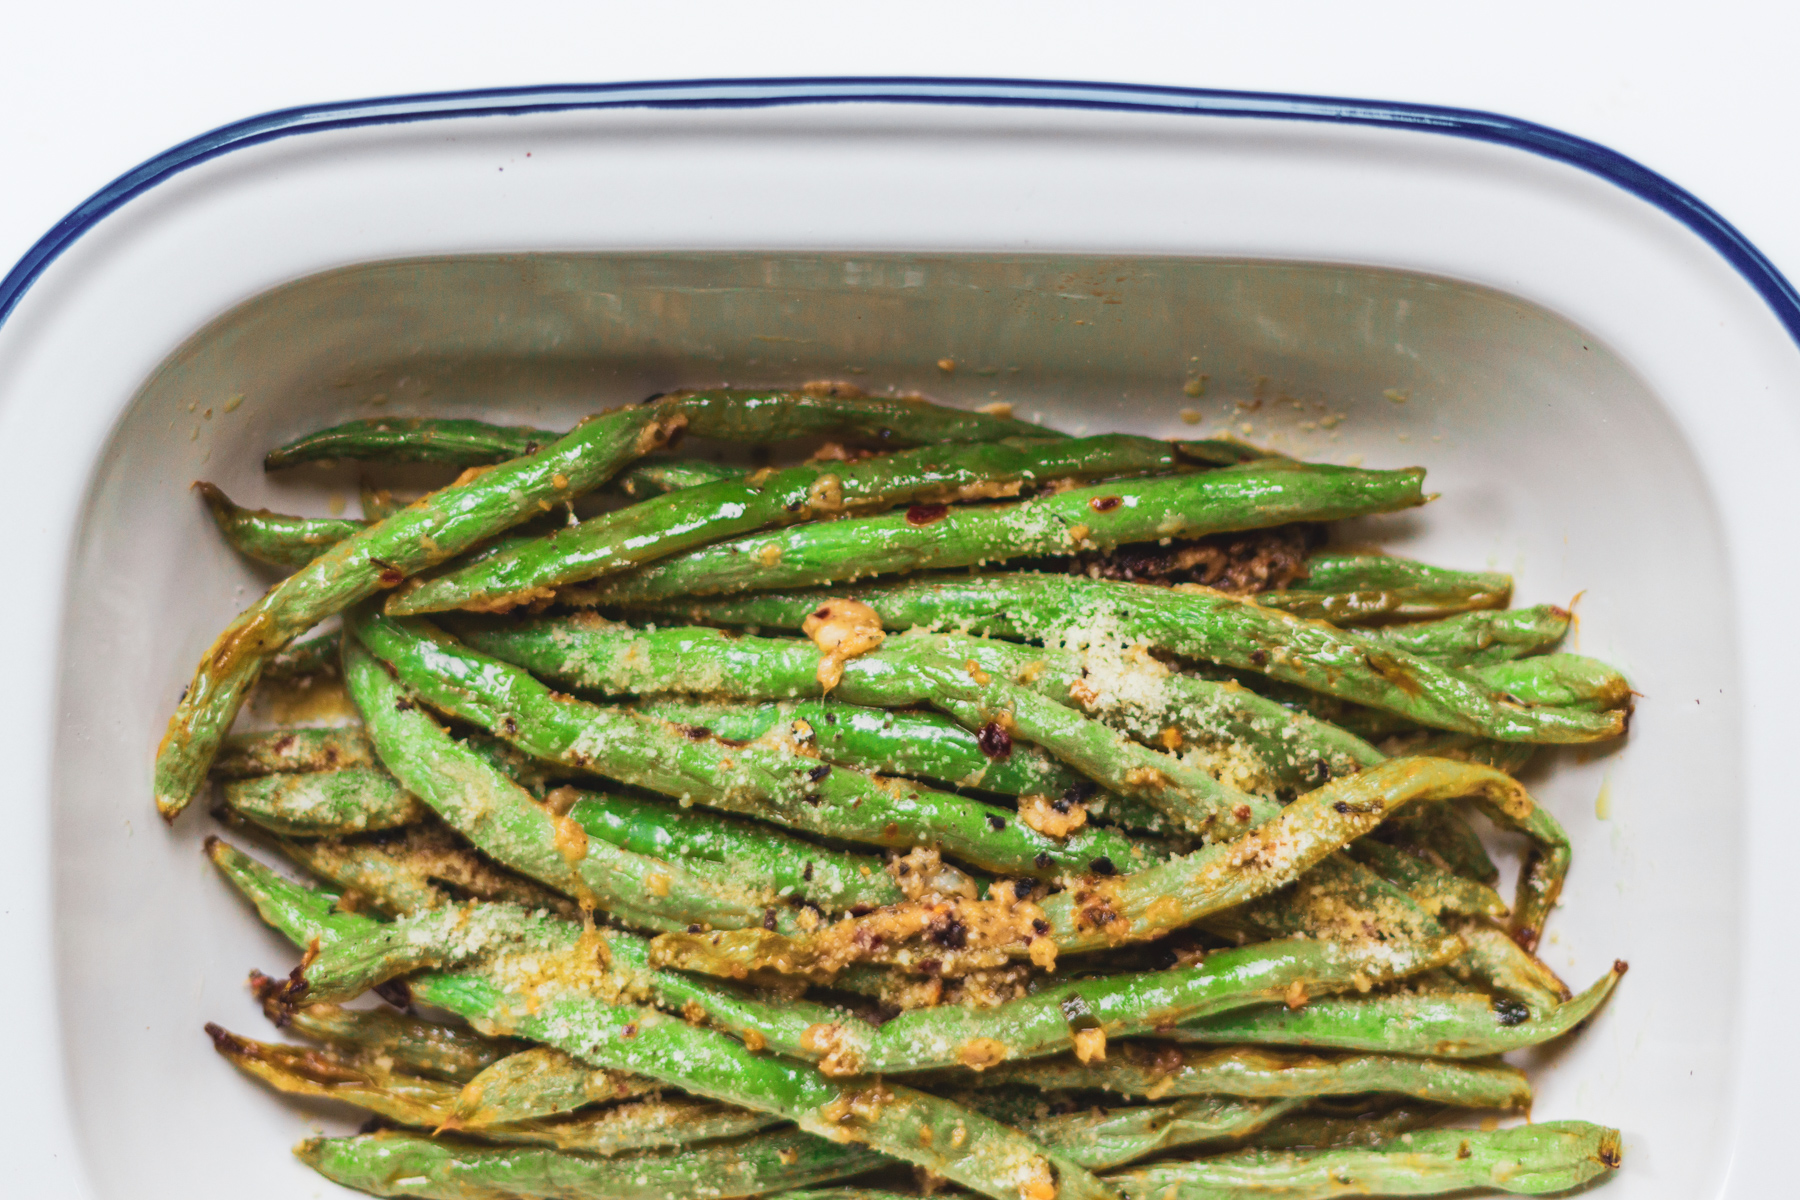
The eggplant is incredibly soft and moist on the inside, and the harissa has a strong kick. The harissa paste has many uses – it is deliciously brushed over lamb chops or smeared over grilled fish – but this dish is big and bold enough without any meat.
We’ve added a harissa glaze before going into the oven to accent the mellow creaminess of the eggplant. Honey helps the cut surface of the eggplant caramelize under the heat while the harissa brings plenty of spice to offset the sweetness. There’s also garlic and cumin to round out those North African inspired flavours.
What you end up with is a dish that’s vibrant with flavour and fantastically creamy. Sprinkle it with some fresh mint to finish or serve it on a bed of lightly dressed greens with some crumbled goat cheese on top for a more substantial meal.
Take a photo of your version, send us an email, tag us on Instagram, tweet us, anything. We love to see you trying out our recipe!
These Roasted Harissa Eggplant Halves make for a healthy and delicious dinner recipe that’s gluten-free and dairy-free!
Ingredients
3 eggplants, halved
4 Tbsp olive oil
6 Tbsp harissa sauce
1 tsp garlic powder
1/4 tsp turmeric
1/2 tsp coriander, ground
1/2 tsp cumin
1/2 cup dairy-free yogurt, plain
salt/pepper
fresh parsley ((optional))
Mixed Quinia
1 cup Spinach
2 tbsp blasmic vinegar
Methods
Preheat the oven to 375 degrees.
Cut each eggplant in half and cut lines into the flesh side of each one.
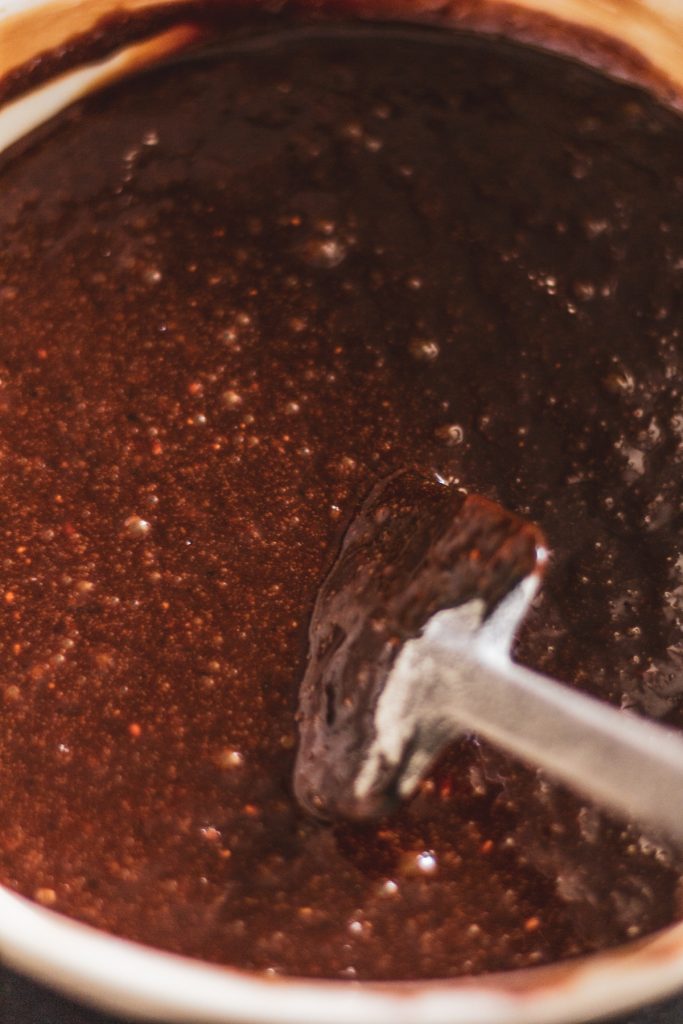
Brush 2 Tbsp olive oil and the harissa sauce evenly over the eggplant halves and place each eggplant cut side down on a baking sheet lined with foil.
Roast for 30 minutes. At the meantime, cook the quinoa base on the package instruction.
Brush the remaining olive oil over the flesh side of the halves and place back in the oven (cut side down) for another 15 minutes (or until soft).
While the eggplant is roasting, mix the cooked lentils with the spices.
Remove the eggplant halves from the oven and top each one with dairy free yogurt, cooked quinoa, spinach, salt, pepper, and parsley (optional). Drizzle it with blasmic vinegar.
It has been a couple of months since the Coronavirus disease (also known as covid-19) outbreak cause a global panicking. First, it was just within China, Wuhan and less than a month it has spread out the whole of China. It was so sad to see people dying every day, prayers have been a daily routine for me. Hoping lesser people suffering in the world.
While Singapore is the most popular tourist destination; like Hong Kong, we are the first few countries that are highly concerned with the spread of the disease. A month ago, while we are still celebrating Chinese New Year, we are also living in fear. Facing uncertainty, the whole community are worried about the disease.
And when our government has raised the DORSCON level – from yellow to orange. Empty shelves can be seen in the supermarkets and malls especially the pharmacy. Not to mention that both the face masks and hand sanitisers are out-of-stock. The basis needs and staple foods are all gone in shelve – although the situation has been getting better with the help of our brilliant government. We have enough supplies on the shelves all the time now but it is no harm to make your organic products.
So let us share with you some tips for making your own.
Soap vs Hand Sanitisers
The primary purpose of hand soap is to remove germs and bacteria, not kill it. When washing your hands with soap, dirt and germs trapped in the natural oils of the skin are lifted and suspended in water.
Alcohol-based hand sanitizer, on the other hand, is proven to kill viruses and bacteria. The alcohol kills the bacteria by softening the bacterial membrane, allowing the alcohol to render bacteria ineffective.
As we can’t use soap all the time outside, so using hand sanitisers has proven to be more effective. It is always good to keep one with you when you are out! There are many homemade hand sanitizer recipes but the only good ones are those with alcohol as it helps to kill the kill viruses and bacteria.
But repeated and frequent use of hand sanitiser has the potential to cause irritation to your hands over time and even minor damage through dryness. So we decide to give our hand sanitizer a lift with skincare protection – having essentials oils, vitamin e and aloe vera gel to give a moisturising boost.
Tips: To protect your hands from becoming overly dry and chapped, or to repair hands that are already suffering, it is best to generously apply moisturiser after each time you use hand sanitiser.
Why Homemade?
Minority commercial hand sanitizer based on the professional it contains ingredients as scary as the germs they protect you from. Lifebuoy, Dettol is highly recommended, we decided to make ours because we can’t find these two reliable brands most of the time these days as it was just gone quickly on the shelve. Now there are many new brands but most of them are simply alcohol-ish with no proper skin care treatment which can be harmful to you and your children so why not make your own hand sanitizer from ingredients you select?
This is an excellent project for kids as well as adults since the project can be expanded to include a discussion about hygiene and disinfection. You’ll save money in the long run, protect yourself from germs, and can customize the scent of the hand sanitizer so it doesn’t smell disgusting!
Essential Oils in Hand Sanitizer
In addition to adding fragrance to your hand sanitizer, the essential oil you choose may also help protect you against germs. For example, thyme and lemon oil have antimicrobial properties. If you are using antimicrobial oils, only use a drop or two, since these oils tend to be very powerful and might irritate your skin. Other oils, such as lavender or chamomile, may help soothe your skin. With citrus, it creates a refreshing scent to keep you cheerful all the time.
So what’s your best bet if you really can’t find a hand sanitiser? “Wash your hands with old-fashioned soap and water for 30 seconds or the time it takes to sing Happy Birthday twice,” said Dr Bagdasarian. Let us now protect ourself and our loves one by practising good hygiene. Share us your experience by sending us an email, tag us on Instagram, tweet us, anything. Take care!
2 tablespoons 70 – 99.7% Isopropyl Alcohol (the % we are using are within WHO guidelines)
5 drops lemon essential oil with Vitamin E
5 drops wild orange essential oil with Vitamin E
5 drops tea tree essential oil
Distilled (or at least filtered, boiled, and cooled) water
Methods
Nothing could be easier! Simply mix the ingredients together and then use the funnel to pour them into the bottle. Screw the pump/spray back onto the bottle and you’re ready to go. Just like attending a chemistry session.
Notes
Vitamin E helps support the immune system, cell function, and skin health. It’s an antioxidant, making it effective at combating the effects of free radicals produced by the metabolism of food and toxins in the environment. You can purchase Vitamin E oil separately to add in. Hence if you purchase good essential oil, most of them contian Vitatmin E inside.
Your bedroom is the only arena in your home that helps you relax and transcend into a peaceful state, after a stressful and hectic day in your office. Therefore, it is absolutely imperative that each decorative, movable or immovable, contributes towards relieving you from your stress and tensions.
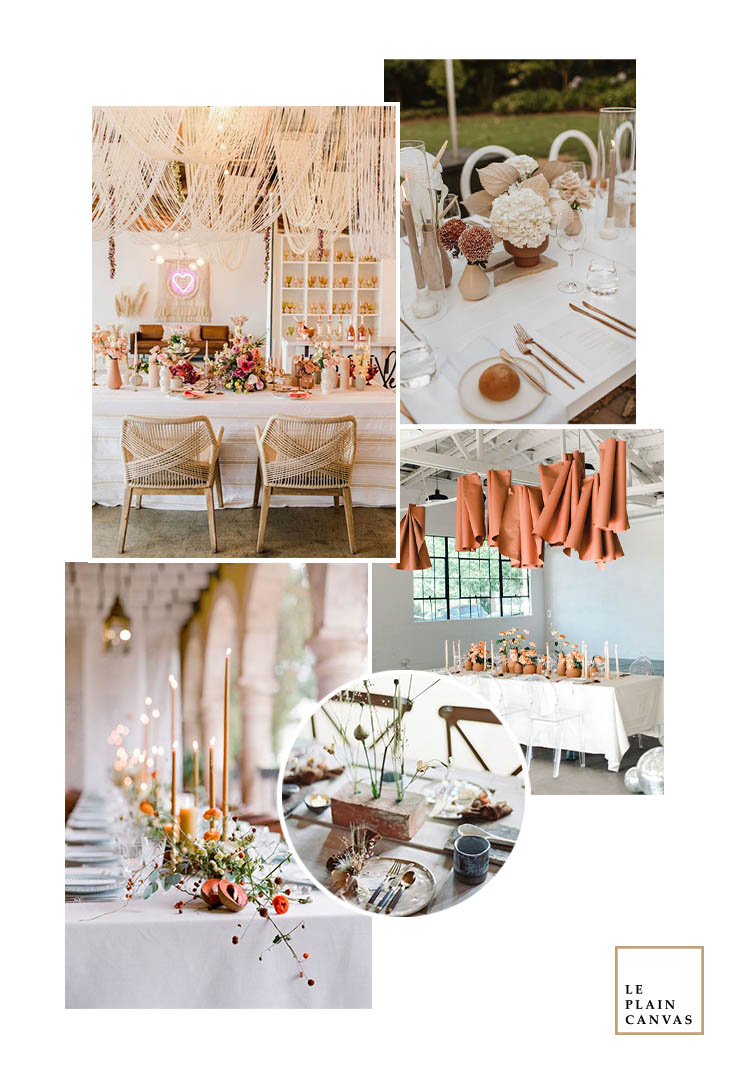
Your room ought to be clean and streamlined for an inviting and calm look. Especially as we’re all looking forwards to warmer weather and sunnier days, and ways to bring that feeling indoors. And I have to say this Spring. I particularly love the rich shades of amber, orange, and pink that predominates within the collection – yes, mix them all together – for a desert hued warmth. Add in some natural materials and who needs a holiday anyway?
When it comes to pie, Angela and I always have this mini-competition on who has
Angela always has a fear of eating a crunchy apple, thus the best way for her to enjoy the apple is by putting them into a pie. There is nothing cuter than a mini pie, and they much such a lovely presentation at a dinner party. A huge plus is that you don’t need to worry about slicing a serving a full pie – something which can easily turn into a messy disaster.
These Mini Apple Pies walk the line between sweet and tart. Sometimes apple pies can be so sweet that you can miss the flavor of the apple itself. This recipe lets the apple shine through. The apple is cooked to the point of being tender, but not mushy. It still has the slightest hint of crispness to it (but not too crunchy). The vanilla and cinnamon merely exist in the background to compliment and amplify the taste of the apple.
The pie consist of 2 component; the crust and filling;
Apples: I usually bake with Granny Smith Apples, but this time I picked up Fuji Apples instead, and I preferred them! I think their flavor is a little crisper and bolder. I think that Granny Smiths have a more sour taste than Fuji Apples. I might be using Fuji for all of my baking going forward!
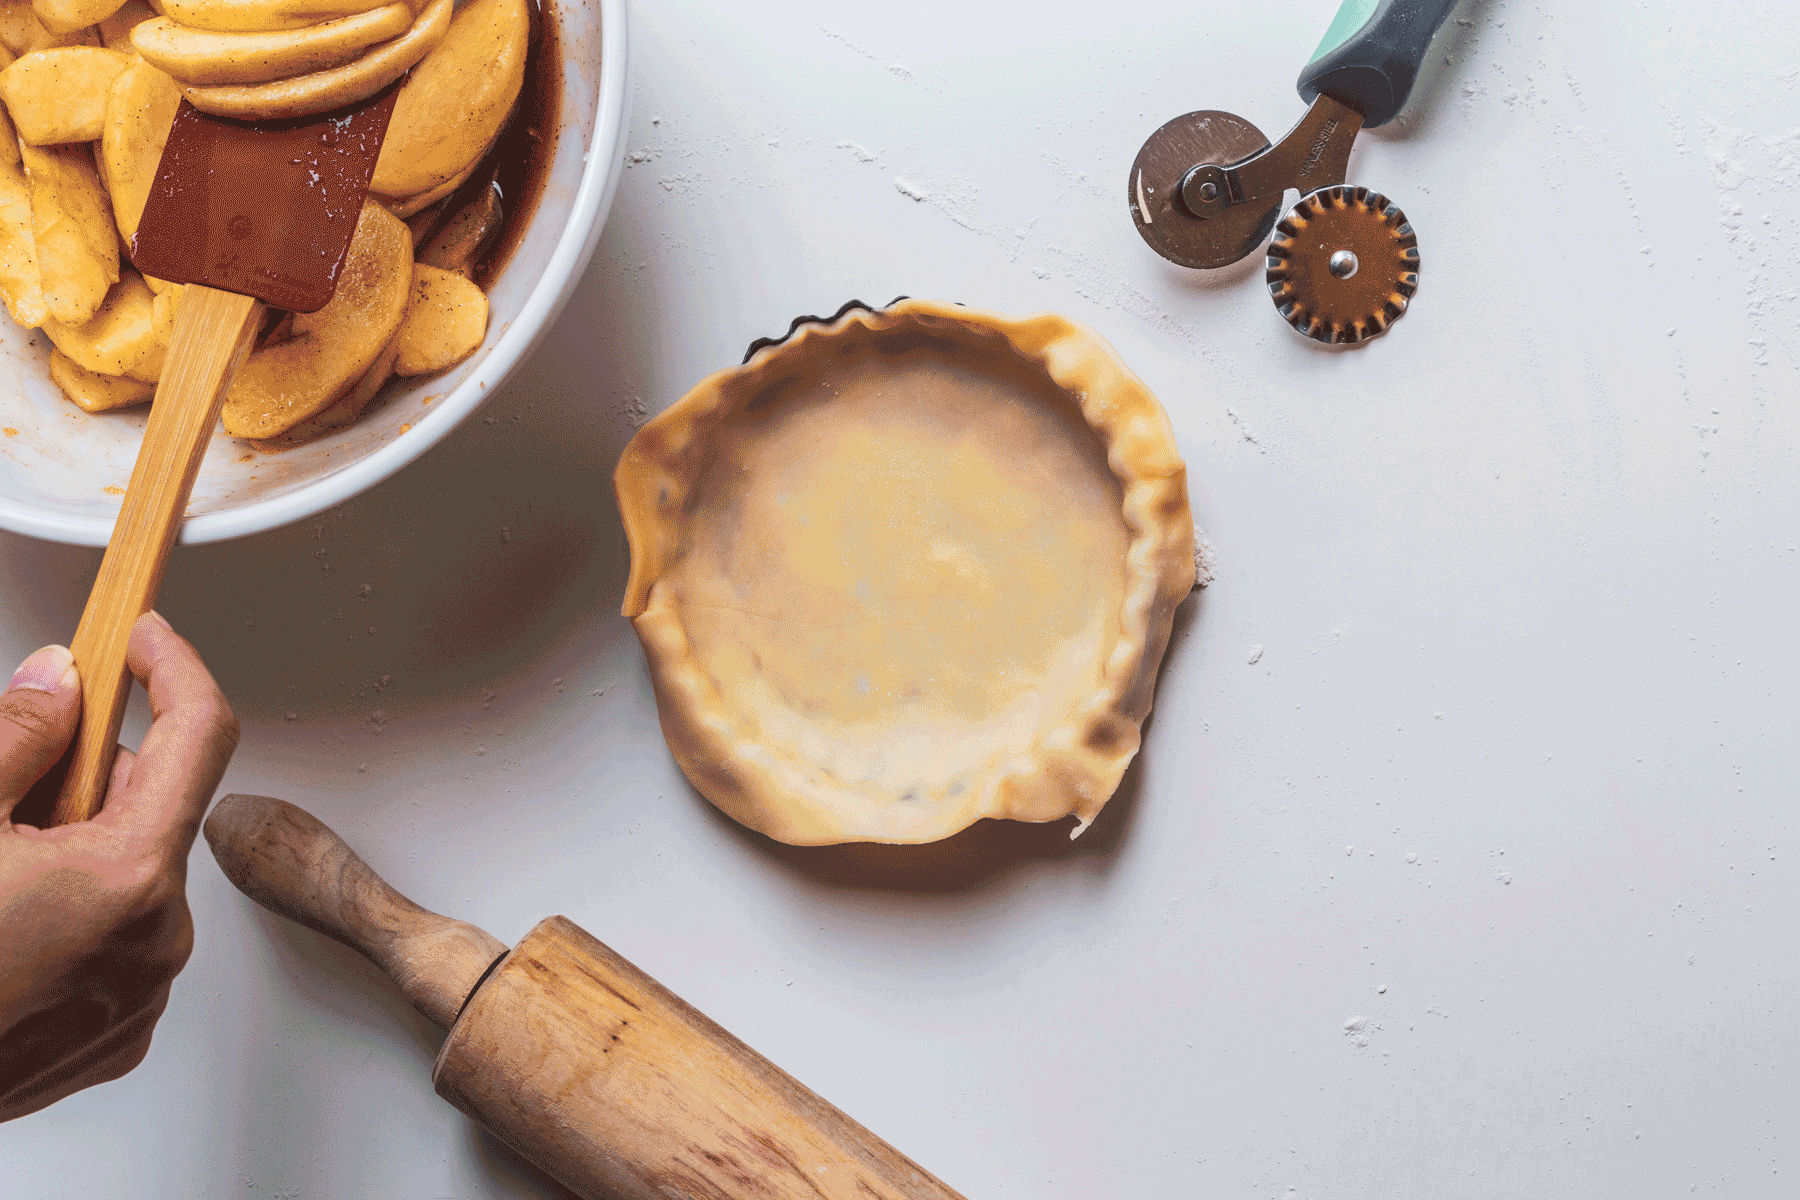
Crust: I used store-bought pie crust (the type that comes in rolls) and it is a huge time saver. The active preparation time for this recipe is only 15 minutes.
You can also decorate the tops of these miniature apple pies however you like. You won’t need all of the pie crusts for the bottom, so you’ll have some left to decorate the tops. I like to use it to make a simple lattice topping or cut out some cute pie crust decorations for the top with small cookie cutters.
This recipe makes 10 mini apple pies. Just enough to serve at a dinner party. If you are having more guests you could easily double the recipe. We recommend serving these mini apple pies warm with a scoop of ice cream on top. Vanilla ice cream is a traditional pairing for pie, but sometimes we like to use caramel ice cream instead.
I mean, just look at how cute those pies are up there! Take a photo of your version, send us an email, tag us on Instagram, tweet us, anything. We love to see you trying out our recipe!
These mini apple pies are a fun twist on classic apple pie and the individual serving size makes them easy to serve!
Ingredients
4 Apples
1 cup Dark Brown Sugar
1 1/2 teaspoon Vanilla
1 tablespoon Lemon Juice
2 tablespoons Flour
1 pinch of Salt
3 tablespoons Butter
1/2 teaspoon Cinnamon
2 rolls of Pie Crust at room temperature
Methods
Start by heating your oven to 375 degrees. Then prepare the pie crusts. Use a biscuit cutter to cut out 8 circles from each roll of pie crust. Knead and roll out the remaining dough, cutting 4 more circles. Then roll out 10 of the dough circles increasing their size by 1/3. Place these circles of dough in the ramekins, lightly pressing the dough up the sides of the ramekins. Set the remaining dough circles aside, you will use these for the tops of the pies.
Peel the apples and chop them into thin slices. Place the apple slices in a medium bowl. Add the brown sugar, vanilla, lemon juice, flour, salt, 2 tablespoons of melted butter, and the cinnamon. Stir to mix.
Divide the apple filling between the 10 pie crusts. Then place the remaining circles of dough on top of the pies, and use a fork to seal the pie crust in place.
Bake the pies for 25 minutes. Then remove from the oven and brush with 1 tablespoon of melted butter. Return the pies to the oven for 10 minutes letting them become golden brown. You can serve the pies warm or a room temperature. Add ice cream on top if you like.
Last October, we have a weekday off, we travelled to Johor Bahru, to relax, eat, and to just get out of Singapore for a day trip. Tired of the crowds at KSL City and City Square Mall? Here’s a new alternative for those of you visiting JB- Spring Labs by Eco Palladium. Though not as big as the main mega-malls, Spring Labs will surely be more than enough to fulfil your eating and photo-taking desires.
To start, Spring Labs is the perfect place to fill your Instagram or Facebook feed. Just look at the entrance! Looks more like a theme park than a mall doesn’t it? Snap some shots in front and you’ll definitely have people asking you where this is.
Go deeper and you’ll meet with the unique striped designs of the stores. Bringing a vintage, retro vibe to space, take a solo aesthetic shot alone or a fun group photo with your friends. The possibilities are endless!
Almost every corner of Spring Labs is Instagram worthy spots. Be it the shop front, walls and also the public toilet area. My friend and I had so much fun walking around the space to take the #ootd shots. The only regret is that we should have to bring a few outfits here to change and continue with our shots. The vibrant backdrop also adds a pop of colour to an otherwise mundane, boring photo. Our favourite is the laundry room, they have this big glass window and air conditioning for you to take a break from the hot weather.
Other than all the beautiful Instagram-able places, there is also many cafes and restaurants for you to take a break from. However little tips for you, visit it during the weekends for more activities and food. As we visited during the weekdays a lot of the shop is closed. However, the good side is we can have all the place we wanted for the photos.
One of the cafes we recommend is the @goodmorning_foodtruck where they have a list of Taiwanese delight. There are different flavours of sandwiches for you to choose from. This is the perfect place when you just want to have a light bite.
早 · 尚好 – Good Morning Food Truck Address: Jalan Ekoflora 1, Taman Ekoflora, 81100 Johor Bahru, Malaysia Opening hours: Tuesday – Saturday 7:00 am – 3:00 pm, Sunday 8:00 am – 4:00 pm (Closed Monday)
Spring Labs Address: Jalan Ekoflora 1, Taman Ekoflora 81100 Johor Bahru Malaysia
I shall wait for the rest of the shops to open before I wait for another round of exploring!
The snowdrifts are all but gone from most towns, but it may not feel like spring yet in your neck of the woods. What’s the solution? Celebrate the season! Whether you have a baby or bridal shower on your calendar or are just looking for an excuse to invite friends over for a fun gathering.
When it comes to party, table arrangement is very important. While the theme of the spring party is flora. You can choose corals and oranges to give the floral arrangements a fall makeover; further embellish your fall roses with lilies, classic roses, berries and leaves. Set off with a crystal or silver vase is sure to make any party venue stunning; from head table to gift table, the garden rose will shine.
Mentaiko Pasta has been in trend for quite a few years, and it has become one of our favourites in making them. It is simple and the ingredients are easy to obtain in our house. It is a combination of Western and Japanese cuisine, two of our favourite cuisine – it is like having the best of both world.
This is one of the quick recipes as it doesn’t require any cooking of the sauce. As soon as the spaghetti is done, just add it to the bowl with the mentaiko mixture and give it a good stir. Then add some of that pasta-cooking water gradually, tossing as you go, until a smooth, emulsified sauce forms. Keep tossing until it just coats the noodles, without any excess liquid pooling below.
Top the pasta with strips of nori seaweed and julienned shiso leaves (perilla) to give it nice distinct aroma and flavour, just like how julienned basil provides the final touch for some Italian pasta dishes.
One last note: Don’t take that nori garnish for granted. It adds an essential flavour to the dish once mixed in; a deeper, more umami flavour of the ocean. It really completes things.
I hope you will enjoy making this Mentaiko Pasta recipe! Leave a comment, rate it (once you’ve tried it), and take a picture and tag it @leplaincanvas on Instagram! I’d love to see what you come up with.
Mentaiko pasta has become a classic of the Japanese-Italian kitchen and is popular on late-night menus as an accompaniment to heavy drinking. It’s also as easy as can be: deliciously buttery noodles tossed with spicy cured pollack roe and strips of nori—all the flavour of the ocean, packed into an effortless bowl.
Ingredients
Kosher salt
1/2 pound (225g) dried spaghetti
1 1/2 to 2 ounces mentaiko (40 to 55g; about 2 small lobes)
In a pot of salted boiling water, cook spaghetti until al dente, according to timing given in package instructions.
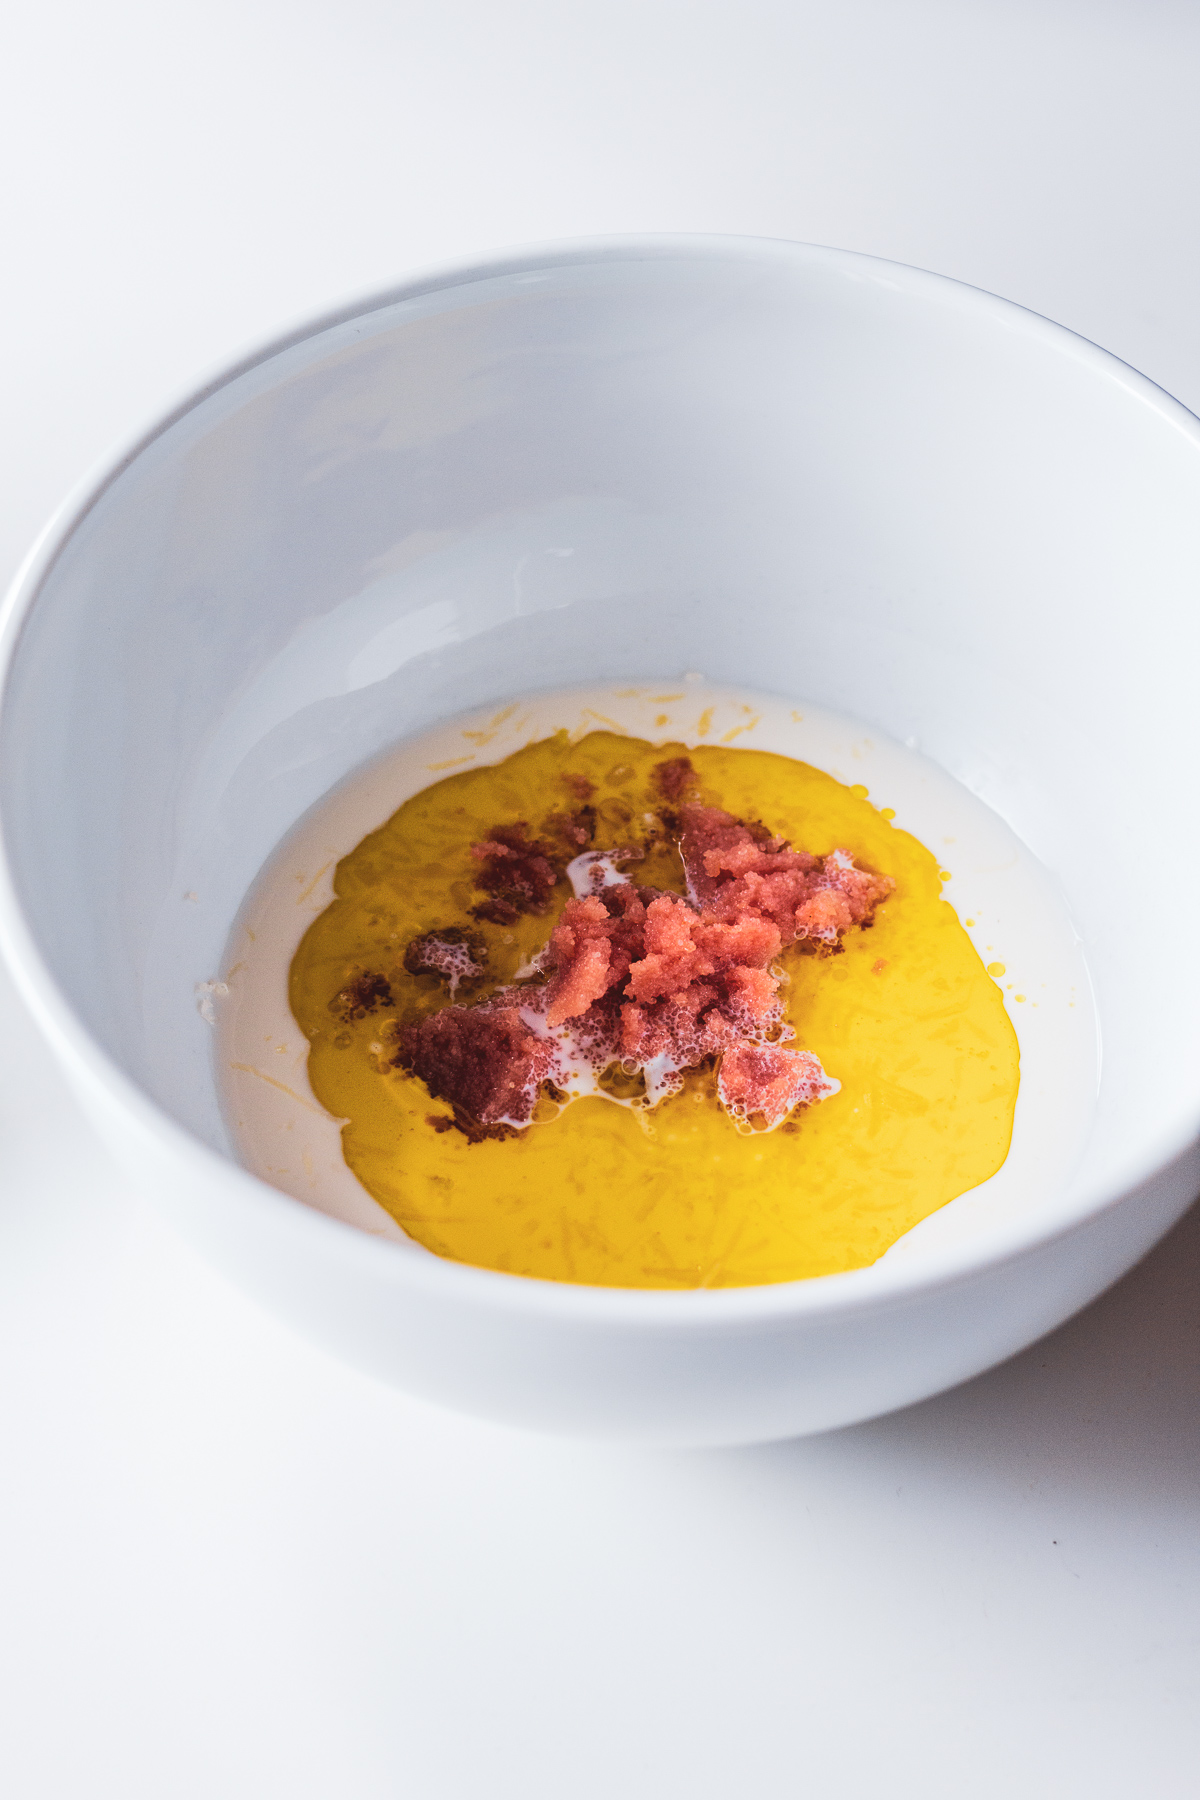
Meanwhile, using a sharp paring knife, slice mentaiko lobes open and scrape out roe. Reserve 2 teaspoons (10g) roe for garnish and place the rest in a large heatproof bowl. Add soy sauce and melted butter to bowl with roe, stirring to combine.
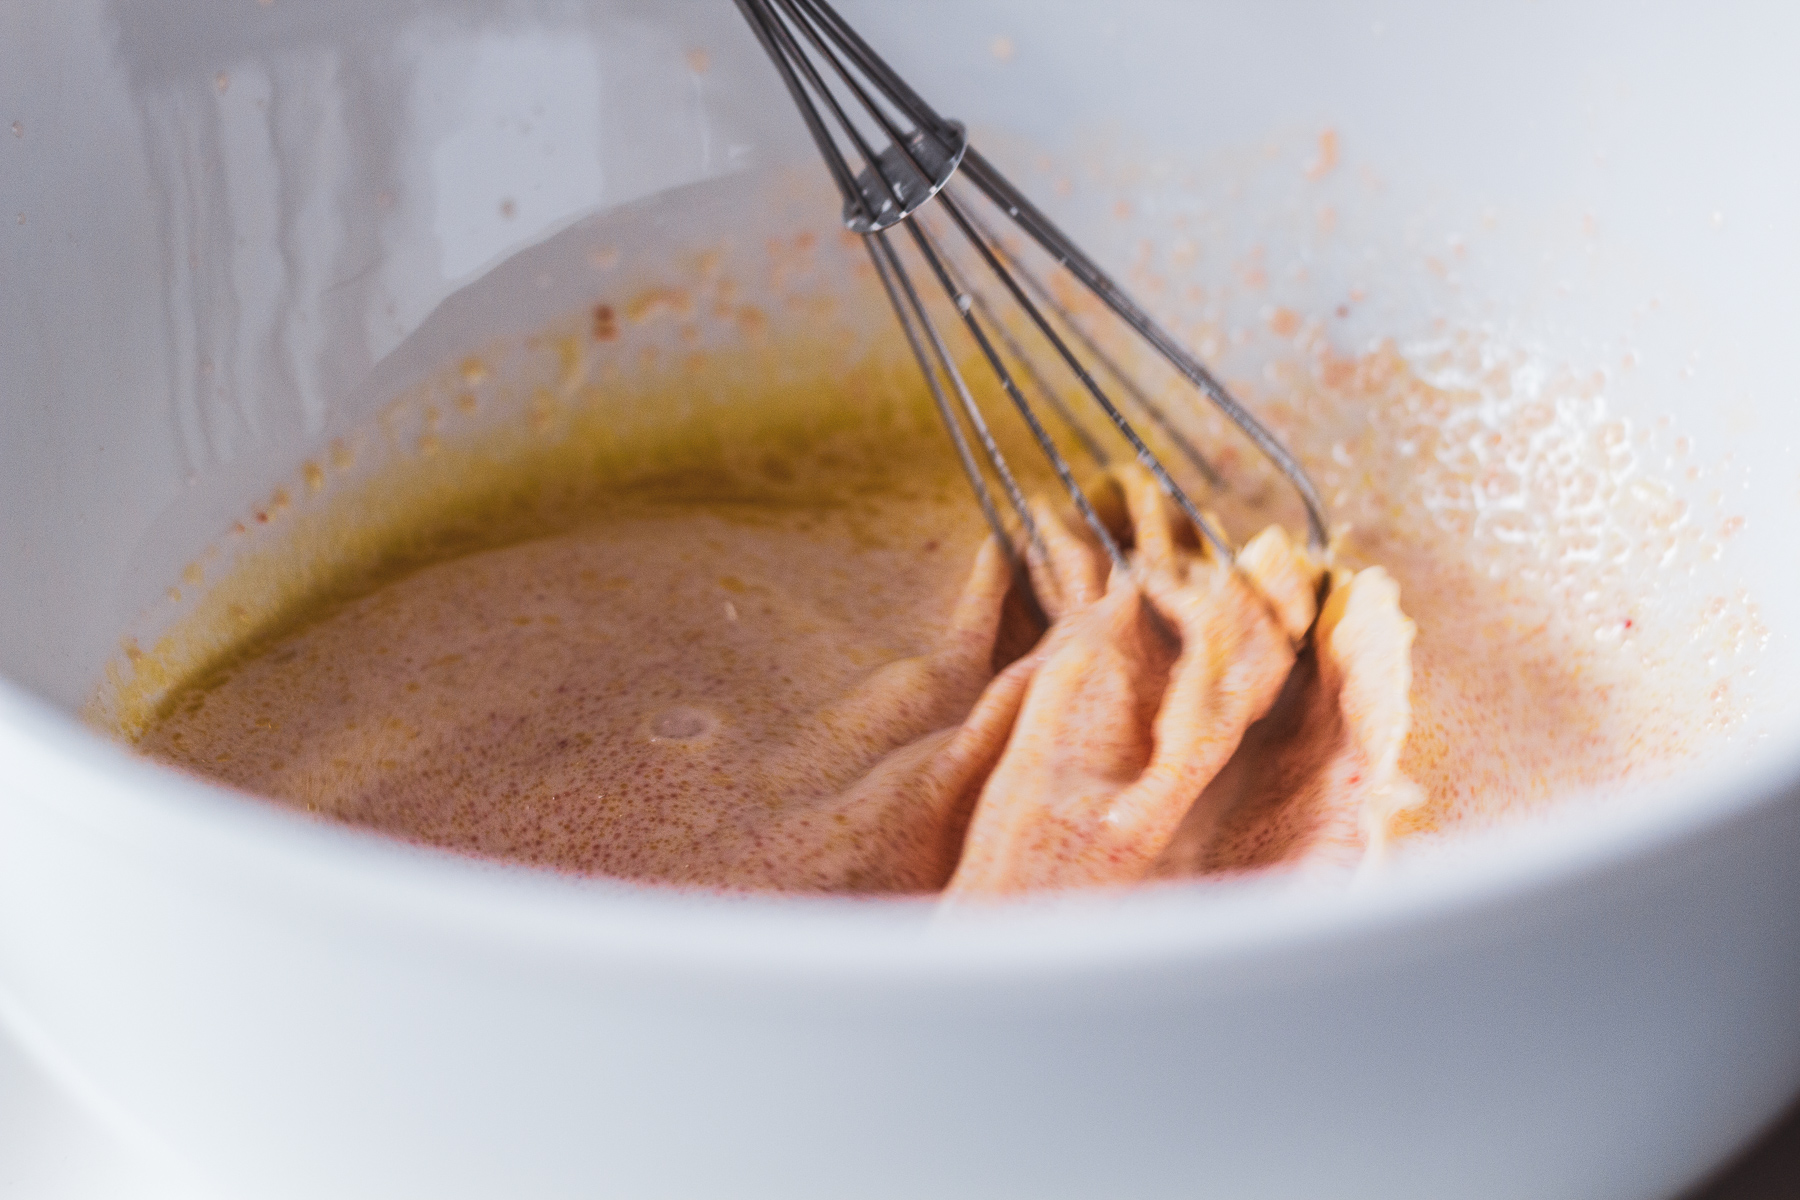
When spaghetti is done, transfer to bowl with butter sauce using tongs. Add 1/4 cup (60ml) pasta-cooking water, then stir and toss pasta until it is evenly coated in sauce, any excess liquid has been absorbed, and a smooth, creamy sauce has formed. Transfer to serving bowls, top each bowl with reserved roe, and garnish with nori strips. Serve right away, mixing nori and roe garnish in with chopsticks before eating.
If you’re planning a trip to Thailand and want to make sure you hit all the dazzling spots, we got you covered. Here, we’ve curated a list of 8 Most Instagram-Worthy Spots in Thailand that will aesthetically feed your ‘gram. From ornate shrines to beautiful landmarks and iconic buildings, make the most of your time in Thailand and get beautiful pictures!
Wat Chaiwatthanaram
Ayutthaya is a city in Thailand, about 80 kilometres north of Bangkok. It was capital of the Kingdom of Siam, and a prosperous international trading port, from 1350 until razed by the Burmese in 1767.
This temple is also a part of Ayutthaya Historical Park and it is one of the best known Ayutthaya’s most Instagram temples. What makes Wat Chaiwatthanaram so special is its architecture; the temple is built in symmetry. This shows how this temple was planned out perfectly before it was built. Therefore, it was defined as a UNESCO World Heritage Site in 1991 and remained important to Thai people until now.
Address: 4 196 Khlong Tho Rd, Phra Nakhon Si Ayutthaya District Opening Hours: Daily, 8.20 am to 6 pm Fee: 50 baht
Pino Latte at Khao Kho
Head out to their open areas for cool shots like this. Of course, I kept my drink free in order to get this chic shot.
I’m sure we can all agree that pretty views and a nice cafe ambience just makes our whole dining experience so much better. Pino Latte will raise your expectations of any cafes you visit in the future with its chill vibe and view of the mountains in the distance. *If you come in the morning you will be able to see the thick misty fog right underneath your feet.
While Chinatown in Bangkok is infamous for their amazing food it’s and another great photo stop for a pop of colour on your feed. Due to the mix of Chinese and Thai cultures, this area is unique and fascinating with stunning temples, street food and everyday street scenes. If Instagram is your main agenda, you’ll be glad to know that the vibrant street and large colourful display boards make a good backdrop for the ‘gram.
Address: Yaowarat Road
The colourful mosaic wall at Wat Pha Sorn Kaew
Thailand is known for majestic temples that not only attract devotees but tourists as well. Wat Prathat Pha Sorn Kaew is no exception. This place of worship has everything from intricately adorned pillars to a grand pagoda that stands majestically in the centre.
If you look closely at the walls, floors and pillars, you’ll find them plastered with different shards of ceramic, beautifully arranged to give a mosaic effect and a unique finish to the place. We were even lucky enough to see one of the artists arranging the pieces to decorate another portion of the temple.
And when you’re done admiring the architecture, drop by the Buddha structure which is equally as impressive. It’s an all-white statue jazzed up with silver embellishments that help to reflect the sunlight, giving the illusion that the statue is glowing.
A dreamy shot in front of the mist at Tanrak Talaymok
We wouldn’t call myself a die-hard nature lover, but we sure couldn’t deny the beauty of Tanrak Talaymok, a restaurant-cum-resort with an open-to-public flower garden. This place is a must-visit photo spot, which is good if you’re on a long drive and need a pit stop. There is also this bench under the tree where we recreated this “Winnie the pooh” photo.
We’d suggest coming here in the morning to check the misty mist off your list and settle dinner at their restaurant, which serves local Thai food. Alternatively, you could book a stay at the resort, where the rooms come with balconies for you to star in your very own Cinderella movie – waking up to birds chirping and a field of flowers dancing in the breeze.
King Kong Khao Kho is a one-stop venue for you to get Tumblr-Esque flower shots in their lalang fields. They even have giant hay structures of King Kong and an elephant which younger kids would have fun posing with.
Another option where you can capture the windmills in their full glory is Khao Kho Windfarm, which is just a 10-minute walk away. This village area is surrounded by many strawberry and cabbage plantations and also doubles up as a viewing point for the massive wind turbines.
Set on the banks of the Chao Phraya River, the temple is a grand and striking sight that will enchant you and your Instagram followers! When the sun sets over the city, Wat Arun is lit up like a shimmering tower of gold against the inky night sky. Whether you capture its beauty from across the river, or climb to the top and snap some close-ups and shots of the view, Wat Arun is one of the best sights in Bangkok and a perfect backdrop for your Bangkok photography.
Address: 158, Thanon Wang Doem, Wat Arun, Bangkok Yai, Bangkok 10600, Thailand Opening Hours: 8 AM – 5.30 PM
Wat Benchamabophit aka Marble Temple
Built from marbles imported from Italy, Wat Benchamabophit is also known as ‘the Marble Temple’. It was designed by Prince Naris, he is well known as a master prince by his gift in architecture, design and music. We think it’s one of the most beautiful temples in the city, and one of the best places to see in Bangkok. It flaunts a photogenic symmetry that will stop Instagram scrollers in their tracks!
Light coloured marble is adorned with splashes of red and gold, while the structure is shaped with balanced curves and angles that the eye can’t help but find pleasing! Snap a strikingly symmetrical shot from the front of the internal courtyard, or capture the temple glowing in the soft golden hour light. Bonus points if you frame it with the archway of the door frame, you want to be a bit creative with your Instagram shots after all!
We hope today’s ’8 Most Instagram-Worthy Spots in Thailand treated you well. So what are the places that you are most excited about? Let us know in the comments. One last thing, don’t forget to share it with your friends and family!
Brick walls have been around for a long time and were a common sight especially in older homes or buildings. When drywalls, pre-fabricated walls and building blocks weren’t invented yet, the old’ brick wall was a necessity. Nowadays, you can still see them in older buildings, as well as buildings that want to retain that old world look. Oftentimes, you can also see bricks being used as a decorative & aesthetic element in interiors, adding a sort of rough and rugged appeal to space.
Bricks are one of the materials that have proven their timelessness. Not only do they look good, but they are also sturdy, which is why older buildings still have their original brick masonry intact! No matter what the style of the color scheme of your space, a brick wall will surely be a great additional feature.
If you have a modern space that mainly uses white or any light colours for the walls and furniture, a red brick wall is an excellent choice to add contrast and texture to space. The example above uses the home’s original vintage bricks to give it rough, imperfect edges and create visual interest.
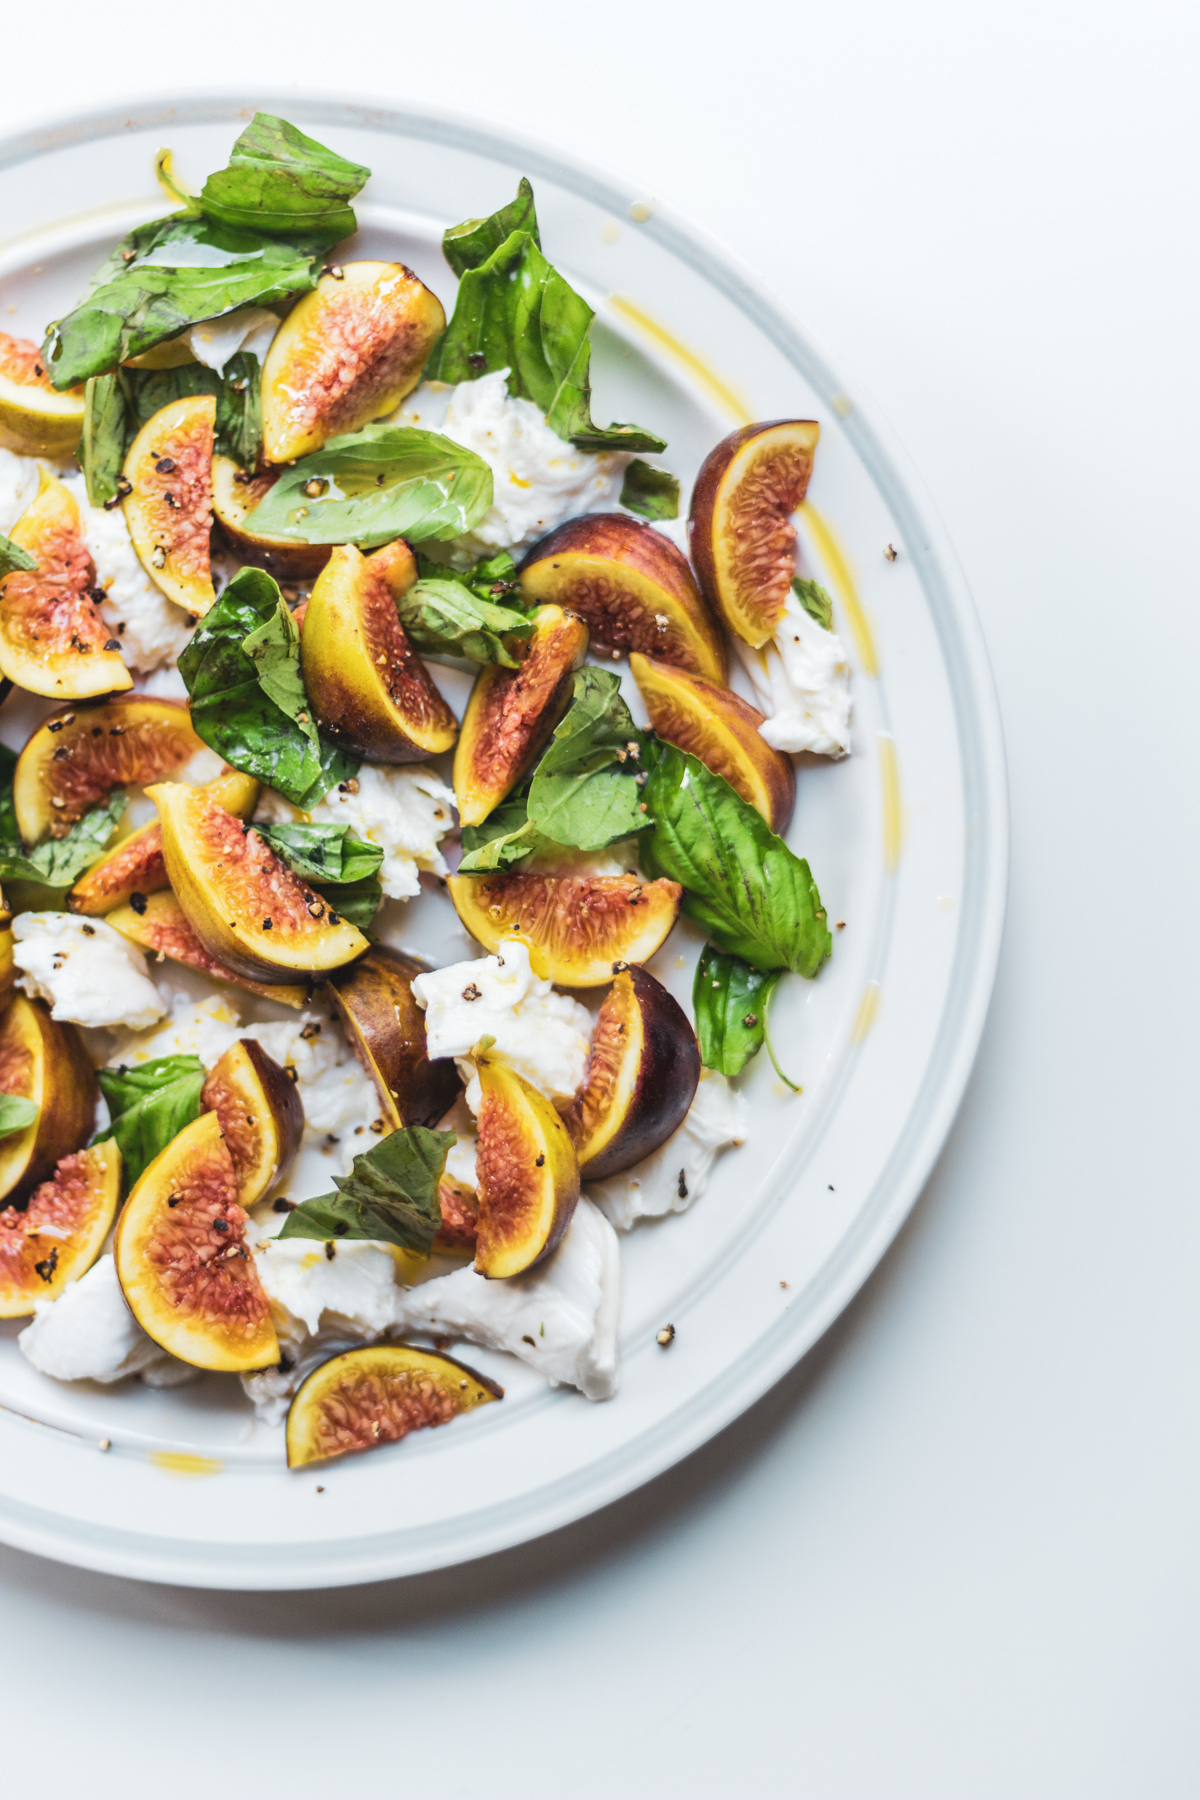
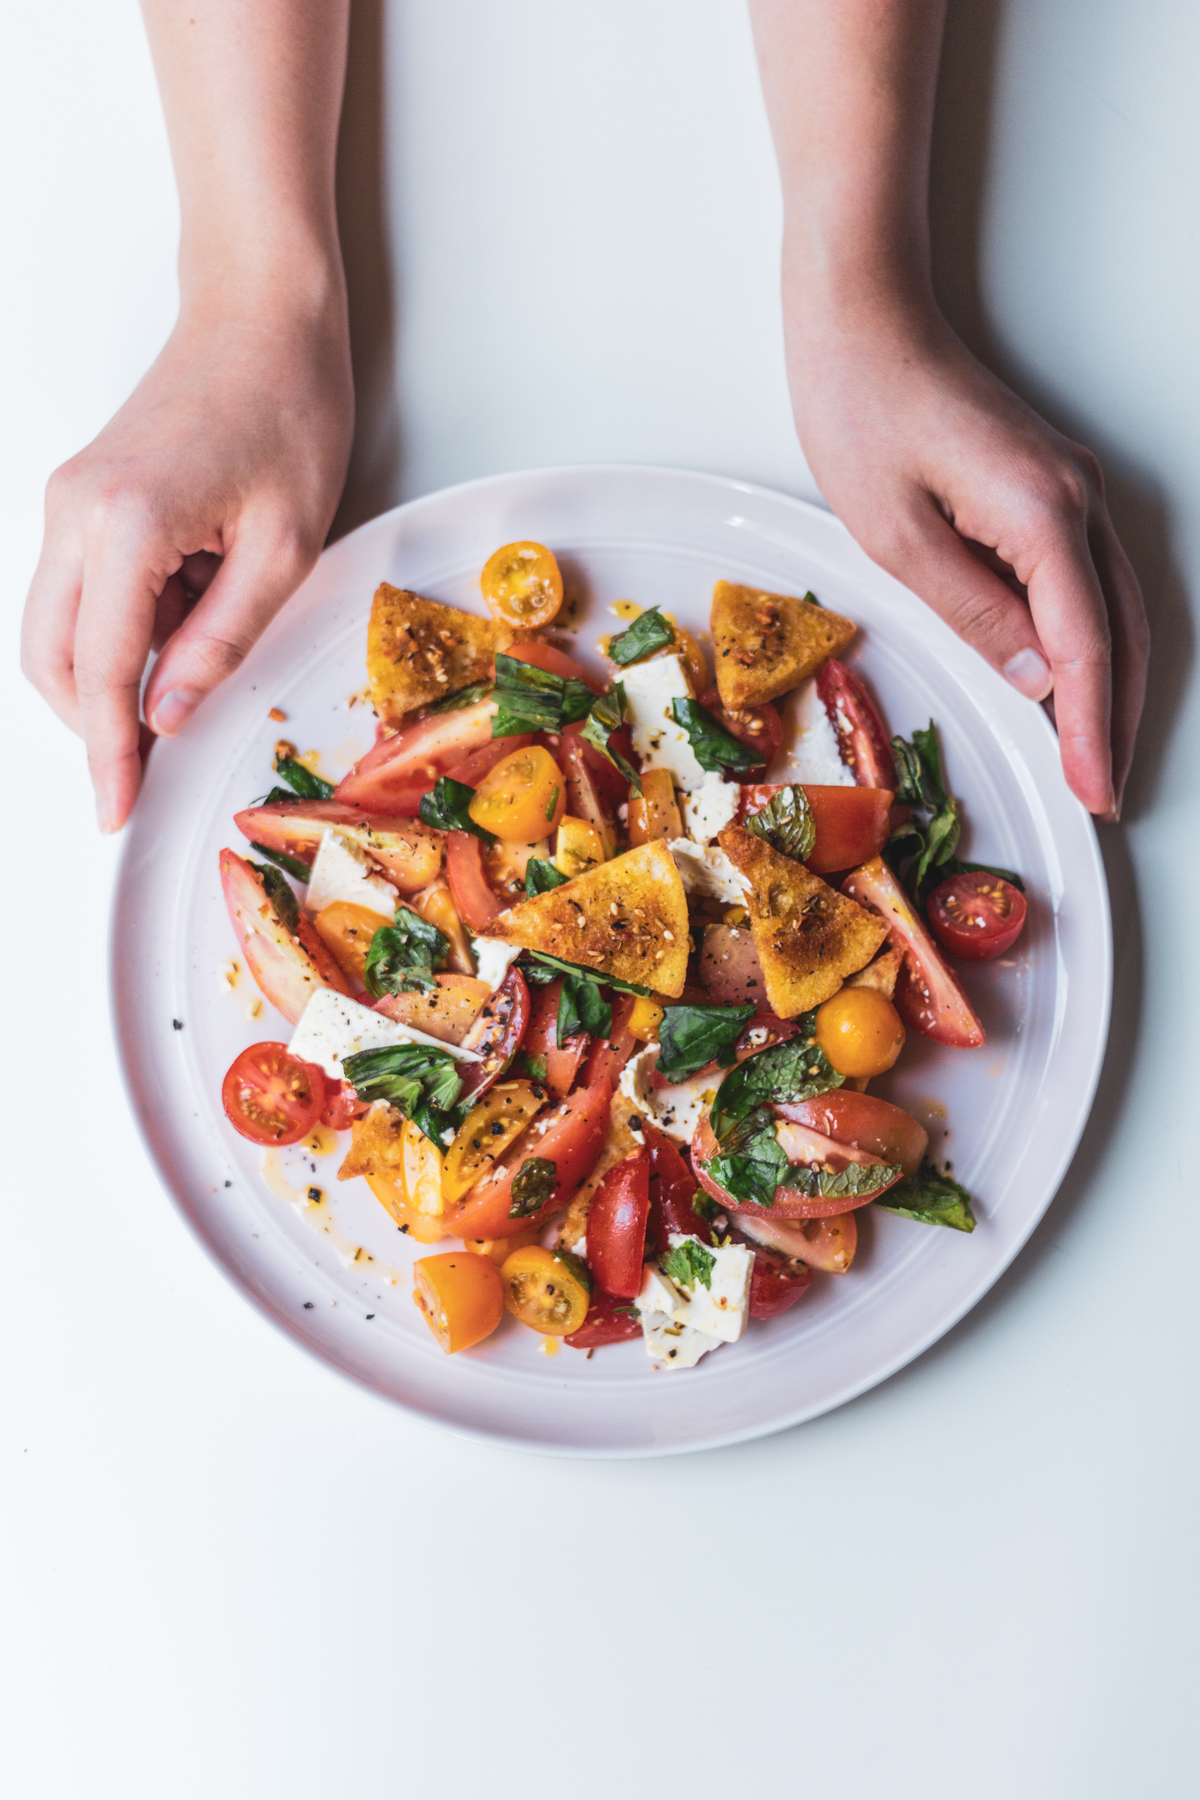
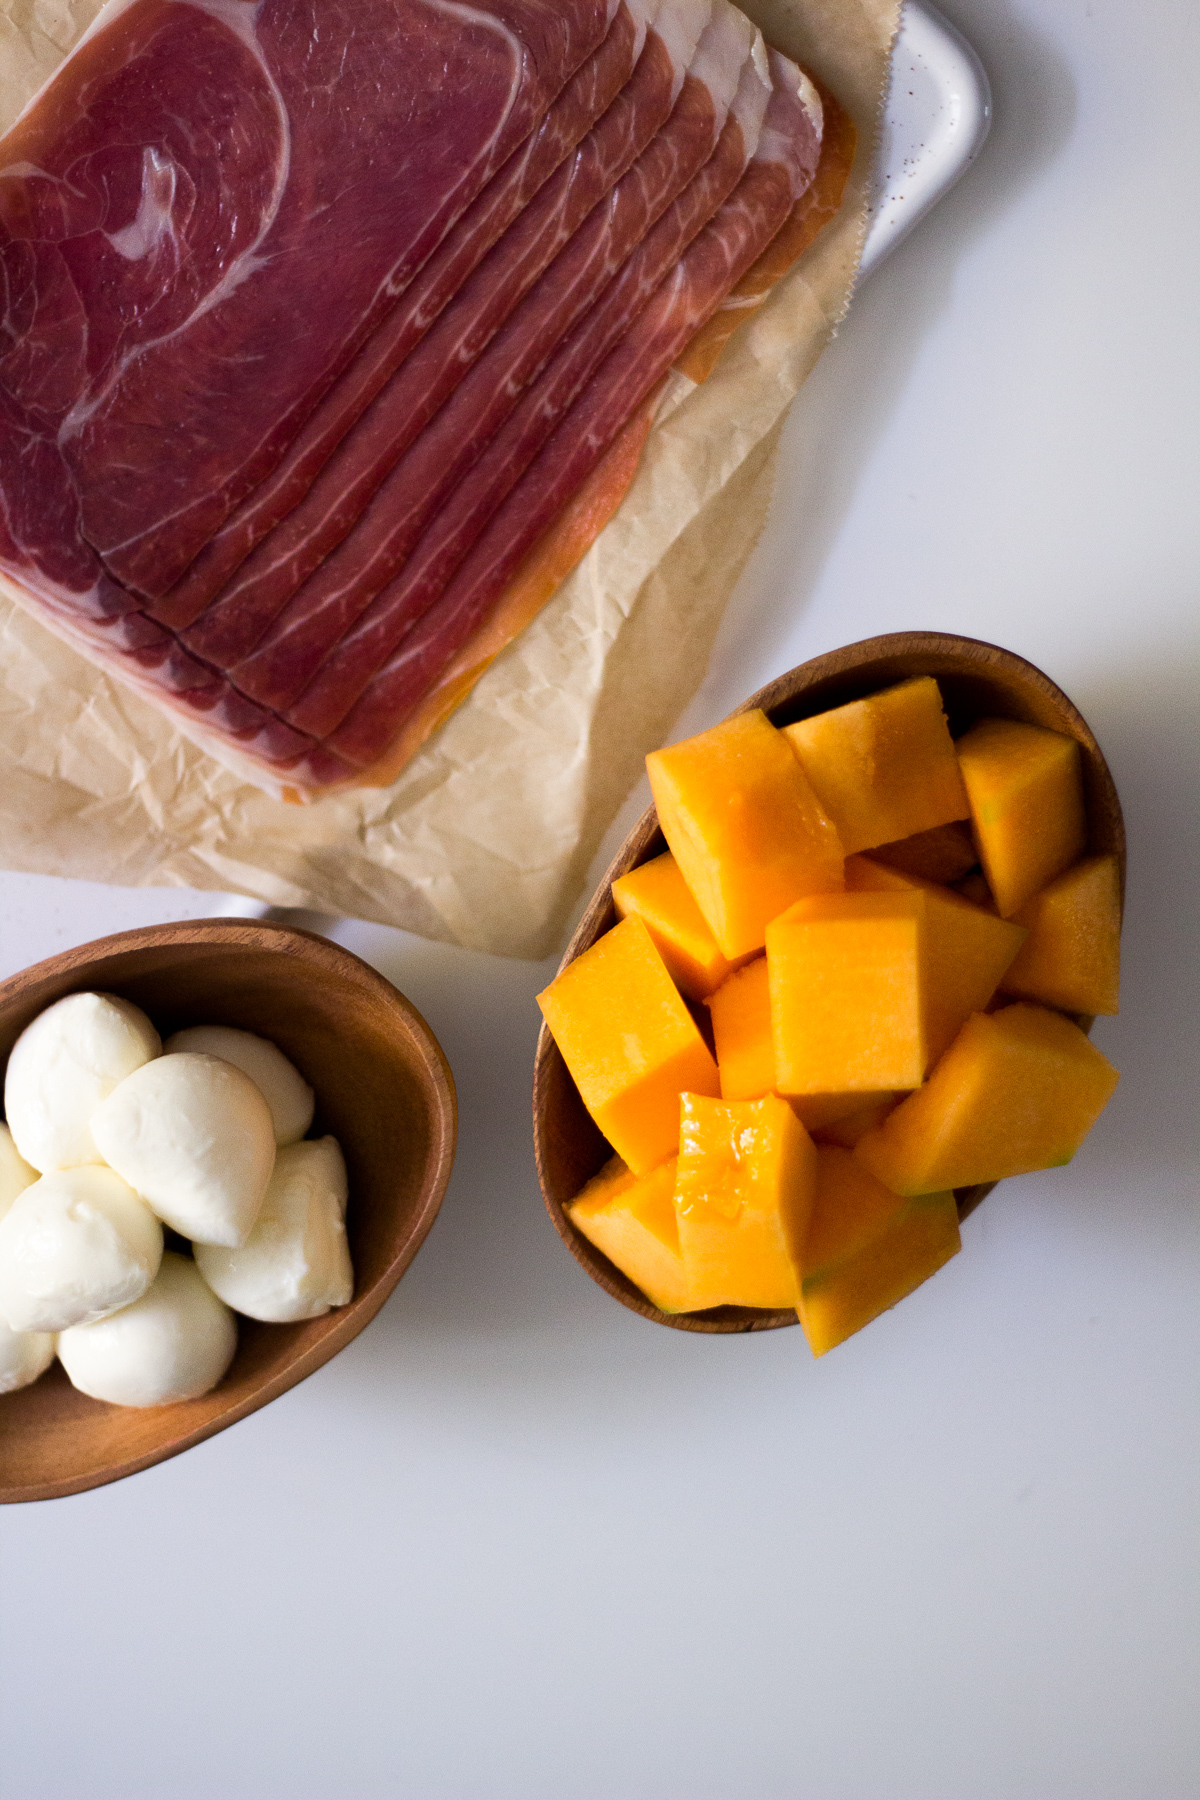
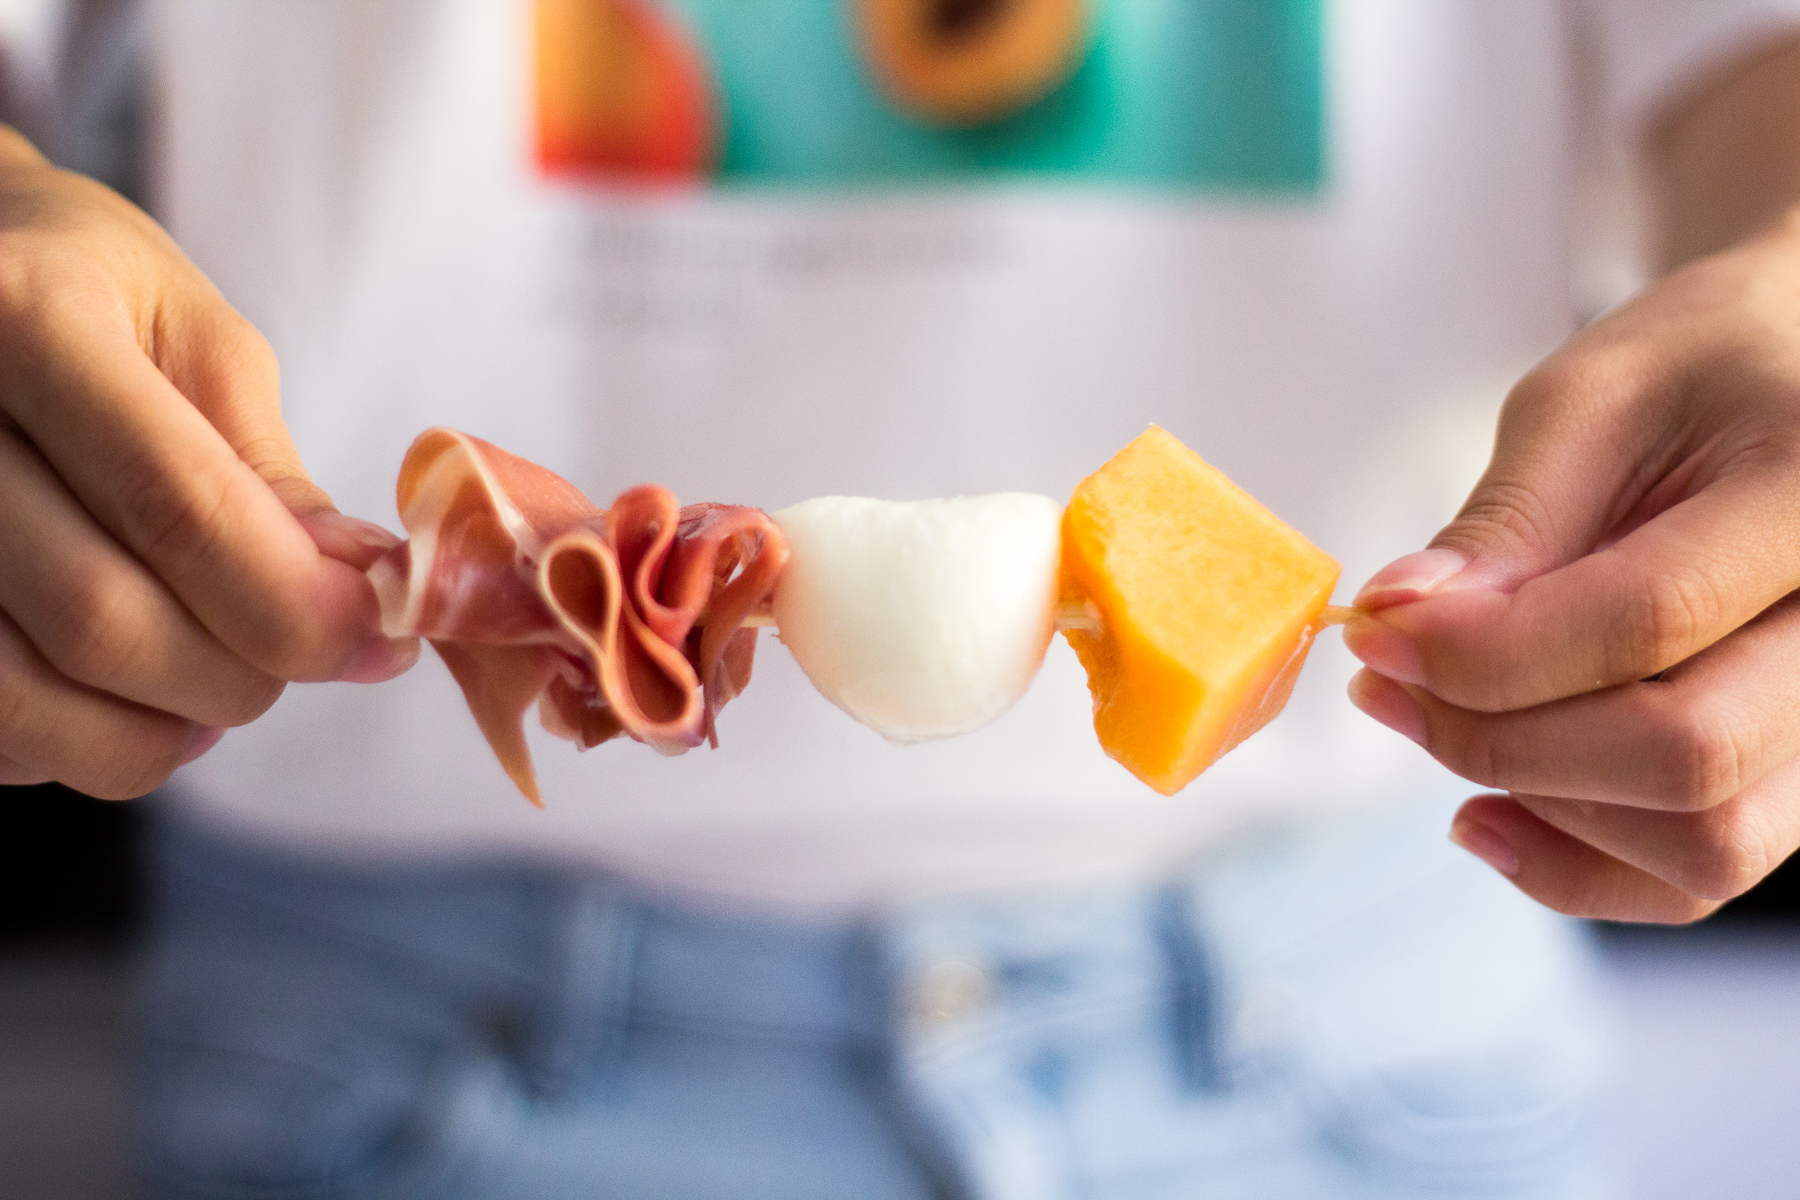
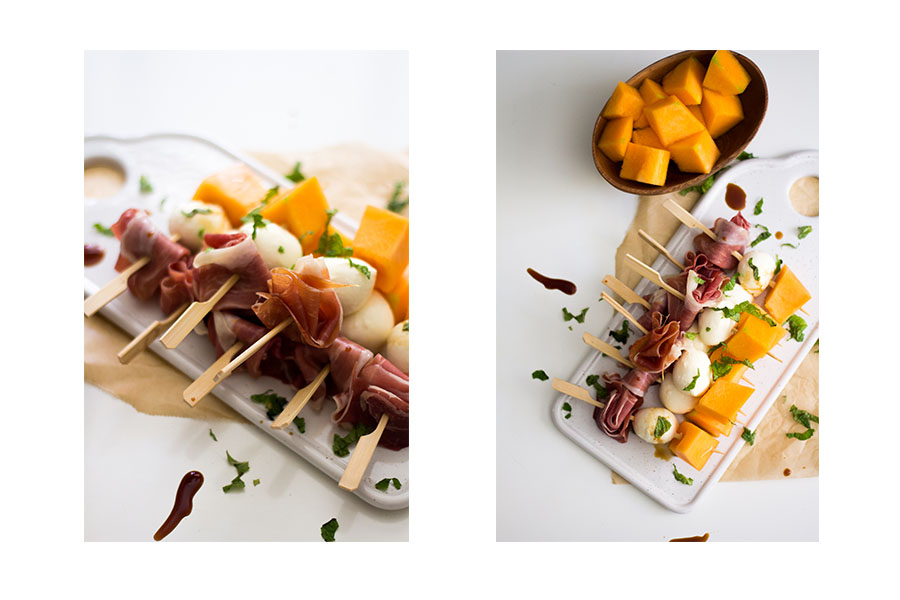
With the Corona Virus around it best to eat healthy and exercise regularly. Therefore we decided to make a simple and healthy snack to fight this virus – Fig and Mozzarella Salad.
This Fig and Mozzarella salad is going to become your new favorite twist on a classic Caprese salad. This is a Fig Caprese! Yes, we are talking figs with cheese. The ripe fresh figs replace the tomatoes, making this a fruity yet savory addition to your dinner table. What could be better than ripe figs, fresh mozzarella, good olive oil and fragrant basil? A perfect lunch or light dinner.
What is a Caprese Salad? A Caprese salad is a classic Italian salad. It is made with fresh tomatoes, fresh mozzarella, tomatoes, and sweet basil, seasoned with salt and great olive oil. Here the tomatoes have been replaced with sweet ripe fresh figs!
I know it sounds a little crazy but replacing the tomatoes with figs really does work so well. And if we think about it, a tomato is a fruit, a fig is a fruit so it isn’t too weird! The sweetness of the fig works so well with the basil and the bite of the olive oil. And creamy fresh mozzarella makes everything better!
Which mozzarella to use in a Caprese Salad?
Caprese salad has just 5 ingredients: Tomatoes, mozzarella, basil, olive oil, sea salt. So it stands to reason that with so few ingredients that you want them to be the best they can be.
For this reason pick a fresh mozzarella that is packed in water. The texture and taste will be worth it. Also allow your mozzarella cheese to come to room temperature before you eat it, this will change the taste and texture.
You can buy fresh mozzarella in bags or pots of water. Which actually isn’t water at all, it is whey. The whey is designed to keep the mozzarella moist so that it still has the soft milky texture.
Remember to season your salad! Even the best olive oil you have you couldn’t complete the aroma of this salad without the help of salt. I know salt gets a bad rap these days but there is no substitute for it here! Salt isn’t just about adding a salty taste to our food; it actually makes foods taste more of themselves. For us we uses the sea salt adds a crunch to what is otherwise quite a soft salad. Use coarse sea salt to really add texture to the dish.
We also complete the salad with the freshly grounded black pepper. What I will say is that freshly cracked black pepper straight from a grinder is 10,000% better than dusty pepper from an old spice jar – just saying.
I love this salad as simple as it is, served as a refreshing starter or a light meal. But a couple of sweet Parma ham slices, an extra bunch of arugula and some toasted rustic bread, will make it well-balanced dinner too.
Please let me know how you liked it! Leave a comment below and share a picture on Instagram with the hashtag #byplaincanvas! Looking at your pictures always makes me smile *and super hungry*!
It’s not about the number of steps or ingredients in a dish. If you shop smart, buying peak-season produce and quality protein, you don’t have to do much at all (like with this easy salad recipe).
Ingredients
8-10 ripe fresh figs
2 fresh mozzarella balls approx 4oz/120g each
small handful fresh basil leaves
1 1/2 tbsp extra virgin olive oil
1/2 tsp sea salt
Methods
Cut the figs into halves or quarters and arrange on a platter/plate.
Tear the mozzarella into rough chunks and arrange amongst the figs.
Sprinkle the fresh basil over the salad, then dress with extra virgin olive oil and the sea salt.
As a traveller, if you ever travel to Thailand, Bangkok or you planned to travel there. Wat Aru (also known as the Temple of Dawn) is a well-known landmark in Thailand – it’s one of a beautiful place to visit. While the temple filled with history but it is also an Instagram-worthy place if you are searching a spot for your Instagram-album collection.
This is the second time I have been to Wat Aru but it is the first time I witness the beauty of the structure as a couple of years back it was under renovation. The temple derives its name from the Hindu god Aruna, often personified as the radiations of the rising sun. We enjoyed exploring places with beautiful architectures – to spend time to see the buildings/temples therefore I respect the architects a lot. As their brillance builds the history in the world.
Tips for photography I wouldn’t say that these are tips but for those who want to take some photographs that stand out from those tourist shots, there are a few things you can always explore.
Explore different angles – play with the wide shot, close up, depth-of-field
Play with the available spaces – look from different
Capture the different expression – the model don’t have to always look into the screen as that is not the only to express the thought
Carry a tripod
Always shoot in RAW (you can do it with smartphones now)
Shoot in the shade (Avoid direct sunlight)
We hope that you find these tips useful, share with us your photos by tagging #byplaincanvas on Instagram.
The story of the Peranakan tile began back in the early 1900s. These ornamental pieces found their way to our shores thanks to the British and found favor in particular with the local Peranakan community, who regarded them as an emblem of wealth and affluence. With its intricacy and artistic detail, it is not hard to see why these tiles became a requisite of the Peranakan decorative repertoire. While these tiles are something to be fascinated by, little else is known about their origins and story. Today we scratch the surface to bring you the finer details of these charming, sentimental decor.
Conventionally, they are loud and ornate, with a predisposition towards sturdy solid wood furniture. But in today’s KonMarie world, where less is more, homeowners here are taking a more pared-back, subdued approach to this traditionally decorated style.
The outbreak of the coronavirus has scared most of the public in the world today. Life has to go-on, while all of us are fearful of the virus, we need to face the fact of the world going through a tough time. There’s this scary dominoes’ effect of disasters since the beginning of the year has not been stopping. Meanwhile, we have more time working from home and we decide to quickly catch up on the post we have promised a long time ago. We shared posts of our Japan trip hence there are many places that fall on the “others” category. Therefore, we decided to compile some must-go places in Tokyo – while it is less tourist area hence it is always crowded as it is loved by the locals in Tokyo.
Zojoji Temple + Toyko Tower
While Toyko Tower is a symbol of Japan’s post-war rebirth as a major economic power, it was the country’s tallest structure from its completion in 1958 until 2012 when it was surpassed by the Tokyo Skytree. Hence it is still a lovable structure in the world with its iconic bright red and white structuring. You will never want to miss it beautiful lights that change from time to time in the evening till midnight.
For those, if you ever watch Cardcaptor Sakura you will know the infamous scene of Sakura had her final battle at Zojoji Temple and on the Tokyo Tower itself. Its artist is well-known in her art capturing of the scenery. While we did our trip-planning we decide to explore if it is true. It appears that you can have the best view of the Tokyo Tower at Zojoji Temple and the park beside the temple.
Many tourists might not know about the Zojoji Temple, it is the temple grounds consist of some impressive structures as well as a mausoleum of the Tokugawa family and a museum. It gives a peaceful vibe upon entering the space, it is an interesting historical spot for a walk during a weekend afternoon. We highly recommend you to visit this temple if you decide to watch Tokyo Tower from far, it is a beautiful location for a photo and learning history
address: 4 Chome-7-35 Shibakoen, Minato City, Tokyo 105-0011, Japan business hour: 9 am to 5 pm
Kanda + Jimbocho
We find that Tokyo, Japan is a very organized city, you can find that each district is distinct from one another. For book lovers, you will never want to miss this oldest street in Tokyo that sells all the range of books you are looking for. Jimbocho’s district is surrounded by both new and old bookstores; the old bookstores are not just second-hand bookstores, many of them contain valuable gems and historical materials.
If you are traveling there, you will find that the area is filled with students even on the weekend. There are plenty of cafes around for you to enjoy your new purchase books with a cup of coffee. Or a free-wifi space for you to study for the coming exams. In the area, there are many curry and udon stores that cater to young students. There’s even a curry festival in November.
Yaguchi Shoten’s structure was built in 1928 and its diluted coffee-color facade has remained unchanged since Japan’s first modernization.
address: 神田神保町2-5-1 Chiyoda, 東京都 〒101-0051 nearest station: Jinbocho Station
Kabukicho
Each city has its very own red-light district and Kabukichō in Tokyo famous for. Kabukichō is the location of many host and hostess clubs, love hotels, shops, restaurants, and nightclubs, and is often called the “Sleepless Town” (眠らない街). Shinjuku Golden Gai, famous for the plethora of small bars, is part of Kabukicho. Honestly, for two girls, we weren’t able to discover it on ourselves
Takahashi Ramen ( Kabukicho Store) For Ramen lover, you would love this fish broth base Ramen. Our Japanese fish brought us to this unique ramen store in the Kabukicho area.
Direction: JR Shinjuku Station West Exit Address: Japan, 〒160-0021 Tokyo, Shinjuku City, 19, 新宿区歌舞伎町1-19-3 歌舞伎町商店街振興組合ビル1階
View of Fuji Mount + Night view of Japan
There are many sight-viewing decks in Tokyo – among all (Tokyo Tower, Tokyo Skytree, Tokyo Metropolitan Government Building and so much more ) we decide to go with Tokyo City View as there is a museum within the building which I always want to go for a visit. It will be an ideal itinerary for a day spend, especially in the night we could have a bird-eye view of Christmas’s lighting (during November till December period). I really enjoyed the Tokyo City View as it is an open helicopter deck for the public. You can have an open space with a 360-degree view of the whole of Tokyo. We are so lucky that we witness the Mt-Fuji during the sunset at 4:30 pm.
Never underestimate the size of Roppongi Hill itself. While we thought that we could visit all the places in the area but Roppongi Hills Mori Tower itself took almost half of the day. To travel to Tokyo you really need to have the stamina to do so.
In the basement, there is this delicious Grilled chicken on skewers, or yakitori is quintessential Japanese soul food – Momodori. It is a busy Saturday when we reached the restaurant it is already a full house and we only get the standing table. The yakitori taste really good but not expensive. You can get absolutely full with just maybe a set meal. On the next visit, we promise to go back again and have several cups of alcohol as the price is very reasonable. (edits: While researching for the store detail, it is sad to find out that it has been closed. However, they still have sister stores around the city and I think it will be good to try)
Kitte Tokyo + Tokyo Station
While we always hate to squeeze with the tourist it is always best to visit some iconic places when traveling and Tokyo Station is on our to-do list. While throughout our days in Tokyo we have been passing by Tokyo Station to change our train we didn’t have a chance to walk around. For the last day of our trip, we make our way down to visit the station and also the Kitte shopping mall.
At Kitte Tokyo, not only they have trendy international fashion stores but they are also many locals brand. While one of our aim when it comes to visiting Kitte Tokyo it is to eat the sushi store – Nemuro Hanamaru Sushi. The experience is amazing and it really didn’t disappoint us at all. If you are visiting during the weekend make sure you come early to take a queue number as you may need to wait up to 2 hours for your turn. While waiting for your turn you can head up to the roof garden at level 6 to see the view of Tokyo Station.
address: JP Tower 5F, 2-7-2 Marunouchi, Chiyoda-ku, Tokyo 100-7005 business hour: (Mon-Sat) 11: 00-22: 00 (Last order 22:00), (Sun / Holiday) 11: 00-22: 00 (Last order 21:00)
Hopefully, it will be a helpful post for you! Please send us your recommendation so we could exchange and get to travel better!
It’s no secret that line drawings and face motifs are big trends in the worlds of fashion and interiors, with a presence on both the catwalk and in the home. MuralsWallpaper wanted to design a face wallpaper collection that celebrated the abstract style, allowing you to achieve the unique, creative feel that comes with using line art within your interior style.
The faces within the designs are all entirely unique, capturing an array of different expressions and personalities in one fun design. Created in a range of colours, each design contributes a different feel to a room, for example, the Dusty Pink offers a minimal, boho feel that can be styled with light furniture to create a fresh feel.
This collection of continuous face line drawings is the perfect example of how imperfections make design much more intriguing. The pieces very much represent the beauty and diversity of a face and make for truly iconic pieces of wall art. If you are looking to bring a unique aspect and interior flair to your home, this continuous line drawing collection is perfect for you.
Now I was definitely a bit skeptical at the complicated mess involved in the making of a corn dog but boy, was I wrong. This is honestly one of the easiest things to make! All you need is a simple homemade cornbread batter and hot dogs on a stick. That’s it! Throw them in a hot pot of oil for 1-2 minutes and they’ll magically puff up into the perfect, most fluffy corn dog.
I immediately had 12 of these as soon as they hit the plate, leaving me to skip dinner. But hey, every bite was so worth it. Even Butters seemed to think so as he patiently stood by my side the entire time I was making this.
A quick-fix cornmeal batter coats the halved hot dogs, which are the perfect size for snacking or for packing in lunch boxes. For us, we get cocktails hotdog to save the time of preparing. When deep-frying it makes sure the oil is not too hot as your hotdog will get brunt in seconds. Turn off your fire and cool down your oil for a few minutes if you are frying in big batches as the temperature of the oil will keep on the increase.
While I bet that there won’t be leftovers thus we always make more to freeze it. You can keep it in the freezer for up to a month. Heat it in the oven without un-freezing it. We heat it for 10 minutes at 270C.
Craving more? If you give this recipe a try, let us know! Leave a comment, rate it (once you’ve tried it), and take a picture and tag it @leplaincanvas on Instagram! I’d love to see what you come up with. Keep the oil boiling and find more inspiration with additional deep-fried recipes.
The easiest corn dogs you will ever make! Perfect as an after-school snack, game-day appetizer or even a quick dinner!
Ingredients
Vegetable oil, for frying
1/4 cup cornstarch
1 (16-ounce) package beef hot dogs, each cut crosswise into 3 pieces
1 1/2 cups self-rising cornmeal mix
1/2 cup all-purpose flour
3 tablespoons sugar
1 1/4 cups buttermilk
Methods
In a large Dutch oven, pour the vegetable oil to a depth of 4 inches. Heat the oil to 350 degrees F.
Place the cornstarch in a small bowl. Place 1 hot dog piece on the end of each skewer. Dredge the hot dogs in cornstarch, gently tapping off the excess.
In a large bowl, combine the cornmeal mix, flour, and sugar. Add the buttermilk, whisking until smooth.
Holding the ends of the skewers, dip the hot dogs into the cornmeal batter to completely cover the hot dog. Holding the ends of the skewers, carefully place the battered hot dogs into the hot oil. Fry until golden brown, 2 to 3 minutes. Drain on paper towels. Repeat procedure with remaining skewered hotdogs and cornmeal batter.
There is no pleasure quite the same as tucking into a steaming bowl of hot homemade soup. Pho, a staple Vietnamese soup, is no exception. Much like miso to Japanese cooking and chicken noodle soup to American cooking, this soup is full of flavors to comfort and warm you up.
And while making pho at home might seem like a complex undertaking, in its most pure form, pho is nothing more than a beautiful broth, supple noodles, and the toppings you choose to add — which means many home cooks have the skills and tools they need to make a version to be proud of.
We combed through many recipes for making pho broth at home before settling on this method we’re sharing here. During our research, we found that most recipes can be divided into two schools.
Elaborate, with three or more types of bones: On one side, you find the more elaborate recipes, with broth made from three or more types of bones.
Shortcut recipes that simply flavor boxed broth: On the other hand, there are recipes filled with shortcuts to get you to the flavors of pho in a hurry.
But when we consider how to make the best pho for most home cooks, we find ourselves somewhere in the middle, with our focus squarely on producing a stand-out broth from scratch.
We spent the majority of our effort on making the best broth — not only because that’s where the bulk of the flavor comes from in this soup, but also because broth-making is a skill most home cooks excel at or are eager to perfect. The techniques of preparing the broth in this recipe are universal. You can learn them here and apply them to your next soup-making endeavor, whether it’s pho you’re making or a favorite chicken noodle soup.
Overall, our goal is to give you a recipe for a soup that’s just as satisfying as the bowl you dive into at your favorite Vietnamese restaurant, but with a method tailored for you, the home cook.
How to choose the right ingredients?
There are many important steps to follow when it comes to cooking pho at home. We’re going to go through all of them in this cooking lesson. But before you even head to the kitchen, you’ve got to head to the store — because the first step to making really good pho at home starts with sourcing the ingredients.
Whether you head to your grocery store, order some of these ingredients online, or visit the Asian grocery store, below are the three ingredients to pay particular attention to. You can check out our detailed lists on what to look for when shopping for your soup for all the specifics.
Bones: Beef knuckles are the preferred cut for beef pho broth because they are rich in connective tissue but low on fat. The knuckle joints cook down in the broth, giving it body and a rich thickness that cannot be replicated. If you can’t find knucklebones, go ahead and double the beef shank called for here. Some Asian markets sell packages labeled “beef soup bones,” which can be exclusively knuckles or a combination of knuckles and shank (or leg bones). If you find them, snatch those up for beef broth.
Fish sauce: Be wary of supermarket fish sauce, which can be full of additives and preservatives. Instead, look for the fish sauce with two or three ingredients on the label. Red Boat is a great entry-level brand if you get overwhelmed with the choices at the Asian market.
Noodles: Beef pho is traditionally made with rice noodles. These flat noodles are sometimes labeled “rice sticks” and sold both fresh (sometimes found in the freezer section) or dried. Look for dried rice noodles with a medium thickness — too thin and they’ll dissolve in the broth, but too thick means endless chewing.
What to take note when making Beef Broth?
For the clear broth, parboil the beef bones: A hallmark of good beef broth is a clear, unclouded broth, without a slick of oil on top. To avoid a cloudy broth, parboil and rinse the bones before making broth. Parboiling removes surface debris and some fat, leading the way for a clearer broth. If you must skip this step, scrub and rinse the bones well before building the stock.
For the true pho flavor, char the aromatics: I’m going to ask you to do something contrary to all your culinary instincts. You have to burn the onions and ginger for this broth. Charring gives the broth a distinct, unmistakable smokey flavor and opens up the these aromatics for boiling.
Toast the spices to bring warm flavor: Warming spices like anise and clove are essential to pho broth. Toasting the spices and tying them into a tidy bundle for simmering in the broth keep their flavors from becoming too pronounced. The result is a subtly spiced broth that can not be mistaken for plain beef broth.
Now combining them together
A bowl of pho is made personal by what you put in your bowl. Up until then, all you’ve got is a spectacular broth, cooked rice noodles, and a tray of garnishes. Here’s how we recommend putting things together:
The bowl: Grab a big one — you’re going to need it.
The noodles: Add the noodles first; it’s easier to add them before the hot liquid goes in.
The beef: Add this in with the noodles. Make sure you cut it very thin. Once you pour over the broth, it will begin to cook
The broth: Ladle over the hot broth. It will continue to soften the noodles and cook the meat.
The condiments: Assemble a tray of mint, scallions, bean sprouts, and limes. Don’t forget to grab a bottle of Sriracha and hoisin, too.
A word of advice: Since most of the efforts in making pho go into making a delicious broth, start off with the Sriracha and hoisin in a small bowl on the side for dipping the meat into. If you like your broth teeming with the sweet heat of Sriracha and hoisin, stir both rights into your bowl.
If you give this recipe a try, let us know! Leave a comment, rate it (once you’ve tried it), and take a picture and tag it @leplaincanvas on Instagram! I’d love to see what you come up with.
2 pounds dry, small or medium rice noodles, labeled banh pho or rice sticks
3 scallions, thinly sliced
2 Thai bird chiles, thinly sliced
4 medium limes, quartered
1 cup bean sprouts
2 cups fresh cilantro, Thai basil, or mint leaves
Hoisin or Sriracha sauce (optional)
Methods
Parboil the bones and shanks: Place the bones and shanks in a large stockpot, cover with water, and bring to a boil over medium-high heat. Boil until a gray foam gathers on top, 5 to 10 minutes. Transfer the bones and shanks into a colander and discard the water. Rinse the bones and shanks under cool running water. Rinse out the stockpot and return the bones and shanks to the pot; set aside.
Char the onions and ginger: Arrange an oven rack directly under the broiler and heat to high. Line a baking sheet with aluminum foil. Peel and quarter the onions, halve the ginger hand and place on the baking sheet. Drizzle with the oil, toss to combine, and arrange in a single layer. Broil, stirring or rotating the pan every 3 to 4 minutes, until the onion and ginger are blackened, 15 to 20 minutes total. Set aside to cool.
Toast the spices: Place the star anise, cloves, coriander, fennel, and cinnamon in a large cast iron skillet over medium heat and toast, stirring frequently to avoid burning, until fragrant, about 2 minutes. Remove the spices to a small bowl and let cool. Secure the spices in a small spice bag or bundle made of cheesecloth.
Simmer the broth: Add the brisket, onion, ginger, and spice bundle to the stockpot. Add 1 gallon of water and bring to a boil over medium-high heat. Reduce the heat to a simmer and cook for 5 to 6 hours. While the broth is simmering, occasionally use a clean spoon to skim any gray foam from the surface. The broth is ready when it reduces by half and the brisket is fork-tender. The broth can be made up to a week in advance, or, if serving immediately, feel free to prepare the noodles, flank steak, and accompaniments while the broth cooks.
Strain the broth: Remove the brisket from the broth and reserve for serving with the finished soup. Add the fish sauce and brown sugar to the broth and stir to combine. Taste the broth. Does it need a little more salt or sugar? Make those adjustments now. Strain the broth through a fine-mesh strainer or a colander lined with cheesecloth set over a large bowl; discard the solids. The broth should be cooled and then chilled immediately for storing, or can be returned to a pot on the stove to return to a boil for serving.
Blanch the noodles: Place the rice noodles in a large bowl, cover with warm water, and soak. Meanwhile, bring a large pot of water to a boil. Drain the noodles and add them to the boiling water. Cook until tender, 1 to 2 minutes. Drain and set aside until ready to serve.
Freeze the flank steak: Place the flank steak on a plate and freeze 15 minutes.
Slice the flank steak: Thinly slice the flank steak across the grain; you may find a serrated knife works best for this. Cover and store in the refrigerator until ready to use.
Prepare the accompaniments: Slice the reserved brisket. Make a small tray of the herbs, chiles, limes, sprouts, and sauces.
Prepare pho bowls: Divide the noodles, brisket, raw flank steak, and scallions among wide, deep bowls.
Boil the broth: Bring the broth back to a boil over medium-high heat. Top each bowl with the boiling broth.
Serving and eating: Put the condiments in a small bowl on the side for dipping meat, as to not ruin the flavor of the broth.
To start the day it always good to have a cup of coffee. Café Kitsuné Tokyo is situated conveniently in Aoyama, just around the corner of Omotesando station. It hasn’t been too long since its arrival to Tokyo but the hype isn’t about to die. Yet.
The Japanese outpost has seats both indoor and outdoor—all bearing Japanese influences such as fusuma sliding doors and tatami. Its iconic photo spot is that one table in the outdoor, with bamboo poles forming a backdrop of sorts and the huge ‘Café Kitsuné’ signage.
Café Kitsuné Tokyo 3 Chome-17-1 Minamiaoyama, Tokyo 107-0062, Japan Tel: +81 3 5786 4842 Daily: 9am – 7pm Nearest Station: Omotesando
After our visit to Cafe Kitsune Tokyo in the morning for a coffee, we headed over to Omotesando Hills. At Omotesando, you will visit the super cool reflective entrance at Tokyu Plaza where all the Instagrammer take their photo at.
Besides the main strip, don’t forget to check out Cat Street. It’s where the ultracool and hipster shop and hangout. It’s much more hipster-like, less than Harajuku’s mainstream “Kawaii” style with numbers of used/vintage shops, street fashion clothing boutiques, and some street arts. It’s much quieter and cozy than the main street of Shibuya or Harajuku where the majority of people shop and it’s a great place to meet Japanese hipster culture in Tokyo.
Omotesando Hills 4-12-10 Jingumae, Shibuya-ku, Tokyo 150-0001 Nearby Station: JR Yamanote Line, Harajuku Station Omotesando exit, 7 minutes’ walk
Cat Streets Nearby Station: 7 mins fromHarajuku station
Make a left and keep walking, soon you’ll see Harajuku Station. Opened in 1906, Harajuku station still looks pretty much the same ever since it was first built. Its unique traditional look stands out among today’s Tokyo subway and train stations. Despite its small size, it’s the 6th busiest station in Tokyo, with 70k+ riders a day.
Right across the Harajuku Station is the famed Takeshita Dori, the main street in Harajuku. Takeshita Dori or Takeshita street houses hundreds of shops and restaurants that are on the leading edge of Japanese youth culture. Besides fashion, clothing, and accessories shops, there are wildly popular sweet shops that sell crepe, cotton candy, rainbow sweets, and various Japanese treats.
Even though they’re right next to each other, Harajuku and the uber high-end shopping at Omotesando can’t be more different from each other.
There is a lot of different food stores around Harajuku that you can rest your leg at. After resting our legs for a bit, it’s time to, you’ve guessed it, do more shopping in Shibuya! For more Japan travel guide click here.
While many think that you only can make art using paint but the answer is no. As the trend of retro is back to style. Many of them started customizing their window grill. Some using the traditional simple pattern while some modernize it and tell a story.
Old-fashioned metal window grills and door gates with their intricate designs and geometric patterns are commonplace in Singapore flats of the 60s and 70s. Many of these homes were then demolished and the structural pieces collected and repurposed into beautiful decorative pieces in today’s newer flats.
They’re a good choice as a room divider for small apartments. Owing to their see-through nature, you don’t get a visual heftiness like with concrete walls. Work them in plainer settings so that they’ll be more conspicuous.
This year Lunar New Year came early – while the Christmas and New Year have just barely ended, the festive season continues in the Chinese community. While we have lots of auspicious dishes, hotpot (aka steamboat) is the most popular gatherings ways of eating at all times. We believed that it is also the most easier way to serve a huge group of people and families.
Like a summer barbecue, a Chinese hot pot party is as important as a social event as it is a meal, where friends and family gather and cook around a common pot while chatting and sipping beer. The great thing about a hot pot party is, it’s easy to prepare and very affordable. Plus, a group of people can share so many ingredients, so everybody has an opportunity to try out a variety of things, as well as enjoy their favourites.
Hot pot is a Chinese cooking process. A big pot is set in the centre of the table containing boiling hot broth with a heating element underneath. Various raw ingredients are served around the pot, such as thinly sliced meat, seafood, vegetables, tofu, dumplings, and noodles. The guests cook the ingredients in the broth and eat them with a dipping sauce.
Broth/ Soup Base There are many different styles of hot pot in China, depending on the region. The primary difference from region to region is the broth. Choosing the type of broth is one of the most important considerations when planning a hot pot party because all the food will be cooked in this broth. So it’s essential to choose a flavour that pleases all your guests.
For our family, we don’t have a habit of heavy sauce-dipping, therefore, we take the soup base seriously. Although, there is so much option of soup base sell outside commercially. Our family continues our maternal-grandmother and mother’s tradition – we will cook our own pork bone broth at home. The reason we prefer pork bone broth is that having hotpot could be heaty and we do not wish to worsen it for our health. (Usually, if I have Chicken soup, I have fever and throat issues easily.)
– Pork Bone Broth – Chicken Broth – Seafood Broth – Mala Broth – Japanese-styled Broth (e.g. Shio/Soyu/Miso)
Condiments and Staple food While preparing hotpot (aka known as steamboat) we would never forget both condiments and the staple food (like rice, noodles, and dumplings).
Following are some of the basic types of condiments you will use: – Oils (e.g. Sesame Oil, Chili Oil) – Sauces (e.g. Soya Sauce, Yuzu Sauce, Goma Sauce) – Garnishing (Garlic, Corriander, Chilli, Sesame, Spring Onion)
Type of Staple Food: – Rice – Noodles (Rice Noodle, Udon, Glass Noodles, Ramen, Vincelli Noodle) – Matou – Dumpling
Now is the fun part. I love shopping for hot pot ingredients because you have practically unlimited options. And it’s a fact that almost everything will taste good thrown into a hot pot. Here are a few food groups that I recommend. It’s almost impossible to make a grocery list when it comes to hot pot ingredients because each grocery store carries so many different things. You should check out each food group and try to get a few diverse items from each group.
Meat and Seafood Some of my personal favourites include sliced beef, sliced lamb, and fish balls. Ideally, you should shop for these ingredients at a supermarket. Because you can find machine-sliced meat that is intended for use in the hot pot. You can find these meats in the freezer section. The meat slices are rolled and packed in plastic containers.
Of course, you can always buy the meat and cut it at home. In this case, you’ll want to buy some well-marbled meat and slice it as thinly as possible, so the cooked meat will remain juicy and tender.
For those who are not huge fans of meats, seafood is is another amazing option for Hotpot. Seafood such as shrimp, squid, and sliced fish filets all work well in the hot pot. There is also the option like; – Fish – Shellfish (Prawn, Oyster, Clams, Mussels) – Prawn Paste – we make our very own version of prawn paste which is very similar to the HaiDiLao steamboat that we like – Fish Maw – Octopus
One thing to remember is to never leave the meat in the hot broth and forget about it. The thinly sliced meat usually needs less than 30 seconds to cook through. What I usually do is hold the meat with my chopsticks and dip it in the hot broth, then immediately take it out when the colour has just changed to cooked (or medium-rare, sometimes).
Seafood needs to be cooked according to the same rule, that you always want to keep an eye on it so it won’t overcook.
Tofu and soybean product This food group is always a star at a Chinese hot pot party because there are so many varieties. There are tofu slices, beancurd sheets, fried tofu, cheese tofu, etc. All of them are made from soybeans but they have very different textures. The great thing is that they soak up flavour really well, so they taste so good when cooked in a hot pot.
Tofu usually requires the longest cooking time. So it’s very common to add a few pieces at the beginning of cooking and fish them out after 10 minutes or longer when you’re ready to eat them. The various tofu products require relatively little cooking time but they hold their shape well even when you cook them a bit too long. And they are edible even when cold, so they are ready to eat when tender and heated through.
Vegetables and Eggs
Another must-have on my hot pot table. Not all vegetables are created equal when it comes to the hot pot. The types that work best are leafy greens and root vegetables. For example, our current favourite Chinese Lettuce (油麦菜). For mushroom, although regular white mushrooms work well, do venture out and try out some different types. Some of my favourites include golden needle (enoki) mushrooms (separated into smaller threads), shimeji (separated into smaller bunches), king oyster mushrooms (sliced), and shiitake mushrooms (sliced or halved).
The smaller mushrooms only take 2 to 3 minutes to cook, versus the large shiitake mushrooms, which can take 5 minutes or more.
The prep you’ll need for a hot pot party at home
The best thing about preparing a hot pot party is that it requires very minimal prep work. All you need is:
1. Consider the dietary restrictions of your guests, then decide the type of soup broth you will serve. Also, you need to plan based on the number of guests. A big hot pot usually serves six people perfectly, but could possibly serve eight. If you have more guests, you’ll need to consider setting up two hot pot sets, so your guests will have enough room to cook and will not be waiting forever for small amounts of food.
2. Shop for the ingredients, preferably at an Asian market where you can get everything you need. If there are no Asian markets where you live, you might want to plan a few days ahead and order some of the ingredients and equipment online.
When shopping for food for the hot pot, you simply need to consider the amount of meat and seafood. I usually prepare 4 to 8 ounces of meat and seafood per person. And I usually get plenty of other ingredients so I have a beautiful spread of food. I’ll save all the leftovers and use them to cook soups and noodles in the days following the party.
3. On the day of the party, wash and chop all the ingredients. Prepare the dipping sauces. Add the hot pot base and water into the hot pot, set it on the portable stove and place it in the centre of the table. Prepare a slotted ladle on the side. Arrange all the ingredients around the pot. Prepare one to two small bowls, one plate, and one pair of chopsticks for each person.
Lastly, happy cooking and I wish you a successful hot pot party!
If you give this recipe a try, let us know! Leave a comment, rate it (once you’ve tried it), and take a picture and tag it @leplaincanvas on Instagram! I’d love to see what you come up with. xoxo, Angela
If you ever want to visit temples we highly recommend the temples in Kyoto, Japan. Hence if you didn’t plan to go to Kyoto yet, Tokyo actually has a lot of temples that are worth visiting. There is this beautiful yet adorable temple that catches our sight right away when we discovered it. We love the temples, and Gotokuji Temple definitely is on our list of going, it is also a “Lucky Cat” Temple for Cat Lovers which you won’t want to miss it!
We would say that both Spring and Autumn are the most beautiful season for temples visiting as most of the temples they designed with selected trees and flowers in their garden. Usually, you will find the most beautiful trees hidden on their ground, you can see why from most of our Kyoto temples visits. While some famous for their Sakura but Gotokuji Temple look the best in the autumn with their autumn leaves.
The temple is fairly easy to be found, simply get on the train to Gotokuji station via Odakyu Line hence to warn that you should plan as little itineraries as possible as it is quite far from the city area (which we underestimate it). From google estimation, it requires at least 50mins from the Shinjuku Station.
The neighbourhood is very quiet and beautiful, on the road you will see all the houses organized nicely in orders. Unlike places we stayed in Tokyo, I would say that this neighbourhood is further away from the city, they do not have any high rises building so you can see how clear the sky is and enjoy the breeze with just fragrance of nature.
Upon entering the temples, you will see it covered with red and orange autumn leave (during the Autumn season). It is so clean and magnificent. I’m amazed at how it is different from a Chinese temple, it feels so “zen”, the way of life that enlighten me on a different level. Unlike the Chinese temple, Japan temples are not just for prayers, they allow the public to go and find their own and enjoy what they are looking for.
Between, the period we went, we saw lots of little girls or boys dress up in their Kimono/Robes for prayers. We are curious but from a Japanese friend of mine, we learned that during our trip it was the season of “Shichi-Go-San”.
Each autumn, families with young children celebrate a tradition known as Shichi-Go-San. In the custom, which literally means “seven-five-three,” families with three- or seven-year-old girls or five-year-old boys visit a shrine or temple to pray for the health of their offspring as they grow. Don’t you think they are adorable?
Hotpots are an exquisite traditional Chinese way of eating: friends and family gather around a bubbling pot of broth on a conveyable stove with plates of meat, seafood, and vegetables able to be cooked within the soup. This is communal dining at its best, and the most memorable conversations are made over dunking fresh ingredients into hot, savoury soup followed by dipping them into sauces.
This is often communal dining at its best, and also the most memorable conversations are remodelled by dunking fresh ingredients into hot, savoury soup followed by dipping them into sauces. Taking the planet by storm is Haidilao Hot Pot, China’s hottest chain of restaurants with over 100 outlets in 60 Chinese cities, be loved by Singapore and all Asians. We conceive to up our game in an exceedingly hotpot and make their signature hot pot ingredients to assist you up to your steamboat game.
Angela’s obsession
My sister is definitely easily obsessed with a hobby or a sort of food. While Angela fell dotty with “Hai Di Lao” Prawn Paste initially sight despite her mild allergy to prawns. She still fell loving about eating them and that we have them whenever we are there. But because we are not wealthy and cannot afford to visit Hai Di Lao every week, we decide to recreate it based on what we taste and see.
Ways of Serving
You could serve the prawn paste in a piping bag like what they did in ‘Hai Di Lao’, where you will eat a small thick strip of prawn paste. Or you could put them in this bamboo holder, scooping them out using a spoon, allowing you to taste them like a prawn ball.
Our version’s texture is meatier; we think this is due to the sort of prawns, the way they were chopped, and the quantity of corn starch we used. The best part about cooking at home is that you may experiment with different methods because you don’t have to follow a recipe exactly like in the restaurant. We create our home’s taste in this way just like our grandmother and mother.
Now you don’t need to head down ‘Hai Di Lao’ for this and you could enjoy them at your cosy home. Give this recipe a try and don’t forget to tag us on Instagram as @leplaincanvas and use the #byplaincanvas hashtag. We love seeing your takes on my recipes!
Deshell the prawns and finely mince them, you can use a blender but we prefer the knife and board. Marinate it with a pinch of starch and the corn starch in and knead the mixture until combined well. Pound the paste onto a cutting board repeatedly till you reach a springy consistency.
Store in fridge till ready to cook. You could serve the prawn paste in a piping bag like what they did in ‘Hai Di Lao’, where you will eat a small thick strip of prawn paste. Or you could put them in this bamboo holder, scooping them out using a spoon, allowing you to taste them like prawn balls.
The prawn paste balls are ready to be eaten when they float to the surface, about 3 minutes.
Get ready to celebrate and start decorating for the Chinese New Year. Decorate for the Chinese New Year with items such as lanterns, take-out boxes, festive table settings, oranges, and tangerines. Tie in traditional symbols and incorporate the colors red and gold in the decorations.
Take advantage of these traditional Chinese New Year decoration ideas:
Lanterns: Select beautiful Chinese New Year lantern decorations to hang throughout your home or venue. Hang the lanterns both inside and outside of your home. Use the outdoor lanterns to help guests identify your home for a Chinese New Year party.
Take-out Boxes: Set up a table specifically for Chinese New Year party favors. Display the favors so they have a two-fold effect (serving as both favors and decorations). Put Chinese fortune cookies inside red take-out boxes. Decorate the outside of the boxes with gold designs, writing, or symbols.
Table Setting: Host a Chinese New Year party and be selective when it comes to the table settings. Lay down the foundation of the table with a red tablecloth. Use gold dinner plates and napkins. Place a centerpiece in the middle of the table such as a dragon figurine to symbolize power and good luck.
Oranges and Tangerines: Decorate which oranges and tangerines, which symbolize luck and wealth, as another Chinese New Year decoration idea. Put the oranges and tangerines in a bowl and place them in the middle of the tables for centerpieces. For another idea, hand out the fruit as the Chinese New Year party favors.
Plan out your Chinese New Year decorations ahead of time, and don’t forget to clean your home in advance of setting up the décor. Clean away any ill-fortune, and welcome luck for the upcoming new year!
I came across this image where the kangaroo is jumping across an orange sky. Two different perspective of view came across me. One – the kangaroo is jumping across the sunset and heading back to their nest. Two – the kangaroo is running for their life under the red fire forest.
While the brush fire has now got better but the animals and families there are not okay yet. Many organizations are accepting donations to help with these devasting fires; donations to help communities rebuild, to help injured wildlife, and to keep the amazingly brave firefighter teams going.
Samaritan’s Purse – Spearheaded by evangelical pastor Franklin Graham, Samaritan’s Purse has had boots on the ground in Australia for the past three months. According to the Samaritan’s Purse website, the humanitarian aid organization’s mission is to provide “spiritual and physical aid to hurting people around the world.” Samaritan’s Purse has a location-based in Sydney that works with local churches to set up command centers near disaster zones. Donate here.
Victoria, Australia Fire Departments – The Victoria Government has partnered with the Salvation Army and Bengido Bank to create the Victorian Bushfire Appeal. One hundred percent of the funds donated to the appeal go directly toward communities in need. Donate here.
New South Wales Rural Fire Service – Known for being the largest volunteer fire service in the world, the New South Wales Rural Fire Service is comprised of 2,100 rural fire brigades with a total of about 72,000 volunteer firefighters. Donations made to the NSW Rural Fire Service or local Rural Fire Brigade will directly benefit the organization’s volunteers. Donate here.
Today, the Chinese in Singapore mainly are both English and Chinese speakers hence each of us also inherits our grandparent’s roots. The most widely spoken dialects in Singapore include Hokkien, Teochew, Cantonese, and Hainanese. While both Joe and I surely learned and inherit both the culture of the Cantonese and Teochew. We also study deeply the food culture of our grandparents and parents origins. Despite being Chinese, different groups have different ways of preparing food. While the Cantonese love the bold flavours, the Teochew definitely enjoying the simplest of the taste that came from the ingredients.
While we are fortunate to born in both the culture as food is never boring with just one kind of flavour. This week we decide to share with you the making of Turnip Cake, 萝卜糕 is also known as Lo Bak Ko (the Cantonese pronunciation of Turnip Cake).
“Go” is the Cantonese way of saying “Kueh”, you will be surprised that in Asia that cake has multiple and hundreds of ways of making and we never define that it has to be just sweet. Savoury cakes play a huge part in our diets which we hope that more people get to know more about them.
Making Lo Bak Ko is fairly easy hence it contains many prep works, so if you are doing alone it considers at a 4 stars tough level. So we highly recommend you make it in a huge group when everyone is involved it makes things simple and time-saving.
Awhile back, I have this good friend shared with me that she was upset that foreigners don’t know about our dessert or Kueh’s culture.
As she mentioned that a foreign laughed about how Kueh Lapis is being made. “A dessert should be simple and what’s the fuse of having so many layers and despite the taste is the same,” she repeated what she heard from. That made me want to share more about our food – it’s a culture of our origin that we are proud of.
As you see, while Peranakan is a mixture of two cultures (Chinese and Malay) when two couples bonded as one.
It’s definitely will be complex and different but here is where a new culture is formed. That’s something so special that deserves to be praised and you can simply trace the history through the food we cook and eat. So we hope that you will fall in love with our food culture as we do.
You could serve in two beautiful ways – steam or pan-fry it after the 1st round of the steam (that we shared in the instruction sheet below).
We love the result of the Lo Bak Go, as it is firm and flavourful. You can serve and garnish it with spring onion. You will be able to taste all the amazing flavours from ingredients and with not even a bit of salt.
What I like about making it yourself is you could add in all the ingredients as much as you want, unlike a plain Turnip Cake you purchase outside.
Give this recipe a try and don’t forget to tag us on Instagram as @leplaincanvas and use the #byplaincanvas hashtag. We love seeing your takes on my recipes!
The Cantonse Go (Kueh) – made with raddish but often rampantly mistranslated as ‘turnip cake’- is a must for Chinese New Year or a Dim Sum feast.
Ingredients
wet rice flour
200g rice flour
140g water
other ingredients
45g dried shiitake mushroom
60g hay bee (dried shrimp)
360g peeled daikon raddish
30g wheat starch
2 lup cheong (preserved Chinese sausages, about 110g total)
2 tbsp lard
2 tsp minced garlic
2 tbsp minched shallots
2 tsp Shaoxing wine
1 tsp sugar
1 tsp white pepper
300g very hot water
oil for greaing pan
Methods
Met wet rice flour*(see note 1), which will be a stiff, claylike paste. Cover and chill for 12 hours.
Soak dried mushroom in lukewarm water for 8 to 12 hours in the fridge. Drain and reserve soaking water. Remove stems and cut caps into 6mm dice.
Rinse ans drain hay bee, cover with water and soak for 15 minutes. Drain, reserve soaking liquid, and chop roughly. Combine haybee liquid and mushroom liquid.
Grate one third of the radish into fine sherd with a stand grater. Cut the rest into 5cm matchstick, 3 mm thick. Combine all the raddish with the salt in a large bowl and mix well, gently rubbing in the salt. Cover and set aside for 20 minutes.
Pour raddish into a sieve se over a bowl, ans squeeze raddish shreds to extract their juices. Add enough hay bee -mushroom liquid to the raddish juice to obtain 420g liquid in total. Whisk this liquid with the wet flour and wheat strach until smooth. Set aside.
Rinse lup cheong witgh hot water, drain and pat dry. Cut into 6mm dice.
Heat lard in a wok over medium heat. When very hot , add lup cheong (preserved chinese sausages), garlic and shallots and fry for 1 minute. Add hay bee (dried little shrimp) and fry until shallots start to brown lightly. Add the shiitake mushroom, wine, sugar and pepper and fry for 2 minutes. Transfer mixture to a bowl. Do not need to wash the wok.
Finish the batter. Pour the 300g very hot water into the rice batter while whisking constantly until smooth. Pour batter into the wok. Add raddish, and stir constantly till the batter thickens to a creamy paste. Stir in fried ingridents and mix well. Spread well into the greased pan and spread evenly.
Steam “Go” over medium-high heat for 45 to 55 minutes, until moistly set. A chopstick inserted into its centre should emrge damp but mostly clean. Serve it warm or fried it with some oil until browned.
Notes
Making wet rice flour; Combine the rice flour with the water and slowly stir and fold with spatula until througly combined.
Asakusa (浅草) is the centre of Tokyo’s shitamachi (literally “low city”), one of Tokyo’s districts, where an atmosphere of the Tokyo of past decades survives. Asakusa’s main attraction is Sensoji, a very popular Buddhist temple, built in the 7th century. We stayed fairly close to Asakusa that name Asakusabashi, therefore, we decide to discover this old city during the very first day of our trip to Tokyo. Unlike Osaka and Kyoto, for a certain, it gives out a different vibe. The streets are busy with the Salary Man and in no doubt, it is quiet everywhere.
We kick start our morning by taking the train to in search for this cute little muffin that we found out on a variety show – it called Daily Muffin. What it attracts me was they serve freshly baked sweet and savory muffins.
It’s a small shop, but it has a large variety of muffins, plus a few other things like cookies. There’s even a cafe area where you can sit and have a drink with your snack. The muffins (which cost around ¥290) come in both sweet and savory options, and the range is great. Some of my favorites are the Japanese flavors, with kinako (roasted soybean) bases, Anko (bean jam) or green tea. The flavors change regularly and include seasonal fruit.
I was so upset after having the muffin as I lost my scarf that hangs onto my bag. It definitely spiled my mood deeply. It only gets better upon shifting to Sensoji.
Daily Muffin 2-3-1 Kuramae, Taito City, Tokyo 111-0051, Japan Opening Hours: 8 am to 5 pm Nearby Station: Kuramae Station
Usually, when we discover a new country, we head over to the cultural tourist information center and see what they could provide us. It helps you to gather maps and interesting informations about the city when you are all alone. I will say that the Culture Tourist Information Center is a very good one, there are many local volunteers that speak English and they could introduce you a different insight into the places of interest. Please do spend some time there and exchange with the locals.
Culture Tourist Information Center 2 Chome-18-9 Kaminarimon, Taito City, Tokyo 111-0034, Japan Opening Hours: 9 am to 8 pm Nearby Station: Asakusa Sation
Upon exit the Culture Tourist Information Center, Kaminarimon Gate Senso-Ji is just opposite the traffic. You would find it pretty obvious when the gate display with the huge lantern on the Kaminarimon Gate. Unlike the temples we visit in Kyoto, you don’t have to pay entrance fees for Sensoji. After you go over the gate you will be shocked by the sea of human right in front of you. It’s the infamous Nakamise Shopping Street before you actually get over to Sensoji. This traditional shopping district, they sell all the lovely goods and traditional snack you can’t find elsewhere. The following are some of our favorite food to be found; – Kimuraya – Kibidango Azuma; the store is famous for its sweet dumpling made with mochi flour
Tips: Honestly, I won’t spend my money here as they are overpriced. As compared to Osaka and Kyoto, Tokyo seems to be much expensive as compare to all. So if you travel to other cities as we do, try to get ask much as you want at Osaka and Kyoto as Tokyo certainly will hurt your wallet!
Kaminarimon Gate Senso-Ji and Nakamise Shopping Street (Orange Street) 2 Chome-3-1 Asakusa, Taito City, Tokyo 111-0032, Japan Opening Hours: 24 Hours
You will find a purification spot (手水舎) before entering Sensō-Ji in fact all temples in Japan. It is a way of cleaning yourself and showing respect the God.
Due to the popularity of Sensoji, compared to other temples in Japan, they have both Japanese and English translation (another temple would be Meiji Temple, another popular temple to visit). Furthermore, for usually only 100 yen, you can pray and get an omikuji, a slip of paper with fortunes written on it; depending on your fortune, you can either keep them or tie them to a rope (usually you tie them to a rope outside the temple when it reflects you are having a bad luck). While mostly in Japanese, some shrines offer English copies of the fortunes as well.
Sensoji Temple 2 Chome-3-1 Asakusa, Taito City, Tokyo 111-0032, Japan Opening Hours: 6 am to 5 pm Nearby Station: Asakusa – exit the train station you will see the Culture Tourist Information Center, Sensoji is just across the street.
We followed what the locals did, after greeting with the cute little incense, we use both hands to bring the smoke toward our body. It seems like bring good blessings when you do so.
We have a great experience especially both of us was in a bit of good luck for the next following year – 2019!
You can spend the whole morning and afternoon at Asakusa, starting from Sensoji. Sensoji was surrounded by all other amazing attractions. Naming a few will be KappabashiUtensils Street, Temples around the Sensoji, Hopping Street and Tokyo Sky Tree (we decide to save money and see it from far).
While the Tokyo Sky Tree was across the Sumida River, you can see the Tokyo Sky Tree from all angles in the Asakusa’s region. We are fortunate to do that as they have low-rising buildings and that allows us to see any iconic building and the beautiful sky. Walking down the street the area is definitely a back-in-time district, you can find lovely old bars and eatery shops.
Further down you will discover KappabashiUtensils Street, a street filled with distributors for kitchenware, knife, utensils, baking tools and all sort of things that you can imagine. And what caught our eyes most was the almost-real fake food display, it seems like there is the school for the fake food making.
Kappabashi Utensils Street 3 Chome-18-2 Matsugaya, Taito City, Tokyo 110-0036, Japan
No harm to revisit Unlike other cities, you will always find yourself in a different scene during the day and night regardless of visiting the same location in Japan. You will be so surprised by the different vibes that bring to you, therefore it’s worth revisiting places in this city, at least twice. Nothing is repeatable and they are simply amazing at all times. So if you want to avoid the crowd for photo shooting at Sensoji, after 9 pm it the best hours to do so.
Hopefully, it will be a helpful post for you! Please send us your recommendation so we could exchange and get to travel better!
The recipe for making tang yuan is a no-brainer really. It always helps to relive a childhood memory where we used to play with glutinous rice doughs as well!
I remember it was the time when we had to use plasticine quite a bit for art & craft class to make all sorts of small things out of them. Plasticine was stinky and our hands frequently got really dirty after fooling around too much with it. PlayDoh was just becoming fashionable in the toys department but we couldn’t afford it of course. So the best way which my mum thought of was to let us play with a simple dough made with just glutinous rice flour and warm water!
I see a lot of my cooking and baking kakis giving that to their kids nowadays to play with since it is really safe, being food after all! Wonder if they too had similar fun experiences as I had when I was a kid playing and shaping glutinous rice doughs.
I’d always been wanting to make some goldfish tangyuan because of the idioms 年年有余 symbolist that every new of the year there will still be food on our table.
Rolling glutinous rice dough into tangyuan is really easy but shaping it at will requires a bit more practice I think. For coloration, I’d decided to go all-natural as well, using carrot juice for the orange bodies and charcoal powder for the eyes. Playing with the glutinous rice dough this afternoon was really like walking down memory lane for me.
Keep the unused dough covered with a damp cloth to keep it soft, as the dough dries out fairly quickly and soon becomes crumbly. But it can always be reconstituted and soften with a dab of warm water ready in a small bowl at hand. I don’t play with fondant so I don’t have a decent set of tools as some of my friends do. I would have imagined it to be much easier with those tools but I just have to make do with whatever there is in the house. In fact, I’d only used 3 things… a toothpick, a disposable plastic spoon, and a fruit knife. Glad the fishes turned out decent somewhat and what was more important was, it was a lot of fun!
The recipe for the glutinous rice dough as I’d mentioned is very easy to remember. It’s just about 100g of glutinous rice flour to 70-80g of lukewarm water give and take. Always have extra flour and warm water at hand to adjust the texture and elasticity of the dough as required. I was in the “trying out” mood and didn’t weigh the carrot juice, charcoal powder, as well as the extra flour used. I would probably do that next time with a frame-to-frame tutorial on how the fishies are being done.
Usually, we make tang yuan during the tang chek, however now and then we will make them when we have a gathering as tang yuan represent reunion. I always love making them because of all the wonderful memories I had when my mother and grandmother, as they got busy with the mixing and rolling while we kids fool and mess around in the kitchen. So please get your children or even your spouse and friends engaged in this really easy hands-on activity!
During the Lunar New Year, you are able to see lots of different lanterns on the streets. Lantern plays a very important part in Chinese culture, whereby during the Mid-Lunar festival children will play with the lanterns while their parents eating the mooncake and also there is light festival where we will release lantern with our wishes on it.
At this pop-culture, we are adding more traditional elements into our living, such as adding oriental elements and zen culture. If you don’t want to change your furniture at your home, the other easy way is to change the lamp for your house. If you are unable to get the oriental lantern that shown above you can get plain covers to form IKEA and do some painting and DIY yourself. Adding design like bamboo or flowers.
Just little changes will help you change the style of your modern home right away without doing much.
For those who visit our blog for the first time, we always love to share dumpling-making and experience a different type of recipe with you! This time we decide to share with you meat choice – beef dumpling. So those halal eaters you can enjoy this recipe at home too, join us for the Chinese New Year.
This post we will be sharing with you the different ways of wrapping it. Honestly is it the most simple thing to make even if you try it for the first time.
What makes a great filling for dumplings? I would say: Firstly, a nice balance between the main ingredients; Secondly, a great combination of flavours; and Lastly, a moist, juicy texture.
–Pork & Shrimp Filing; where the Beijing families enjoy. – Tofu Filling; To make tofu filled dumplings, drain as much excess water as possible beforehand (You may do so by putting a heavy object onto the tofu block). If using soft tofu, it’s better to blanch it in boiling water for a few minutes. This will help it stay in shape without getting too mushy. – Beef with Spring Onion; this time we are going to do something special the beef and spring onion dumpling. You will rarely see it as beef are easy to overcook. However, we tried and tested for you. It’s amazing!
You can choose the pattern(s) that suits your cooking method. For example, if the dumplings are to be boiled, they are less likely to retain a perfect look after cooking. So to save time, you could go for one of the simpler patterns. Whereas steaming or pan-frying wouldn’t affect the shape of the dumplings. So you could try some of the more intricate patterns instead.
Boxed Dumpling Place the filling in the middle of the wrap. Using thumb and index finger of both hand fold in fold corners of the wrap toward the center and press tightly.
Yuan Bao (Sliver Ingot) Dumpling Place the filling in the middle of the wrap. Fold the wrap into half to form a semi-circle and press tightly. Holding the two corners of the end, push evenly to each other.
Lettuce Shaped Dumpling Place the filling in the middle of the wrap. Folding the wrap into half to form a semi-circle (but do not press tightly). Making fold like the gyoza dumpling method on both of the half semi-circle vertically. Tuck the wrap in at the end of the dumpling.
Homemade dumplings freeze very well. Right after they are assembled, lay them on a tray (dust with flour or line with parchment paper) to freeze. Then put them in an air-tight bag when totally frozen. Follow the same cooking procedure (do not defrost).
Give this recipe a try and don’t forget to tag us on Instagram as @leplaincanvas and use the #byplaincanvas hashtag. I love seeing your takes on my recipes!
1/4 tsp ground Sichuan pepper, or Chinese five-spice powder
1 tsp light soy sauce
1/2 tsp sesame oil
1 egg yolk
1 tsp white pepper
1 tbsp of corn flour (or more)
Methods
Combine all the ingridents, other then corn flour in a mixing bowl. Using a chopstick, swirl the mixture in one direction until no more liquid can be seen. Add in the corn flour and contiune swriling. Add more if the mixture is still too wet.
Shibuya definitely is a pop culture since the 90s – the 109 building, Shibuya crossing and the fashion in the district. We lived by lots of memories gathered from the media and TV programmes. Therefore, during our first visit to Tokyo, I doubt we could miss-out visiting this area! This area surely is like is shopping’s heaven, they have all the trendy store and they still have the world biggest records. You can see moving tracks playing the latest songs release. It is the busiest district for the youth!
While Shibuya Crossing – the world-famous busiest pedestrian crossing. To the locals, they will never understand why the tourists, we are so into it hence they never know the phenomenal bring to the world. When the green traffic light is lid-up, during the few minutes having thousands and thousands of people crossing the street, the moment is spectacular. this will never happen in Singapore, we tried in our city but it didn’t work it so well, the magic just didn’t happen! So this is the one and only still!
Honestly, it is too huge to finish it in a day or even two – I believed it is almost 10 times the size of the Orchard Road in Singapore. So we decide to pick up the interest based on our liking and we have them separated based on the areas to share with you.
Tatsuya, Tower Records, HMV, Kinokuniya For music and book lovers, you do not want to miss out these places in Shibuya or Tokyo. They have the biggest selection of both music records and books. Personally, I highly recommend you to go to Tatsuya if you do not have enough time for all. While I preferred Tatsuya, as it has the combination of both the records and the books which allows me to find what I want within one space. Before or after shopping, you could grab a coffee from Starbucks at the entrance and see the people watching of the Shibuya Crossing. I could spend whole there!
Between Alleys Behind Tatsuya building, there are more shopping malls and brand outlets. Due to the limited of space, many restaurants are hidden between buildings or underneath of outlets. That’s where you can find one of Joe’s favourite Ramen in Tokyo, Ichilan Ramen. There are at least 2 outlets in Shibuya, and the one that we visit was at the Jinnan area. It located underneath the Ikinari Steak, another famous steak’s outlet in Tokyo (I only found out in a recent program so then I didn’t know about it). address: 150-0041 Tokyo, Shibuya City, Jinnan, 1 Chome−22−7 岩本ビル B1F
Disney’s Store For those Disney’s lover, you don’t have to visit Disneyland or Disneysea to get the merchandise. You can get the official merchandise at their Disney’s store in Shibuya. It is a 3 storey cute little store filled with all the “kawaii”(aka adorable) merchandising. You are welcome to the store with a huge iconic mickey’s die-cut at the entrance. The store are dreamy and filled with lovely music. they have so much collectable collection that you only can be found in Japan. address:20-15 Udagawacho, Shibuya City, Tokyo 150-0042, Japan
Just across the Hachi Statuethat is the Shibuya Mark City, another shopping mall among all the shopping malls in Shibuya. We decide to hang out another area during one of our other evening in Shibuya. Following are some of our recommendations you might like.
Flying Tiger Copenhagen Chance upon Flying Tiger Copenhagen in London, I fell in love with the store, knowing that Japan have the outlets, I definitely need to revisit to do my shopping! You can find this shop in countries like Europe and the States but Asia wise you only can find it in Japan and Korea. Sad news but more reason to travel! address: 150-0043, Tokyo, Shibuya City, Dogenzaka, Tokyo Mark City 1F
Sushi no Midori Shibuya While googling what to have in Shibuya for dinner, Sushi no Midori appears top in the search. So we find our way on the cold weather and we found it in Shibuya Mark City. Shibuya sushi outlet was small but crowded for sure. It was barely 6 pm but there’s the queue outside the store, we manage to grab a countertop table within 45 mins. As most restaurants do not have an English option, getting a queue number via their machine definitely was a struggle. It made me felt much at ease that watching all Japanese drama and variety show didn’t go wasted. address: 1-12-3, Dogenzaka, Shibuya-ku, Tokyo Mark City East 4F
It’s our first time in Tokyo, we never expect it to be huge and so tiring by walking. It was during the late autumn so the light goes off by 5 pm or six. Hopefully, during our next trip, we could share a lot of new discovery with you! Please send us your recommendation so we could exchange and get to travel better!
Lately, we start to make Kueh (aka. cake) at home – “Nonya Kueh” is part of our cuisine in Singapore. We had all these delicious Kueh since we were kids so we decide to get to know more about them. Kueh is a universal language for all kinds of cakes and desserts in Kueh’s dictionary. Back in the old days, we will run to the table to grab all the Kueh we could whenever our mother makes it or our grandparents brought it from one of those Nonya stores outside. It comes in all kinds of flavors; sweet, savory or a mixture of both. It is a huge part of our very own dessert heritage in Singapore.
Therefore we decided to trace back our heritage and rediscover the different ways of making it. After trying, we rediscover how easily you could make it at home. There are many techniques and steps hence it is rather simple and fun to do it like baking. Kueh involved with different types of culture – there are Malay, Chinese, Peranakan, Eurasian and Indian- that what makes a multiracial of our motherland. We also discover the different methods; steamed, fried, baked, layered, boiled, leaf-wrapped and many more.
We are going to start with the steam + leaf-wrapped method, and it will be the most popular choice Ang Ku Kueh.
Learn how to make traditional Ang Ku Kueh filled with homemade sweet mung bean paste. This recipe is easy yet it is soft and chewy. I have been in the mood for tinkering in the kitchen and so I did my very first Ang Ku Kueh and it is a success.
We try both traditional and simple methods for this Ang Ku Kueh and we like both of them. The simple method consists of no cooking of dough and the Ang Ku Kueh is made with mainly glutinous rice flour without any sweet potato-like in the traditional recipe. The Ang Ku Kueh is soft yet chewy, which I like. The sweet potato version is less chewy. I guess it’s really a personal preference.
This round I use a homemade sweet mung bean paste for filling instead of sweetened peanut filling. All of a sudden I have this craving for sweet mung bean paste. I made it the day before so I won’t feel so overwhelmed trying to do everything on the same day. We did the traditional method for the mung bean paste, whereby it is steamed and then cook on the pan. If we have a pressure cooker it will be much easier. (this year we need to invest in one)
When pressing the dough into the mold remember to dust the surface of the wrapped dough with a very thin layer of glutinous rice flour. (to prevent it from stuck onto the mold)Place the wrapped roll into the mold and press gently to shape. Knock the sides of the mold to release the kueh and place it on a piece of greased banana leaf.
Lastly, steam the Ang Ku Kueh and you’re good to go!
Place the molded kuehs in the steamer and steam at high heat for three minutes. Brush the steamed Ang Ku Kuehs with a thin layer of oil and let it cool down slightly before serving. While the preparation of making Ang Ku Kueh is troublesome, but the end product is worth it!
Give this recipe a try and don’t forget to tag us on Instagram as @leplaincanvas and use the #byplaincanvas hashtag. I love seeing your takes on my recipes!
Did you know that eating Ang Ku Kueh, also known as the Red Tortoise Cake, is a sign of longevity? They are shaped to look like tortoise shells with the Chinese character “寿” (which means ‘longevity”) imprinted in the centre. So, if there is a birthday coming up – you know what you can bring for the party!
Ingredients
200 g purple sweet potato peeled, cut into big chunks
250 to 300g glutinous rice flour
150 ml coconut milk
2 tbsp caster sugar
1 tsp salt
1 tbsp oil
100 ml water add more if required
1 packet banana leaves ; Cut into small pieces that fits the size of the kueh, brush with oil.
Mung bean filling
300 g mung bean soaked in water for 1 hr
4 pandan leaves knotted
135 g caster sugar
1 tsp salt
3 tbsp shallot oil
3 tbsp water
Methods
In a steaming bowl with mung beans, place the knotted pandan leave on it. Place mung beans and sweet potato on the steaming rack, steam at high heat. 15 mins later, remove from heat. Remove pandan leave from the mung bean. Blend mung bean with 5 tbsp water, sugar and salt. Mash sweet potato in a large mixing bowl.
In a pan on medium heat, add in 3 tbsp of oil. Pour in the blended mung bean and fry until it is aromatic and dries up slightly. Transfer back into the bowl. Set aside and let cool.
In the large bowl with mashed sweet potato, add in oil, coconut milk, salt and sugar. Blend it into a thick watery texture. Pour in 250g flour, knead with clean hands. Adjust the consistency of the dough with small portions of water and/or flour till the dough does not sticks to hand and the side of the bowl.
Divide the dough and mung bean into 30g balls. Flatten the dough into a disc and place a ball of mung bean in the middle. Wrap carefully and ensure that the mung bean is fully sealed within the dough. Repeat the steps for the remaining dough and filling . Dust the surface of the wrapped dough with a very thin layer of glutinous rice flour. Place it into the mould, press gently to flatten. Knock the sides of the mould to release the kueh and placed it on a piece of greased banana leaf.
Place the Ang ku kuehs in the steamer and steam at high heat for 3 minutes. Brush the steamed Ang ku kuehs with a thin layer of oil and let it cool down slightly before serving.
Chinese New Year is around the corner, and it’s always good to have some oriental elements in the house to create the festive season. Using cushions in golden hues and sky blue shades look stunning piled on a grey sofa. Furniture with clean lines allows light to circulate around the room. Most importantly is to create a sense of calm with a striking textured pendant lantern in a natural color, surrounded by soft tones and textiles.
While trying to plan for Asian-style interiors, the word ‘balance’ is something that you will come across time and time again. And we simply cannot overstate the importance of this singular aspect of oriental design. Balance is often the key defining aspect of an Asian theme. You need the right harmony of not just the colors but also different textures and elements that surround you. If your home is just one big block of concrete, think about adding glass partitions, natural stone decorations, wooden floors, bamboo blinds and a few organic textures in a poised fashion.
Did you know you could make your own fortune cookies at home? I love this recipe & I think you will too! These were a lot of fun to make but I have to tell you the first time I made them I folded them the wrong way…rookie mistake. I won’t be making that mistake again ;). I folded them in half then I folded them in half again & I couldn’t figure out why they didn’t look right. So don’t make the same mistake as me! *Make sure when you bend them over the mug that the seam is facing up.
Homemade fortune cookies look paler compared to the factory-made ones because they put food dye in them to give them a golden colour but don’t worry these taste just as good!
You can handwrite your fortune cookie messages or type them up. I chose to type them up on the computer using size 11 font, print them, & cut them into strips. If your message is too long to fit inside the cookie you can fold it in half. If you need some ideas on fortune cookie messages to write try looking at fortunecookiemessage.com
The trick with these cookies is to work quickly. You only have about 30 seconds before the cookie becomes too cool to shape & mould into form. I have made them by myself but it helps to have an extra pair of hands so you can work faster.
I have heard that wearing tight fitted cotton gloves helps so you don’t burn your hands when working with the hot cookies. We will try these tips again next time!
Lunar New Year is coming very fast and these fortune cookies will be the best gifts for those young friends. Give this Fortune Cookies a try, don’t forget to tag us on Instagram as @leplaincanvas and use the #byplaincanvas hashtag. I love seeing your takes on my recipes!
Fill these Homemade Fortune Cookies with your own personal fortunes for a fun and delicious crafty treat!
Ingredients
3 large egg whites
3/4 cup sugar
1/2 cup butter melted
1/4 tsp vanilla extract
1/4 tsp almond extract
3 tbsp water
1 cup all purpose flour (5 oz by weight)
Methods
Preheat the oven to 375 degrees F. Line a sheet pan with parchment paper or a silicone mat, and have your fortune strips ready to go.
In a stand mixer (or large bowl with a hand mixer), whip the egg whites and sugar on high speed for about 2 minutes, until frothy. Whip in the melted butter, vanilla, almond extract, and water until incorporated. Add the flour and mix until the flour *just* disappears.
With a tablespoon measure, spoon the batter onto the parchment paper and spread it out into an even 3 inch circle. I recommend not doing any more than 2-3 at a time, since they set very quickly and you will not be able to fold more than that.
Bake the fortune cookies for 7-8 minutes, until the edges brown slightly. If you let them brown too much, they will snap when you shape them. Conversely, if they don’t brown a little bit, they will also break (but tear, rather than snapping).
When each batch of fortune cookies finishes baking, remove them from the oven and quickly flip the circle over, and fold your fortune cookie in half, into a semicircle. This is when you slip your note into the cookie (quickly) because if you slip it in right at the beginning, the cookie will be too hot and your paper will stick to the cookie. Place your semicircle onto the edge of a cup, and quickly fold the ends down, to crimp into a fortune cookie shape (see above tutorial video if needed).
Place the cookie in a muffin tin to let it cool and hold its shape.
If your home is cluttered with things that are making your unhappy, chances are, you’re wasting time, energy and suffering from mental overload. In fact, every distraction—from the shopping bags on the floor to a messy sofa —can make yourself lazy and create undue stress, which can have negative effects on your health. Thus the more zen we have in the house the less stress we will be having.
In a zen’s home, we like furniture with legs and have a lighter shade of colour. It helps to create more space for the room and make it brighter. Having a bonsai at the common area will also provide a mindful environment to your space.
How did you spend your time during the counting down of the new year? I stay in my bed listening to the “bombing” sound of the fireworks! Thus since I didn’t get to see one, I decided to paint instead.
This year I promise to spend more time painting and learning more painting techniques. Well, you can say that’s one of my new year resolutions.
2019 has been nothing but amazing yet and we can’t believe that we have to bid goodbye already. To welcome a new decade, we can’t deny how frightening it can be but our excitement has also weighted the other half. Before we begin 2020 tomorrow, let look back to reflect on what happened this year!
This year, we have devoted most of our time at work and half of our time on traveling hence we felt terrible that we haven’t been spending much time on our blog. If you don’t know about it, actually this year we had beat the highest record on the road by far. We conquered 4 trips in the Asian – Hong Kong, Malaysia, Taiwan, and Thailand. It was amazing to observe and experience our working desk. And we promised that we will bring more ideas on our blog in the new year!
Earlier the year, my calendar was fully packed with lots of projects and it was hard to breathe. Thankfully Joe was always assisting me in managing them as well. Also, I’m glad that I booked a ticket the year last year to pay my lovely friends a visit to Hong Kong. I’m glad to went on this spontaneous trip. Honestly, although it was short I could grab a glimpse of the peaceful side of Hong Kong before the chaos has happened this July. Through what the everyday news shared, the prosperous is nowhere to see but it is a city filled with treasure, therefore, I hope the new year will bring them a new outlook. As I can’t wait to travel back soon, sure to visit my friends and maybe with Joe this time!
This year is also definitely a year to reconnect with the family – it was a year since our granny is no longer by our side. While our parent adopts new changes in life, we want to spend more time with them. Bring them on trips and make sure they could some holiday where usually they don’t. Since more of the time, they need to work and accompany our bedridden granny. It will be the first official trip we went on together while both of us are adults now. Penang was a delighted birthday trip that we all endorse delicious food. Right after that, we hopped on to another long trip in May to Taiwan. We haven’t finished sorting out most of the post and we are definitely overdue but we promise to update them as soon as possible.
It was 10 days vacation with our parents and it definitely more challenging than traveling to Penang. It taught me to be more patience as they can’t afford to travel like how we do. They physical weaken so much and we are guilty that we can’t do much more so we decide to at least bring them on trips more whenever we can. At least this has made into our next year’s resolution.
Frankly speaking, we never actually stayed in the mountain before neither watching the sunrise up in the mountain. Therefore the year-end trip to Khao Kho, Thailand was a delightful experience for us. Unlike the last couple of years, this trip wasn’t just both of us, we were joined by my friend. It is something special despite the differences, we have the best time in a lifetime! We are preparing toe share all our trip stories with you all soon! Lots of editing so stay tuned!
Thank you 2019 and gave us so many lovely memories with our loved ones. We are bidding goodbye for a new decade of love, dreams, and hope.
Happy New Year Eve!! Its been a whole great year this year. This year we have also stopped on our website for a period of this however it is great that we revamped our website too! Thus it is worthy of a celebration as a little step will make a difference someday.
How will you be counting down to the new year this year? For us, it will be some pizza and champagne. And also counting down under the fireworks. Let’s wish you a Happy New Year, see you next year!
On 26 December 2019, Singapore experience a solar eclipse and I could say it is one of the best things that happened this year. Like many others across the island, I look out to my sky and have a peek to see the moon meeting the sun. The skies were a little cloudy, but fortunately, at the critical moment, the sun (and moon) peeped through!
This painting is inspired by Singapore’s Prime Minister Mr. Lee Hsien Loong. He has a trip down to the Garden by the Bay and has a walk there. He used his experience skill and took this shot down. What a great way to end this year like this.
Through the years of preparing meals for Christmas, we get to know one thing! Always keep one thing in mind when you compose food your table. Plan the ultimate combination and flavor for your dishes and allow your guests to have the best experience of all dishes. It could be a simple 3 dishes on the table but it will be an amazing experience on their plate.
We’re sure you’ll be ready for some quiet time once New Year’s Eve rolls around. If you’re not into large crowds during this hectic holiday season, may we suggest recreating a restaurant-style dinner at home instead?
Main Dish: Mediterranean Stuffed Pork Tenderloin
Juicy, tender Stuffed Pork Tenderloin is filled with Mediterranean spinach and feta cheese blend and then covered in a tangy balsamic and rosemary sauce. Any home cook can make this gorgeous pork tenderloin recipe with restaurant-worthy results!
Poor pork tenderloin. Can you imagine living under the shadow of bacon your whole life? Talk about feeling like the ugly duckling. While bacon has entire fan clubs dedicated to celebrating its goodness, pork tenderloin has faced a myriad of insults–too dry, too tough, too flavorless.
Cauliflower is such a versatile vegetable and I’ve grown to love experimenting with it. One of my favorite things to do with this cruciferous vegetable is to turn it into “rice.” Because rice can often leave dishes feeling heavy, it’s nice to substitute a vegetable where a starch would usually be. In addition, it’s a great way to squeeze more servings of vegetables into your day.
Grilled green beans are tender and smoky with crisp edges. If you’ve wondered how to grill green beans, this is it! Just toss the green beans in a simple mixture of oil, herbs, and spices then transfer to a grilling basket/pan. Cooking green beans on the grill is an easy and delicious way to enjoy one of summer’s star vegetables .
Make your guests feel pleased with the little touch and effort you put on the table. Simple details such as accenting a simple white bouquet with sprigs of rosemary and glass sparkling water bottles will help create a romantic ambiance without being too fancy. For Christmas Eve or New Year’s Eve, your significant other will appreciate the time you’ve put into this dinner, but we won’t tell that it took you less than an hour!
Cauliflower is such a versatile vegetable and I’ve grown to love experimenting with it. One of my favorite things to do with this cruciferous vegetable is to turn it into “rice.” Because rice can often leave dishes feeling heavy, it’s nice to substitute a vegetable where a starch would usually be. In addition, it’s a great way to squeeze more servings of vegetables into your day.
There are two techniques for making cauliflower rice. You can either use a box grater with the medium-size holes (pictured below) traditionally used for cheese, or a food processor with the grater blade to blitz it into small pieces. With both techniques, you’re aiming for little pieces the size of rice.
One additional step I like is to press any excess moisture from the rice by transferring the cauliflower rice to a large paper towel or absorbent dish towel and squeeze/press to remove any remaining water. This ensures no excess moisture remains, which can make your dish soggy.
Once you have your cauliflower rice, it’s easy to cook! Simply sauté in a large skillet over medium heat in 1 Tbsp oil. Use a lid to cover so the cauliflower steams and becomes more tender. Cook for a total of 5-8 minutes, stirring occasionally, then season as desired (such as with soy sauce or salt and pepper).
Lastly, add in your cooked quinoa to the cauliflower rice and mix well!
Give this Cauliflower Quniao Rice a try, don’t forget to tag us on Instagram as @leplaincanvas and use the #byplaincanvas hashtag. I love seeing your takes on my recipes!
Cauliflower is such a versatile vegetable and I’ve grown to love experimenting with it. One of my favorite things to do with this cruciferous vegetable is to turn it into “rice.” Because rice can often leave dishes feeling heavy, it’s nice to substitute a vegetable where a starch would usually be. In addition, it’s a great way to squeeze more servings of vegetables into your day.
Ingredients
1 large head cauliflower
1 cup of mixed quinoa
Parsely for garnish
Methods
Wash and thoroughly dry cauliflower, then remove all greens.
If using a box grater, cut the cauliflower into large chunks and use the medium-sized holes (see photo – the side commonly used to grate cheese), to grate into “rice.” If using a food processor, cut into small pieces and use the grater attachment to grate the cauliflower into “rice.”
Optional: Transfer to a clean towel or paper towel and press to remove any excess moisture, which can make your dish soggy.
Once you have your cauliflower rice, it’s easy to cook (or enjoy raw)! Simply sauté in a large skillet over medium heat in 1 Tbsp oil. Cover with a lid so the cauliflower steams and becomes more tender. Cook for a total of 5-8 minutes, then season as desired (such as with soy sauce or salt and pepper).
Cook the mixed qunioa with the instructure given on the packaging. Mixed the cauliflower rice and mixed qunioa well. Served with parsely.
Use cauliflower rice in recipes that call for rice, such as stir-fries or fried rice! Store leftovers in the refrigerator for up to 5 days. Store uncooked cauliflower rice in the freezer for up to 1 month.
It’s no secret that I love Scandinavian design. My house is influenced heavily by the neutral tones, light wood, and geometric elements that are so commonly found in nordic homes. So it comes as no surprise that I love the way Scandinavian folks decorate their homes for Christmas. I’ve spent countless hours perusing slash drooling over thousands of gorgeous images on Pinterest and there are several common design elements that tie these beautiful nordic scenes together. Read on for 10 ways to get that Scandinavian Christmas look for yourself.
Scandinavian design is all about those pale, neutral colors. Think white, beige (the natural wood variety) + grey, and add some pops of black for contrast. And of course, lots of rich, winter greenery since it is Christmas after all. Bring the outdoors inside with wood, moss, evergreens, pinecones, and other natural materials. Your house should smell like a forest!
Lighting is key in Scandinavian design and Christmas is no exception. It is, after all, the time of year with the least amount of daylight, with the northern tip of Norway being in complete darkness for about 60 days a year. So make sure to fill your house with pretty mood lighting. Mix-and-match candles, twinkle lights draped over furniture, and paper lanterns (star shapes are the best!) hanging from the ceiling. The simplest decor will have the biggest impact. Grab an evergreen branch, put it in a simple but beautiful vase, add a candle (or four) and voilà, you’ve got yourself a beautiful, Scandinavian table display.
The holiday season is finally here — which means it’s time for all things red, green, merry, and bright. And while we obviously adore Christmas, it can sometimes be all too easy to get lost in the hustle and bustle of the holiday preparations — which is why wholesome Christmas quotes are so important. Because before Santa slips down the chimney, you’ve got cookies to bake, a tree to decorate, and so many gifts to buy. It’s no wonder that by the time the big day finally arrives, all you want to do is kick back with a glass of eggnog and a bucket of Christmas candies.
But wait! Christmas is about so much more than festive decor and gifts under the tree — it’s about celebrating family, friends, and everything else that brings you joy.
I know it is quite a contradicting with what we believe in – on our daily days all we concern about the environment; the recycle and not being wasteful but when it comes to this time of the year, I hate myself not able to help save the environment by a bit (like what I did usually).
As designers, we’re so into the packaging and I cant denied my love to wrap gifts to my loved ones in the most presentable way during this festive season. It’s in my blood since young and this is the only time of the year I allow myself to be as guilty as possible. The past couple of years I love to be minimalist using brown papers, straw string with dried flowers for wrapping but this year I found I have this set of lovely Harry Potter gift wrapper I got awhile back, so I decide to make use of it.
If you would like to recreate what we did it is very simple, simply gathering some ribbon from ArtFriend, Spotlight and wrappers that within the theme at Typo. We decided to go with Red, Gold and black, they are pretty gorgeous for the theme and wrap them in your best ways. Honestly, I barely spend $10 dollars on all the gift wrapping as many items are reusable and could last very long! Have you completed your gift wrap yet? We hope that this inspired your gift wrapping experience!
Have a Merry Christmas and a wonderful holiday season! xoxo, Angela
Grilled green beans are tender and smoky with crisp edges. If you’ve wondered how to grill green beans, this is it! Just toss the green beans in a simple mixture of oil, herbs and spices then transfer to a grilling basket / pan. Cooking green beans on the grill is an easy and delicious way to enjoy one of summer’s star vegetables.
When you think of green beans, how do you imagine cooking them? Steamed? Boiled? Stir-fried?
How about grilled?
Somehow this did not occur to me in Summers past, to grill green beans. Perhaps it was the thought that they would be too dry. Not so. Think of stir frying them in a blistering hot skillet or wok; on the grill you get the same result: smoky deliciousness. And preparing them couldn’t be simpler. Honestly, we hardly even stir them once they go on the grill – just toss them in an even layer on a grill pan (so they don’t fall through the grid and burst into flame) and let them sizzle away. They’re best left with a bit of crunch to offset the char. And if you want to brighten up their sultry flavor, squeeze a lemon over the top just before serving.
Serve these as a delicious side to anything you’re grilling, like these Salt Crusted Lamb! Give this Grilled Green Bean a try, don’t forget to tag us on Instagram as @leplaincanvas and use the #byplaincanvas hashtag. I love seeing your takes on my recipes! xoxo, Joe
In the bottom of a large bowl, whisk together olive oil, garlic, cumin, paprika, and cayenne. Add green beans to bowl and toss to coat evenly. Place beans in an even layer directly on on a grill pan.
Cook, stirring often, until crisp-tender and unevenly charred and blistered, 10-12 minutes, depending on the amount of char you like.
Transfer beans to a serving bowl and season to taste with salt and freshly ground black pepper. Squeeze lemon juice over if desired. Serve.
Notes
As these are often served as a side dish to whatever you’re grilling, let the main dish dictate whether you make these with the BBQ lid open or closed. I’ve made them both ways, just be sure to stir them occasionally either way. And if they’re the main attraction, opt for having the lid open so you can keep an eye on them and get the edges charred exactly as you like.
Green is my favourite colour this year. Not that “green” aka eco but literary green colour Christmas! If you are too busy this year but would like to do some last minutes decoration green is the theme that you are looking for. Get a green Christmas tree, green Christmas wreath and hang up that green garland. Yes, you are already 60% there. Finish up with changing some of the cushions covers and tada you are all good to go. Isn’t it simple?
The season of overindulgence is vastly approaching. Lights are coming up, our to-do lists are rapidly growing and it’s almost time to decorate the tree. With all the excitement and anticipation that come with these yearly festivities, it’s easy to see why it’s the most wonderful time of the year. Can’t wait for the d-day!
Counting 5 days to Christmas, we still not prepare yet. Christmas checklist not done, present yet to get! However, the amount of work is stacking up very fast. Somehow I wish that I can stay in a forest (just me alone), spending all day painting and enjoying the view of snow.
“For Christmas is tradition time— Traditions that recall The precious memories down the years, The sameness of them all.”
Today we’re talking spiced hot toddy. Out of all the holiday cocktails, the hot toddy is my favourite. I can pass on spiked eggnog, hot buttered rum, and even a boozy hot chocolate, but hot toddy is my weakness. Last year we make a hot apple cider for our Christmas. this year we are going to try a honey flavour hot toddy.
The traditional hot toddy usually has a base of black tea. However, for us, we prefer a sweeter base, we used the honey we got from our Thailand trip. This the perfect warm beverage for chilly Christmas night. It’ll definitely help you relax and unwind.
You are able to use any whiskey bourbon, for us we used our father favourite Honey Jack Daniels. It is not as strong compared to the usual bonbon, as there is a hint of sweetness in it. Perfect choice for our taste bud.
Jack Daniel’s Tennessee Honey features a light, sweet honeyed aroma. This is marked with undertones of that classic, sugar maple and charcoal-mellowed fragrance that we’ve come to know and love about JD. The liqueur has the same body and mouthfeel as classic Jack Daniel’s. Quite simply, it tastes as if you mixed a little local Tennessee honey into a shot of Jack. The finish is clean and sweet, which makes it perfect for adding it to our tobby.
And in my case, it’s easing the transition from vacation mode to normal life a heck of a lot easier. Give this Spiced Hot Toddy a try, don’t forget to tag us on Instagram as @leplaincanvas and use the #byplaincanvas hashtag. I love seeing your takes on my recipes!
During the cold “winter” it is always best to indulge in these fudgy Salted Caramel Brownie with a cup of warm milk in my cosy bed. Now imagine that the sticky tops of the caramel pools on top of your brownies are not only oozing with love from the sides of the adorable Pinterest-level heart-cut-outs but that they are also speckled with delicate, flakey sea salt. It screams for a glass of milk or a latte, complete with candles and pyjamas.
Imagine your most thick, dense, fudgy, rich, beautifully underbaked brownie. Now imagine it studded with soft caramel. Not like a sickly-sweet caramel. A just-right, flavour-rich, soft, silky caramel. That you made yourself, cause you’re a boss, duh.
Is it even a surprise that these beauties, these love-of-my-life salted caramel brownies just straight-up have it all? They have everything. They check off everything on my list. They literally ARE everything.
This is Christmas.
If you make our Salted Caramel Brownie, don’t forget to tag us on Instagram as @leplaincanvas and use the #byplaincanvas hashtag. I love seeing your takes on my recipes!
6 Tablespoons (90g) salted butter, room temperature cut up into 6 pieces
1/2 cup (120ml) heavy cream
2 teaspoon salt
Brownie Base
120g unsweetened chocolate (one bar)
1 stick salted butter (8 tablespoons)
1 cup of sugar
pinch of salt
2 eggs
1 teaspoon vanilla
3/4 cup flour
Methods
Homemade Salted Caramel
Heat granulated sugar in a medium saucepan over medium heat, stirring constantly with a high heat resistant rubber spatula or wooden spoon. Sugar will form clumps and eventually melt into a thick brown, amber-colored liquid as you continue to stir. Be careful not to burn.
Once sugar is completely melted, immediately add the butter. Be careful in this step because the caramel will bubble rapidly when the butter is added.
Stir the butter into the caramel until it is completely melted, about 2 minutes. If you notice the butter separating, remove from heat and vigorously whisk to combine it again. (If you’re nervous for splatter, wear kitchen gloves.)
Very slowly drizzle in 1/2 cup of heavy cream while stirring. Since the heavy cream is colder than the caramel, the mixture will rapidly bubble when added. Allow the mixture to boil for 1 minute. It will rise in the pan as it boils.
Remove from heat and stir in 3 teaspoons of salt. Allow to slightly cool down before using. Caramel thickens as it cools.
Brownie
Preheat oven to 350. Line a flat plate with parchment paper and coat with cooking spray. Line an 8×8 square baking pan with parchment paper and coat with cooking spray.
Melt the chocolate and the butter (microwave or double boiler). Whisk in the sugar. Whisk in the eggs and vanilla. Whisk in the flour and salt.
Stir most of them into the brownie batter and transfer to the pan. Drop the last few caramel on top of the brownies. Bake for 30 minutes (more or less to taste). Cool in the fridge or freezer for easier cutting.
Notes
For the homemade salted caramel, you are able to made ahead. Cover tightly and store for up to 1 month in the refrigerator. Reheat in the microwave or on the stove to desired consistency.
It has been a while seen we created a mood board, it is always nice to get different inspiration from people around. Singapore has been raining since the starting of the month of December. Although as a tropical country you won’t have winter there is always the time that is cold. The month of December is also the month you can see all the Christmas lighting up on the streets and all the mall having sales – and it is the time we prepare for Christmas.
During the Christmas, we love to create lots of different recipes for you readers but we also prepare some Christmas Essential for ourself to enjoy the season. We always wanted a Christmas tree for our Christmas and yes this year our dream came through. We also get cosy up by putting up our fairy lights, fur and hot chocolate to keep ourself warm.
Comment below or on our Instagram, we would love to know more on how you prepare your Christmas.
Although Singapore doesn’t have magnificent Chritsmas lighting in Singapore compared to many countries. One of the venues I love to visit is the pop-up carnival they have around Singapore. As they always have this beautiful carousel waiting for me.
Carousel always reminds me of my childhood. How I always beg my parents that I want to seat on the horses. To me, the carousel is always the highlight of the carnival, the place to end my day. Now I am too old to ride on one but it is always nice to visit one and see the lighting.
The recipe calls for a mix of heirlooms and cherry tomatoes, but you know what? Buy the best-looking, ripest, most fragrant tomatoes wherever you happen to be shopping, be it the farmers market or grocery store. Or pick them from your own garden, if that’s your situation! Good tomatoes should smell like something when you press the skin against your nose and inhale, and they should feel heavy for their size, which means they are filled with juice and are not mealy.
You will expend very little effort making this salad, and yet, it will be very beautiful. Doing all of the things we tell you to do may indeed make you feel that the recipe is a little fancy. One hundred percent of people who have made the salad would make it again; be encouraged. The tomatoes are worth it. You’re worth it.
This salad is like a fattoush, but without the cucumbers. It’s like Panzanella, without the giant croutons. It’s a Greek salad without the grape leaves. It’s got all sizes of beautiful tomatoes cut into attractive halves and wedges. It’s got planks (not crumbles, and not cubes—planks) of crumbly feta. It’s got a fragrant dressing built on za’atar, the Middle Eastern dry spice made with sesame seeds and thyme and sumac and other things depending on who made it or where you got it. It’s got a little lemon to dial up the natural acidity of the tomatoes, honey to amplify their sweetness, and garlic to coax out their savoury flavours. It has it all.
If you make our tomato salad, don’t forget to tag us on Instagram as @leplaincanvas and use the #byplaincanvas hashtag. I love seeing your takes on my recipes!
Here’s the first thing you should make when you want to show off the peak-season tomatoes you’ve been waiting all year for. A colorful gang of cherry tomatoes and dramatic heirlooms are mixed with zhuzhed-up pita chips, salty feta, and lots of herbs. So elegant! So fancy! And, shh, don’t tell the tomatoes, but the real star is the za’atar dressing: Toasty, earthy, and tangy, it’d be welcome on seared zucchini, slow-roasted fish, or corn on the cob. Remember that just because it’s an heirloom doesn’t mean it’ll taste great—your picks should smell incredibly tomato-y and feel heavy for their size—that means they’re juicy.
Ingredients
1½ lb. heirloom tomatoes (about 3 medium)
12 oz. mixed cherry tomatoes
1¾ tsp. kosher salt, divided plus more
1 lemon
½ garlic clove
6 Tbsp. extra-virgin olive oil
2 Tbsp. za’atar
2 cups pita chips
1½ tsp. (or more) honey
3½ oz. Greek feta
½ cup basil leaves
½ cup mint leaves
Methods
Using a paring knife, core 1½ lb. heirloom tomatoes, then cut each into 8–12 wedges, depending on their size, using a very sharp chef knife or serrated knife (if your chef knife is dull, it’s going to squish your precious tomatoes). Halve or quarter 12 oz. mixed cherry tomatoes (cutting them through their equators will reveal more seeds and make them even prettier).
Transfer tomatoes to a large bowl; season with 1¼ tsp. salt. That salt is going to draw out moisture from the tomatoes, which will intensify their flavor. Stir to gently combine (be careful with those delicate tomatoes!); set aside.
Zest ¼ lemon—you want about ½ tsp. zest (it’s easiest to measure if you hold the Microplane upside down so that the zest collects on top and you can scoop it into the measuring spoon). Grate ½ garlic clove. Set aside.
Heat 6 Tbsp. extra-virgin olive oil in a small saucepan or skillet over medium until just starting to shimmer, about 2 minutes. Add 2 Tbsp. za’atar and cook, stirring occasionally, until fragrant and darker in color, 1 to 2 minutes. Stir in reserved lemon zest and garlic. Wait 10 seconds, then remove from heat. (You’re looking to cook off the raw flavor of the garlic without losing the brightness of the lemon.) Transfer za’atar oil to a heatproof measuring cup.
Place 2 cups pita chips in a medium bowl. (Yes, we made our pita chips ourselves) Pour 2 Tbsp. za’atar oil over; season with salt. Mix well with a rubber spatula, aiming to coat chips without breaking them into too many pieces.
Slice 3½ oz. feta into thin planks (we like Greek feta because it’s easy to crumble, with a pleasant tang), then add to bowl with reserved tomatoes. Tear any large ½ cup basil leaves and ½ cup mint leaves (if you have shears, you can cut them to avoid bruising and browning!) and add to bowl. Drizzle about 3 Tbsp. dressing over and toss to gently combine (your tomatoes are precious, delicate gems).
Add pita chips to bowl (don’t leave leftover oil behind—scrape that in too) and fold gently to combine. Spoon salad onto platter, making sure to leave no juices behind. Drizzle with remaining za’atar oil.
Notes
Eat fast for crunchy chips or let sit for a crispy-gone-soggy experience.
There is always leftover ingredients left in our fridge. Thus we always challenge ourselves in making use of this chance to create our very own recipes. There are some rules with this creation, first; we only can use the ingredients found at home, and second; it needs to be a simple recipe to be complete in 30 minutes.
As there are still some leftover tomatoes from our Tomato Feta Salad, we decide to make our favourite Chorizo Pasta, however this time in pesto based sauce. This Spanish pasta recipe is a delightful combination of hearty pesto sauce with Spanish chorizo, a spicy pork sausage, and smoked Spanish paprika.
As the pasta and the pesto may be a bit dry, we decide to heat up the oven and roast some tomato allowing the juice of the tomato to flow out to the pasta. We always think that chorizo and tomato is the best combination but sometimes the sour taste to the tomato sauce is always too much. Using this recipe you are able to enjoy the savoury taste of both.
If you make our pasta, don’t forget to tag us on Instagram as @leplaincanvas and use the #byplaincanvas hashtag. I love seeing your takes on my recipes!
Bring a large pot of water to a boil; add 1 tablespoon salt. Add pasta; cook 10 minutes or until al dente. Drain pasta in a colander over a bowl, reserving 6 tablespoons cooking liquid. Return pasta to pan. Combine reserved cooking liquid and 2 tablespoons oil in a small saucepan; bring to a boil. Boil 4 minutes or until mixture measures 1/3 cup. Add oil mixture to pan with pasta; toss to coat.
While pasta cooks, combine remaining 2 tablespoons oil, tomatoes, and chorizo on a jelly-roll pan, tossing to combine. Bake at 450° for 11 minutes or until tomatoes are lightly browned and begin to burst. Add tomato mixture, 1/2 teaspoon salt, pesto and pepper to pasta; toss to coat. Top with cheese and basil.
Despite its name suggesting that it is a park for the people, exploring People’s Park Complex is by no means a walk in the park.
Better known as Zhen Zhu Fang to the older Chinese generation in Singapore, the Chinese characters, 珍珠坊, are clearly imprinted on the narrow façade facing Eu Tong Sen Street. People’s Park Complex today continues to reflect the vision of a large social living room. It is a public domain just like the old street in Chinatown, where residents of the neighborhood would gather to socialize, eat, and shop.
This month we celebrate our loves for the hotdog, and we think why not have a hot dog party would make a great addition to your long weekend! Add your favorite creative toppings, and let your guests mix and match.
Why should ketchup and mustard get the monopoly on hot dog toppings? From a ginger-scallion relish to a Buffalo–blue cheese takeover, we’ve got three new-wave treatments that are more than just condiments: They’re a way of life. (P.S. These dogs are cookout game-changers, but any of the accompanying slaws and sauces would slay on their own too.)
Prepare your bun + sausages
A little crispiness to the bun is always a must-do while having a hotdog. This time we glaze it with some butter and sesame seed before baking them to add flavoring to it.
We choose the chorizo sausages for this hotdog party. Grill them with bits of oil and butter till brown and crispy.
Flavor 1: Banh Mi HotDog
The Banh Mi Hotdog has a combination of Spicy Mayonnaise, Pickled Carrots, thinly sliced pickles and lastly garnish with fresh mint leaves.
We start by preparing the Pickled Carrots; pack the sliced carrots and radish into the jar. Bring vinegar, sugar, salt, and ¾ cup water to a simmer in a small saucepan, stirring to dissolve sugar and salt. Pour brine over carrots, seal the jar, and chill until cold.
For the Spicy Mayonnaise; Mix mayonnaise, tabasco, and rice vinegar in a small bowl; season with salt.
Flavor 2: Green Salad Pesto Hotdog
The Green Salad Pesto Hotdog has a combination of Homemade Almond Pesto and Mixed Green Salad.
Recently we have to fall in love with making the salad for our everyday. This time we decided to make some that are a great combination for the hotdogs party.
For this Mixed Green Salad; Combine your favorite greens in a big bowl. For us, we use endive, rockets, and Japanese cucumber. Finish the salad with dressing up with olive oil and salt.
Flavor 3: Ranch Hotdog
The Ranch Hotdog has a combination of Creamy Ranch Slaw and served it with our favorite coriander.
The Creamy Ranch Slaw; Toss cabbage with ranch dressing in a medium bowl; season with salt and pepper. We also make the ranch dressing our own by stirring the sour cream, mayonnaise, vinegar, and garlic powder together in a small bowl; season with salt and pepper.
If you make our hotdogs, don’t forget to tag us on Instagram as @leplaincanvas and use the #byplaincanvas hashtag. I love seeing your takes on my recipes!
I love how contact lenses can be found and bought easily at any Watsons / Sasa / Cosmed, etc in Taiwan. The prices are usually reasonable and the colors or designs available are quite vast so I couldn’t help buying a few different brands just to try.
While ACUVUE is still my favorite among all the brands as I could wear them for the whole day without feeling tired or any dryness.
2. Rohto Lycee Eye Drops
I always want to try the Rohto Lycee Eye Drops, as the review I have seen everywhere is good. The first time I tried it and the sensation can be described as being very “minty”. See, I wasn’t really used to something like that, and I kind of panicked because it felt like my eyes burned. After a few seconds, my eyes were fine and felt very refreshed.
Compare to the Original Rohto Eye Drops this has a more “minty” sensation, for me, it is more refreshing. However, the cons of this are that I only can get it in Taiwan and Japan.
3. Dr. Morita Mask
The mask in Taiwan is so much cheaper to Singapore. The time we purchase them, they even have a 1 for 1 promotion. Recently the Dr. Morita Sheet Mask has been the top-selling item in Taiwan. Thus I want to give them a try and I can say they are really good.
Admittedly summer is not my favorite season. In comparison to fall and winter holding the best holidays and spring gifting me with my favorite weather, summer doesn’t receive the most excitement probably because I dread living through the heat with AC units that cool only parts of our home. This is not to say that I dislike summer either!
Summer brings longer days, more frequents trips to the beach, outdoor movies, and barbecues, but despite all that fun, I find my creativity tends to go through a lull during this time.
I’m not sure why and wonder if this is common among others, but to get myself hyped for the season I compiled this mood board that’s the part inspiration on colors, textures, and feels and part summer bucket list. What kind of things are you looking forward to this summer?
Hill Street Central Fire Station is one of the oldest fire stations in Singapore, and I can say it is the most beautiful fire station I have ever seen. The red and white brick building can totally the identity of Singapore.
It’s still a working fire station, however, it still acts as a museum for the public. For the kids, you are able to head down to experience for free. How I wish I am still a kid.
However, for those Instagramer, this is the best place to take some #ood for yours Instagram.
We don’t make pizza at home very often as we are always lazy and just order for delivery. It is nice to mess around with pizza toppings and tailor them to your particular tastes without breaking the bank.
As summer is very much in the air, we’ve decided to come up with a season-appropriate (sorry, Aussies!) summer green goddess pizza. It’s loaded with my favorite spring veggies: baby rockets, baby spinach, asparagus, cucumber, and cherry toms, flavored with fresh basil pesto, and finally a small amount of tangy mozzarella.
After a lot of taste tasting (tough job but someone’s gotta do it!), we pronounce the flavor combo to be a winner so we hope you try it next time you’re making pizza at home.
Pizza Dough
Making a Pizza Dough is not once an easy task for us, however, after times of practices, we have mastered it. We always love to make our dough ahead, as you are able to make the premade dough 2 weeks ahead and leave it in the freezer.
Ingridents|
250 g of bread flour
250 g of all-purpose flour
1½ of tsp salt
7 g sachet fast-action dried yeast
1 1/3 cups of water (lukewarm)
1 tbsp of olive oil
Method|
Mix the flour, salt, and yeast in a large mixing bowl. Pour in the lukewarm water and olive oil. Stir everything together with a large wooden spoon. When the mixture has mostly stuck together turn the mixture out on to a work surface or breadboard.
Knead the mixture by holding one end of the dough in one hand and stretching it out with the other hand (see photo below). Reform the dough, turn it 90 degrees and start again. Repeat this for 10 minutes.
When the dough is shiny and smooth, put it in a large mixing bowl, coat it in a thin layer of olive oil and cover the bowl with a tea towel. Leave this in a warm place (but not too warm – ie not next to open fire!) for between one and two hours (until it has doubled in size).
Simple Walnut Pesto
The base for this pizza we use the homemade pesto sauce that we made and this time we use walnut in this pesto. However, you can also use Almond Basil Pesto or even Pistacho Herb Pesto.
Ingridents|
small bunch of sliced cucumber
small brunch of baby rocket and spinach
20 cherry tomatoes, halved
a few dollops of mozzarella
Shredded parmesan cheese for garnish
salt & pepper
Method|
Set the oven to 250° C / 480° F. Empty the dough out on to a work surface and push the air out with your fingertips. Roll out 2 small pizzas from half of the dough on two well-oiled baking trays. We used a small roller to roll the pizzas out, but you can also simply push the dough out with your hands – just make sure to oil them lightly.
Spread a layer of pesto on each pizza leaving a small border around it. Arrange the tomato halves, cucumber slices and mozzarella on top. Bake each pizza in the hot oven for about 8-10 mins. Proceed in the same way with the remaining dough.
Once out of the oven, decorate the pizzas with baby rocket, spinach, and shredded parmesan cheese. Season with salt, pepper, chili flakes and an additional drizzle of pesto.
If you make our green goddess summer pizza, don’t forget to tag us on Instagram as @leplaincanvas and use the #byplaincanvas hashtag. I love seeing your takes on my recipes!
One of the best ways to lighten up a room and embrace summer home decor trends is to switch out your dark wood furniture for fresh white options. If it’s time to replace your furniture, go for white painted wood instead so your home feels lighter and brighter. But if you want to make use of your current furniture, then it’s time to get out the paintbrushes and start some easy DIY updates.
If all else fails, invest in some white throws to drape over dark wood sofas and chairs, to give your room a brightness boost. This way, any room in your home will also appear larger.
How can be sweet packaging so adorable? This is a very problem Herbal Candy in Taiwan and it tastes refreshing. It is the best option for you if you want to get some as a souvenir.
2. Various Dried Fruits
We are amazed by the variety of dried fruits they have in Taiwan 7/11 and these Mango Slices caught our attention. We have tried this Mango Slices and it is delicious. It is not very dried like chips and the fragrance of mango flow up once we open the packet.
3. Nim Jiom Herbal Chew
Nim Jiom is only of the famous brand that even Singaporean knew. It is easy to find the cough syrup in Singapore, it can be found in any supermarket or mini-mart. However, for this Herbal Chew, it can only be found in Taiwan. Therefore I always get dozens of it when I travel to Taiwan!
What are some of the candies you will be getting on your trip to Taiwan? Tell us below and we will get some from our next trip to Taiwan. xoxo, Joe
Garden by the Bay is one of the favorite places I love to visit in Singapore. As Singapore is a humid city with tall building it is very hard for us to experience the cooling jungle. However at Garden by the bay, I can see plants and tree I have not to see before, and the plus point it is cooling.
As an architecture lover, how the architect builds the place really amazed me. However, it does cost to visit the place even as a Singaporean, which means I couldn’t visit it every day.
Lucky I stay around the central area of Singapore, and I am able to have a run to Garden by the bay from my house and enjoy the view.
This recipe was inspired by my love of sour flavors and light, nutritious entrees. The pretty salad has an appealing variety of textures. We make it year-round because it’s fast and easy to prepare after a long day at work.
Although you can use any leafy green in this spicy main-course salad, we suggest rockets because it adds another subtle, peppery layer of heat to the dish.
If you make our Orange Blossom Beef Steak Salad, don’t forget to tag us on Instagram as @leplaincanvas and use the #byplaincanvas hashtag. We love seeing your takes on my recipes!
From Dorothy Anderson of Ottawa, Kansas, this lively salad is nice year-round—both for every day and entertaining. “It fits nicely into a ‘hurry-up’ meal,” Dorothy notes.
Ingredients
1 tablespoon whole black peppercorns
1 1/2 pounds New York strip steaks, cut 1 inch thick
2 cups olive oil
Salt
8 small oranges
1/4 cup fresh small orange juice
Freshly ground pepper
One 6-ounce bunch of mix greens, thick stems discarded
Methods
Marinate the steak with black pepper and salt, seat for 10 minutes. Grill the steaks over a medium-hot fire with garlic, olive oil and butter, turning occasionally, about 10 minutes for medium-rare meat. Transfer the steaks to a cutting board and let rest for 15 minutes.
In a large bowl, combine the fresh orange juice, lime juice, and rice vinegar. Add the oranges and greens. Season the salad with salt and pepper and toss well. Transfer the salad to large plates. Slice the steak across the grain and arrange on the salads.
We knew that Taiwan culture is deeply inspired by Japan. However little we know that it’s that much of it! However, this Taiwan trip we rediscover how much the Taiwanese are in love Japan’s culture deeply. Apart from their living lifestyle and food, one of them is the recreation of famous scenes in animation.
Many fans of Miyazaki’s My Neighbour Totoro would remember when Satsuki waited at the bus stop for her dad in the rain and Totoro gave her shelter. When both Joe and I was planning to visit the one in Japan. And we discover that Taichung’s very own Totoro Bus Stop! It’s not an actual bus stop, but based on our research it has been sticking around long enough.
Totoro Bus Stop (大里龍貓公車站) Address: No. 133, Qiao Cheng Road, Dali District, Taichung City, Taiwan
Will you want to add this into your travel itinerary? It’s okay that you don’t stay tuned for more of our travel post coming up soon!
Getting out and having fun in the sun is something those of us stuck in seasonal climates have been looking forward to all year, and now that summer is here, it’s officially the season of glorious pool trips and sunbathing galore. If you want to do your lounging by a natural, un-chlorinated body of water, then I’d imagine a beach trip is in the works for you. And if you want to do that beach lounging as millennial-style as possible, then I’d imagine finding the prettiest millennial pink beach accessories is exactly where your head’s at.
You don’t need a holiday to celebrate millennial pink, though. All you need is a desire to go do something fun, and there you have it. Read on to find out some millennial pink options for your next beach trip.
Built-in 1908 by the Japanese, this Western-style building and its surrounding square located at Ximending is home to Taipei’s creative and culture industry, hosting exhibitions and performances daily.
Originally, the complex with built to serve as the first government-operated public-run market, and now is classed and preserved as a municipal heritage site. The building features an octagonal entrance and cross-shaped floor plan where merchants could showcase their goods. Today the market has modernised to become a space for the creative and art industry, including an outdoor Market for Artists and Designers located within the North Square.
A small concert hall is located within the complex, and frequently hosts cultural events such as concerts and exhibitions. Head down and have a look!
If you asked me to wrap up all my favorite flavors – sweet, salty, creamy, tangy – on a cocktail skewer, I’d pile it with fresh melon, paper-thin proscuitto and soft mozzarella! There’s just no appetizer as easy, elegant and essentially “summer” tasting as the combination of all three. With a drizzle of balsamic reduction, each bite is a little bit of bliss!
I may have been a naughty preggo with the prosciutto indulgence, but hey. This baby gotta learn to love Italian! Capiche?
Once the weather warms, the color in my kitchen is instantly amped up by a bit more green, white and red, after all! Handfuls of plump basil and juicy, garden-fresh tomatoes are always in stock. Red bell peppers and hot jalapeños hang out in a basket on my counter, inspiring me to cook something delicious and zesty! And of course, fresh mozzarella joins the mix and adds pure white creaminess to all the vibrant color. We can’t get enough of the stuff – from caprese salads to pizzas and sandwiches, it adds amazing melt-in-your-mouth richness to our savory favorites.
It’s simple skewers like these that make me love mozzarella best, though… and make me want to put on a spring dinner for friends, al fresco style!
For warm weather entertaining, you’ll love these salty, creamy proscuitto bites with mozzarella and cubed cantaloupe! Feel free to substitute thinly sliced ham for the proscuitto, since the good stuff can be pricey (but worth every penny). You’ll get lots of bang for your buck out of just 1/4 pound! Not much is needed for this recipe.
Ingredients |
1 medium cantaloupe, cut into 1-inch cubes
1/4 lb. thinly sliced prosciutto
20 small mozzarella balls
Chopped fresh mint
Balsamic Vinegar
Method | Onto small cocktail skewers, thread prosciutto, mozzarella, and melon cubes. Place on a serving platter. Sprinkle with parsley, if desired. Serve immediately after drizzling with balsamic reduction, if using.
Enjoy your summer weekend, foodie friends. I have lots more deliciousness I can’t wait to share with you next week!
Craving more? Keep in touch on Pinterest and Instagram for new post updates and more.
The freedom of expression arts in the city has become a culture for their society. A neighbourhood as steeped in history as it is brimming with style, Sheung Wan is the perfect place to seek out a unique experience of the local lifestyle.
Whether you want to visit a local bar, comb through the longest escalator or look your best at one of the many fashionable concept shops, this happening area boasts no shortage of gems waiting for treasure hunters to discover.
For those who are planning a trip to Hong Kong, you might want to check out our previous post of A Weekend in Hong Kong. Happy Friday!
There are many types of plywood, but you should only go for high-density plywood, which is made out of a hardwood.
High-density plywood is very strong and usually can bear greater loads than solid or MDF. They are commonly used for the internals of chairs and sofas where it is out of sight. It is also easily shaped without losing structural strength. Hence it is commonly used for curved structures in furniture.
Using them at home is very versatile at the same time much affordable than the rest of the woods.
I am surprised that I could find lots of Japan elements in Taiwan. Or I can say all the elements inspire to Japan. Fans of Miyazaki’s My Neighbour Totoro like me would remember when Satsuki waited at the bus stop for her dad in the rain and Totoro gave her shelter.
Thus we channel our inner anime character and recreate that iconic scene at Taichung’s very own Totoro Bus Stop! It’s not an actual bus stop, but stick around long enough and who knows, you might just encounter the Catbus *wink*
Right next to this adorable fixture is Home Doctor, an interior design and housing repair company. The owner built the entire setup himself, with the giant grey creature crafted out of scrap wood. Chibi and Chu Totoro are present too, and the wall behind is dotted with Soot Balls. There was even the soundtrack from the movie playing when we visited – how’s that for attention to detail!
The sea dog (a fried fish sandwich) is not really a thing but should definitely be a thing because it’s that good. The batter alone should become your go-to whenever you fry fish.
We’ve put our own spin on this classic sandwich and we’re pretty pleased with the results. No matter which team you’re rooting for, if you love avocados as much as we do, this recipe will be a touchdown.
Not only are these crispy fish po’ boys topped with slices of fresh lemon, we also included homemade tar tar sauce. We opted for a tar tar sauce instead of a traditional remoulade sauce and we think it works beautifully with the Creole seasoned beer battered fish.
Because spice is a theme throughout this sandwich, the tar tar sauce has a little kick to it as well. Spice is nice.
Tartar Sauce, shredded lettuce, and lemon wedges (for serving)
Method |
Lightly season cod with salt and black pepper. Transfer to a wire rack set inside a rimmed baking sheet. Chill, uncovered, at least 1 hour or up to overnight (this air-dries the surface so the batter will adhere better to the fish).
Whisk flour, cornstarch, Old Bay, baking powder, paprika, garlic powder, onion powder, baking soda, cayenne, 2½ tsp. salt, and ½ tsp. black pepper in a medium bowl. Add beer and vinegar and whisk just until combined and no lumps remain.
Fit a large heavy pot with thermometer; pour in oil to a depth of 3″. Heat over medium-high until thermometer registers 375°. Working in batches, dip fish into batter, allowing excess batter to drip back into bowl. Lower carefully into oil and fry until light golden brown and just cooked through, 3–4 minutes. Transfer to paper towels to drain.
Heat a large skillet over medium. Spread bottom and sides of each bun with butter. Toast buns, pressing down lightly, until golden, about 2 minutes per side.
Generously spread some tartar sauce in each bun; top with lettuce and a fried fish fillet. Serve with lemon wedges and additional tartar sauce alongside.
Last March weekend I travelled to Hong Kong, to visit friends, and to just get out of the humid city for a while. I spent my short stay with Shan whom I hadn’t spent quality time for almost a year since she relocated. It did not feel like any time had passed, nor that we were reuniting on the other side of the world. It was a busy weekend for her but I appreciate that she gave me all the time she got. She brought me from cafe to street shopping also local food-hopping since it was my first time. I also spent a day each with Sophia and Daisy and leaving the city after these 4 days wasn’t easy at all. It definitely changes my perceptive of Hong Kong within 84 hours.
It was still cold and gloomy in late March but for those who know it, I’m definitely the person who enjoyed the cooling weather. I hate hot and humid therefore I have been thinking to relocate from Singapore. Thanks to the cooling weather I got this lovely coral jacket from Mongkok during the post-winter hunt shopping with Shan. It definitely was the best buy I ever got.
It is definitely a long post to share which I had summarised it. I decided to do a visual journal this time. for those who are interested in knowing more, I hope I could share more in details maybe during my second trip to Hong Kong! Anything please ask ahead, I’m happy to answer them!
My absolute favorite is the cabinet made of rattan, it can perfectly match it with a rattan bench . Closely followed by the super soft looking bluevelvet sofa. I really think I need to make space for at least the cabinet and the small bench. Let’s be frank, I won’t fit in the sofa unfortunately. But how cool are the rattan pieces? Also the home textiles look divine. I love the natural materials and tactile surfaces.
The rattan cabinets seems to be all about a tactileexperience at home. It makes you want to touch and feel every piece consciously. Thus, I don’t mind putting my fingers on the new pieces and I am pretty sure a few of those pieces will find their way into my home.
Whenever we travel the country, other than heading to scenery places. I always love to add in some tourist and historic places to my itinerary. Taiwan is a place full of history and it is also still a place that will still create history for the future.
Although we didn’t get to visit one this time, we did 6 years ago. The octagon-shaped white building and is covered with blue tiles and red accents. The eight sides represent the Chinese cultural symbolism of the number eight which is traditionally associated with fortune and wealth.
It does remain me of Osaka Castle, the white body with bits of blue.
This Green Goddess Hummus recipe is the smoothest and creamiest hummus recipe we’ve ever made! And the flavor unbelievably delicious! Perfect for pita chips and veggies, or use it as a spread on your favorite deli-style turkey or veggie sandwich.
We definitely questioned my green goddess concept while we were tossing expensive packets of fresh tarragon and chives into my cart at the grocery store, but this hummus proved its worth. That said, feel free to hold off on this hummus until your herb garden is in full swing, or change up the herbs to cut costs.
This Green Goddess Hummus dip is the perfect snack any day at any time! Who could resist?
Here’s how we want to get part of my veggie intake for the day! My whole family loved this hummus recipe and that’s saying something, I hated hummus when I was a kid.
This homemade hummus can be made in under 10 minutes and it makes for the perfect midday snack. If you make it take to a party, you likely will be coming home without a drop left.
Customize your Hummus
If you’d like the flavor of the herbs to shine through more in this hummus recipe you can reduce the tahini slightly, but if you want it to have more of a traditional hummus flavor leave it as it is.
We did add the cilantro to ours!
Ingredients |
1 (15 oz) can chickpeas, well drained
½ cup roughly chopped, loosely packed fresh parsley
¼ cup roughly chopped, loosely packed fresh tarragon or basil
2 to 3 tablespoons roughly chopped fresh chives or green onion
3 Tbsp olive oil, plus more for serving if desired
1 1/2 Tbsp tahini
3 Tbsp fresh lime juice
1 clove garlic, peeled
Salt and freshly ground black pepper
1/8 tsp cumin
1 – 2 Tbsp finely chopped cilantro leaves, for topping
Red pepper flakes, for topping
Method | Pulse chick peas, olive oil, tahini, lime juice, and garlic in a food processor until smooth, about 2 minutes. Season with salt and pepper to taste (I did a scant 1/2 tsp salt and about 1/8 tsp pepper), add cumin and avocados and pulse mixture until smooth and creamy, about 1 – 2 minutes longer.
Serve topped with more olive oil if desired and sprinkle with cilantro and red pepper flakes. Serve with pita chips or tortilla chips.
This is the best hummus! It’s rich and creamy and packed with that irresistible avocado flavor. Think hummus meets guacamole, I mean what more could you want? The perfect dip for veggies or pita chips or as a spread for your favorite sandwiches. You could also try Roasted Pepper Hummus, Basic Hummus, Carrot Hummus, and Pumpkin Hummus.
Todays mood board was inspired by this beautiful mum – Poppy Lane. She is one of those women who leaves you feeling both warm and inspired through her work.
I love the colour she uses in here work, it is all so natural and calming. The cozy lounge chair is one of my favourite. Instantly cozify your space with this overstuffed lounge chair upholstered in fluffy faux sheepskin. In a soft, frame-less shape you can always depend on for flopping onto at the end of each day.
The 100-year old A-Mei Tea House in Jiufen inspired the Japanese anime Spirited Away. The movie has won the Academy Award for Best Animated Feature at the 75th Academy Awards in 2003. It is one of the greatest animated films that I like.
The first 2 times I visited Jiu Fen I experience the tiredness of travel for 1-hour train ride. However, this time we get to enjoy a car ride making the experience more fun and easy.
Jiufen is now my favorite place in Taiwan and I can’t wait to go back…
We fell in love with hummus the first time Angela tried it a few years ago, but we’ve always made the traditional version until I try a store-bought roasted red pepper hummus and it tastes even better! Unfortunately, the store-bought hummus had white sugar, refined sunflower oil and other nasty ingredients, so I prefer to make this homemade hummus and it tastes even better.
We eat hummus as an appetizer with some crudités (we love carrots!) or with homemade tortilla chips, salad dressing or as a side dish, but my favourite way to enjoy this delicious dish is spreading the hummus over a baked pizza crust and I also add chopped tomatoes, sweet paprika, extra virgin olive oil and some olives, it tastes really awesome!
Tip for you to make it simpler;
Feel free to use store-bought roasted red peppers if you’re too busy.
Roasted tahini also works and it tastes better, but raw tahini is more nutritious.
You can see the roasted red peppers and the hummus texture in the food processor in the picture below.
Ingredients |
1 julienned red bell pepper
2 1/2 cups cooked or canned chickpeas (400g)
1 clove of garlic (remove the germ to improve your digestion)
The juice of 2 lemons
1 tbsp raw tahini
3 tbsp extra virgin olive oil
1 tsp sea salt
1 tsp ground cumin
1 tsp sweet paprika
Method |
Preheat the oven to 350ºF or 180ºC. Roast the red pepper on a baking tray for 10 or 15 minutes. Let it cool. Combine all the ingredients in a food processor or a blender until smooth.
Many people headed down Penang for the mural arts. Well, the arts do impress us but just not as much as the streets of Penang. While it is a must to visit iconic places but there is the time it is too touristy.
Both of us loves walking down the streets and experience the culture in the country. And by chance, you are able to find out places that you can’t see online or even on the map.
Syarikat Boon Wan Building
Along the street of Jalan Pintal Tali we spotted this bright green and purple building from afar. The building seems like an abandon company as it doesn’t seem to be in maintain. However, we knew that we have to grab a shot of it. It will be a perfect spot for the #ootd lovers.
Penang Peranakan Mansion
Well, we do have a great time at the Penang Peranakan Mansion as it has great air condition and a good guide helping us to learn more throughout the tour. Well, we have been to the Peranakan museum in Singapore for a few times and it is quite a different experience from here.
The museum itself is housed within a distinctive green-hued mansion at Church Street, George Town, which once served as the residence and office of a 19th-century Chinese tycoon, Chung Keng Quee. While we could learn more about the Peranakan but at the same time the history of this historical person.
Admission Hours: 9 am to 5 pm Fee: RM 20
Hin Bus Depot
An abandoned bus depot in the past, Hin Bus Depot has now evolved ( or rather is progressing) to become a more inclusive, full-fledged art space with a cafe concept coming up. Some of the permanent art pieces include Lithuanian artist Ernest Zacharevic’s first wall murals in Penang.
For now, if you are strapped for time, there are no compelling reasons to make a special trip down. The whole place took us at most 30 mins to explore and photo-taking before leaving. Was sort of startled by the emptiness of the whole art centre upon entering. However, there are workers around and I believe they will be building up to something soon.
With Elvarli – wardrobe and Ikornnes – mirror under our radar we decided to use bamboo texture on our accessories and furniture. To match the beautiful bamboo colour, earth tone best matches to our room. Bamboo and weaving basket will help to add some colours and texture to the room but yet adding functionality to it.
In the past, I always thought that having an armchair in the room is a waste of space. However, when time passes I thought of it as adding a little place for relaxation. However, since we are going to have benches at the window do you have any suggestion how can we incorporate bamboo in it?
After long to taiwan with our parents we are back with heavy loading of work pilling beside us. Anyway, this 11 days trip to Taiwan is such an experience one. It doesn’t feel much different when leaving together, it just feel the same but in a different country.As usual, there are always some arguments along the trip but we do try to solve it as soon as possible.
This is the 3rd times I am back to Taiwan, and it feels a bit familiar. I am able to walk the street without looking at the map. And at times it feels good as it feels like I am at home.
Before our trip to Taiwan, we have made a batch of homemade strawberry jam for our family and friends. There are times we are wondering on how to enjoy them than just having them on our toast? This time we decided to use them on our waffles instead.
We have brought the ready-made waffles but there are some days I would like to have a waffles machine to make some fresh one instead. Anyway, if you are not a waffles lover, you can replace them with pancakes too.
This month there are plenty of different berries in our local market, therefore, you don’t have to worry about choosing what fruits to use for this.
Some little fun facts; Apples are great, but strawberries will also keep the doctor away. They are rich in vitamin C, flavonoids, potassium, fibre, folic acid, and folate, which is quite a nutritional hodgepodge. Incorporating strawberries into a healthy diet may help:
Reduce the risk of stroke and cancer (antioxidants)
Prevent heart disease and lower inflammation (flavonoids)
Regulate blood pressure (potassium)
Stabilize blood sugar in diabetics (low glycemic index)
That’s a pretty powerful fruit! Strawberries are also cholesterol free, low in fat and sodium, and contain no artificial preservatives or colours. They are perfect for everyone, even people following gluten-free, kosher, or vegan diets.
Penang is a town with many different delicious food. When my parents ask what is there to do in Penang? We replied “food, so please make sure you have an empty tummy at al time!” In Penang, everyone is Penang Foodie. We all know where to locate the best food in Penang.
After a little stroll to the uptown hill – Penang Hill, we when back down and tired many delicious food. Here are a list of food to try in your day in Penang.
Breakfast: Toh Soon Cafe
“Where’s Penang best coffee again?” Our guide then dropped us by the backlane, and we realised a crowd of people in a dark alley sandwiched between two old buildings.
Toh Soon Cafe 多春茶室, so discrete you won’t have thought this was a proper coffee place. Charcoal-grilled the traditional way right in front of your eyes, by the Indian who had to bend down the whole day (we were thinking about his ergonomics), this had a crisp texture, spread with home-made kaya. Decent stuff, but not enough to warrant the wait.
Something that only the local knows, order the egg on toast but not separately. It taste really different from just dipping them.
Lunch: Kimberly Street
At the corner of Kimberly Street there is this durian store that serve delicious and cheap durian. Although I am sensitive to the smell of durian on my finger but they do provide some plastic gloves. So don’t worry just grab a seat and a durian, then enjoy your afternoon there.
No we are not just having durian for lunch. Straight down the street there are a street of delicious food like Duck Kway Chap. The dish consists of a type of Chinese noodle strips, stewed duck meat, hard-boiled egg and various pig intestines. We guarantee that it’ll give you a new experience! This hawker stall is often crowded, so arrive early to avoid the queue!
High Tea: Cafes Hopping
When I first thought of Penang, only the transitional local food came into my mind. However there actually a list of unique and modern cafe in Penang that you must visit
Norm Cafe
If you do see some hype for this cafe is that, a cafe in the day and a bar or cocktail bar at night. At night, this bar is hit on with blue neon and pink light which marks them a total transformation of ambiance that played with lighting.
It’s serve delicious ice cream waffles and unique drinks in the afternoon.
Rabbit x Holdup
We are so lucky we got to pass by the Rabbit x Holdup at the last day of our trip. This cafe served coffee soft served ice cream.
There are still tons of delicious food in Penang we have and need to try. So stay tuned for more blog post on our trip to Penang.
It’s always tough to find nice-looking mirrors, and the Ikornnes range of mirrors ticks all our boxes. Made of ash wood, it’s beautifully simple; the standing model comes with a rail for airing clothes, while the smaller version can be placed on a dressing table or hung on the wall.
Moreover, this mirror suits the style of our room very much, and it is simple to fix yourself.
Currently I am at Taiwan trip with my family, and just by luck we watch Thor: Ragnarok again on the television during our rest hours. (P.s: There may have some spoiler here) Looking at the rainbow bridge being destroyed I am so sad about it, although I have watched it many times.
Asgard is one of my favorite places in the Marvel Universal and yes the rainbow bridge is one of the places I would like to visit if it is real.
Each Summer, when lovely berries and stone fruit come into season, I love the tradition of making jam! Homemade jam is an incredible way to make the most of all the strawberries, blackberries, and raspberries that fill the farmer’s markets and grocery stores.
Around this time of year, there is such an abundance of excess fruit that stores often freeze these berries — making them a freezer staple in my house, and the key to making homemade Strawberry Jam all year around. While the traditional method of making jam is a fun project, it is just that — a project.
My recipe for Easy Strawberry Jam (and more flavors!) turns making jam into a crazy simple process. I make homemade jam with just berries, sugar, and lemon in no time!
What’s the difference between Jam and Jelly?
The difference between jam and jelly is really a matter of texture. Jelly has added pectin or fruit sugars which allow the mixture to set into a more gel or jell-o like texture. Additionally, jelly is strained of any seeds, skin, or fruit to form a clear fruit spread.
Jam, on the other hand (like my Strawberry Jam), is simply fruit and sugar cooked together into a thick glossy spread. Jam, unlike jelly, highlights the cooked fruit by keeping in the natural fruits seeds and chunks, which is always my favorite part!
Ingredients |
2 cups (10oz/284g) strawberries *fresh or frozen
1/4 cup (2oz/57g) sugar
juice of 1/2 lemon
Method |
Combine all ingredients in a small sauce pan. Simmer over medium-low heat for 7-10 minutes until the fruit is broken down and the mixture has thickened.
Transfer to a jar or airtight container and refrigerate for 4-6 weeks. And be sure to sterilize your jar by washing thoroughly with soap and water and then placing in the oven at 140°C / 275°F for around 20 minutes. Make sure both the jam and jar are cooled before storing.
As May is the month of Strawberry you will be seeing us making lots of Strawberry Jam for friends and family.
A month ago our family visits the little town of Malaysia – Penang. This is our very first family trip after two decades and we are so excited about it. As we thought that Penang is small, we decided to stay there for 4 days 3nights. (And I can tell you it is not enough)
There are so much to share, this one post is never enough. However, let’s start with the first one – Heading up the Hill!
Penang Hill
The first stop we head to Penang Hill – Penang Hill or affectingly known by locals as “Bukit Bendara”, is one of the most popular tourist attractions. Setting on a hill with an elevation of about 833 m (2723 ft), you would need to take the funicular railway. From my experience, it is better to plan your visit here by 10 am as anytime later would require you to queue up pretty long before you can hop onto the tram.
Fee: If you are an adult tourist, a 2-way ride would cost you RM30!
Heading up the hill, we walk along the streets and found this talented artist. What he painted is different from the other street artist, it is my favorite water painting. Our parents decided to get a painting from him. Although it took us a while to wait for our turn the final result is indeed worth it.
Air Itam Assam Laska
We took a cab from Penang Hill which took us 5 minutes to get to one of the best Assam Laska in Penang. This is one of the best dishes I have in Penang and I can’t stop eating it. It has been ranked by CNN as the top 7 best dishes in the world, and I have to agree on this.
You would notice this uncle (the owner) scooping up the aromatic soup in and out the bowl in quick succession, and he does this repeatedly so that the thick vermicelli gets covered thoroughly in the gravy and the dish stays hot.
He has a chain of staff helping with assembling the other key ingredients of cucumber, onions, red chilies, pineapple, lettuce, mint, and ginger.
RM4! Each bowl only cost 4 Malaysian Ringgit (SGD$1.60) which is such a steal.
Kek Lok Si Temple
The hill next to Penang Hill is the home of Kek Lok Si Temple, the biggest Buddha temple in the whole of Southeast Asia. The taxi usually drops visitors off on the entrance level higher up. But this time I find it entertaining to talk up the stone steps through the stalls of souvenir shops.
The weather is so humid and hot but to get to see the biggest Buddha for my record is a great experience.
Penang Little India
The colorful building in Little India brighten our day up and help to end the afternoon in a great way. Other than taking photos of the colorful building, our other mission is to try the famous Samosa from Penang!
If you are a big fan of Indian food like Angela, you need to try this. She loves how spices add so much depth and flavor to otherwise ordinary ingredients. Therefore we were most delighted when we stumbled upon this little stall at the junction of Market Street and Queen Street in Little India selling an array of Indian snacks.
Our trip are not ended yet, this one of the small part of the trip. Stay tuned for more of this. xoxo, Joe